
Enchanted Stories 1: Mystic Woods – Invites you into the heart of a magical adventure where you will control Rose, a determined girl who has gone into the woods to help her grandmother and finds herself at the center of events on which the fate of the entire forest depends. Her grandmother’s old house is far away, and the way to it is full of challenges. Already at the very beginning Rose realizes that without a map she risks getting lost like a sheep in the thicket. Somewhere she has seen the very book with the map, but where did she put it. Arriving on the scene, Rose learns the truth, the magic that has nourished the forest for centuries is fading. And a ruthless logging agreement is jeopardizing its very existence. Now only she can continue her grandmother’s work and become the new guardian. An unexpected ally appears in her cause, a wolf from whom you don’t know whether to expect help or danger. But in this forest full of shadows and secrets, just such a companion can be the key to salvation. Many unusual tasks await you: you will have to find an ancient book, collect healing moss and eggshells with honey to help treat a wounded wolf, brew a potion, and look into the bowl of visions. But even the potion won’t give you a straight answer, it will only show you possible paths, and only you can choose the right one. As you progress you will meet colorful characters, Morgan the local woodcutter, whom you have to save, but who warns that wolves are only a small part of the dangers of the forest. You’ll have to interact with ancient trolls, help the sirens living in a magical river, and try to prevent a conflict with werewolves that could escalate into a real war. Every action Rose takes, every find and every choice will bring you closer to solving and possibly saving the dying forest. But remember, the woodcutters are already sharpening their axes, and there is less and less time to think. If you can not pass any of the puzzles or do not know where the items are, on our site you can watch the walkthrough of Enchanted Stories 1: Mystic Woods, and restore the power of the forest.
Enchanted Stories 1: Mystic Woods – Walkthrough
Here you can see the full walkthrough of Enchanted Stories 1: Mystic Woods, namely for all chapters, including bonus chapter, in pictures.

- Take and read the note, take CROCHET HOOK (A).
- Take the TASK BOOK and SCOOP NET FRAME (B).
- Use CROCHET HOOK on the box, take LACE NAPKIN and FLOWER TILES (C).

- Take and read the book, examine the drawer, use FLOWER TILES on the drawer lock (D).
- Easy solution: Click 1-2×2-3×3-4×3-5-6×2 (E).
- Hard solution: Click 2-3×2-4×2-6 (F).
- Take GAME CHIPS 1/2 and NEEDLE AND THREAD.
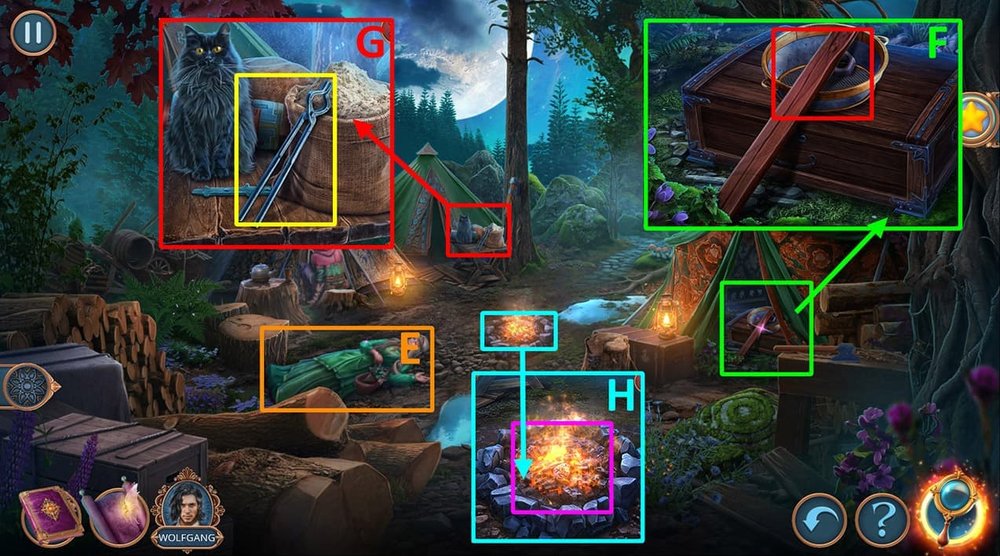
- Use LACE NAPKIN and NEEDLE AND THREAD on SCOOP NET FRAME, earn SCOOP NET (G).
- Go forward.

- Take the map, BROKEN NECKLACE, LEVERS 1/2, and POUCH (H).
- Use SCOOP NET on the fireflies, earn FIREFLIES (I).
- Use FIREFLIES on the tree (J).
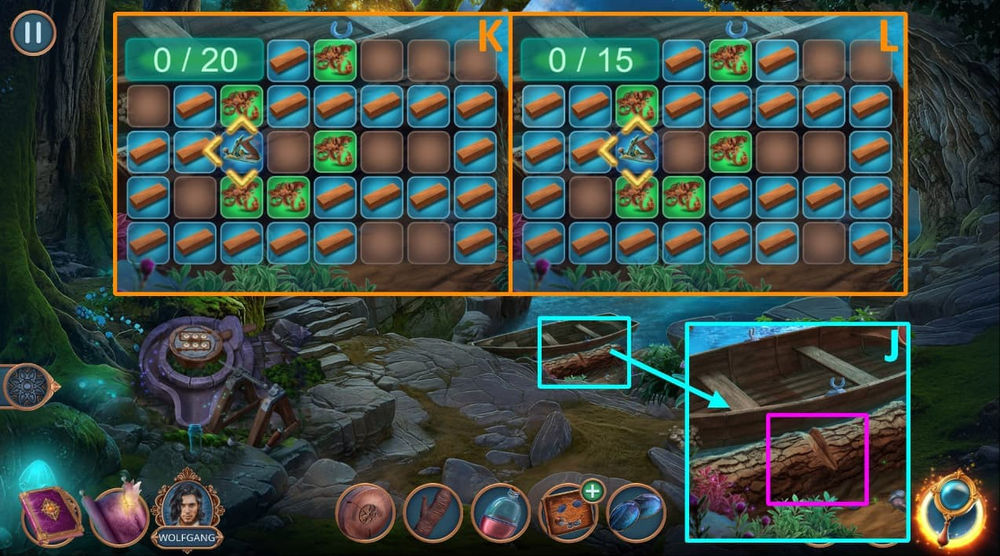
- Play puzzle, earn EARRING (K).
- Go back.

- Use EARRING on the purse, take BOWSTRING and GAME CHIPS 2/2 (L).
- Use GAME CHIPS on the board (M).

- Easy solution: Follow the instructions shown in the picture (N).
- Hard solution: Follow the instructions shown in the picture (O).
- Take ZOETROPE PART.
- Use ZOETROPE PART on the zoetrope, take GLOVE (P).
- Go forward.

- Use GLOVE on the book, examine the book, click on the items that match the highlighted words: trolls, mermaids, tree, take FOREST MAP and EGGSHELL (Q).
- Use FOREST MAP on the path on the left (R).

- Solution: 1 step: 4-7-2-3-7-1, 2 step: 7-3-7-5, 3 step: 3-3 (S).

- Take BOW (T).
- Take FISHING ROD (U).
- Use FISHING ROD on the box, use POUCH on the moss, take ARROW (V).

- Use BOWSTRING and ARROW on BOW, earn BOW AND ARROW (W).
- Use BOW AND ARROW on the branch above the wolf (X).

- Easy solution: Follow the instructions shown in the picture (Y).
- Hard solution: Follow the instructions shown in the picture (Z).

- Select this option, earn PICKAXE (A).
- Use PICKAXE on the boulder, take MILL WINGS (B).
- Go to Rose’s Cottage.

- Use MILL WINGS on the mill, take LEVERS 2/2 (C).
- Use LEVERS on the empty slots, click on them in the order shown in the clue on the door: 1, 4, 3, 2, take BASKET (D).
- Go to the Forest Glade.

- Use BASKET on the ferret, take BOWL (E).
- Use BOWL on the pile of dirt, open the bag, take BOOTS (F).
- Use BOOTS on the swamp (G).
- Go forward.

- Take and read the note, take TOY BALLISTA PARTS 1/2 and ACID (H).
- Use ACID on the lock, take FAIRY AMULET (I).
- Go to the Forest’s Edge.

- Use FAIRY AMULET on the birdhouse, take and read the note, take MAGIC STONES 1/2 (J).
- Play puzzle, earn BELL (K).
- Go to Granny’s Yard.

- Use BELL on the bell holder, click on the bell icon (L).
- Select this option (M).
- Go forward.

- Take TUNING FORK and CUTTERS, take and read the recipe (N).
- Take SUNFLOWER, use TUNING FORK on the crystal (O).
- Use CUTTERS on the dreamcatcher, earn DREAMCATCHER’S TAIL (P).

- Use DREAMCATCHER’S TAIL on the web, take BELLE NOCTURNAL and POTION HOLDER, use SUNFLOWER on the drawer (Q).
- Use BELLE NOCTURNAL on the table (R).
- Go back.

- Take and read the note (S).
- Go back.

- Use POTION HOLDER on the log, take FAN (T).
- Go to the Magic Greenhouse.

- Use FAN on the green pollen, take IRON WAND (U).
- Use IRON WAND on the crystal, take FEATHER EMBLEM (V).
- Go to Granny’s Yard.

- Use FEATHER EMBLEM on the slot, take MOONFLY’S TEAR and PESTLE (W).
- Go to the Magic Greenhouse.

- Use MOONFLY’S TEAR on the table (X).
- Use PESTLE on the drawer, take GOLDFISH SCALES (Y).
- Use GOLDFISH SCALES on the table (Z).

- Easy solution: Click 1-2-G, 3-5-G, 4-E-G, 4-F-G, D-F-G, A-E-G, B-C-G (A).
- Hard solution: Click 1-2-I, 3-5-I, 3-H-I, A-G-I, 1-B-I, B-G-I, C-H-I, F-H-I, D-E-I (B).
- Click on the cauldron to skip the images.
- Go back.

- Take MAGIC STONES 2/2 (C).
- Use MAGIC STONES on the crystal ball (D).

- Easy solution: In the pictures, the numbers represent spheres and the letters represent cells.
- 1-A, 2-H, 3-F, 4-E, 5-B, 6-C, 7-D, 8-G (E).
- Hard solution: In the pictures, the numbers represent spheres and the letters represent cells.
- 1-A, 2-I, 3-E, 4-J, 5-G, 6-F, 7-D, 8-H, 9-C, 10-B (F).

- Take MEDICAL PLANTS (G).
- Use MEDICAL PLANTS on the table (H).
- Play puzzle, earn FIZZY TINCTURE (I).
- Go back.

- Use FIZZY TINCTURE on the bag, click on the bag to open it, take MALLET (J).
- Use MALLET on the pumpkins, use BROKEN NECKLACE on the pumpkins, earn SEASHELL NECKLACE (K).
- Go back.

- Use SEASHELL NECKLACE on the moss, earn HEALING MOSS and TOY BALLISTA PARTS 2/2 (L).
- Go forward.

- Use TOY BALLISTA PARTS on the table (M).
- Easy and Hard solution: Consistently build the ballista from the bottom up (N).
- Take TOY BALLISTA.
- Examine the barrel, use TOY BALLISTA on the cork, use EGGSHELL on the honey, earn EGGSHELL WITH HONEY (O).
- Go forward.

- Use HEALING MOSS and EGGSHELL WITH HONEY on the table (P).
- Play puzzle, earn MOSS COMPRESS (Q).
- Use MOSS COMPRESS on the wolf (R).

- Select this option (S).
- Select this option (T).

- Take OIL (U).
- Use pipe on the ladder, use OIL on the mechanism (V).

- Easy solution: Follow the instructions shown in the picture (W).
- Hard solution: Swap the gears on the following slots: (3-6)-(2-5)-(3-6)x2-(1-4)-(5-2)x2-(3-6)-(5-2)-(3-6)x3-(5-2)-(3-6)-(2-5)-(3-6)-(5-2) (X).
- Take LOOPED ROPE and SACK OF SAND.
- Use SACK OF SAND on the fire (Y).

- Select this option, earn BASKET (Z).
- Use LOOPED ROPE on the stick (A).
- Go forward.

- Use BASKET on the mug (B).
- Easy solution: Remove the pairs of vials with identical images (C).
- Hard solution: Remove the pairs of vials with identical images (D).
- Take the poison.
- Click on Granny (E).
- Take BOARDS 1/2, NUT, and SIEVE (F).
- Take TONGS, use SIEVE on the flour, take GOLDEN SICKLE (G).
- Use TONGS on the fire (H).

- Use GOLDEN SICKLE on the vines (I).
- Easy solution: Follow the sequence of steps shown in the picture, press the ‘Play’ button (J).
- Hard solution: Follow the sequence of steps shown in the picture, press the ‘Play’ button (K).
- Go forward.

- Use NUT on the valve, take COAT (L).
- Use BASKET on the cave, take BOARDS 2/2 (M).
- Use BOARDS on the bridge (N).

- Easy solution: Click 6-2×2-7×2-3×2-8×2-9-5.
- Press the ‘Play’ button (O).
- Hard solution: Click 1-9-3×2-10×2-4×2-11×2-12-6-7.
- Press the ‘Play’ button (P).
- Take STICKS and BUTCHER’S HOOK.
- Use BUTCHER’S HOOK on the well, click on the handle, take BUCKET OF WATER (Q).
- Go back.

- Use COAT and STICKS on Granny (R).
- Use BUCKET OF WATER on the fire, earn STONE WITH SYMBOL (S).
- Go forward.

- Use STONE WITH SYMBOL on the well (T).
- Easy solution: Follow the instructions shown in the pictures (U).
- Hard solution: Follow the instructions shown in the pictures (V).
- Take CHEST KEY.
- Go back.

- Use CHEST KEY on the lock, use BASKET on the chest, take BASKET OF JERKY (W).
- Give BASKET OF JERKY to the cat, take TOTEM (X).
- Go back.

- Use TOTEM on the empty stand (Y).
- Easy solution: Follow the instructions shown in the pictures (Z).
- Hard solution: Follow the instructions shown in the pictures (A).
- Take SILVER CLAW.
- Go to the Cliff.

- Use SILVER CLAW on the valve, take ROPE (B).
- Go back.

- Use ROPE on Granny (C).

- Easy solution: Follow the instructions shown in the picture (D).
- Hard solution: Follow the instructions shown in the picture (E).

- Take SHARPENING STONE, OVEN MITT, and SIEVE (A).
- Use SIEVE on the pile of sand, get EMPTY BOTTLE and BAT FIGURINE (B).
- Use BAT FIGURINE on the mount next to the similar one, click on it twice, take INSTRUCTIONS, LENSES, and MECHANISM PART (C).

- Use MECHANISM PART on the mechanism (D).
- Easy solution: Follow the next sequence 1×4-2-3×2-4×4-5×2-6×3 (E).
- Hard solution: Follow the next sequence 1×3-2-3-4×4-5×4-6×4-7×2-8×3 (F).
- Go forward.

- Take BRUSH and SLEEPING POWDER (G).
- Use SLEEPING POWDER on the plant, take FIGURINE PART and DULL PLANER (H).
- Use SHARPENING STONE on its wooden frame, use DULL PLANER on the grinder, get SHARP PLANER (I).
- Use SHARP PLANER on the log (J).
- Easy solution: Click on the arrows: up-down(x2)-up-down-right-left-right(x2)-left-right-up(x3)-down (K).
- Hard solution: Click on the arrows: up-down(x2)-up-down-right-left-right(x2)-left-right-up(x3)-down (L).
- Go forward.

- Select this option (M).
- Take BROKEN FIGURINE, CLOAK SCRAP, FRAME, and HAND DRILL, use OVEN MITT on the scalding cauldron lid (N).
- Use EMPTY BOTTLE and HAND DRILL on the sap leaking out of the tree trunk (O).

- Easy solution: Move the bottle down-right-down(x2)-left(x2)-right-up(x3)-right-up(x2)-left(x3)-down(x2)-right(x2) (P).
- Hard solution: Move the bottle left(x2)-down-right(x3)-down-up(x3)-left(x3)-up-right(x4)-left(x2)-down(x2) (Q).
- Take BLUE PINE SAP.

- Use LENSES, BRUSH, FRAME, and BLUE PINE SAP on INSTRUCTIONS, get SUNGLASSES (R).
- Use SUNGLASSES on the blinding light, take DIRTY SHIELD and OUROBOROS (S).
- Go to the Wolf’s Den.

- Use OUROBOROS on the chest (T).
- Easy solution: Fill all the holes with gems of the corresponding colors (U).
- Hard solution: Fill all the holes with gems of the corresponding colors (V).
- Take HONEY DIPPER.
- Go to the Lumberjacks’ Camp.

- Use HONEY DIPPER on the cauldron, get HONEY DIPPER WITH RESIN (W).
- Use FIGURINE PIECE and HONEY DIPPER WITH RESIN on BROKEN FIGURINE, get SILVER WOLF (X).
- Use SILVER WOLF on the hollow space in the cavern, take SCRAPER (Y).
- Go to Wolf Rock.

- Use SCRAPER on the moss, take SUNFLOWER SEEDS (Z).
- Use SUNFLOWER SEEDS on the press (A).

- Easy solution: Follow the next sequence 4×4-5×6-2×4-1×7-3×2.
- Press the ‘Play’ button (B).
- Hard solution: Follow the next sequence 4×5-5×7-6×4-2×7-1×7-3×6.
- Press the ‘Play’ button (C).
- Get SUNFLOWER OIL.

- Use CLOAK SCRAP and SUNFLOWER OIL on DIRTY SHIELD, get SHINY SHIELD (D).
- Use SHINY SHIELD on the round stone behind the sword, take SWORD (E).
- Go to the Lumberjacks’ Camp.

- Use SWORD on the lumberjacks’ equipment in the center (F).
- Select this option, get PUNGENT PERFUME (G).

- Use PUNGENT PERFUME on the ants, take BOW and AXE (H).
- Use AXE on the fallen tree (I).
- Go forward.

- Take ARROW and RIBBON (J).
- Take BARBED NET and STINGING PLANT FRUIT (K).
- Read the note, use RIBBON on the drawer, take BOOK OF FLOWERS and ROPE, use STINGING PLANT FRUIT on the table (L).

- Use BOW, ARROW, and ROPE on the raft, take KEY, HAMMER, and STICKS (M).
- Use BARBED NET and ROPE on STICKS (N).

- Easy solution: Follow the instructions shown in the picture (O).
- Hard solution: Follow the instructions shown in the picture (P).
- Get BARRICADE.
- Go back.

- Use BARRICADE in front of the blue tent near the exit (Q).
- Talk with the character, get TROWEL.
- Go to the Forest Grove.

- Use TROWEL on the dirt, take TRUFFLES, PICKAXE SHAFT, NAILS, and BUCKET (R).
- Use BUCKET on the water, get BUCKET WITH WATER (S).
- Use TRUFFLES and BUCKET WITH WATER on the table (T).

- Easy solution: Follow the instructions shown in the picture (U).
- Hard solution: Follow the instructions shown in the picture (V).
- Take ROOT-KILLING POTION.

- Use ROOT-KILLING POTION on the roots, use KEY on the door, play puzzle, earn MAP (W).
- Use MAP on the crossroad (X).
- Go forward.

- Take PIPETTE and BASKET, use HAMMER and NAILS on the broken ladder (Y).
- Use BOOK OF FLOWERS on the flowers, read the book, use BASKET on the flowers, pick the pink flowers, take GLOWING FLOWERS (Z).
- Use GLOWING FLOWERS on the darkness of the forest (A).

- Solution: Follow the instructions shown in the picture (B).
- Take SWAMP SHOES.

- Use SWAMP SHOES on the ground (C).
- Go forward.

- Select this option (D).
- Go forward.
- Read the note, take POUCH (E).
- Take RITUAL STONES 1/3 and MORTAR AND PESTLE (F).

- Use MORTAR AND PESTLE on the cypress, take CYPRESS POWDER (G).
- Use POUCH and CYPRESS POWDER on the plants, pick the red fruits, take FRUITS (H).
- Use FRUITS on the tree hollow, take RITUAL STONES 2/3 and LEVER (I).
- Go back.

- Take GEARS 1/2 and PICKAXE HEAD (J).
- Take BOARDS 1/2 and SCREW (K).
- Use PICKAXE HEAD and SCREW on PICKAXE SHAFT, get PICKAXE (L).

- Use PICKAXE on the wagon (M).
- Easy solution: Uncover all the sapphires on the field (N).
- Hard solution: Uncover all the sapphires on the field (O).
- Get PINK SAPPHIRES.

- Read the note, use the knocker on the door, use PINK SAPPHIRES on the door’s window, play puzzle, earn CANE (P).
- Use CANE on the pond, get WATER LILY (Q).
- Use WATER LILY on PIPETTE, get WATER LILY NECTAR (R).
- Go back.

- Use WATER LILY NECTAR on the chest, take BOARDS 2/2 (S).
- Use BOARDS on the ladder, take GEARS 2/2 and CROWN (T).
- Go to the Dryads’ Thicket.

- Use CROWN on the statue (U).
- Easy solution: Follow the instructions shown in the picture (V).
- Hard solution: Follow the instructions shown in the picture (W).
- Take AXE AMULET.

- Use GEARS and AXE AMULET on the wagon, take BROOCH, BRUSH, and RAKE (X).
- Use RAKE on the leaves (Y).
- Go to the Lumberjacks’ Camp.

- Select this option (Z).
- Use HAMMER on the cart (A).
- Use BROOCH on the bag (B).

- Solution: Follow the instructions shown in the picture (C).
- Take BELLOWS.
- Go back.

- Use BELLOWS on the mushrooms, take DARTS, CUFFLINK 1/2, and PIN (D).
- Play puzzle, earn OIL (E).
- Use OIL on the rusty wheel, take WHEEL, use LEVER on the boulder, take ROAD SIGN (F).
- Go to Whispering Hill.

- Use ROAD SIGN on the geyser, take RITUAL STONES 3/3 (G).
- Use RITUAL STONES on the stone slab (H).

- Easy solution: Follow the next sequence 3×2-2×2-6×3-7×4-6-1×2-3-7-3×2-5×4-8×2-4×2-5×4 (I).
- Hard solution: Follow the next sequence 6-1-6-1×3-9-6×2-7×2-3-8×2-5×4-9×5-8×4 (J).
- Go to the Lumberjacks’ Camp.

- Use PIN and WHEEL on the cart (K).
- Go forward.
- Select this option (L).

- Take CHISEL (M).
- Use DARTS on the dartboard, move the loose strap of burlap, use CHISEL on the boards, take VINEGAR (N).
- Use VINEGAR and BRUSH on the stains, take LONG TONGS (O).

- Use LONG TONGS on the campfire, get APPLE (P).
- Use APPLE on the raccoon, take OILCLOTH CLOAK (Q).
- Go to the Hidden Path.

- Use OILCLOTH CLOAK on the waterfall, take BULL’S EYE (R).
- Go to the Lumberjacks’ Cages.

- Use BULL’S EYE on the dartboard (S).
- Easy solution: Follow the instructions shown in the picture (T).
- Hard solution: Follow the instructions shown in the picture (U).
- Take CUFFLINK 2/2.
- Go to the Forest Grove.

- Examine the bag, use CUFFLINK on the clasp, take DIADEM (V).
- Play puzzle, earn SAPPHIRES (W).
- Use DIADEM and SAPPHIRES on the skull, take KEYS (X).
- Go to the Lumberjacks’ Cages.

- Use KEYS on the cage (Y).
- Easy solution: Match the keys to the lock (Z).
- Hard solution: Match the keys to the lock (A).

- Take VINEGAR and TASSELS, read the recipe (A).
- Use TASSELS on the rings (B).
- Play puzzle, earn SILVER PLATE (C).
- Use SILVER PLATE on the pile of dirt, take MANDRAKE ROOT and BARRETTE (D).
- Use BARRETTE on the lock, take the key and use it on the lock (E).

- Easy solution: Click on the arrows in following order: 4×2-3×2-4×4-1×2-4 (F).
- Hard solution: Click on the arrows in following order: 4×4-3×2-4×2-1×2-4-1-4 (G).
- Go forward.

- Take WALNUT LADLE (H).
- Use VINEGAR on the chest lock, use WALNUT LADLE on the water, earn SHARP RAZOR (I).
- Read and take the note, use SHARP RAZOR on the cocoon of vines, take POLLEN POUCH and SCOOP NET, try to take something from the Living Tree’s mouth (J).
- Use SCOOP NET on the flying turnips (K).

- Easy solution: Place the leaves in the slots: 1-C,2-E,3-B,4-A,5-D (L).
- Hard solution: Place the leaves in the slots: 1-D,2-B,-3-A,4-E,5-G,6-F,7-C (M).
- Take BRUSH.
- Go back.

- Use POLLEN POUCH and BRUSH on the lock with gems, press on the gems in the following order: navy blue, green, red, sky blue, read and take SHEET MUSIC, take WIRE BRUSH (N).
- Go to the Magic Forest.

- Use WIRE BRUSH on the chest lock, earn LASSO (O).
- Use LASSO on the high branch, earn MYSTERIOUS FRUIT (P).
- Use SHEET MUSIC on the Living Tree (Q).
- Go back.

- Play puzzle, earn MAGIC FLUTE (R).
- Go to the Magic Forest.

- Use MAGIC FLUTE on the Living Tree (S).
- Easy solution: Place the sliders as shown in the picture (T).
- Hard solution: Place the sliders as shown in the picture (U).
- Take MAGIC SEED.
- Go back.

- Use MANDRAKE ROOT, MYSTERIOUS FRUIT, and MAGIC SEED on the preparation table (V).
- Easy solution: Press on the ingredients as shown in the picture (W).
- Hard solution: Press on the ingredients as shown in the picture (X).

- Select this option (Y).
- Take HAMMER, TOTEM PIECES 1/3, and BOARDS (Z).
- Use BOARDS on the water wheel, open the bag and take STATUETTE, BAMBOO FISHING ROD, and NAILS (A).
- Use HAMMER and NAILS on the wooden bridge, take HOOK and SICKLE (B).

- Use HOOK on BAMBOO FISHING ROD (C).
- Use SICKLE on the vines (D).
- Easy solution: Place the sliders as shown in the picture (E).
- Hard solution: Place the sliders as shown in the picture (F).
- Go to the Siren Swamp.

- Take TOTEM PIECES 2/3 and DENSE FABRIC (G).
- Use DENSE FABRIC on the magic pollen, take LAMP and CHISEL (H).
- Use STATUETTE and CHISEL on the loose stone in the wall, take KEYS 1/3 and TOTEM PIECES 3/3 (I).
- Go back.

- Use TOTEM PIECES on the totem (J).
- Easy solution: Press on the buttons as shown in the picture (K).
- Hard solution: Press on the buttons as shown in the picture (L).
- Take MAGNIFYING GLASS and LINE.

- Use LINE on BAMBOO FISHING ROD, earn BAMBOO FISHING ROD (M).
- Use BAMBOO FISHING ROD on the bag in the water, open the bag and take MILL TOP (N).
- Go to the Siren Swamp.

- Use MILL TOP on the mill, take BROOM and FLASK (O).
- Go back.

- Use FLASK on the water, earn FLASK WITH WATER (P).
- Go to the Siren Swamp.

- Use FLASK WITH WATER on the closed buds, take CRYSTAL (Q).
- Use CRYSTAL in the empty slot (R).
- Easy solution: Arrange the beams as shown in the picture (S).
- Hard solution: Arrange the beams as shown in the picture (T).
- Take KEY.
- Go back.

- Use KEY on the door lock, take SAW (U).
- Go to the Siren Swamp.

- Use SAW on the logs (V).
- Easy solution: Press on the chips as shown in the picture (W).
- Hard solution: Press on the chips as shown in the picture (X).
- Earn ARTIFACTS 1/3.

- Select this option (Y).
- Earn ARTIFACTS 2/3.
- Take WOODEN STEPS (Z).
- Use BROOM on the spider web, take LITTLE PEACOCK (A).

- Use LITTLE PEACOCK on the mother peacock (B).
- Play puzzle, earn HAIRPIN (C).
- Use HAIRPIN on the stash in the rocks, take BROOCH and ROPE LADDER (D).
- Use WOODEN STEPS on ROPE LADDER, earn ROPE LADDER (E).
- Use ROPE LADDER on the oak (F).

- Easy solution: Arrange the path as shown in the picture (G).
- Hard solution: Arrange the path as shown in the picture (H).
- Select this option (I).
- Go to the Giant Nest.

- Take GLAMORIZED INK, CHISEL, and TORN KITE (J).
- Take THREAD and THIN CHISEL (K).

- Use CHISEL and THIN CHISEL on the wooden totem, take HEALING SCROLL, CLOTH, and ROPE LADDER (L).
- Use ROPE LADDER on the iron brackets, take DIVIDERS (M).
- Use THREAD and CLOTH on TORN KITE (N).
- Use GLAMORIZED INK on HEALING SCROLL (O).
- Go back.

- Take OIL and HEARTWOOD (P).
- Use OIL on LAMP (Q).
- Use DIVIDERS on the two holes in the bag’s lock, take GLUE (R).
- Use GLUE on TORN KITE, earn KITE (S).
- Go to the Giant Nest.

- Use KITE on the high branch, take SIGNET RING (T).
- Go back.

- Use MAGNIFYING GLASS on the symbols on the tree (U).
- Easy solution: Press on the symbols as shown in the picture (V).
- Hard solution: Press on the symbols as shown in the picture (W).
- Take MAPLE LEAF and SHELL.

- Use SHELL on the moss, take KEYS 2/3 and WICK (X).
- Use WICK on LAMP (Y).
- Easy solution: Place the oil sections as shown in the picture (Z).
- Hard solution: Place the oil sections as shown in the picture (A).
- Earn LAMP.
- Go back.

- Use LAMP on the dark space (B).
- Easy solution: Move the lights in the order shown in the picture (C).
- Hard solution: Move the lights in the order shown in the picture (D).
- Take DAGGER.

- Use DAGGER on the sack, take SAWFISH, use SIGNET RING on the slot on the chest, take QUILL (E).
- Use QUILL on HEALING SCROLL, earn HEALING SCROLL (F).
- Go to the Giant Nest.

- Use HEALING SCROLL on the owlings (G).
- Easy solution: Arrange the symbols as shown in the picture (H).
- Hard solution: Arrange the symbols as shown in the picture (I).
- Go back.

- Use SAWFISH on the branches, take BONE and TONGS (J).
- Use TONGS on the rim in the tree, take RIM (K).
- Use RIM on the two holes beneath the house, take NUT (L).
- Go back.

- Play puzzle, earn FEATHER (M).
- Use BONE, NUT, and FEATHER on the altar, take KEYS 3/3 (N).
- Go to the Top of the Oak.

- Use KEYS on the box, take AMULET OF RENEWAL (O).
- Use HEARTWOOD and AMULET OF RENEWAL on the heart of the tree, take ARTIFACTS 3/3 (P).

- Select this option (Q).
- Read and take the scroll, use ARTIFACTS on the altar (R).
- Use MAPLE LEAF on the slot in the door, take SUNDIAL PART (S).

- Use SUNDIAL PART on the sundial (T).
- Solution: Arrange the arrows as shown in the picture (U).
- Take ROCK PAINTING.

- Use ROCK PAINTING on the painted stone, take ANTLER (V).
- Use ANTLER on the reindeer, take HUNTER’S BAG (W).

- Use BROOCH on HUNTER’S BAG, read and take SPELLBOOK (X).
- Select this option (Y).
- Use SPELLBOOK on the altar (Z).

- Easy solution: Press on the arrows: 1-2×2 (A).
- Hard solution: Press on the arrows: 1×3-2×2 (B).
- Walkthrough Bonus Chapter, at the link below.


