
Grim Tales 26: Prisoners of the Past – Transports you into a maelstrom of mysteries surrounding the Gray family’s past. Anna receives a letter asking her to help her adopted brother Thomas Cray. It tells her about a box hidden in the Frey family mansion and the need to bring it to the orphanage, the place where Thomas was locked up on the orders of their own father, Richard. Trying to make sense of what has happened draws Anna into a chain of events. It’s up to her to discover why Richard imprisoned Thomas, and what the fear that hovers around the story has to do with it. As she progresses, she encounters frightening letters, drawings that create a future prison, and voices from the past that sound a warning or a threat. Thomas himself, who has survived betrayal and dramatically changed his appearance, claims that his past is not over. Someone is preparing for the final clash, and it is possible that it will be his last. Anna will have to overcome ghosts both real and metaphorical, and untangle this web of lies, supernatural visions, and broken bonds. Penetrating letters, strange coincidences and haunting images all lead to one thing, a long forgotten story needs a denouement. If you can not pass any of the puzzles or do not know where the items are, on our site you can watch the walkthrough of the game Grim Tales 26: Prisoners of the Past, and help Anna to uncover the truth.
Grim Tales 26: Prisoners of the Past – Walkthrough
Here you can see the full walkthrough of Grim Tales 26: Prisoners of the Past, namely for all chapters, including bonus chapter, in pictures.
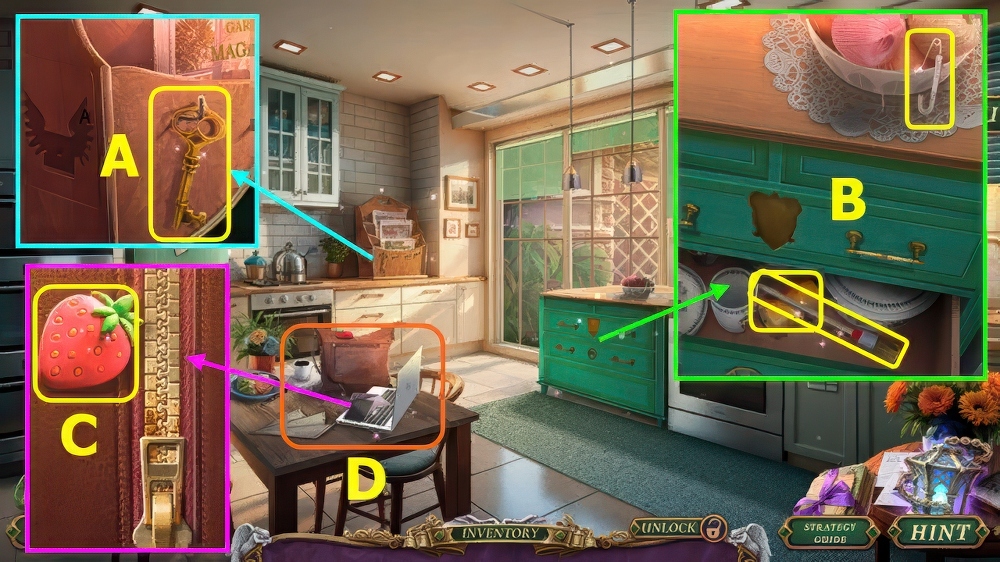
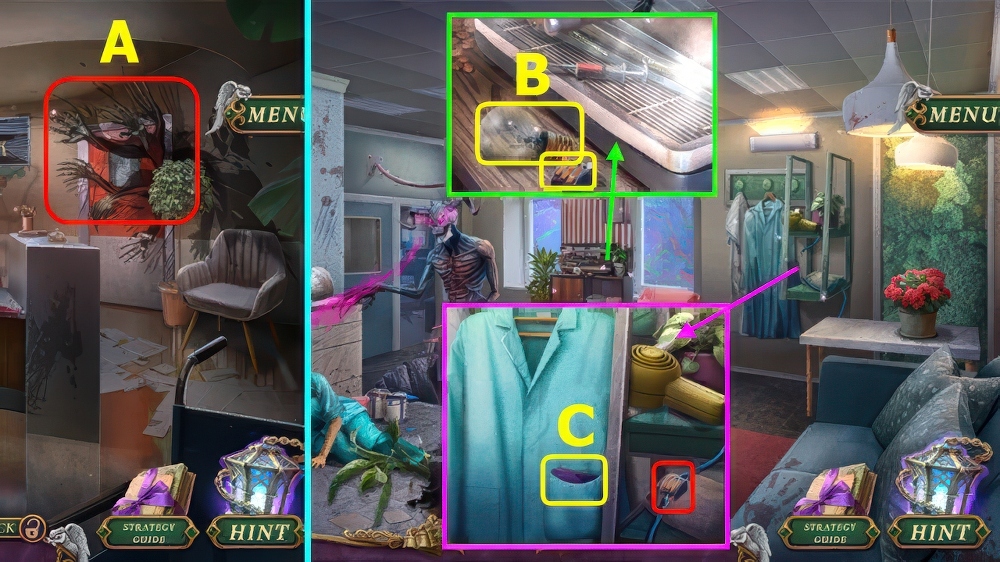
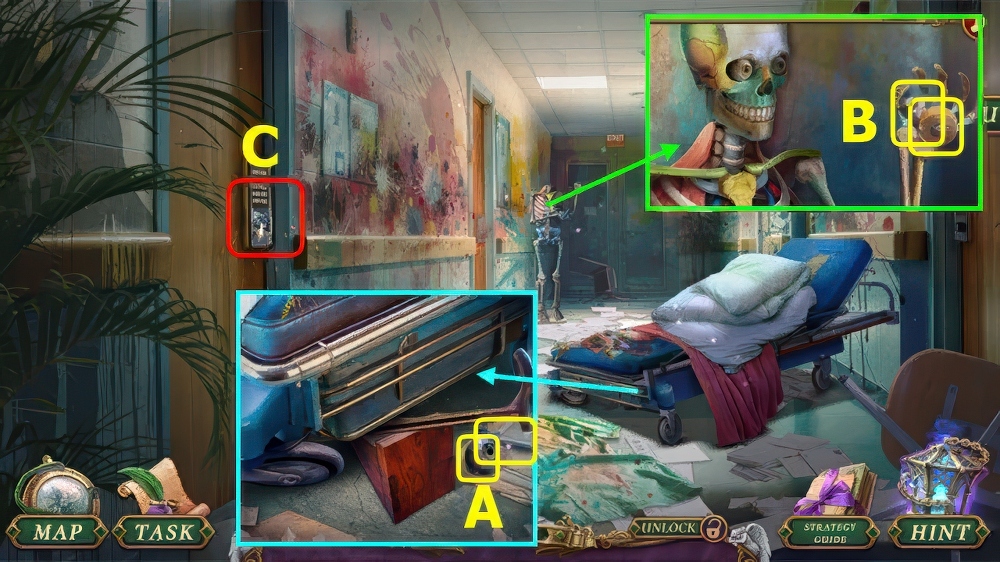
- Select note.
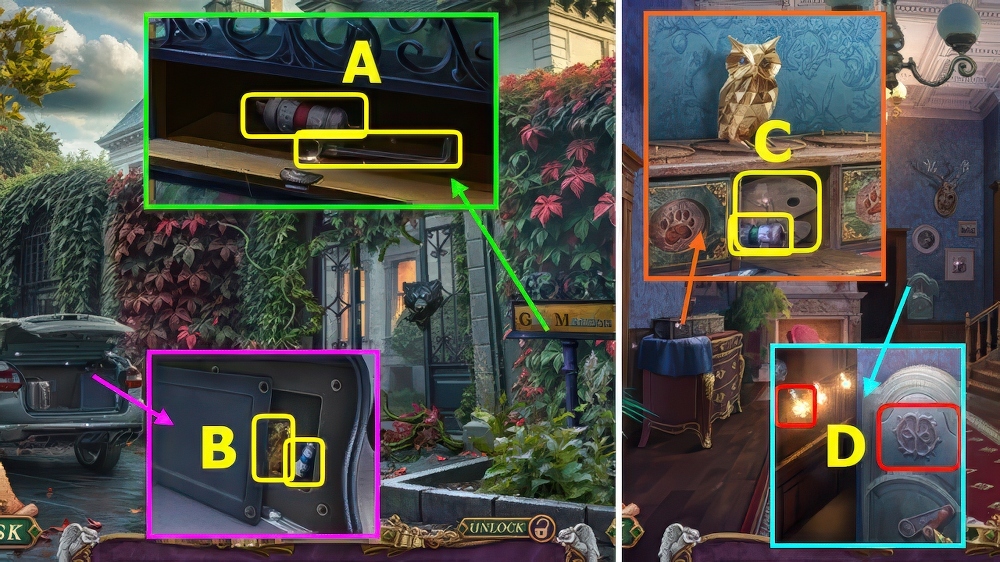
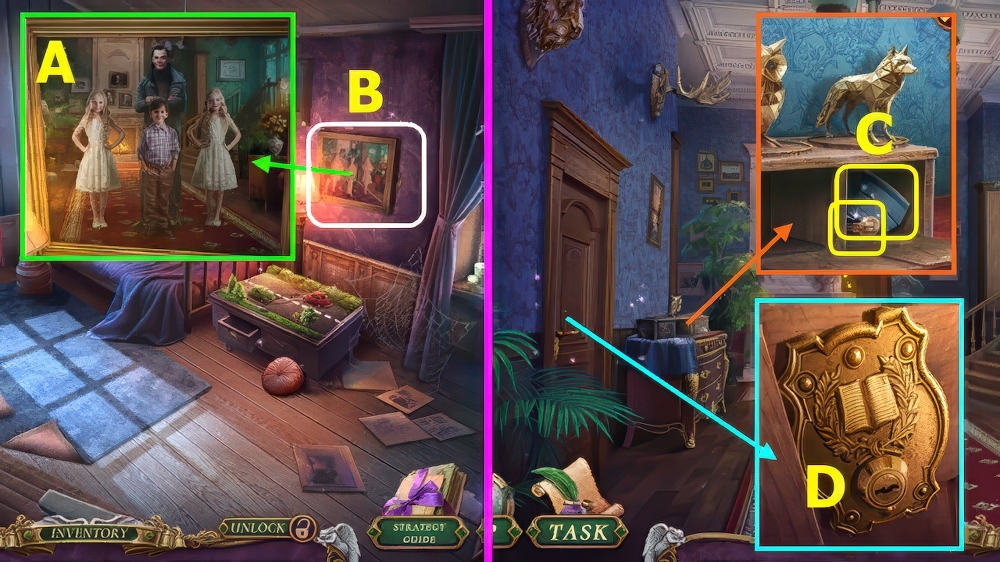
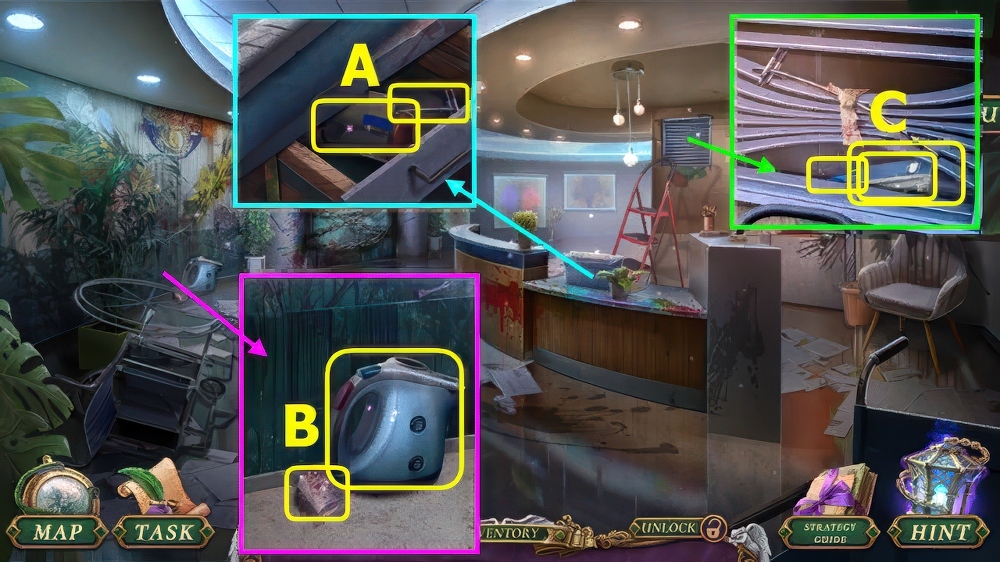
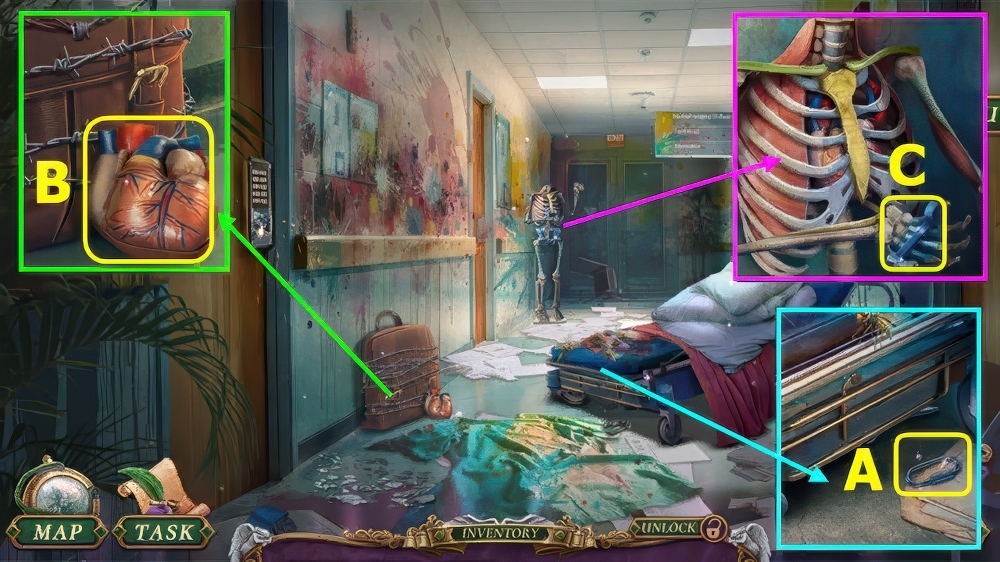
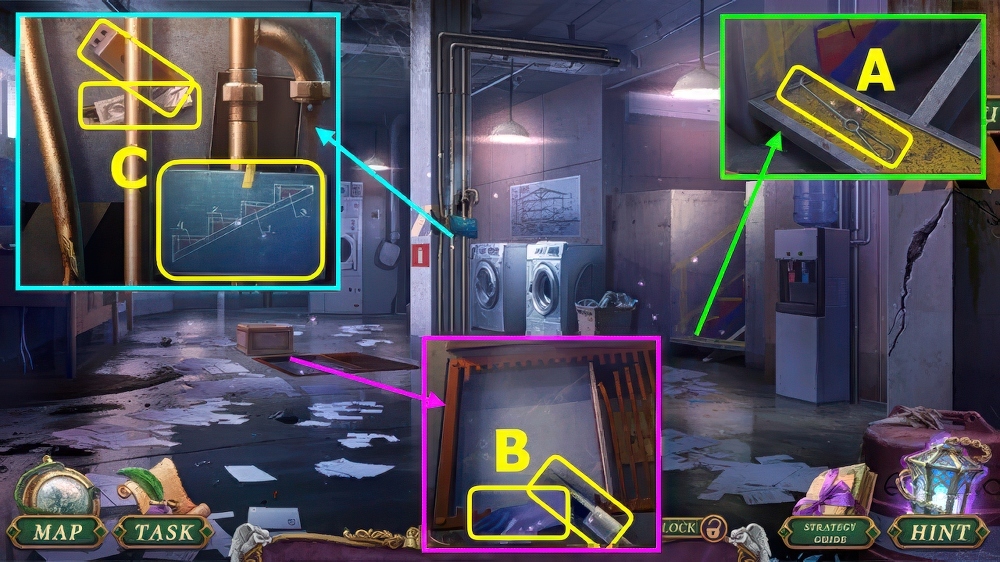
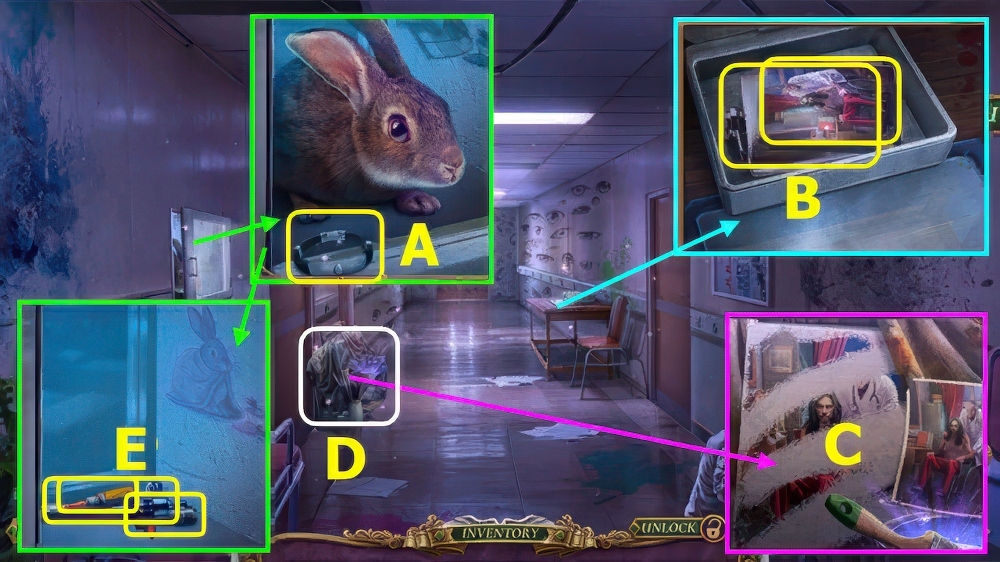
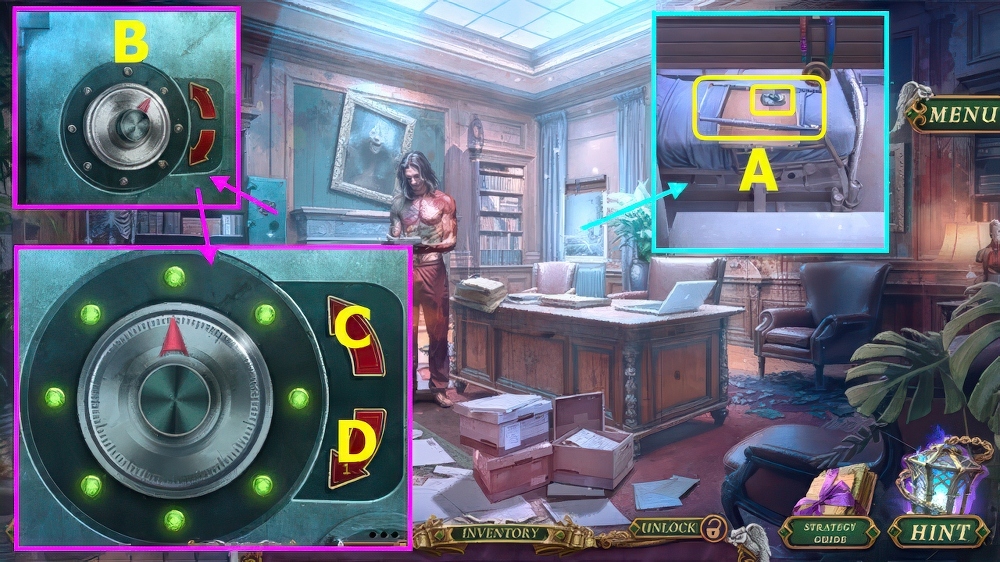
- Take DRAWER KEY (A).
- Use DRAWER KEY, take PAINTBRUSH, CANDLE, and SAFETY PIN (B).
- Take STRAWBERRY MAGNET, select zipper pull, use SAFETY PIN and CANDLE, select (C).
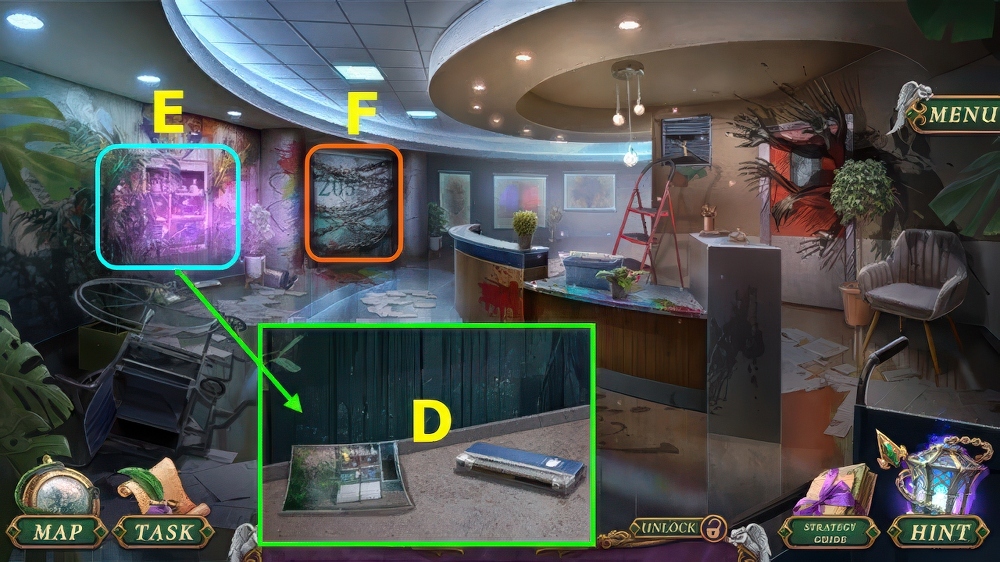
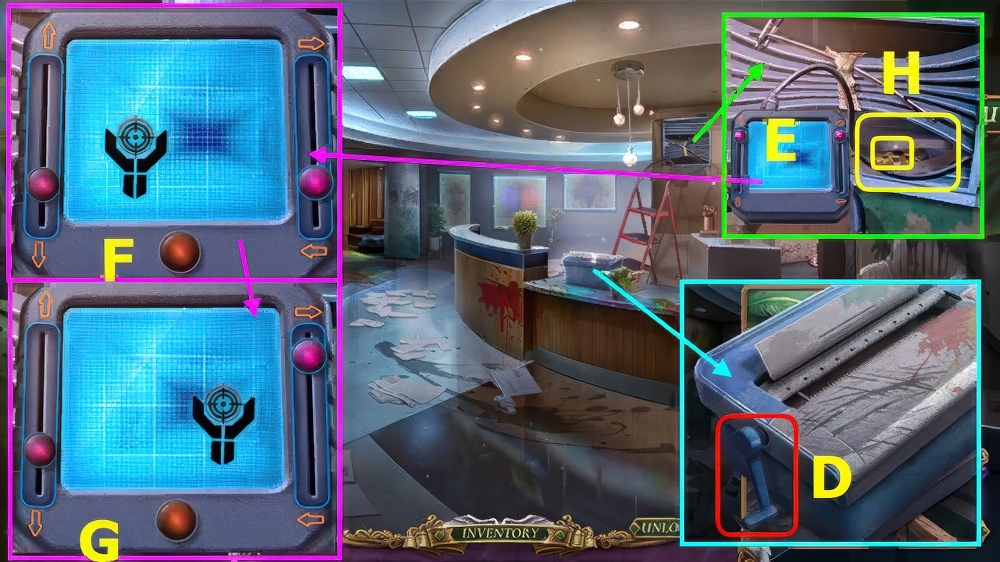
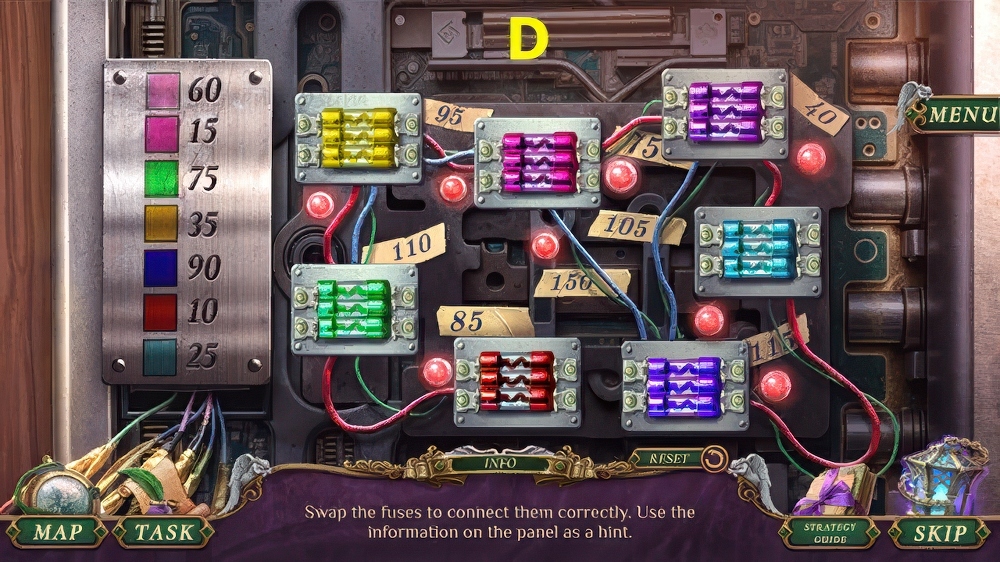
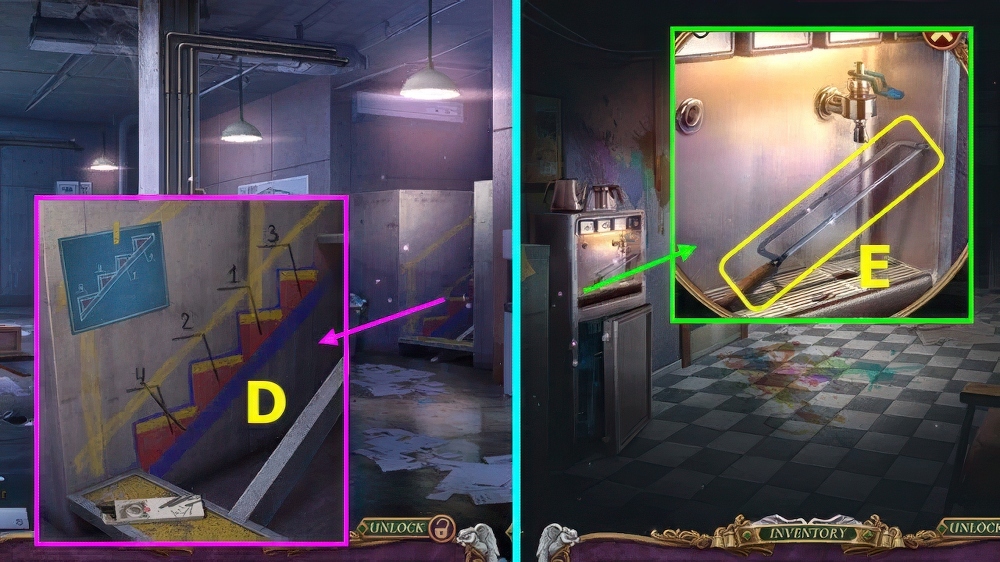
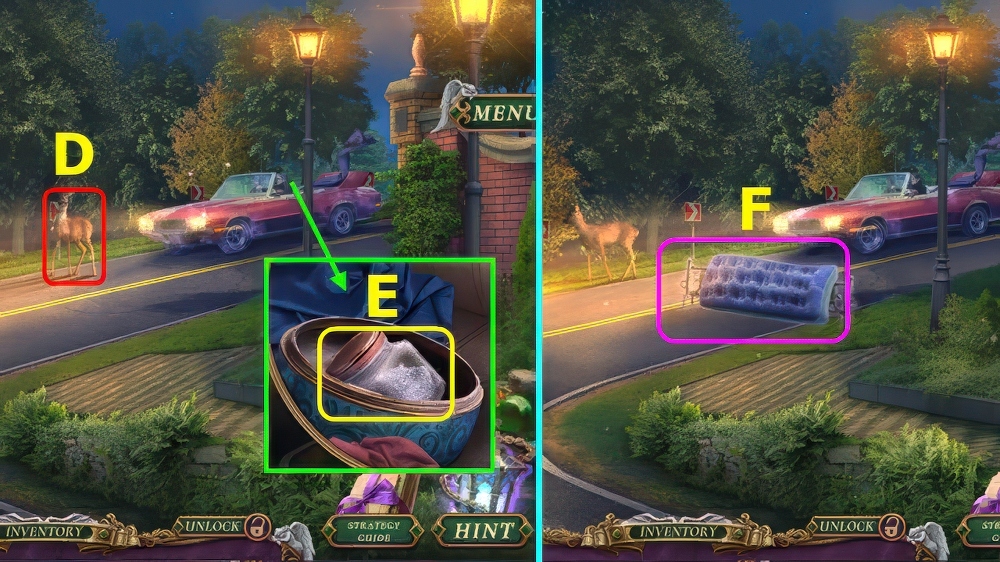
- Play puzzle, earn ENVELOPE AMULET (D).
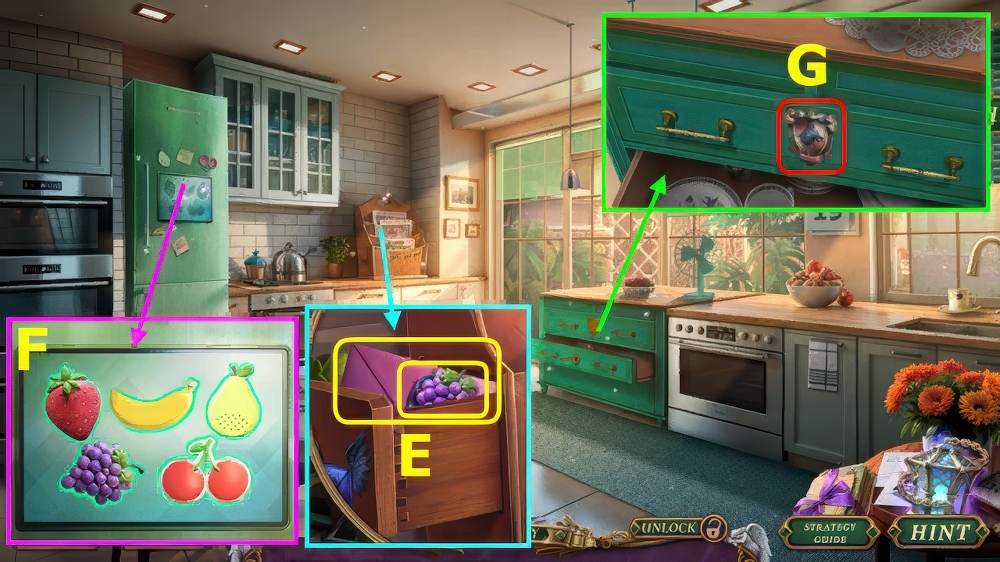
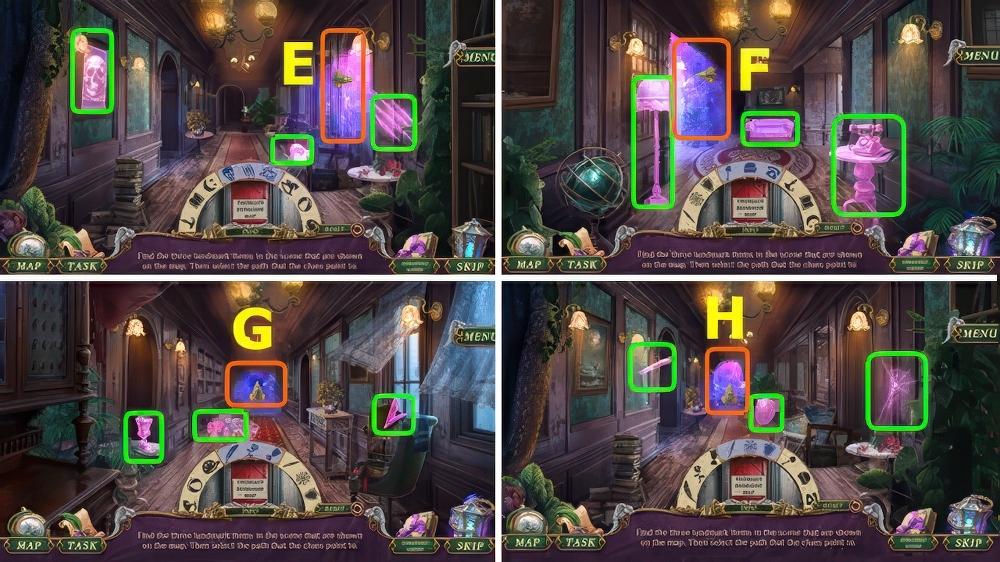
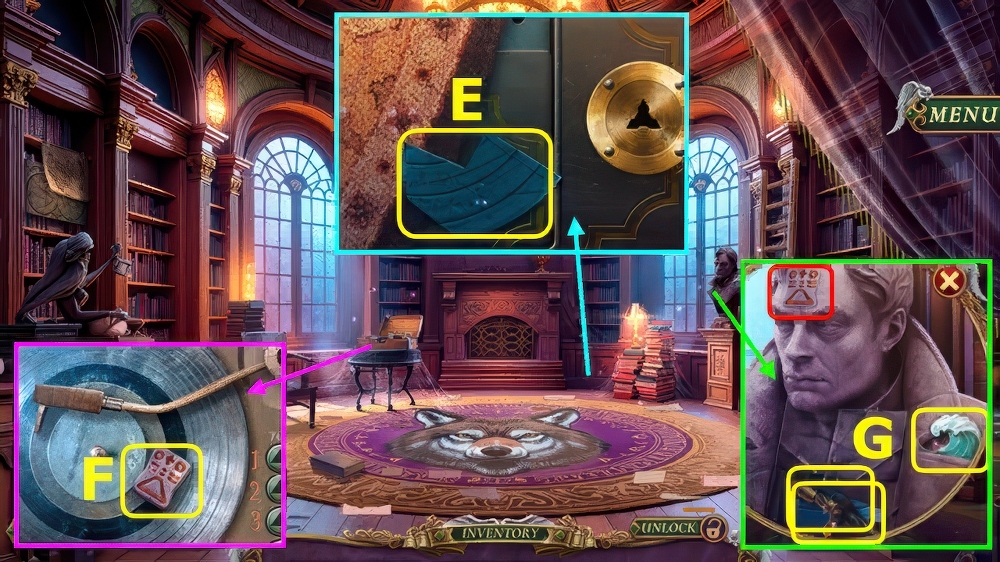
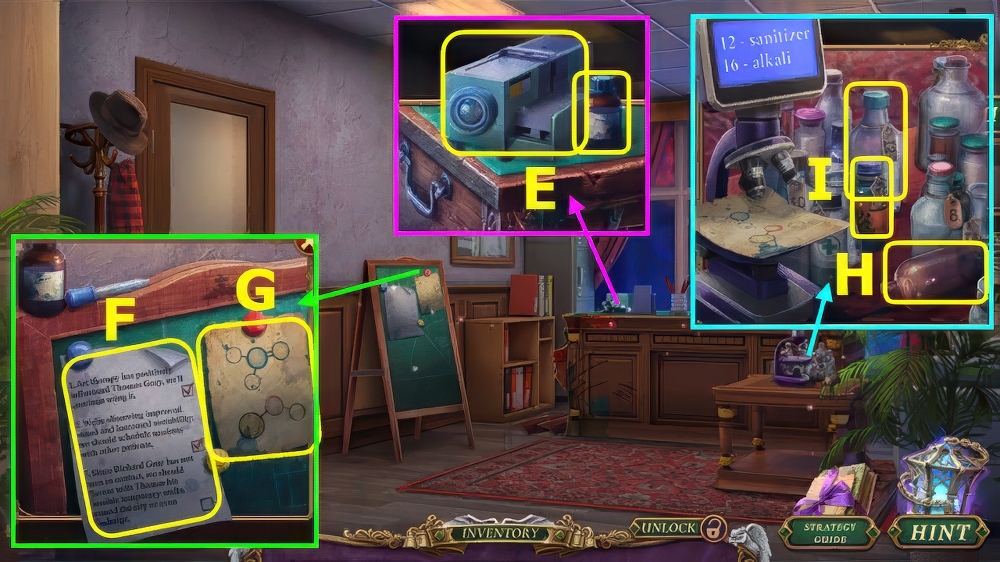
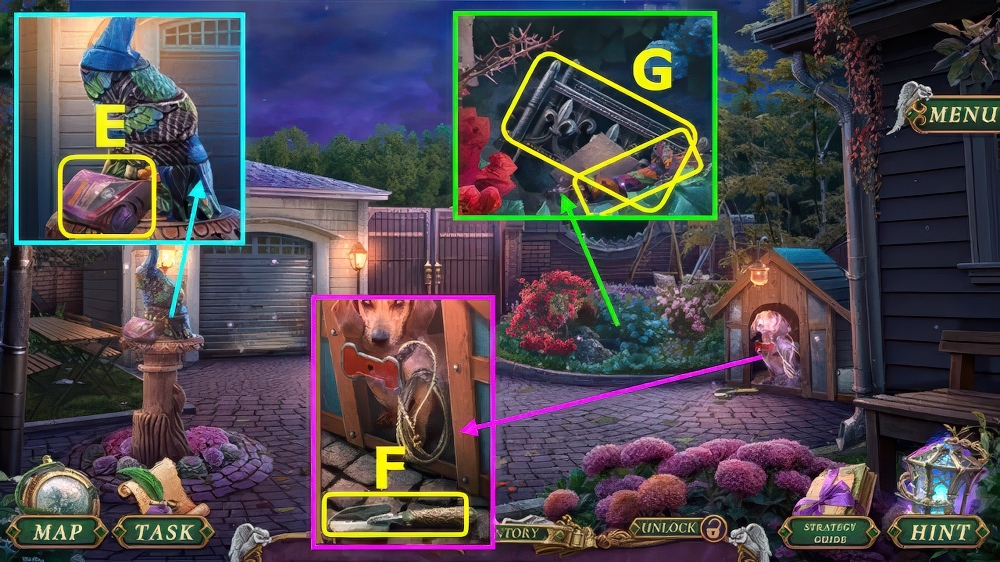
- Place ENVELOPE AMULET, take GRAPES MAGNET and PINK ENVELOPE (E).
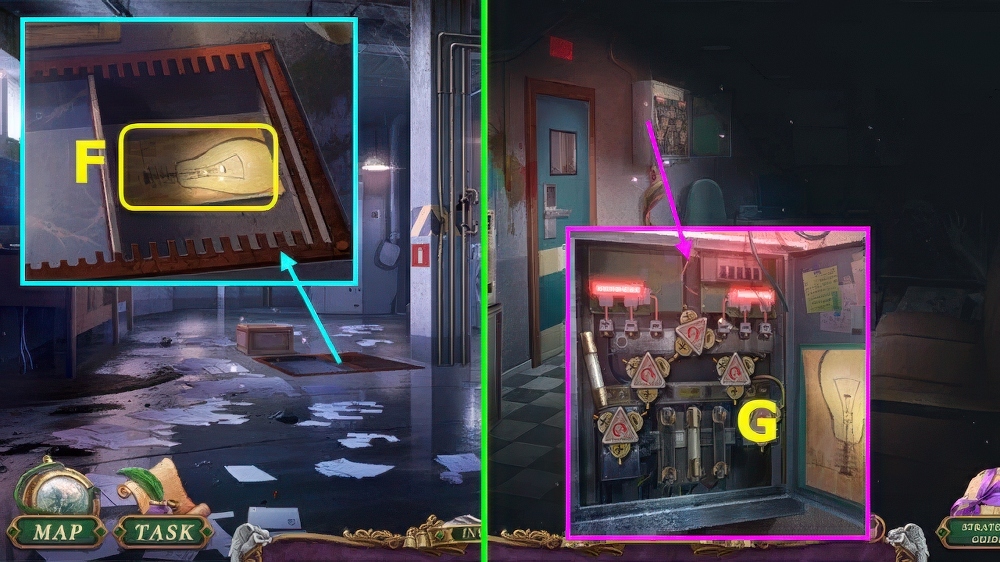
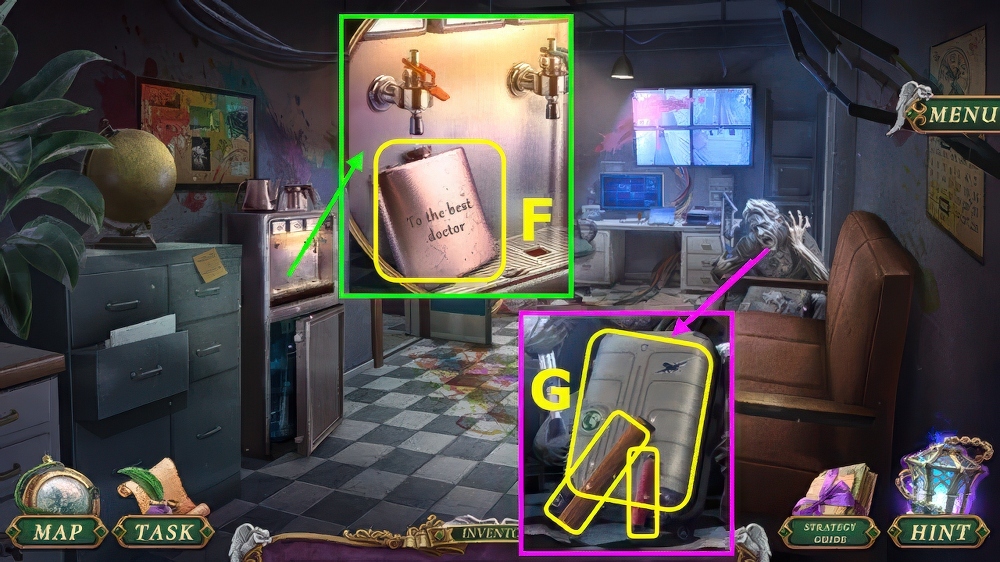
- Place STRAWBERRY MAGNET and GRAPES MAGNET, restore magnets (F), take CORN SYRUP and DULL KNIFE.
- DULL KNIFE on PINK ENVELOPE, select, earn FAMILY CREST.
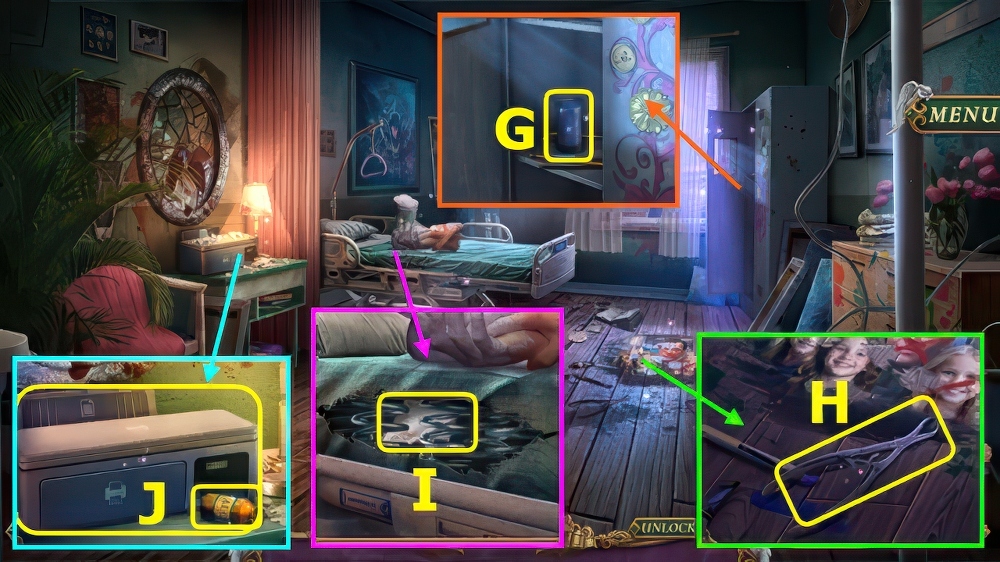
- Use FAMILY CREST and CORN SYRUP (G), play puzzle, earn MANSION KEY.
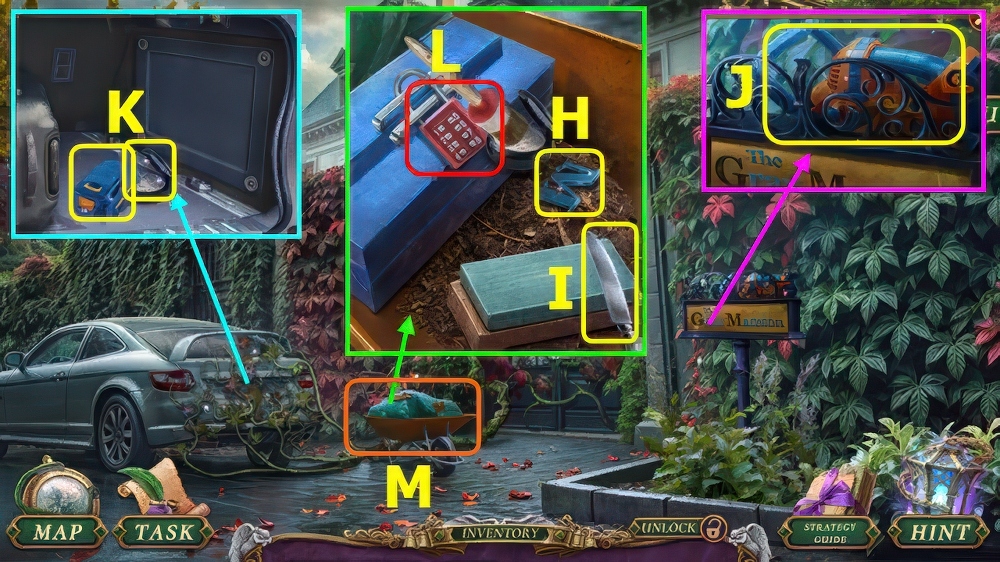
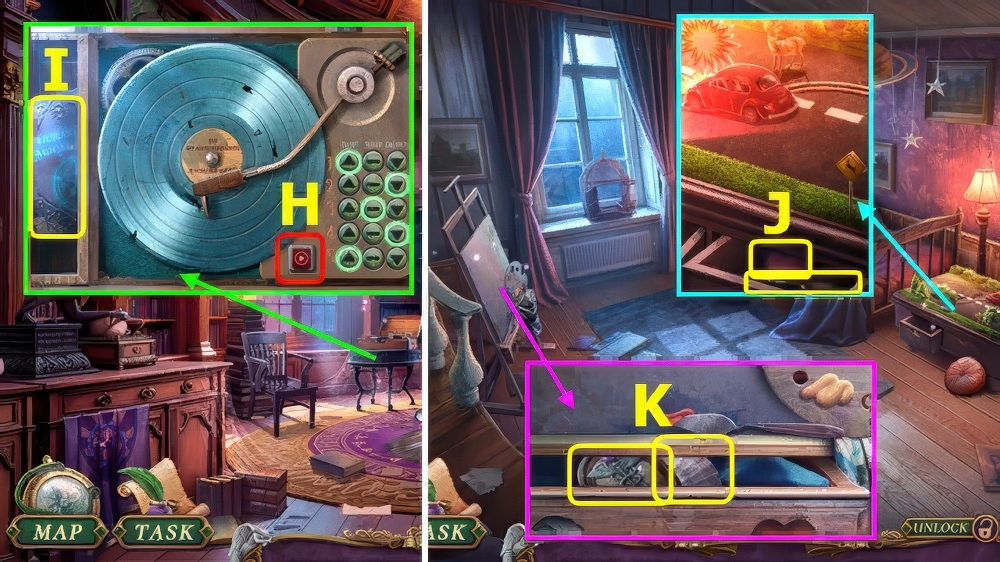
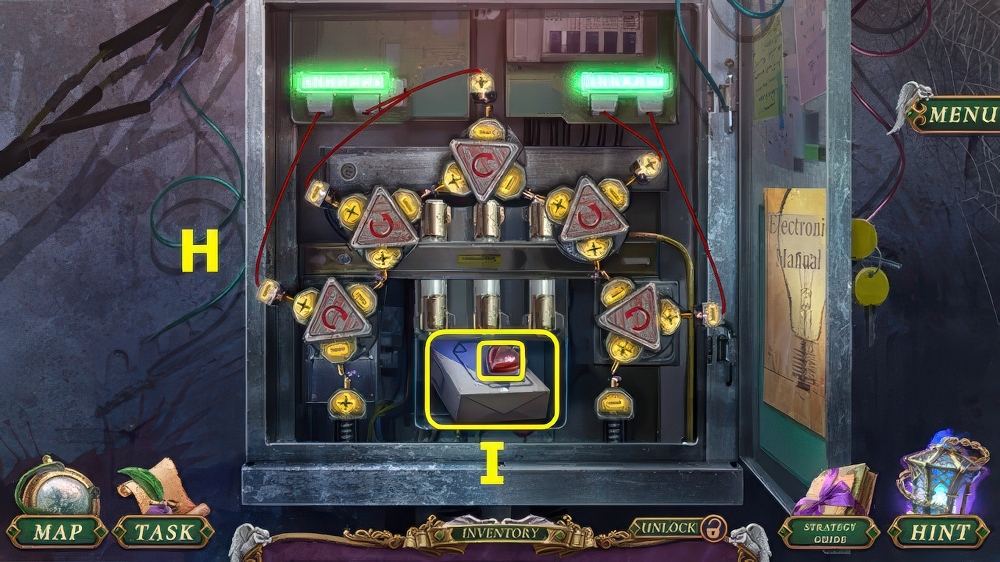
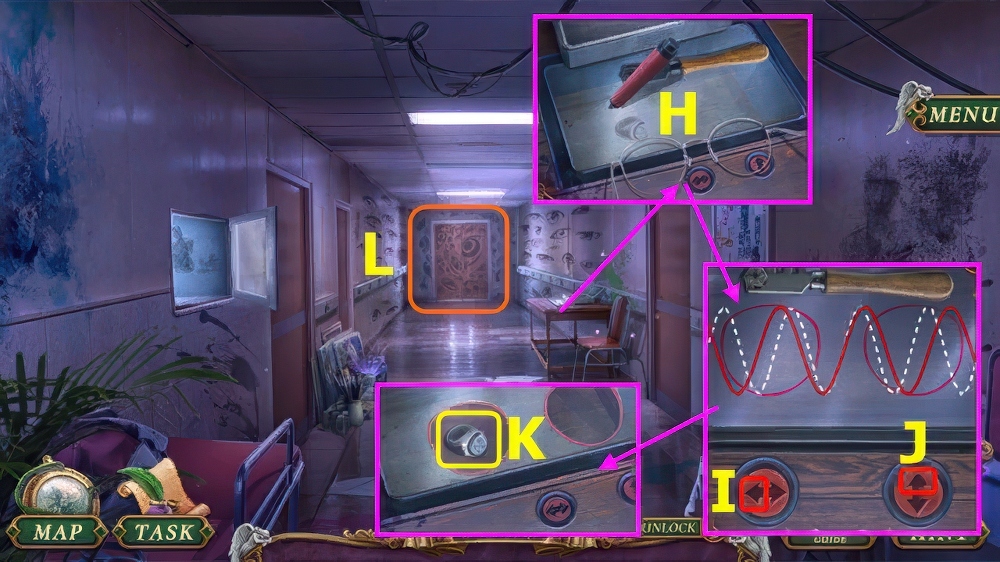
- Remove cover, take METAL M (H).
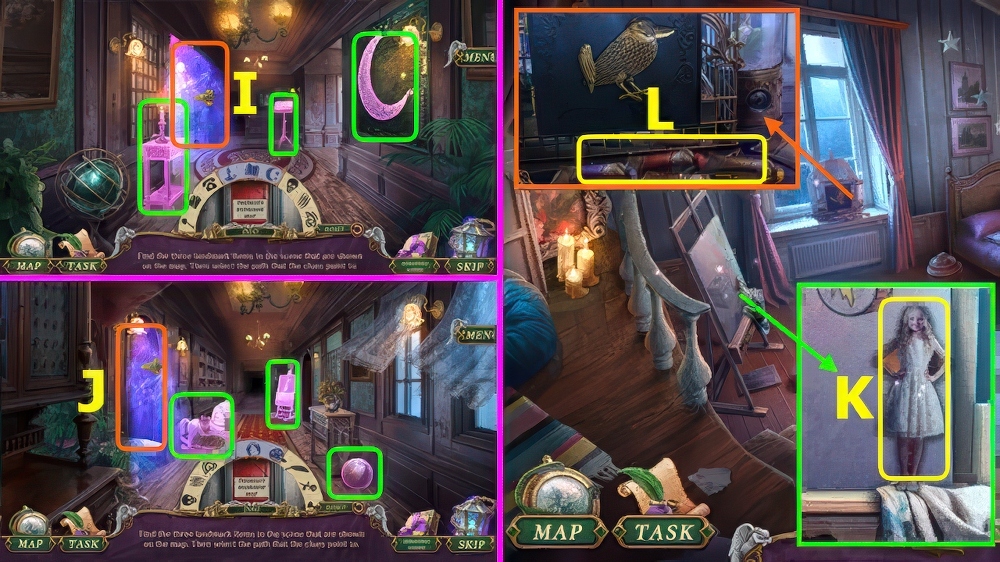
- Use DULL KNIFE, earn SHARPENED KNIFE (I).
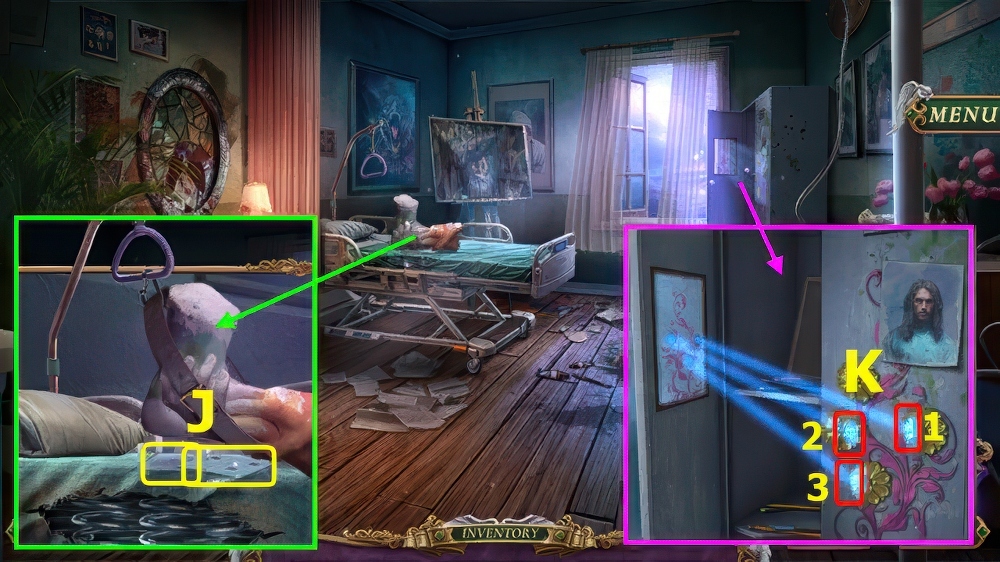
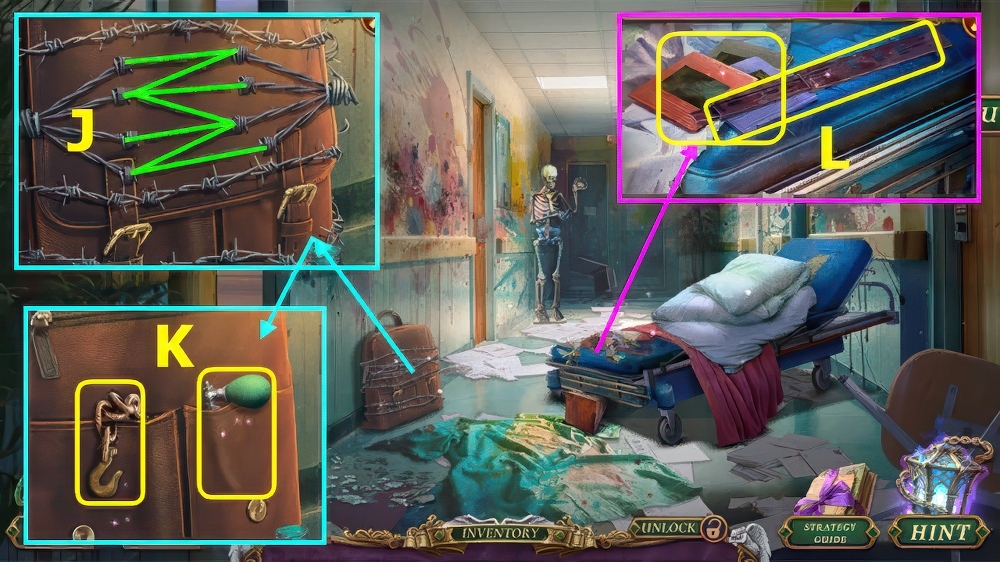
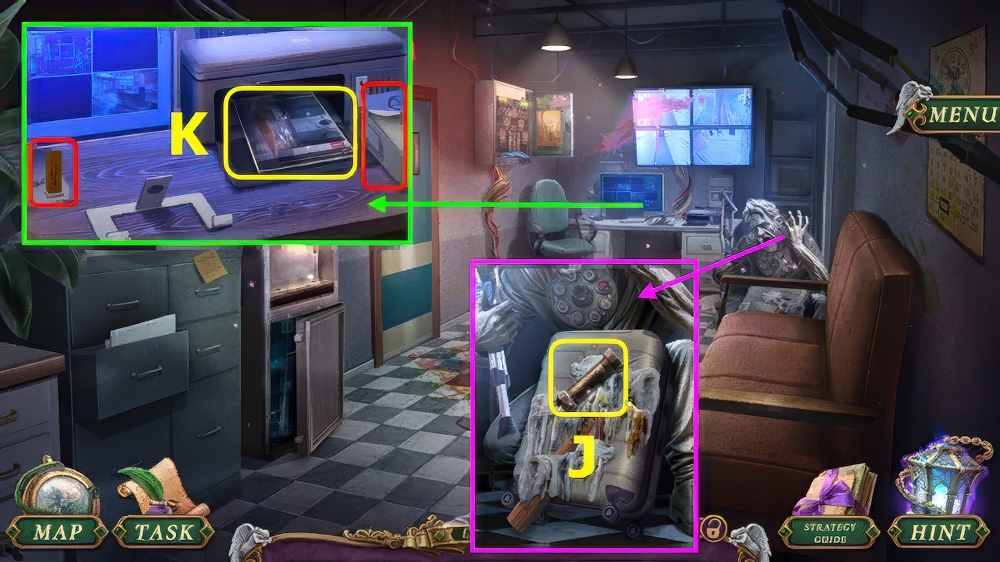
- Take BROKEN HEDGE TRIMMER (J).
- Use SHARPENED KNIFE, take BATTERY and POWDER (K).
- Use POWDER and PAINTBRUSH (L).
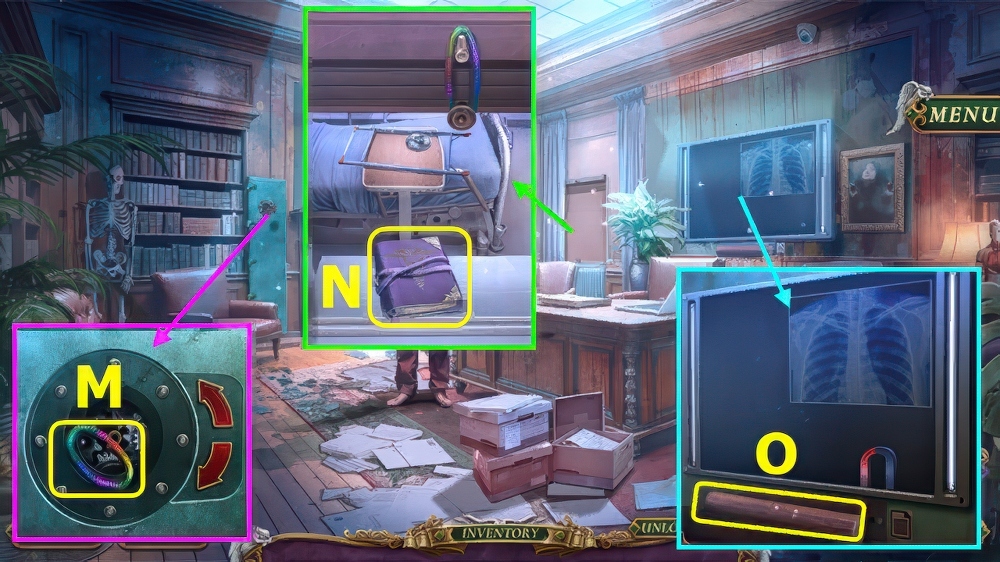
- Play puzzle, earn TRIMMER BLADE (M).
- TRIMMER BLADE and BATTERY on BROKEN HEDGE TRIMMER, take HEDGE TRIMMER.
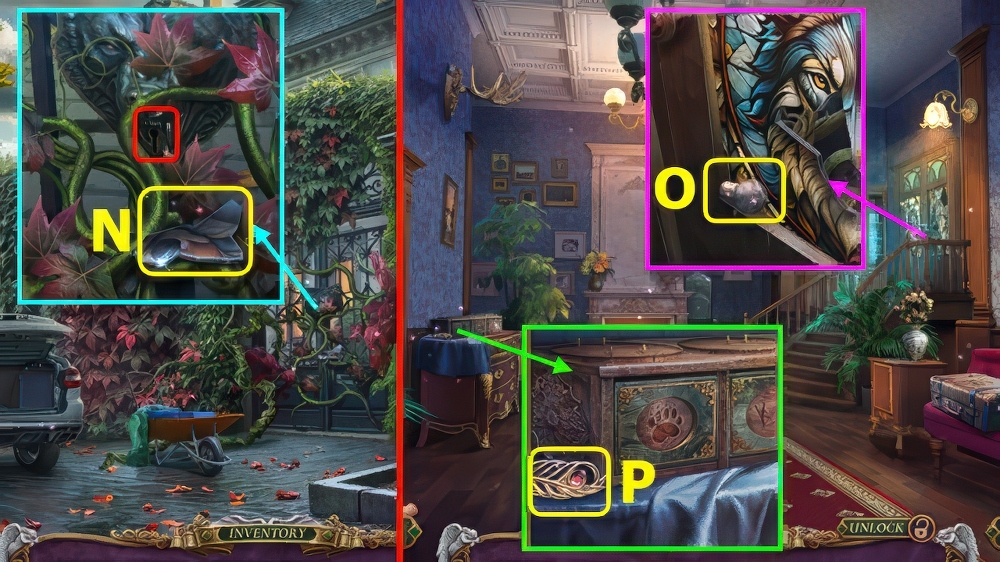
- Take 1/2 STAINED-GLASS PIECES, use HEDGE TRIMMER and MANSION KEY (N).
- Go forward.
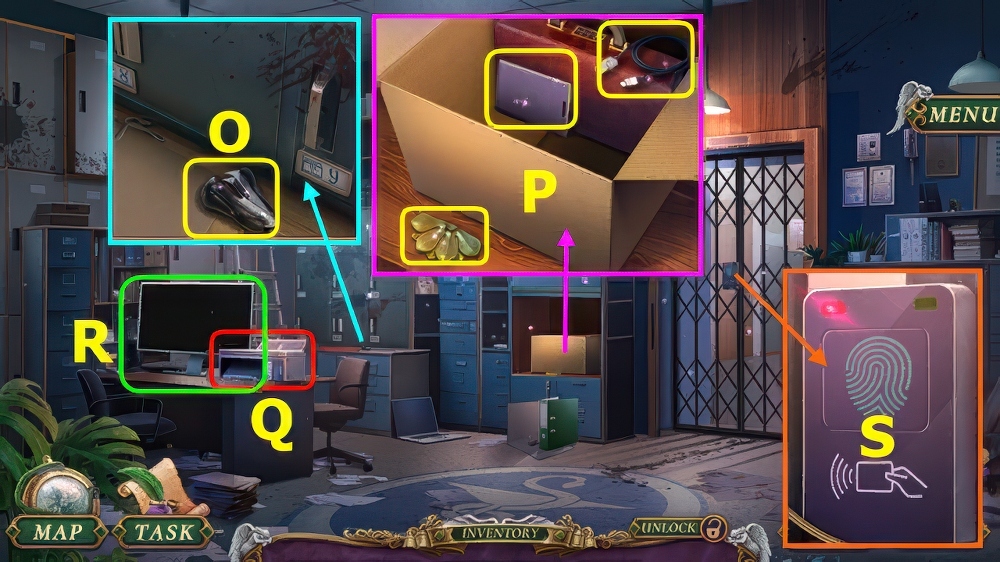
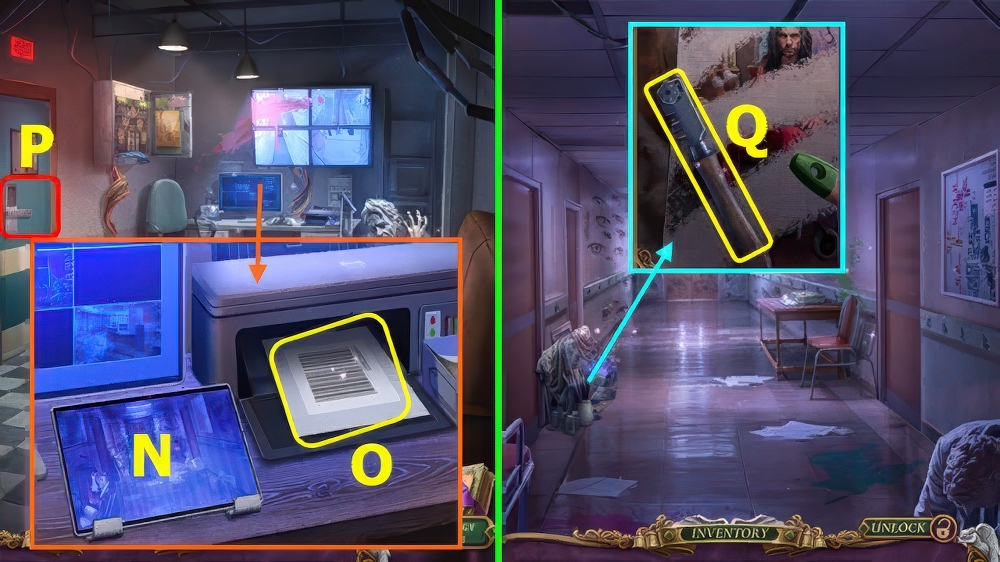
- Take LIGHT BULB (O).
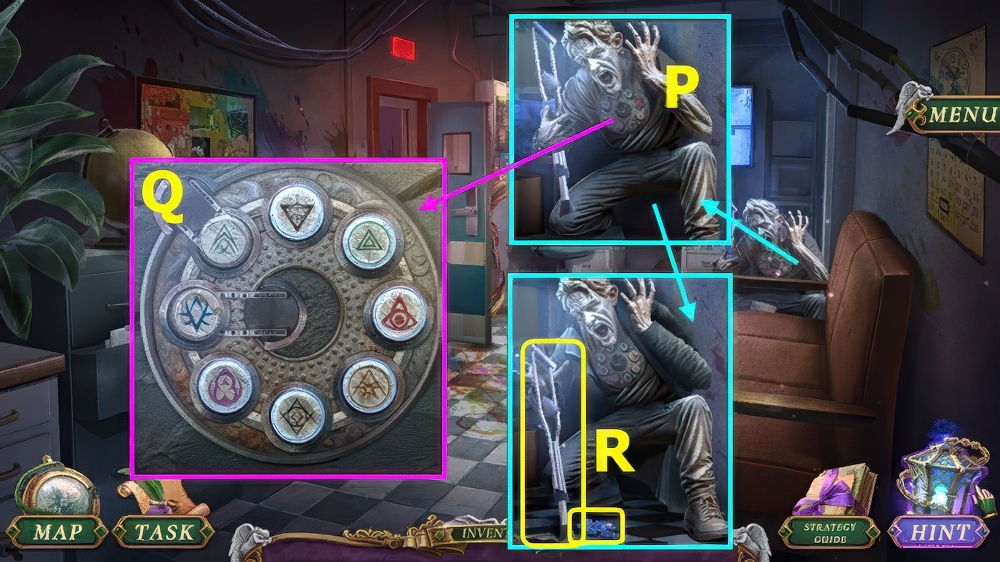
- Take FEATHER BROOCH (P).
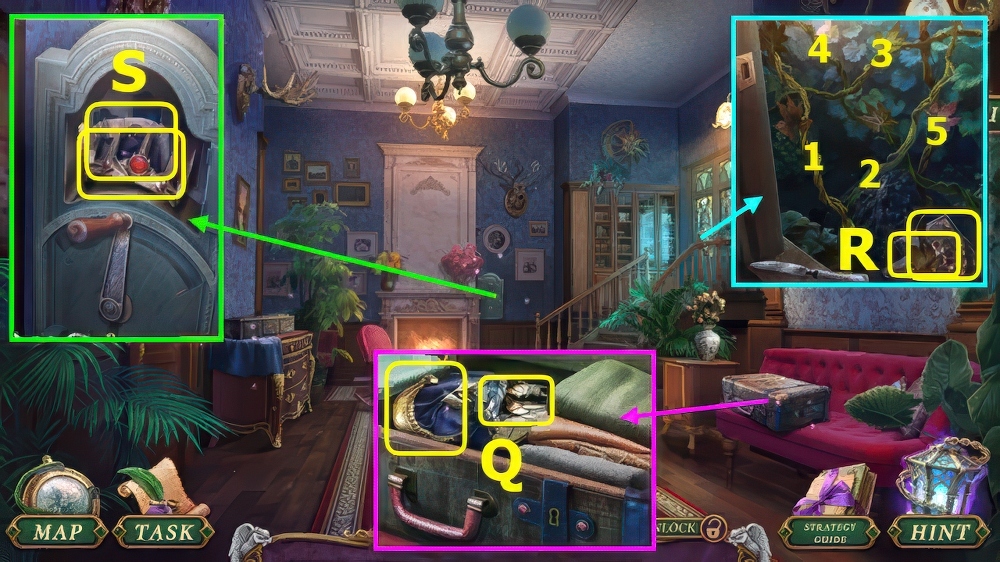
- Use FEATHER BROOCH, take SKULL JAW and 2/2 STAINED-GLASS PIECES (Q).
- Place STAINED-GLASS PIECES, use SHARPENED KNIFE, select 1-5, take HANDLE and RICHARD’S DIARY (R).
- Use HANDLE, take SKULL CROWN and CHILD’S DRAWING (S).
- SKULL CROWN and SKULL JAW on RICHARD’S DIARY, play puzzle, earn CHILD’S MAP and METAL G.
- Walk down.
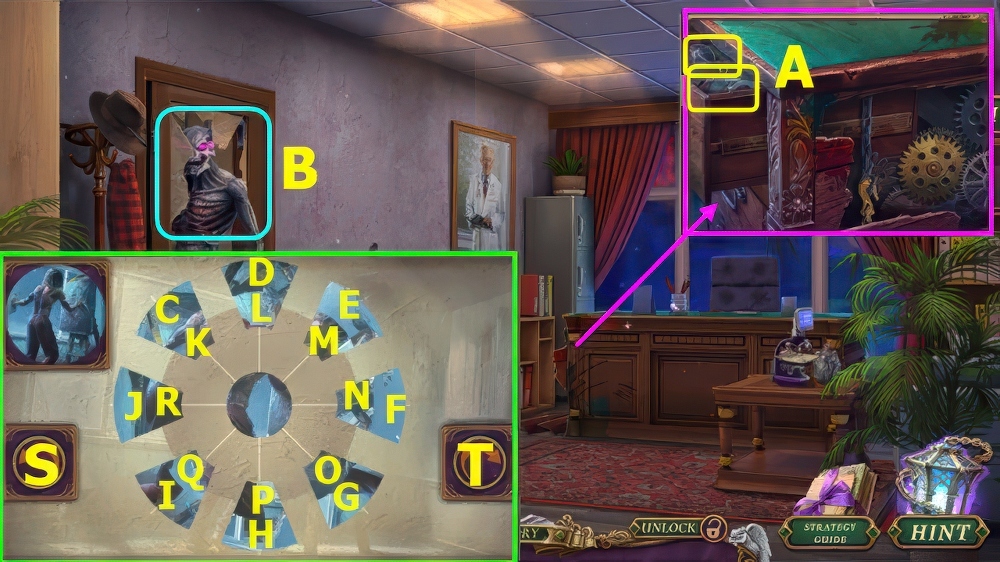
- Place METAL G and METAL M, take STAR KEY and 1/3 FUSES (A).
- Use STAR KEY, take 2/3 FUSES and OWL FIGURINE (B).
- Go forward.
- Place OWL FIGURINE, take 3/3 FUSES and THOMAS’S PALETTE (C).
- Place LIGHT BULB and FUSES, use CHILD’S MAP (D).
- Select items, go right (E).
- Select items, go left (F).
- Select items, go forward (G).
- Select items, go forward (H).
- Select items, go left (I).
- Select items, go left (J).
- Take ANNA (K).
- Take PAINTS (L).

- Take RED CAR (M).
- Place RED CAR, take GOLDEN WING (N).
- Place GOLDEN WING and CHILD’S DRAWING, solution (O), take BROKEN RECORD and PAINTING KNIFE.
- PAINTS and PAINTING KNIFE on THOMAS’S PALETTE, take PAINTING SET.
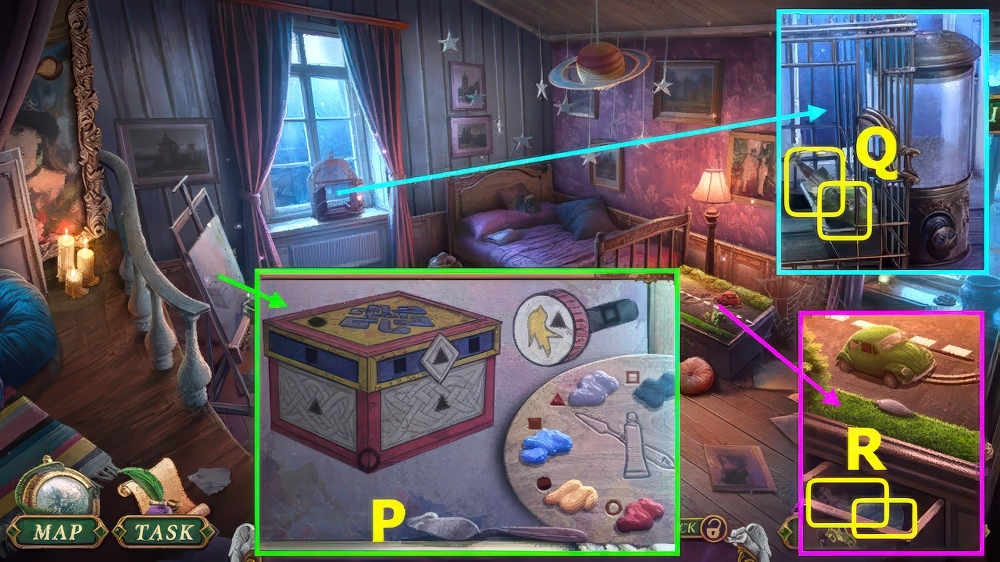
- Place PAINTING SET, solution (P), take CARVED BOX and FEEDER BUTTON.
- Place FEEDER BUTTON, take GREEN CAR and LOUISA (Q).
- Place GREEN CAR, take 1/4 RECORD PIECES and THOMAS (R).
- Place ANNA, THOMAS, and LOUISA (A).
- Play puzzle, earn GLUE and WOLF FIGURINE (B).
- Walk down.
- Place WOLF FIGURINE, take ARCHIVE KEY and 2/4 RECORD PIECES (C).
- Use ARCHIVE KEY (D).
- Go left.
- Take 3/4 RECORD PIECES (E).
- Take RICHARD’S SYMBOLS (F).
- Place RICHARD’S SYMBOLS, take STASH HANDLE, 4/4 RECORD PIECES, and WATER AMULET (G).
- RECORD PIECES and GLUE on BROKEN RECORD, take OLD RECORD.
- Place OLD RECORD, select green buttons as shown, select (H), take TOY DEER and BARRIER INSTRUCTIONS (I).
- Walk down, forward.
- Place TOY DEER, take AWL and HEART AMULET (J).
- Place WATER AMULET and HEART AMULET, take CADUCEUS MEDALLION and SCALLOP SHELL (K).
- Walk down.

- Use SCALLOP SHELL, take BARRIER SCEPTER and BEAR FIGURINE (A).
- Place BEAR FIGURINE, take ENCHANTED CHALK and PATTERNED TILE (B).
- Go left.
- Select fabric, place PATTERNED TILE and STASH HANDLE (C).
- Solution K-L-M-N-J-I-H-G-K-O-P-L-M-I-E-D-H-I-J-N-R-Q-P-L-K-G-H-I-M-Q-P-L-M-I-E-D-C-G-K-O.

- Take 1/3 MAGIC CRYSTALS and ASYLUM PHOTO (D).
- Take BADMINTON RACKET (A).
- Use BADMINTON RACKET, take BRONZE FRAMES and 2/3 MAGIC CRYSTALS (B).
- Take GLOVES, place CADUCEUS MEDALLION and BRONZE FRAMES, solution (C), take BUSINESS CARD and WEIGHT.
- Use AWL and WEIGHT, take 3/3 MAGIC CRYSTALS (D).
- Read BARRIER INSTRUCTIONS, add BARRIER SCEPTER, MAGIC CRYSTALS, GLOVES, and ENCHANTED CHALK, take MAGIC KIT.
- Use MAGIC KIT (E).
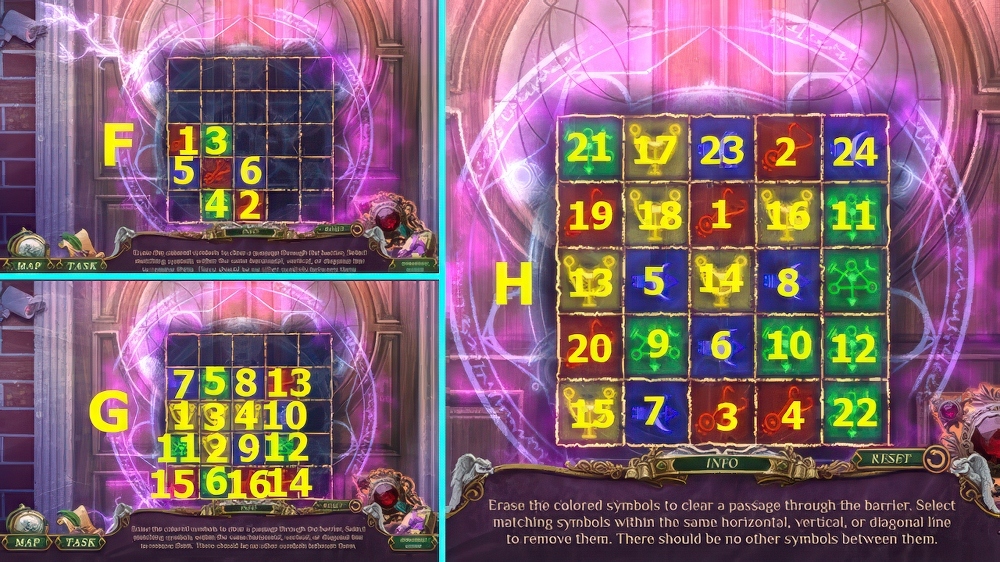
- Select 1-6 (F).
- Select 1-16 (G).
- Select 1-24 (H).
- Open drawer, use BUSINESS CARD, take GRADUATED CYLINDER and MEDICAL ROD (A).
- Take BROKEN STEAM CLEANER and BLOODY SCARF (B).
- Use MEDICAL ROD and BLOODY SCARF, take UV FLASHLIGHT, SEAM RIPPER, and HOSE WITH NOZZLE (C).
- Place ASYLUM PHOTO and UV FLASHLIGHT (D).
- Play puzzle, earn DECANTER WITH WATER (E).
- HOSE WITH NOZZLE and DECANTER WITH WATER on BROKEN STEAM CLEANER, take STEAM CLEANER.
- Use STEAM CLEANER (F).
- Go forward.
- Take PAINT PELLETS (G).
- Take MEDICAL CLAMP (H).
- Use SEAM RIPPER and MEDICAL CLAMP, earn SCARF (I).
- Use SCARF, take ALCOHOL and BROKEN PRINTER (J).
- ALCOHOL and PAINT PELLETS on GRADUATED CYLINDER, take PAINT.
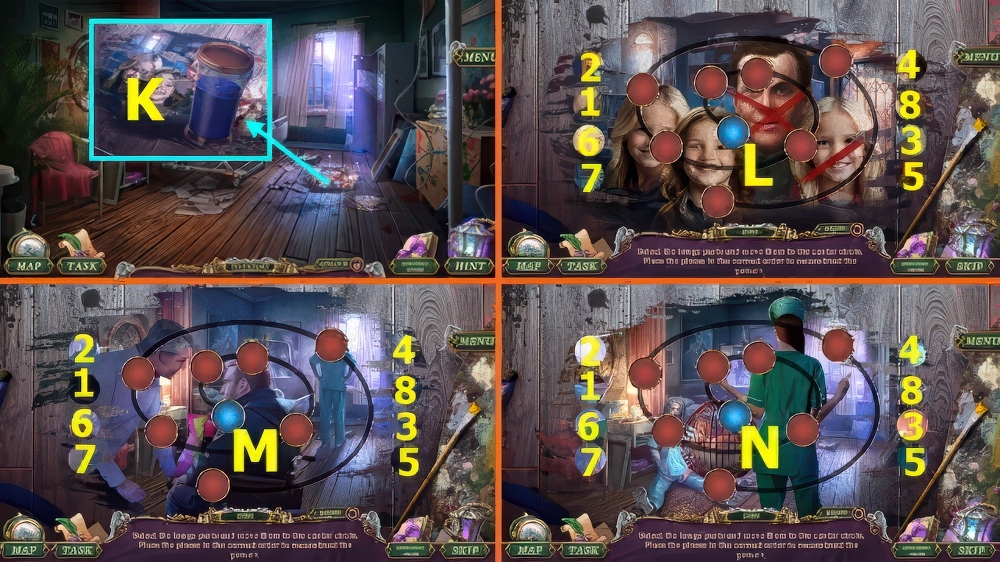
- Place PAINT (K).
- Drag 1-8 to blue circle (L).
- Drag 1-8 to blue circle (M).
- Drag 1-8 to blue circle (N).
- Take THOMAS’S CUP and FIRE EXTINGUISHER.
- Walk down.
- Use FIRE EXTINGUISHER (A).
- Go right.
- You earn FLEXIBLE LAMP.
- Take LIGHTBULB and SCREW TERMINAL (B).
- Use SCREW TERMINAL and SEAM RIPPER, read book, take 1/3 ENGRAVINGS and CAPPUCCINO SPOUT (C).
- Place CAPPUCCINO SPOUT and THOMAS’S CUP, take FOLDING RACK and SYRINGE WITH INK (D).
- LIGHT BULB and FOLDING RACK on FLEXIBLE LAMP, take MEDICAL LAMP.
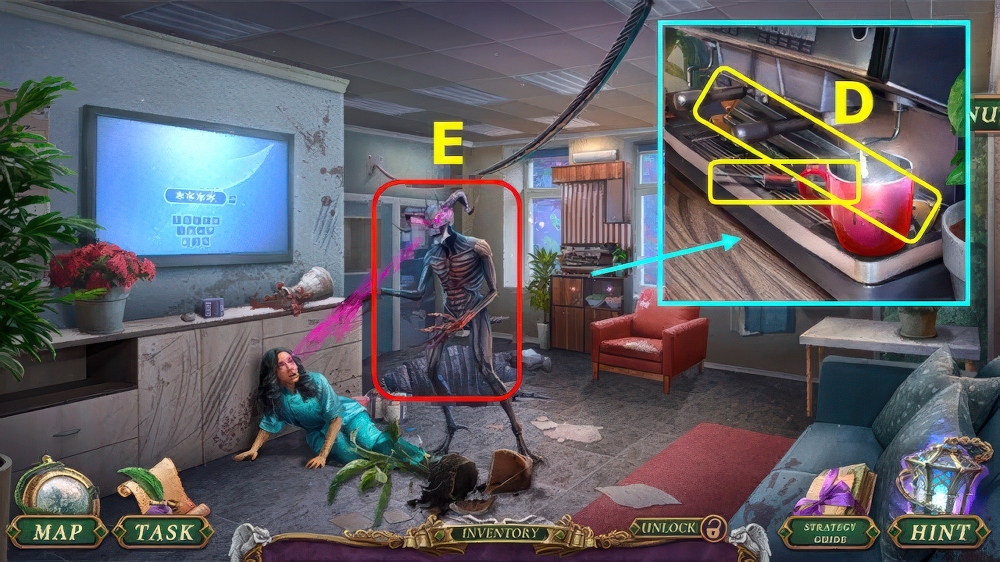
- Use MEDICAL LAMP (E).

- Select F-G-H-I-J
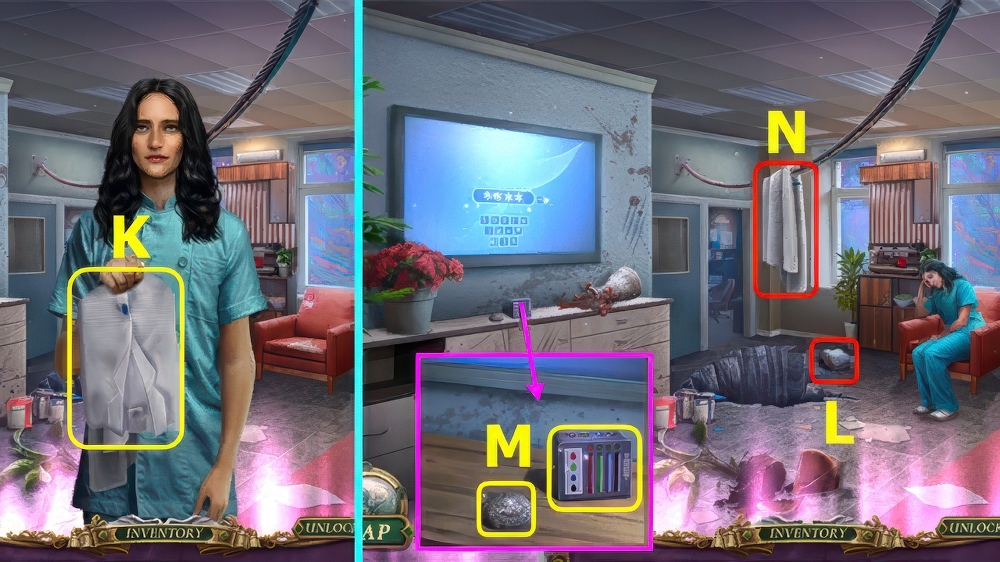
- Talk, take MEDICAL COAT (K).
- Select (L).
- Take 2/3 ENGRAVINGS and EMPTY CARTRIDGE (M).
- Use MEDICAL COAT (N).
- Take STAPLE REMOVER (O).
- Use STAPLE REMOVER, take 3/3 ENGRAVINGS.
- DOCTOR’S PASS, and WIRE (P).
- SYRINGE WITH INK, EMPTY CARTRIDGE, and WIRE on BROKEN PRINTER, take PRINTER.
- Place PRINTER (Q).
- Play puzzle, earn ENCRYPTED DATA and FINGERPRINT (R).
- Use DOCTOR’S PASS and FINGERPRINT (S).
- Go forward.
- Take CARABINER (A).
- Take PROP HEART (B).
- Place PROP HEART, take SHREDDER LEVER (C).
- Walk down 3x.
- Place SHREDDER LEVER (D), play puzzle, take ENDOSCOPE.
- Use ENDOSCOPE (E).
- Move figure as shown F-G, select red button.
- Take LEATHER BELT and GEAR (H).
- Go forward.
- Use LEATHER BELT and CARABINER, take STENCIL and GLASS WITH HOLES (J).
- Place ENGRAVINGS and GLASS WITH HOLES, select 1-3 (K), take EXTENDABLE CANE and THOMAS’S MEDICAL RECORD.
- THOMAS’S MEDICAL RECORD and STENCIL on ENCRYPTED DATA, take TV PASSCODE.
- Walk down, right.
- Use TV PASSCODE (L).
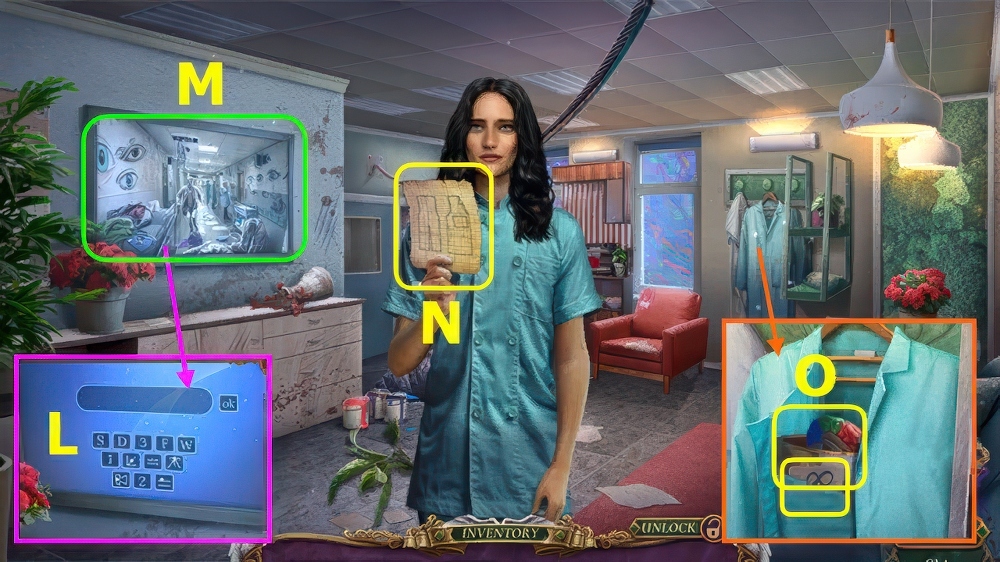
- Play puzzle (M).
- Talk, take COAT CLUE (N).
- Place, select COAT CLUE, take ARCHIVE NUMBER and BROKEN ANATOMICAL SKULL (O).
- Go forward.
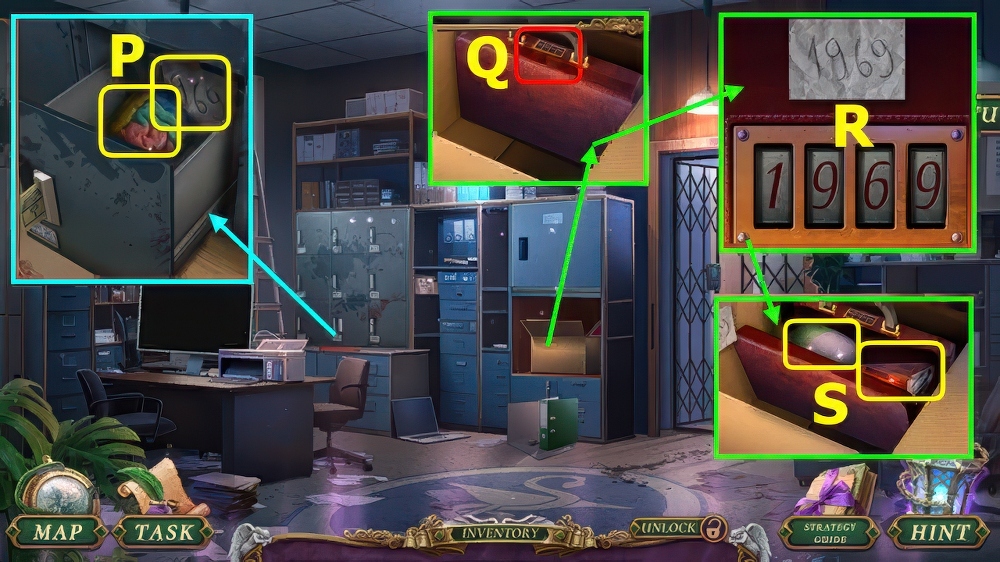
- Use ARCHIVE NUMBER, take MODEL BRAIN HALF and SUITCASE CODE (P).
- Use SUITCASE CODE (Q).
- Enter 1-9-6-9 (R).
- Take CALVARIA and METRONOME (S).
- Go forward.
- Use EXTENDABLE CANE and METRONOME, take MODEL EYE and DROPPER (A).
- MODEL BRAIN HALF, MODEL EYE, and CALVARIA on BROKEN ANATOMICAL SKULL, take ANATOMICAL SKULL.
- Place ANATOMICAL SKULL, take ADHESIVE TAPE and MICROSCOPE LENS (B).
- Use ADHESIVE TAPE (C).
- Solution (D).
- Take INK DEVELOPER and PORTABLE PROJECTOR (E).
- Use INK DEVELOPER and DROPPER, select Fx4-Gx2, take TREATMENT PLAN and TEST RESULTS.
- Take BOTTLE (H).
- Place MICROSCOPE LENS and TEST RESULTS, take SANITIZER and ALKALI (I).
- Walk down.
- Use ALKALI, solution (J).
- Take CHAIN and PERFUME PUMP (K).
- PERFUME PUMP and SANITIZER on BOTTLE, take SANITIZER.
- Use SANITIZER, take METAL BAR and SLIDES (L).
- Go left.
- Use CHAIN, METAL BAR, and GEAR, take PROJECTOR LENS and NURSE’S GLASSES (A).
- SLIDES and PROJECTOR LENS on PORTABLE PROJECTOR, take PROJECTOR.
- Use PROJECTOR (B).
- Select K-P-T-M-O-R-Sx2-L-N-Q-S-C-G-S-D-S-H-J-S-E-F-Sx2-I.
- Take MEDICAL HOOK (A).
- Use MEDICAL HOOK, take RUBBER GLOVES and SEALANT (B).
- Use SEALANT, take STAIRS CLUE, COAL, and FLASH DRIVE (C).
- Use COAL and STAIRS CLUE, select 1-4 (D).
- Go right.
- Take HACKSAW (E).
- Walk down.
- Use HACKSAW, take INSTRUCTIONS (F).
- Go right.
- Use INSTRUCTIONS and RUBBER GLOVES (G).
- Solution (H).
- Take HEART LOCKET and PRINTING PAPER (I).
- Read note, take PIPE (J).
- Place FLASH DRIVE and PRINTING PAPER, take CAMERA PHOTO (K).
- Walk down.
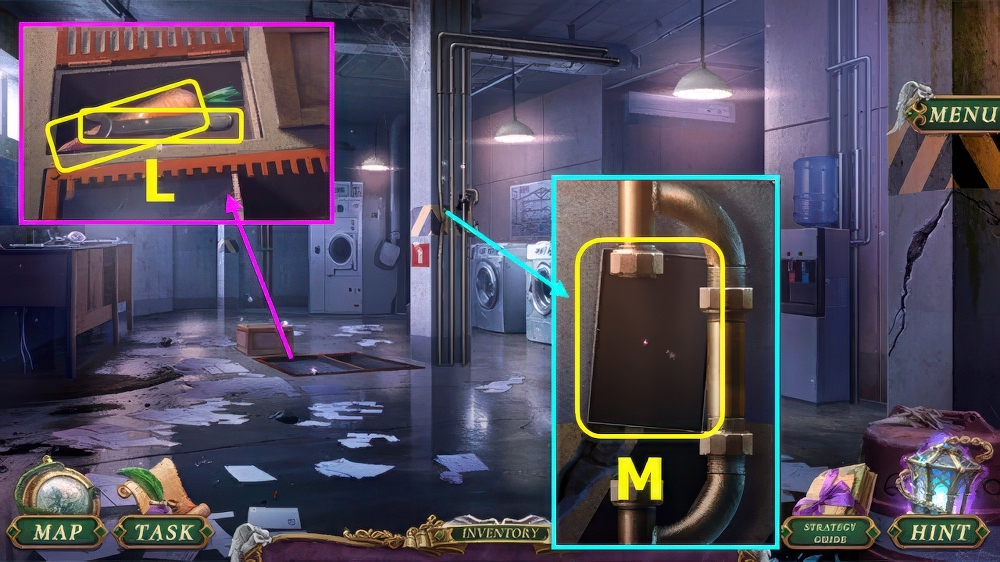
- Use CAMERA PHOTO, take WRENCH and CARROT (L).
- Use PIPE and WRENCH, take MONITOR (M).
- Go right.
- Place MONITOR (N), play puzzle, take ACCESS KEY (O).
- Use ACCESS KEY (P).
- Go left.
- Take GLASS CUTTER (Q).
- Open door, take BLOOD-TYPE BRACELET (A).
- Use HEART LOCKET and BLOOD-TYPE BRACELET, take STAFF PHOTO and FLASK (B).
- Use STAFF PHOTO (C).
- Play puzzle, earn THOMAS’S HANDKERCHIEF (D).
- Give CARROT and THOMAS’S HANDKERCHIEF, take LED, FAUCET, and GLUE (E).
- Walk down.
- Use FAUCET and FLASK, take HOT WATER (F).
- Use HOT WATER, take 1/3 BOARDS, MARKER, and DOCTOR’S SUITCASE (G).
- Go left.
- Use MARKER and GLASS CUTTER (H).
- Select Ix5-Jx8, you earn LENSES.
- Take RICHARD’S RING (K).
- LENSES and GLUE on NURSE’S GLASSES, select broken lens, take REPAIRED GLASSES.
- Use REPAIRED GLASSES, select for puzzle (L).
- Talk, you earn 1/2 THOMAS’S SYMBOLS.
- Take HAIR TIE (M).
- Use HAIR TIE, take DIRECTOR’S DIARY, MAGNET, and SYMBOL (N).
- Take 2/3 BOARDS, replace LED, add MAGNET and TREATMENT PLAN, earn PUTTY and RICHARD’S CLOAK (O).
- RICHARD’S RING, RICHARD’S CLOAK, and SYMBOL on DOCTOR’S SUITCASE, take RICHARD’S BELONGINGS.
- Walk down 2x.
- Use RICHARD’S BELONGINGS (P).
- Solution (Q).
- Take 2/2 THOMAS’S SYMBOLS and CRUTCH (R).
- Go left, forward.
- Use CRUTCH and PUTTY, earn BROKEN LADDER and SAFE DIAL (A).
- Use SAFE DIAL and DIRECTOR’S DIARY (B).
- Solution Dx3-Cx3-Dx4-C-D-C, take FAMILY CHAIN and THOMAS’S KEY.
- THOMAS’S SYMBOLS and THOMAS’S KEY on CARVED BOX, read clipping, take PINK RIBBON.
- Take ENGINE OIL (E).
- Take GARDEN SHOVEL (F).
- Use GARDEN SHOVEL, take GARDEN FENCE and TOY ROPE, read note (G).

- Use ENGINE OIL and TOY ROPE (H), play puzzle, earn DOG FOOD.
- Place DOG FOOD, take 3/3 BOARDS and CARVING KIT (I).
- BOARDS and FAMILY CHAIN on BROKEN LADDER, take GARDEN LADDER.
- Place GARDEN LADDER (J).
- Go forward.
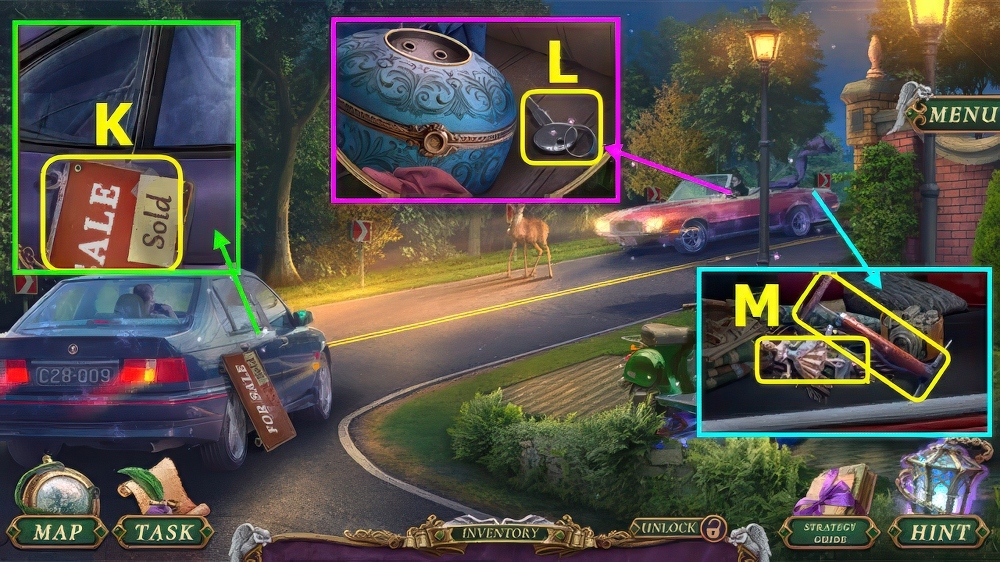
- Take SALE SIGN (K).
- Take TRUNK KEY (L).
- Use TRUNK KEY, take PUMP and LOUISA’S TOY (M).
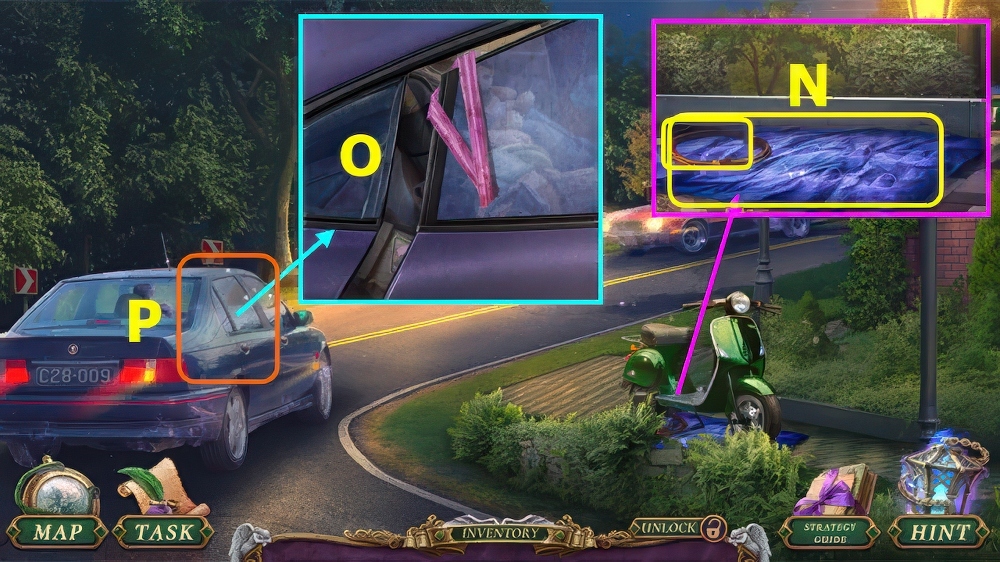
- Use PUMP, take DEFLATED BOAT and COIL OF WIRE (N).
- Use COIL OF WIRE and PINK RIBBON (O).
- Play puzzle, earn THOMAS’S MITTEN (P).
- Walk down.
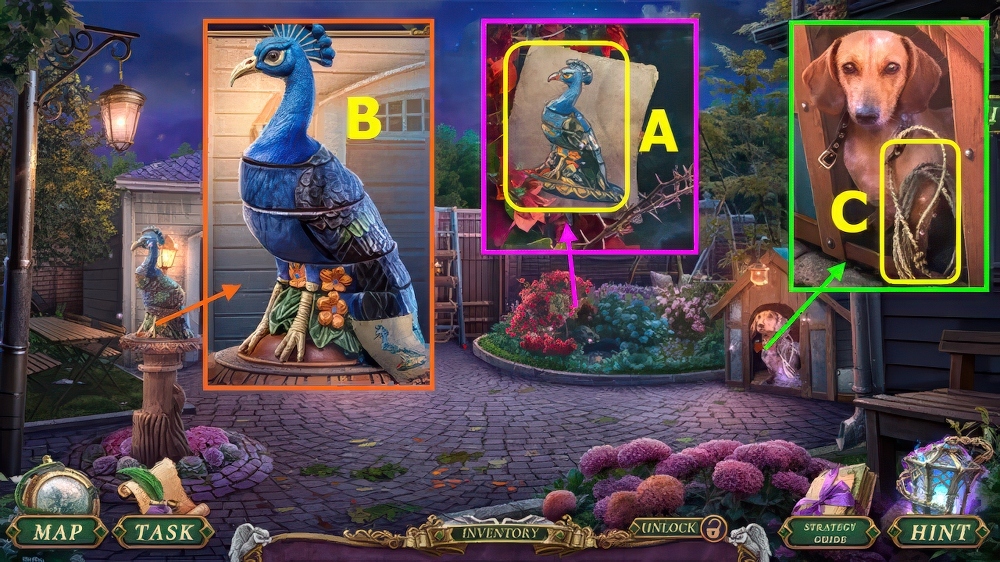
- Use THOMAS’S MITTEN, take CHILD’S DRAWING (A).
- Use CHILD’S DRAWING and CARVING KIT, solution (B), take BONE AMULET.
- Place BONE AMULET, take LASSO (C).
- Go forward.
- Use LASSO (D), earn LOST NECKLACE.
- Use LOUISA’S TOY and LOST NECKLACE, take GLOWING POWDER (E).
- PUMP, SALE SIGN, DEFLATED BOAT and GLOWING POWDER on GARDEN FENCE, take PROTECTIVE BARRIER.
- Place PROTECTIVE BARRIER (F).

- Move squares 1-6 (G).
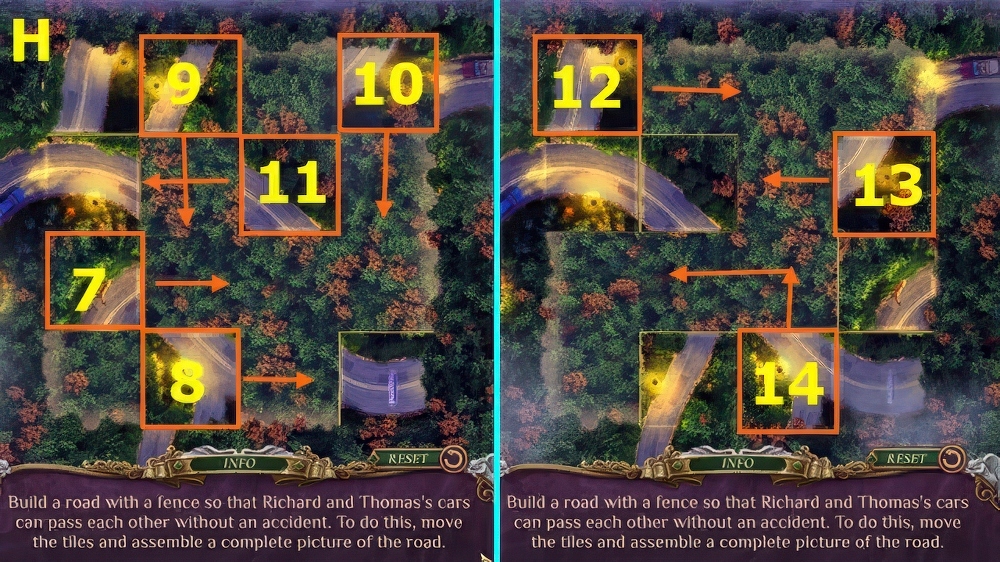
- Move squares 7-14 (H).
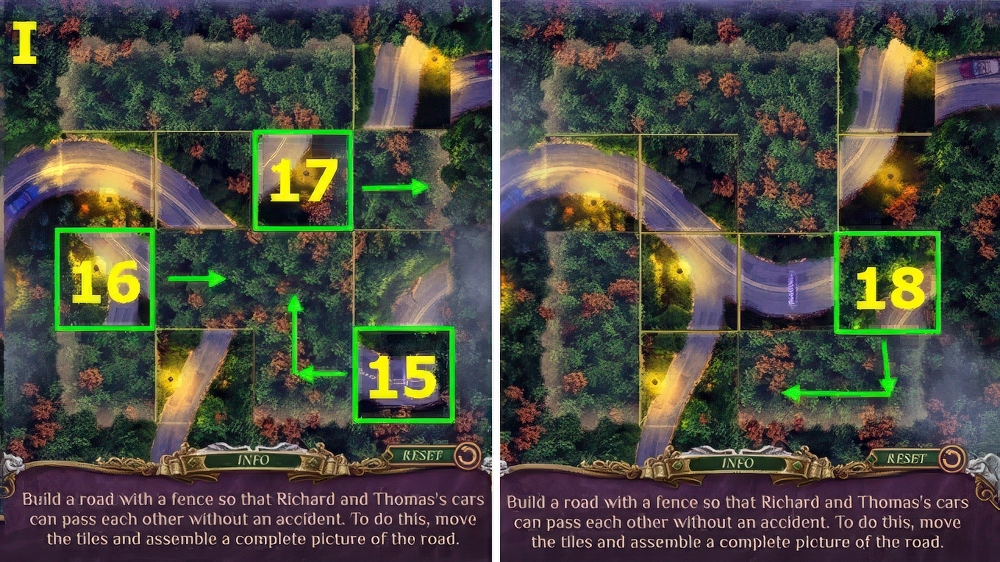
- Move squares 15-18 (I).
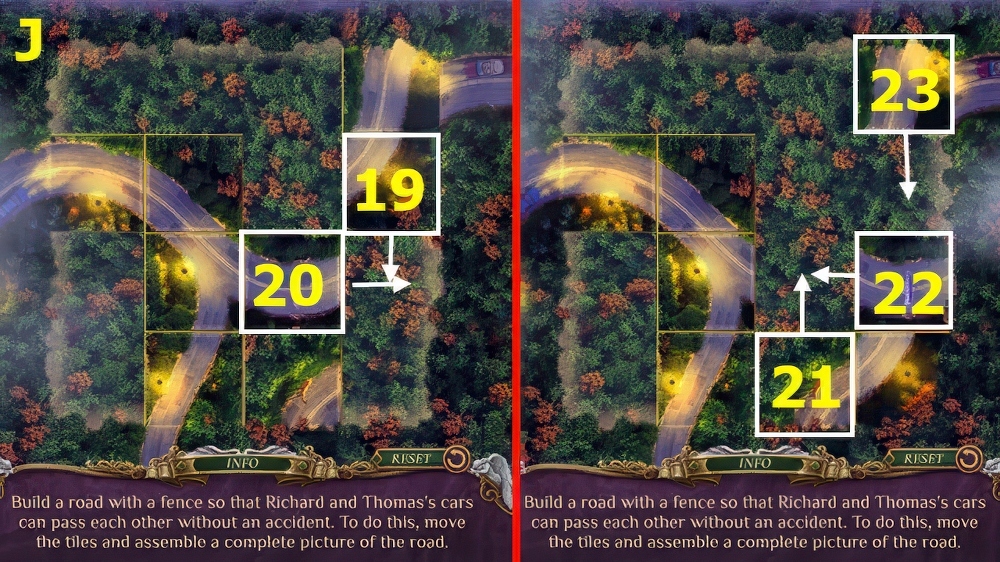
- Move squares 19-23 (J).
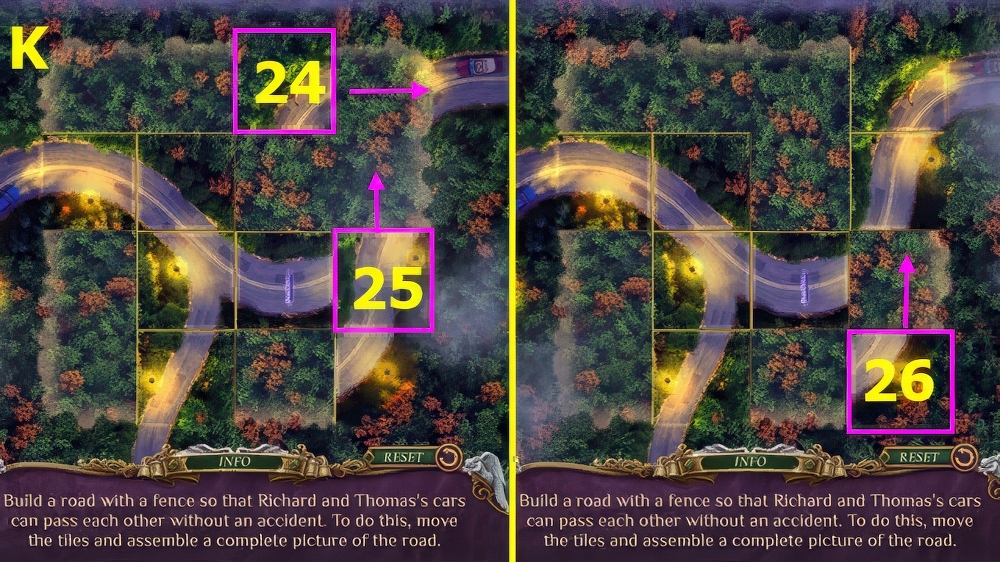
- Move squares 24-26 (K).
- Walkthrough Bonus Chapter, at the link below.


