
Halloween Stories 5: The Neglected Dead – Immerse yourself in an exciting adventure where the line between reality and myth becomes blurred. This time you’ll take part in the investigation of a series of strange disappearances linked to the legend of Dullahan, the mysterious messenger of death. You’ll join a group of myth-busters traveling to the deserted town of Bridgestone. It was once a bustling place, but now it has become a magnet for daredevils who want to uncover the dark secrets of Samhain. With the backdrop of events, you’ll not only have to unravel what’s behind the legend of Dullahan, but also find out who or what’s really behind the disappearances. If you can not pass any of the puzzles or do not know where the items are, on our site you can watch the walkthrough of Halloween Stories 5: The Neglected Dead, and find out the truth about what is happening.
Halloween Stories 5: The Neglected Dead – Walkthrough
Here you can see the full walkthrough of Halloween Stories 5: The Neglected Dead game, namely for all chapters, including bonus chapter, in pictures.
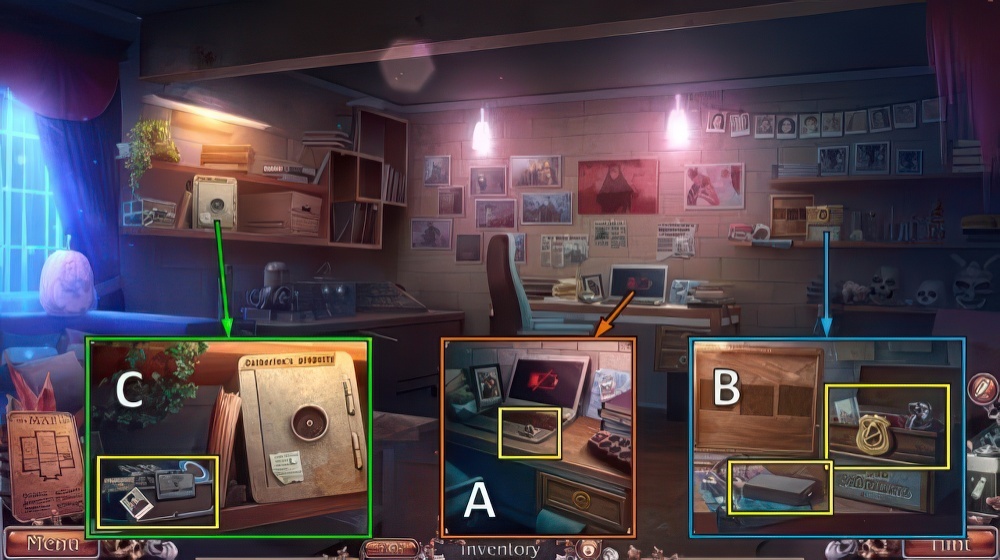
- Take DEBUNKER BADGE (A).
- Place DEBUNKER BADGE, take PERSON AMULET, ACCESS CARD and ADAPTER (B).
- Use ACCESS CARD, take PHOTOS 1/3, SPIRIT AMULET and TAPE (C).
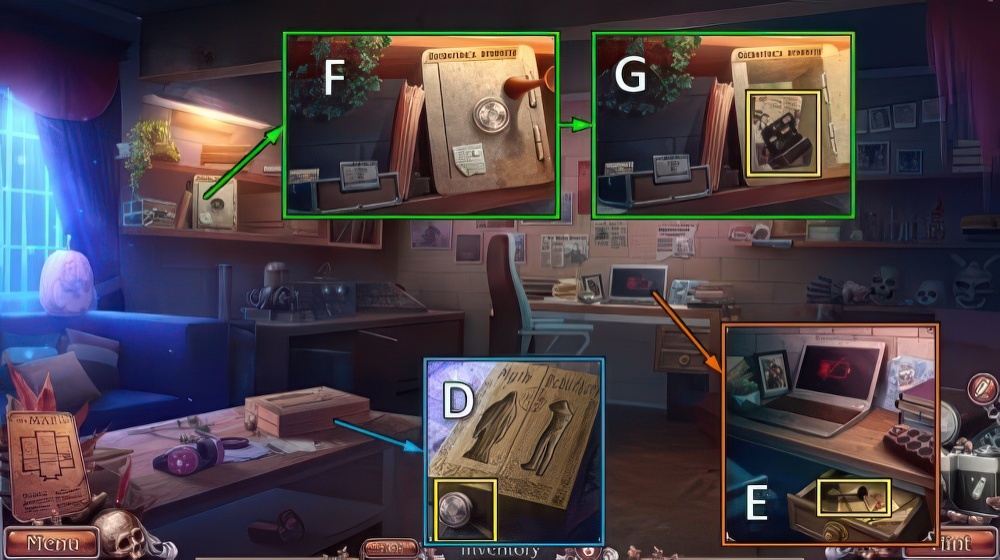
- Take DIAL, place PERSON AMULET and SPIRIT AMULET for a mini-puzzle (D).
- Receive IRON KNOB.
- Place IRON KNOB, take PHOTOS 2/3 and EAR TRUMPET (E).
- Place DIAL and EAR TRUMPET (F).
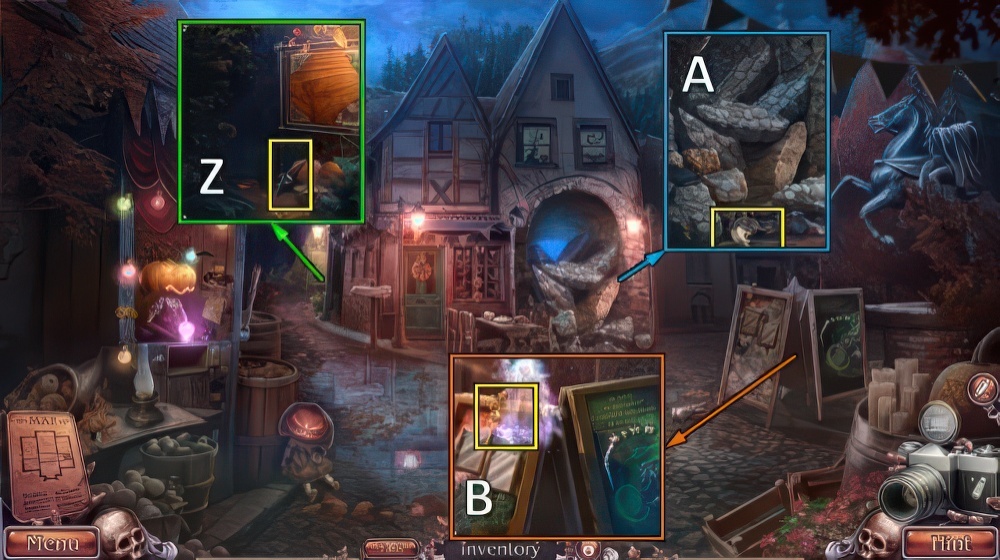
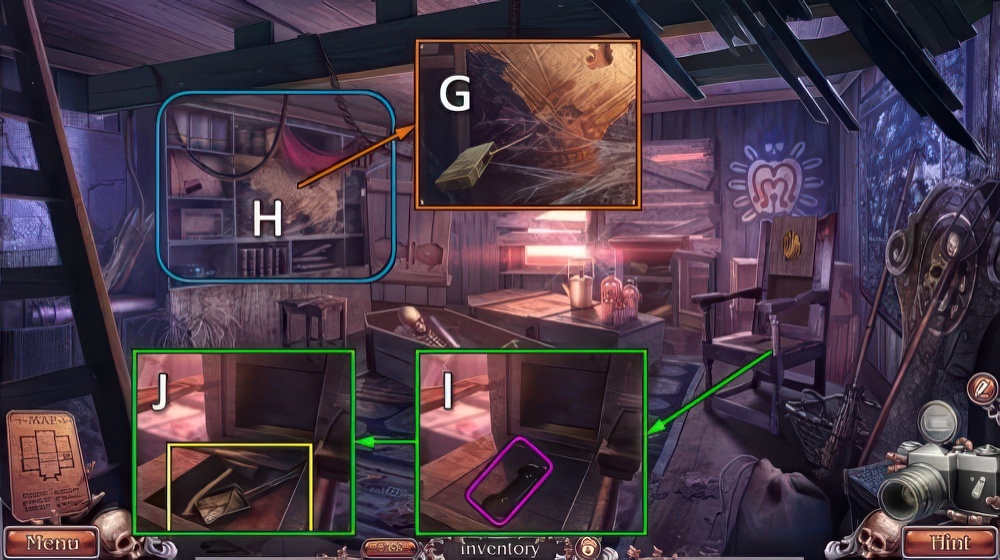
- Take CAMERA and PHOTOS 3/3 (G).

- Place PHOTOS, take POWER CORD and POWER BUTTON (H).
- TAPE and POWER CORD on ADAPTER, take CHARGER.
- Place POWER BUTTON and CHARGER (I).
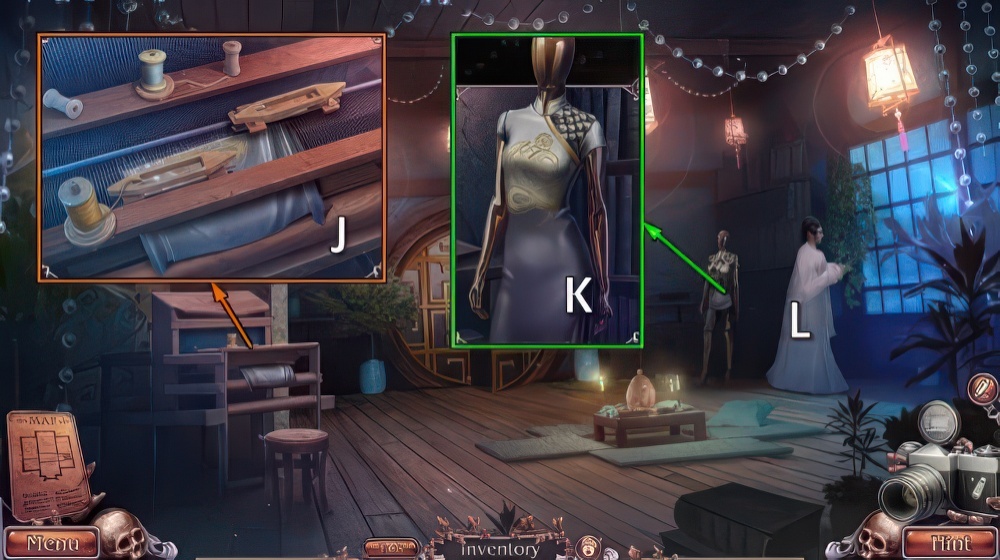
- Take ADDRESS (J).
- Offer ADDRESS, play puzzle (K).
- Receive HORSEMAN AMULET.

- Use CAMERA (L), receive BROKEN CAMERA.
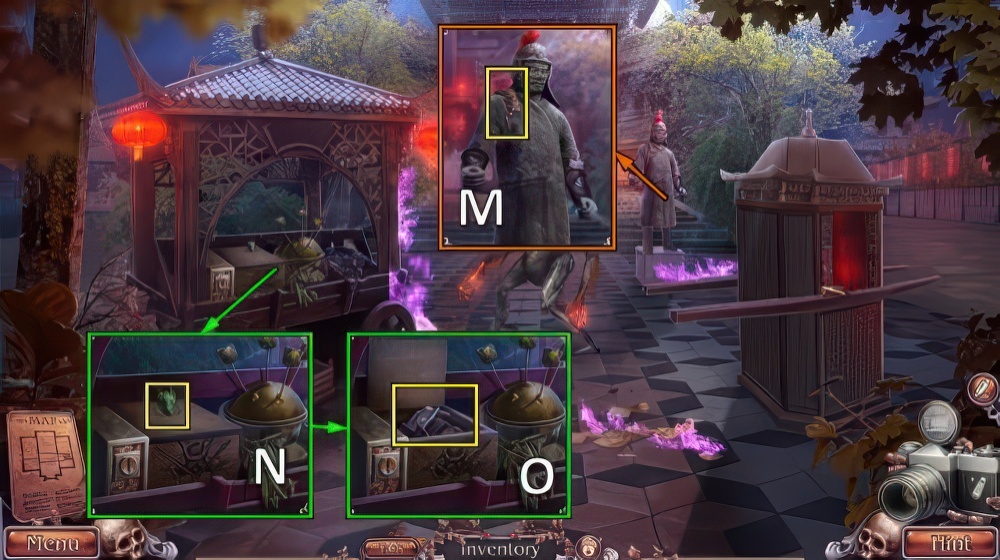
- Take COINS 1/6 and REBAR (M).
- Use REBAR (N).
- Take BROKEN STATUETTE, MATCHES and COINS 2/6 (O).
- Take STATUETTE PARTS 1/3, use MATCHES for mini-puzzle (P).
- Receive OIL.

- Use OIL, take PLAQUE (Q).
- Place PLAQUE, take STATUETTE PARTS 2/3 and CART AMULET (R).
- Place HORSEMAN AMULET and CART AMULET (S).
- Take COINS 3/6 and GLASS SHARD (T).
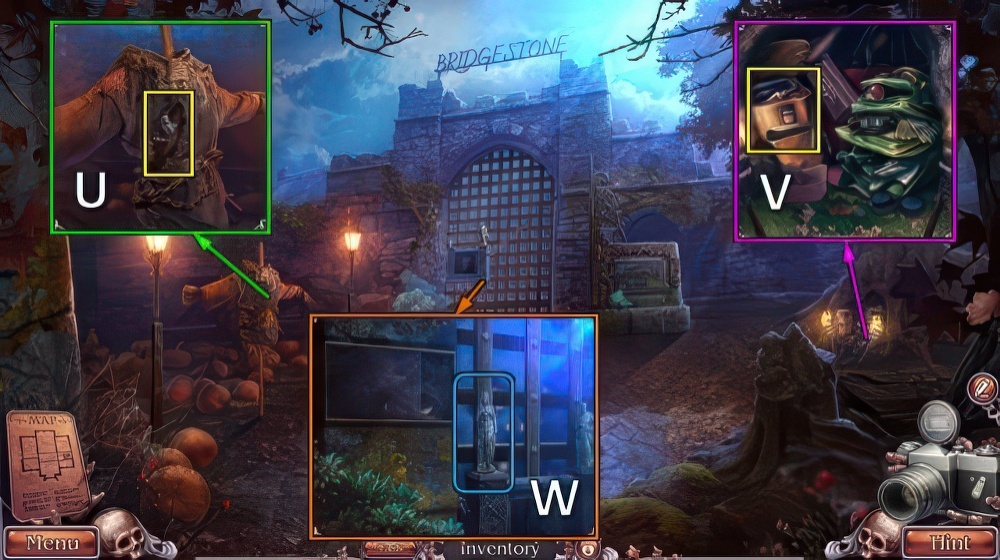
- Use GLASS SHARD, take STATUETTE PARTS 3/3 and LOCKPICK (U).
- Use LOCKPICK, take GLUE and COINS 4/6 (V).
- STATUETTE PARTS and GLUE on BROKEN STATUETTE, take STATUETTE.
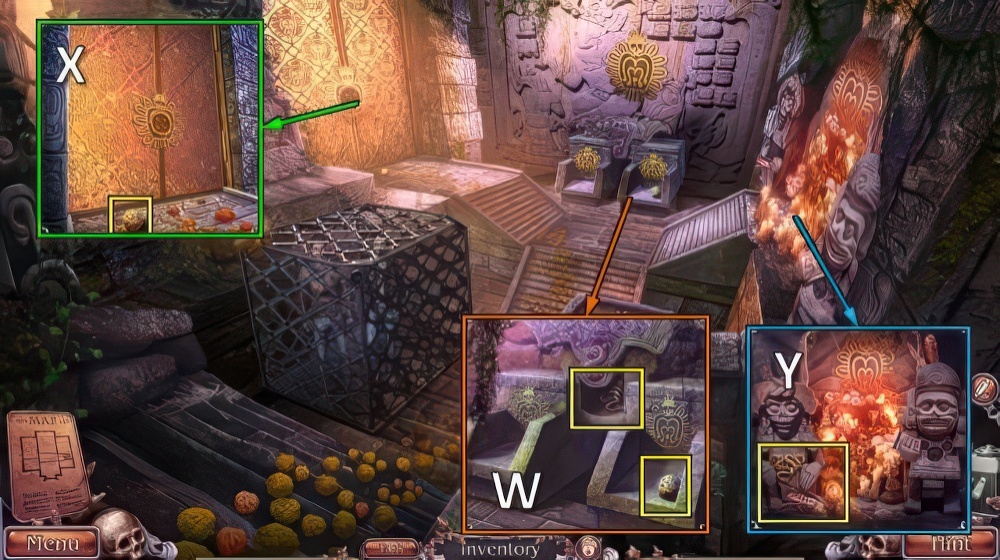
- Place STATUETTE (W).
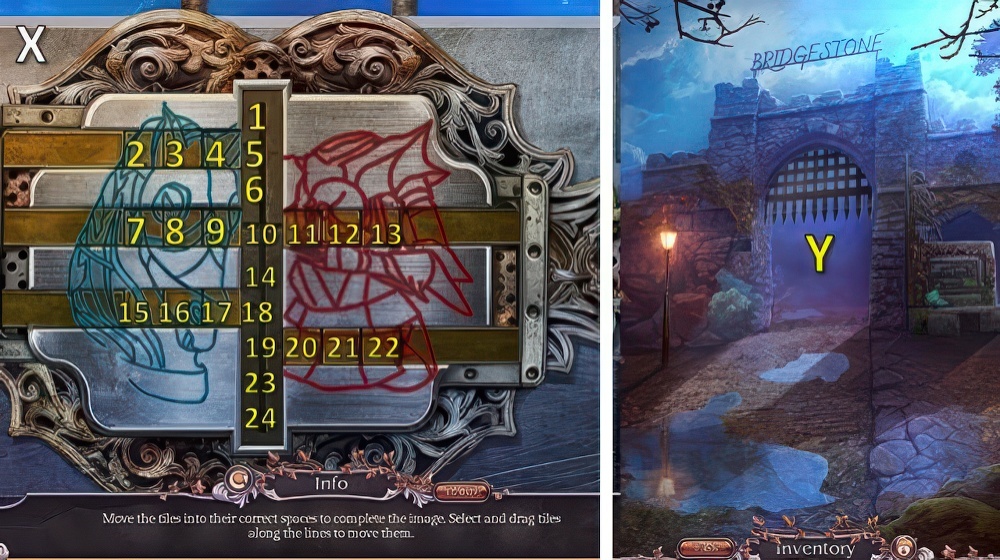
- Hard solution (X): (4-24)-(3-23)-(20-1)-(21-3)-(22-4)-(9-22)-(23-21)-(8-23)-(7-20)-(11-7)-(1-8).
- (17-1)-(16-11)-(15-9)-(23-15)-(24-16)-(4-24)-(3-23)-(2-17)-(11-19)-(12-18)-(13-2)-(18-6).
- (19-13)-(23-12)-(6-11)-(24-3)-(1-4).
- Casual solution (X): (4-1)-(17-4)-(16-24)-(1-16)-(24-17)-(9-24)-(20-9)-(11-1)-(12-5)-(21-12)-(5-11)-(24-21)-(1-20).
- Go (Y).
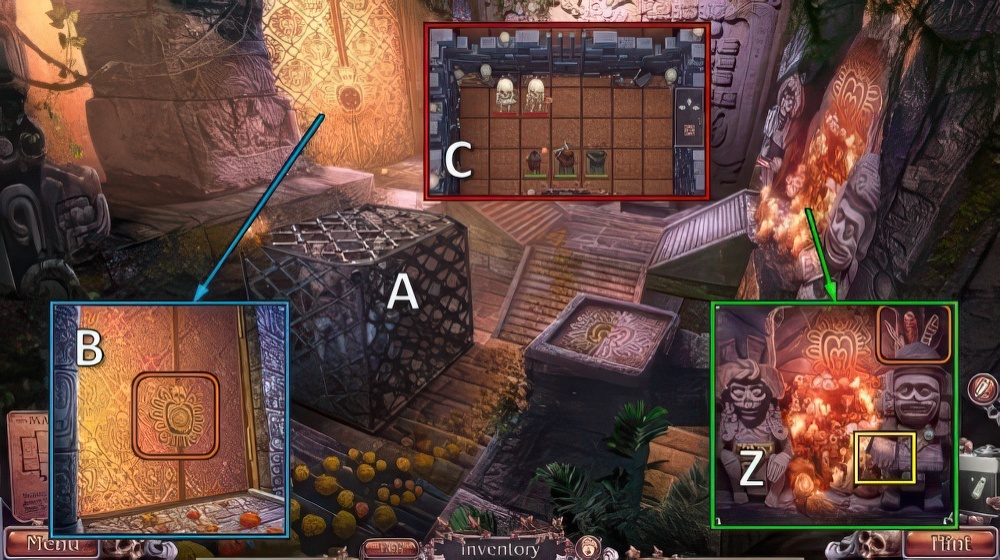
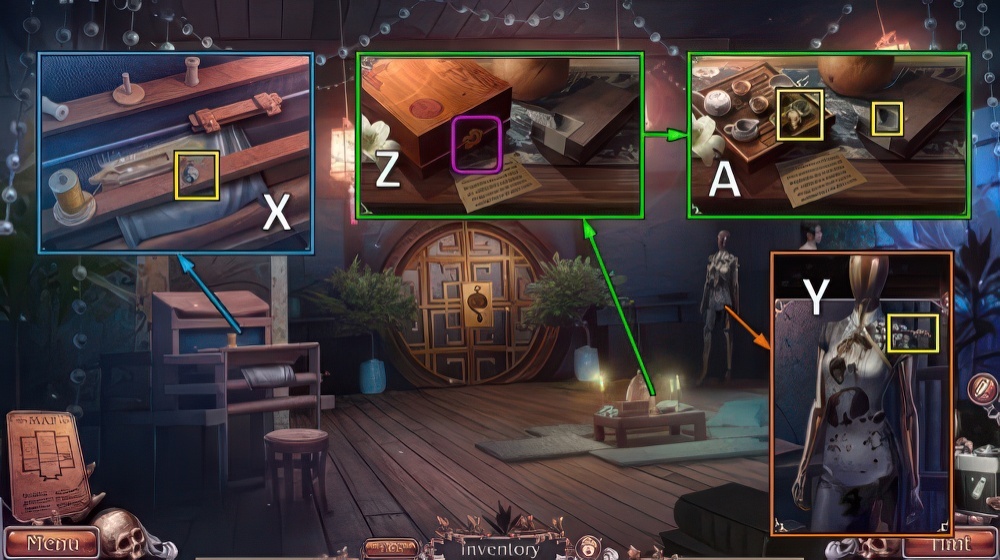
- Take PICKAXE HEAD (Z).
- Take VERTEBRAE 1/5 (A).
- Take HEART KEY (B).

- Take DULLAHAN PICTURE, use HEART KEY (C).
- Enter H-A-N-I-A-M-S (D).
- Take PUMPKIN and LENS (E).
- Walk down.

- Place PUMPKIN, take COINS 5/6 and RAVEN AMULET (F).
- Place RAVEN AMULET (G), take VERTEBRAE 2/5 and FAIRY PICTURE (H).
- Go (I).

- Place DULLAHAN PICTURE and FAIRY PICTURE, take COINS 6/6 and CAMERA CARTRIDGE (J).
- Use COINS, receive HANDLE.
- Take VERTEBRAE 3/5 (K).
- HANDLE on PICKAXE HEAD, receive PICKAXE.
- Use PICKAXE (L).
- Go (M).

- Receive STAIRSTEPS 1/4.
- Take JUG (N).
- Take VERTEBRAE 4/5 (O), take WINE with JUG (P).
- Offer WINE (Q), receive FOREST MAP.
- Walk down.

- Place FOREST MAP (R).
- Go (S).
- Play puzzle.
- Receive PHOTO ALBUM.
- Take NET (T).
- Take VERTEBRAE 5/5 and FISH TOTEM with NET, take DRUM (U).
- Walk down.

- Place VERTEBRAE, take SHUTTER BUTTON and HORN (V).
- Go (W).

- Place DRUM and HORN, take TUNING FORK (X).
- Use TUNING FORK, take EXTINGUISHER (Y).
- Use EXTINGUISHER, take LADDER and STAIRSTEPS 2/4 (Z).
- Go to Forest.

- Place LADDER (A).
- Hard solution (B): Cx2-G-Cx2-Gx2-Cx3-Ex4-Gx2-C-D-G-Cx3-E-Gx2-C-Hx2-F-H-Fx2-H-Fx5-Hx2.
- F-Hx2-Dx5-Ex4-Hx2-Dx5-Hx2-Dx4-Hx2-Dx5-H-D-Ex5-H-Ex3-G-Ex5-Gx2-Ex4-G-Ex3-Gx2-Ex3.
- G-Ex4-Gx2-E-G-E.
- Casual solution (B): G-Ex3-G-E-G-E-Hx2-D-Gx2-Dx3-H-D-Hx2-Dx4-Gx2.
- Take FLASH (I).

- LENS, SHUTTER BUTTON, FLASH and CAMERA CARTRIDGE on BROKEN CAMERA, take CAMERA.
- Take SPIRIT PICTURES 1/6 with CAMERA (J).
- Walk down.
- Take SPIRIT PICTURES 2/6 with CAMERA (K).
- Go (L).

- Take SPIRIT PICTURES 3/6 with CAMERA (M).
- Take SPIRIT PICTURES 4/6 with CAMERA (N).
- Take SPIRIT PICTURES 5/6 with CAMERA (O).
- Take SPIRIT PICTURES 6/6 with CAMERA (P).
- Go to Forest.

- SPIRIT PICTURES on PHOTO ALBUM, take SPIRIT ALBUM.
- Offer SPIRIT ALBUM (Q), receive STAIRSTEPS 3/4 and DAY AMULET.
- Go (R).
- Take NIGHT AMULET (S).
- Place DAY AMULET and NIGHT AMULET (T).
- Play puzzle, receive BEAR TOTEM (U).
- Walk down.

- Place FISH TOTEM and BEAR TOTEM, take FIGUREHEAD and CLOTH (V).
- Place FIGUREHEAD, take BLADE and DAGGER (W).
- Go to Fairground.

- Place BLADE (X).
- Solution (Y): 1-1-2-3.
- Take RED PAINT and MUSIC NOTE (Z).
- Place MUSIC NOTE, take STAIRSTEPS 4/4 (A).
- Go to Coast.

- Place STAIRSTEPS, take GOLD (B).
- Place GOLD, CLOTH, RED PAINT and DAGGER (C).
- Use CAMERA (D).
- Solution (E).

- Select Catherine (F).
- Take LOCKED DIARY (G).
- Take TWEEZERS (H).
- Take MARIGOLDS 1/5, move blanket (I).

- Use TWEEZERS, take BULBS, SKULL HALF and SOMBRERO (J).
- CACTUS KEY from LOCKED DIARY.
- Take MARIGOLDS 2/5, use CACTUS KEY (K).
- Take DEAD FLASHLIGHT and SCREWDRIVER (L).

- Use SCREWDRIVER, take MUSTACHE and BATTERY (M).
- BATTERY and BULBS on DEAD FLASHLIGHT, take FLASHLIGHT.
- Place FLASHLIGHT for mini-puzzle (N), receive MARACAS.
- Place SOMBRERO, MUSTACHE and MARACAS (O), take JACK (P).

- Place JACK, take SKELETON FIGURINE (Q).
- Place SKELETON FIGURINE, take MARIGOLDS 3/5 and SKULL HALF (R).
- Place SKULL HALF x2, take MONOGRAM (S).

- MONOGRAM on LOCKED DIARY, play puzzle.
- Receive SYMBOL.
- Take MAGNIFIER RING (T).
- Take CAN OPENER (U).
- Use CAN OPENER, take PICTURE PARTS 1/4, STAPLE REMOVER and SECURITY PASS (V).

- Use STAPLE REMOVER (W).
- Select 1-2-3-4-5-6-7-8 (X).
- Take MARIGOLDS 4/5 and PASSWORD (W).
- Use SECURITY PASS and PASSWORD, enter 1-9-4-7 (Y).
- Go (Z).

- Take GOLD KNOB (A).
- Place GOLD KNOB (B).
- Place SYMBOL, take PICTURE PARTS 2/4 and MAGNETIC BOOKMARK (C).
- Take BROKEN PICKER (D).

- Use MAGNETIC BOOKMARK, take RIVETS, STILETTO and LENS (E).
- Use STILETTO, take POINTER and PICTURE PARTS 3/4 (F).
- Walk down.
- Take PICTURE PARTS 4/4 with POINTER (G).
- Go forward.

- LENS and RIVETS on MAGNIFIER RING, take MAGNIFIER.
- Place MAGNIFIER and PICTURE PARTS (H).
- Play puzzle (I), receive MATHEO’S WANTED POSTER.
- Take DIEGO’S BACKPACK (J).
- Go (K).

- STAR KEY and MARIGOLDS 5/5 from DIEGO’S BACKPACK.
- Use STAR KEY, take BRUSH and BOLT CUTTER (L).
- Walk down.
- Use BOLT CUTTER (M), take PRUNER and STICK (N).
- Use PRUNER, go (O).

- Take MATCHBOX (P).
- Take HEART (Q).
- Place HEART, take TILES 1/4, PLIERS and MICTLANCIHUATL (R).
- Walk down.

- PLIERS on DIEGO’S BACKPACK, take SPRAY PAINT.
- Place MARIGOLDS and use SPRAY PAINT, take RUST REMOVER and EGG (S).
- Use RUST REMOVER and BRUSH (T).
- Move runner to- and select the following positions (U): 3-2-1-3-4-2-1-6-1-2-1-2-4-3-6-5-4-1-2-4-2-3-1-3-2-1-2-1-3-1-3.
- Take TILES 2/4 and MICTLANTECUHTLI (V).
- Go (W).

- Place MICTLANTECUHTLI and MICTLANCIHUATL, take SKEPTICS’ MARK (X).
- Place SKEPTICS’ MARK (Y).
- Go (Z).

- Offer MATHEO’S WANTED POSTER (A), receive PROTEST AMULET.
- Take TILES 3/4, place PROTEST AMULET (B).
- Take PLATE HALF and HAMMER (C).

- Take WOOD BLOCK, use HAMMER for mini-puzzle (D).
- Receive OLD KEY.
- Take FLOUR (E).
- Use OLD KEY, take PLATE HALF and BLACK GRAVESTONE (F).
- PLATE HALF x2 on DIEGO’S BACKPACK, take MATCH.
- Use MATCHBOX and MATCH (G).
- Play puzzle (H), receive WOODEN BONE.
- Place WOODEN BONE (I), take SHOVEL and SLEDGEHAMMER (J).
- Walk down.

- Use SHOVEL, take CHISEL and RED GRAVESTONE (K).
- Go (L).
- Place BLACK GRAVESTONE and RED GRAVESTONE, take PATTERN (M).
- Walk down.

- PATTERN, CHISEL and SLEDGEHAMMER on WOOD BLOCK, take ANGEL.
- Place ANGEL (N), take DEATH STAFF and TILES 4/4 (O).
- Place TILES (P).

- Solution (Q).
- Take OVEN KNOB and SACKCLOTH (R).
- STICK and SACKCLOTH on BROKEN PICKER, take FRUIT PICKER.
- Take LIME with FRUIT PICKER (S).
- Walk down.

- Place EGG, FLOUR, LIME and OVEN KNOB, take BREAD OF THE DEAD (T).
- Go (U).
- Replace BREAD OF THE DEAD (V).
- Receive UNADORNED NECKLACE.
- Use DEATH STAFF, take EYES 1/3 and SNAKE SKIRT (W).
- Take EYES 2/3 (X).
- Place SNAKE SKIRT, take OWL FEATHERS and EYES 3/3 (Y).
- EYES on UNADORNED NECKLACE, take NECKLACE.
- Place OWL FEATHERS and NECKLACE, take FREEDOM SPELL (Z).
- Use FREEDOM SPELL (A), receive SUN AMULET.
- Place SUN AMULET (B).
- Defeat all skeletons and find the end of the dungeon (C).

- Take FIRE HAMMER (D).
- Use FIRE HAMMER, take BAG, EMPTY BUCKET and FLAG (E).
- Take WATER with EMPTY BUCKET (F).
- Use WATER (G).

- Take ID CARD (H).
- Use ID CARD (I).
- Solution (J).
- Take STONES 1/5 and TROPHY (K).

- Place TROPHY, take UNLOADED GUN and POLICE BADGE (L).
- FLAG and POLICE BADGE on BAG, take STONES 2/5 and FIRE KEY.
- Use FIRE KEY (M), take POLICE FIGURINE and RUBBER GLOVES (N).
- Place POLICE FIGURINE for mini-puzzle (O), receive AMMO.

- AMMO on UNLOADED GUN, take LOADED GUN.
- Use LOADED GUN (P).
- Receive CASE FOLDER.
- Take CLIP WRENCH (Q).
- Use CLIP WRENCH, take STONES 3/5, UV LAMP and VALVE HANDLE (R).
- Take STONES 4/5 (S), use UV LAMP and RUBBER GLOVES (T).

- Play puzzle (U), receive BRUSH.
- Use BRUSH, take STONES 5/5 and STAMP HALF (V).
- Place STONES (W).
- Select 1-2.
- Go (X).

- Take CHOPSTICKS (Y).
- Place CHOPSTICKS, take GLYPHS 1/4, SMALL KNOB and STAMP HALF (Z).
- STAMP HALF x2 on CASE FOLDER, take REMOTE and GLYPHS 2/4.
- Use REMOTE, take CLIPPERS and FAUCET HANDLE (A).
- Walk down.

- Take KEYS and CHAIN with CLIPPERS (B).
- Go (C).
- Place KEYS (D).
- Solution (E).
- Many strategies possible.
- Take TEST TUBE and GLYPHS 3/4 (F).

- Place TEST TUBE and FAUCET HANDLE, take CHEMICAL BASE (G).
- Place VALVE HANDLE and CHEMICAL BASE, take SOLVENT (H).
- Walk down.

- Use SOLVENT (I), take FLASH DRIVE and WHITE SCALE 1/5 (J).
- Go (K).
- Place SMALL KNOB and FLASH DRIVE (L).
- Print and take SUSPECT PHOTO (M).
- Walk down.
- Offer SUSPECT PHOTO, receive BODY CAMERA (N).

- Take ORNAMENT (O).
- Place ORNAMENT (P).
- Play puzzle (Q), receive IRON TONGS.
- Take METAL BELL (R).

- Take WHIP HANDLE, place METAL BELL and IRON TONGS (S).
- Receive HOT METAL.
- Use HOT METAL (T), receive WEIGHT.
- CHAIN and WEIGHT on WHIP HANDLE, take WHIP.
- Take GLYPHS 4/4 with WHIP (U).

- Place GLYPHS, solution (V).
- Go (W).
- Receive PAINTBRUSH.
- Take WHITE SCALE 2/5 (X).
- Take PIN (Y).
- Use PIN (Z), take WHITE SCALE 3/5, DRAGON HEADS 1/4 and VASE (A).
- Walk down.

- Take WHITE SCALE 4/5 with VASE (B), receive COOL WATER.
- Use COOL WATER, take WHITE SCALE 5/5 and WHITE SNAKE (C).
- Go (D).

- Place WHITE SNAKE (E).
- Play puzzle (F), receive INK.
- Place INK and PAINTBRUSH, take GHOST AMULET and THREAD (G).
- Walk down.

- Place GHOST AMULET, take SHUTTLE (H).
- Go (I).
- Place THREAD and SHUTTLE (J), receive SILK.
- Place WHITE SCALE and SILK, take DRESS (K).
- Offer DRESS (L), receive VENERATION SCROLL.
- Take COINS (M).
- Take DRAGON HEADS 2/4 (N), use COINS.
- Take SWORD and ARMOR (O).

- Take CANDLES, use SWORD (P).
- Take GLAIVE and DRAGON HEADS 3/4 (Q).
- Place ARMOR and GLAIVE (R), receive DRAGON HEADS 4/4.

- Place DRAGON HEADS (S).
- Solution (T): (A-5)-(Y-7)-(Z-7)-(Y-7)-(X-7)-(Y-7)-(X-7)-(Y-6)-(X-7)-(W-6)-(X-4)-(W-5).
- (U-1)-(V-4)-(U-2)-(V-1)-(W-3)-(X-3)-(Z-4)-(A-4)-(Z-2)-(A-4).
- Take TURTLE and INCENSE (B).

- Place TURTLE, take PANDA (C).
- Place PANDA (D).
- Take SACRIFICIAL MEAL (E).
- SACRIFICIAL MEAL, INCENSE and CANDLES on VENERATION SCROLL, take VENERATIVE GIFTS.
- Offer VENERATIVE GIFTS, use BODY CAMERA (F).
- Walkthrough Bonus Chapter, at the link below.


