
Halloween Stories 6: Mark on the Bone – You will take on the role of medium Agatha Blake, who receives a disturbing message from Detective Ethan. In the letter he asks for help, pointing to strange symbols and events taking place in an ancient castle. Agatha decides to go there to solve a series of disappearances related to Halloween. The castle holds many secrets. Why does a mysterious mark appear on Agatha’s hand, similar to those she sees on the remains of the victims? What connects this place with disappearances and what horror is hidden within its walls? You will not only have to unravel a complex case, but also to cope with an ancient evil that wants to subdue the castle and get rid of all who get in his way. Help Ethan cope with the anxiety and find out what exactly led the detectives and adventurers to their grim fate in this place. If you can not pass any of the puzzles or do not know where the items are, on our site you can watch the walkthrough of the game Halloween Stories 6: Mark on the Bone, and confront the ancient evil.
Halloween Stories 6: Mark on the Bone – Walkthrough
Here you can see the full walkthrough of Halloween Stories 6: Mark on the Bone, namely for all chapters, including bonus chapter, in pictures.
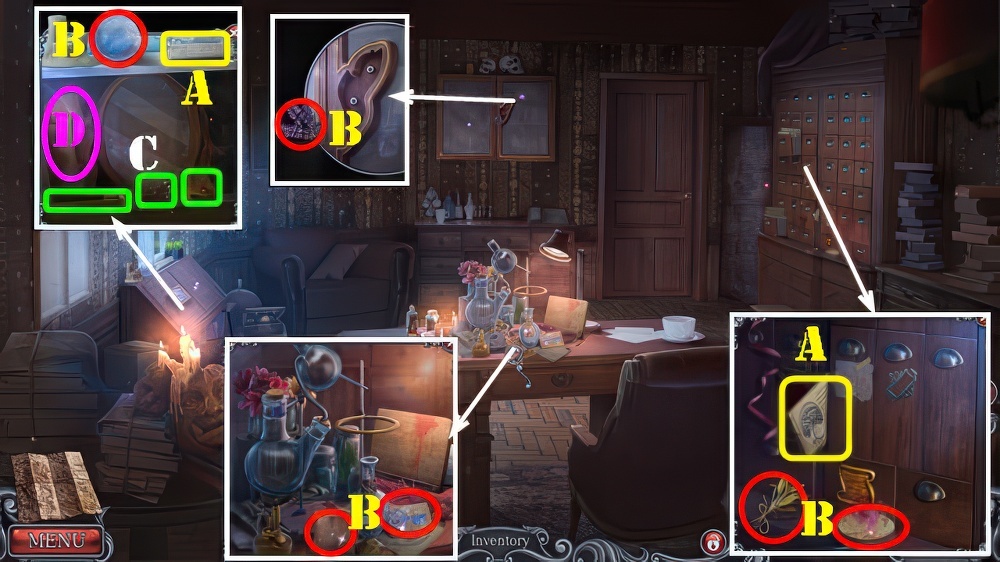
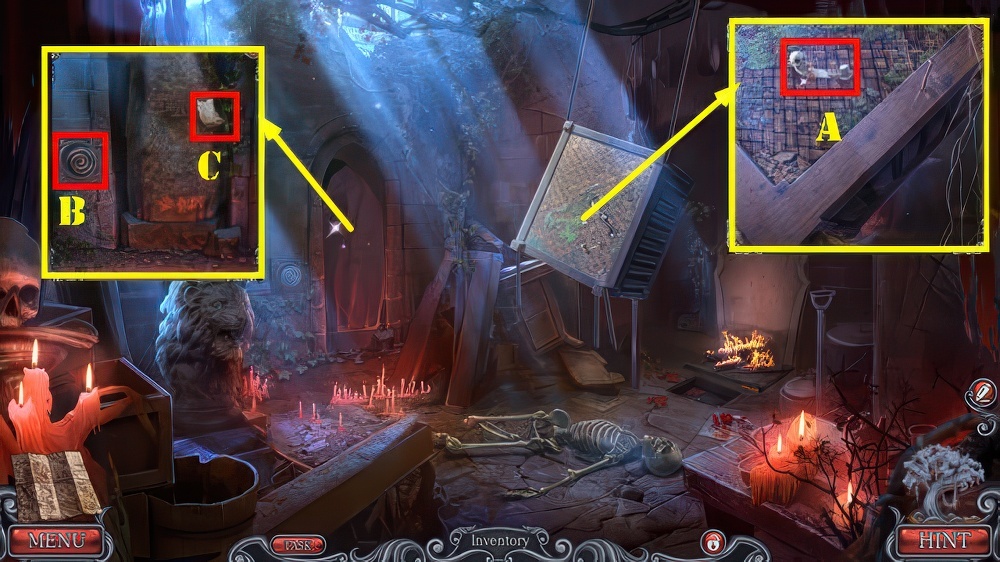
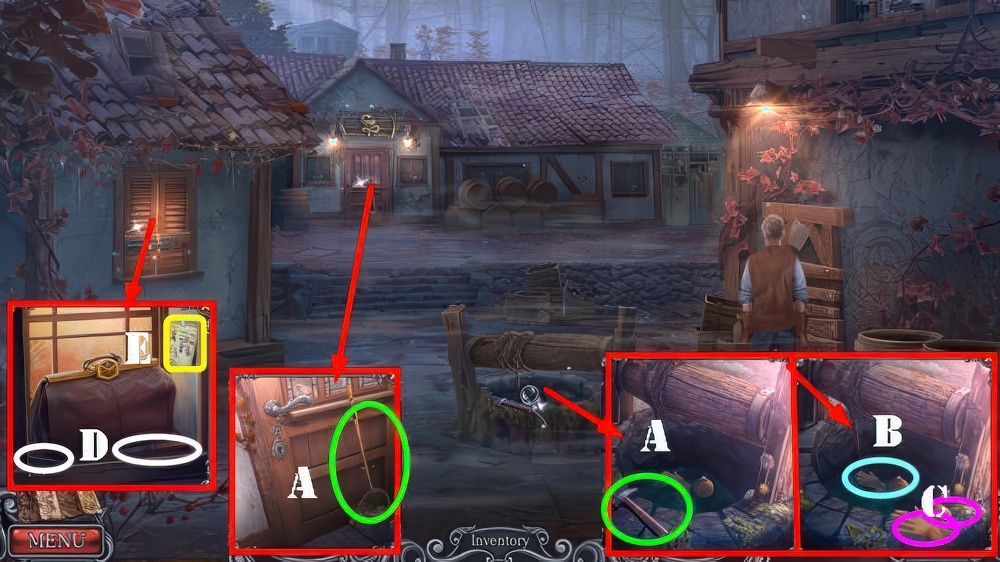
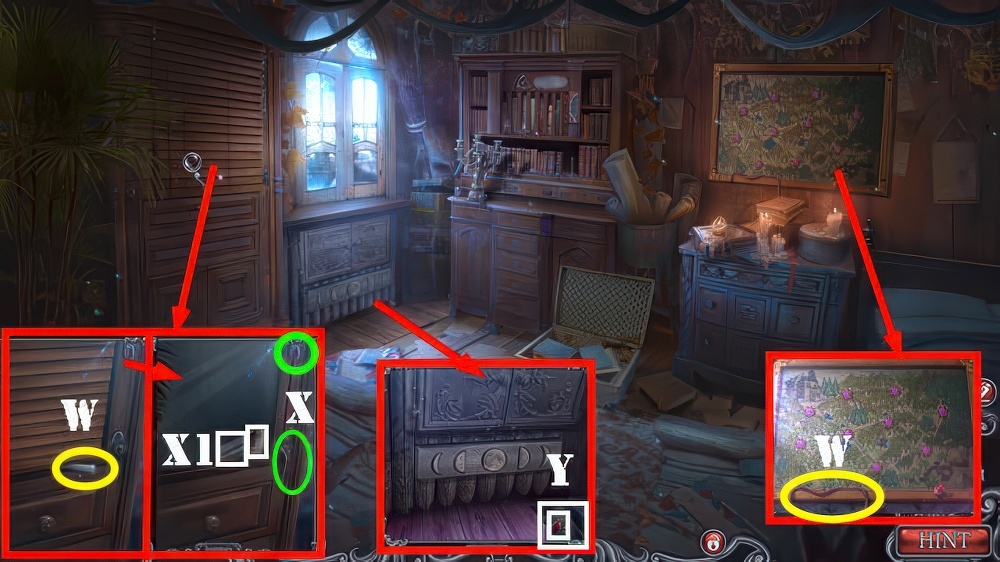
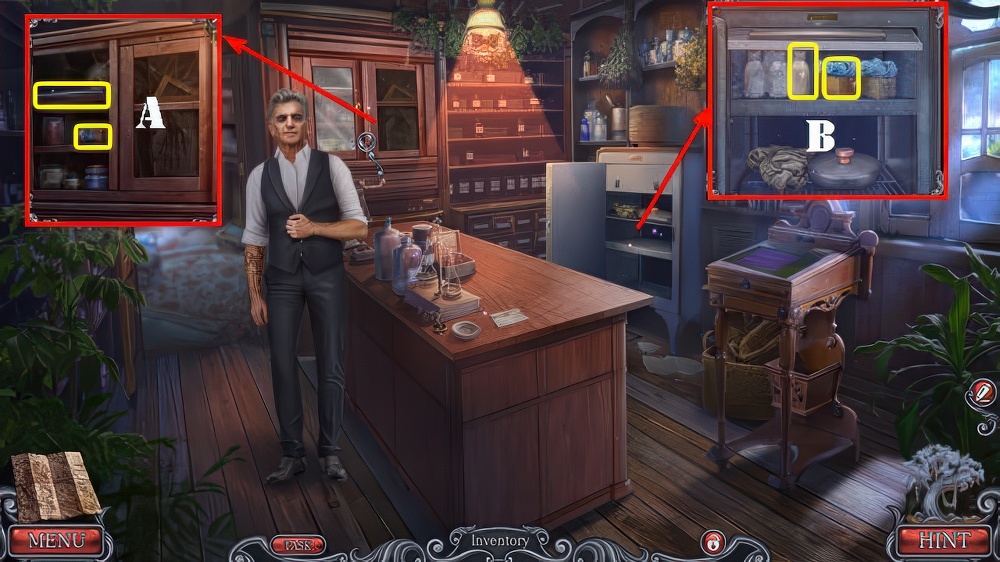
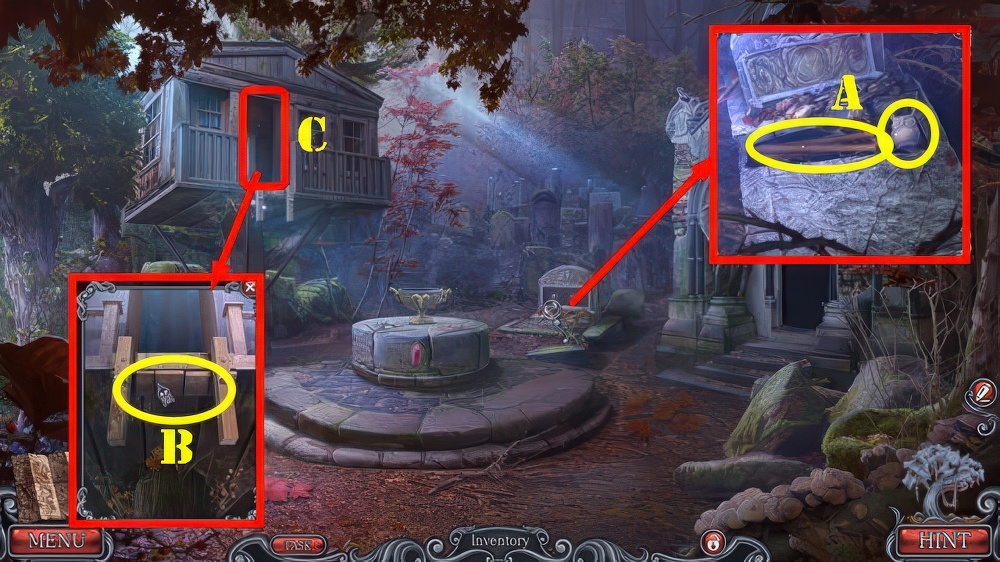
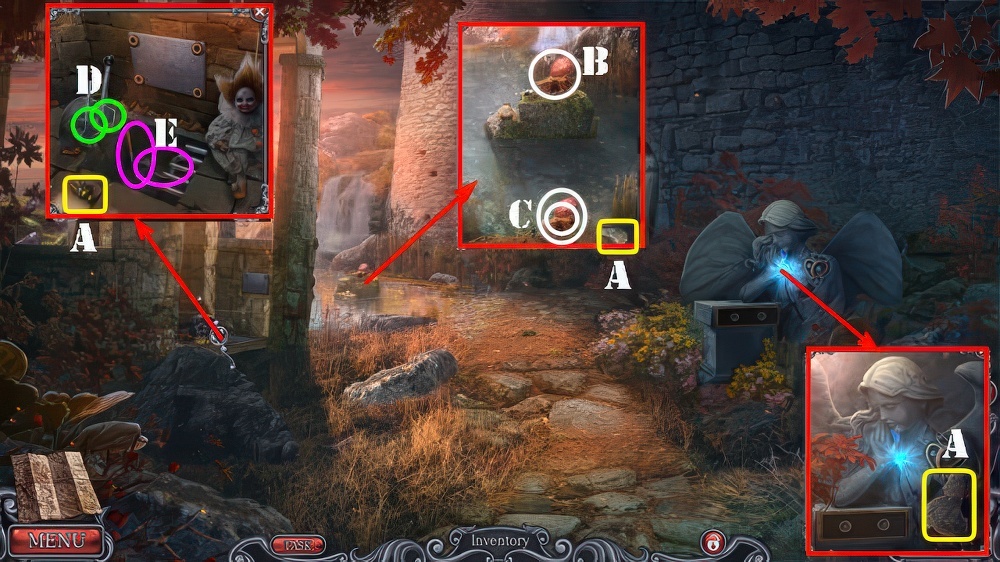
- Look at two Notes (A).
- Take CRYSTAL BALL, LAVENDER, KEY CARD, SPIRIT TREAT, SEDATIVE SACHET, and HEATHER (B).
- Use KEY CARD, take SPRAYER PART, CHAMOMILE, and SCROLL OF KNOWLEDGE (C).
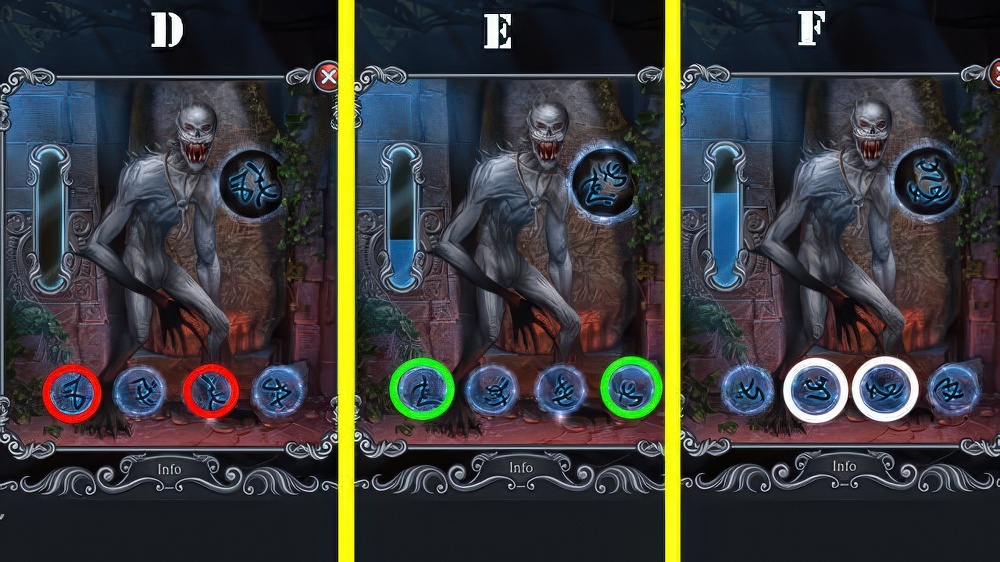
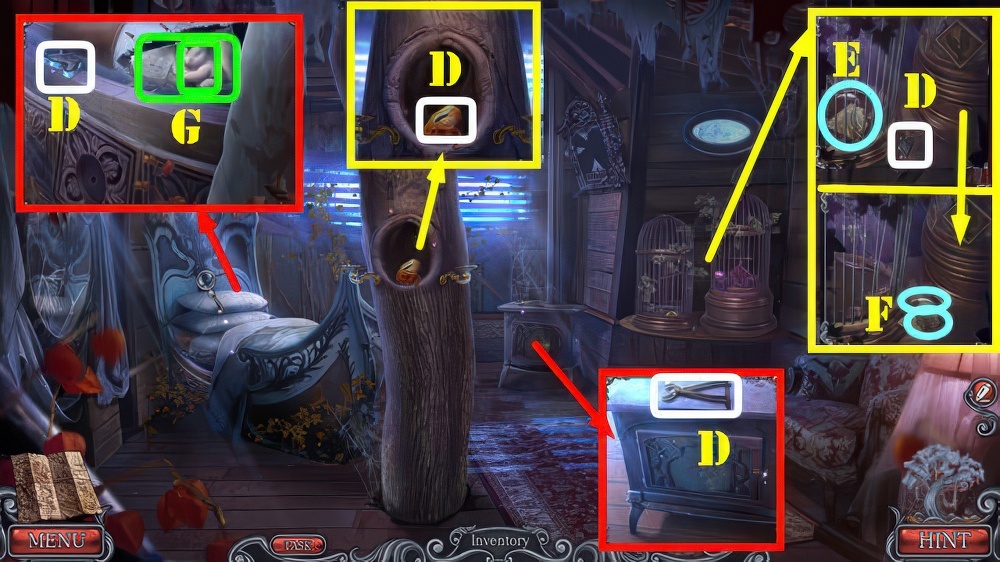
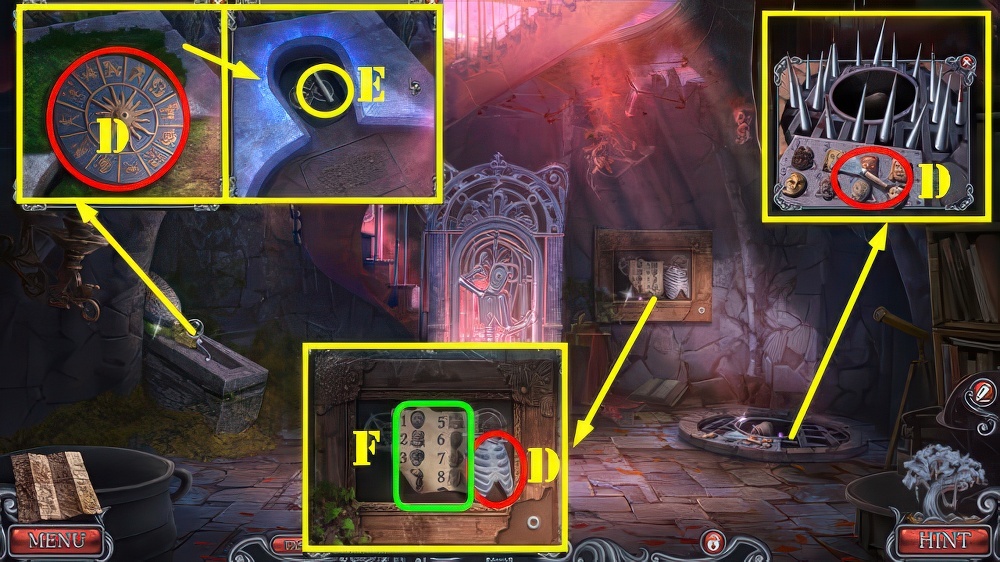
- Look at Note (D).
- CHAMOMILE, HEATHER, and LAVENDER on SEDATIVE SACHET, take SEDATIVE.
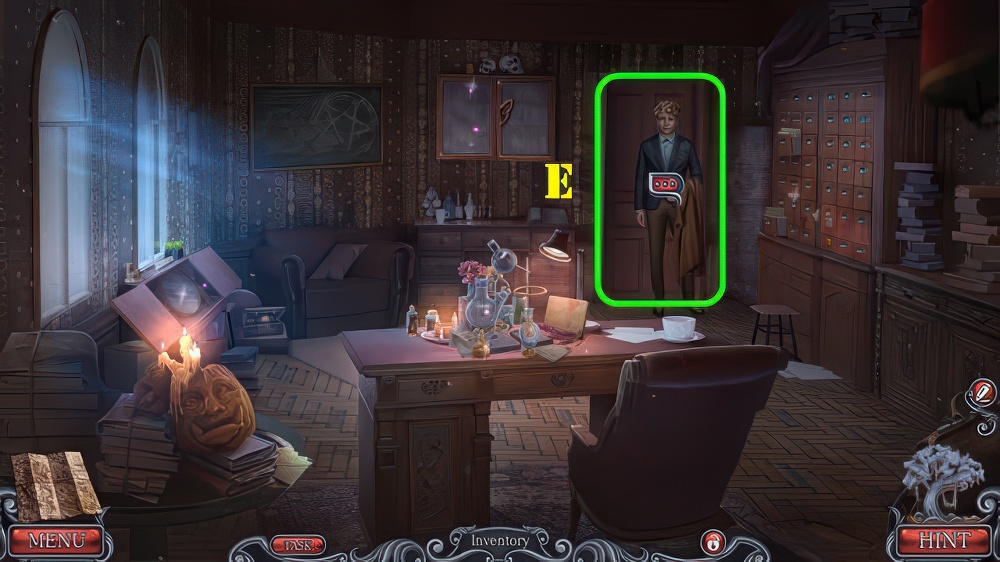
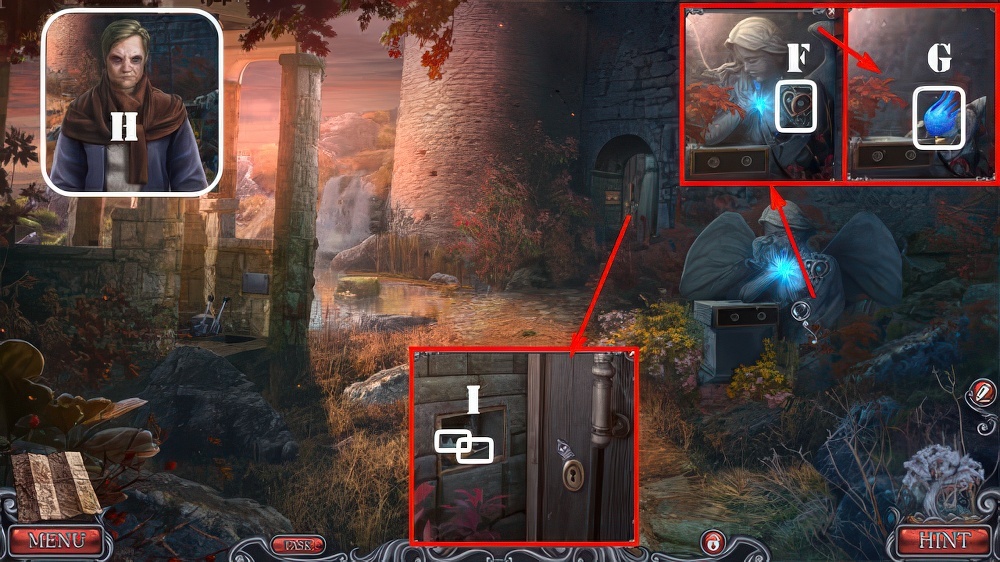
- Talk and then give SEDATIVE (E), receive LETTER.

- Open LETTER.
- Solution (1-4).
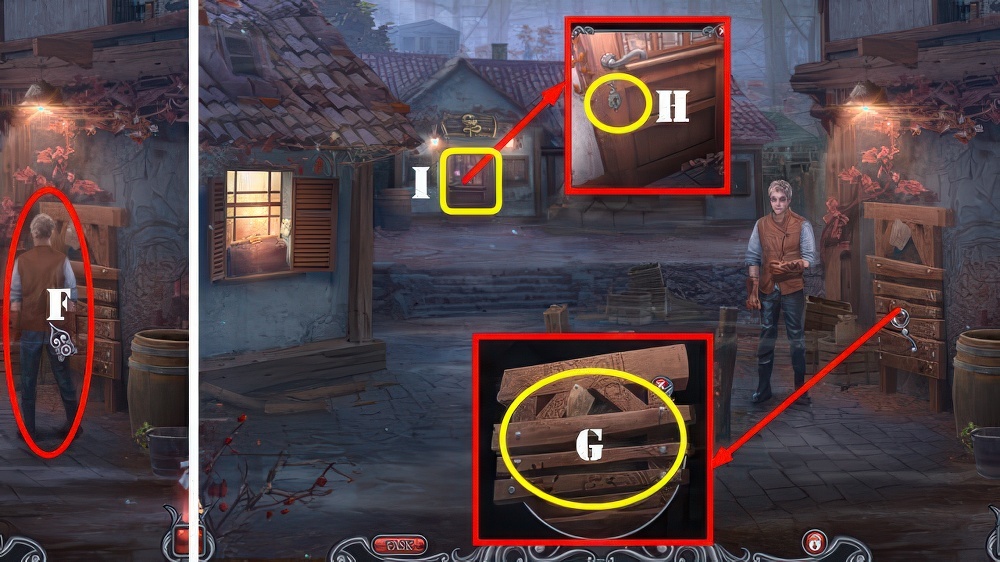
- Take LETTER (F).
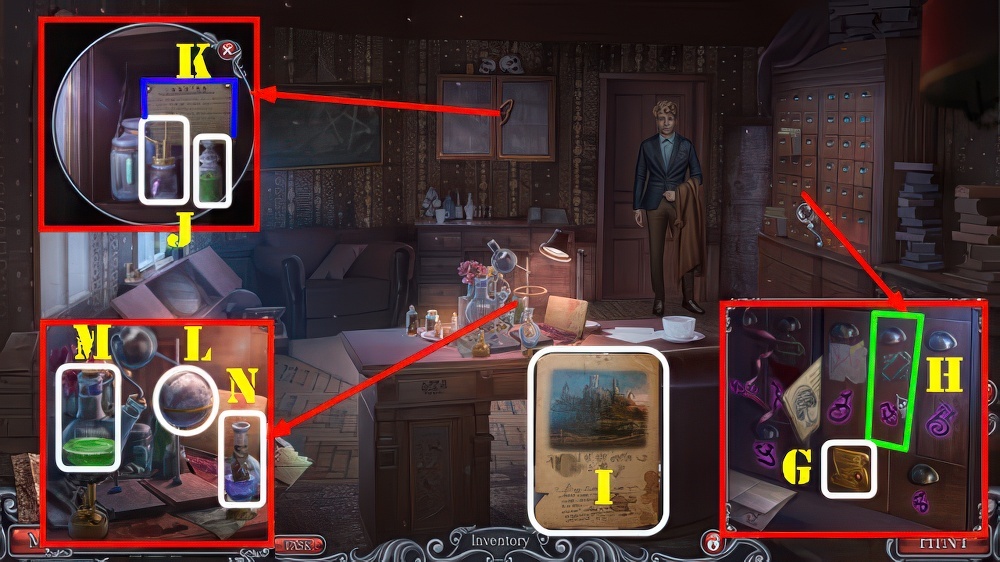
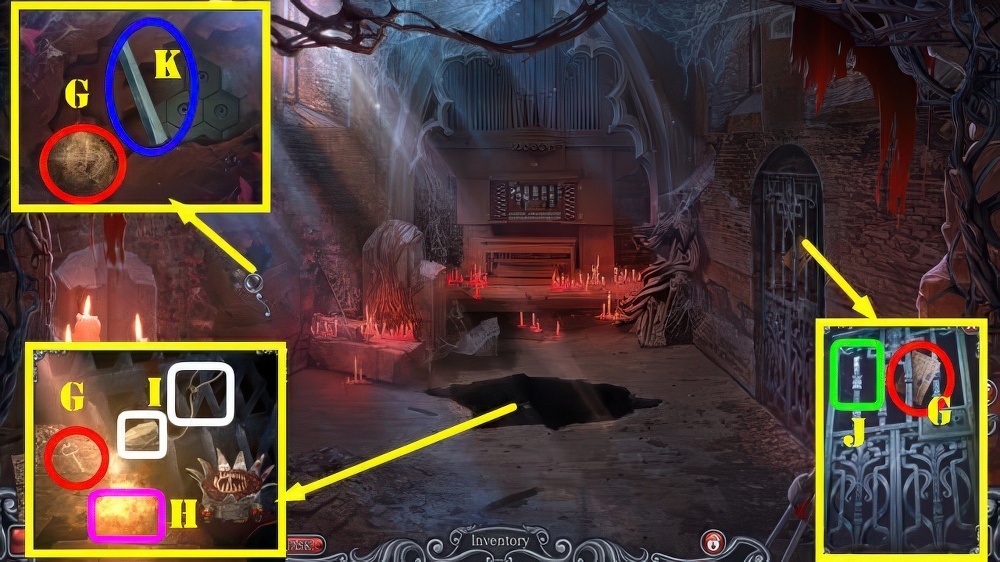
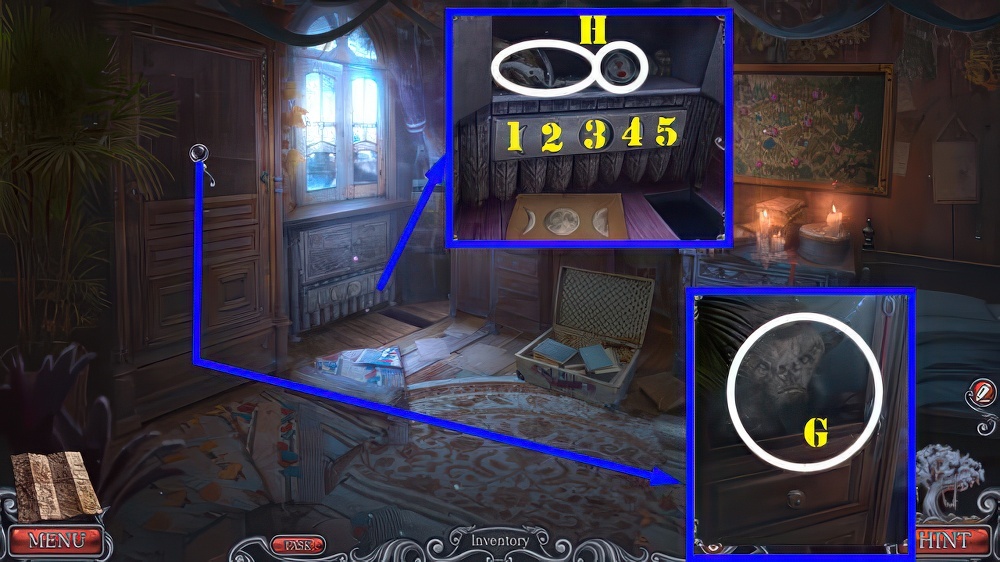
- Place SCROLL OF KNOWLEDGE and LETTER (G).
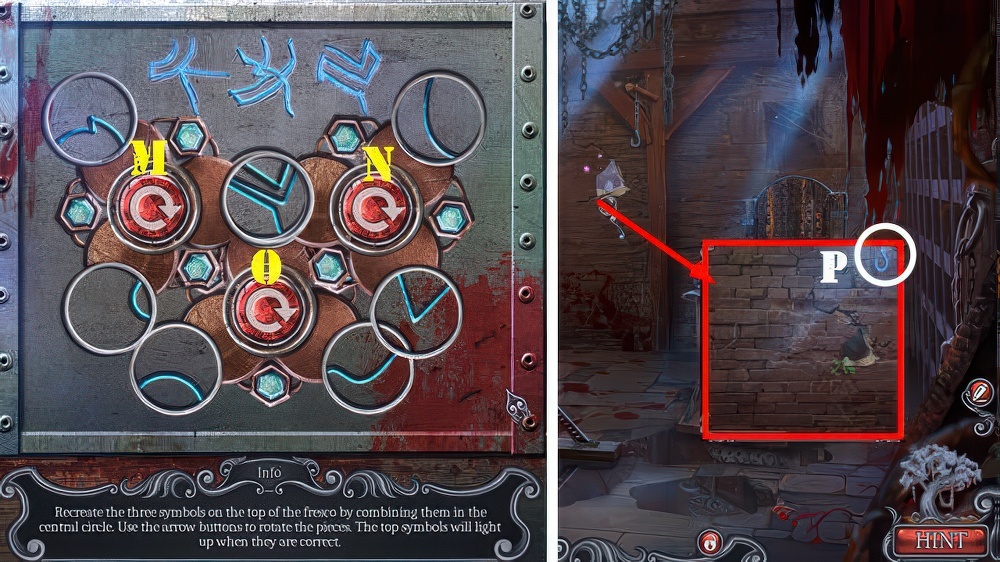
- Select drawer (H).
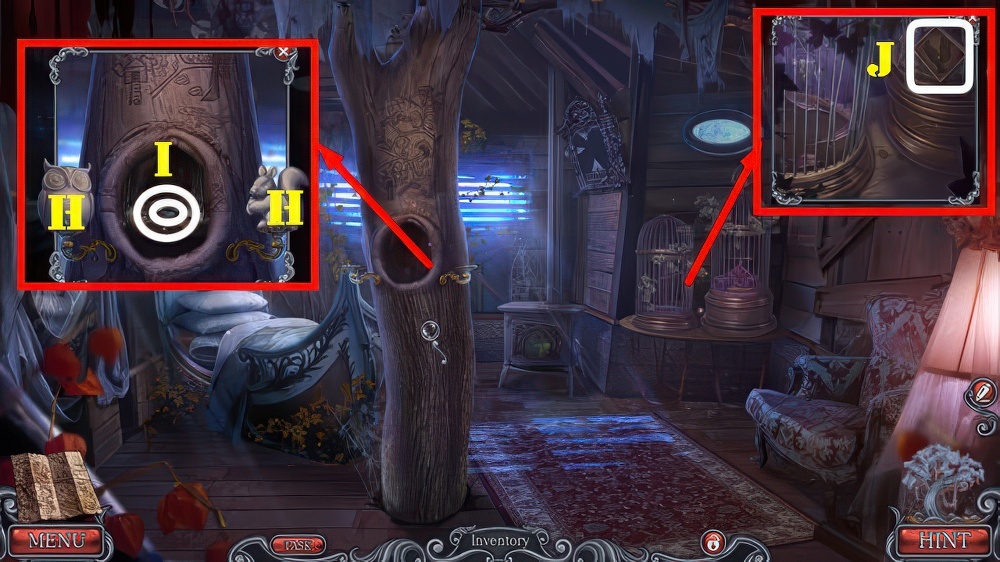
- Play puzzle, receive LILY EMBLEM.
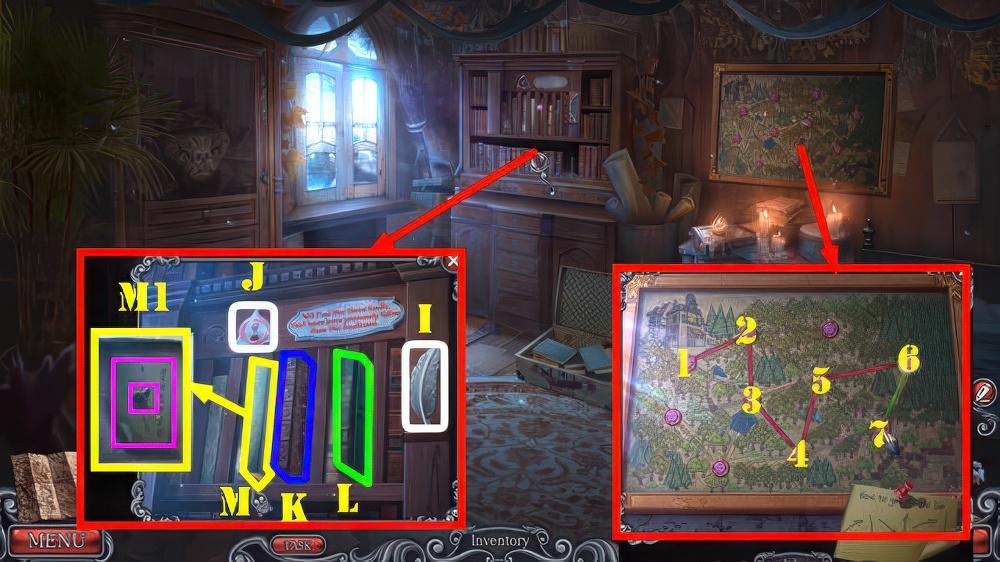
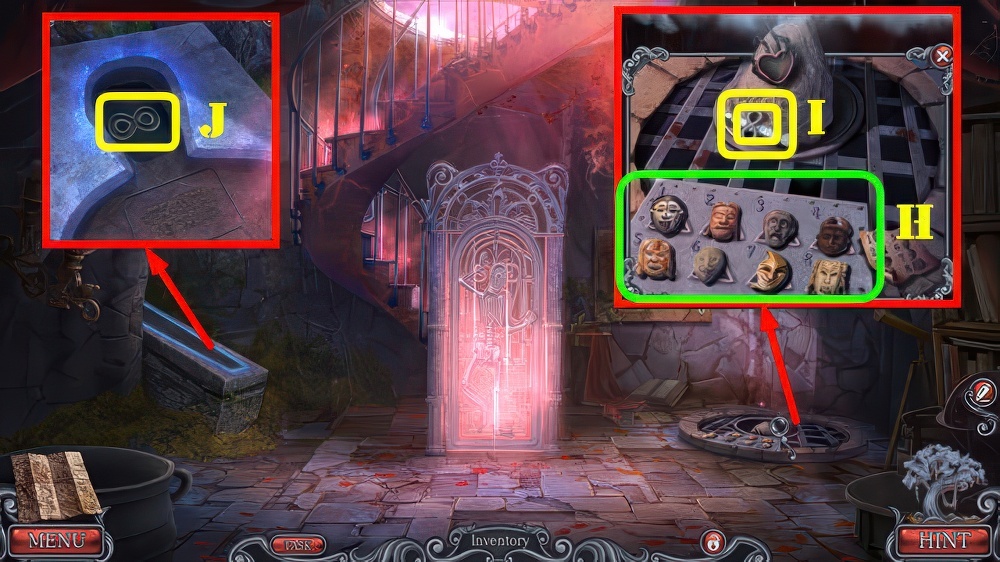
- Take INCOMPLETE ROUTE (I).
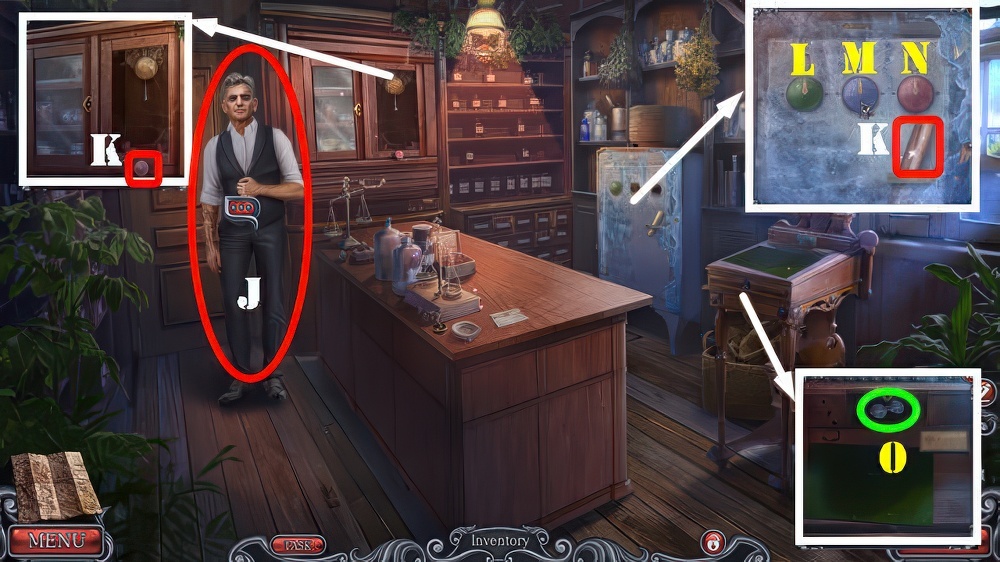
- Use LILY EMBLEM, take SPRAYER and HERBAL INFUSION (J).
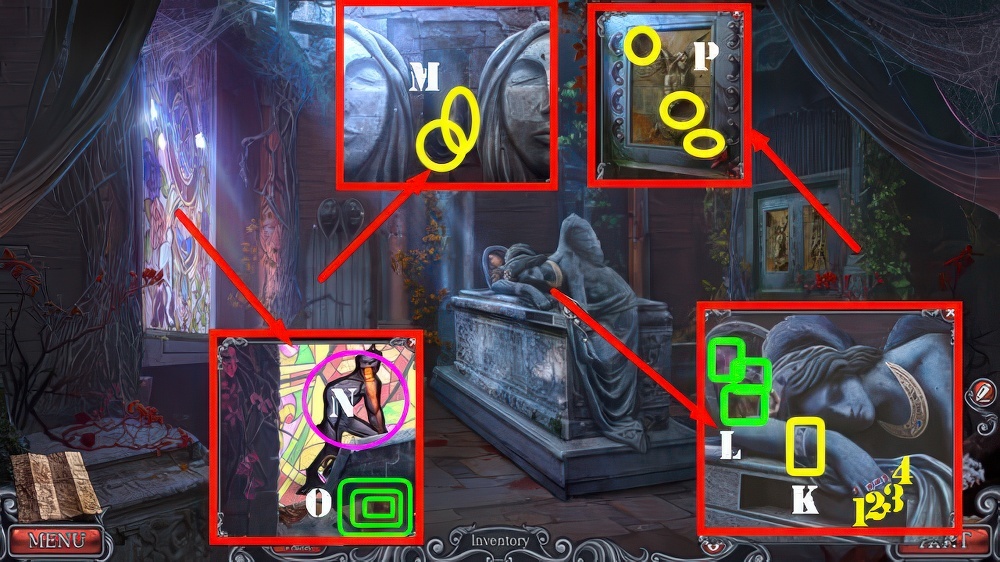
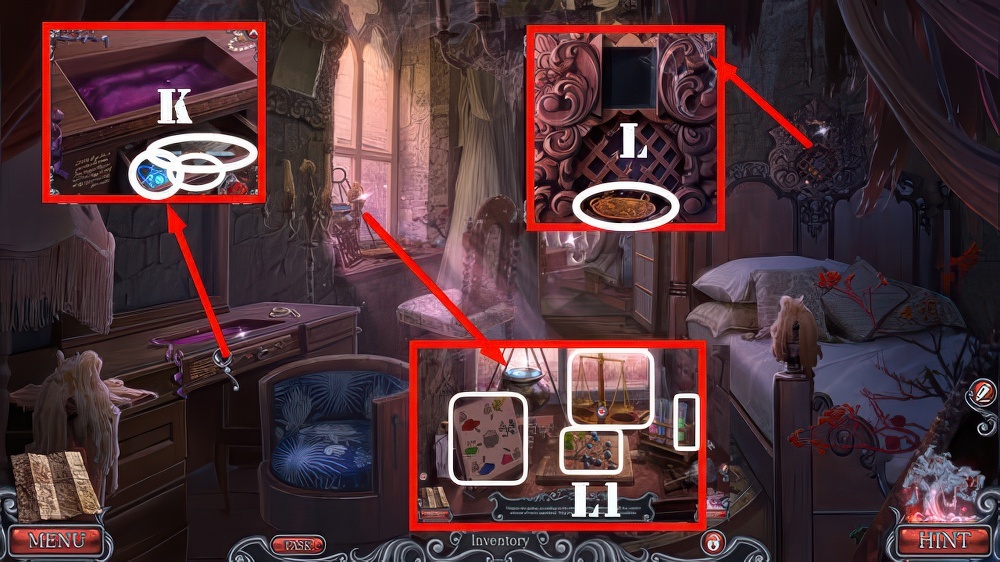
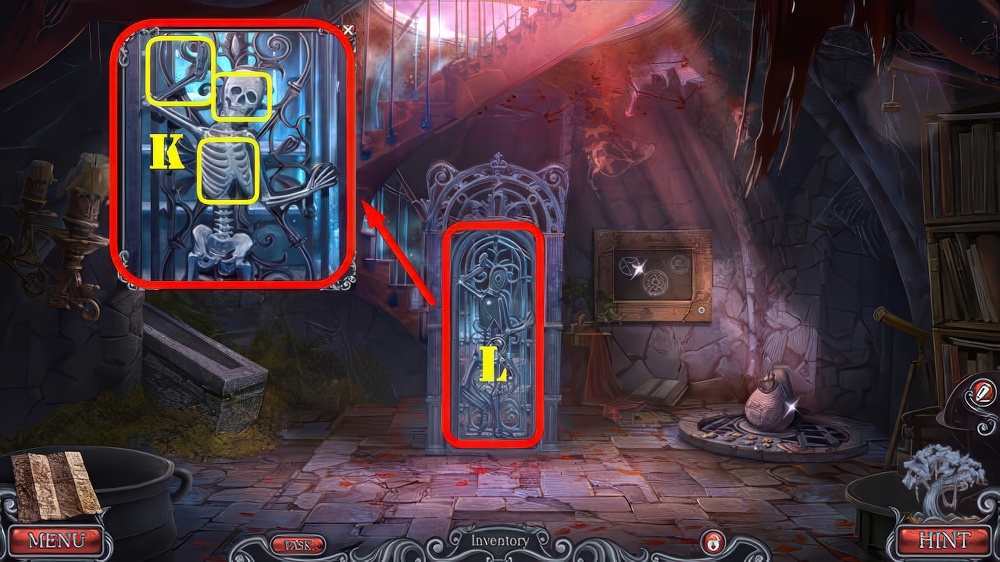
- Look at Note (K).
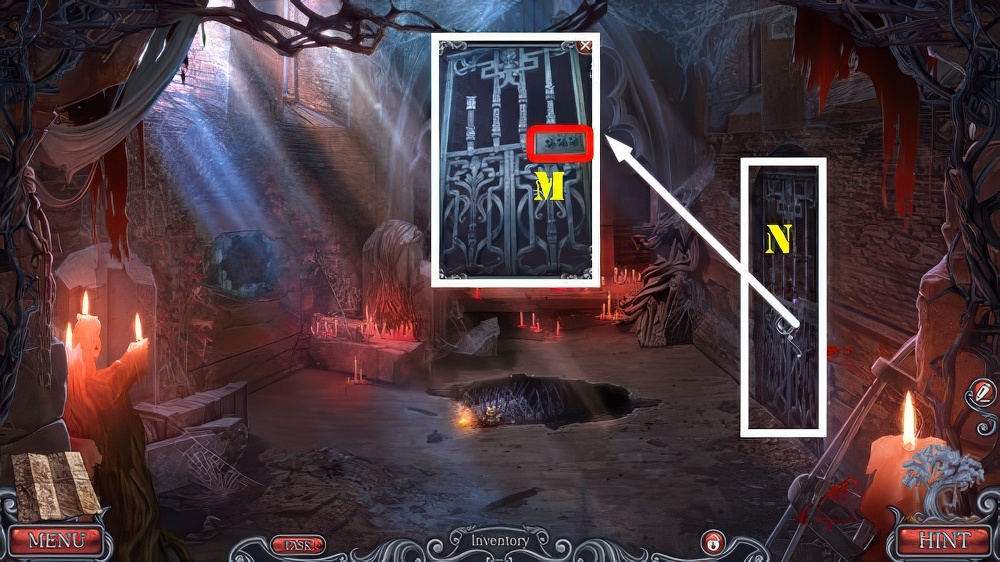
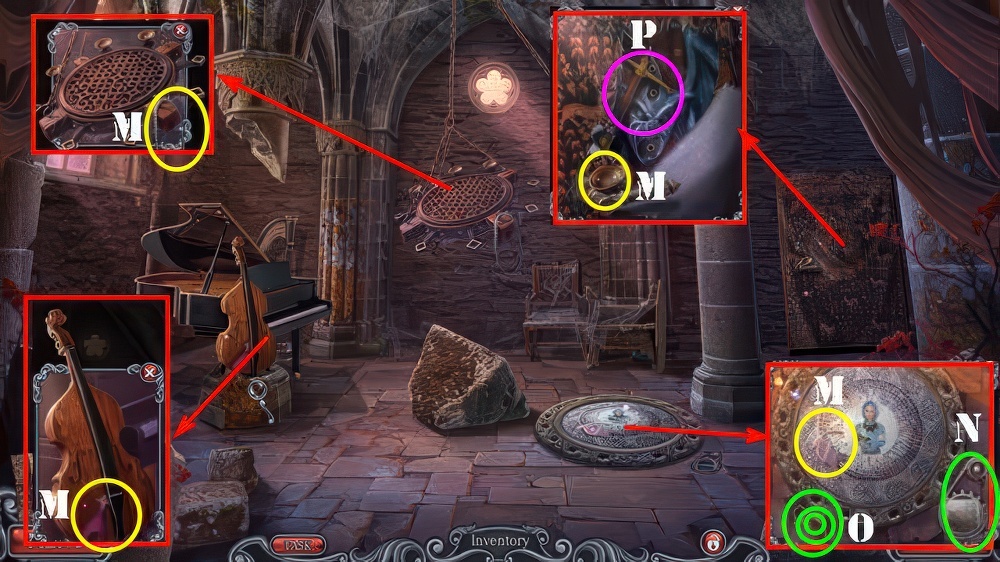
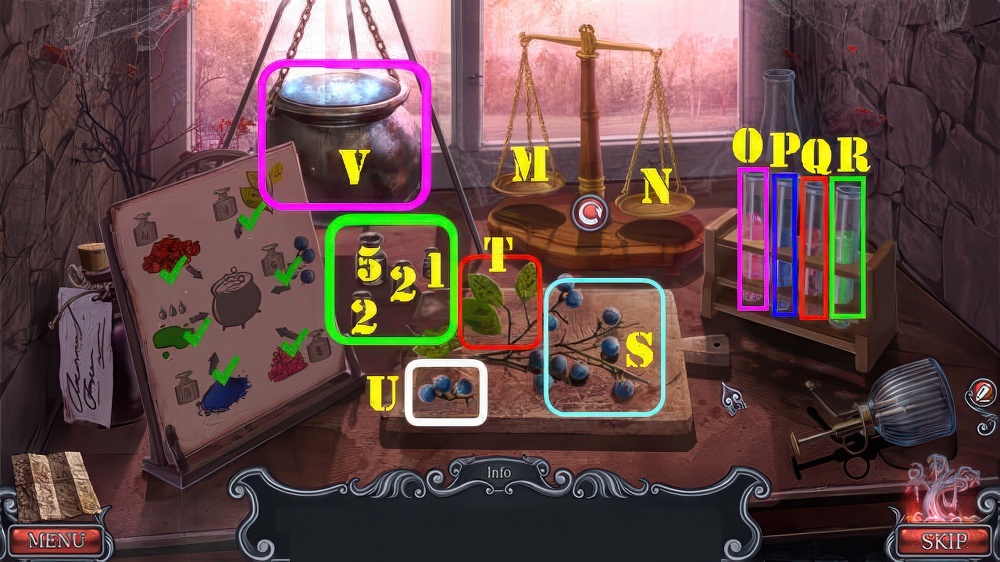
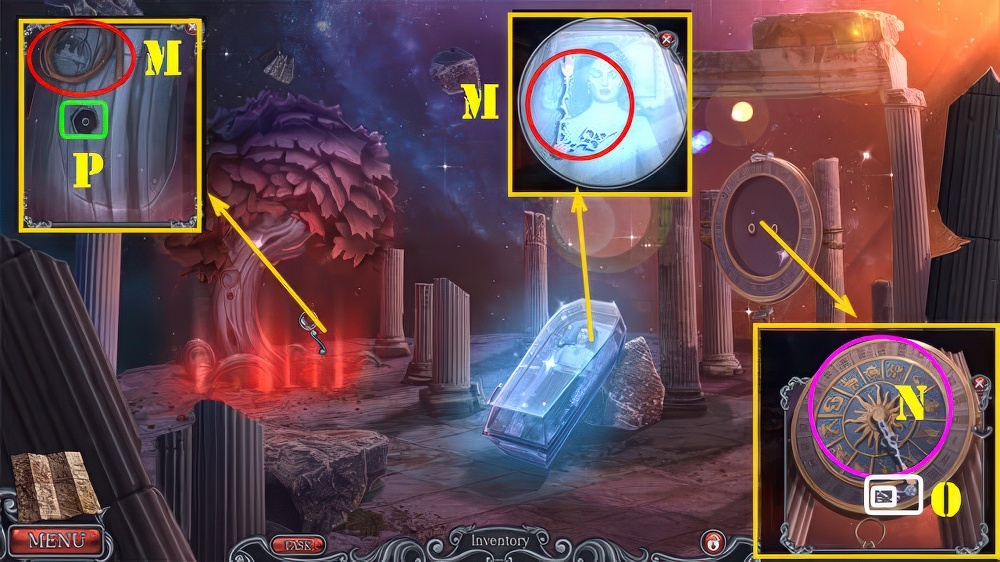
- Place CRYSTAL BALL (L) and use HERBAL INFUSION (M).
- Take ALL-SEEING POTION (N).
- ALL-SEEING POTION and SPRAYER PART on SPRAYER, take ALL-SEEING POTION.
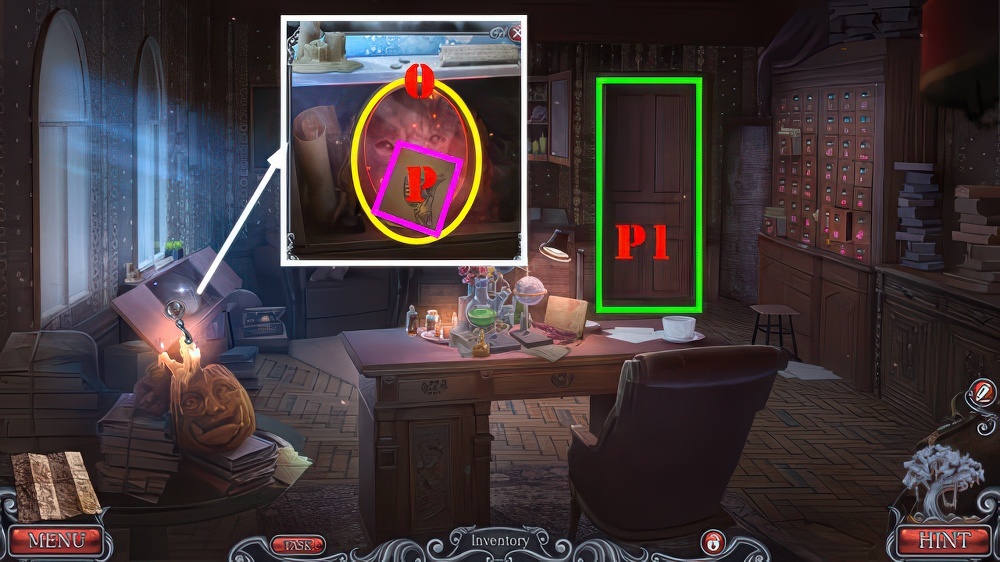
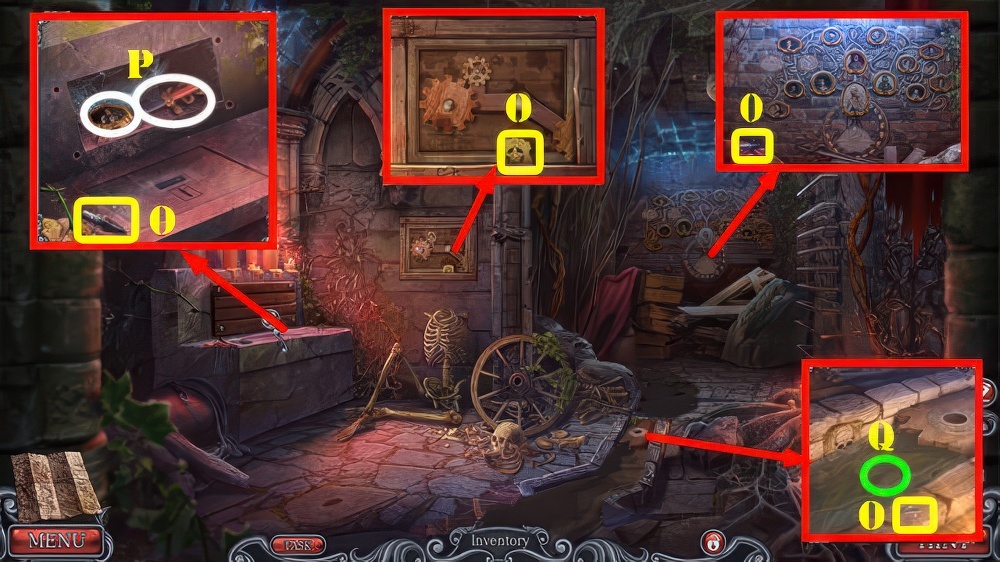
- Use ALL-SEEING POTION, SPIRIT TREAT, and INCOMPLETE ROUTE (O).
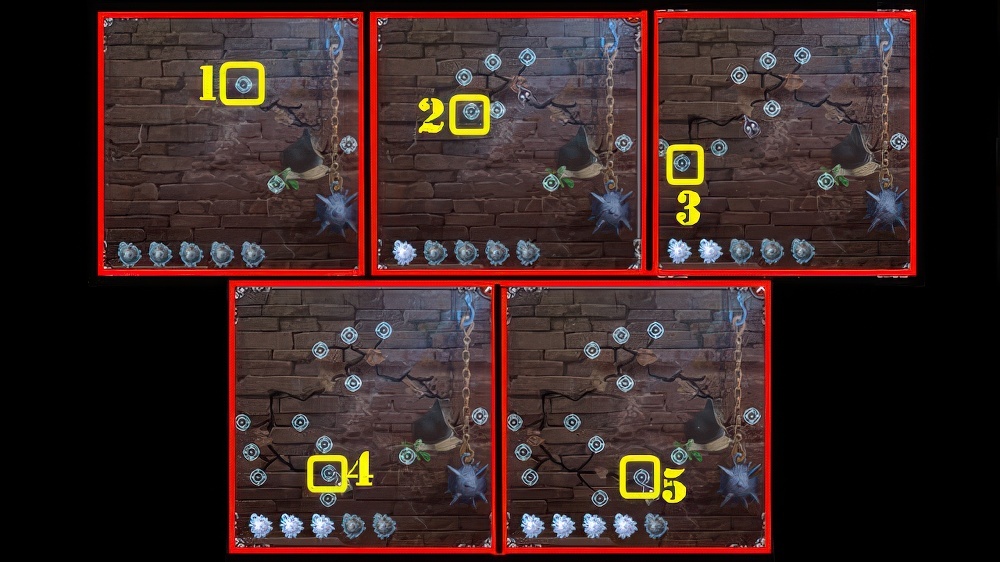
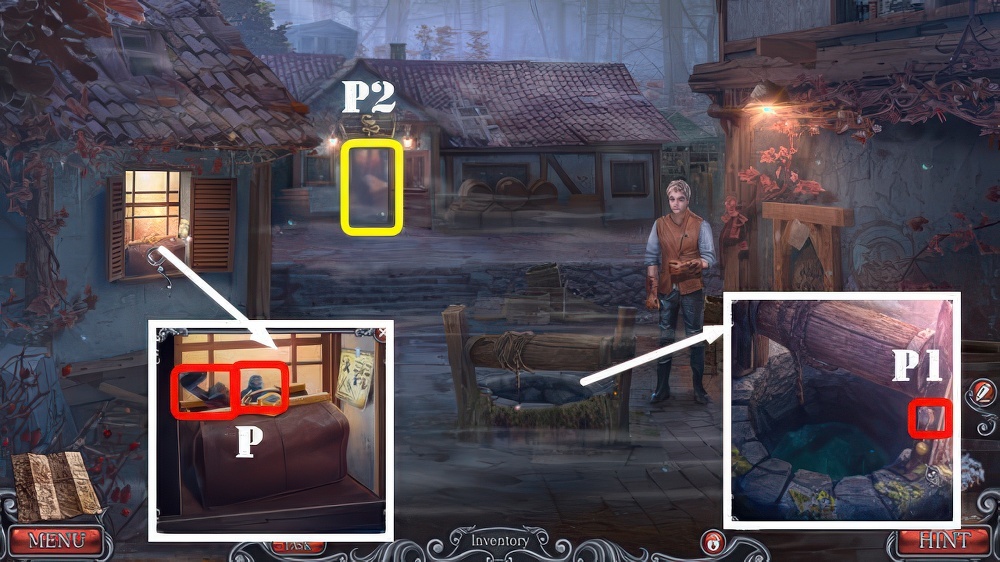
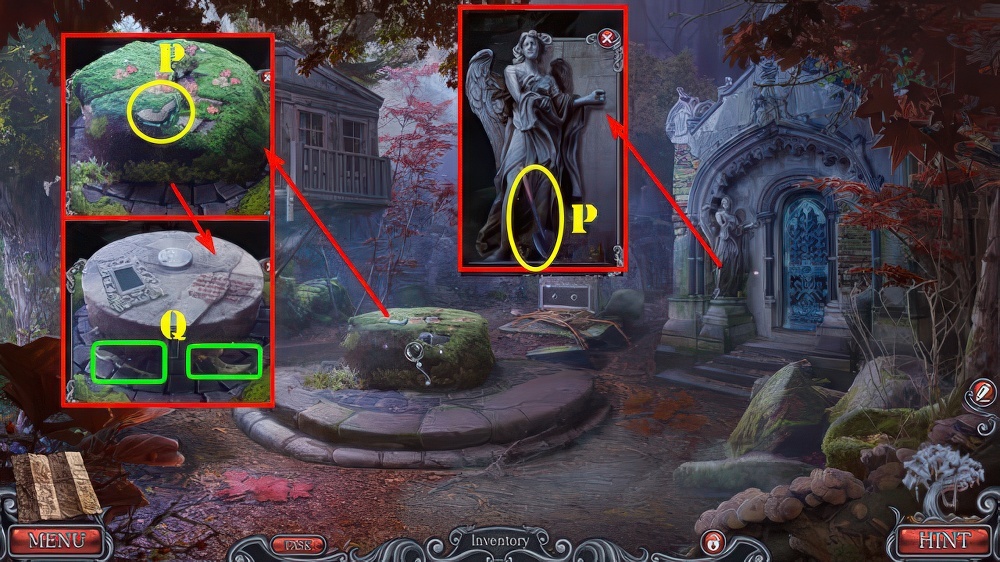
- Take SUN KEY and ROUTE (P).
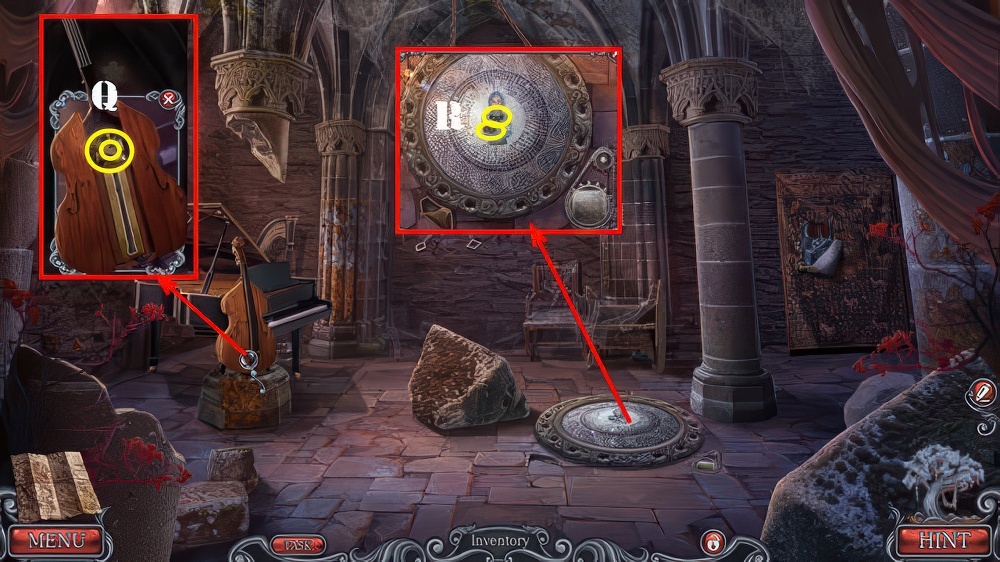
- Use ROUTE (P1).

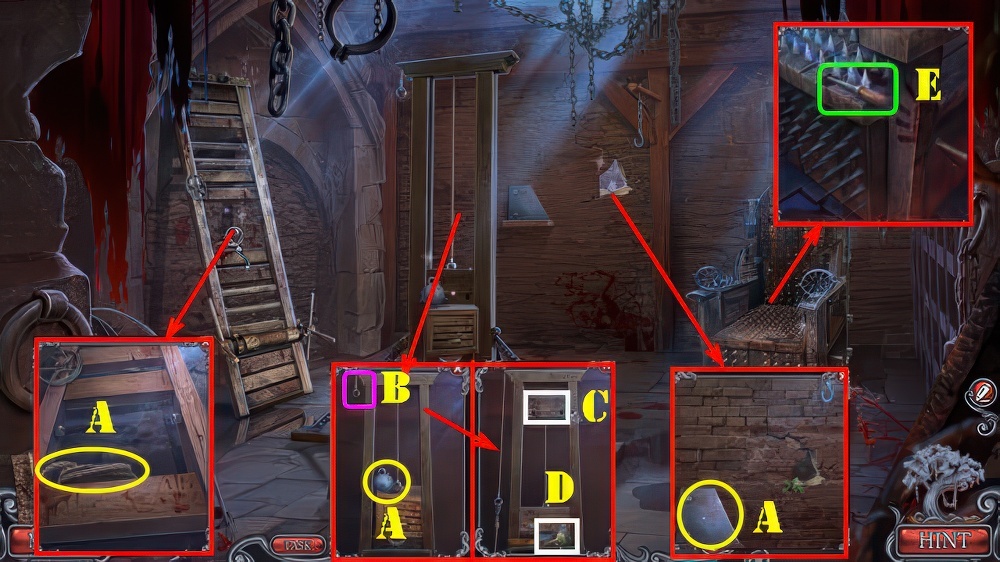
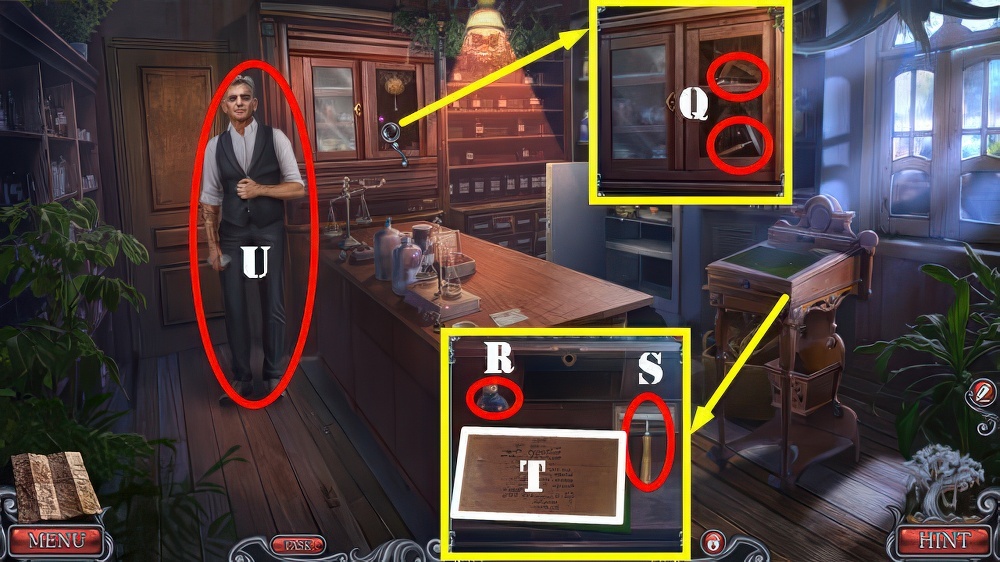
- Take FABRIC, KNIFE, and THRONE DECORATION 1/3 (Q).
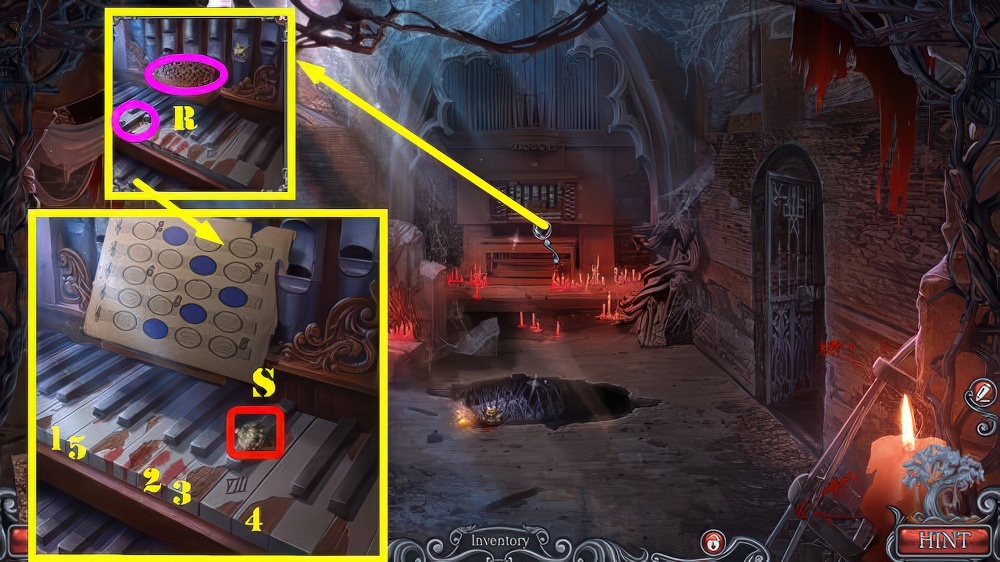
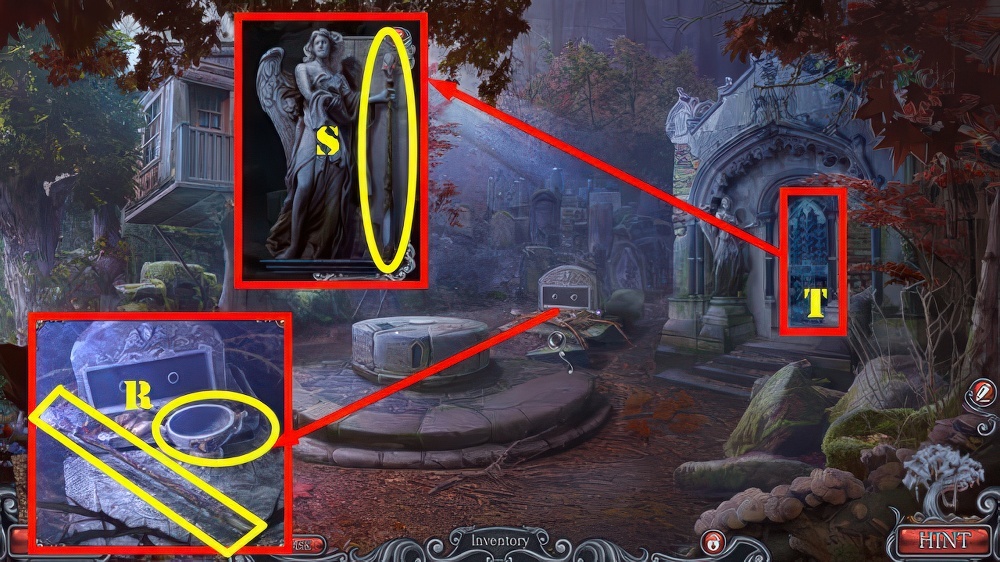
- Use FABRIC and ALL-SEEING POTION (R).
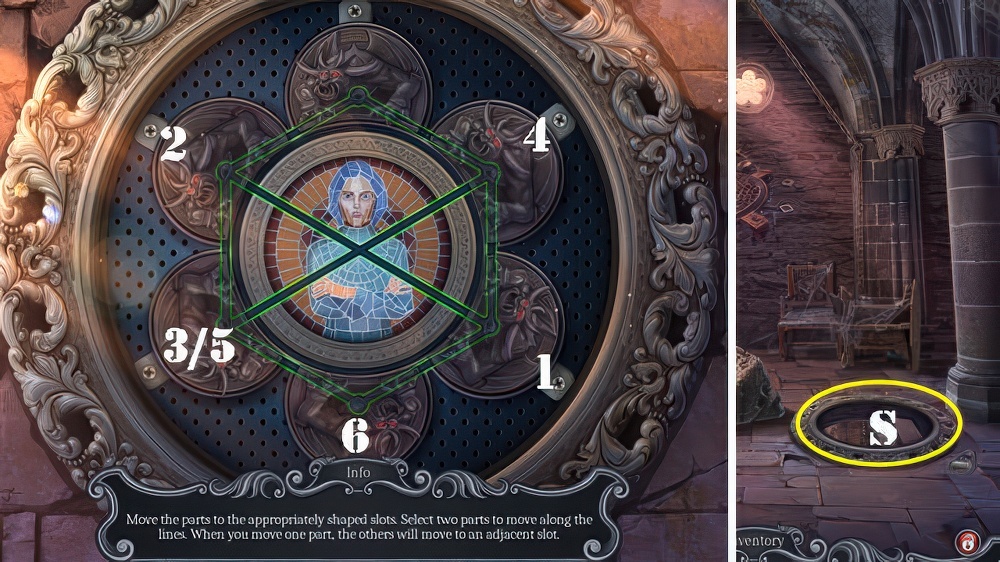
- Select ivy (S).
- Use KNIFE, take THRONE DECORATION 2/3 and SCEPTER (S1).
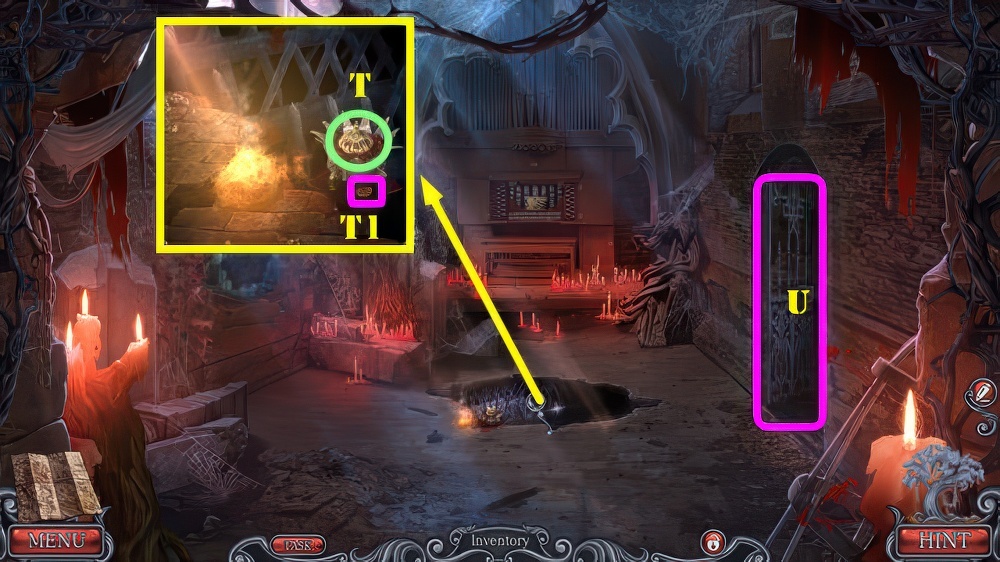
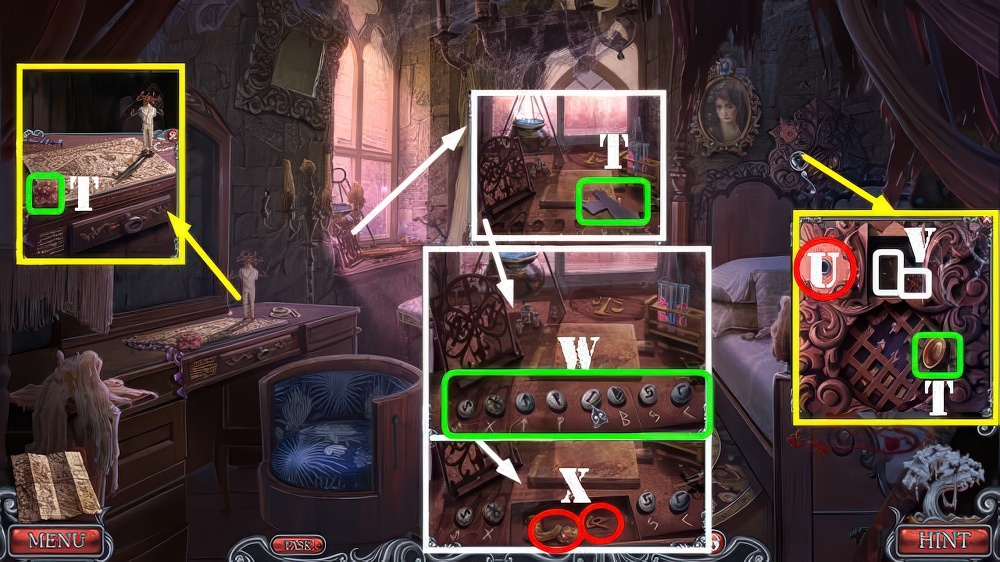
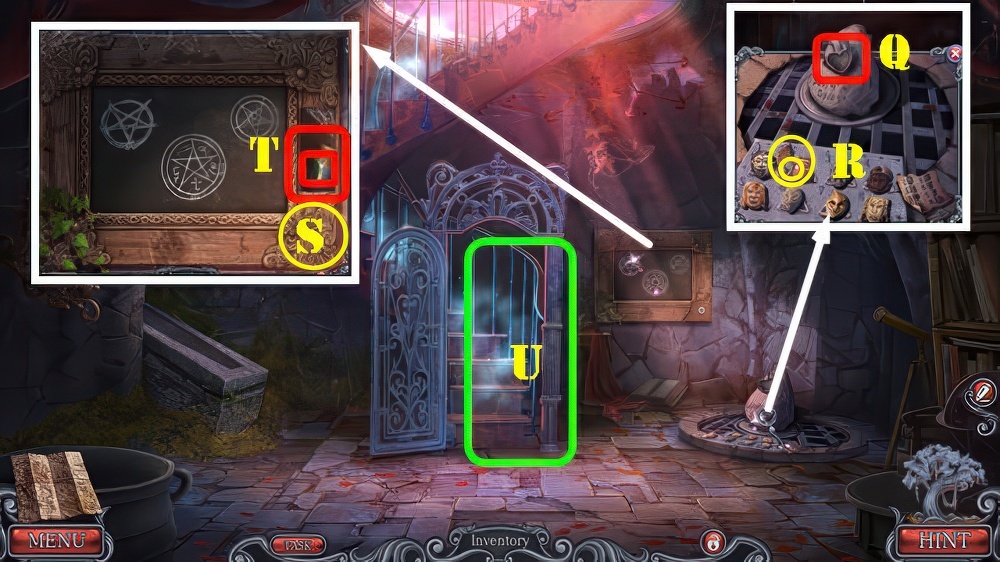
- Use SCEPTER (T), receive THRONE DECORATION 3/3 and STONE FRAGMENT.
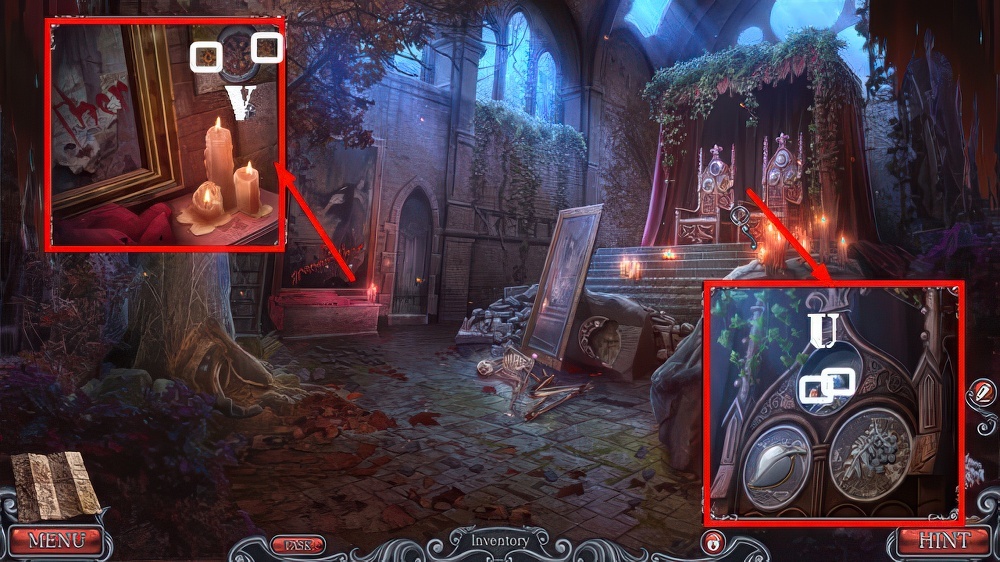
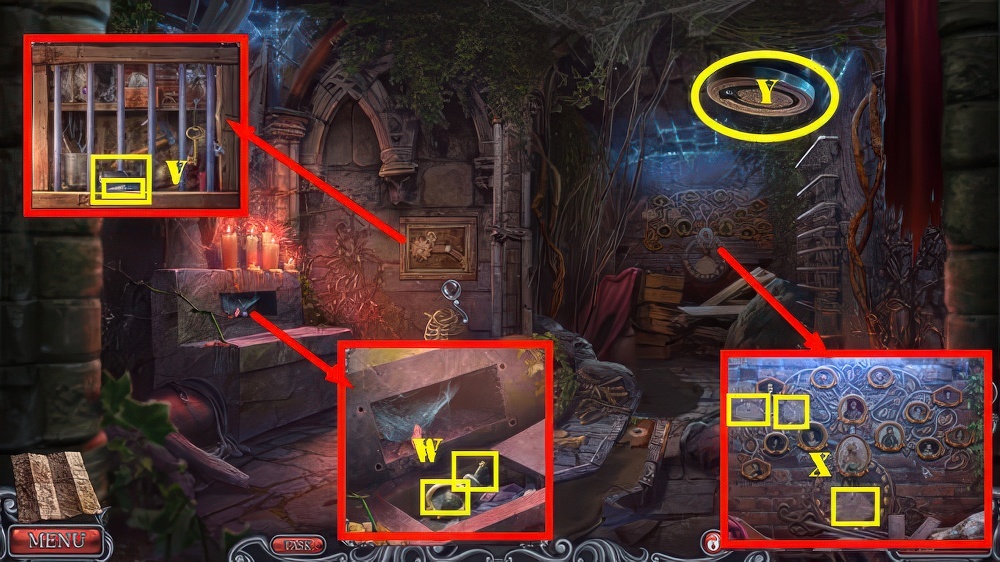
- Place THRONE DECORATION 3/3, take STAR KEY and LION’S EYE (U).
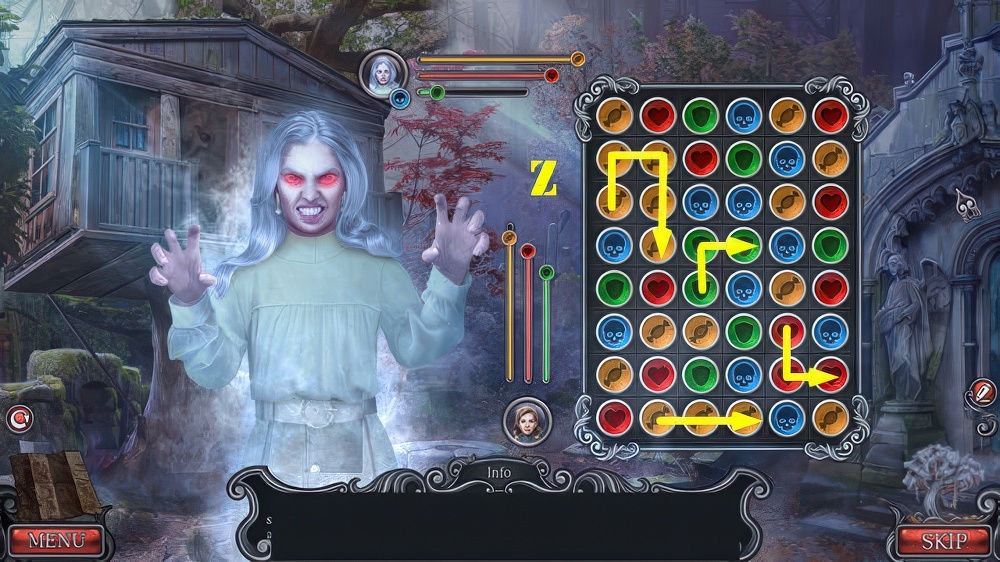
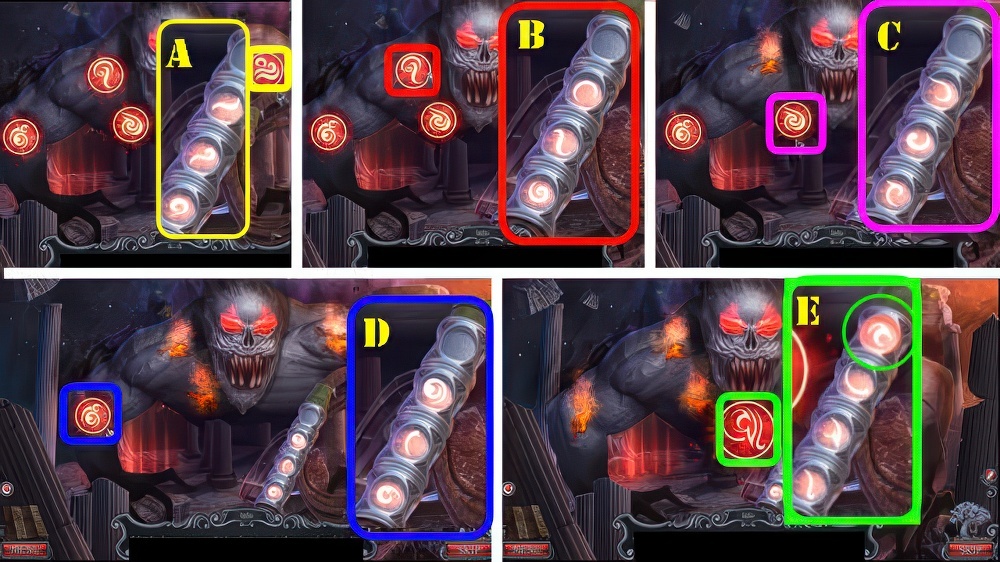
- Use STAR KEY and SUN KEY (V).

- (A) and (J) are the rings you spin.
- They can be accessed through multiple spots.
- Solution: (Ax2-I-B-F-E-Ax4-H-G-C-D)-(J-L-J-R-O-J-Q-Jx2-N-J-P-M-J-K).
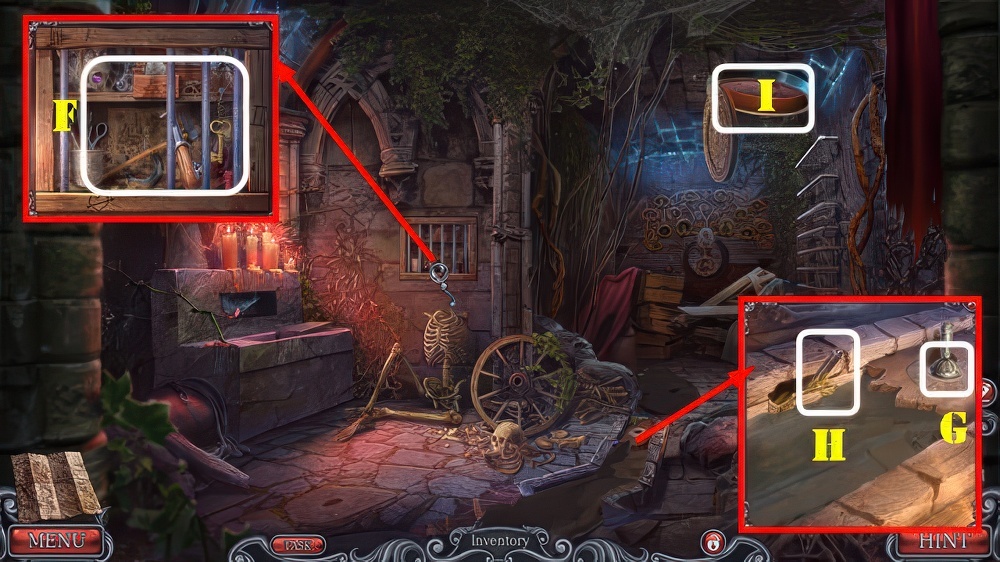
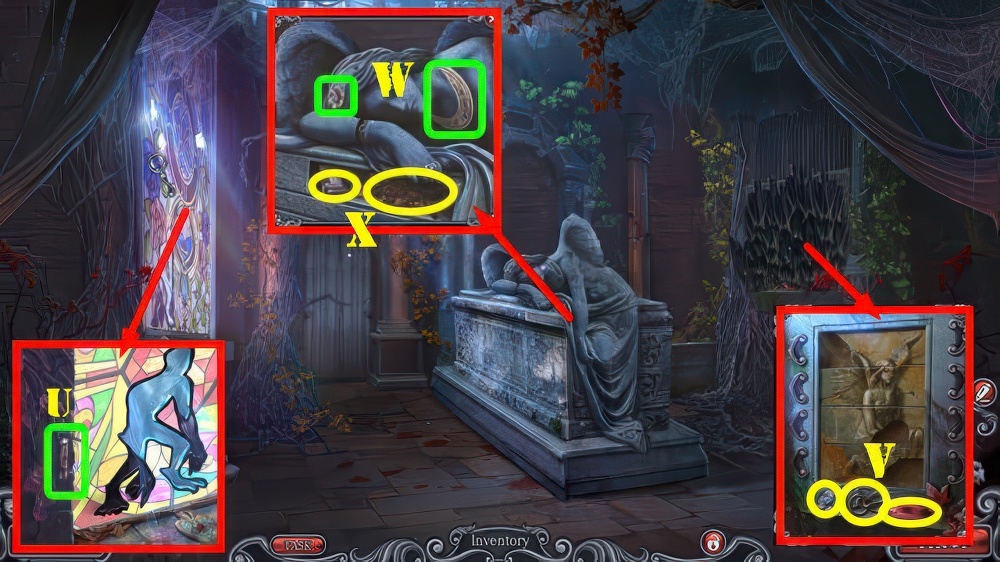
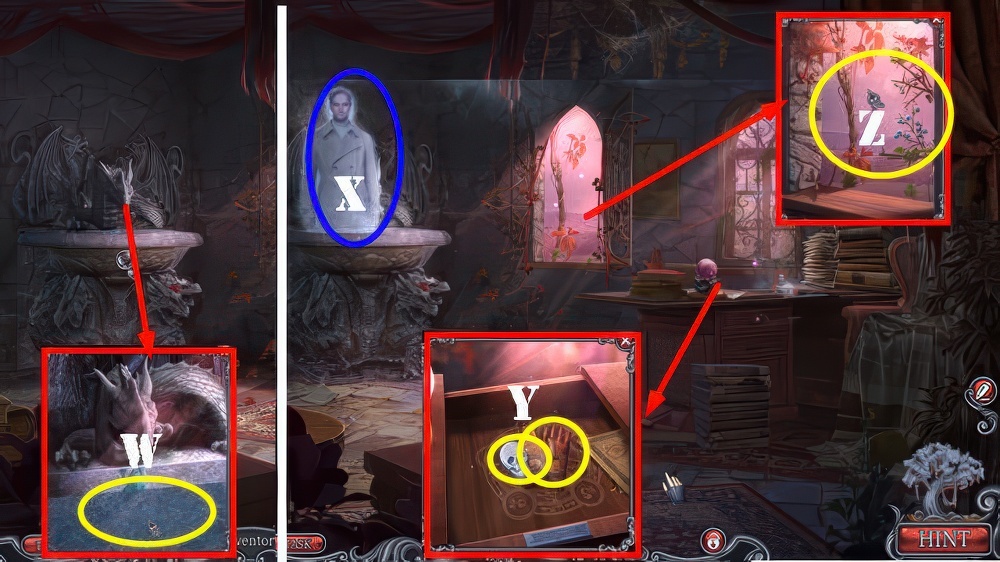
- Go (W).
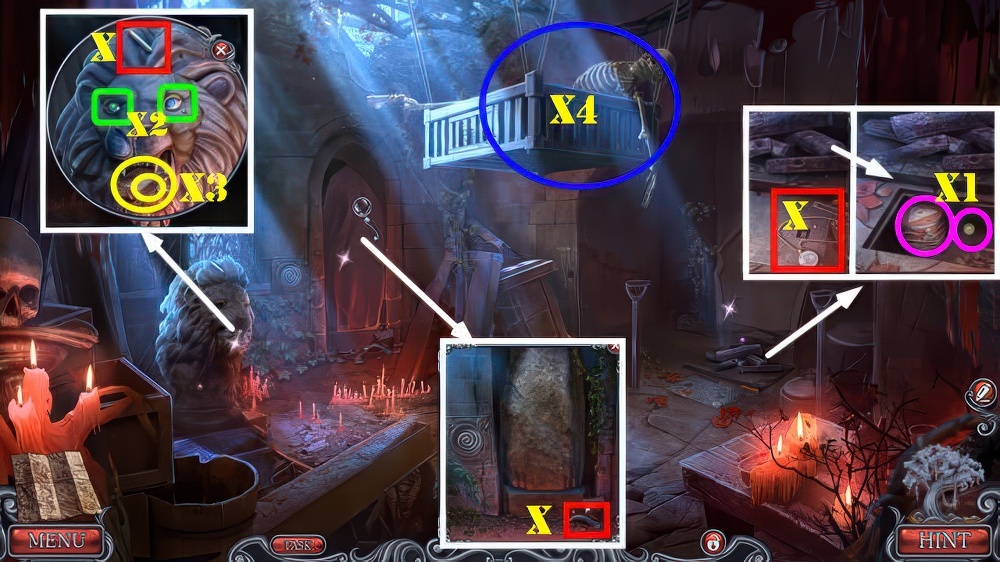
- Take CHALK, HANDLE, and LENS (X).
- Place HANDLE, take RITUAL BOX and LION’S EYE (X1).
- Place two LION’S EYES (X2).
- Take MATCHES and THROWING STAR (X3).
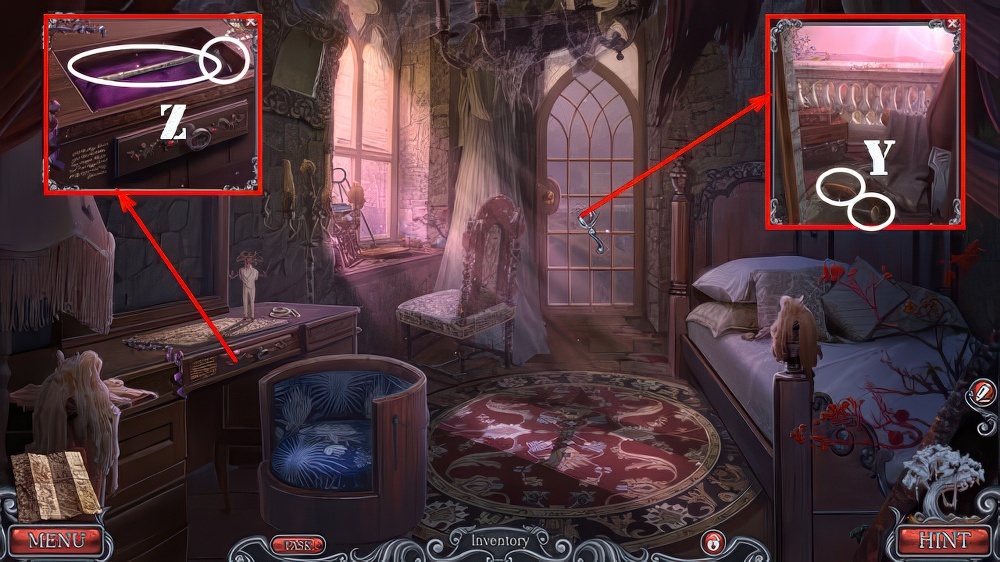
- Use THROWING STAR (X4).
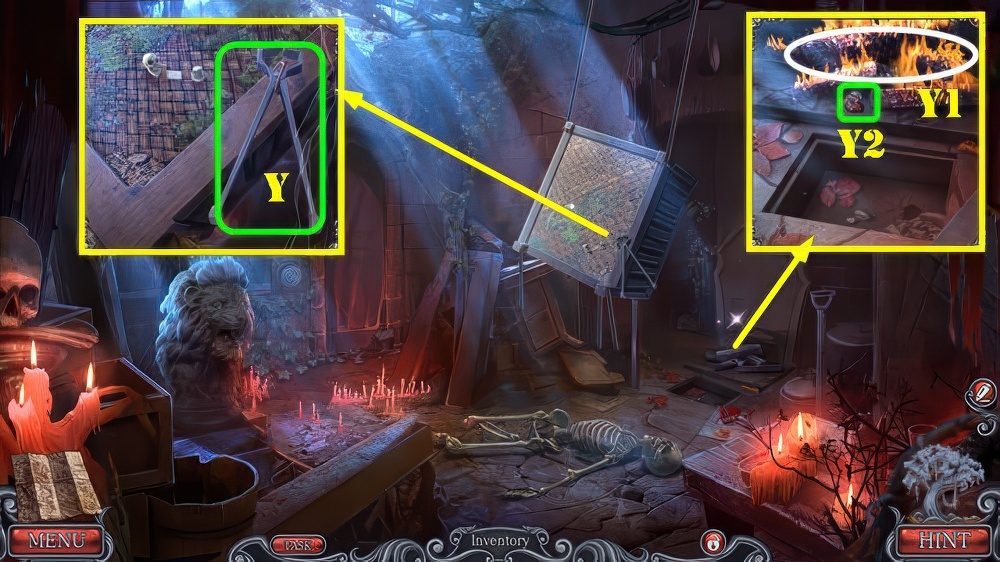
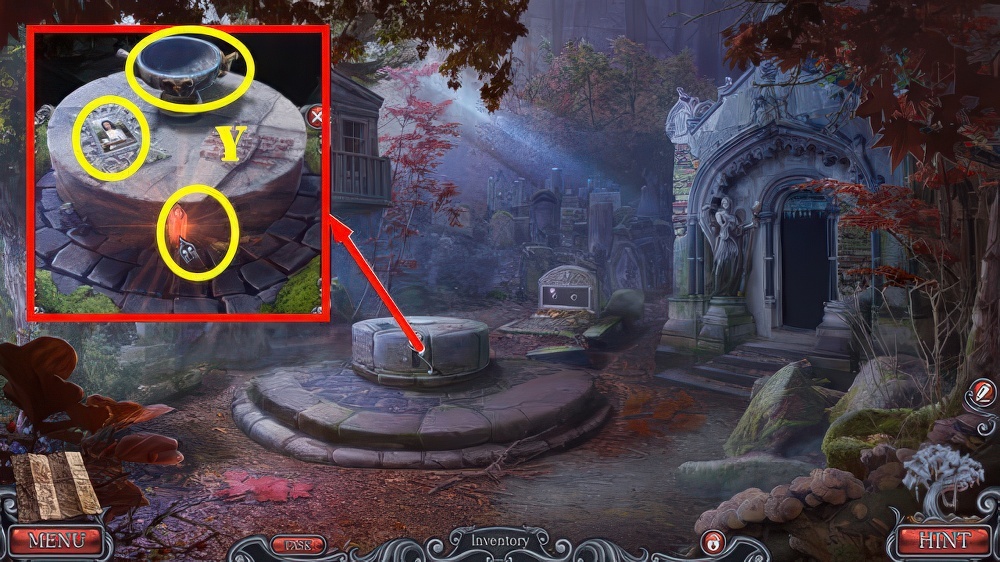
- Take FIRE TONGS (Y).
- Use MATCHES (Y1).
- Use FIRE TONGS (Y2), receive BURNING COAL.
- Walk down.
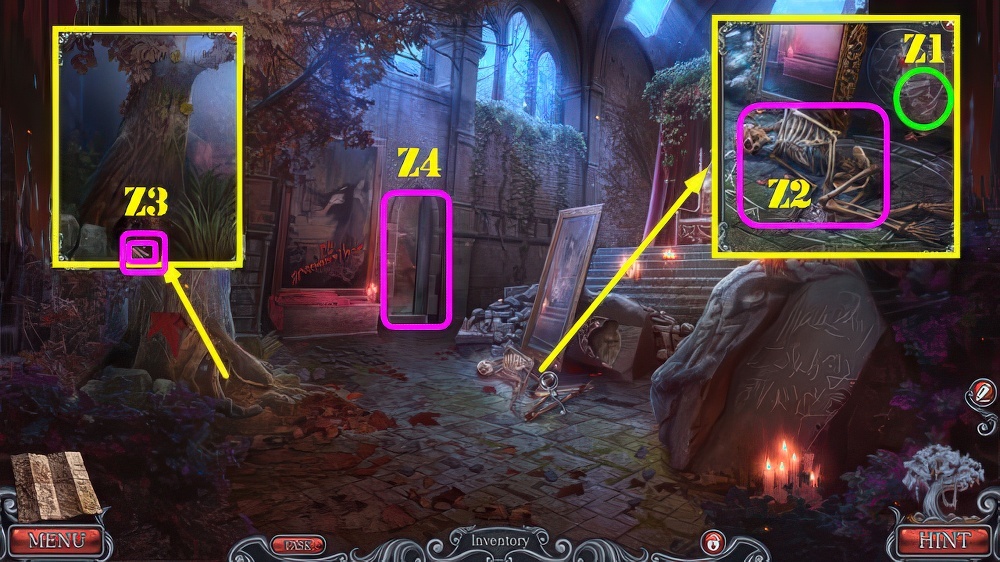
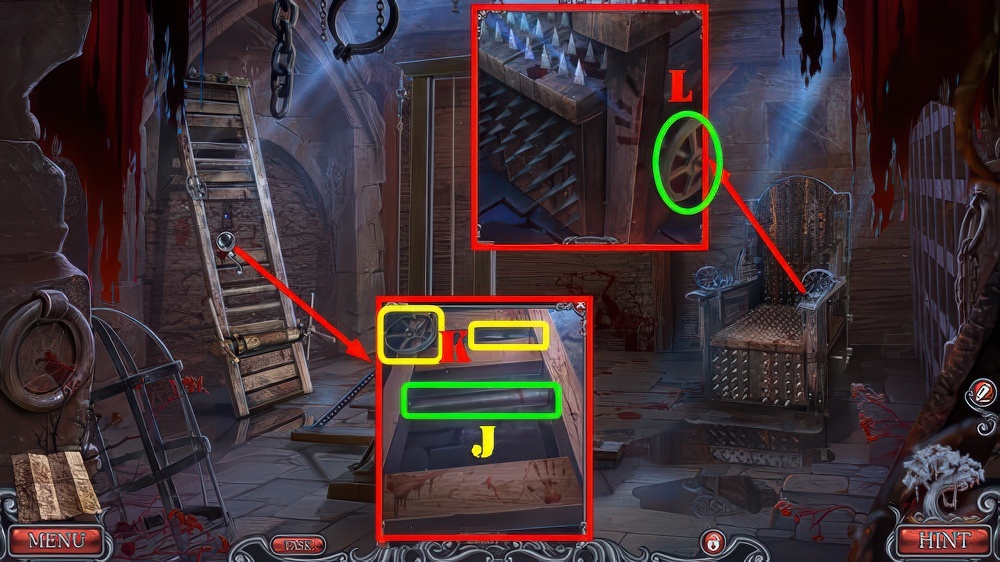
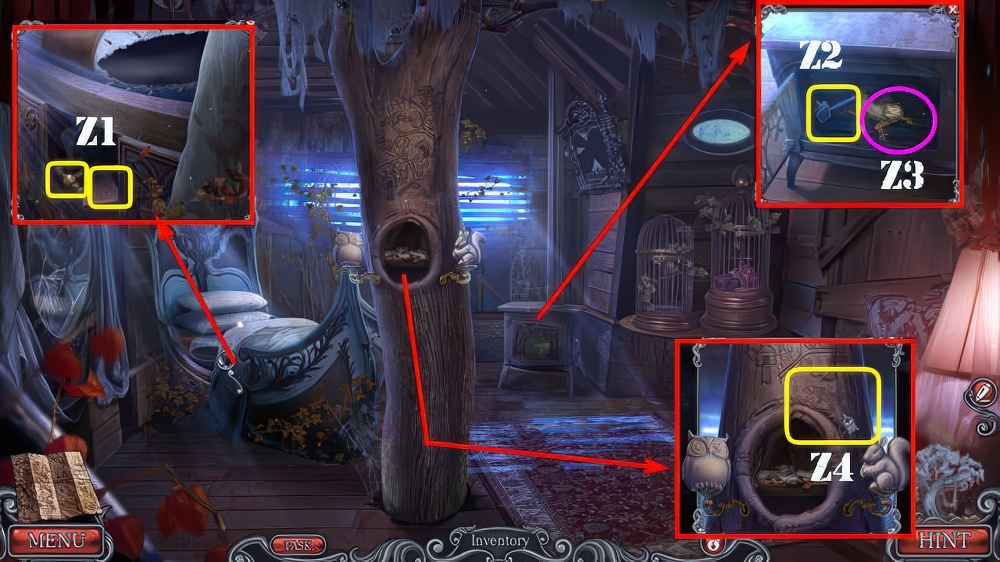
- Place STONE FRAGMENT (Z1).
- Use CHALK and BURNING COAL (Z2).
- Play puzzle, receive SKELETON HAND.
- Use SKELETON HAND, take KNIFE and LID PART (Z3).
- Go (Z4).
- Use KNIFE, take BOX HANDLE (A).
- BOX HANDLE and LID PART on RITUAL BOX, take MAGIC SYMBOL.
- Place MAGIC SYMBOL (B).
- Select door and look at Note (C).
- Solution (D-E-F).
- Receive KEY 1/3.
- Take KINDLING, KEY 2/3, and MUSIC NOTES (G).
- Place KINDLING and LENS (H), take WIRE and HEAVY STONE (I).
- Use WIRE (J), receive GRATE BAR.
- Use GRATE BAR and HEAVY STONE (K).
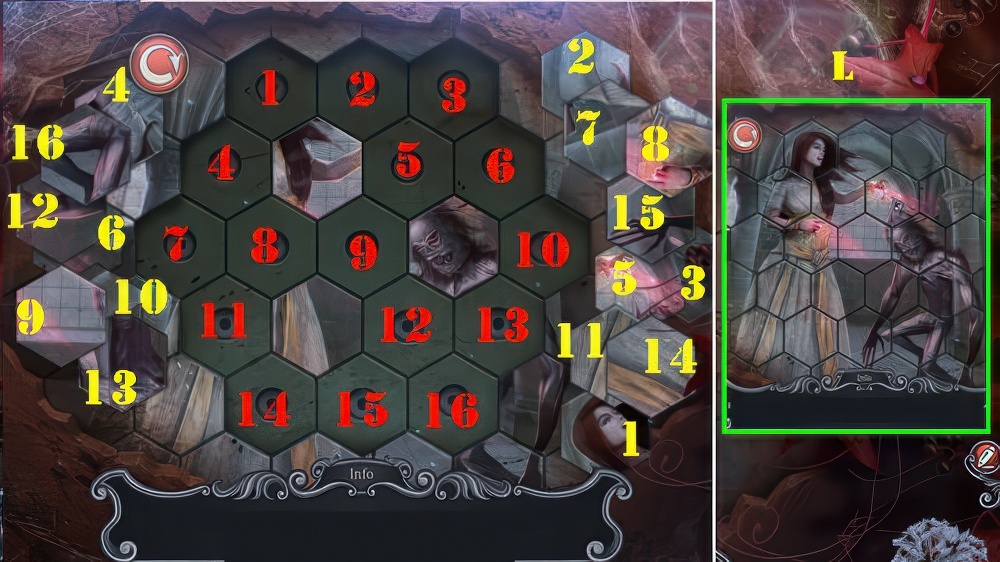
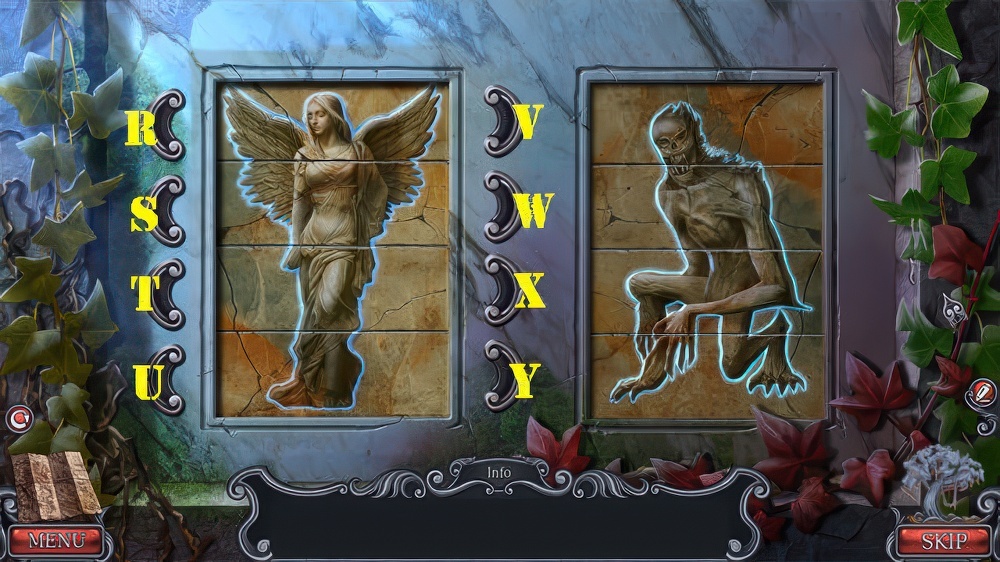
- Solution: Place puzzle pieces in their matching-numbered spots (1-16), rotate them as shown below before placing them.
- Rotate and place: (1×1)-(2×2)-(3×3)-(4×4)-(6×1)-(7×2)-(8×3)-(10×5)-(12×2)-(13×3)-(14×4)-(15×5).
- Place the following pieces without rotating them: (5-9-11-16).
- Solved image (L).
- Take KEY 3/3 and PRESENCE SPELL.
- Use KEY 3/3 (M).
- Go (N).
- Take SPIKE 1/4, SPIKE 2/4, DETECTIVE’S BADGE, and CROWN PART (O).
- Use DETECTIVE’S BADGE, take MAGNET and PORTRAIT (P).
- Use MAGNET (Q), receive PIANO KEY and PORTRAIT.
- Walk down.
- Place PIANO KEY and MUSIC NOTES (R).
- Solution (1-5).
- Take CROWN POMMEL (S).
- Place CROWN POMMEL and CROWN PART (T).
- Take SILVER NEEDLE and WOODEN GEAR (T1).
- Go (U).
- Place WOODEN GEAR, take SPIKE 3/4 and STONE TILE (V).
- Use STONE TILE, take PORTRAIT and ALCOHOL (W).
- Place 3 PORTRAITS (X).
- Play puzzle, receive HATCH RING.
- Use HATCH RING and go (Y).
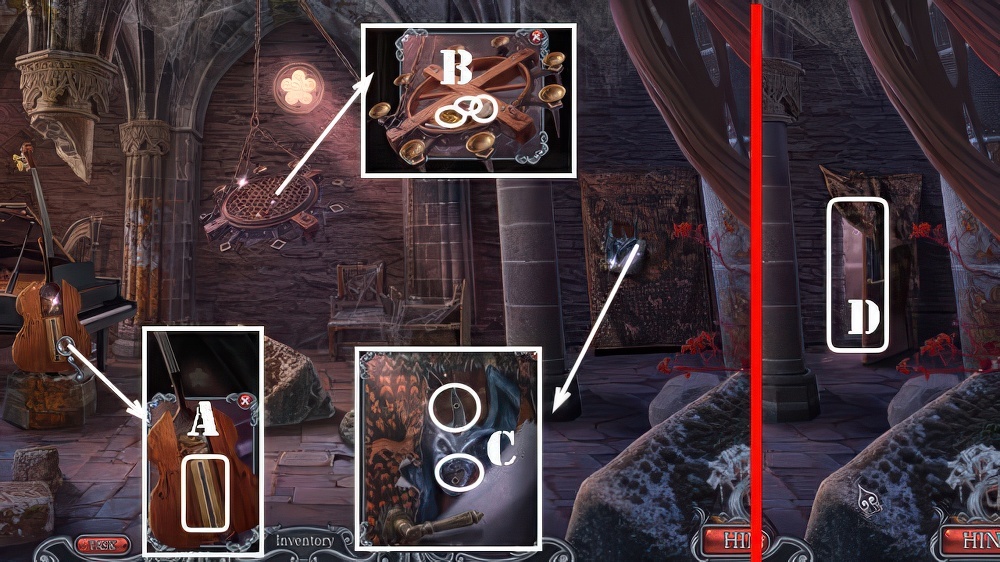
- Take GUILLOTINE BLADE, ROPE WITH HOOK, and SPIKED BALL (A).
- Place ROPE WITH HOOK (B) and GUILLOTINE BLADE (C), take ACID (D).
- Use ACID, take FILE (E).
- Walk down.
- Use FILE (F).
- Play puzzle, receive LAND MAP.
- LAND MAP, ALCOHOL, and SILVER NEEDLE on PRESENCE SPELL, take PRESENCE POTION.
- Place PRESENCE POTION (G), take IRON BEAM (H).
- Go (I).
- Place IRON BEAM (J), take VALVE and SPIKE 4/4 (K).
- Place VALVE (L).
- Solution: (O-Nx2)-(Mx2-N-O)-(Mx2-N-O).
- Take CHAIN WITH HOOKS and RIGHT GLOVE.
- SPIKE 4/4 and CHAIN WITH HOOKS on SPIKED BALL, take MACE AND CHAIN.
- Hang MACE AND CHAIN (P).
- Solution: (1-5).
- Take HAMMER and NET (A).
- Use NET (B), take LEFT GLOVE and KNOB (C).
- Use KNOB, take BALLPOINT PEN and CHISEL (D).
- Look at Note (E).
- LEFT GLOVE and BALLPOINT PEN on RIGHT GLOVE, take SUBMISSIVE MARK.
- Use SUBMISSIVE MARK (F).
- Use HAMMER and CHISEL (G).
- Play puzzle, receive PHARMACY KEY.
- Use PHARMACY KEY (H).
- Enter Pharmacy (I).
- Talk (J), receive BLUE DIAL.
- Take RED DIAL and CARDBOARD (K).
- Place RED DIAL and BLUE DIAL.
- Solution: (Lx7-N-M)-(N-M-N-M).
- Receive SCREWDRIVER and HANDBAG PART.
- Use SCREWDRIVER, take GLASSES (O).
- Give GLASSES (J), receive HANDBAG PART.
- Walk down.
- Place 2 HANDBAG PARTS, take WRENCH and INK (P).
- Use WRENCH (P1), receive PENDULUM.
- Go (P2).
- Place PENDULUM, take BLINDS HANDLE and PAINT ROLLER (Q).
- Place INK (R) and PAINT ROLLER (S), select ink bottle and then paint roller.
- Use CARDBOARD, take INHERITANCE TITLE (T).
- Give INHERITANCE TITLE (U).
- Solution one: (3-1)-(4-2)-(4-3)-(5-4).
- Solution two: (7-8)-(6-7).
- Solution three: (11-9)-(17-10)-(16-11)-(17-12)-(15-13)-(15-16).
- Go (V).
- Take PESTLE and CORD (W).
- Use CORD and BLINDS HANDLE (X).
- Take QUILL OF KNOWLEDGE and CHOPPING KNIFE (X1).
- Use CHOPPING KNIFE, take RECIPE WITH MORTAR and PHARMACIST’S SEAL (Y).
- Walk down.
- Use PHARMACIST’S SEAL, take SUBMISSION BALLS and FRIDGE HANDLE (A).
- Place FRIDGE HANDLE, take MOONFLOWER and CREAM (B).

- Place MOONFLOWER and use PESTLE (C), take BLUE POWDER (D).
- Go (E).
- Select RECIPE WITH MORTAR and open book.
- Place SUBMISSION BALLS, BLUE POWDER, and CREAM in the mortar, take SPIRIT TREAT.
- Use ALL-SEEING POTION and SPIRIT TREAT (G).
- Play puzzle, receive PUZZLE CLUE.
- Place PUZZLE CLUE, solution (5-3-2), take SECATEURS HANDLE and SPELL SEAL (H).
- Place QUILL OF KNOWLEDGE (I) and SPELL SEAL (J).
- Select brown book twice (K).
- Select seal (J) and then green book twice (L).
- Select seal again (J) and then open book (M), take MAP COORDINATES and BOLT (M1).
- Place MAP COORDINATES.
- Solution: (1-7).
- Take STAINED-GLASS PART 1/6 and SHOVEL (P).
- Use SHOVEL, take KEEPER’S NECKLACE and SECATEURS BLADE (Q).
- SECATEURS BLADE and BOLT on SECATEURS HANDLE, take SECATEURS.
- Use SECATEURS, take SUMMONING BOWL and STAFF (R).
- Place STAFF (S).
- Enter (T).
- Take ULTRASONIC WHISTLE (U).
- Use ULTRASONIC WHISTLE, take CARABINERS, MEMORY RUNE, and KEEPER’S JEWEL (V).
- Place KEEPER’S JEWEL and KEEPER’S NECKLACE (W), take THERESA’S PORTRAIT and BROKEN LADDER (X).
- Walk down.
- Place SUMMONING BOWL, MEMORY RUNE, and THERESA’S PORTRAIT (Y).
- This solution is random (Z).
- Receive GRAVE PLATE.
- Place GRAVE PLATE, take PLANKS and OWL FIGURINE (A).
- PLANKS and CARABINERS on BROKEN LADDER, take ROPE LADDER.
- Place ROPE LADDER (B).
- Enter (C).
- Take STAINED-GLASS PART 2/6, STAINED-GLASS PART 3/6, TAR, and DENTIST’S TONGS (D).
- Use DENTIST’S TONGS (E), take STONE FRAGMENT and SHARP CLAW (F).
- Use SHARP CLAW, take STONE NOSE and SQUIRREL FIGURINE (G).
- Place OWL FIGURINE and SQUIRREL FIGURINE (H), take STAINED-GLASS PART 4/6 and BIRD EMBLEM (I).
- Place BIRD EMBLEM (J).
- Play puzzle, receive KEEPER’S BRACELET.
- Return to Crypt.
- Place KEEPER’S BRACELET (K), select 2-1-4-3, take STONE MOUTH, FABRIC, and STONE FRAGMENT (L).
- Place STONE MOUTH and STONE NOSE, take TURPENTINE and STAINED-GLASS PART 5/6 (M).
- TURPENTINE and FABRIC on TAR, take STAINED-GLASS PART 6/6.
- Place STAINED-GLASS PART 6/6 (N), take WEAKENING SPELL and STONE FRAGMENT and look at Note (O).
- Place 3 STONE FRAGMENTS (P).
- Solution: (R-T-Wx2-Yx2).
- Take WOODEN PATTERN and MAGIC COLLAR.
- Return to Treehouse.
- Place WOODEN PATTERN, take OVEN HANDLE and look at Note (Z1).
- Place OVEN HANDLE, take RIGHT LEVER (Z2).
- Place MAGIC COLLAR (Z3), receive WOOD SPIRIT.
- Place WOOD SPIRIT (Z4).
- Play puzzle.
- Take STONE HEART PART, NET, and MACE HEAD (A).
- Use NET (B), take CRUSTACEAN HOUSE and LEFT LEVER (C).
- Place RIGHT LEVER and LEFT LEVER (D), take FILE and STONE RIBBON (E).
- FILE on CRUSTACEAN HOUSE, take STONE HEART PART.
- Place two STONE HEART PARTS and STONE RIBBON (F).
- Take FLAME SYMBOL and GOLDEN KNOB (G).
- MACE HEAD and FLAME SYMBOL on WEAKENING SPELL, take WEAKENING MACE.
- Use WEAKENING MACE (H).
- Play puzzle, receive SILVER KNOB.
- Place SILVER KNOB and GOLDEN KNOB, take SCREWDRIVER and RHEA’S MEDALLION (I).

- Use SCREWDRIVER, take STATUE NAMEPLATE and look at Note (J).
- Place STATUE NAMEPLATE, take PEDAL and LOCKPICK (K).
- Use LOCKPICK (L).
- Take MIRROR SHARD 1/4, STAND BODY, CHAIN, and CHANDELIER PEG 1/5 (M).
- Place CHAIN and PEDAL (N), take SEAM RIPPER and TUNING PEG SET, look at Note (O).
- Use SEAM RIPPER, receive STRINGS, take SCALE STAND (P).
- Place TUNING PEG SET and STRINGS, take CHANDELIER PEG 2/5 and RHEA’S GLOVE (Q).
- Place RHEA’S GLOVE and RHEA’S MEDALLION (R).
- Solution: (1-6).
- Go (S).
- Take CHANDELIER PEG 3/5, MIRROR SHARD 2/4, and DECORATION (T).
- Place DECORATION (U), take RUNES and STAND HOOKS (V).
- Use RUNES and place them as shown (W).
- Take BALCONY HANDLE and STAND ARMS (X).
- Use BALCONY HANDLE and select area 3x, take CHANDELIER PEG 4/5 and ANTIQUE STAND BASE (Y).
- ANTIQUE STAND BASE, STAND ARMS, and STAND HOOKS on STAND BODY, take ANTIQUE STAND.
- Place ANTIQUE STAND, take FLUTE and HORN OF WISDOM (Z).
- Walk down.
- Place FLUTE (A).
- Play puzzle, receive CHANDELIER PEG 5/5.
- Place CHANDELIER PEG 5/5, take SACRED APPLE, SCALE and look at Note (B).
- Place HORN OF WISDOM and SACRED APPLE (C).
- Go (D).
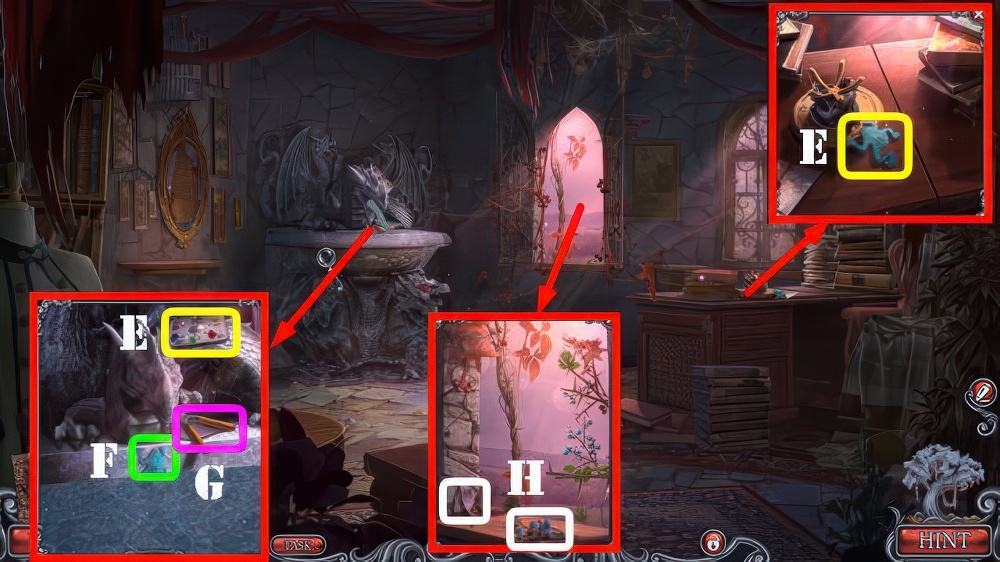
- Take POTION RECIPE and FROG TILE (E).
- Place FROG TILE (F), take PRUNERS and MIRROR SHARD 3/4 (G).
- Use PRUNERS, take MIRROR SHARD 4/4 and BLACKTHORN BRANCH (H).

- Place MIRROR SHARD 4/4 (I).
- Play puzzle, receive RHEA’S BALL.
- Place RHEA’S BALL, take RHEA’S SOULSTONE and CORKED TIMELESSNESS (J).
- Go to Rhea’s Room.
- Use RHEA’S SOULSTONE, take TWEEZERS and EMBODIMENT OF MAGIC and look at Note (K).
- Use TWEEZERS, take SCALE (L).
- Two SCALES on SCALE STAND, take SCALES.
- Place POTION RECIPE, BLACKTHORN BRANCH, CORKED TIMELESSNESS, and SCALES (L1).
- Solution: (Ox4).
- Drag weights (5)-(2)-(1) to (M).
- Select (N).
- Place weights on (M) back in their place.
- Select: Select (Px2).
- Drag weights (2) and (1) to (M).
- Select (N).
- Place weights on (M) back in their place.
- Select (Qx2).
- Drag weights (2) and (2) to (M).
- Select (N).
- Place weights on (M) back in their place.
- Select (Rx3).
- Select (S)-(Tx2).
- Drag weight (1) to (M).
- Select (N).
- Place weight on (M) back in its place.
- Select (Ux3).
- Drag weights (5) and (1) to (M).
- Select (N).
- Take MATERIALITY POTION and CHAIN LINKS (V).
- Return to Medium’s Room.
- Use MATERIALITY POTION (W).
- Talk (X), receive BRACELET.
- Place BRACELET and CHAIN LINKS, take ALPINIST’S GLOVES and SKULL, look at Note (Y).
- Use ALPINIST’S GLOVES (Z).
- Solution: (A-B-C).
- Take RIBS, DIAL, and SCRAPER (D).
- Use SCRAPER, place EMBODIMENT OF MAGIC and select area twice, take CHALK (E).
- Use CHALK, take FACES CLUE (F).
- Place FACES CLUE.
- Solution (H).
- Take INFINITY SYMBOL and BROKEN WEAPON (I).
- Place INFINITY SYMBOL (J).
- Play puzzle, receive SKELETAL HAND.
- Place SKULL, SKELETAL HAND, and RIBS (K).
- Go (L).
- Take CLOCK HANDS and WHIP (M).
- Place DIAL and CLOCK HANDS (N), take STASH HANDLE and THORNS (O).
- Use STASH HANDLE (P).
- Play puzzle, receive HEART OF DARKNESS.
- Walk down.
- Place HEART OF DARKNESS (Q).
- Take DIAMOND RING and FRAME PART (R).
- Place FRAME PART (S).
- Take OBLIVION POTION and TAPE (T).
- Go (U).

- Use DIAMOND RING and OBLIVION POTION (V), receive DRAINED AMULET OF STRENGTH.
- Use DRAINED AMULET OF STRENGTH (W), receive AGATHA’S STRENGTH.
- WHIP, THORNS, TAPE, and AGATHA’S STRENGTH on BROKEN WEAPON, take WHIP OF DESTRUCTION.
- Use WHIP OF DESTRUCTION (X).
- Solution: (A-E).
- Receive THERESA’S AMULET.
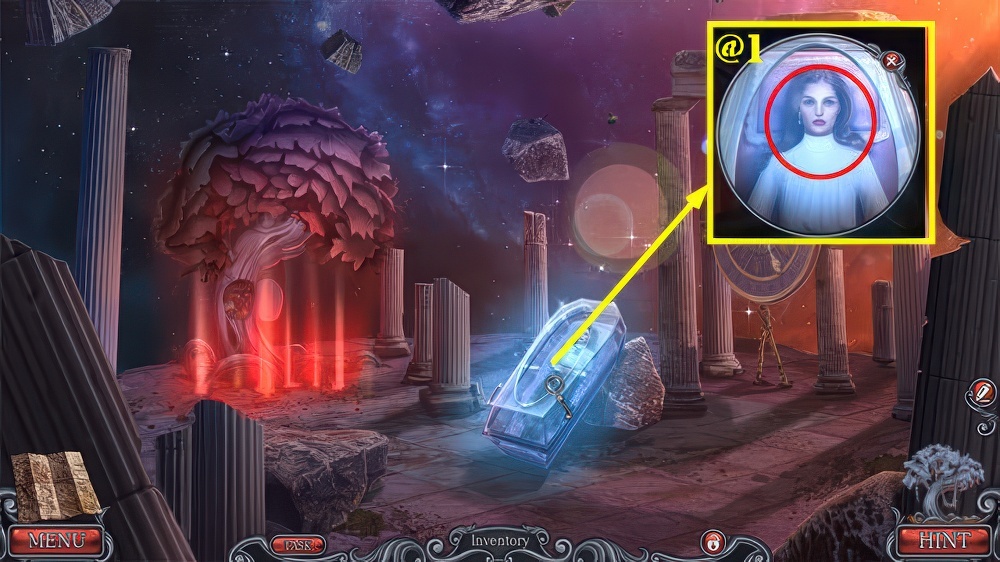
- Use THERESA’S AMULET (@1).
- Walkthrough Bonus Chapter, at the link below.


