Mindframe 1: The Secret Design – Dive into a suspenseful detective story full of mystery and unexpected twists and turns. William Rogers once agreed to participate in a medical experiment, not even realizing that it would change his life forever. The side effect was a unique gift, the ability to read minds and see other people’s memories. Years later, after becoming a police consultant, he uses his power to help investigations. But one day his secret is no longer a secret. An unknown man calling himself the Designer gets on William’s trail, drawing him into a dangerous game. How he learned of Rogers’ supernatural gift, and what he seeks is unknown. While investigating an attack on a truck driver, William encounters the first signs of an impending threat. Using his abilities, he enters the victim’s mind and reconstructs the details of the incident. His memories are distorted by fear, but Rogers manages to make out an important detail, a tattoo on the attacker’s arm. And then the figure of a masked man watching. Each mystery solved, each fragment of memory brings you closer to uncovering the conspiracy. It’s up to you to collect all the clues, get ahead of the Designer, and uncover his secret plot. If you can not pass any of the puzzles or do not know where the items are, on our site you can watch the walkthrough of the game Mindframe 1: The Secret Design, and deal with the Designer.
Mindframe 1: The Secret Design – Walkthrough
Here you can see the full walkthrough of Mindframe 1: The Secret Design game, namely for all chapters, including bonus chapter, in pictures.
- Open WALLET, examine ID card.
- Take CREDIT CARD.
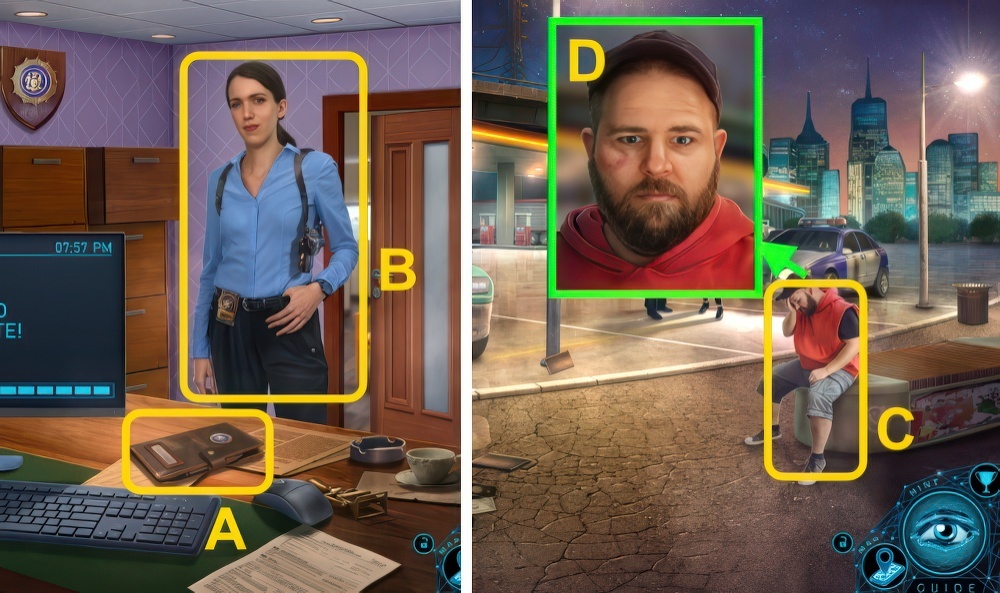
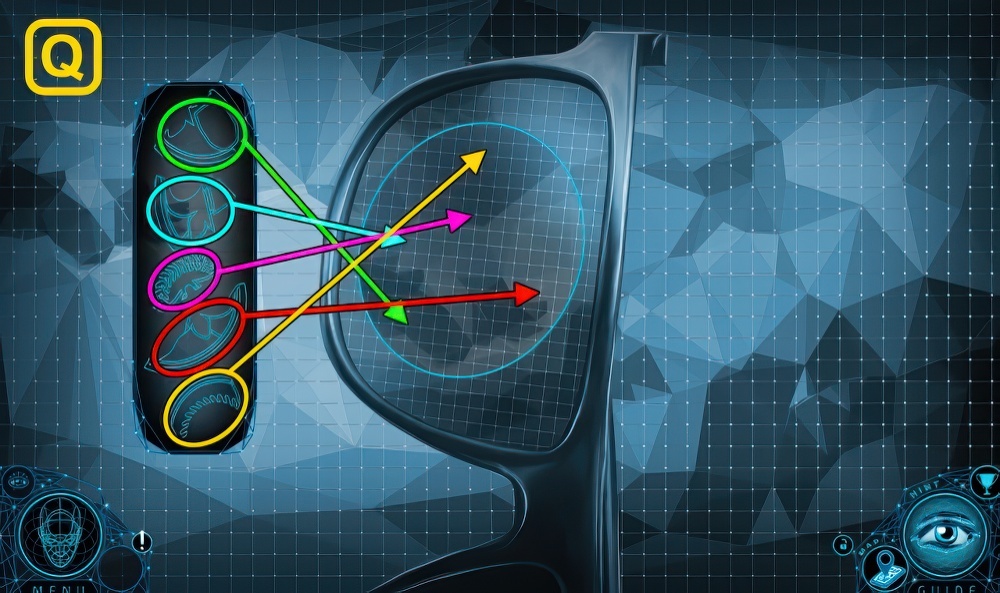
- Read journal (A), play puzzle.
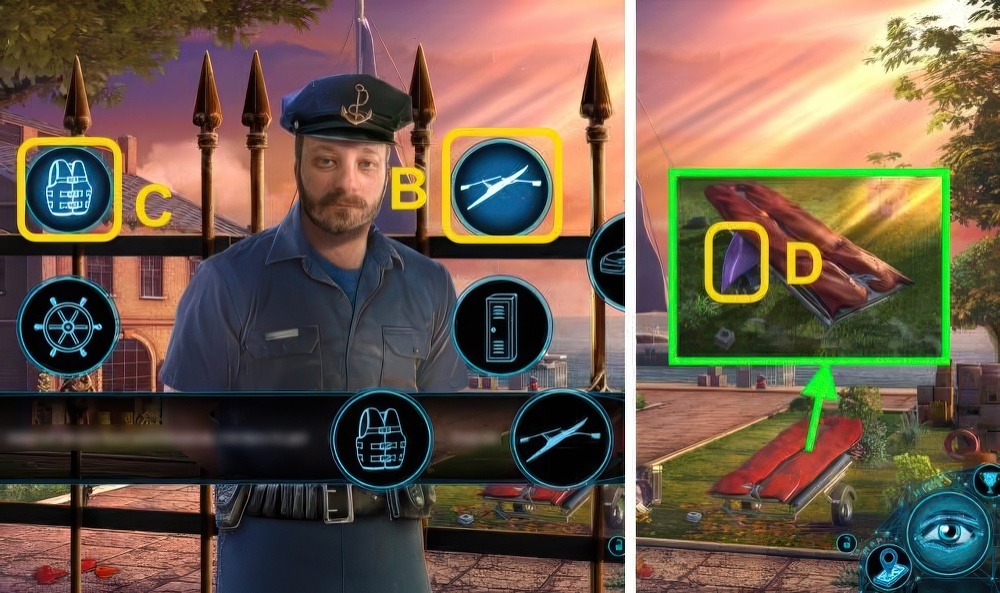
- Talk (B).
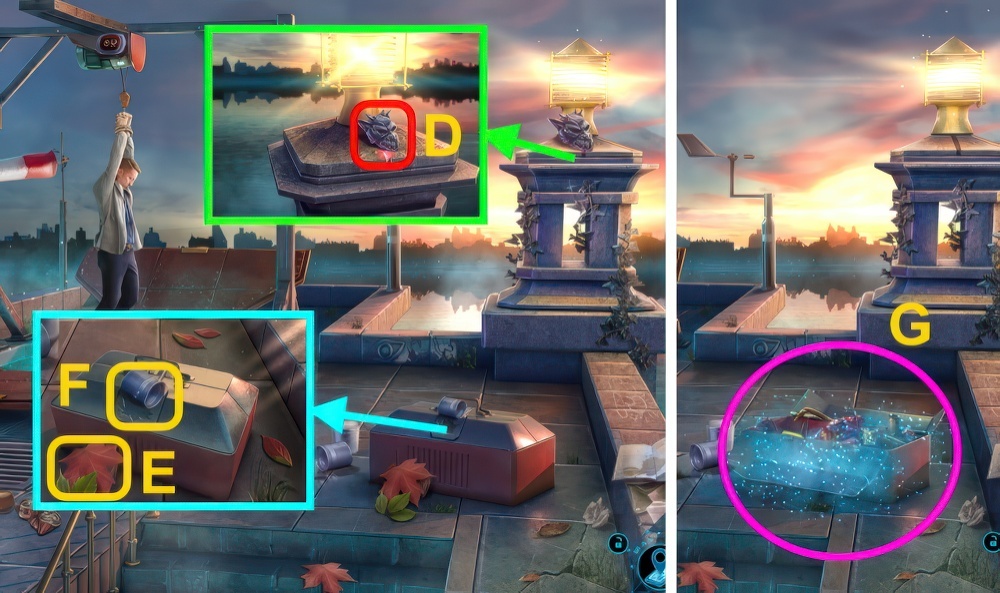
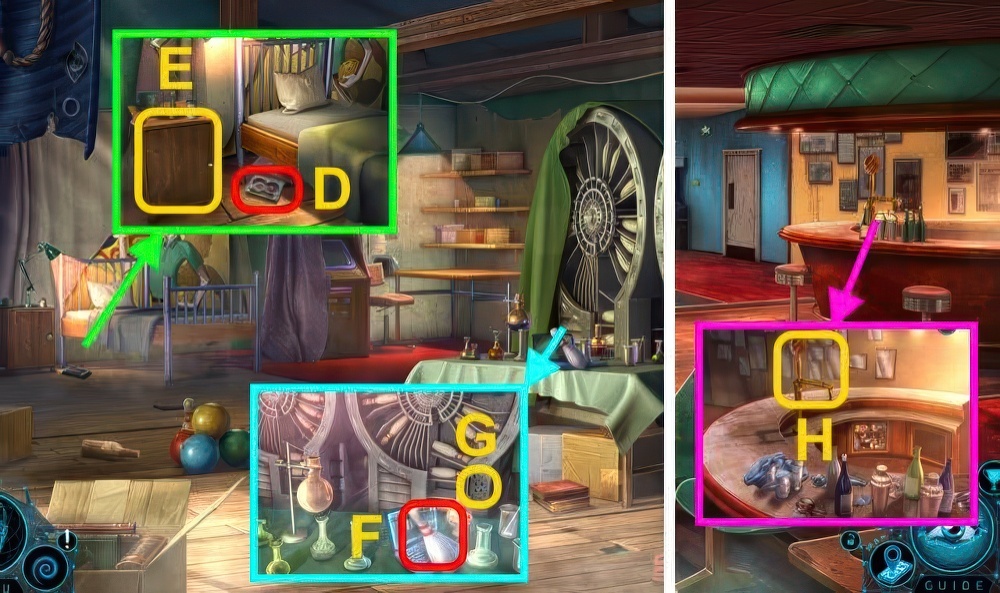
- Talk (C), examine (D).

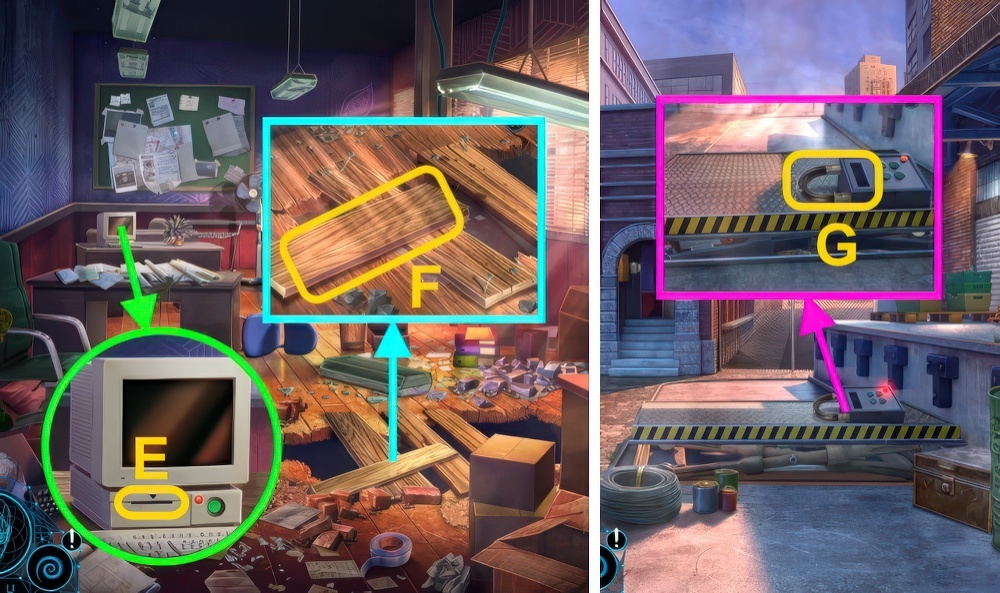
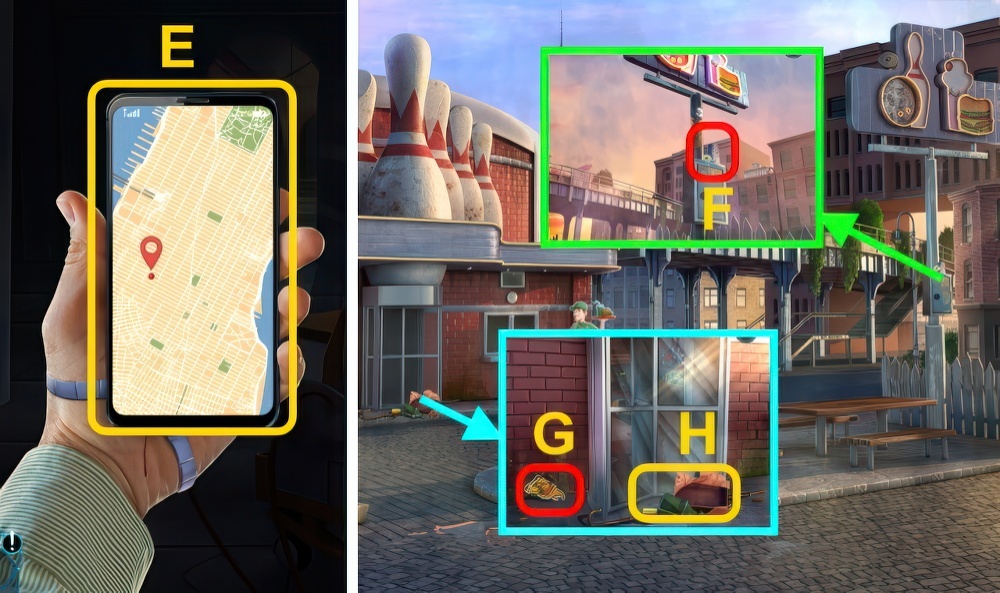
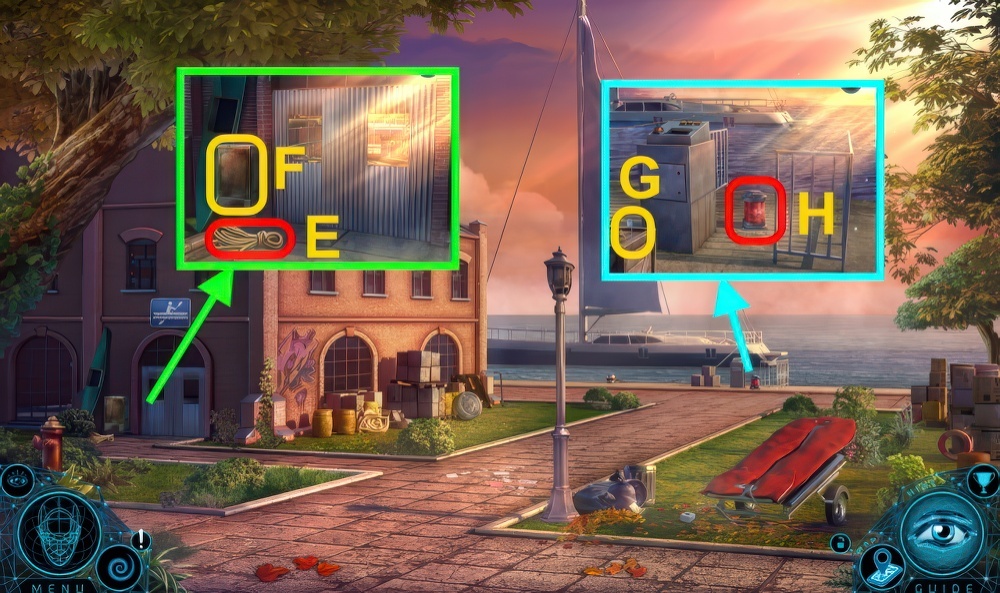
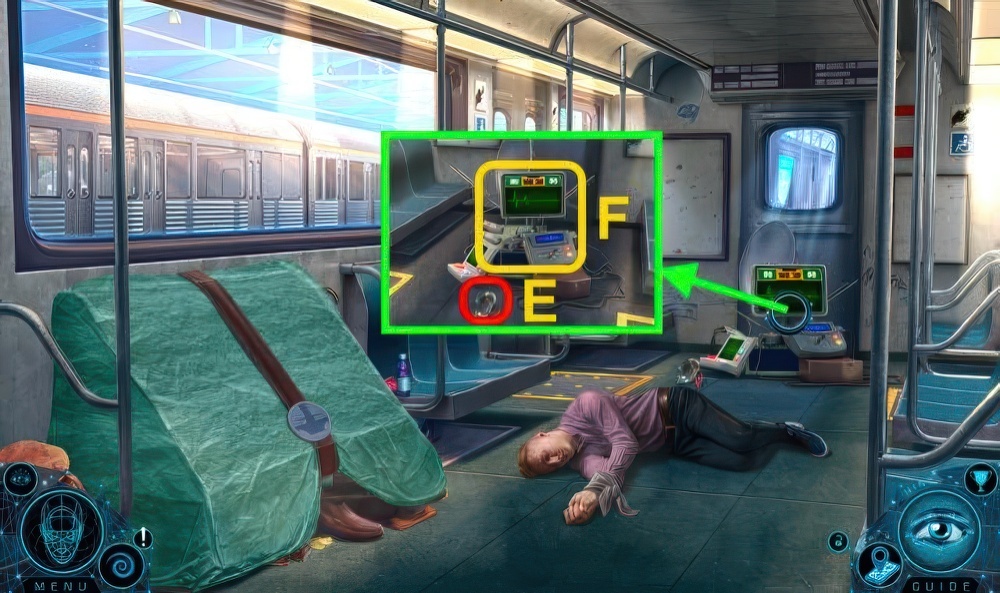
- Solution (E).

- Solution (F).

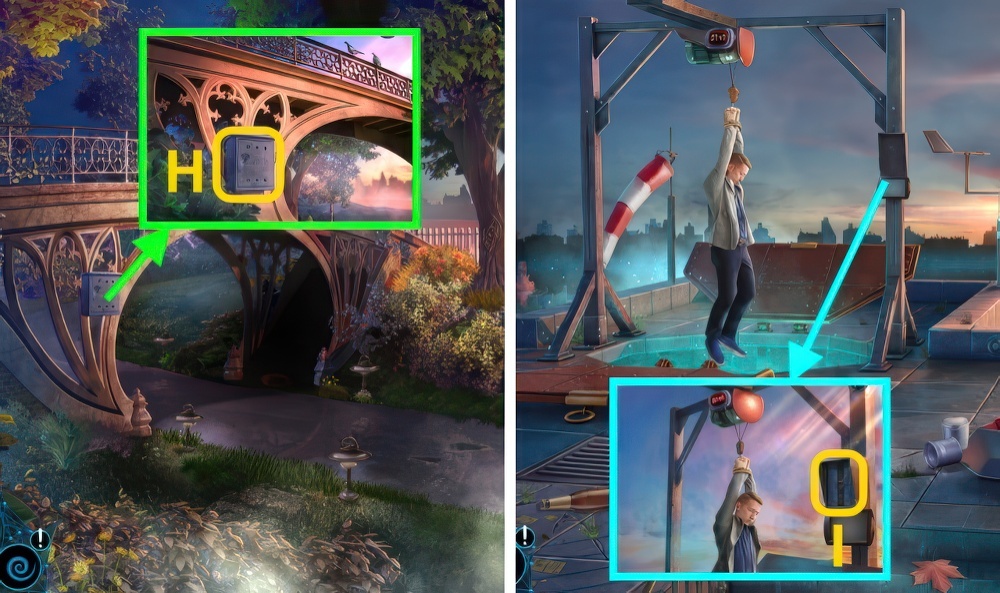
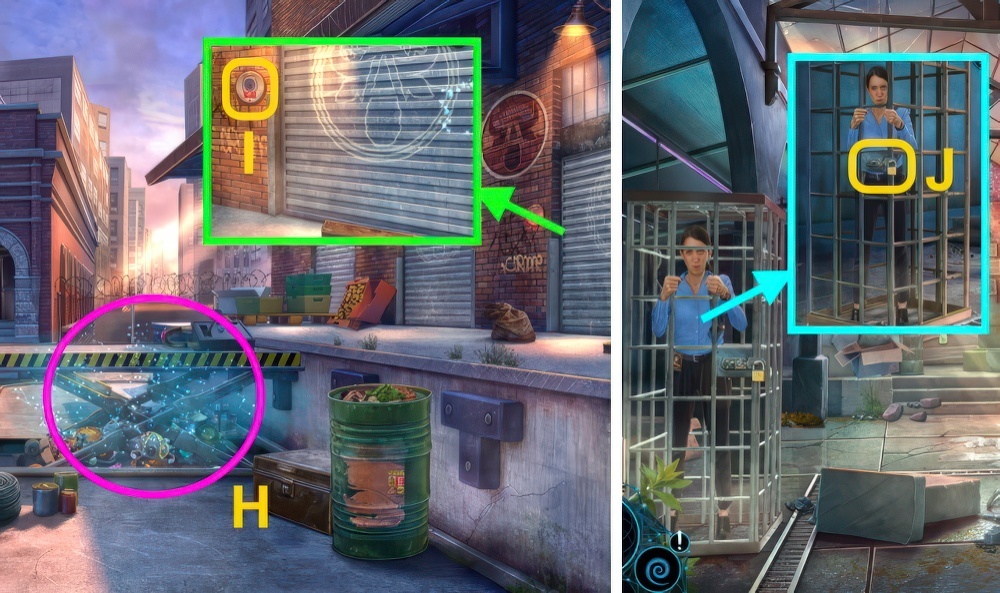
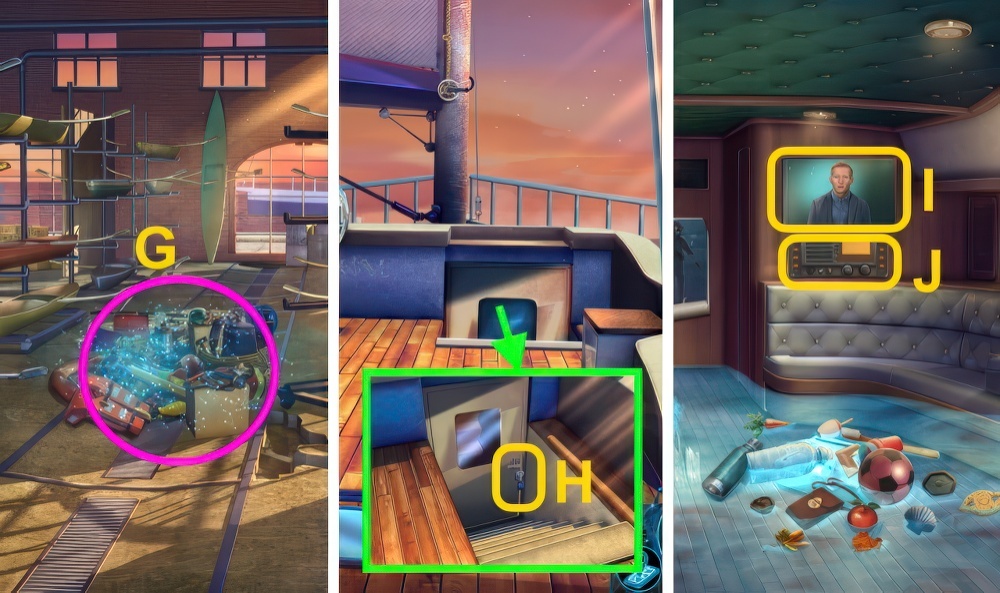
- Examine (G-I).
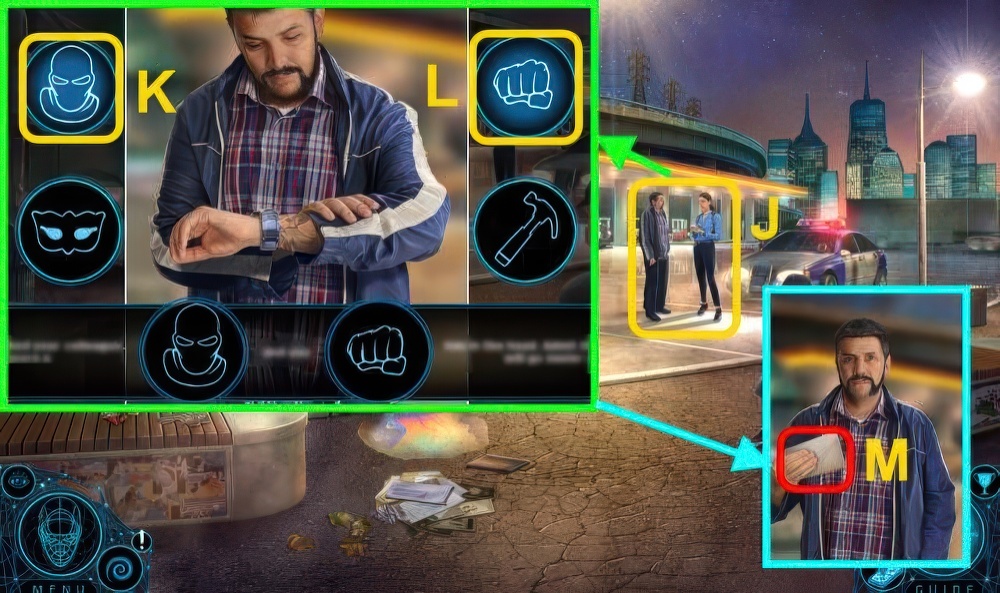
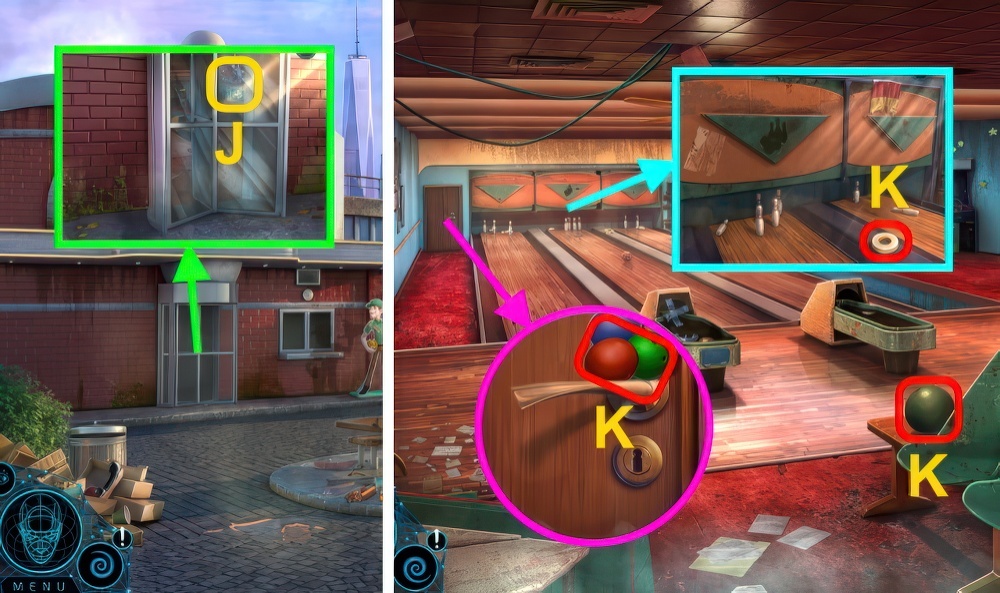
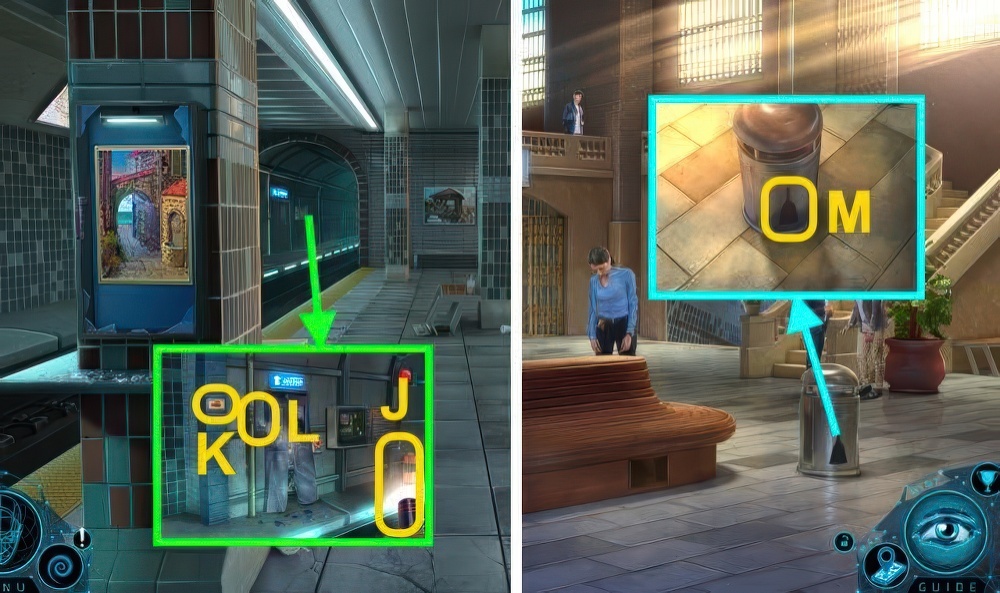
- Talk (J).
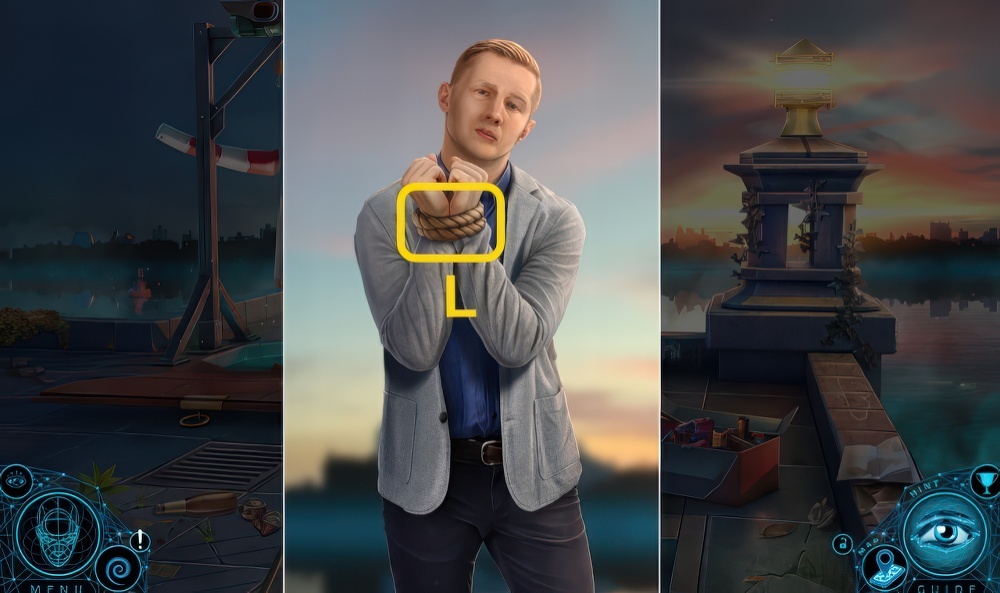
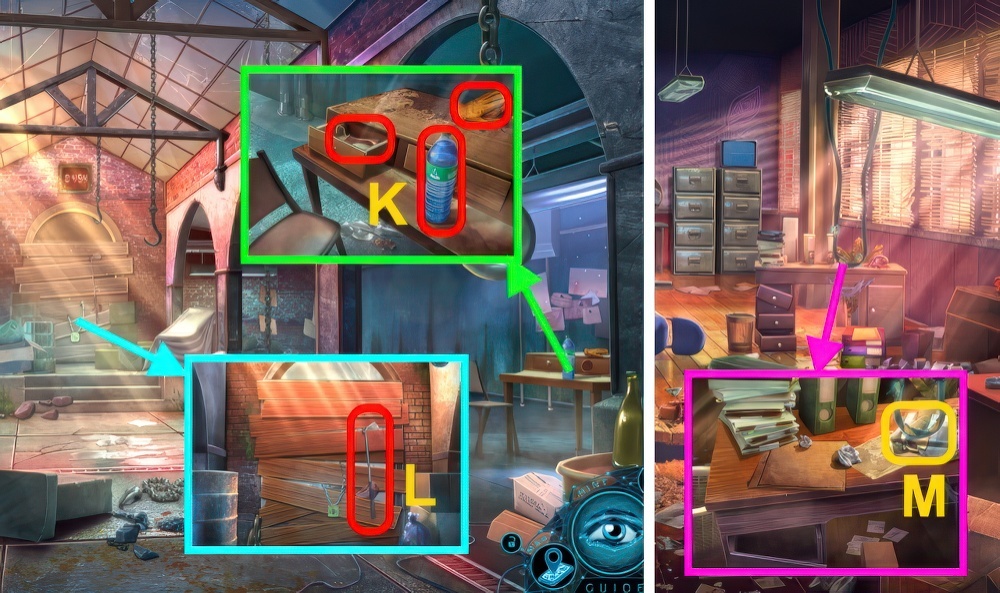
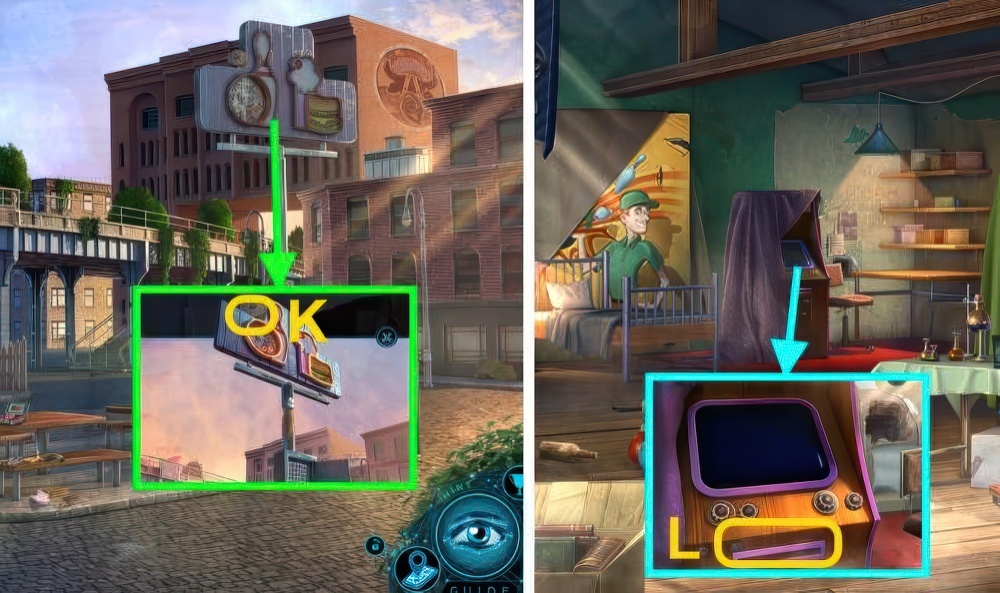
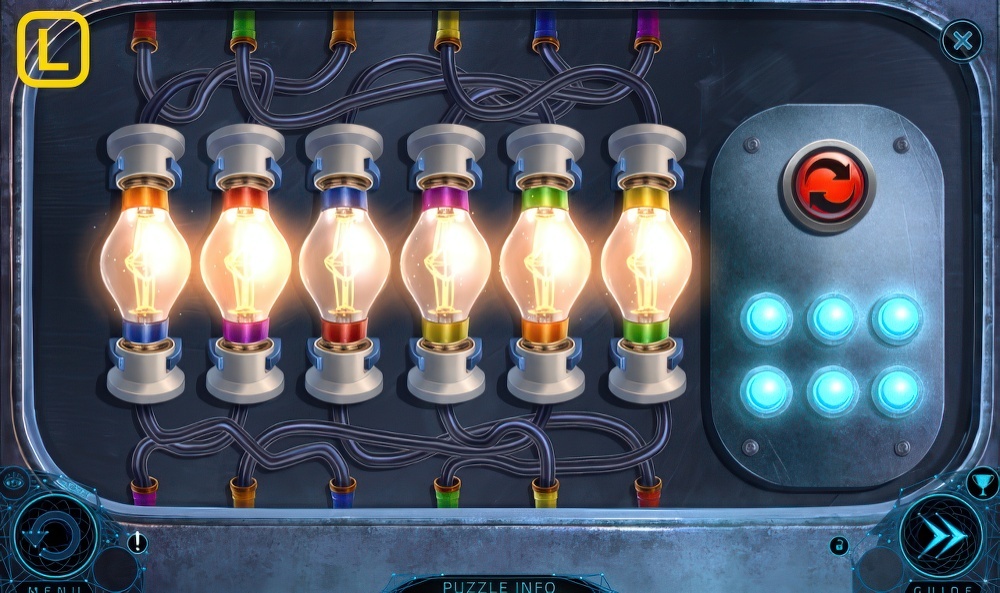
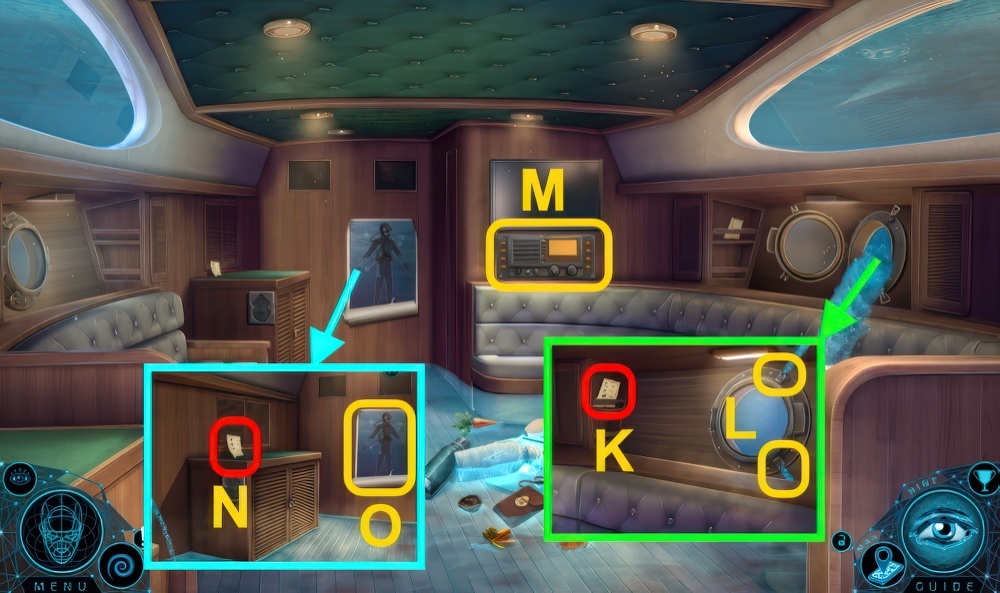
- Select (K-L).
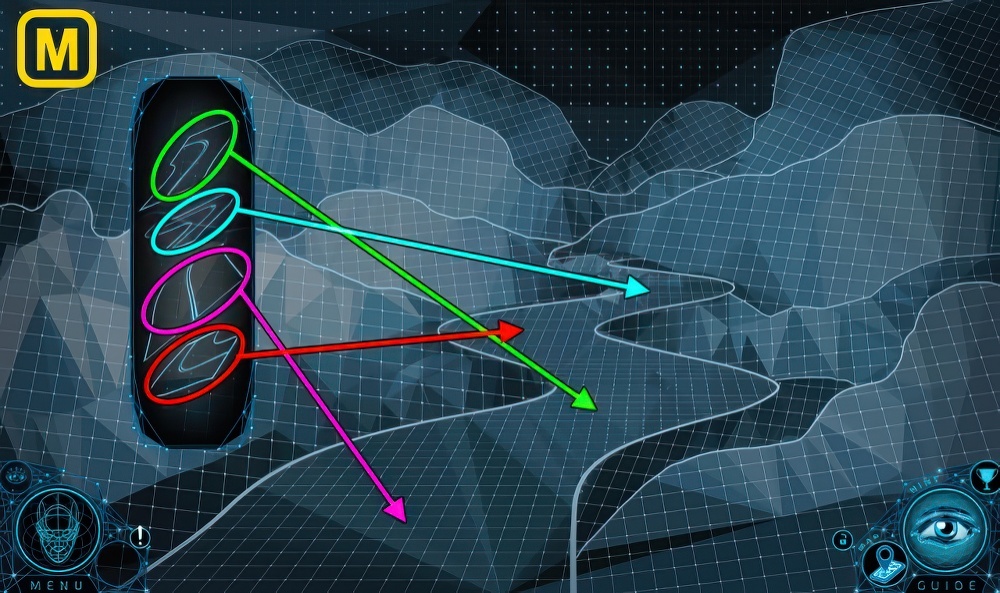
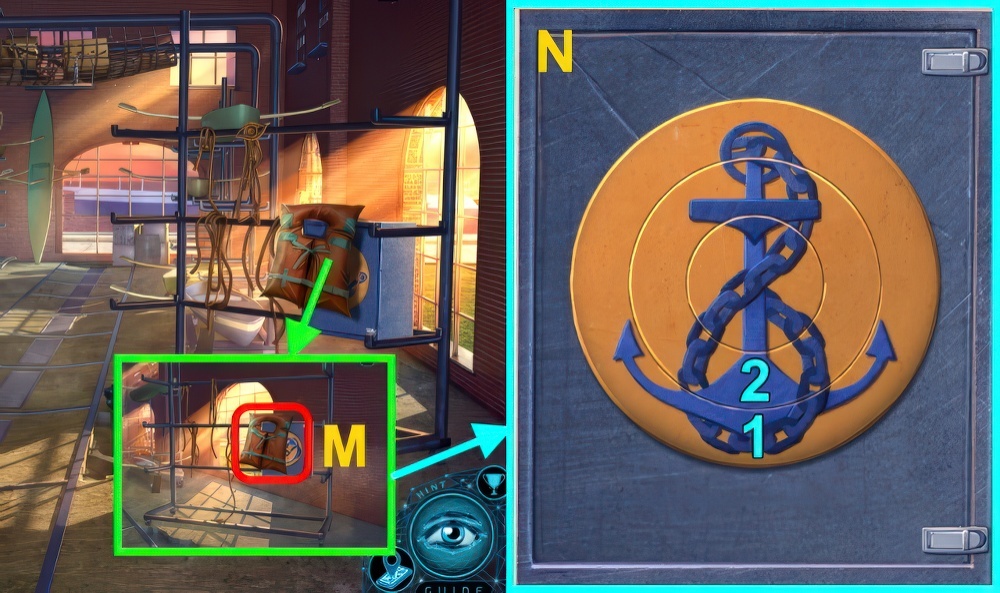
- Take LETTER (M).
- Open LETTER, take DOOR LATCH.
- Enter Driver Cabin.
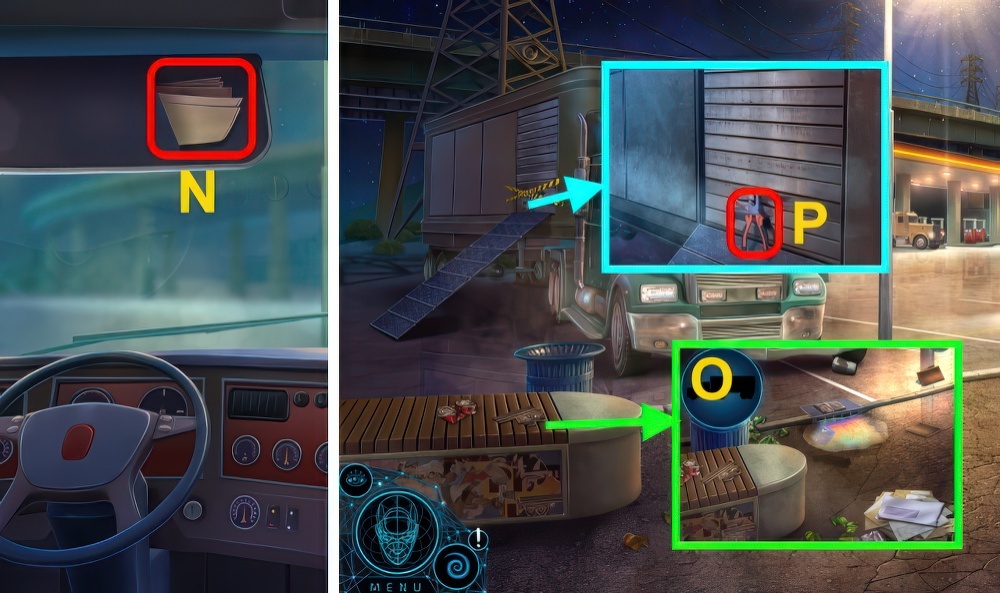
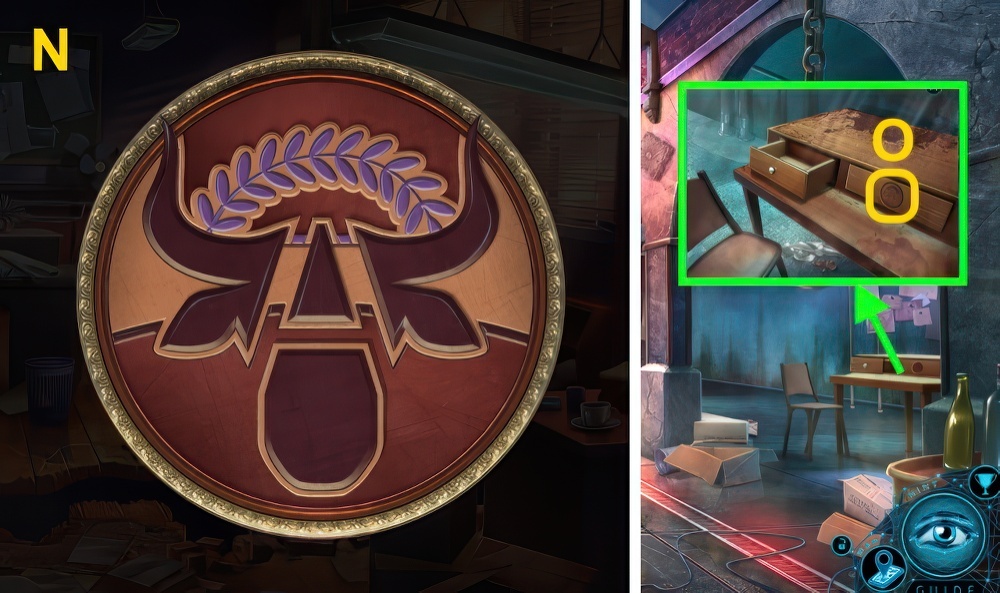
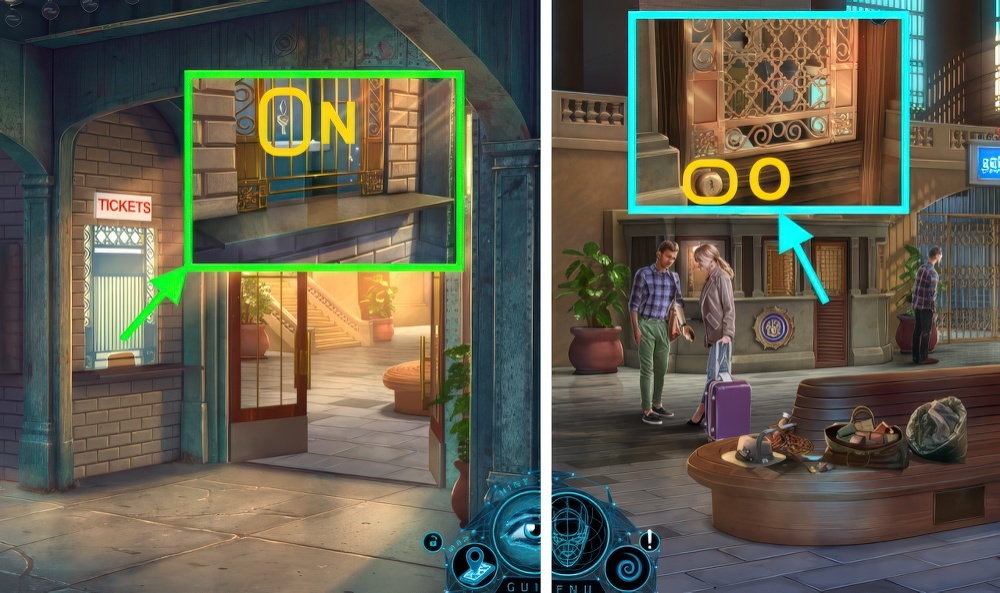
- Take PAPER NOTE (N).
- Read PAPER NOTE, take PAPER CARD.
- Go left.
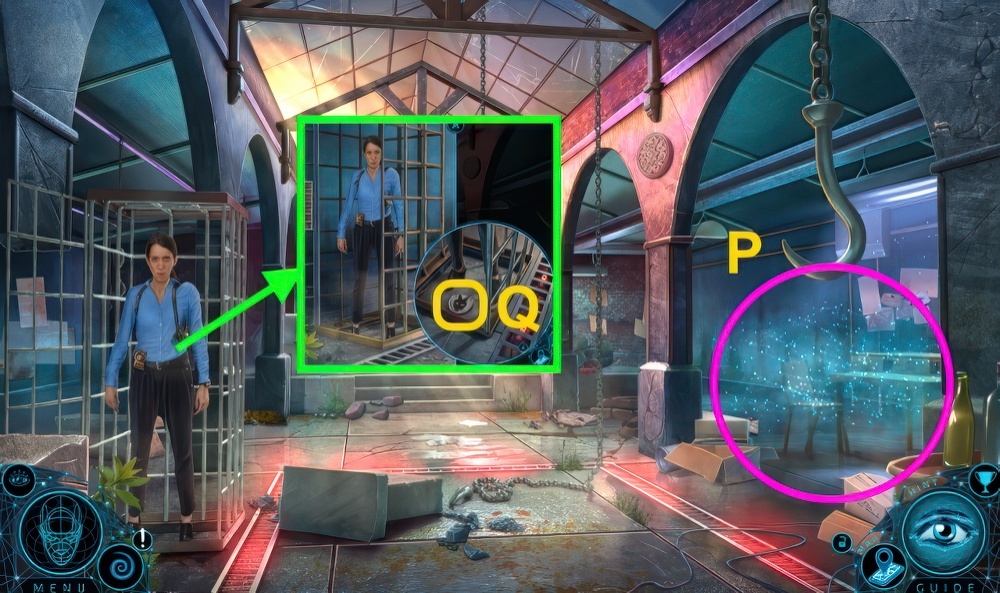
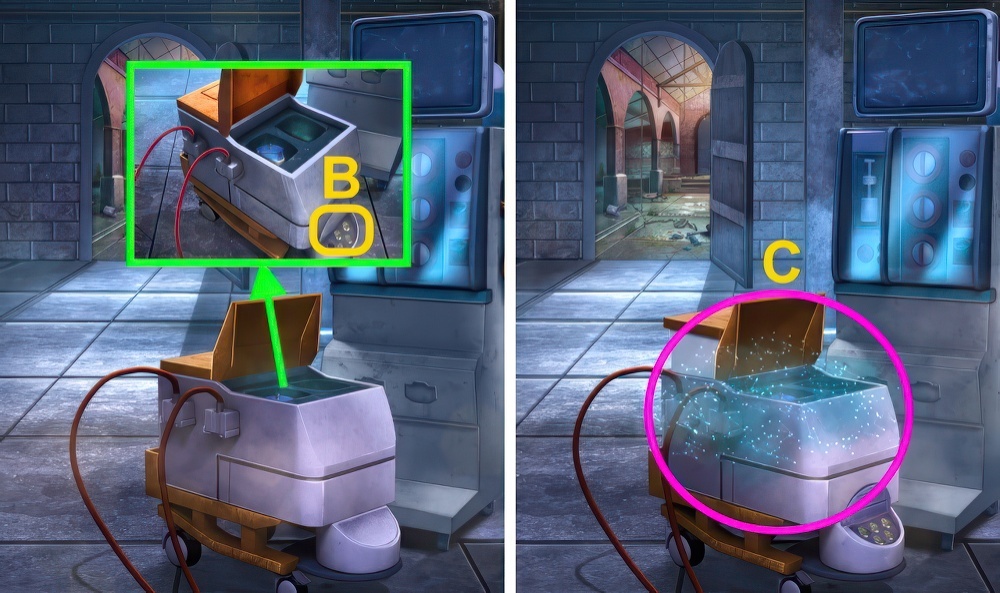
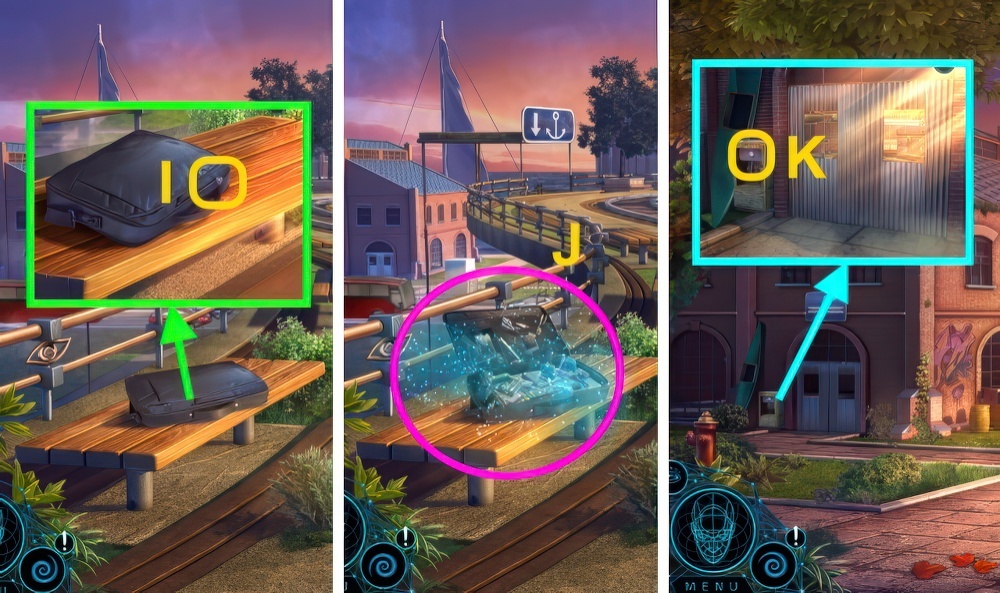
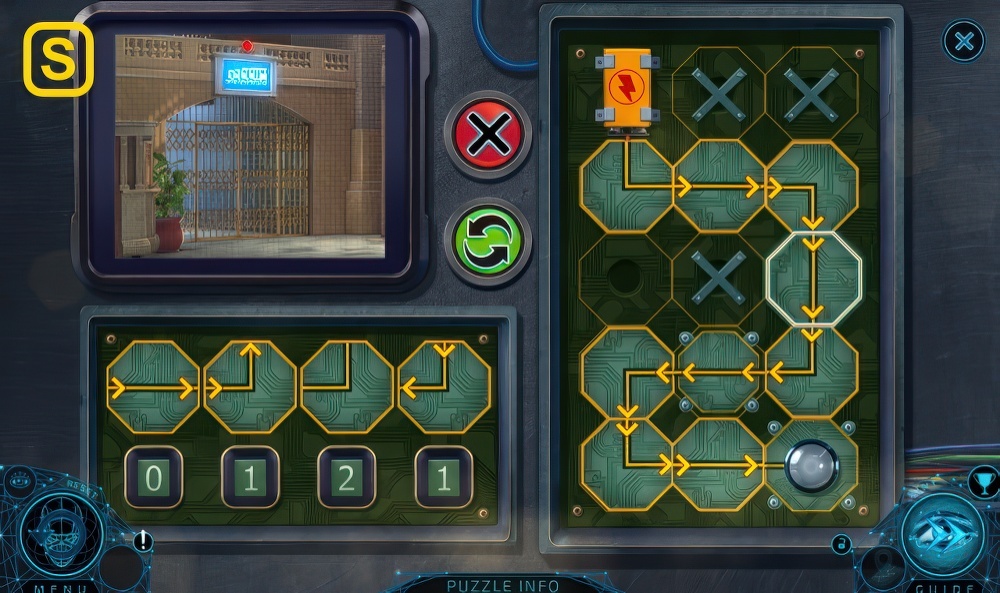
- Play puzzle (O), receive METAL TRUCK.
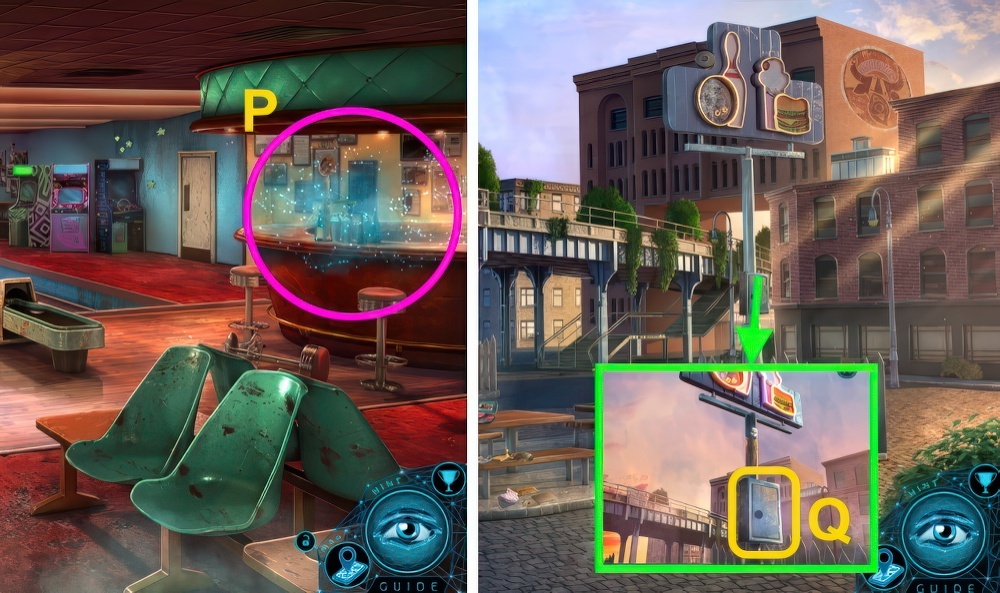
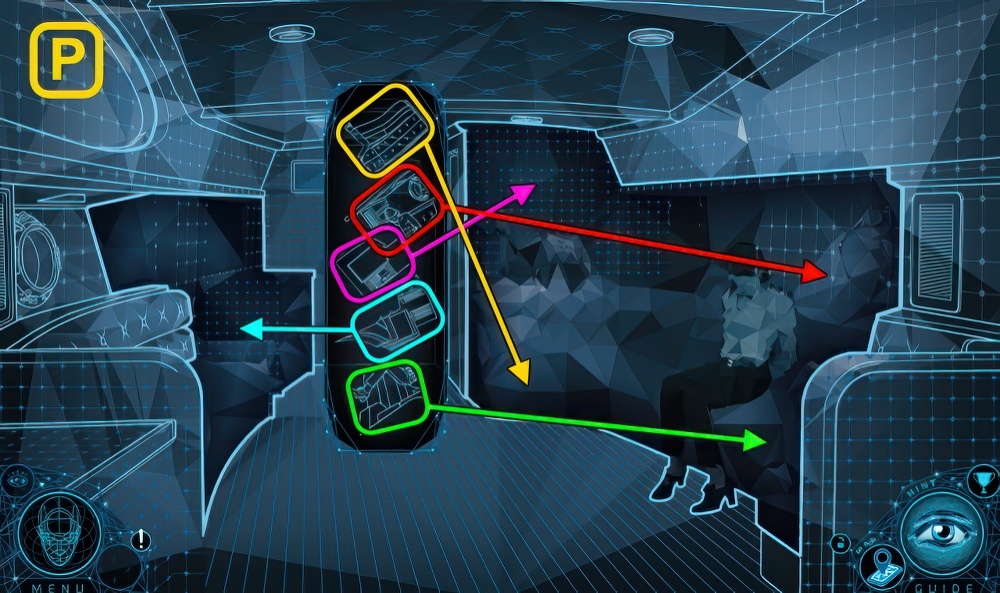
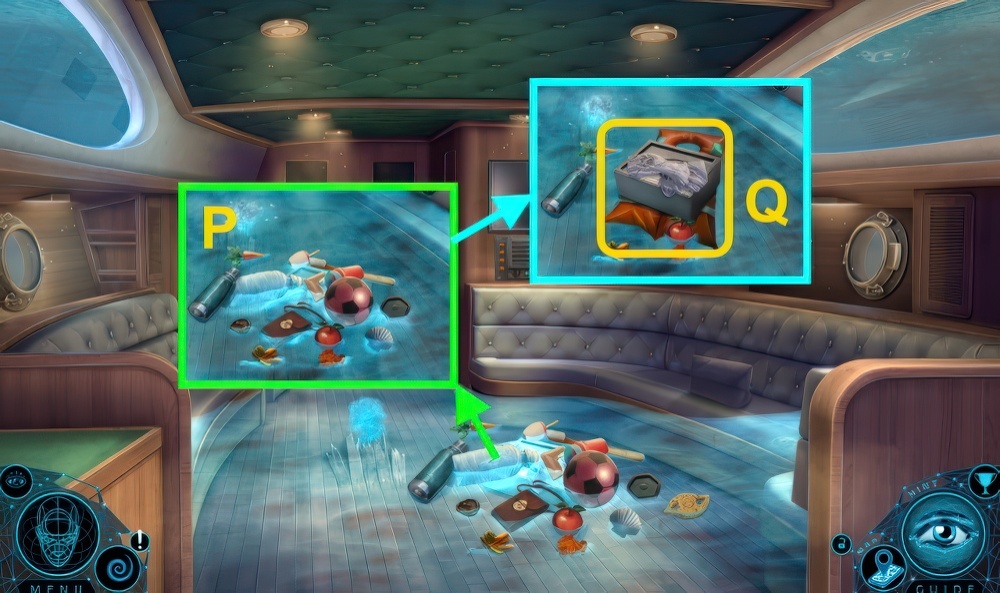
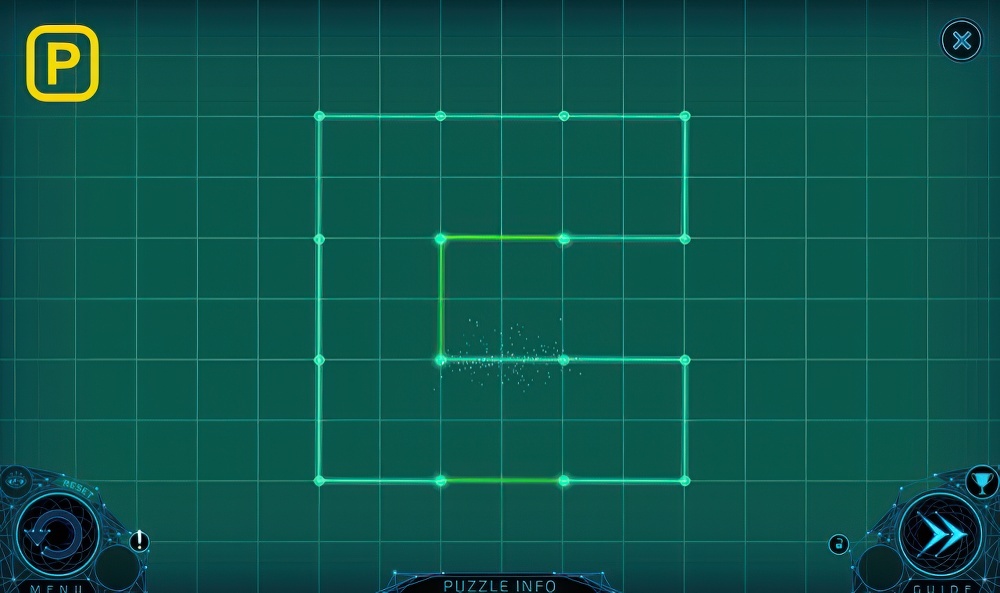
- Remove tape, take SMALL PLIERS (P).
- Use DOOR LATCH.

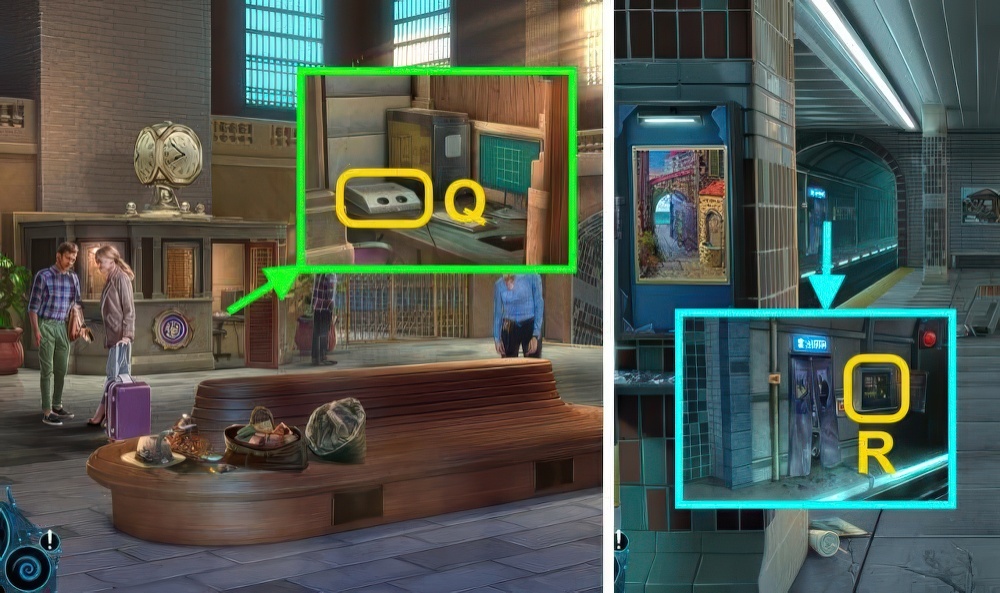
- Play puzzle, receive METAL BOX (Q).
- Enter Driver Cabin.
- Place METAL TRUCK (R).
- Move items, take TOOL POUCH and DEFROSTER.
- Examine METAL BOX, read note.
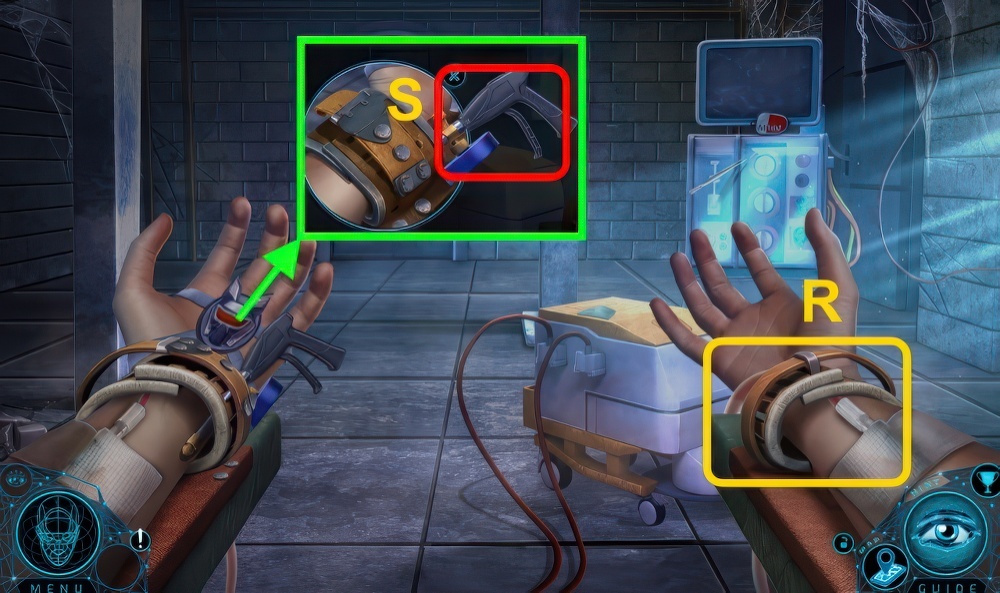
- Use DEFROSTER and PAPER CARD.
- Enter code (S), take items.
- Open TOOL POUCH, assemble and take SHOVEL.
- Walk left.
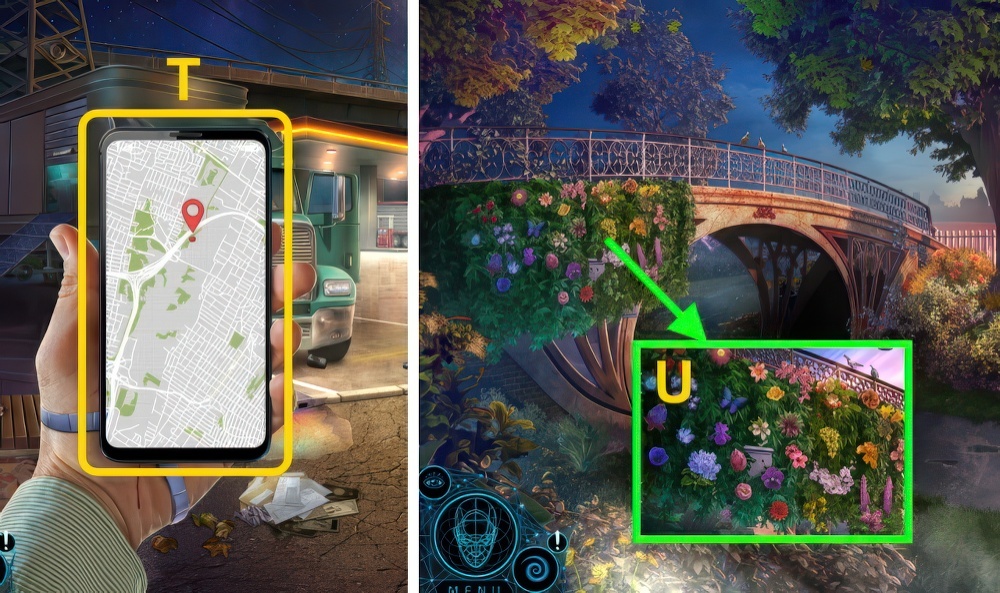
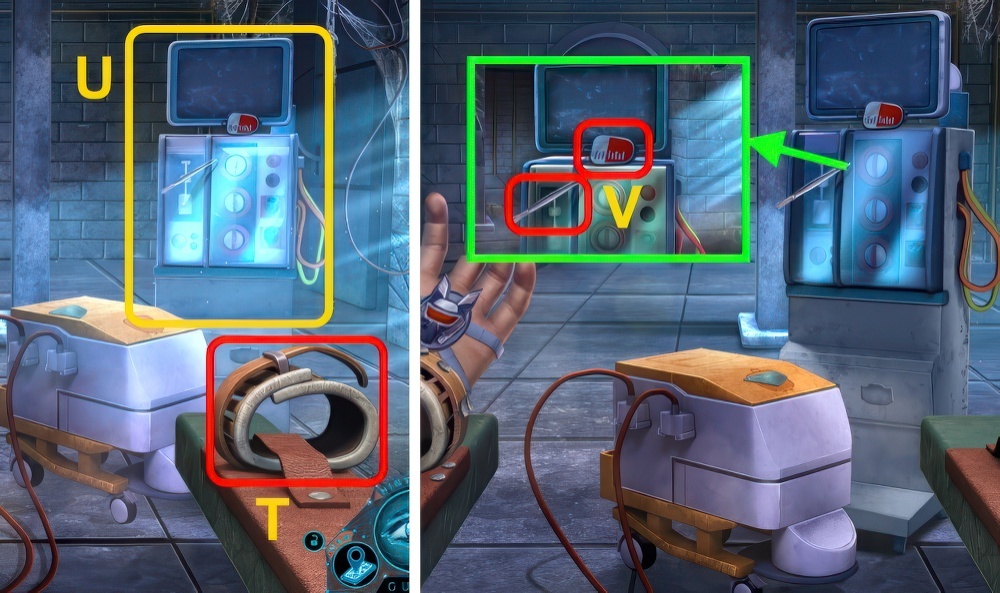
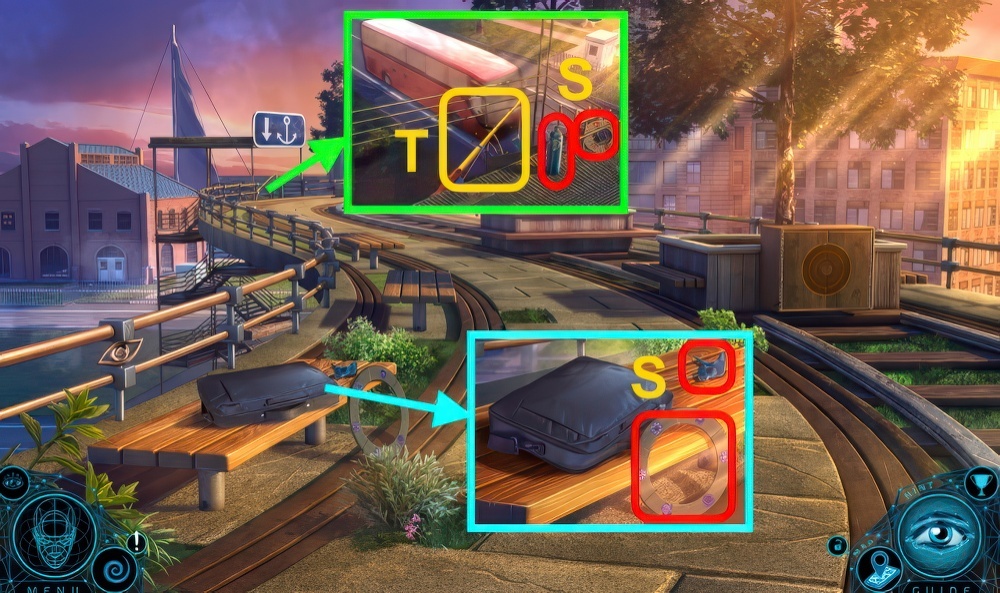
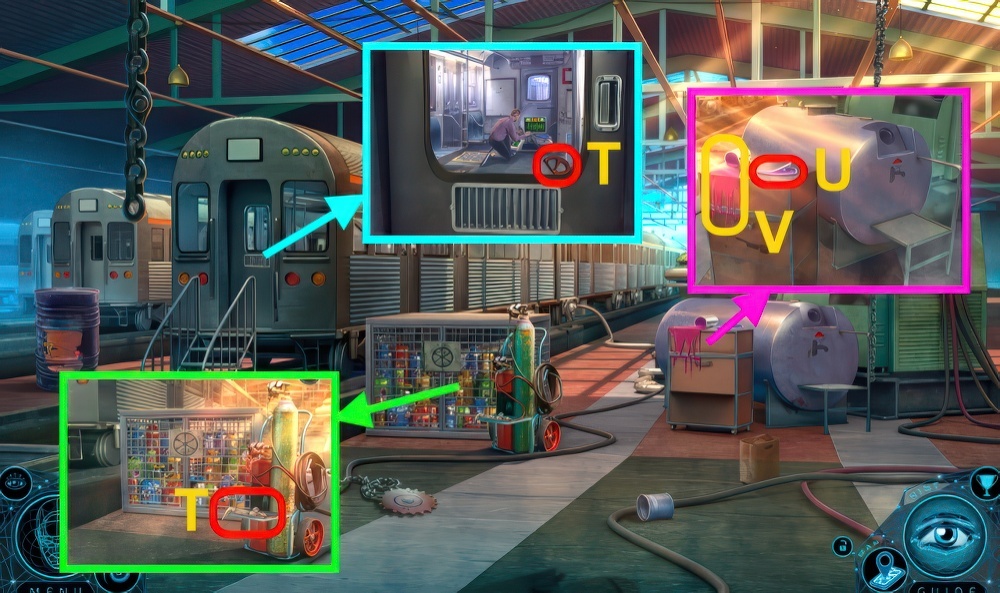
- Examine (T).
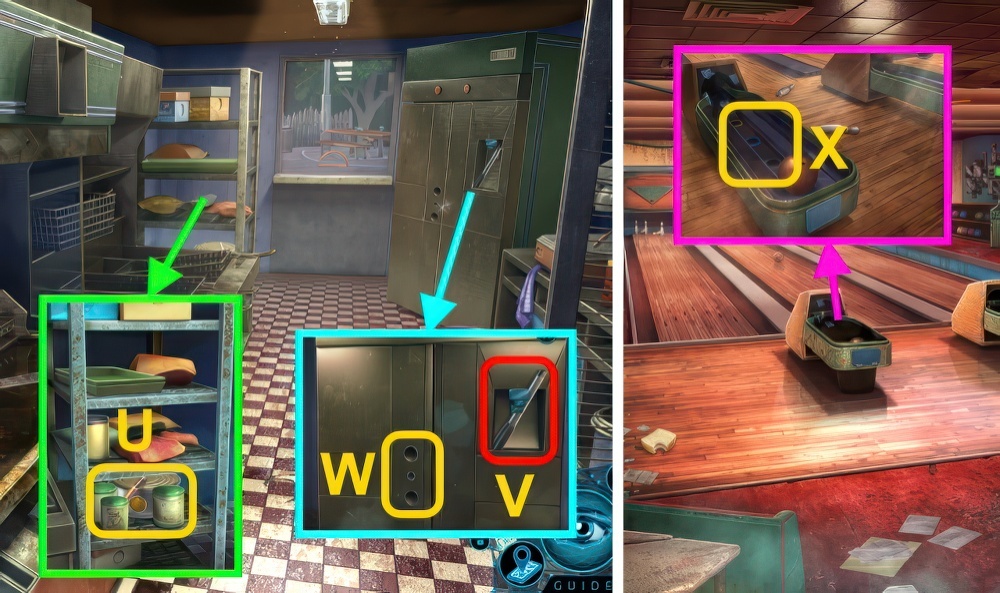
- Play puzzle (U), take HOOK.
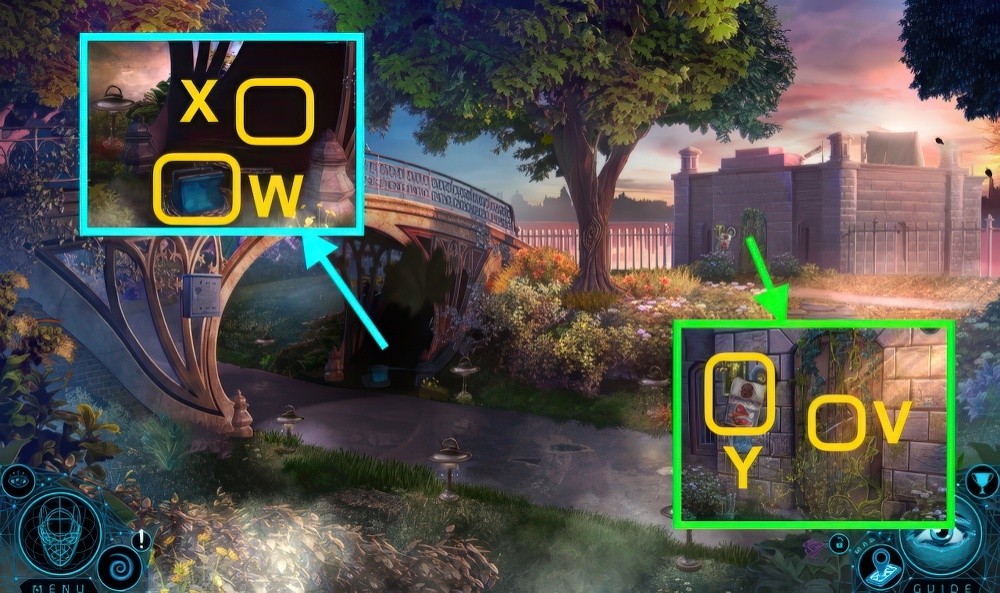
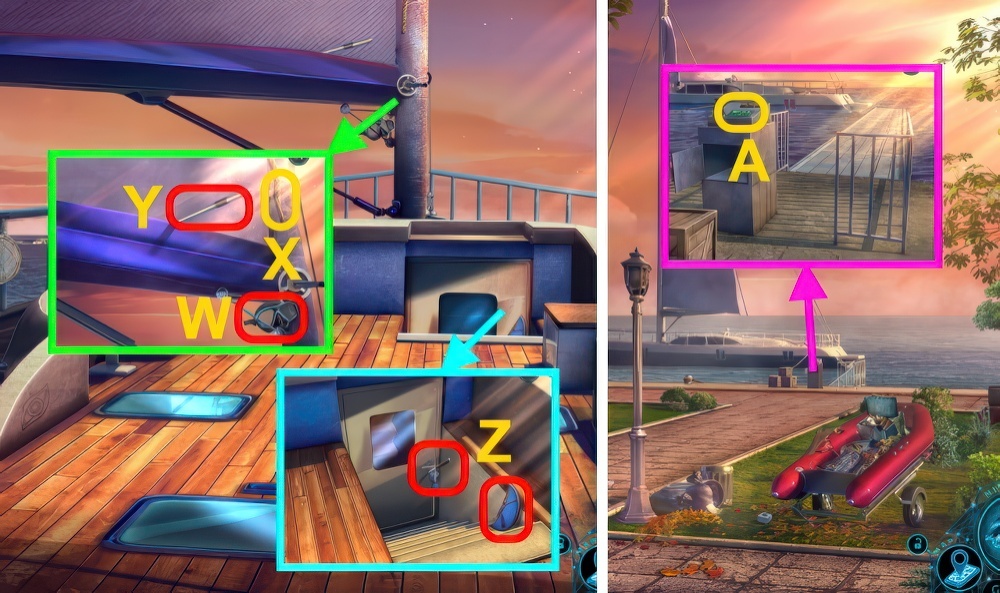
- Remove plants (V), take FLASHLIGHT.
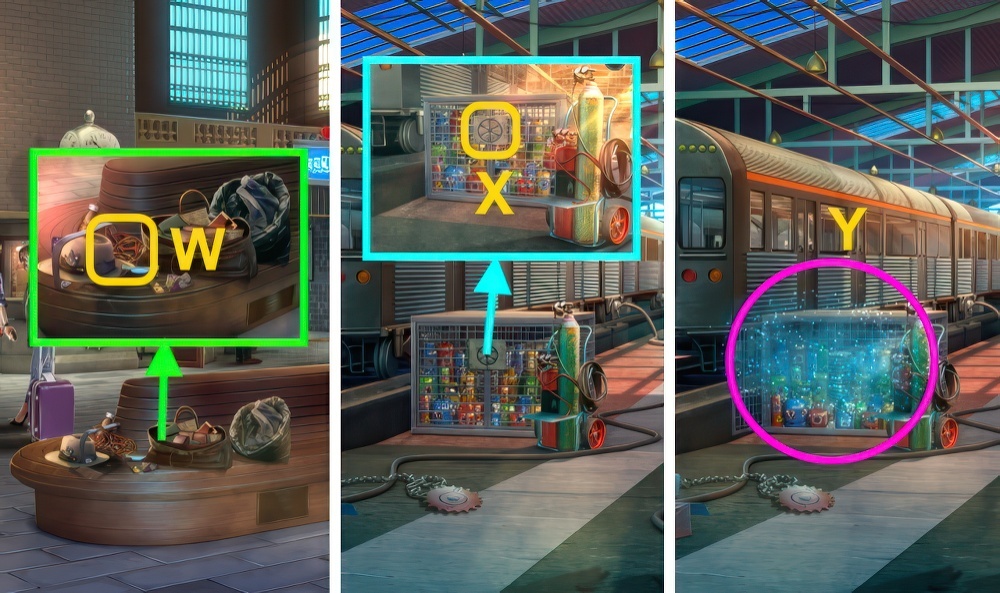
- Examine (W), open.
- Remove items, take NAIL POLISH REMOVER.
- Take CHAIN, use SHOVEL.
- Take RED WHEEL.
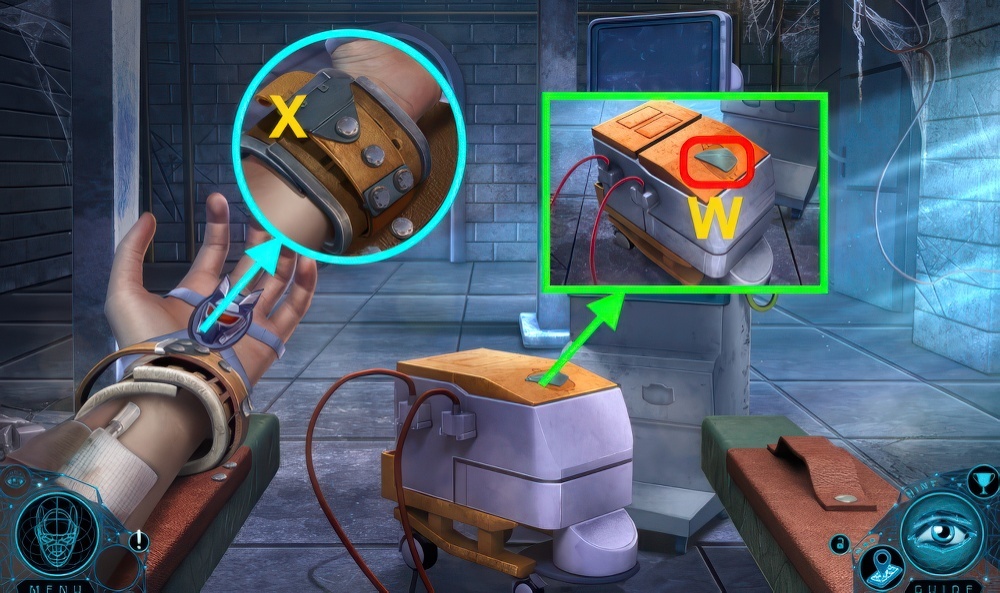
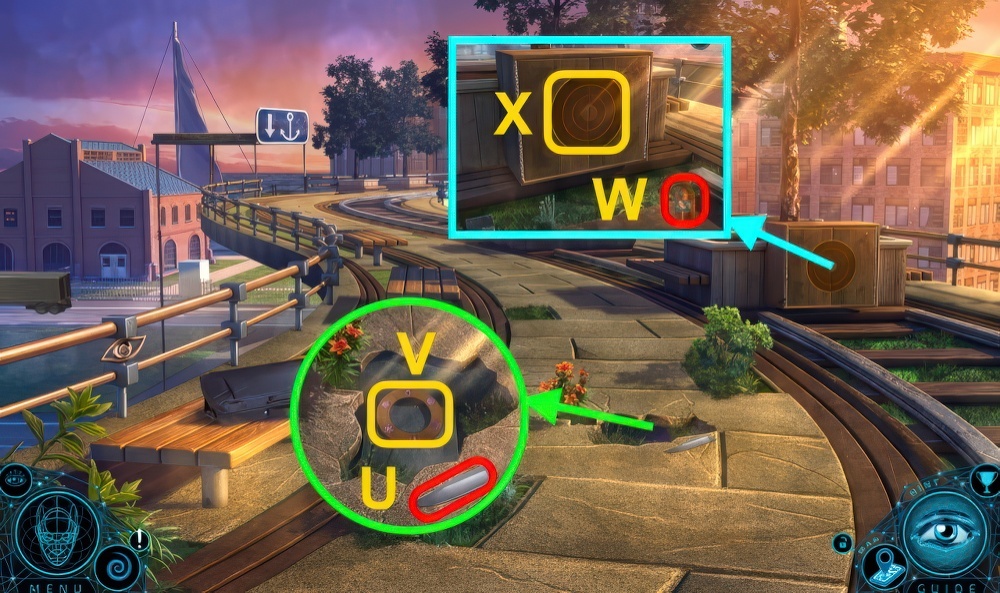
- Use FLASHLIGHT (X), receive SAFETY CARABINER.
- HOOK and SAFETY CARABINER on CHAIN, take LONG CHAIN.
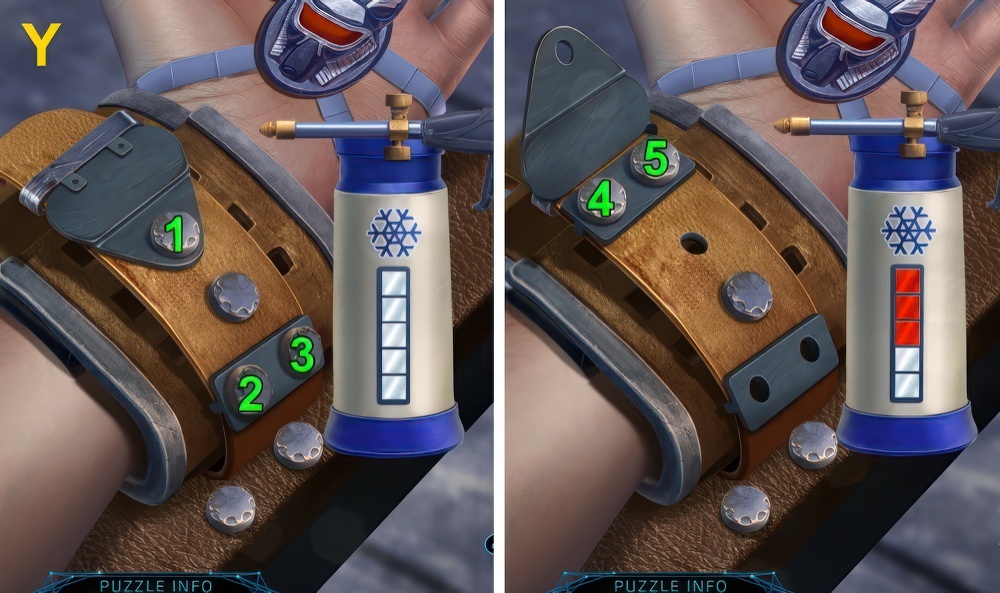
- Examine note (Y), place RED WHEEL.
- Use LONG CHAIN.
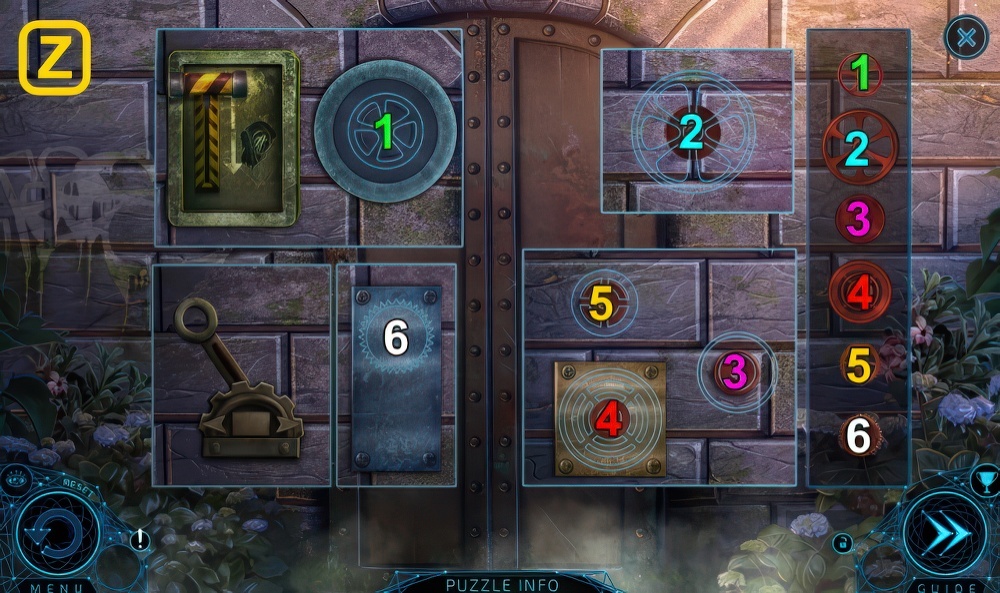
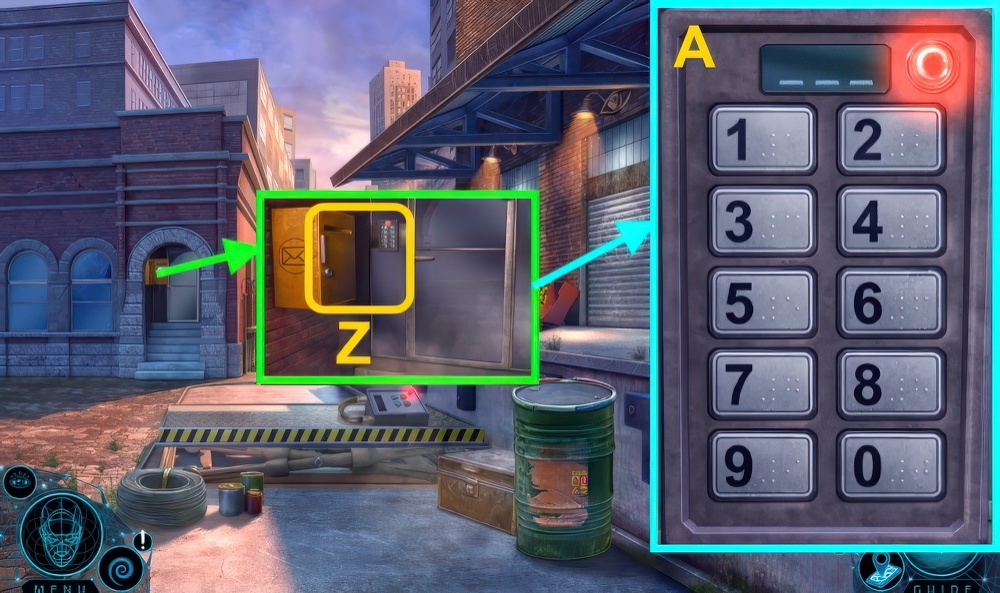
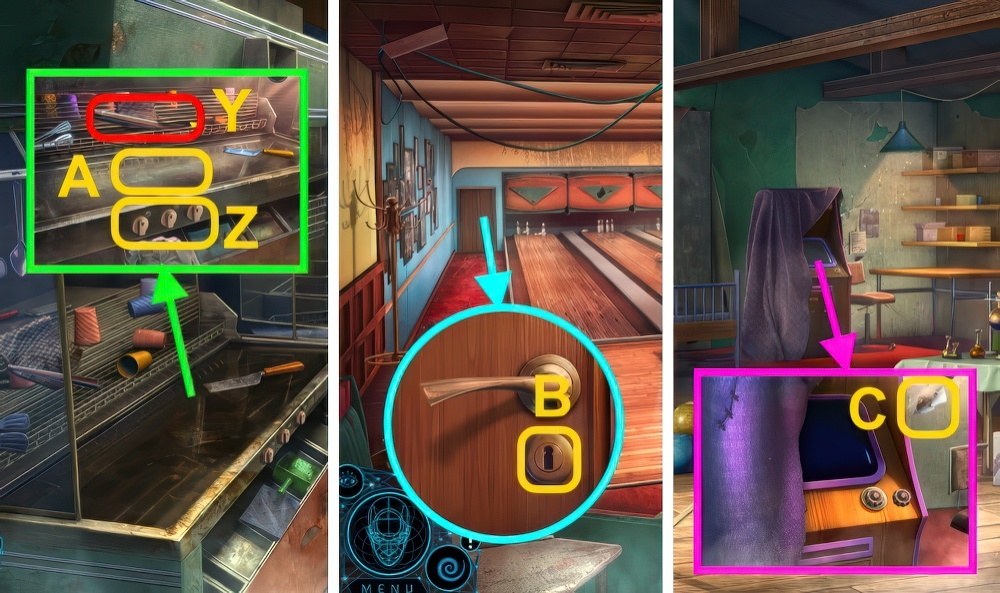
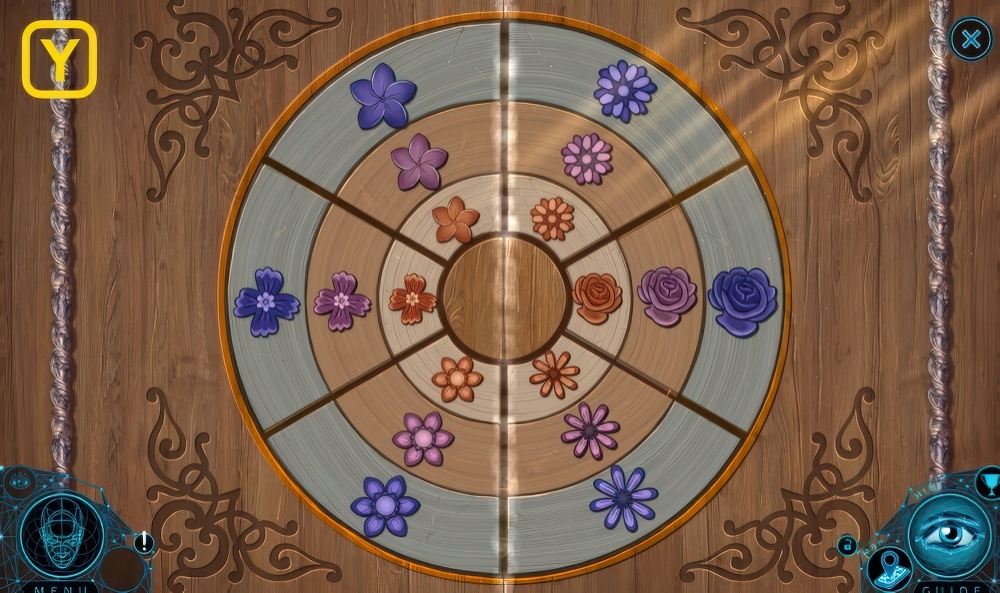
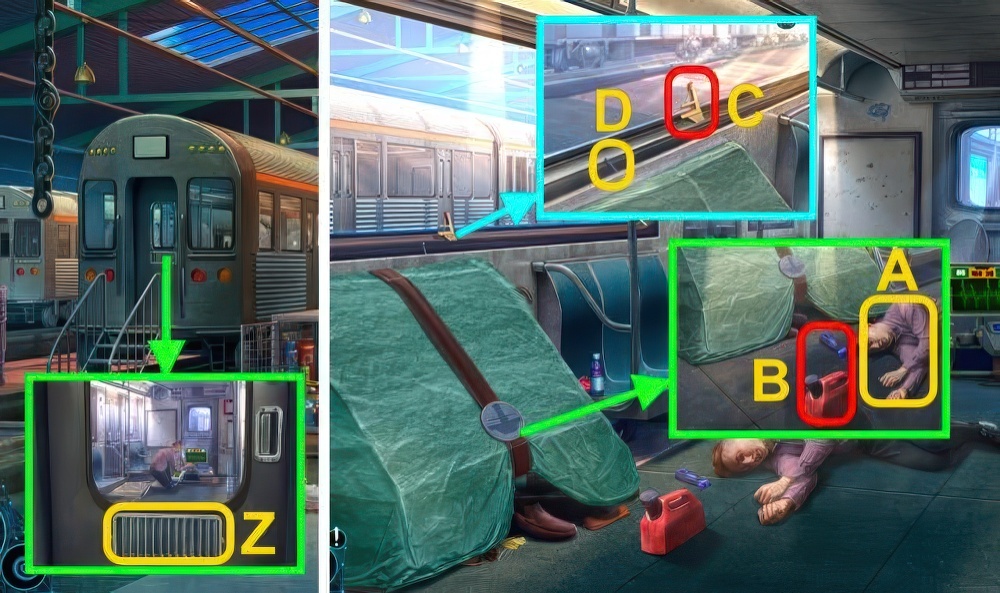
- Solution (Z).
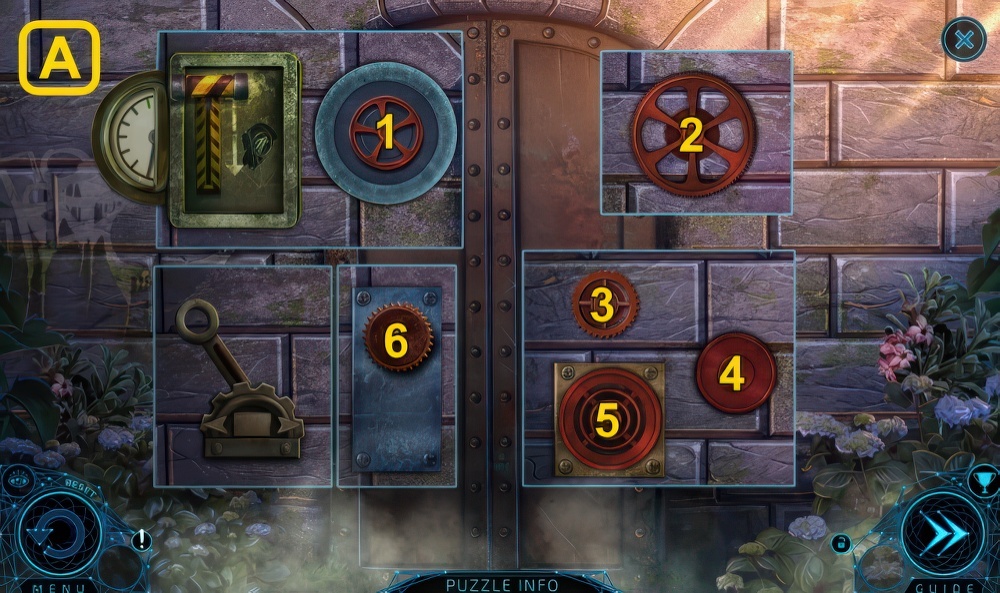
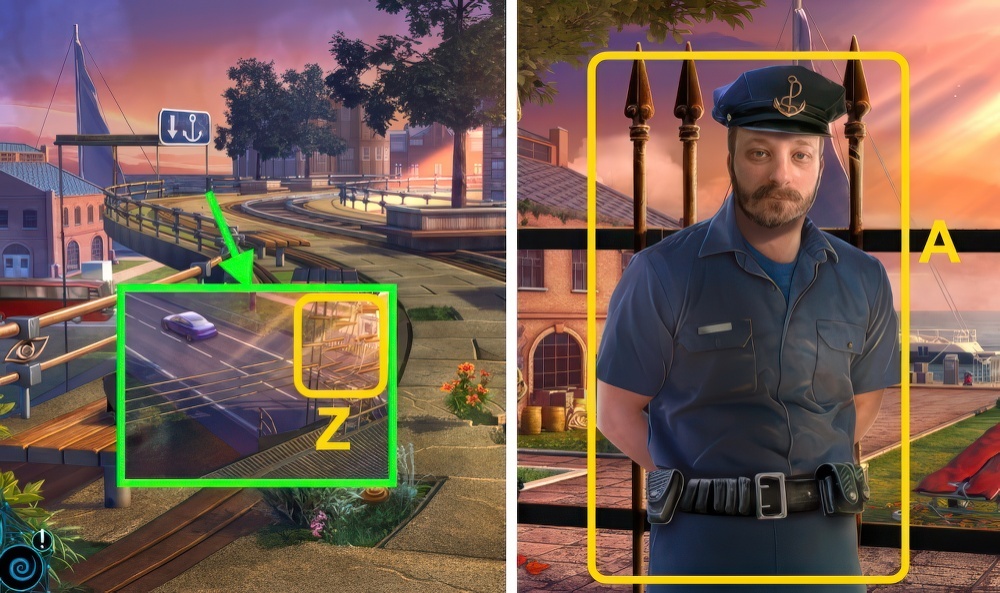
- Solution (A).
- Pull lever.
- Walk right.

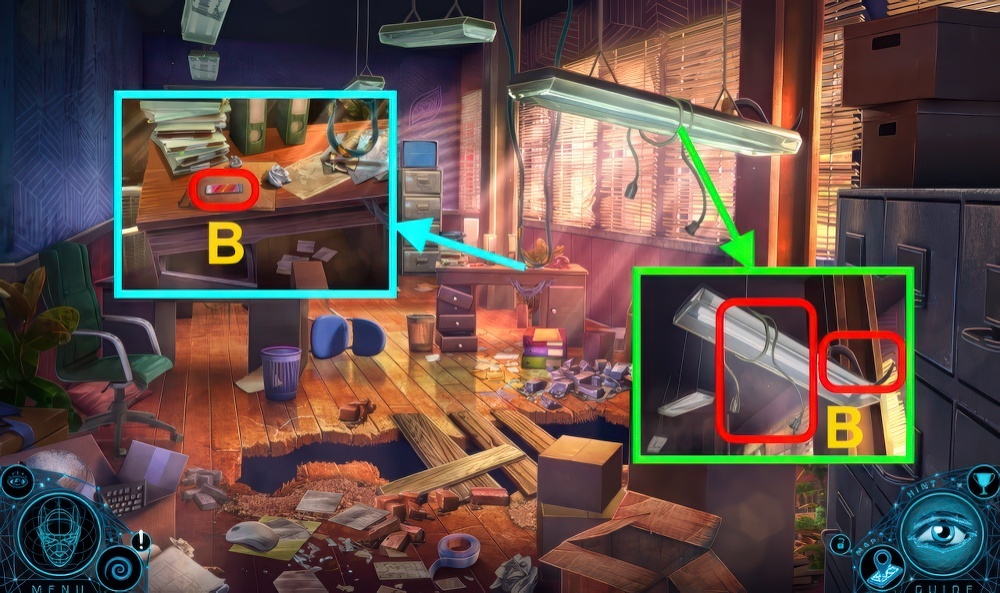
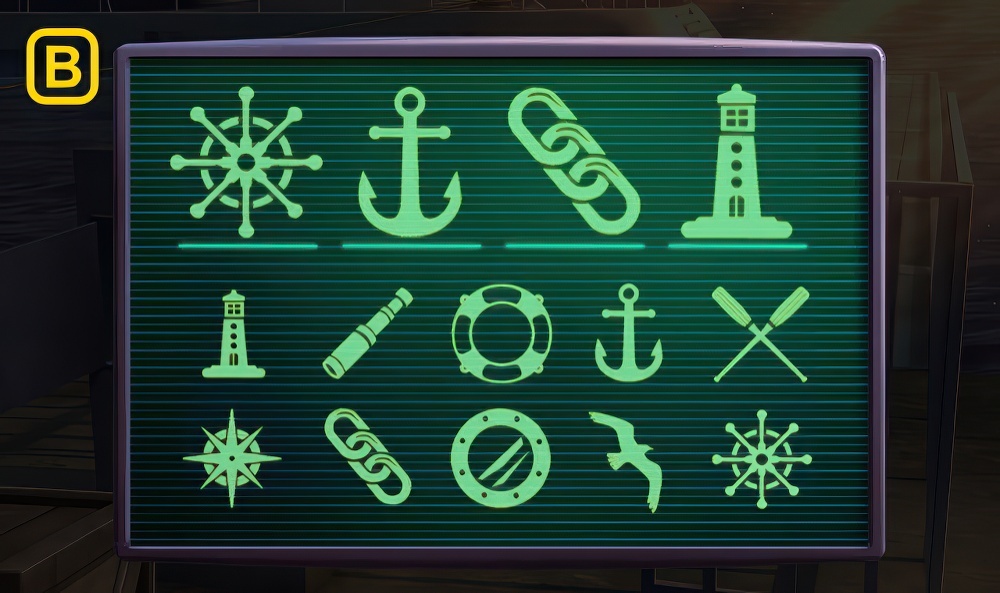
- Examine (B), talk.
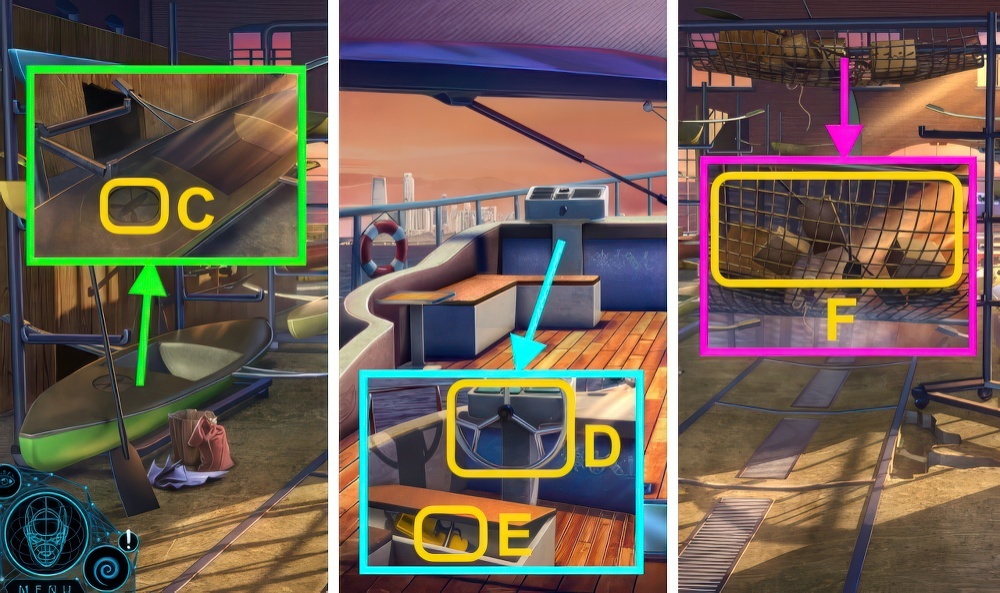
- Take ORNAMENT (1/2) and OXIDIZED ORNAMENT (C).
- Take STONE GARGOYLE ORNAMENT (D), use CREDIT CARD.
- Take LOCKER TAG.
- Remove leaves (E), take SANDPAPER.
- SANDPAPER on OXIDIZED ORNAMENT, take ORNAMENTS (2/2).
- Examine (F), place ORNAMENTS (2/2).
- Play puzzle (G), receive LOCKER TAG PIECE.
- SMALL PLIERS and LOCKER TAG PIECE on LOCKER TAG, take LOCKER TAG.
- Walk down.
- Use LOCKER TAG (H), take EMERGENCY PANEL.
- Walk right.
- Place EMERGENCY PANEL (I).

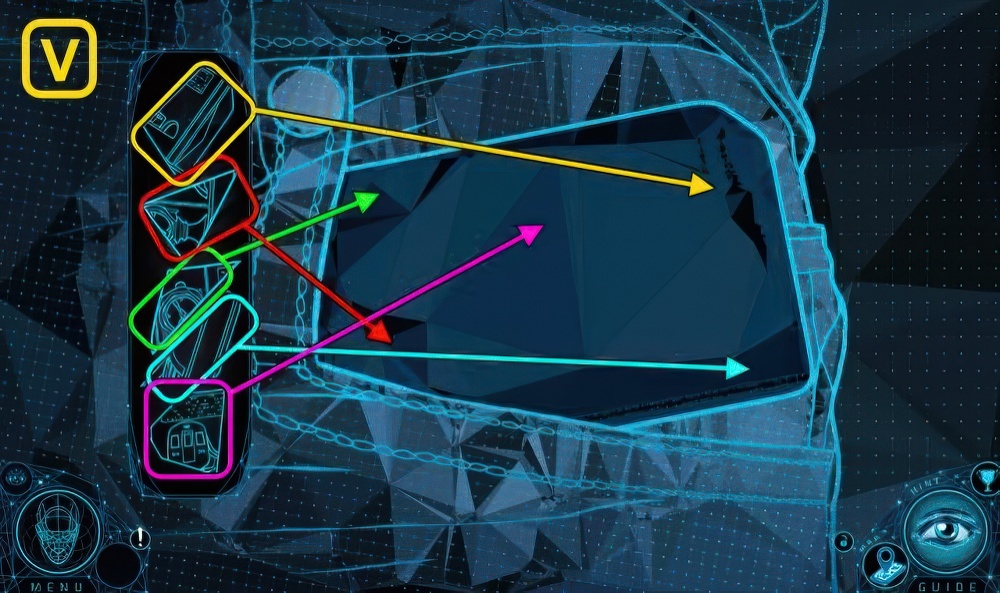
- Solution (J): Place pieces as shown, select (A-Bx2).
- Solution (K).
- Examine (L), talk.
- Solution (M).

- Examine (N-P).
- Solution (Q).
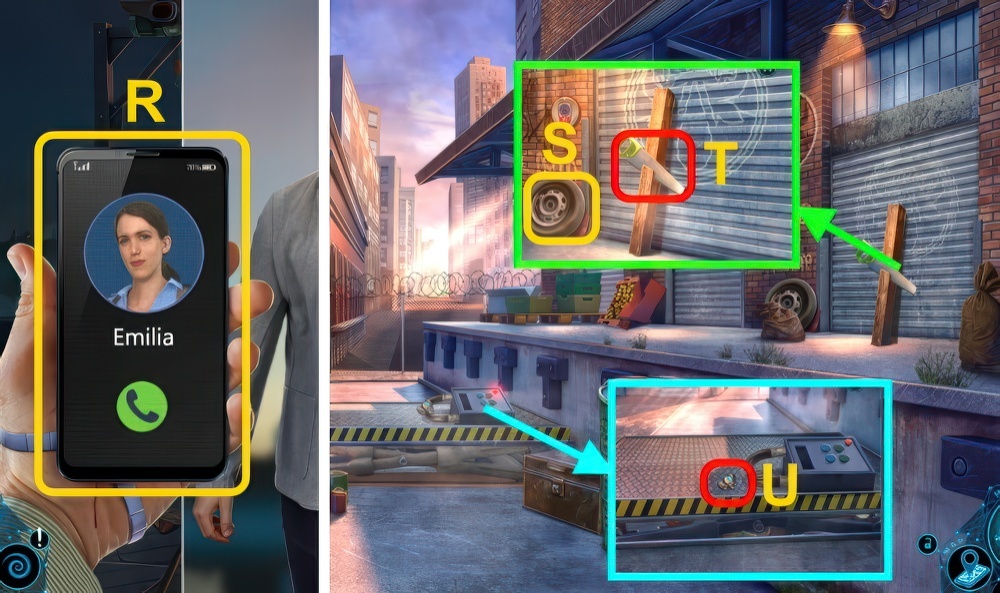
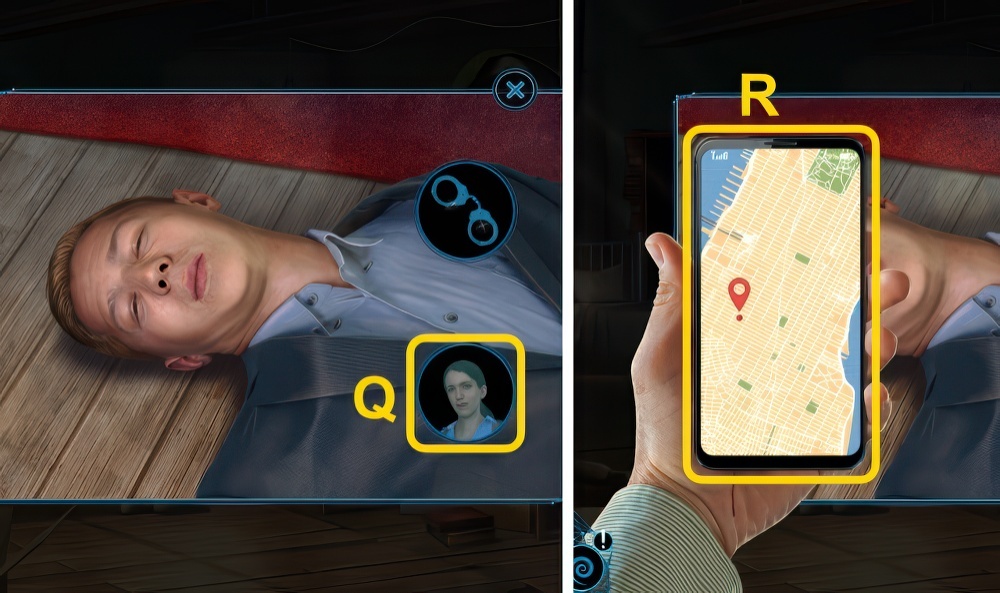
- Examine phone 3x (R).
- Move tire (S).
- Take SMALL CASE and SAW (T).
- Take METAL BUCKLE (U).

- NAIL POLISH REMOVER on SMALL CASE, use METAL BUCKLE.
- Take LOCKPICKING SET.
- Use LOCKPICKING SET (V).
- Solution (W-Y).
- Take BROKEN BULL EMBLEM.
- Close door, examine (Z).
- Enter 1-2-4 (A).
- Take MEATHOOK, POWER CABLE and BUBBLEGUM (B).
- Walk down.

- Use MEATHOOK (C).
- Solution (D).
- Move items, take FLOPPY DISK.
- Walk left.
- Use FLOPPY DISK (E), play puzzle.
- Take MAGNET.
- Examine POWER CABLE, place MAGNET.
- Take CABLE NOOSE WITH MAGNET.
- Move board (F), take EMBLEM PART (1/3).
- Use SAW, use CABLE NOOSE WITH MAGNET.
- Receive LARGE LEVER.
- Walk down.
- Use BUBBLEGUM and LARGE LEVER (G).
- Play puzzle (H), receive SLAUGHTERHOUSE KEY.
- Examine (I), use SLAUGHTERHOUSE KEY.
- Use STONE GARGOYLE ORNAMENT (J), take GUN.
- Open drawer, take COAT HANGER PART, WATER BOTTLE, and RUBBER GLOVES (K).
- Take GOLF CLUB (L), use COAT HANGER PART.
- Receive EMBLEM PART (2/3).
- Walk down, then left.
- Use RUBBER GLOVES (M), take EMBLEM PART (3/3).
- EMBLEM PART on BROKEN BULL EMBLEM, place parts (N).
- Take BULL EMBLEM.
- Walk down, then right.
- Place BULL EMBLEM (O).
- Play puzzle (P), receive DOG MASK SYMBOL.
- Place DOG MASK SYMBOL (Q).
- Use GUN on scene.
- Examine 2x (R).
- Use WATER BOTTLE on scene.
- Take NITROGEN HANDLE (S).
- Take HEAVY BELT (T).
- Use HEAVY BELT (U).
- Take TWEEZERS and BLOODPACK SYMBOL (V).
- Take GLASS SHARD (W).
- Place BLOODPACK SYMBOL, use TWEEZERS.
- Use NITROGEN HANDLE, receive LIQUID NITROGEN.
- Use LIQUID NITROGEN (X).
- Solution (Y).

- Open, take DAMAGED SD CARD (Z).
- Walk forward.
- Move cloth (A), take CAN OPENER.
- Examine, use TWEEZERS.
- Receive BATTERY.
- Walk forward.
- Open, place BATTERY (B).
- Play puzzle, receive SCALPEL (C).
- SCALPEL on DAMAGED SD CARD.

- Solution (D).
- Examine (E).
- Take EMPTY CUP and CUTTING STONE (F).
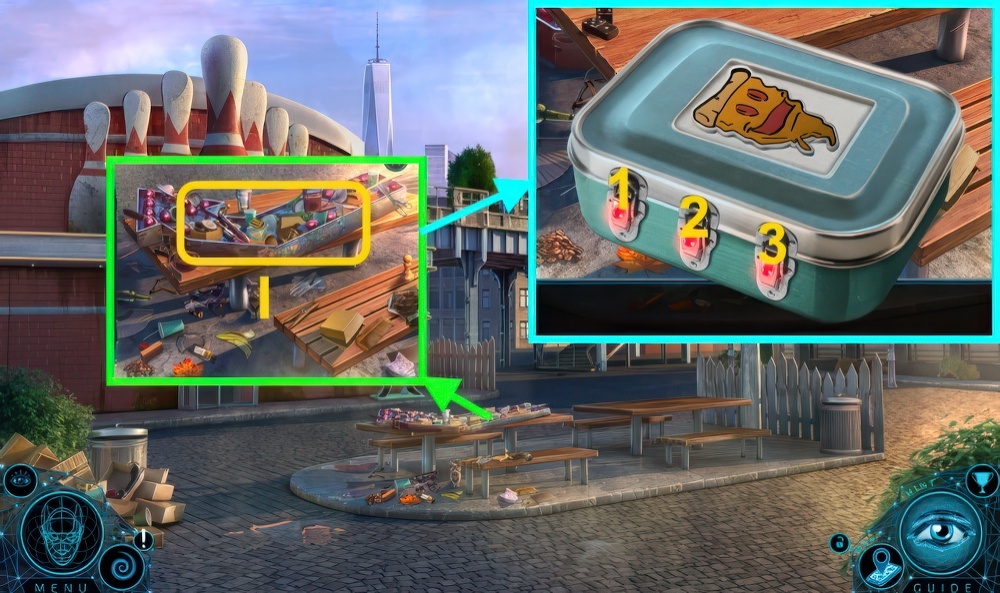
- Take LUNCBOX EMBLEM (G).
- Move items (H), take MOP HEAD.
- Play puzzle, use GOLF CLUB (I).
- Take SCRAPER.
- Examine lunchbox, place LUNCHBOX EMBLEM.
- Select (1-3), take BROKEN GLASS CUTTER.
- CUTTING STONE on BROKEN GLASS CUTTER, receive GLASS CUTTER.
- Use GLASS CUTTER (J), press button.
- Walk left.
- Take BOWLING BALL (1/3), DUCT TAPE, and BOWLING SYMBOL (K).

- Take FREEZER HANDLE (L).
- Use GLASS SHARD (M), receive TAP HANDLE.
- Take SERVICE KNOB (N), use TAP HANDLE (O).
- Play puzzle, receive FUSE (P).
- Walk down.
- Place SERVICE KNOB and FUSE (Q).

- Solution (R).

- Solution (S).

- Solution (T).
- Walk left, then right.
- Move cans (U), take PEN.
- Use CAN OPENER, receive BOWLING BALLS (2/3).
- Take MOP PARTS (1/3) (V), use EMPTY CUP.
- Receive CUP WITH ICE.
- Place FREEZER HANDLE (W), take BOWLING BALLS (3/3).
- Walk down.
- Place BOWLING BALLS (3/3) (X), receive WAX-ENCASED KEY.
- Walk right.
- Take MOP PARTS (2/3) (Y), turn handles (Z).
- Place WAX-ENCASED KEY (A), place CUP WITH ICE.
- Use spatula on key, receive BACKROOM KEY.
- Walk down.
- Use BACKROOM KEY (B).
- Walk left.
- Use SCRAPER (C), take SWITCH.
- Take MICROFILM (D).
- Open cupboard (E), take TAP HANDLE.
- Take BOWLING PIN (F).
- Place SWITCH (G), turn.
- Take MOP PARTS (3/3).
- MOP PARTS (3/3) on MOP HEAD, receive MOP.
- Walk down.
- Use TAP HANDLE (H).

- Play puzzle, receive PIN EMBLEM (I).
- Place BOWLING SYMBOL and PIN EMBLEM (J), take MICROFILM REEL (1/2).
- Walk down.
- Use MOP (K), receive MICROFILM REEL (2/2).
- MICROFILM REEL (2/2) and DUCT TAPE on MICROFILM.
- Walk left twice.
- Move curtain, place MICROFILM (L).

- Solution (M).

- Examine (N).
- Use BOWLING PIN on scene.
- Talk (O), examine.
- Solution (P).
- Select (Q).
- Examine phone (R).
- Take INSECT REPELLANT, DECORATIVE RINGS (1/3)-(2/3), and SPRAY CAP (S).
- SPRAY CAP on INSECT REPELLANT.
- Use INSECT REPELLANT (T), take TOY FISHING ROD.
- Take SNAPPED BLADE (U).
- Use TOY FISHING ROD (V).
- Receive DECORATIVE RINGS (3/3).
- Take DIRTY BOTTLE (W).
- Place DECORATIVE RINGS (3/3) (X).
- Solution (Y).
- Take ROPE LADDER.
- Use ROPE LADDER (Z).
- Go to Dock Walkway.
- Talk (A), examine.

- Solution (B), read note.
- Select symbols (B-C).
- Use SNAPPED BLADE (D), receive SIGNAL FLAG.
- SIGNAL FLAG on DIRTY BOTTLE, take INDUSTRIAL OIL.
- Take SAILING ROPE (E).
- Use INDUSTRIAL OIL (F), take SPONGE.
- Use PEN (G), receive SAFETY PIN.
- Take SIGNAL LAMP (H).
- Walk down.
- Use SAFETY PIN (I).
- Play puzzle, receive HANGAR KEY (J).
- Walk left.
- Use HANGAR KEY (K).
- Solution (L).
- Walk left.
- Take LIFE PRESERVER (M), examine.
- Solution (N): arrange pieces in order (1-2).
- Take PRESSURE GAUGE.

- Take METAL HANDLE (O).
- Place SIGNAL LAMP (P), take PUMP.
- Take PUMP CHARGING CABLE (Q).
- Walk down.
- Place METAL HANDLE (R), take PUMP HOSE.

- PRESSURE GAUGE, PUMP CHARGING CABLE, and PUMP HOSE on PUMP, take AIR PUMP.
- Use AIR PUMP (S).
- Play puzzle, receive CARTRIDGE (T).
- Place CARTRIDGE (U).
- Enter Sailboat.
- Use SPONGE (V).
- Take DIVING MASK (W).
- Use SAILING ROPE (X), take POLE (Y).
- Take ROWING SYMBOL (1/2) and SWITCHBLADE (Z).
- Walk down.
- Examine (A).
- Solution (B).
- Take ROWING SYMBOL (2/2).
- Walk left.
- Place ROWING SYMBOL (C), take SHIP’S WHEEL.
- Walk down, then forward.
- Place SHIP’S WHEEL (D).
- Open (E), take SAILING HOOK.
- SAILING HOOK on POLE, take BOAT HOOK.
- Walk down, then left.
- Use BOAT HOOK (F).
- Play puzzle, receive HATCHET (G).
- Walk down, then forward.
- Use HATCHET (H).
- Walk forward.
- Examine (I-J).
- Take CODE PART (1/2) (K).
- Close porthole, examine (L).
- Talk (M).
- Take CODE PARTS (2/2) (N).
- Examine (O), unroll poster.
- Take REGULATOR.
- Play puzzle (P).
- Use LIFE PRESERVER (Q).
- Move item, take BREATHING DEVICE.
- Place CODE PARTS (2/2).

- Solution (R): (B-I-C-H)-(D-G-E-H)-(A-I-F-H).
- Take DIVING INSET.

- Place DIVING INSET (S), take DIVING VEST.
- DIVING MASK, BREATHING DEVICE, and REGULATOR on DIVING VEST, examine vest.
- Open (T).

- Talk, examine (U).
- Solution (V).

- Examine scene.
- Examine phone (W).
- Move items, take NEWSPAPER EMBLEMS (1/3)-(2/3), BANDAGE, and PAINT THINNER (X).
- Examine pole, take NEWSPAPER EMBLEMS (3/3) (Y).

- Take FOLDED NEWSPAPER (Z), place NEWSPAPER EMBLEMS (3/3).
- Play puzzle, receive TELESCOPIC HAND (A).
- Open FOLDED NEWSPAPER, take BRICK.
- Use TELESCOPIC HAND (B).
- Walk right.

- Solution (C).

- Play puzzle, take TAPE DRAWER (D).
- Take KEYCHAIN LAMP and POLICE BADGE (E).
- Walk right.

- Examine coat (F).
- Use SWITCHBLADE, take BROOM EMBLEM (G).
- Open, examine pockets.
- Take TAPE.
- Take REWIND BUTTON and SCARF (H).
- Use BRICK (I), take GLUE.
- Examine, use KEYCHAIN LAMP (J).
- Receive ACETYLENE.
- Take METAL SIGN (K).
- Examine METAL SIGN, use GLUE.
- Take METAL PATCH.
- Place METAL PATCH (L), take PLAY BUTTON.
- Walk down.
- Place BROOM EMBLEM (M), open.
- Take WIRE.
- Examine WIRE 4x, receive IMPROVISED HOOK.
- Walk down.
- Use IMPROVISED HOOK (N), receive POLICE KEY.
- Walk right.
- Use POLICE KEY (O), use POLICE BADGE.
- Solution (P).
- Examine (Q), place REWIND BUTTON, PLAY BUTTON, TAPE DRAWER, and TAPE (Q).
- Play puzzle, receive PASS CARD.
- Walk right.
- Use PASS CARD (R).
- Solution (S).
- Walk down, then forward.
- Take TORCH BURNER and VALVE EMBLEM HALF (1/2) (T).
- Take HAIR CLIP (U).
- Use PAINT THINNER (V), open.
- Take TORCH.
- TORCH BURNER and ACETYLENE on TORCH, take WELDING TORCH.
- Walk down.
- Use WELDING TORCH (W), take VALVE EMBLEM HALF (2/2).
- Walk forward.
- Use VALVE EMBLEM HALF (2/2) (X).
- Play puzzle, receive CO2 CANISTER (Y).
- Use CO2 CANISTER and BANDAGE (Z), examine canister.
- Open.
- Use SCARF (A), take CANISTER and HANDLE (B).
- Take METAL SEAT PLATE (C), use HAIR CLIP (D).
- Receive POSTER LATCH.
- Take GASOLINE VALVE (E).
- Examine (F).
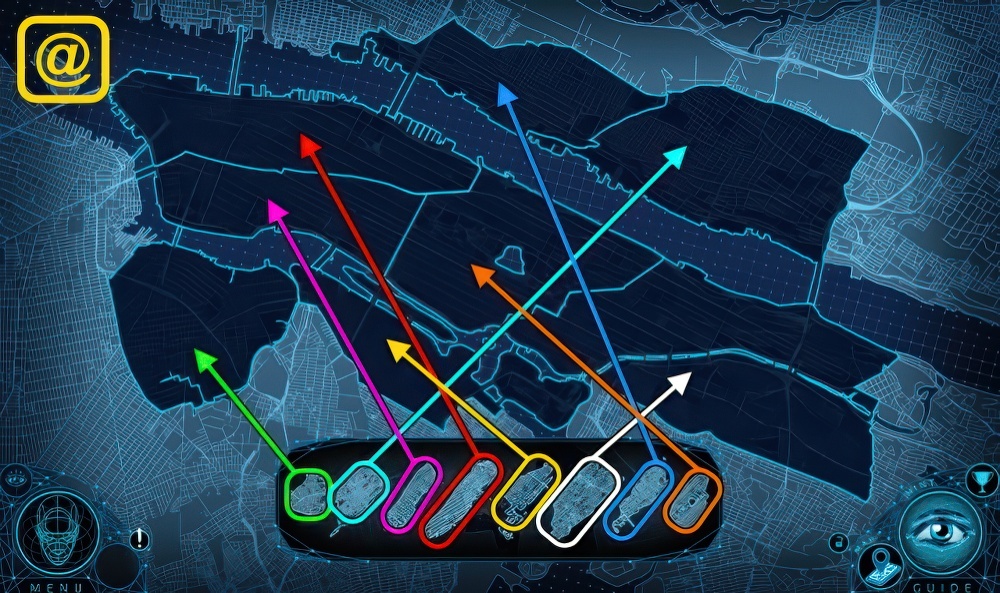
- Solution (@).
- Go to Subway Station.
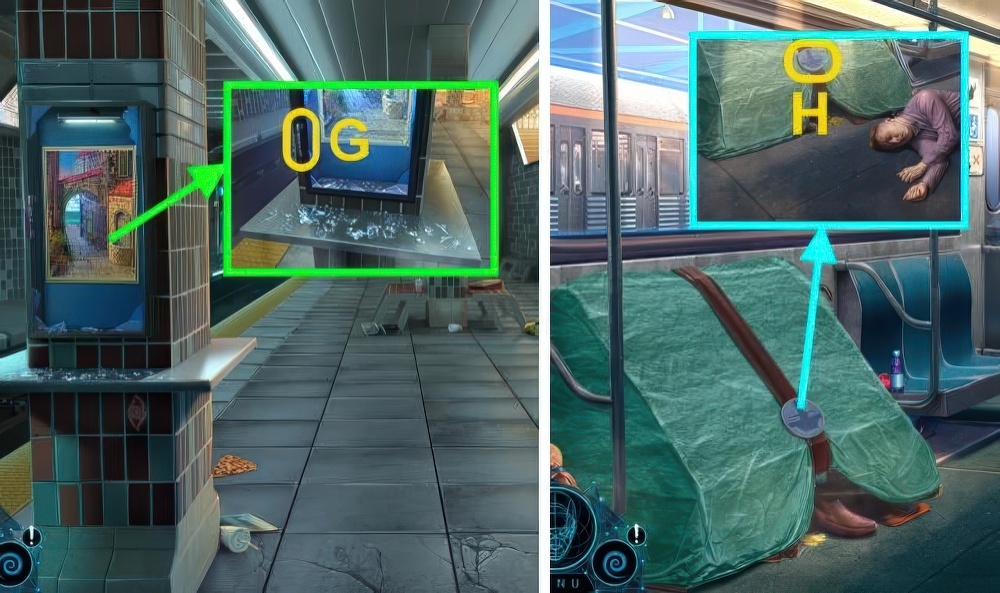
- Use POSTER LATCH (G), take METAL SEAT PLATE (2/2).
- Go to Train Car.
- Examine (H), place METAL SEAT PLATE.

- Play puzzle, receive FILE BLADE (I).
- FILE BLADE on HANDLE, take FILE.
- FILE on CANISTER, take EMPTY CANISTER.
- Walk down.
- Place EMPTY CANISTER and GASOLINE VALVE, place funnel (J).
- Take GASOLINE CANISTER.
- Walk left.
- Use GASOLINE CANISTER and WELDING TORCH (K).


