Paranormal Files 5: Trials of Worth – Rick Rogers receives news that two archaeologists have been found in a catatonic state amidst sand and burnt documents. Colleagues withhold details, and authorities assume a viral infection. But the truth turns out to be far scarier. Rick is summoned to help by his friend Arthur Novak, claiming that artifacts from an ancient Mayan burial ground are to blame. Rick learns that everyone who has come into contact with these finds has encountered unexplained phenomena. Isaac, a young archaeologist on the expedition, claimed to be hunted by a creature from the sand. Arthur is afraid of becoming the next victim and asks Rick to come to the Archaeological Center to get to the bottom of what is going on. However, the situation spirals out of control when Rick himself becomes the target of the sand monster. You will have to help Rick unravel the tangle of mysteries associated with ancient artifacts, find out what power they hide, and understand what terrible fate befell all those who were too close to the clue. If you can not pass any of the puzzles or do not know where the items are, on our site you can watch the walkthrough of the game Paranormal Files 5: Trials of Worth, and shed light on all these mysteries.
Paranormal Files 5: Trials of Worth – Walkthrough
Here you can see the full walkthrough of Paranormal Files 5: Trials of Worth game, namely for all chapters, including bonus chapter, in pictures.
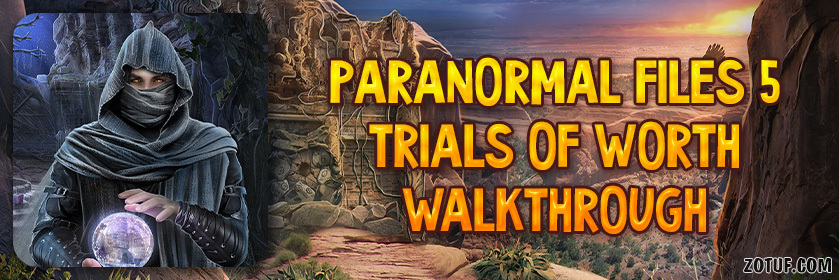
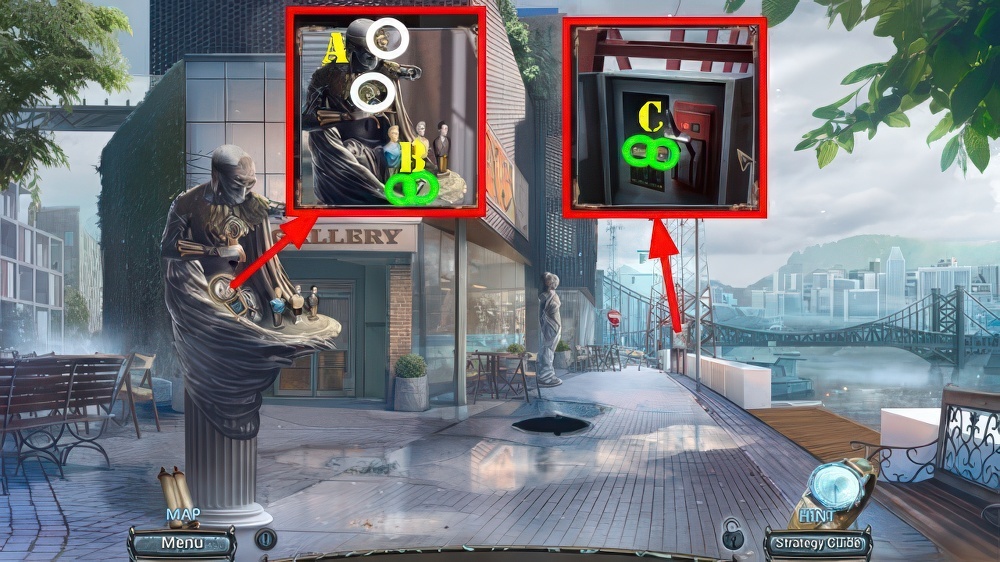
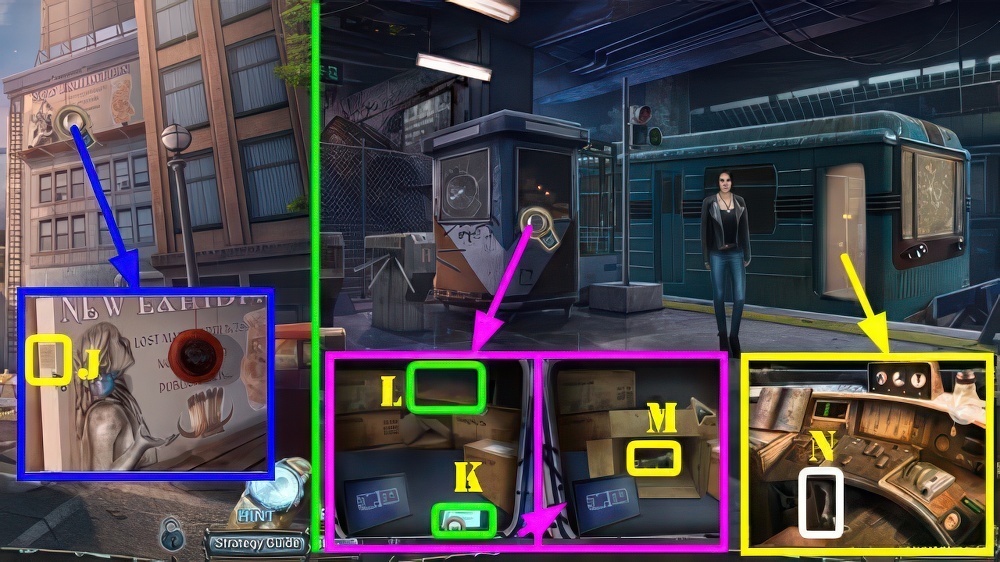
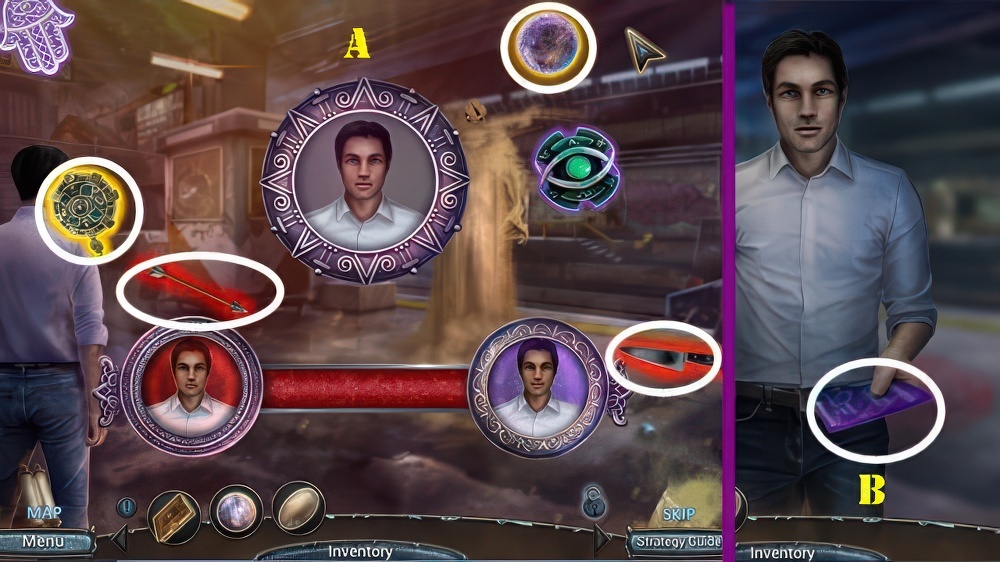
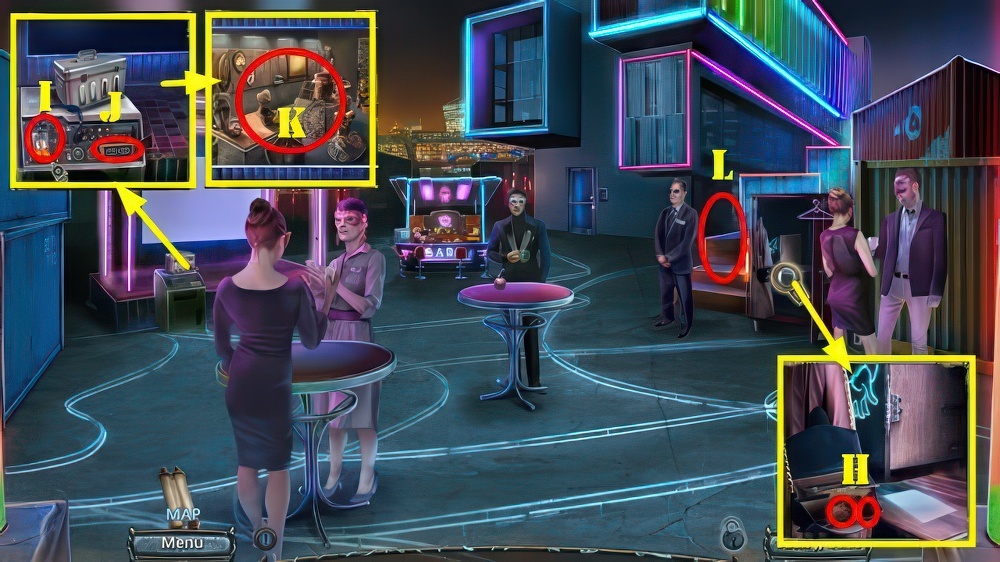
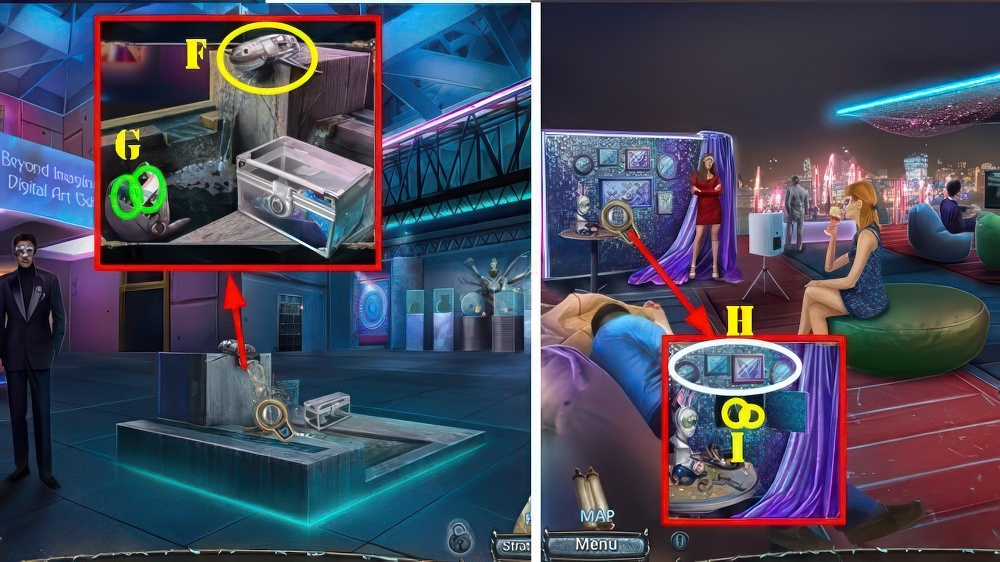
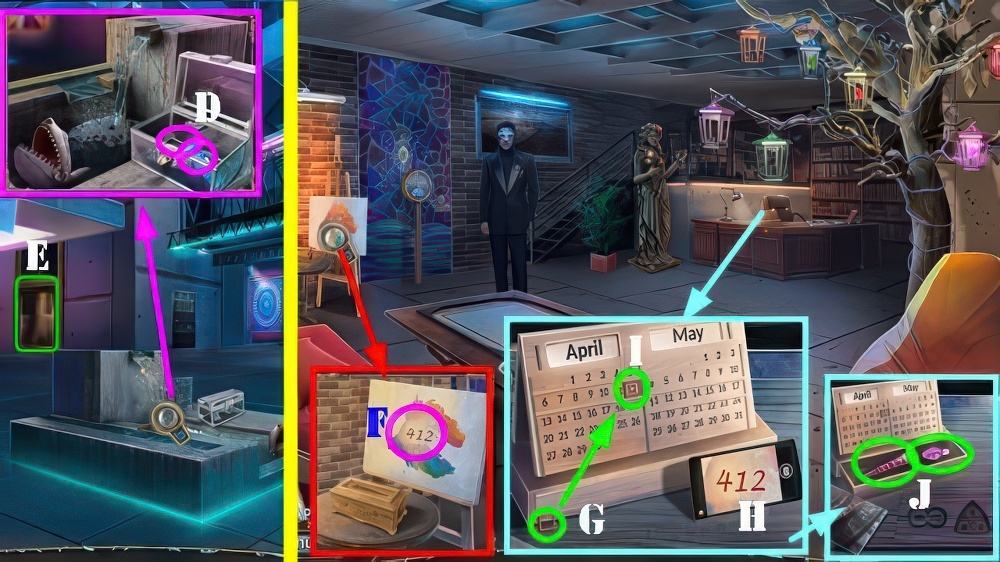
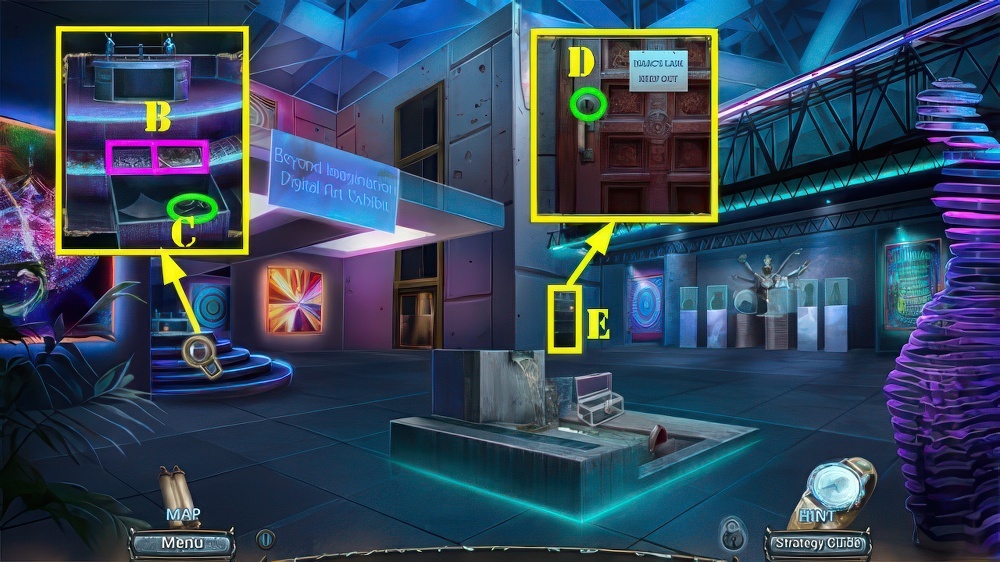
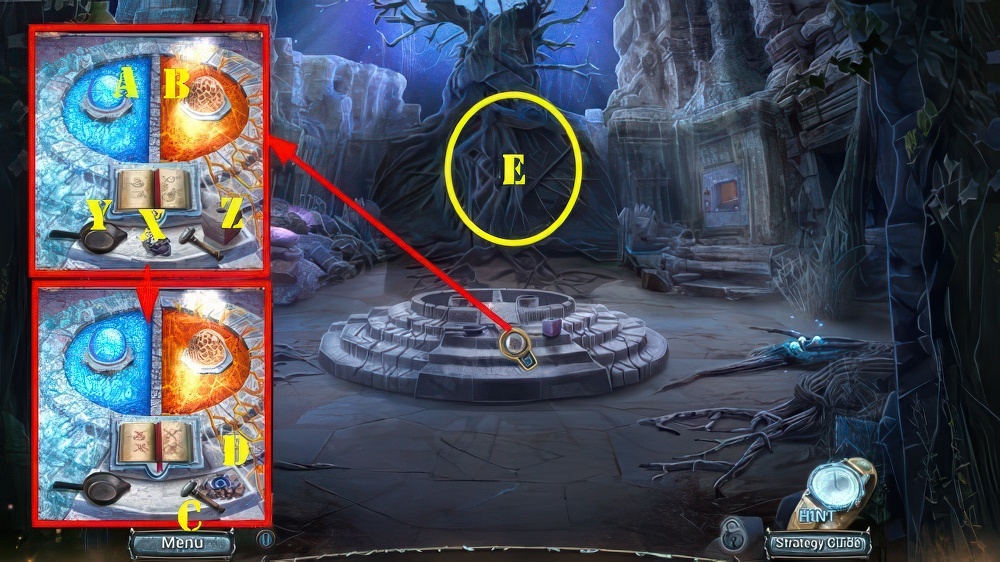
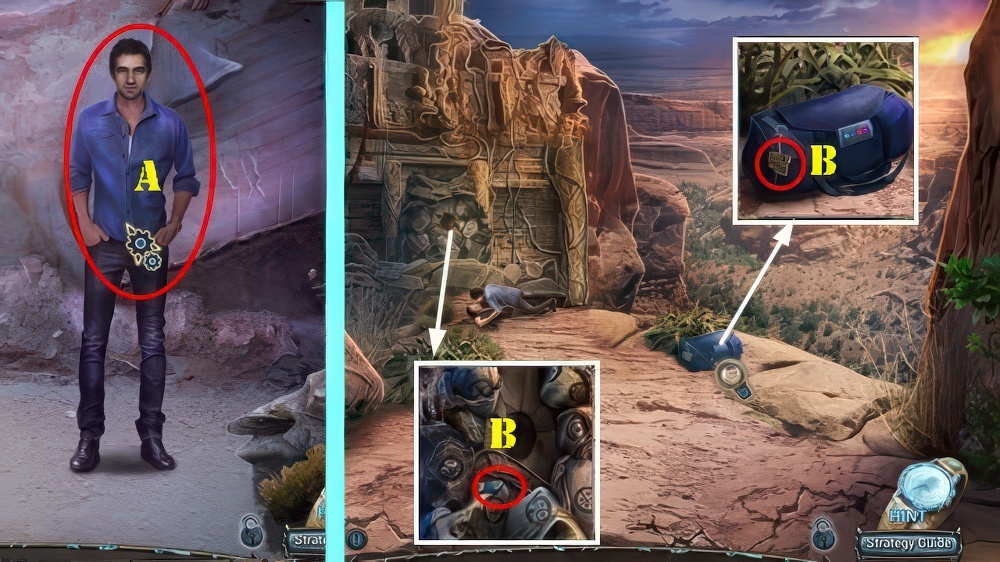
- Select keypad (A).
- Take ‘A’ MONOGRAM, SMALL BAG, REPLICA BOWL, and SCISSORS (B).
- Use SCISSORS, take ‘N’ MONOGRAM and KNOB (C).
- Place KNOB, take WRENCH and CABLE DETECTOR (D).
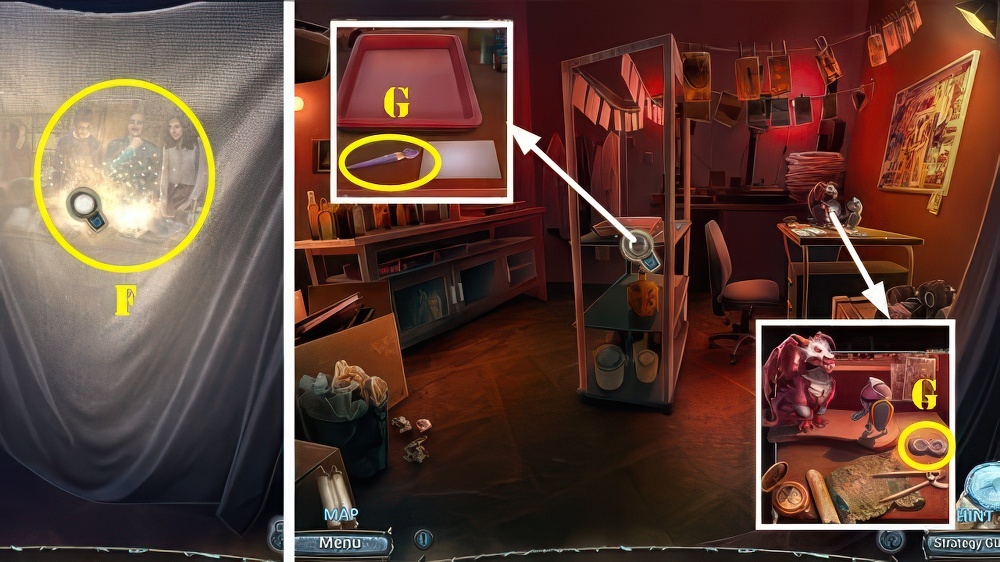
- Use WRENCH (E) and place REPLICA BOWL (F), receive BOWL WITH WATER.
- ‘A’ MONOGRAM and ‘N’ MONOGRAM on SMALL BAG, select notebook 6x, take ACCESS CARD.
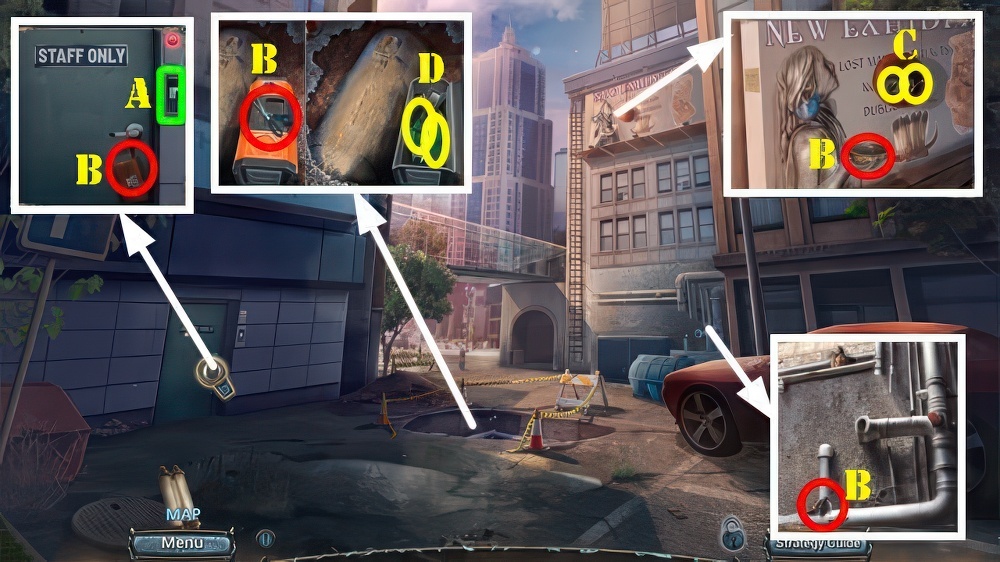
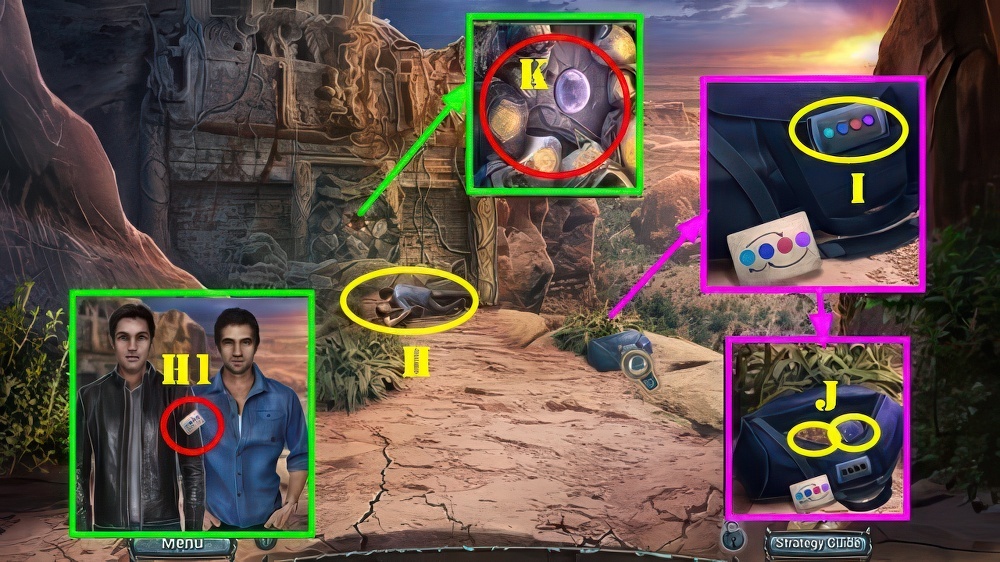
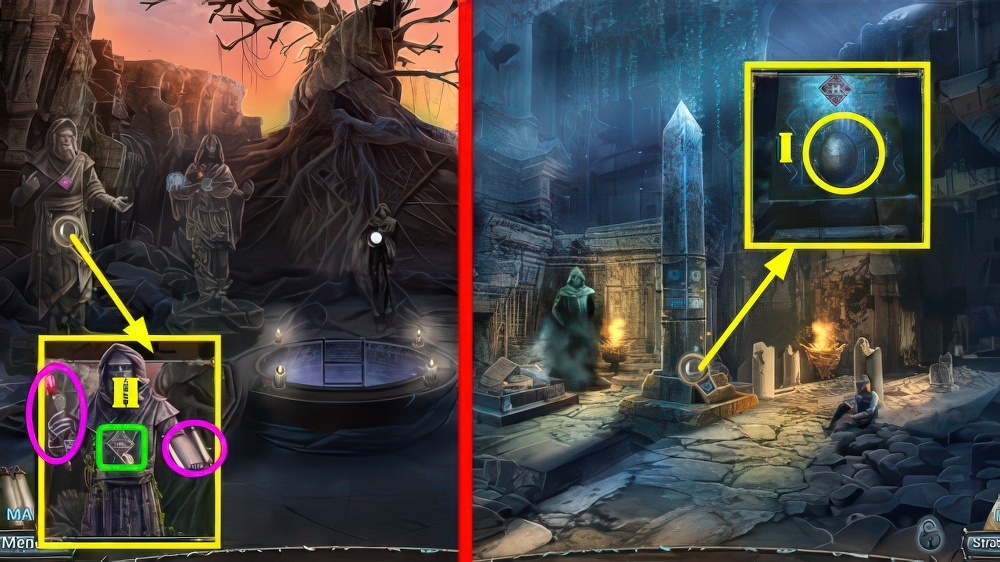
- Use CABLE DETECTOR (G) and place as shown (H), select device and use ACCESS CARD (I).
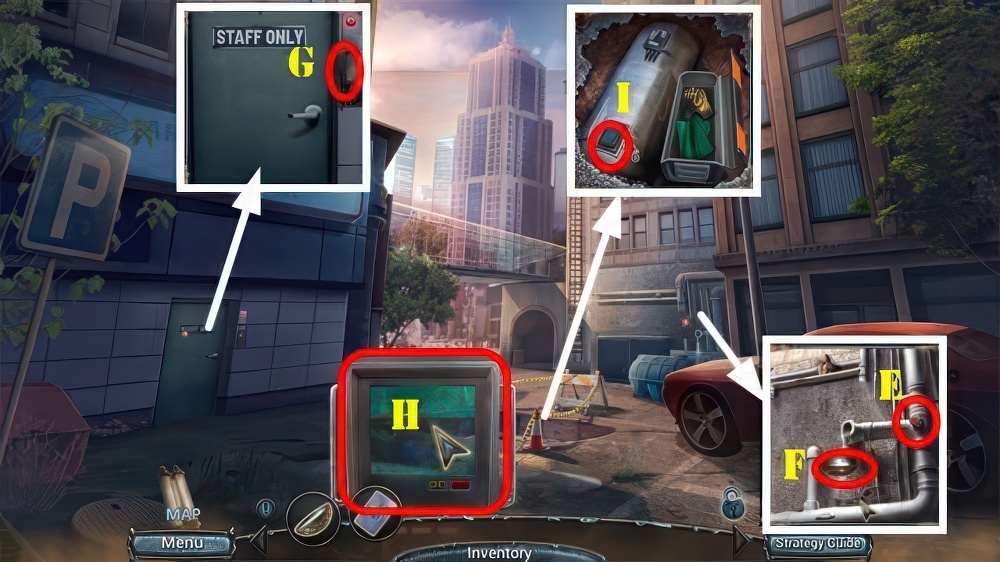
- Solution (Jx2-K-Lx2-M).
- Use BOWL WITH WATER (N).
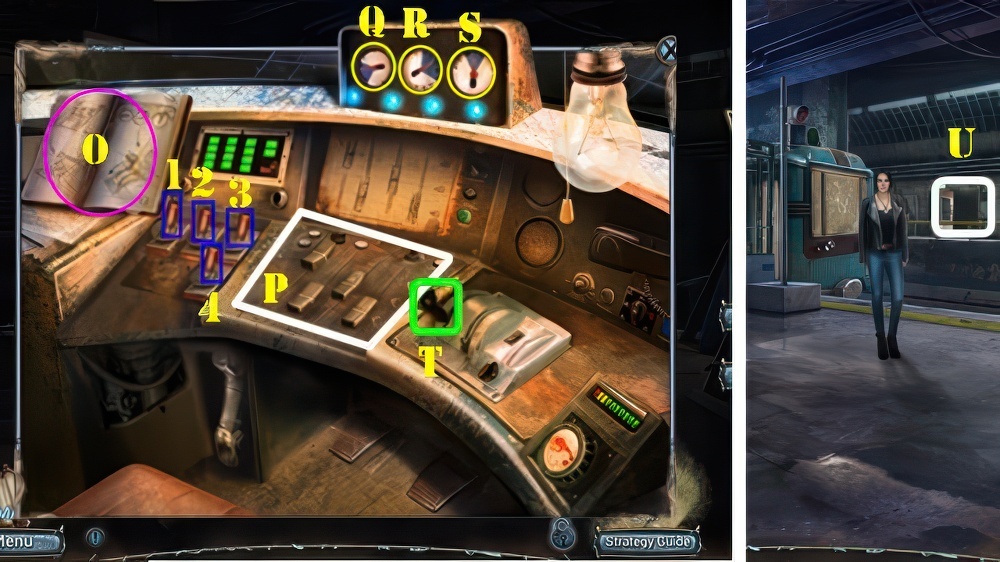
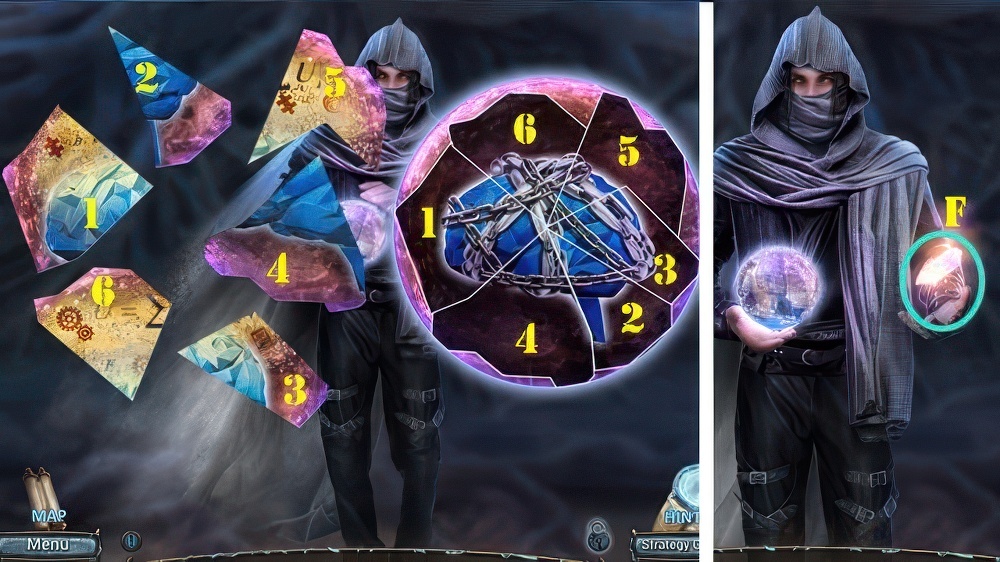
- Enter (O).
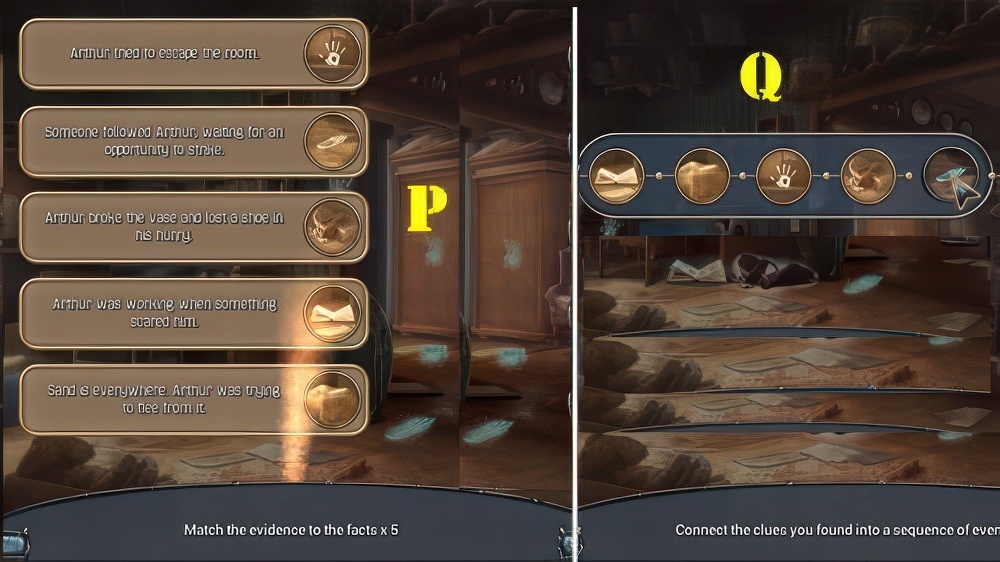
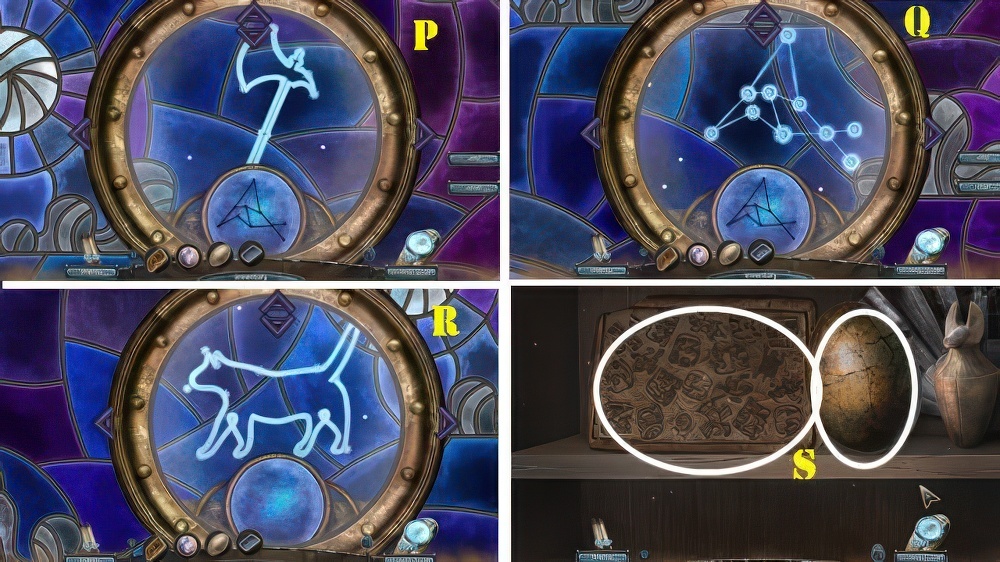
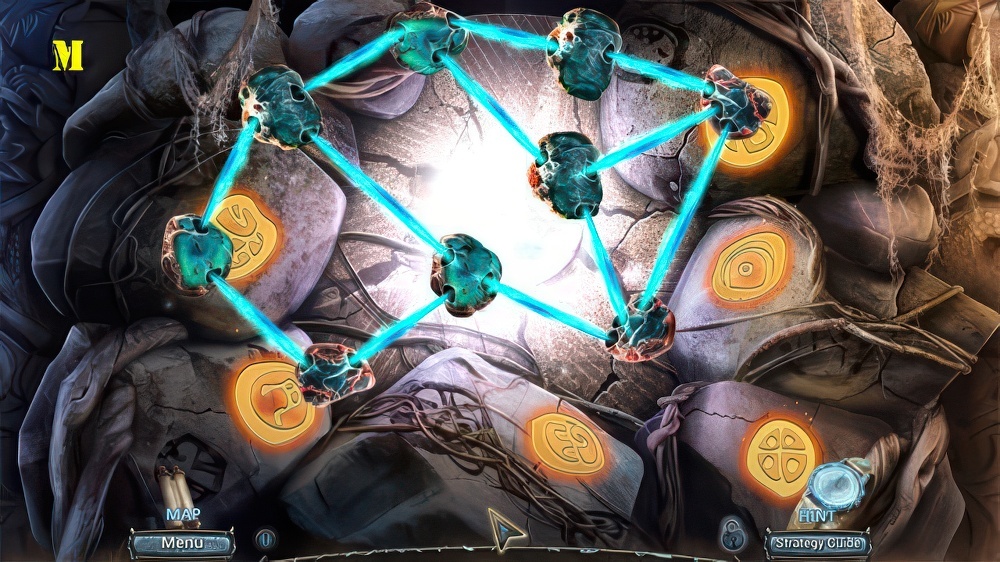
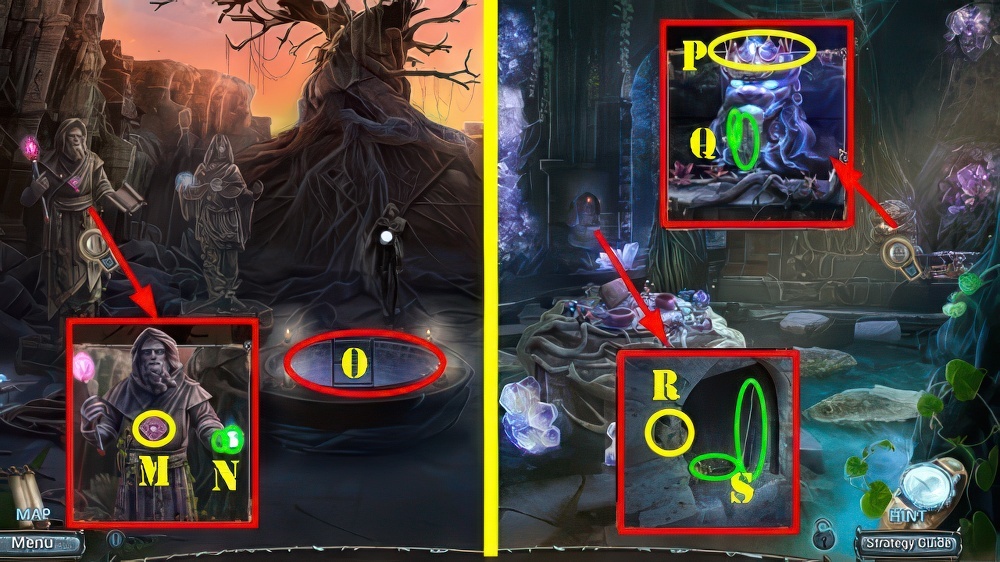
- Play puzzle upon entering scene.
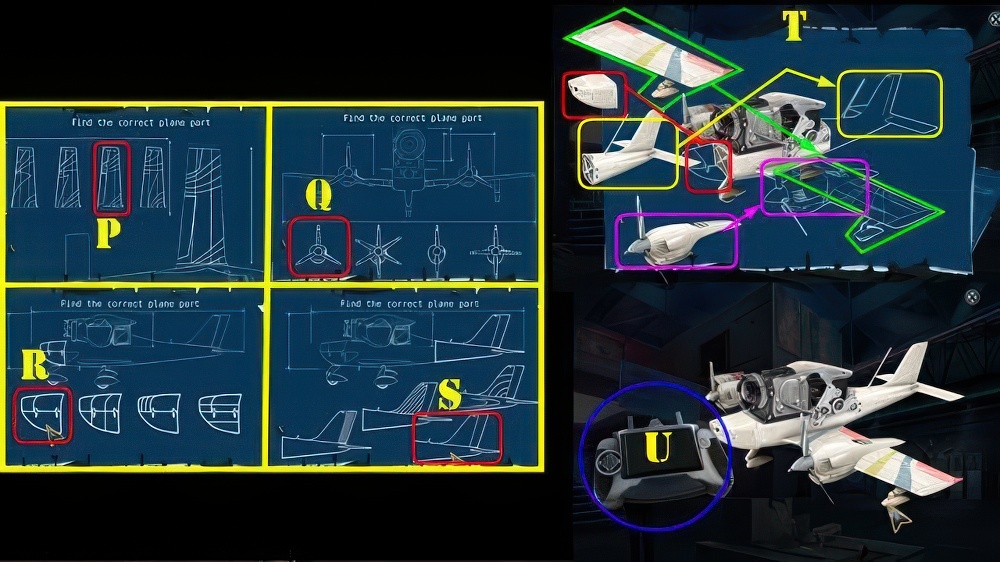
- Solutions (P-Q).

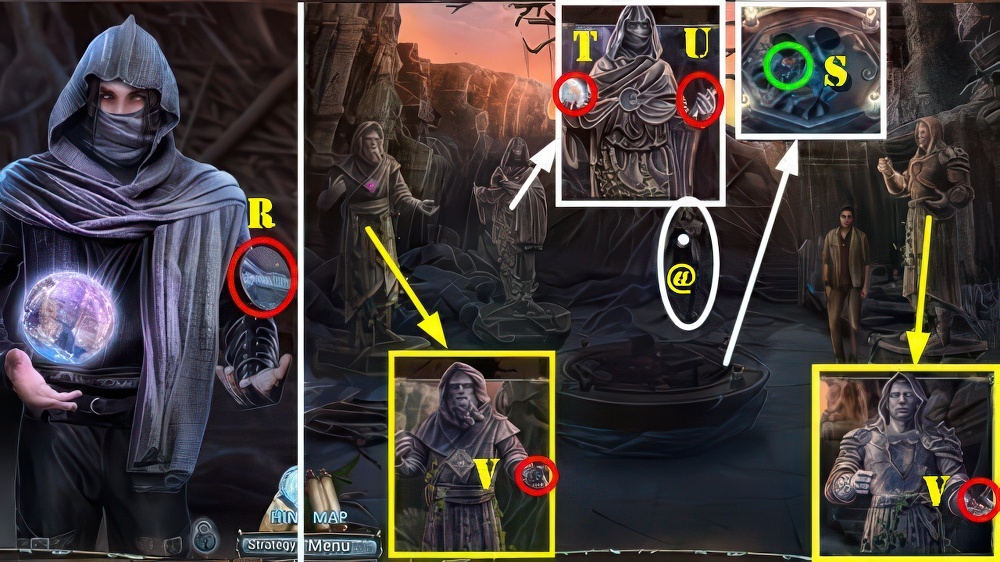
- Take BONE RUNE and ANCIENT TILES 1/3-2/3 (R).
- Select sand, take CANE (S).
- Open door, take FOLDER (T).
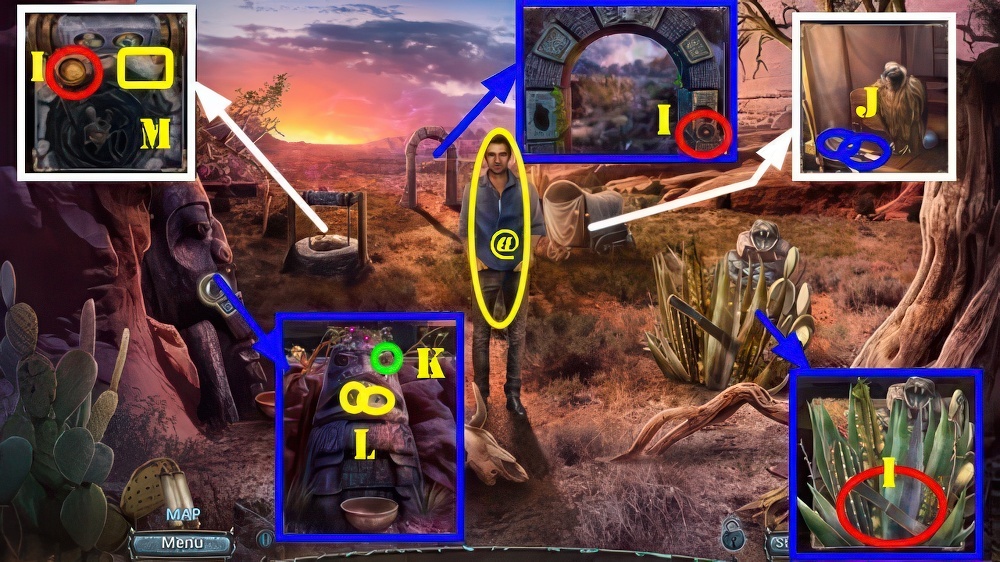
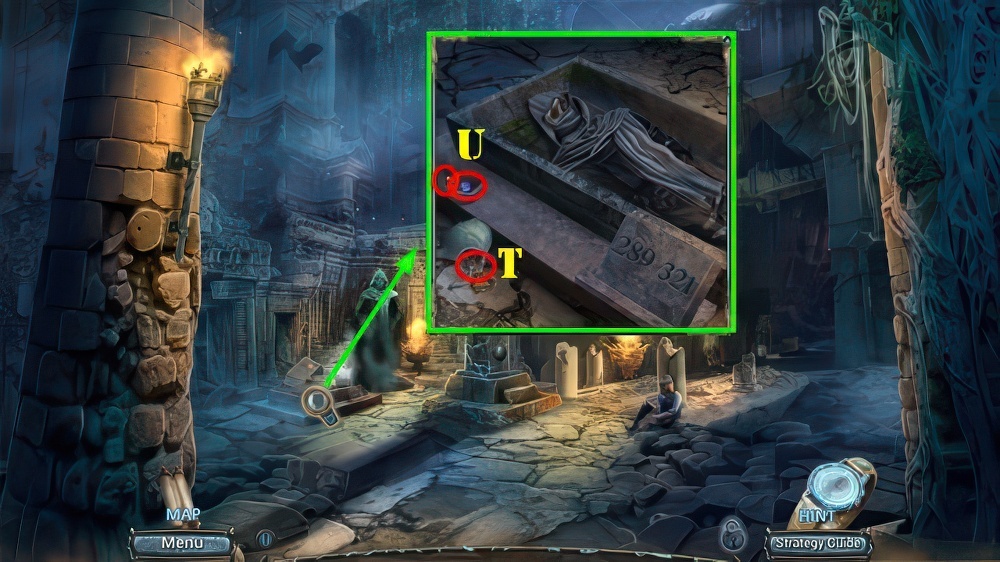
- Walk down.
- Use CANE (U), take AMBER RUNE and MAYAN MASK (V).
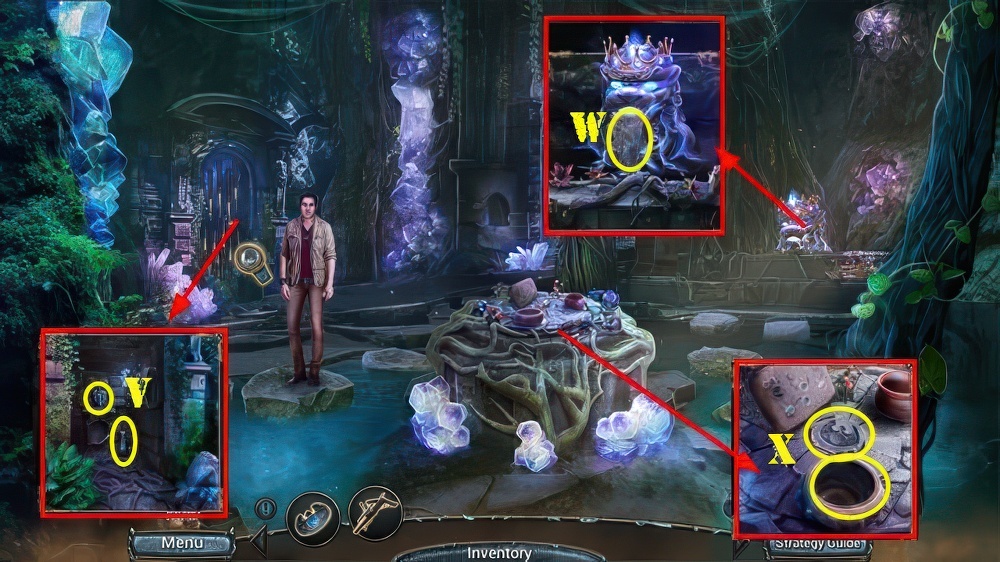
- Go to Arthur’s Office.
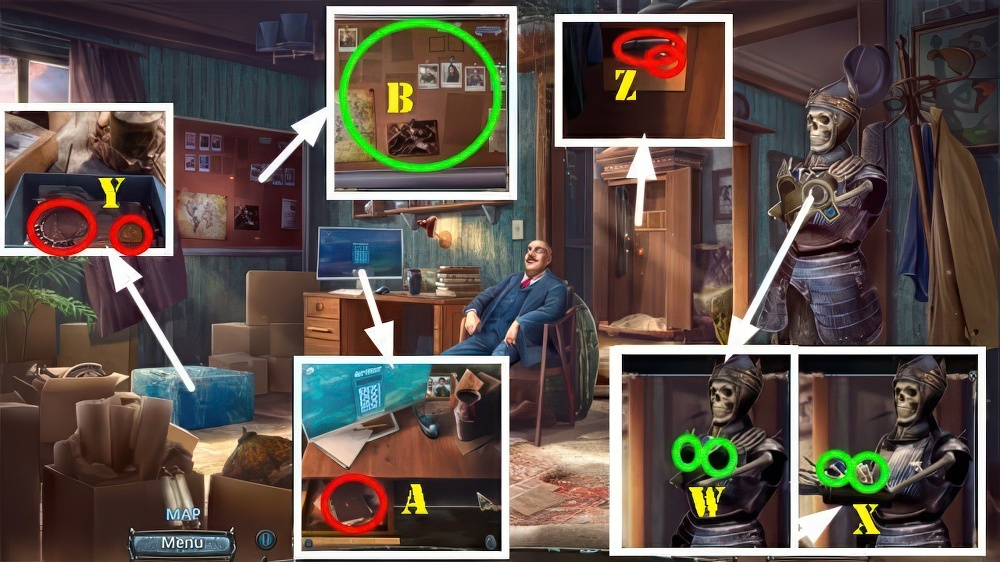
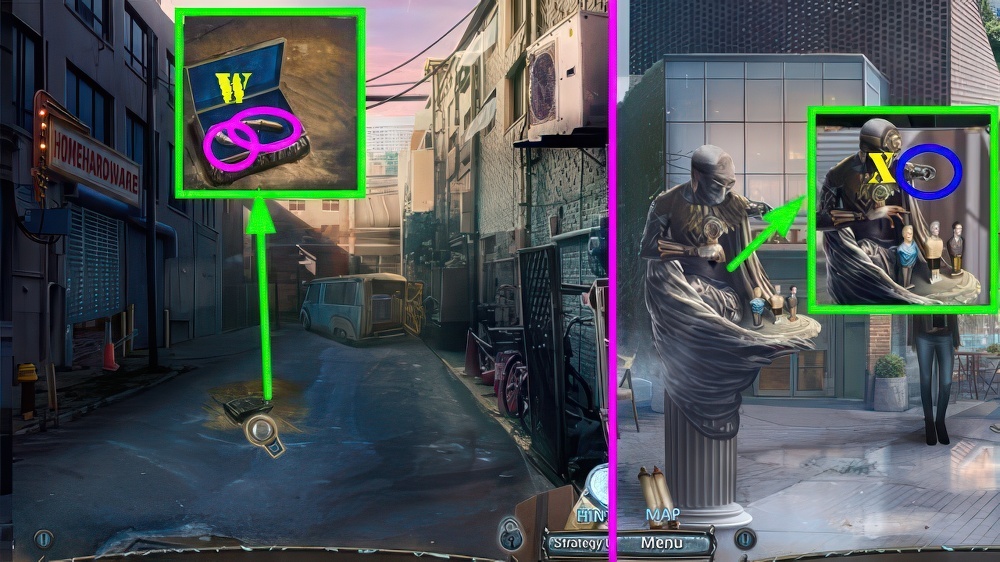
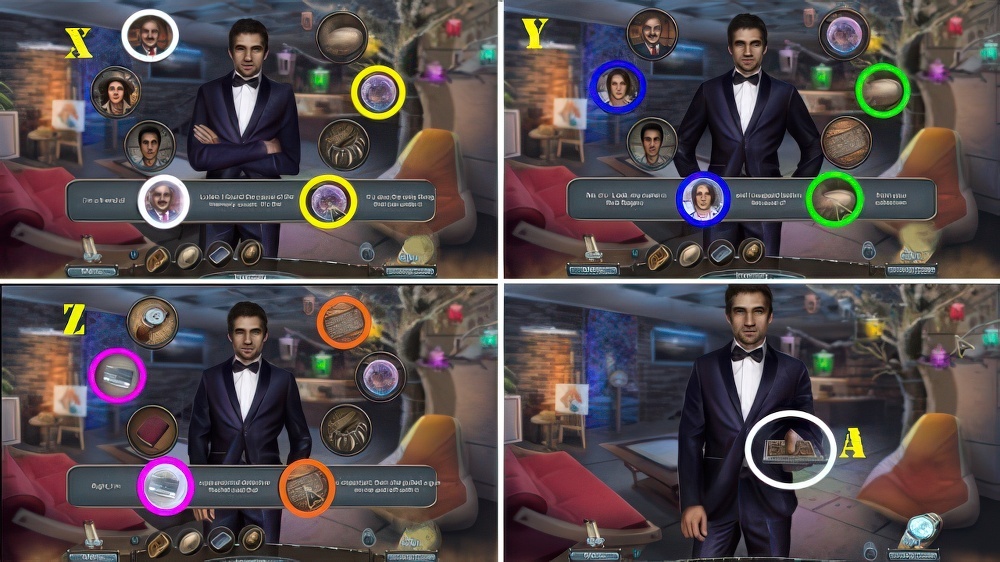
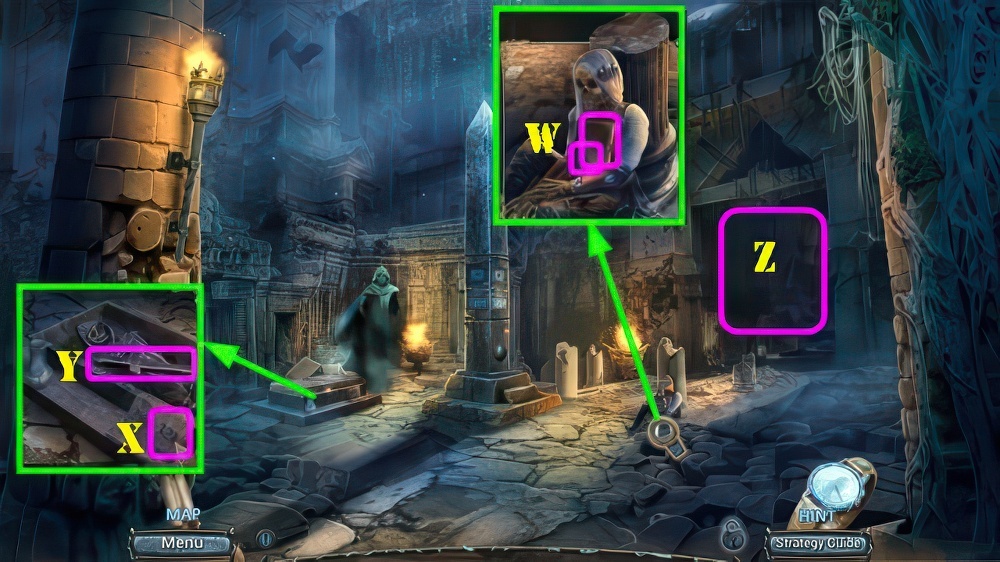
- Place BONE RUNE and AMBER RUNE (W), take ARTIFACT PHOTOGRAPHS and STAPLE REMOVER (X).
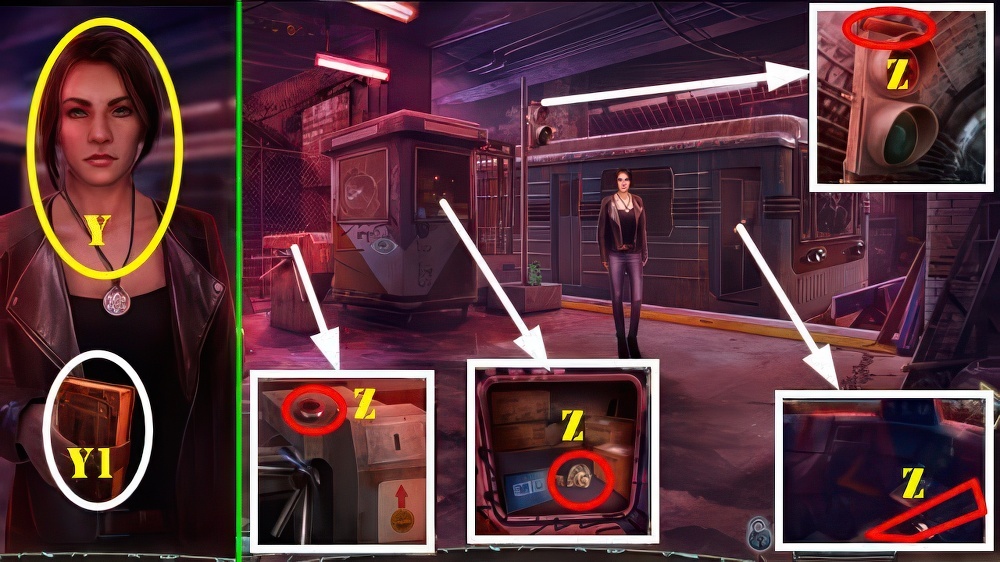
- Use STAPLE REMOVER, take ANCIENT TILES and NECKLACE (Y).
- Place ANCIENT TILES, take BROKEN ARM and DRAWER KEY (Z).
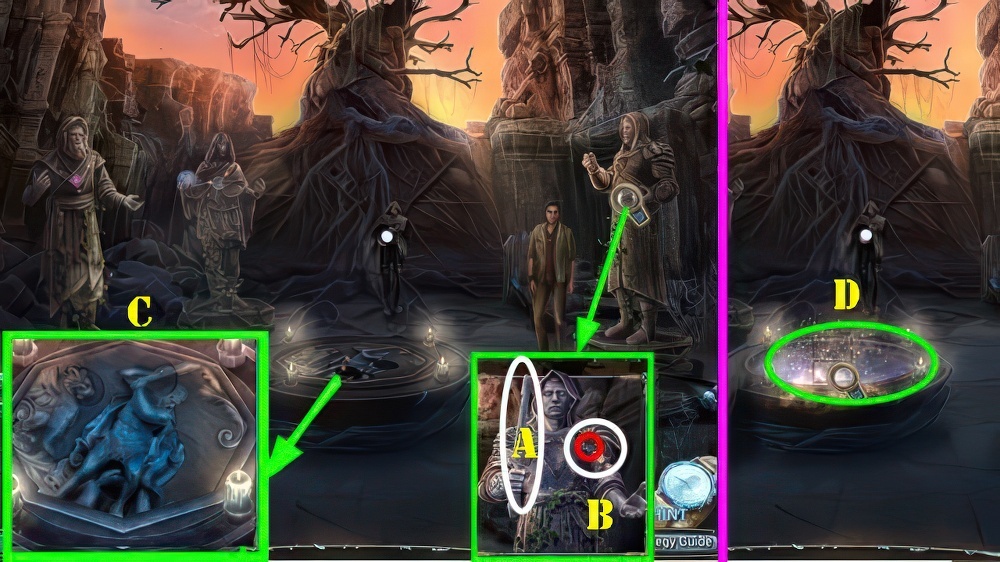
- Use DRAWER KEY, take ARTHUR’S NOTES (A).
- Place ARTIFACT PHOTOGRAPHS and ARTHUR’S NOTES (B).
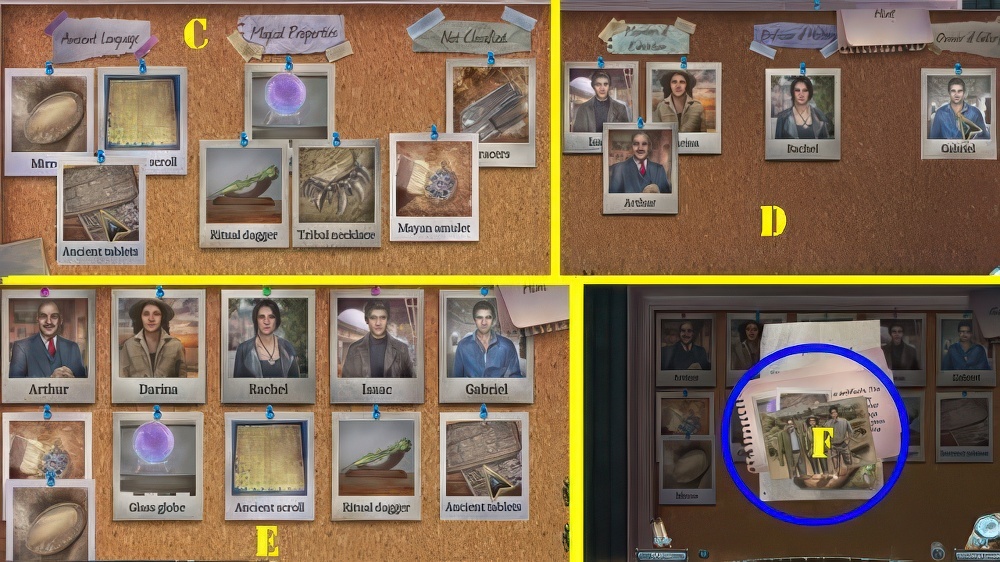
- Solutions (C-D-E).
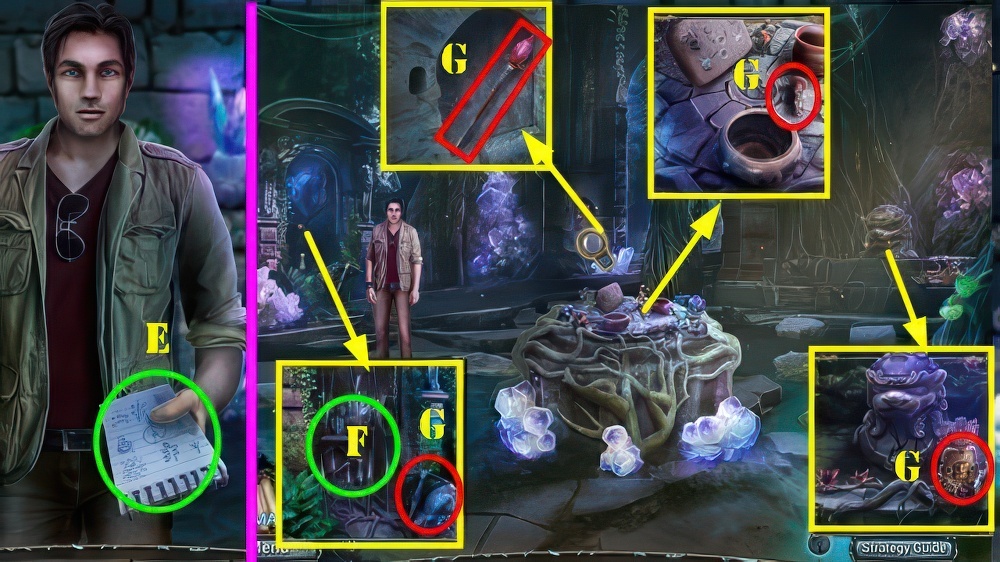
- Take PASSWORD PICTURE and CLUES 1/3 (F).

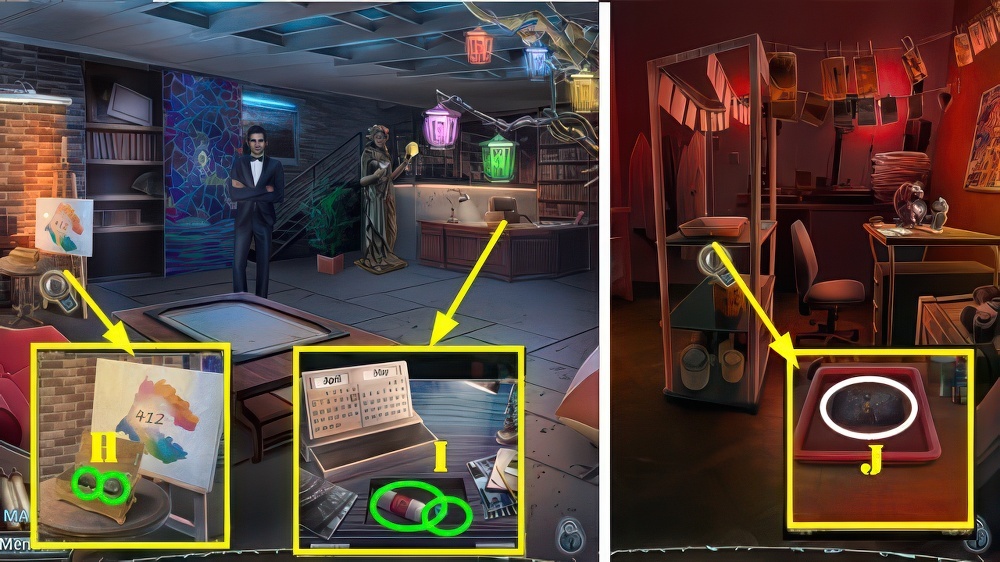
- Place PASSWORD PICTURE and select it (G).
- Enter 0412 (H).
- Select email (I).
- Take MEDALLION and ARTIFACT LIST (J).
- Play automatic puzzle, receive GLASS GLOBE.
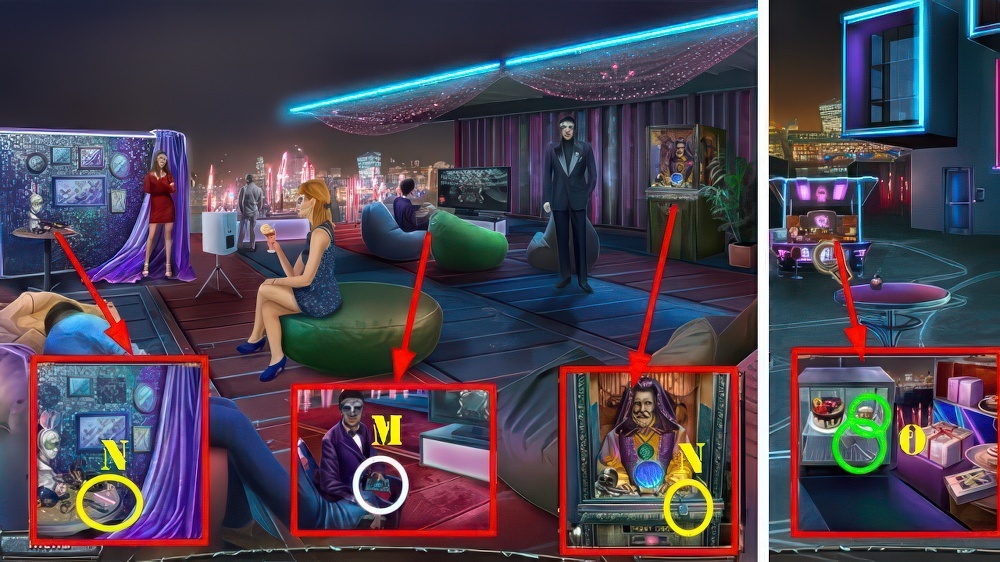
- Select scene.
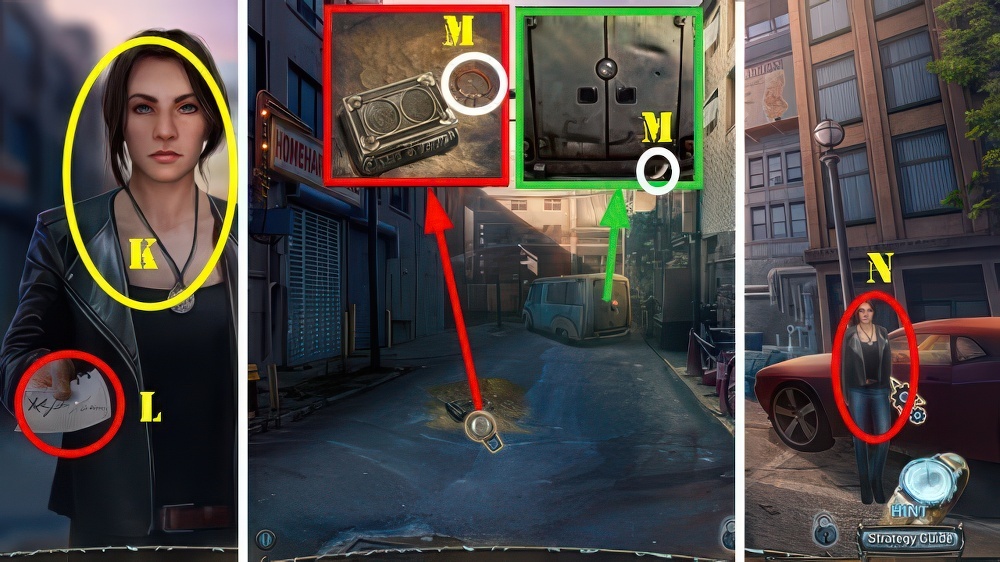
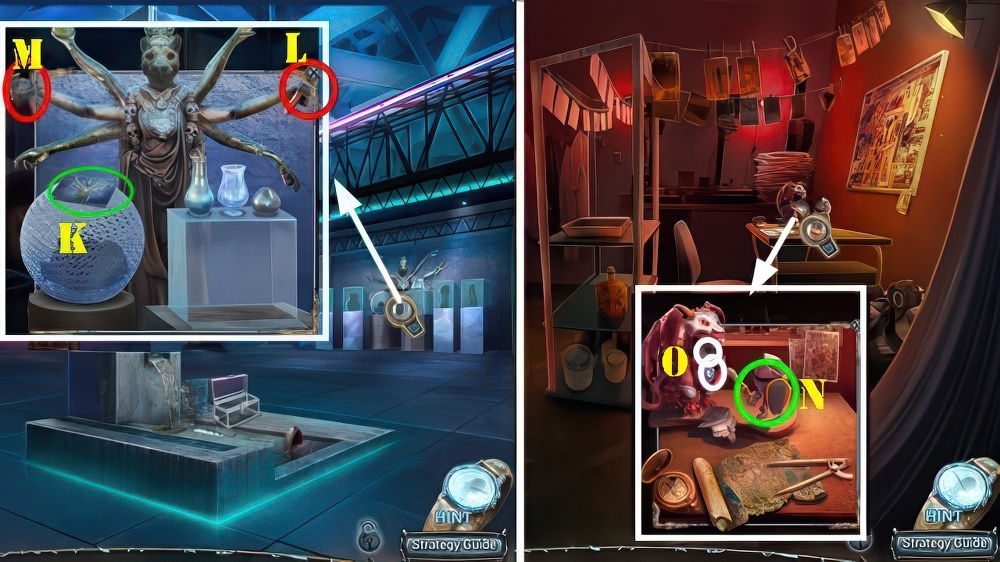
- Give ARTIFACT LIST (K).
- Take GALLERY ADDRESS (L).
- Take FANGS 1/3 and CHARMS BRACELET (M).
- Walk down.
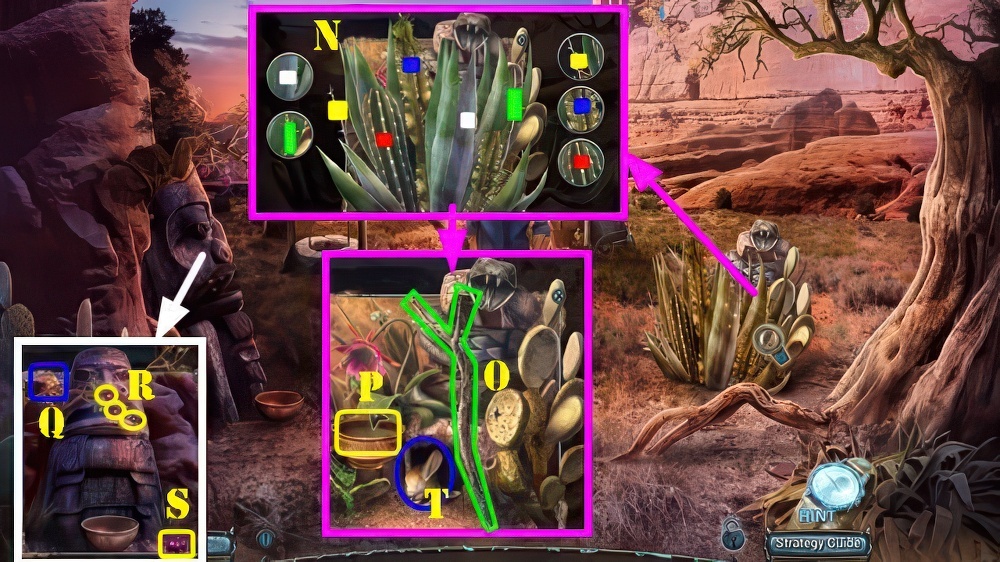
- Use GALLERY ADDRESS (N).

- Select scene.
- Take FANGS 2/3, JACK, CARABINERS, and AWL (O).
- Go to Alley.

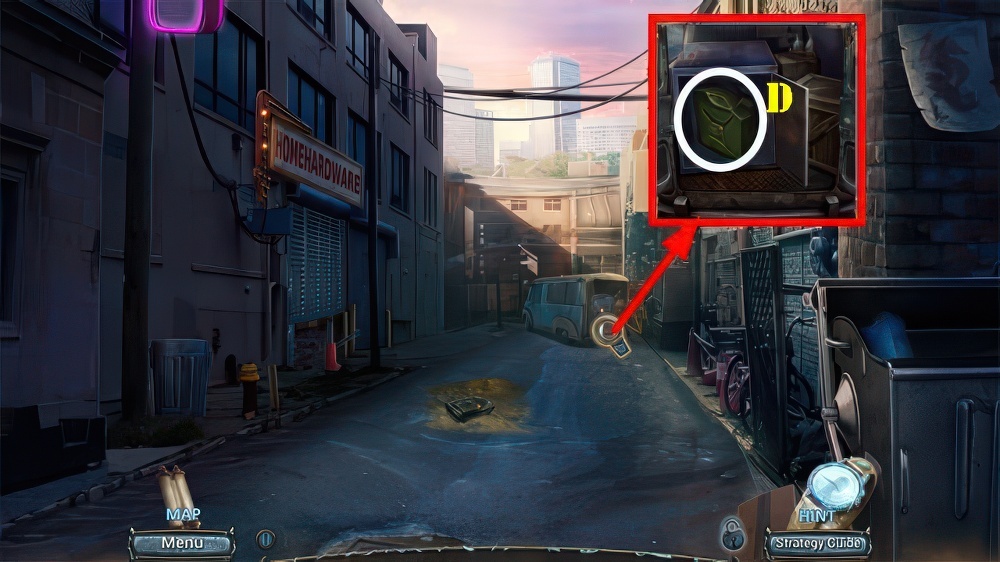
- Use AWL (P), receive RED BUTTON.
- Use JACK, take CHAIN and IGNITION KEY (Q).
- Use AWL, take AFRICAN MASK (R).
- Go to Arthur’s Office.

- Place MAYAN MASK and AFRICAN MASK, take SUBWAY MAP (S).
- Go to Gallery Entrance.
- CARABINERS on CHAIN, take CHAIN WITH CARABINERS.
- Use CHAIN WITH CARABINERS (T).
- Select the other end of carabiner (U).
- Place RED BUTTON (V), use IGNITION KEY and select (W).
- Place SUBWAY MAP (X).

- Solution (1-20).
- Give CHARMS BRACELET (Y), take HISTORY OF MAGIC (Y1).
- Take FISHING LINE, ANCIENT CROWN, METAL BRUSH, and STICK (Z).
- Walk down.
- Place ANCIENT CROWN and MEDALLION (A).
- Take ANTI-RUST and SCARAB MEDALLION (B).
- Use ANTI-RUST and METAL BRUSH, take CAR AMULET and TOKEN (C).
- Go to Alley.
- Place CAR AMULET, take FUEL (D).
- Go to Old Subway.
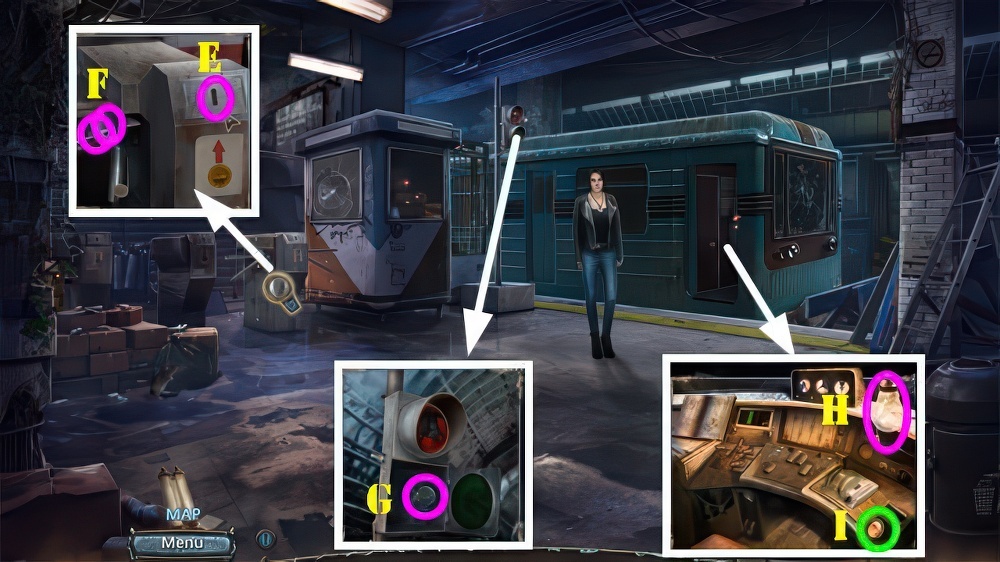
- Insert TOKEN (E), take MAGNIFIER and SCRAPER (F).
- Use SCRAPER, take BULB (G).
- Place BULB (H), use FUEL (I).
- Walk down twice.
- Use MAGNIFIER (J), receive SERIAL NUMBER.
- Go to Old Subway.
- Place SERIAL NUMBER (K): select box (L) and take ENGINE PART (M).
- Place ENGINE PART (N).
- Look at book (O).
- Select switches 1-3-4.
- Sliders (up-down-middle-down) (P).
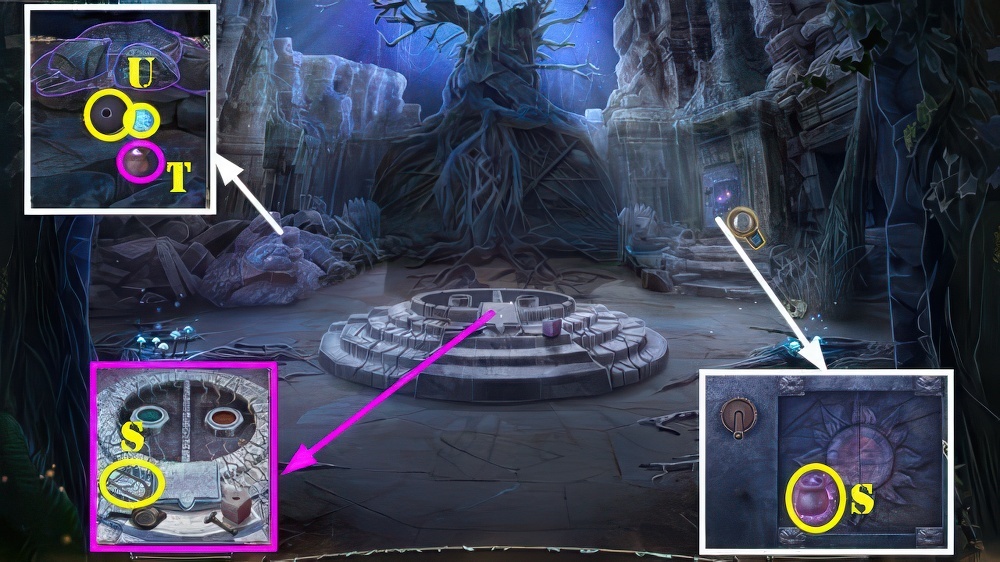
- Select: (Qx7-Sx5-Rx2).
- Handle down (T).
- Go (U).
- Take FINGERS 1/2, MATCHES, and EYE OF HORUS (V).
- Go to Alley.
- Place SCARAB MEDALLION and EYE OF HORUS, take FANGS and FINGERS (W).
- Go to Gallery Entrance.
- FINGERS on BROKEN ARM, take MECHANICAL ARM.
- Place MECHANICAL ARM (X).
- Solution (B-3-C)-(2-3)-(A-1-2)-(C-1)-(B-3-C)-(2-3)-(A-1-2)-(A-C-1).
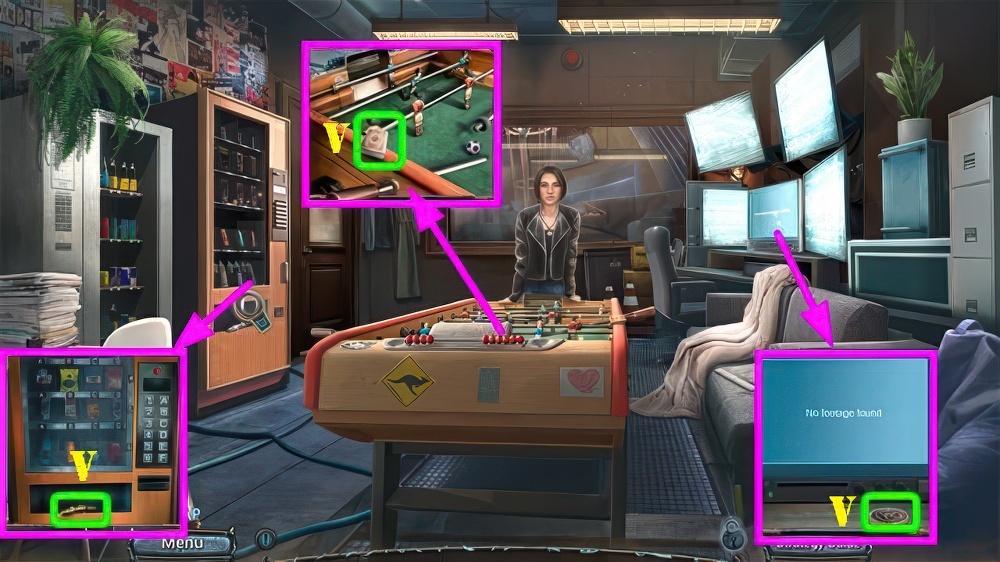
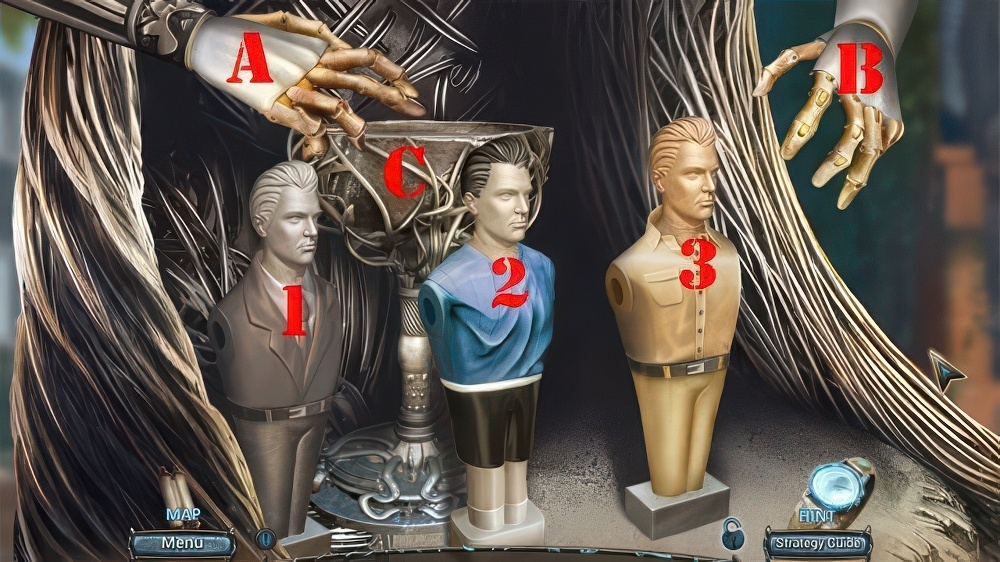
- Take SOCCER PLAYER FIGURINE (2).
- Go to Guard’s Room.
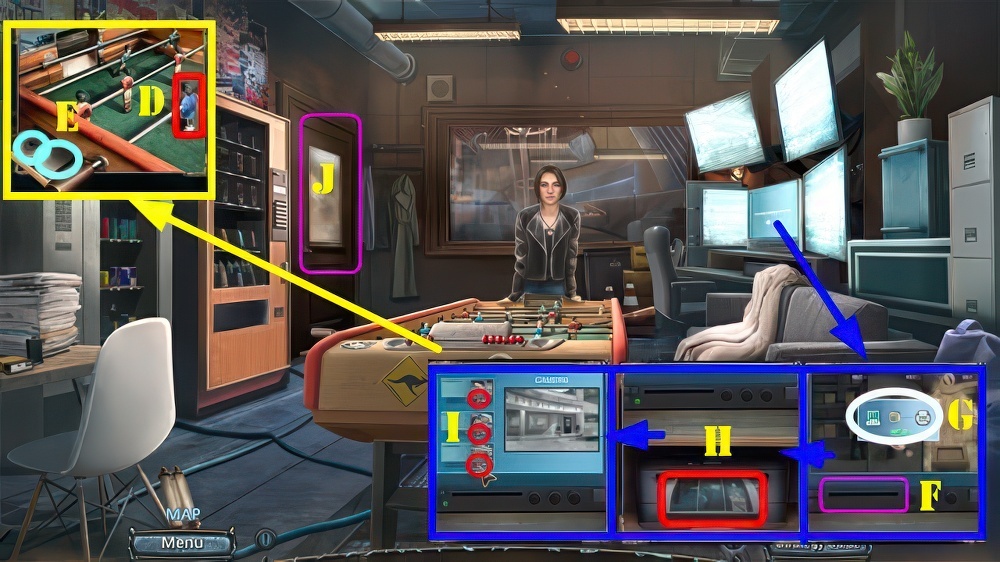
- Place SOCCER PLAYER FIGURINE and select (D), take NOTEBOOK and DISC (E).
- Insert DISC (F) and select monitor (G), take CLUES 2/3 (H).
- Switch off the three cameras (I).
- Go (J).

- FANGS on NECKLACE, take NECKLACE OF POWER.
- Use NECKLACE OF POWER (K).
- Play puzzle (L), receive ANCIENT TABLET.
- Give NOTEBOOK (M), take CLUES and HANDKERCHIEF (N).
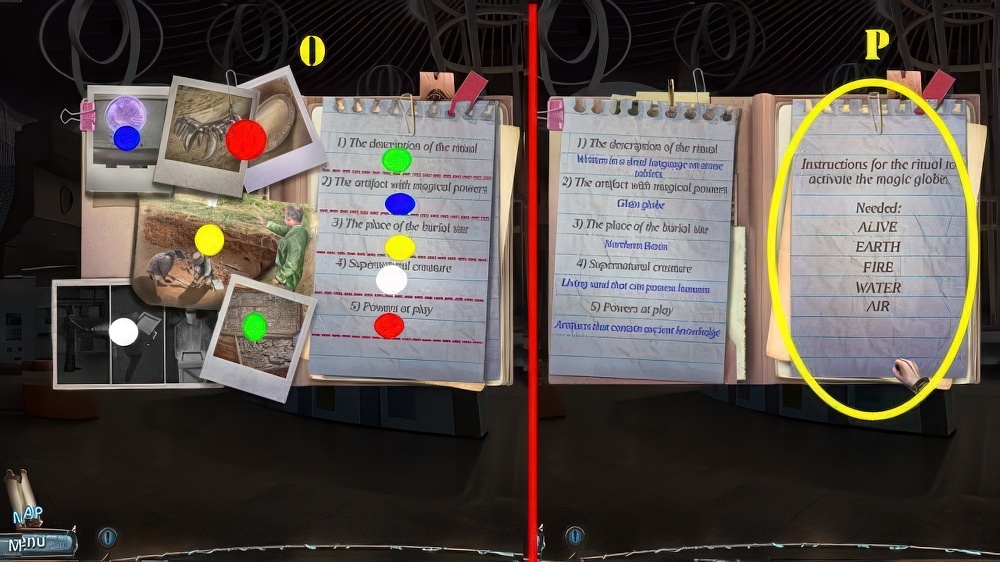
- Open FOLDER and place CLUES.
- Solution (O).
- Take TRANSLATION HINTS (P).
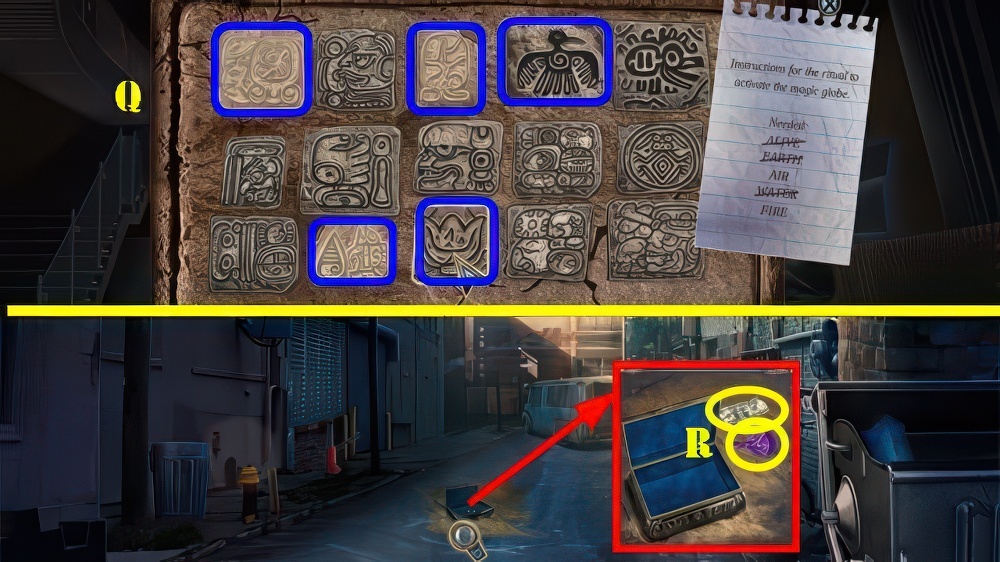
- TRANSLATION HINTS on ANCIENT TABLET.
- Solution (Q).
- Go to Alley.
- Use HANDKERCHIEF, take MONEY and STRANGE SAND (R).
- Go to Guard’s Room.

- Insert MONEY (S), select B4 (T) and take HOOK and SEEDS (U).
- Go to Gallery Entrance.
- Place HOOK and FISHING LINE on STICK, take FISHING ROD.
- Use FISHING ROD (V), select fishing rod and take SEASHELL (W).
- Walk down.
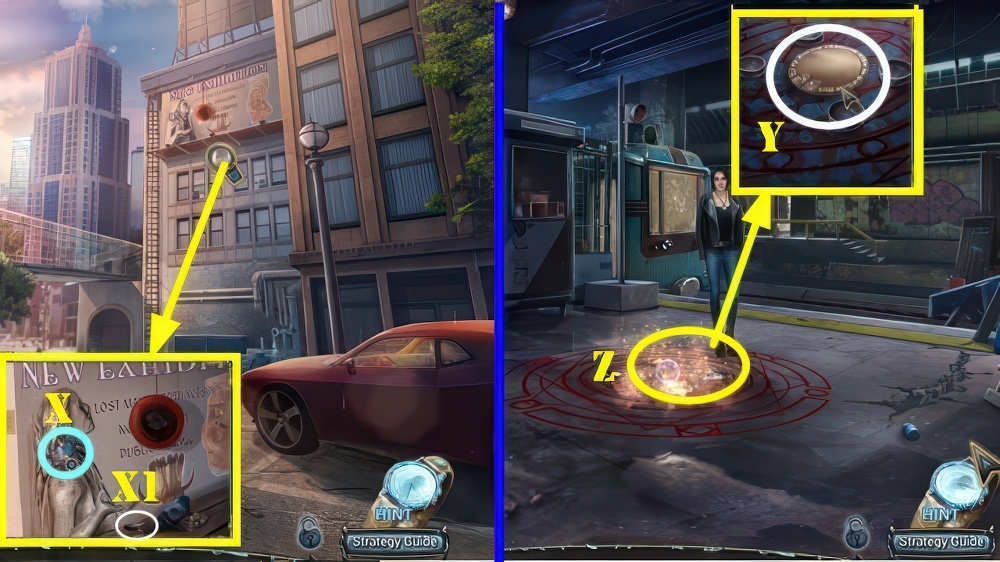
- Use SEEDS (X), take PIGEON FEATHER (X1).
- Go to Old Subway.
- Place STRANGE SAND, PIGEON FEATHER, SEASHELL, MATCHES, and GLASS GLOBE (Y).
- Play puzzle (Z), receive ACTIVATED MAGIC GLOBE.
- Go to Arthur’s Office.

- Use ACTIVATED MAGIC GLOBE (A), receive INACTIVE MAGIC GLOBE.
- Take MYSTERIOUS MIRROR (B).
- Go to Od Subway.
- Use MYSTERIOUS MIRROR (C).
- Select red and yellow items before they reach Rick.
- Solution is random (A).
- Take paper (B).
- Play automatic puzzle (C), receive INVITATIONS.
- Give INVITATIONS (D).
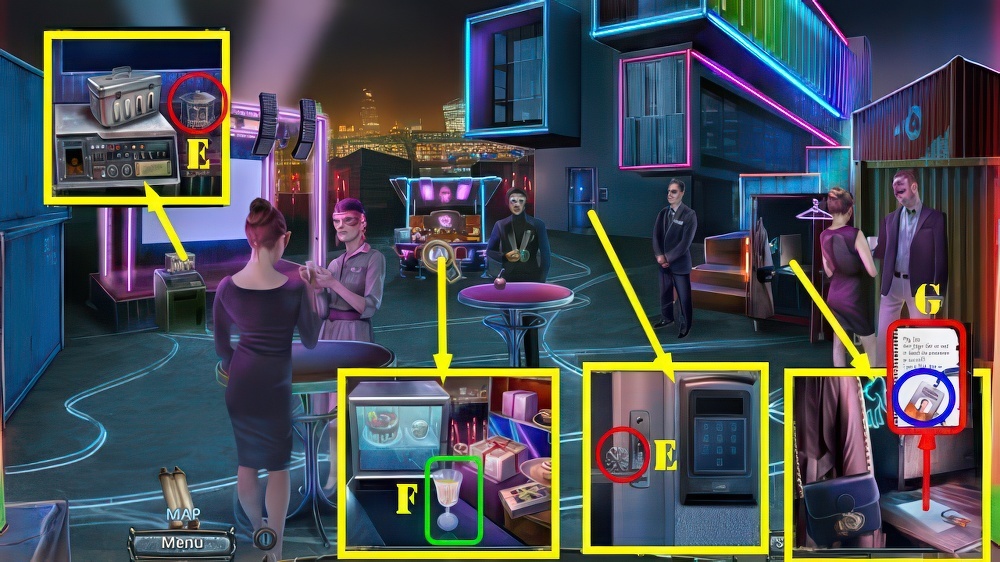
- Take BOX WITH SECRET and TREE AMULET (E).
- Select glass, take WINEGLASS (F).
- Select paper, take BACKSTAGE PASS (G).
- Place TREE AMULET: look at note and take ELEMENTAL FIGURINES 1/4 and FLASH DRIVE (H).
- Use BACKSTAGE PASS (I) and FLASH DRIVE (J).
- Play puzzle (K).
- Go (L).
- Talk, take FORTUNE-TELLER CARD (M).
- Take GLOW STICK and BAR KEY (N).
- Walk down.
- Use BAR KEY, take SPATULA and POWDERED CAKE (O).
- Go to VIP Lounge.
- Use SPATULA and insert FORTUNE-TELLER CARD (P).
- Pull lever (Q), take FORTUNE CARD (R).
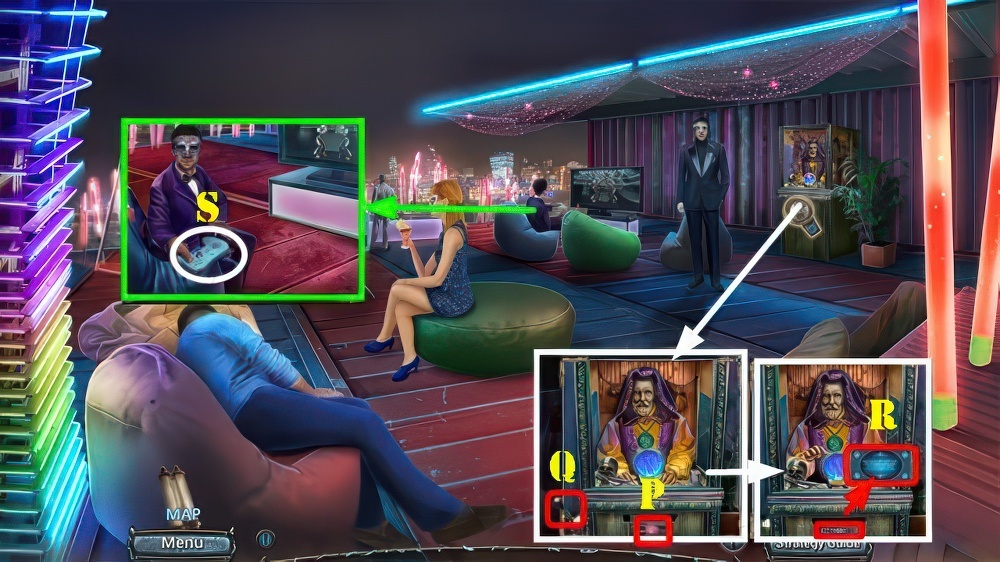
- Talk, take game controller (S).

- Select (T-V) to punch and (U) to block a punch.
- Choose blue or red fighter.
- Solution (Tx14).
- Take TIE PIN and GALLERY ACCESS CARD (W).
- Walk down.
- Use TIE PIN, take GLOW STICK and SHARK EYE (X).
- Place two GLOW STICKS, take ELEMENTAL FIGURINES 2/4, MAKE-UP BRUSH, and BATTERIES (Y).
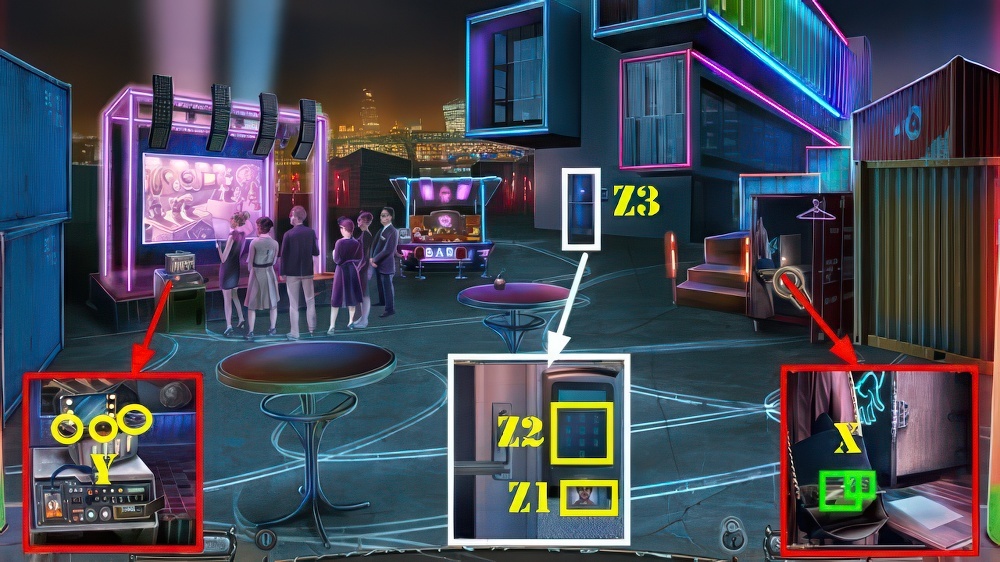
- Use GALLERY ACCESS CARD (Z1).
- Use POWDERED CAKE and MAKE-UP BRUSH, select 16886 (Z2).
- Enter (Z3).

- Take ELEMENTAL FIGURINES 3/4, ELEMENTAL FIGURINES, BROKEN PLANE, and SHARK TAIL (A).
- ELEMENTAL FIGURINES and FORTUNE CARD on BOX WITH SECRET, select 3-1-2-5.
- Take SILVER SKULL and FRAMED BUTTERFLY (B).
- Go to VIP Lounge.

- Place SILVER SKULL (C), take PLANE PARTS 1/4 and DESSERT KNIFE (D).
- Walk down.
- Use DESSERT KNIFE (E).
- Play puzzle, receive SHARK FIN.
- Go to Gallery Hall.
- Place SHARK EYE, SHARK TAIL, and SHARK FIN (F).
- Take PLANE PARTS 2/4 and FRAMED DRAGONFLY (G).
- Go to VIP Lounge.
- Place FRAMED BUTTERFLY and FRAMED DRAGONFLY (H).
- Take INTRICATE HANDLE and PLANE SCHEMATIC (I).
- Walk down.

- Place INTRICATE HANDLE, take PLANE PARTS 3/4 and DONKEY STATUETTE (J).
- Go (K).
- Place DONKEY STATUETTE (L), take GLASS VASE and CALENDAR PART (M).
- Place GLASS VASE (N), take PLANE PARTS and MOSAIC TILE (O).
- PLANE PARTS and PLANE SCHEMATIC on BROKEN PLANE.
- Solution (P-Q-R-S).
- Assemble plane as shown (T).
- BATTERIES on game controller (U), TAKE RC PLANE.
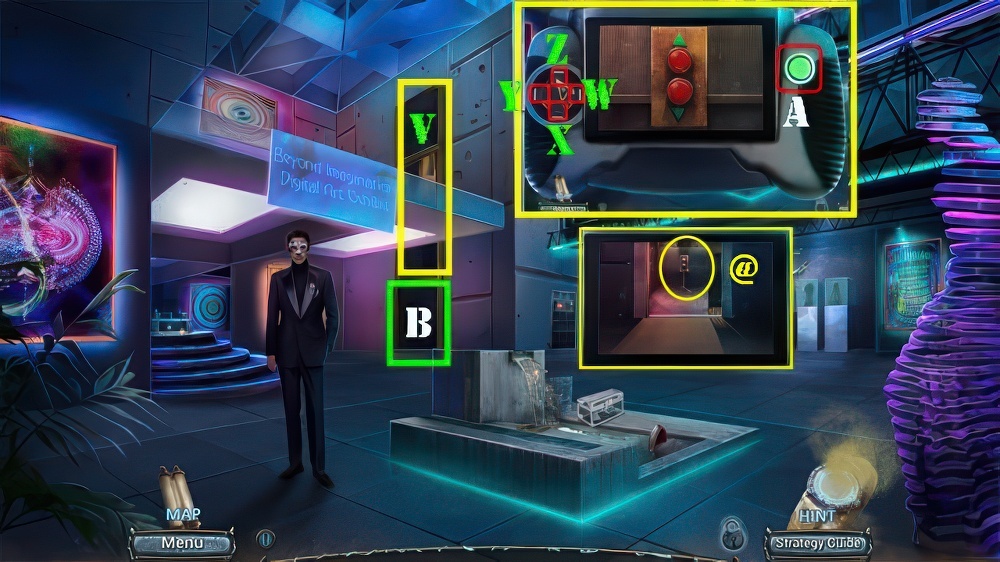
- Use RC PLANE (V).
- Move (W) until it stops.
- Move (X) until it stops.
- Move (Y) until you see a door in the background.
- Move (Z) until you see the controls (@).
- Select green button (A).
- Go (B).
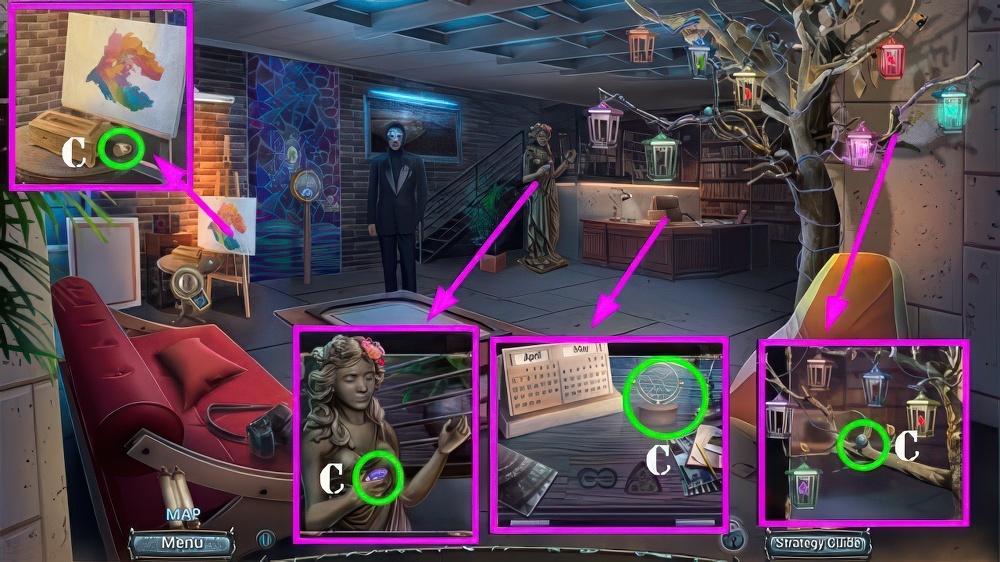
- Take SIGNET RING, COLORED BULBS 1/3, PENDULUM, and LITTLE BALL (C).
- Walk down.
- Use SIGNET RING, take FREEZING SPRAY and SOLVENT (D).
- Go (E).
- Use SOLVENT (F), receive IMPORTANT DATE.
- Place CALENDAR PART (G) and IMPORTANT DATE (H).
- Move calendar part to April 12 (I), take UNICORN HORN and COLORED BULBS 2/3 (J).
- Walk down.

- Use FREEZING SPRAY and UNICORN HORN, take LITTLE CUBE and ANTIQUE FAN (K).
- Go (L).

- LITTLE BALL and LITTLE CUBE on PENDULUM, take COLORED BULBS.
- Place COLORED BULBS on tree, solution (M).
- Place WINEGLASS and ANTIQUE FAN (N), select fan twice.
- Select (O).
- Solution (P-Q-R).
- Take ANCIENT TABLET and FOSSILIZED EGG (S).

- Give ANCIENT TABLET and INACTIVE MAGIC GLOBE (T).
- Select book (U), mug (V), and pillow (W).
- Solution (X-Y-Z).
- Take TABLET PHOTO and MOSAIC TILE (A).
- Walk down.
- Place 2 MOSAIC TILES (B), look at note and take ISAAC’S KEY (C).
- Use ISAAC’S KEY (D).
- Go (E).
- Play puzzle (F).
- Take INFINITY SIGN and BRUSH AMULET (G).
- Go to Gabriel’s Office.
- Place BRUSH AMULET, take CELTIC SIGN and STRANGE FLASHLIGHT (H).
- Place INFINITY SIGN and CELTIC SIGN, take COLORED GLASS and DEVELOPER (I).
- Go to Isaac’s Room.
- Use DEVELOPER, take STRANGE PHOTO (J).
- Walk down.
- Place STRANGE PHOTO (K).
- Arrange arms as shown, take ANTIQUE COMB and SWORD FIGURINE (L-M).
- Go to Isaac’s Room.
- Place SWORD FIGURINE (N), take MOON METAL and ISAAC’S NOTES (O).

- ISAAC’S NOTES and STRANGE FLASHLIGHT on TABLET PHOTO.
- Solutions (P-Q-R).
- Take OLD CHAIN and LEVITATION POWDER (S).
- Place LEVITATION POWDER (T), take ANCIENT GEAR and ICE SPHERE (U).

- Place OLD CHAIN and ANCIENT GEAR (V).
- Play puzzle.
- Take FIRE SPHERE (W).
- Place FIRE SPHERE, ICE SPHERE, MOON METAL, and HISTORY OF MAGIC on the altar.
- Place moon metal (X) in pan (Y).
- Place pan on fire side (B).
- Pour melted metal in cubed stone (Z).
- Place cubed stone on frozen side (A).
- Use hammer (C) on cubed stone, tale ALL-SEEING EYE (D).
- Place ALL-SEEING EYE (E).
- Choose left sphere.
- Solution (1-6).
- Take MAGIC SAND (F).

- Use MAGIC SAND (G).
- Play puzzle.
- Take GABRIEL’S BAG (H).
- Talk (@).
- Take BLUNT BLADE, TOTEM EYE, and ANCIENT BOWL (I).
- Remove curtain, take CLOTH PIECE and CHISEL (J).
- Place TOTEM EYE (K), take MAYAN SYMBOL and CORD SPOOL (L).
- Use CHISEL (M), receive SHARPENING STONE.
- CLOTH PIECE, CORD SPOOL, and SHARPENING STONE on BLUNT BLADE, take MACHETE.
- Use MACHETE, solution (N).
- Take LONG BRANCH (O).
- Use ANCIENT BOWL (P), receive BOWL WITH ACID.
- Use LONG BRANCH, take MECHANISM PART (Q).
- Select 3 berries (R), take BERRIES (S).
- Give BERRIES, take RODENT (T).

- Use RODENT (U), take STONE HEART (V).
- Place COLORED GLASS, BOWL WITH ACID, and MECHANISM PART (W).
- Solution (X).
- Select skeleton, take UNUSUAL STAFF and STONE BRAIN (Y).
- Place STONE HEART and STONE BRAIN (orange), select dagger (Z).
- Go (Z1).
- Give GABRIEL’S BAG (A).
- Play puzzle.
- Take MAYAN SYMBOL and SNAKE SCALE (B).
- Walk down.

- Place two MAYAN SYMBOLS, take OLD LIGHTER and EXHAUST PIPE (C).
- Place SNAKE SCALE, take ANCIENT SCROLL and JINGLE BELLS 1/4 (D).
- Use EXHAUST PIPE (E), receive CACTUS JUICE.
- Place CACTUS JUICE and use OLD LIGHTER, take MAGIC PAINT (F).
- Go (G).
- Use ANCIENT SCROLL (H), take BAG CODE (H1).
- Use BAG CODE, select (purple-dark blue-light blue-red) (I).
- Move tablet, take ACTIVATED MAGIC GLOBE and JINGLE BELLS 2/4 (J).
- Use MAGIC PAINT and ACTIVATED MAGIC GLOBE (K).

- Solutions (L).
- Solutions (M).
- Take MAGIC GLOBE.
- Use OLD LIGHTER on scene and on three torches (purple).
- Take WOLF SKULL, JINGLE BELLS 3/4 and JINGLE BELLS (N).
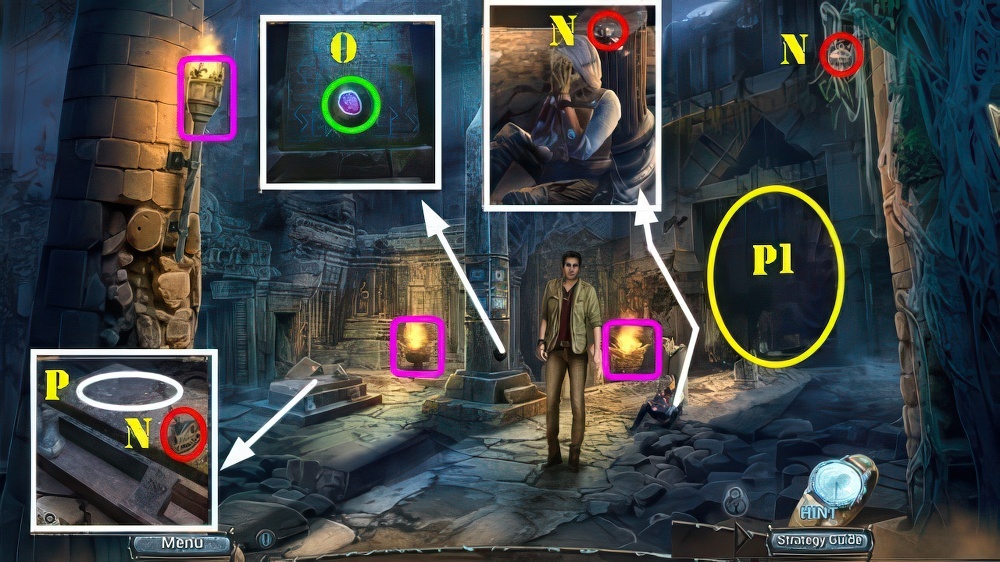
- Place FOSSILIZED EGG, take SHINING CRYSTAL (O).
- WOLF SKULL, SHINING CRYSTAL, and JINGLE BELLS on UNUSUAL STAFF, take SUMMONING STAFF.
- Use SUMMONING STAFF (P).
- Play puzzle.
- Go (P1).
- Talk (@), take STONE PARTS 1/3 (R).
- Use OLD LIGHTER and play puzzle, take ANTIQUE BRACELET (S).
- Place MAGIC GLOBE (T), take SCROLL (U).
- Take STONE PARTS 2/3 and MAGE SEAL (V).
- Walk down.
- Place ANTIQUE BRACELET and ANTIQUE COMB, take TRAVEL LOG and DEATH DATE (W).
- Place DEATH DATE (X), take STONE SWORD (Y).
- Go (Z).
- Place STONE SWORD (A), take STONE PARTS and CROWN (B).
- Place STONE PARTS, solution (C).
- Go (D).
- Select notebook (E).
- Play puzzle.
- Select (F).
- Take PRECIOUS STAUETTE, MAGIC STAFF, BROKEN CROSSBOW, and MAGE SEAL (G).
- Walk down.
- 2 MAGE SEALS on SCROLL, take SPELL SCROLL.
- Place MAGIC STAFF and SPELL SCROLL (purple), take DRAINED MAGIC AMULET (H).
- Walk down.
- Place DRAINED MAGIC AMULET (I).

- Go up, solution (J).
- Go right and up, solution (K).
- Go left twice and up, solution (L).
- Take CHARGED MAGIC AMULET.
- Go to Ruins.
- Place CHARGED MAGIC AMULET (M).
- Take MAGIC FIRE and PRECIOUS JEWEL STONES 1/3 (N).
- Go (O).
- Place CROWN and MAGIC FIRE (P), take ENORMOUS KEY and CROSSBOW STRING (Q).
- Use ENORMOUS KEY (R), take METAL FLOWER and BOLT (S).
- Walk down twice.
- Place METAL FLOWER (T).
- Take PRECIOUS JEWEL STONES 2/3, LOCK PART, and CROSSBOW TRIGGER (U).
- Go to Sanctuary.
- LOCK PART on TRAVEL LOG.
- Play puzzle, receive PRECIOUS JEWEL STONES.
- PRECIOUS JEWEL STONES on PRECIOUS STATUETTE, take GUARDIAN AMULET and GEAR.
- CROSSBOW TRIGGER, BOLT, CROSSBOW STRING, and GEAR on BROKEN CROSSBOW, take LOADED CROSSBOW.
- Use LOADED CROSSBOW, take CHARGED WARRIOR AMULET and JUG (V).
- Use JUG (W), receive JUG WITH DARK WATER.
- Place JUG WITH DARK WATER and GUARDIAN AMULET (X).
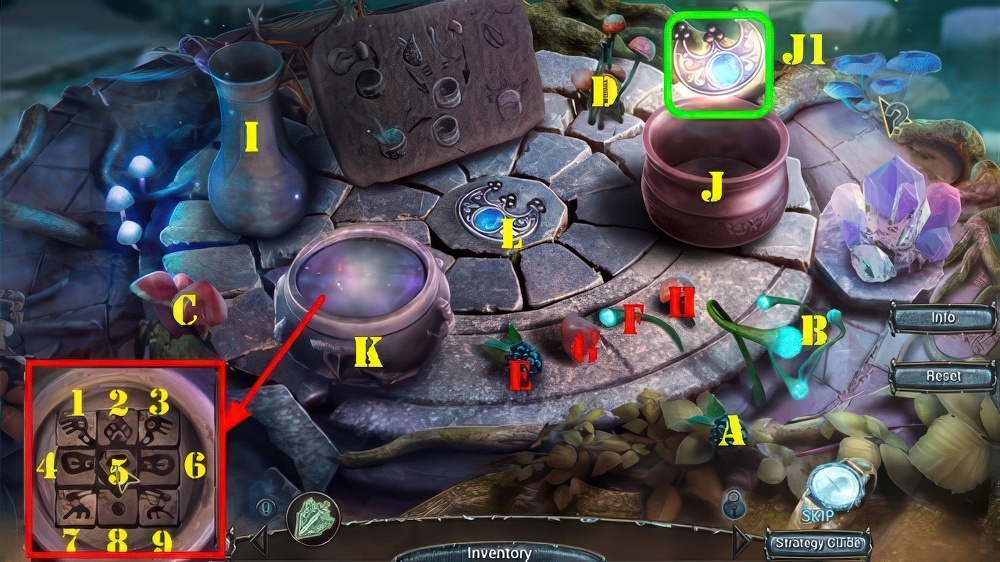
- Select (K).
- Solution (6-4-2-8-1-3-9-7-5).
- Select vase (I).
- Select (A-B-C-D).
- Place (H-F-E) in (J).
- Select (K).
- Place (L) in (J).
- Take CHARGED GUARDIAN AMULET (J1).
- Walk down.
- Place CHARGED GUARDIAN AMULET (M) and CHARGED WARRIOR AMULET (N).
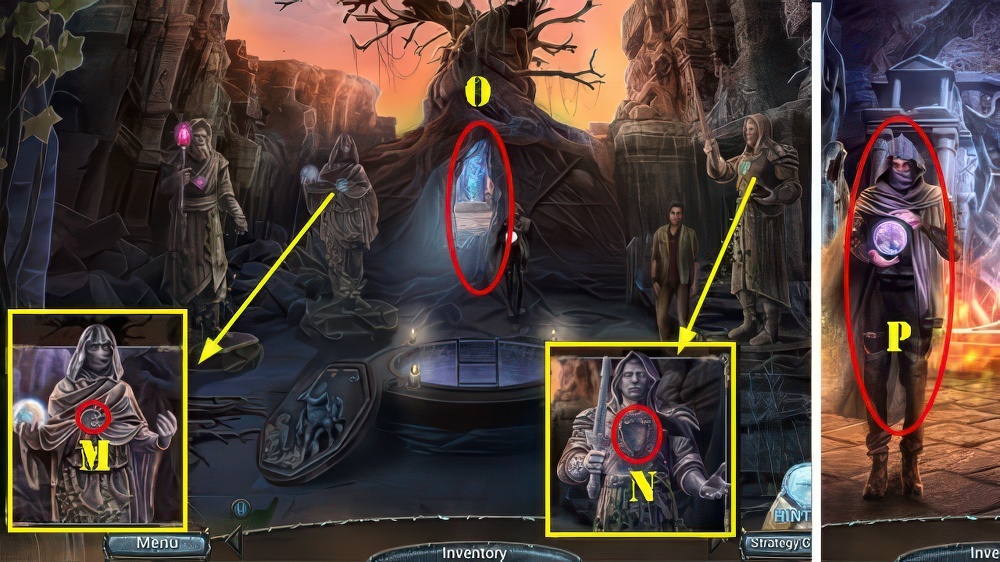
- Go (O).
- Talk (P).
- Select scene.
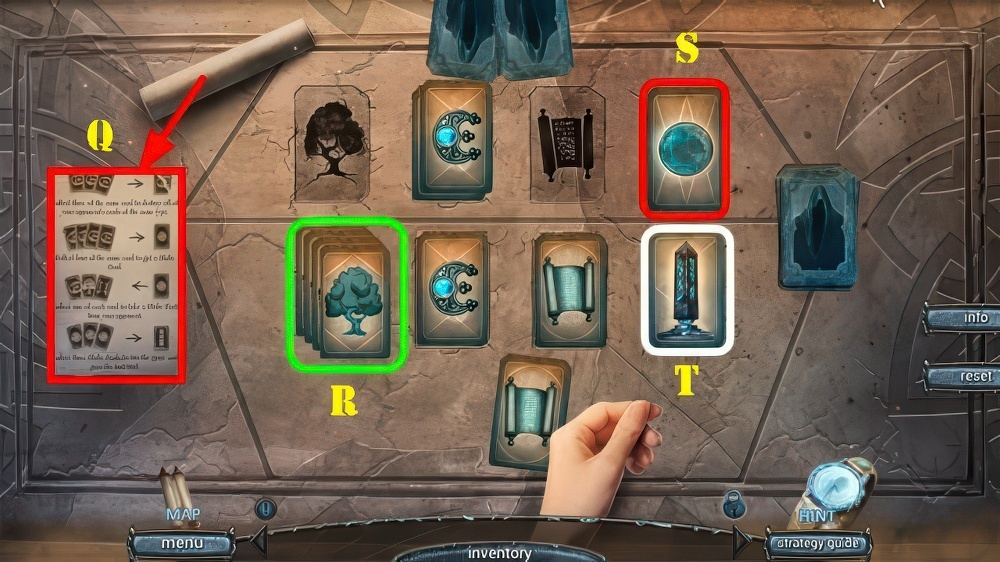
- View the rules (Q).
- Collect one of each card to win a globe card.
- Collect four of the same card (R) to steal a globe card (S) from your opponent.
- Collect three globe cards to win the game.
- The solution is random (T).
- Walkthrough Bonus Chapter, at the link below.


