Unfinished Report 1: Eleanor Case (Bonus Chapter) – Vivien Lane continues her investigation into the activities of the secret society known as the Garden Circle. After discovering a connection between Tom Baker and Sheriff Cole, the journalist tries to find out exactly who was behind the disappearances of Hollow Creek residents and why the town’s influential figures went to such great lengths to cover up what was happening. Following clues from Aunt Eleanor, Vivien turns to Mrs. Vail, who tells her about an old water tower and warns that the journalist may be under surveillance. Upon reaching the tower, Vivien discovers an abandoned pavilion where the Garden Circle held its secret meetings. The documents she finds reveal just how far the organization’s influence extended: its members decided what information should be included in police reports, which newspaper articles needed to be removed, and why cases involving missing persons could not be handed over to the state police. Under the pretext of protecting Hollow Creek’s reputation, they had controlled investigations for years and covered up crimes, presenting the disappearances as ordinary departures from town. Gradually, Vivien learns that Eleanor had managed to sneak into the pavilion and uncover the society’s actual instructions. With Mrs. Vail’s help, the journalist finds a hidden passage from the archive room to an old greenhouse, where additional evidence of the club’s activities is stored. A photograph from the annual charity gala catches her attention: the official photo had been doctored, while the original, found by Eleanor, reveals Sheriff Cole’s presence among the organization’s members. It now becomes clear that her aunt’s disappearance was no accident she had gotten too close to the people who ran the town and used the police to cover up their crimes. You must gather the missing evidence, reconstruct the sequence of events, and determine what role each member of the Garden Circle played in the residents’ disappearances.
Bonus Chapter Walkthrough
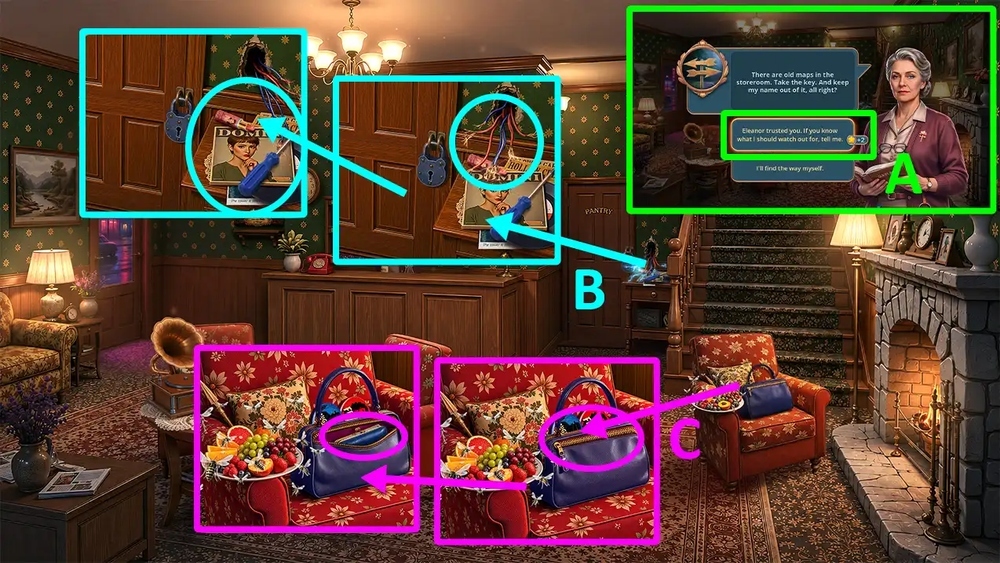
- Select this option, earn STORAGE KEY (A).
- Take SCREWDRIVER, VINYL RECORD and CASE NOTES 1/3, use SILICONE POT HOLDER on the sparkling wire, take LIPSTICK (B).
- Use LIPSTICK on the bag, take WALLET (C).
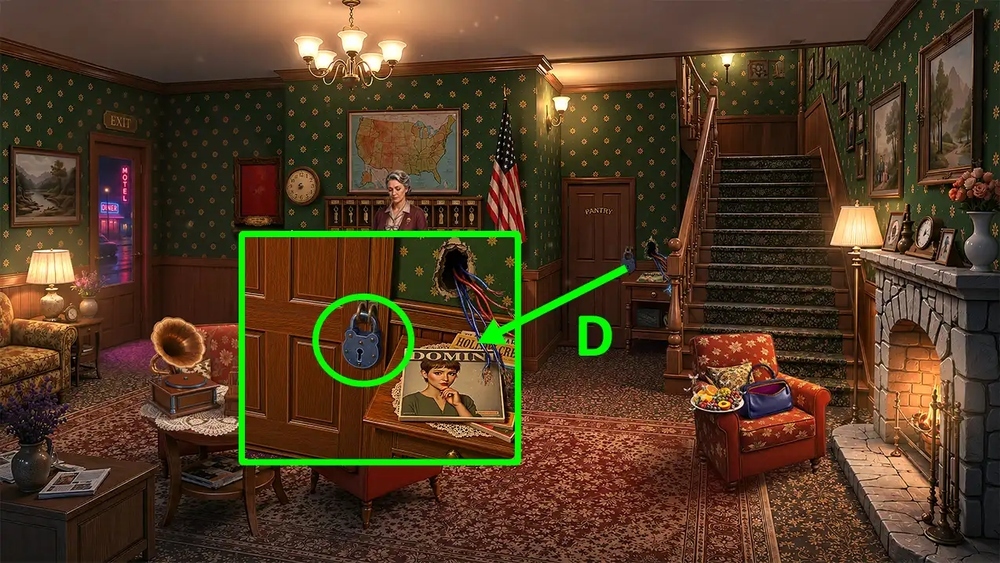
- Use STORAGE KEY on the door (D).
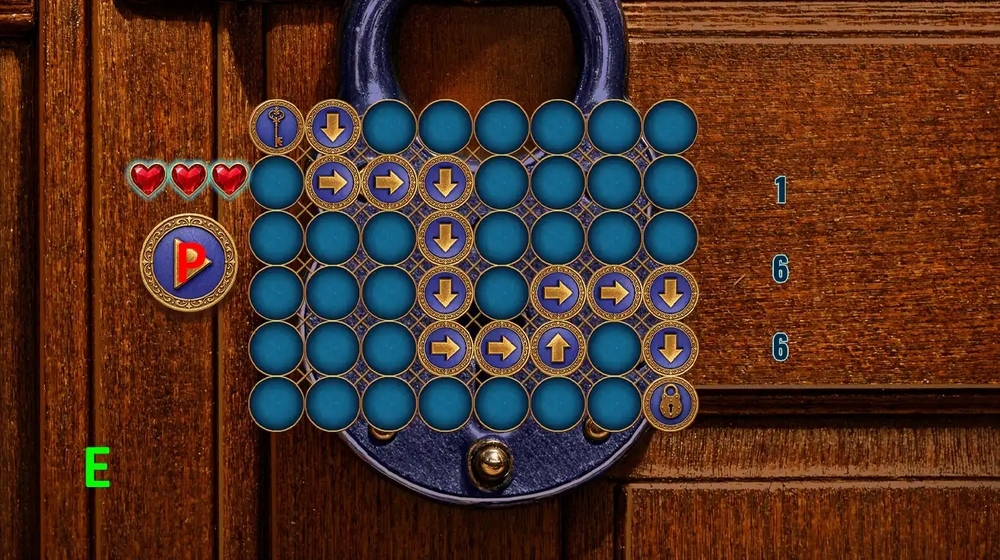
- Easy solution: Set the arrows as in the picture and press “P” (E).
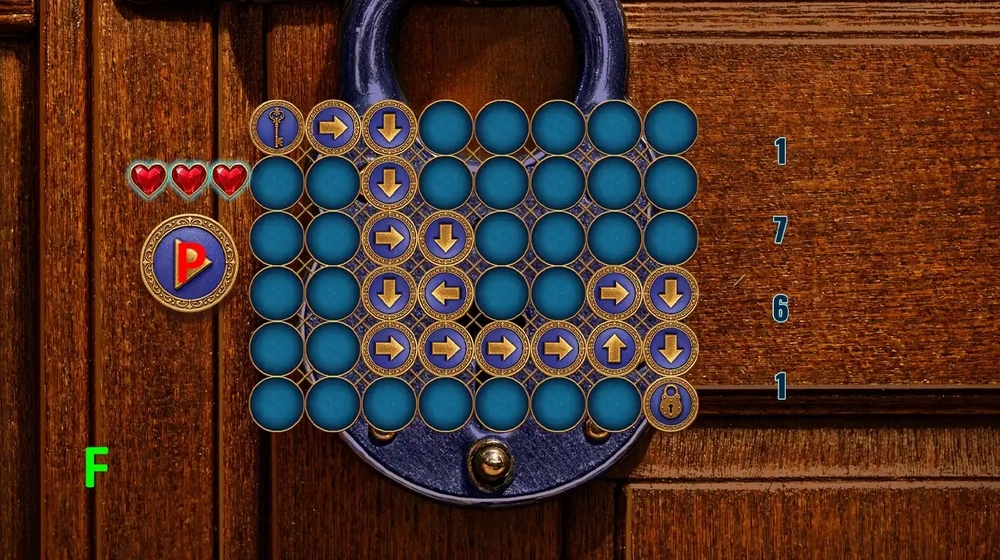
- Hard solution: Set the arrows as in the picture and press “P” (F).
- Go forward.
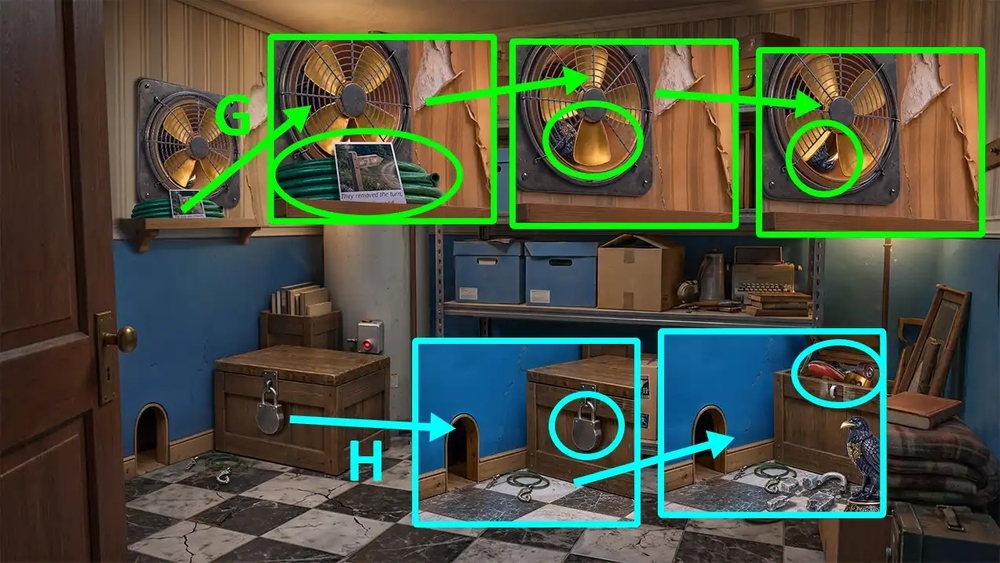
- Take CASE NOTES 2/3 and HOSE, use SCREWDRIVER on the blades, take HEAVY STATUETTE (G).
- Use LIQUID NITROGEN and HEAVY STATUETTE on the padlock, take LOCK CYLINDERS 2/2 and SKATEBOARD (H).
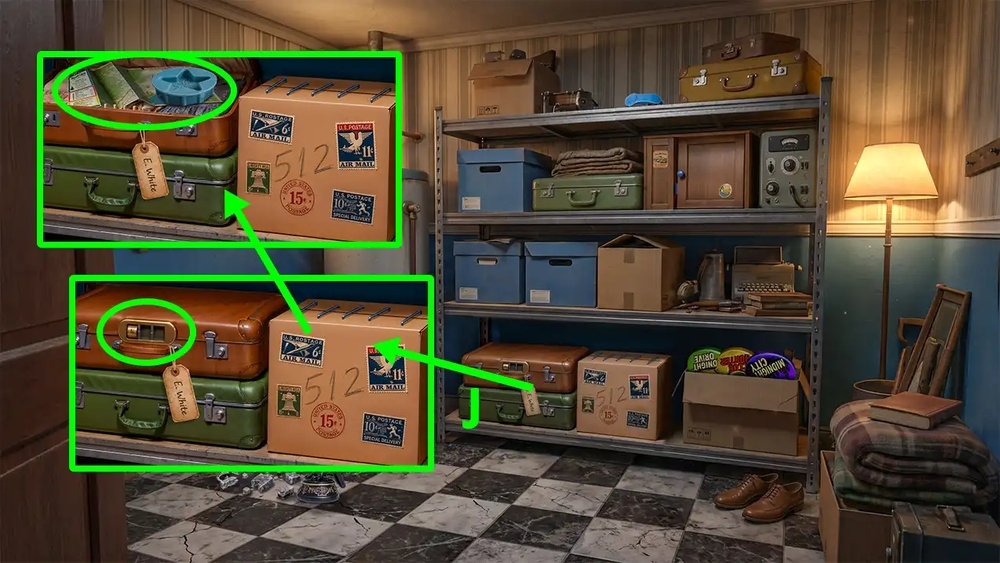
- Use LOCK CYLINDERS 2/2 on the suitcase, take FORM and LOCAL AREA MAP (J).
- Use LEMON JUICE on the LOCAL AREA MAP, take CASE NOTES 3/3.
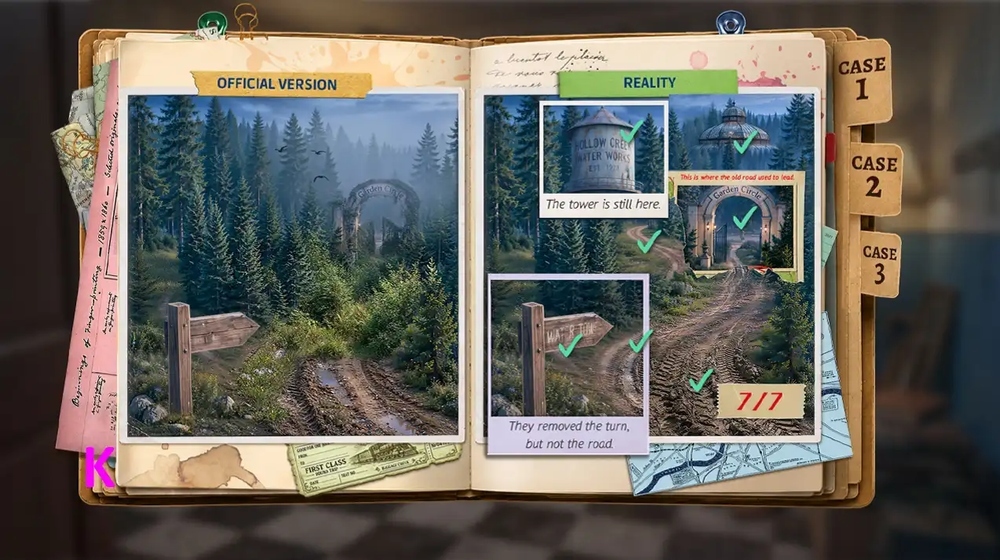
- Easy solution: Use the picture as a hint, earn LOCAL AREA MAP (K).
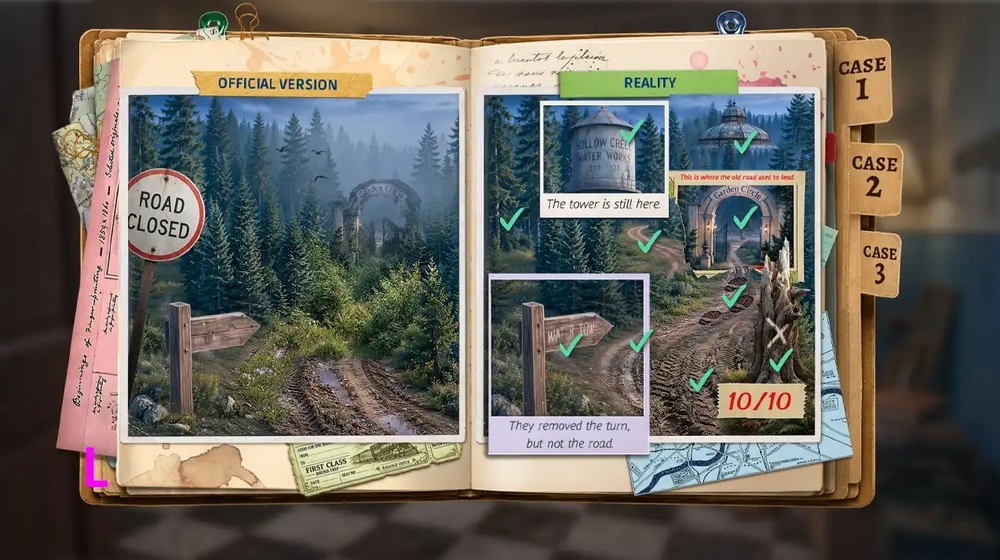
- Hard solution: Use the picture as a hint, earn LOCAL AREA MAP (L).
- Go to Hollow Creek Motel.

- Use LOCAL AREA MAP on Mrs. Vale (M).
- Select this option, earn CAR KEYS (N).
- Go back.
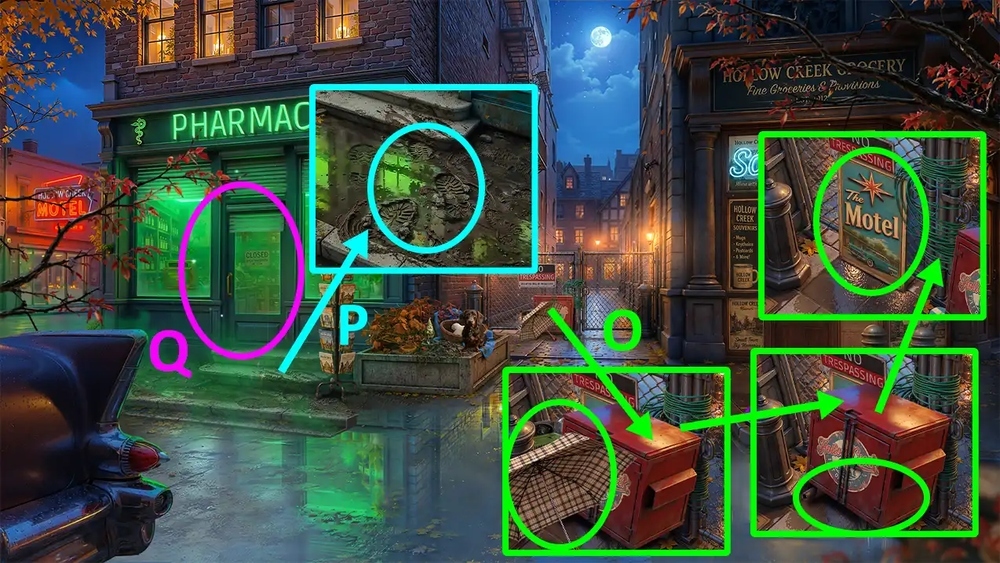
- Take FOLDING UMBRELLA, CHAINSAW and LION STATUE PIECES 1/2, use SKATEBOARD on the container, take BILLBOARD (O).
- Use BILLBOARD on the puddle (P).
- Play puzzle, earn MAGNET (Q).
- Go to Motel Storeroom.
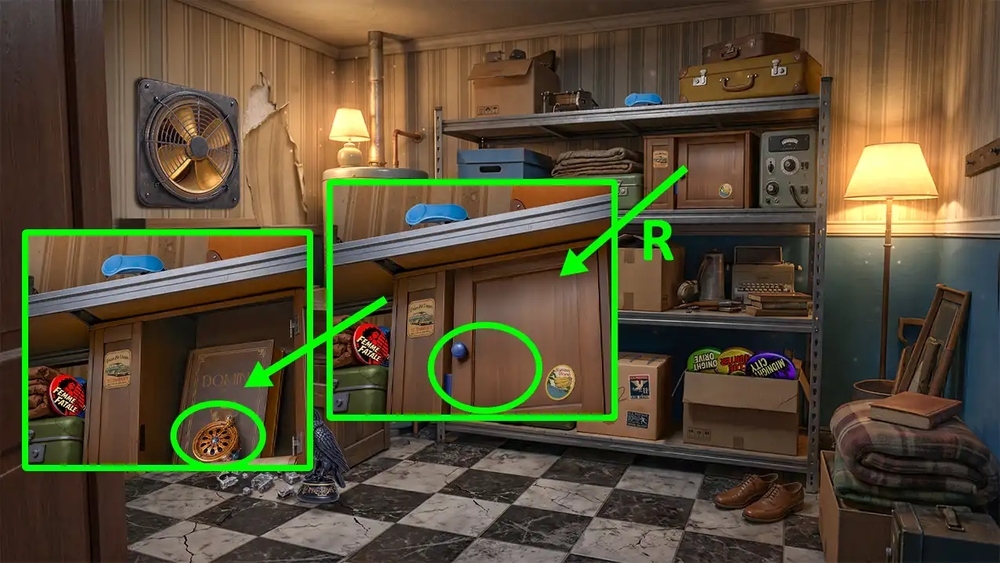
- Use MAGNET on the storage case, take GRAMOPHONE NEEDLE (R).
- Go to Hollow Creek Motel.
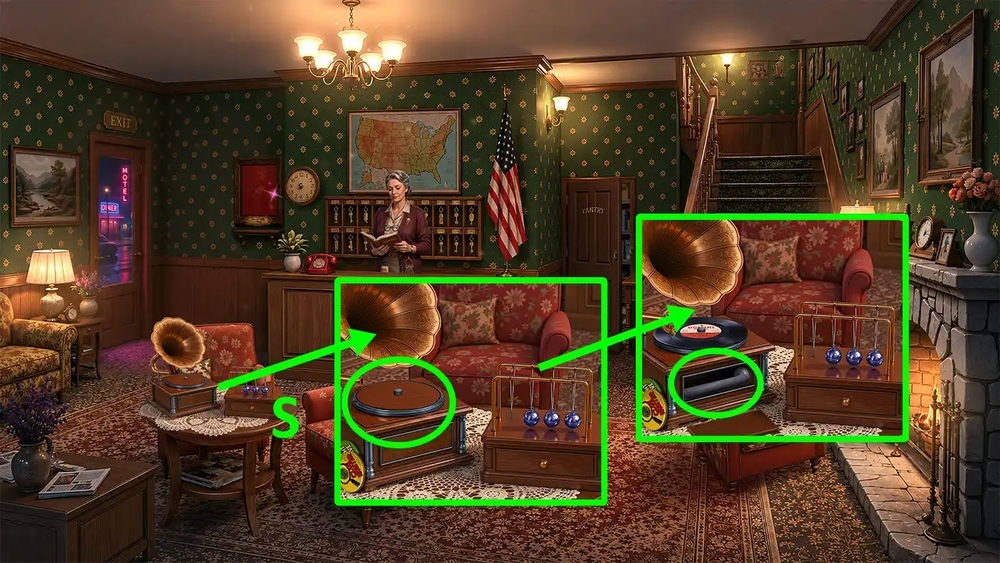
- Use VINYL RECORD and GRAMOPHONE NEEDLE on the gramophone, take CARRIAGE and COVER (S).
- Go to Motel Storeroom.
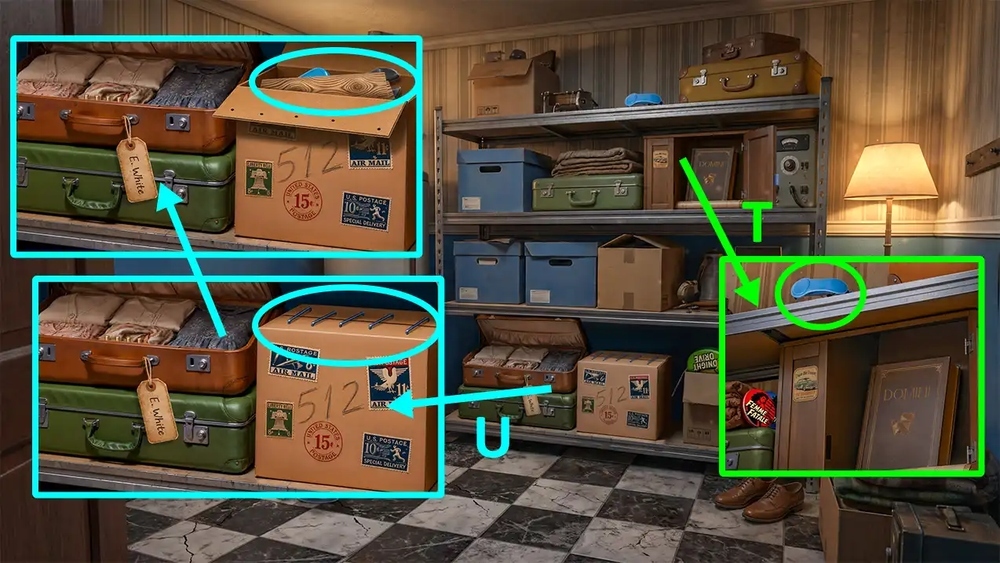
- Use COVER on the FOLDING UMBRELLA, earn UMBRELLA.
- Use UMBRELLA on the storage case, earn STAPLE REMOVER (T).
- Use STAPLE REMOVER on the closed box, take PLANKS, BRUSH and BOLT CUTTER (U).
- Go to Carson Street.
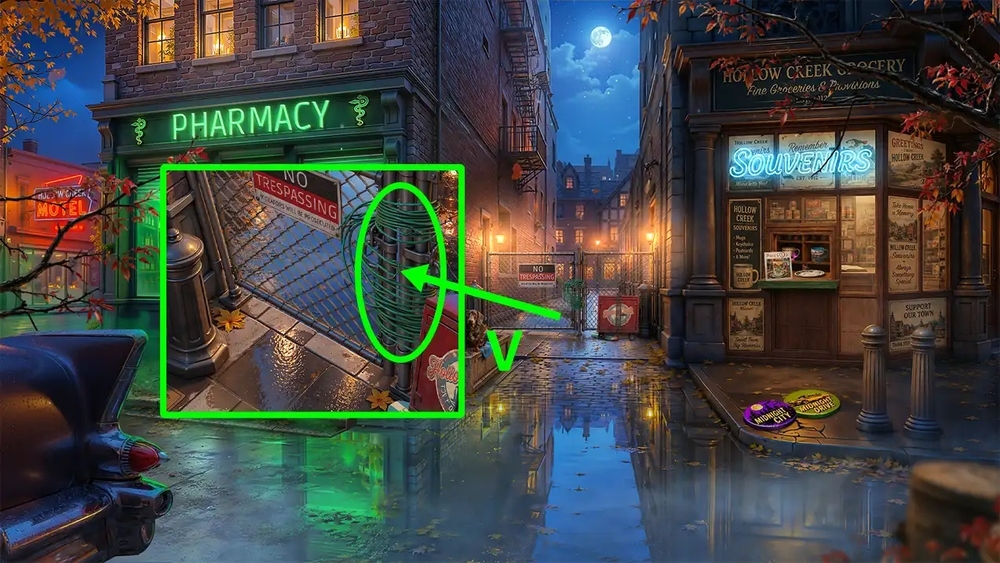
- Use BOLT CUTTER on the grate (V).
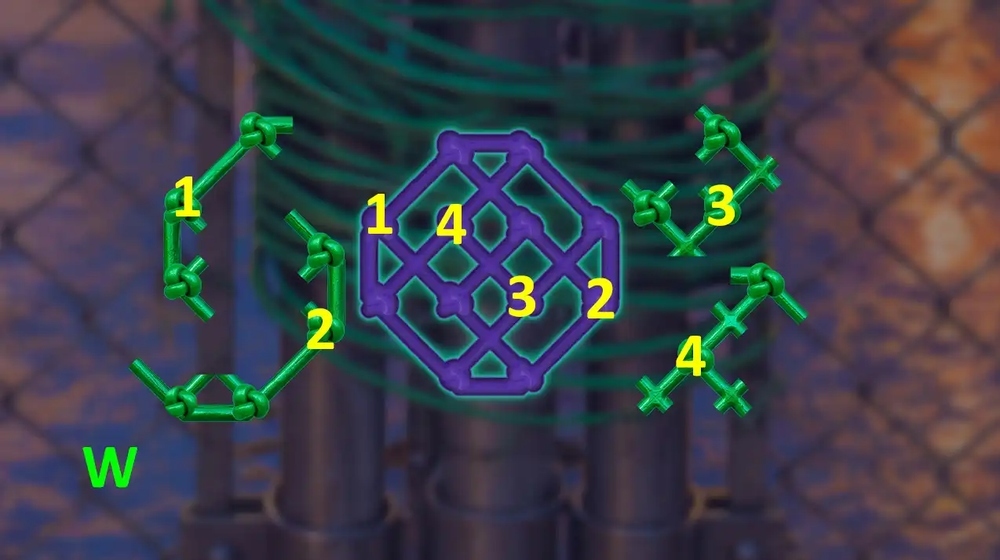
- Easy solution: 1-1, 2-2, 3-3, 4-4 (W).

- Hard solution: R, 1-1, 2-2, 3-3, 4-4, R (X).
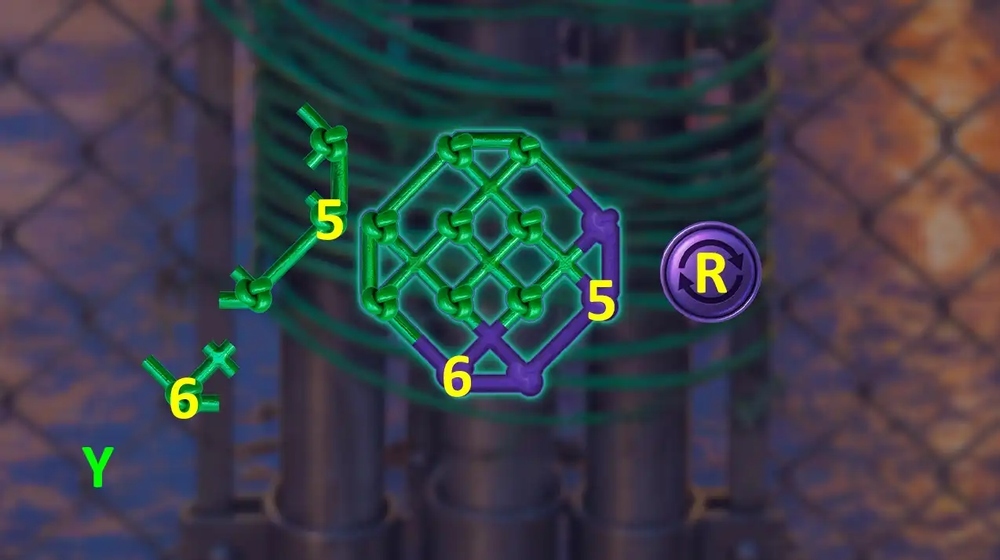
- Hard solution: 5-5, 6-6 (Y).
- Go forward.
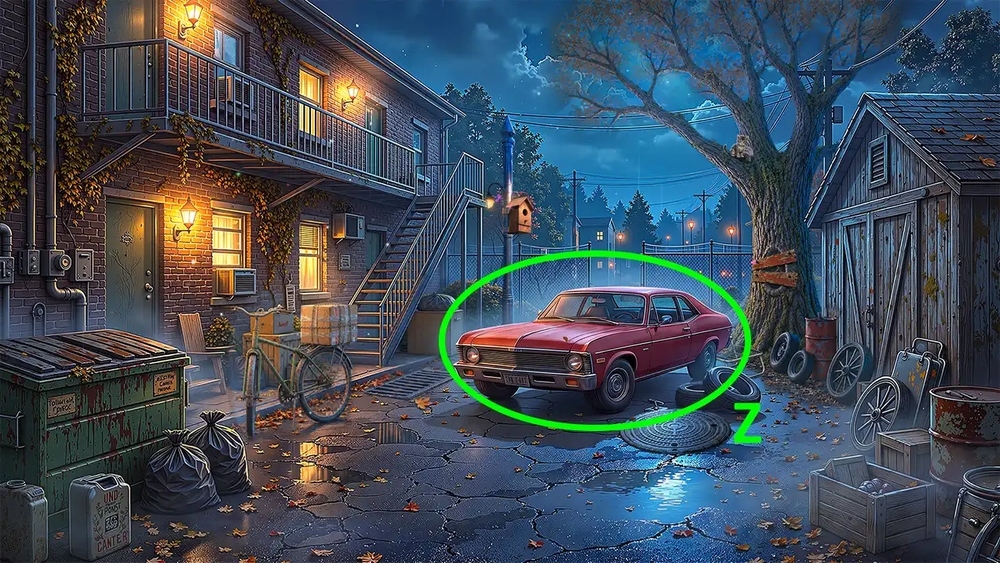
- Use CAR KEYS on the car (Z).

- Easy and Hard Solutions (A): Follow the path shown (F). If you encounter any obstacles, wait until they pass to move forward.
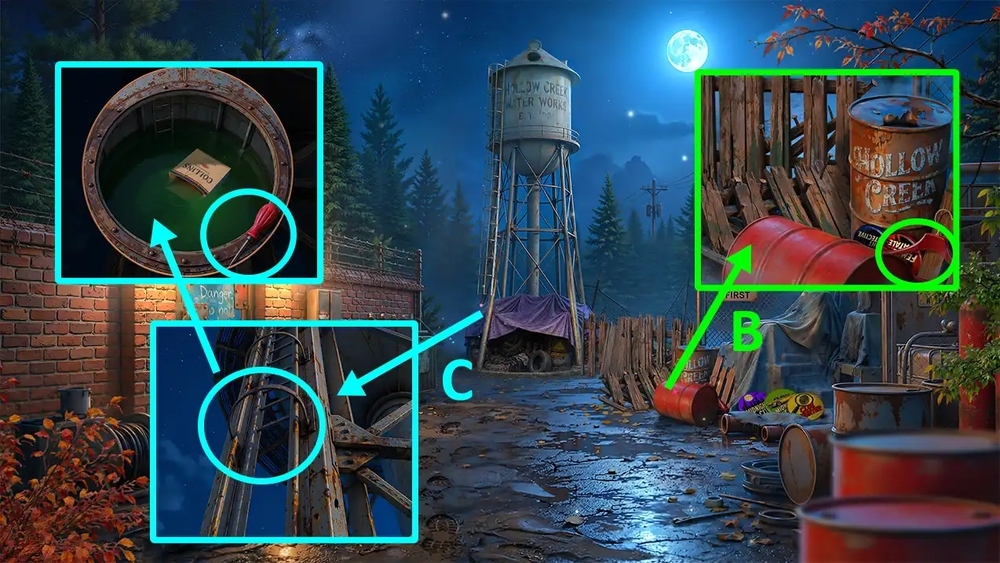
- Take CLOTHES HANGER (B).
- Use CLOTHES HANGER on HOSE, earn HOSE WITH STRAPS.
- Use HOSE WITH STRAPS on the fire escape, take AWL (C).
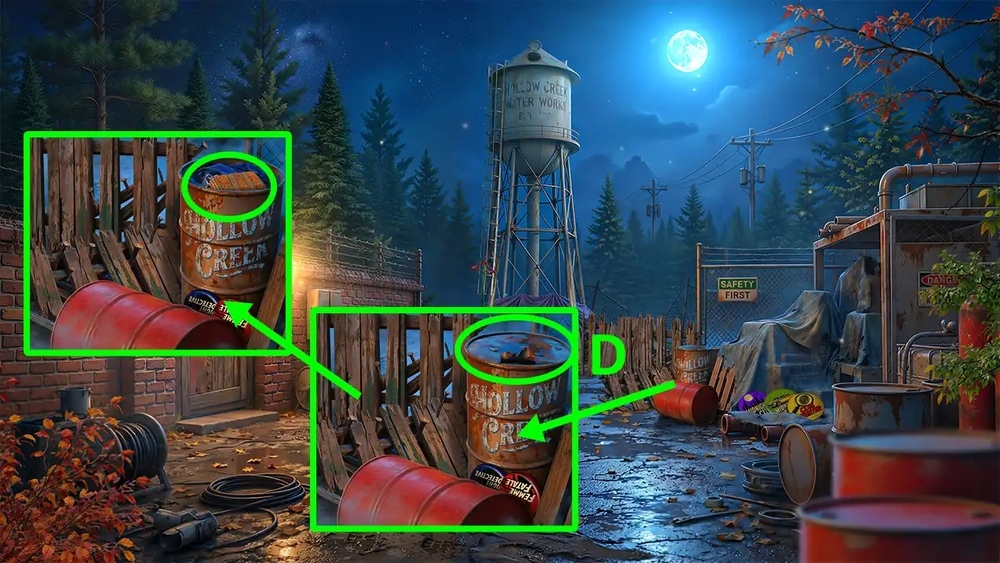
- Use AWL on the barrel, take DECK CHAIR FABRIC and NAILS (D).
- Go to Motel Storeroom.
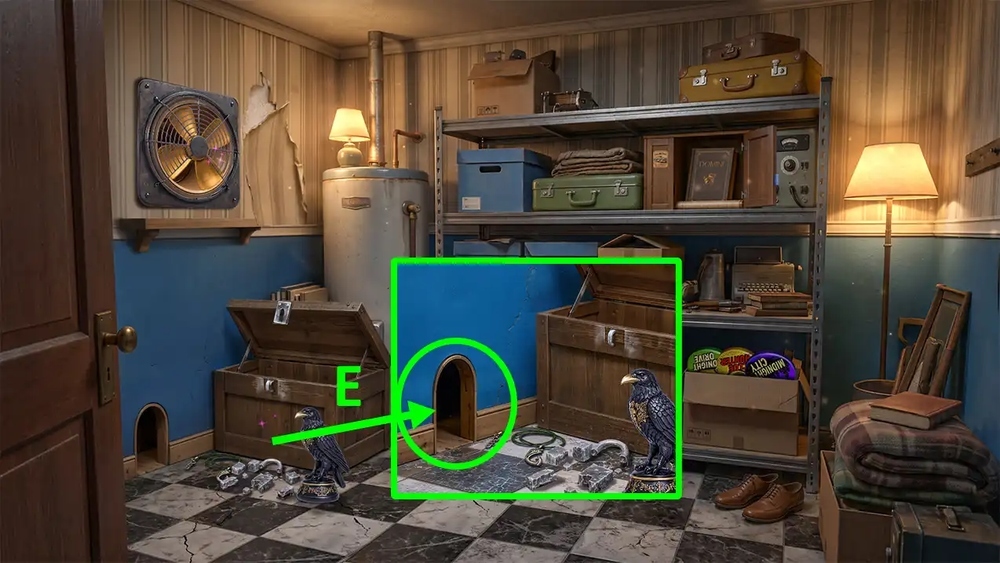
- Use PLANKS and NAILS on the burrow (E).

- Easy solution: Arrange all the puzzle pieces as shown in the image (F).
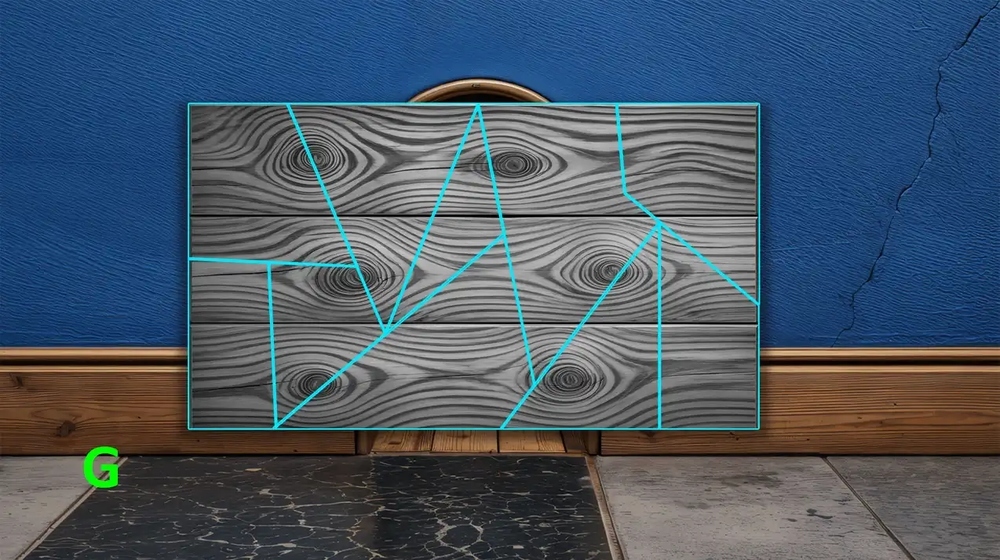
- Hard solution: Arrange all the puzzle pieces as shown in the image (G).

- Take PENDANT HOOK (H).
- Go to Parking Lot.

- Use PENDANT HOOK on the grate, earn SLINGSHOT (J).
- Use SLINGSHOT on the birdhouse (K).
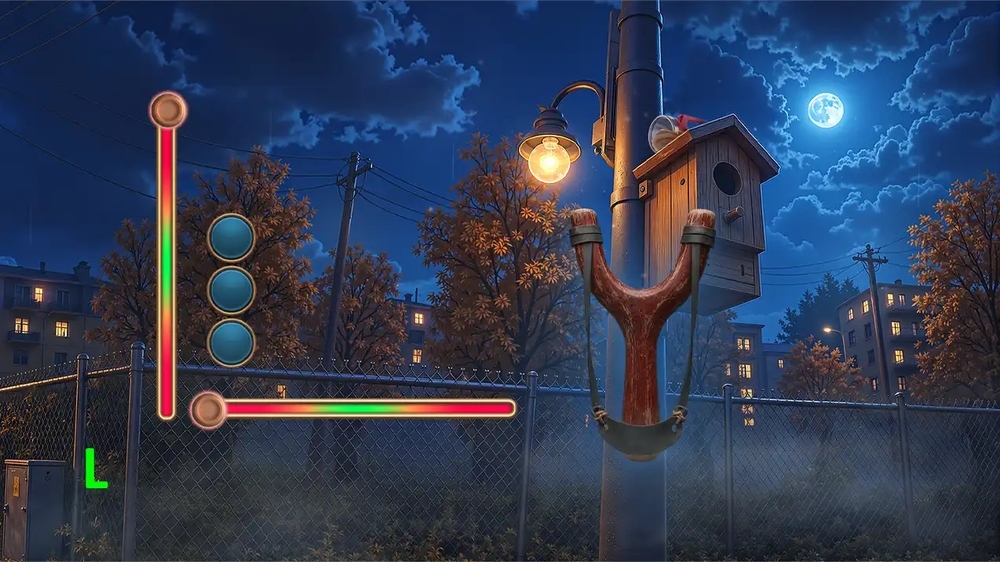
- Easy and Hard Solutions (L): Solution is random.
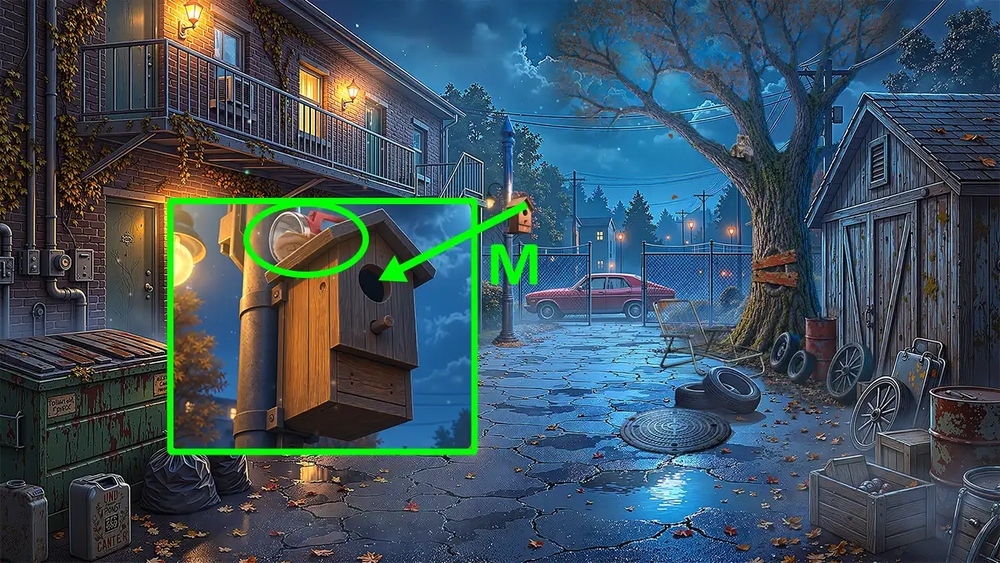
- Take CASE NOTES 1/3 and FLASHLIGHT (M).
- Go to Water Tower.
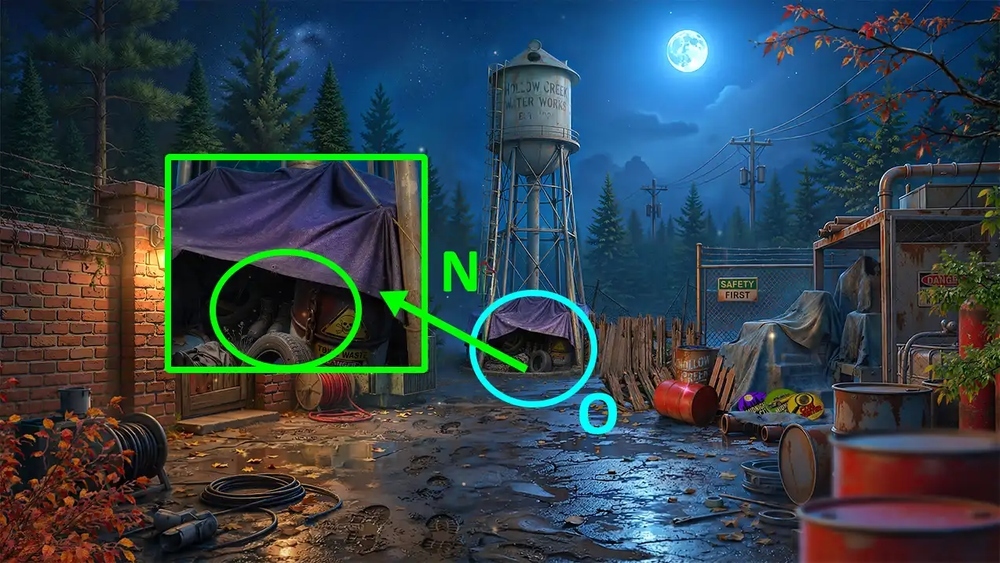
- Use FLASHLIGHT on the ladder (N).
- Play puzzle, read the note, earn BOTTLE OPENER (O).
- Go to Parking Lot.

- Use BOTTLE OPENER on the nails, take KEY (P).
- Use KEY on the hatch, take COIN (Q).
- Go to Carson Street.

- Use COIN on the counter, take SOUVENIR MUG (R).
- Use SOUVENIR MUG on the dirt, take SAW BLADE (S).
- Go to Water Tower.
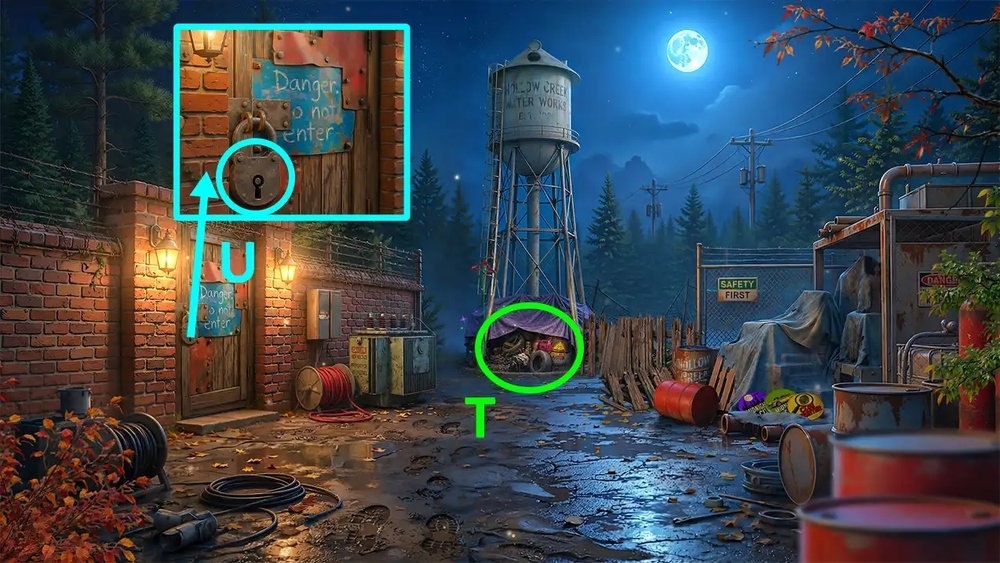
- Play puzzle, earn FIBULA (T).
- Use FIBULA on the lock (U).
- Go forward.
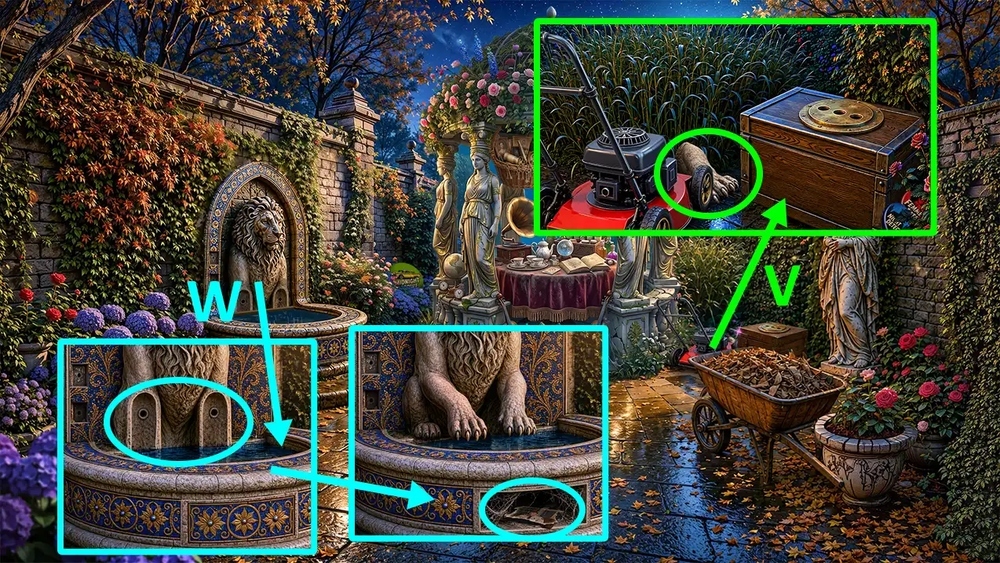
- Take LION STATUE PIECES 2/2 (V).
- Use LION STATUE PIECES 2/2 on the lion statue, take CASE NOTES 2/3 and LEVER (W).
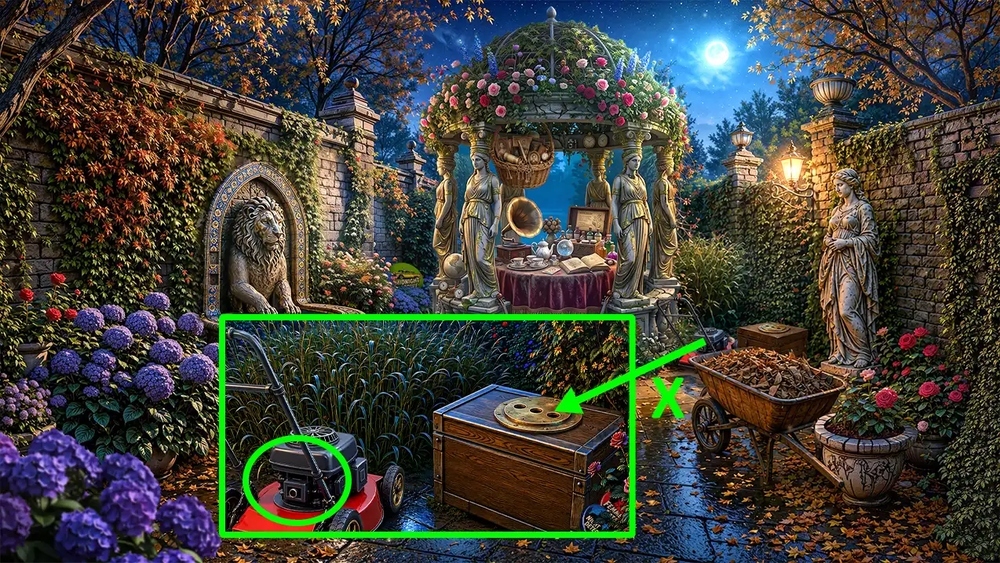
- Use LEVER on the lawn mower (X).
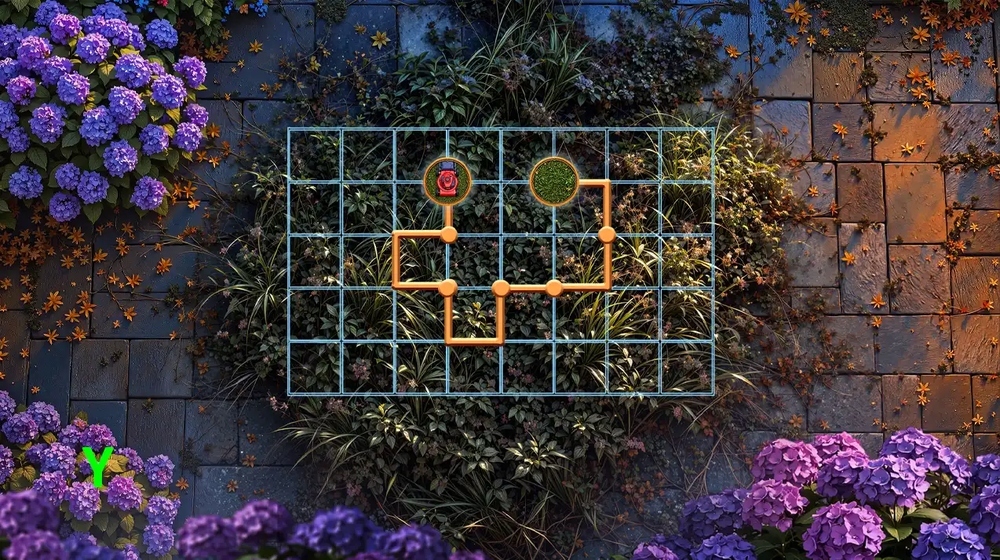
- Easy solution: Arrange all the puzzle pieces as shown in the image (Y).
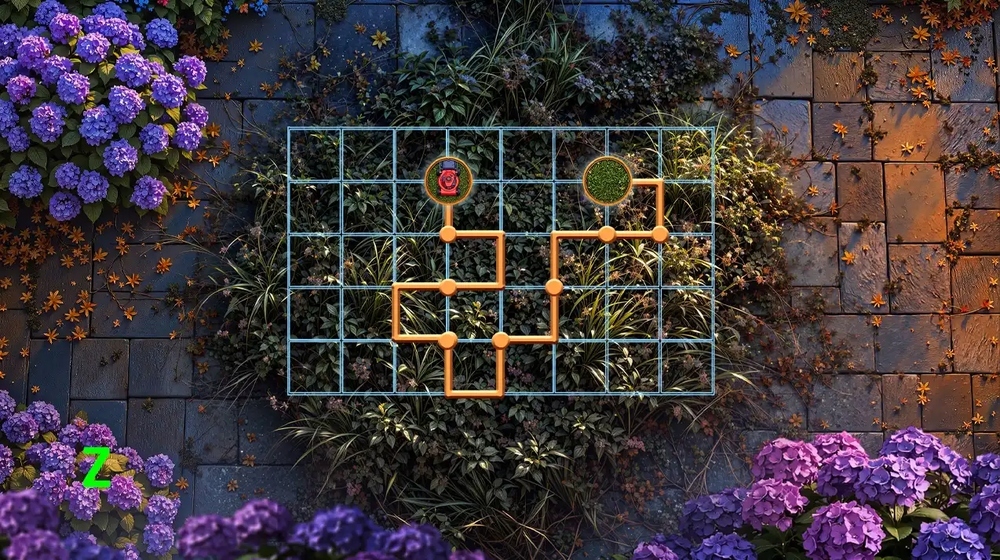
- Hard solution: Arrange all the puzzle pieces as shown in the image (Z).

- Take CANNED FOOD and CUTTERS (A).
- Go to Parking Lot.
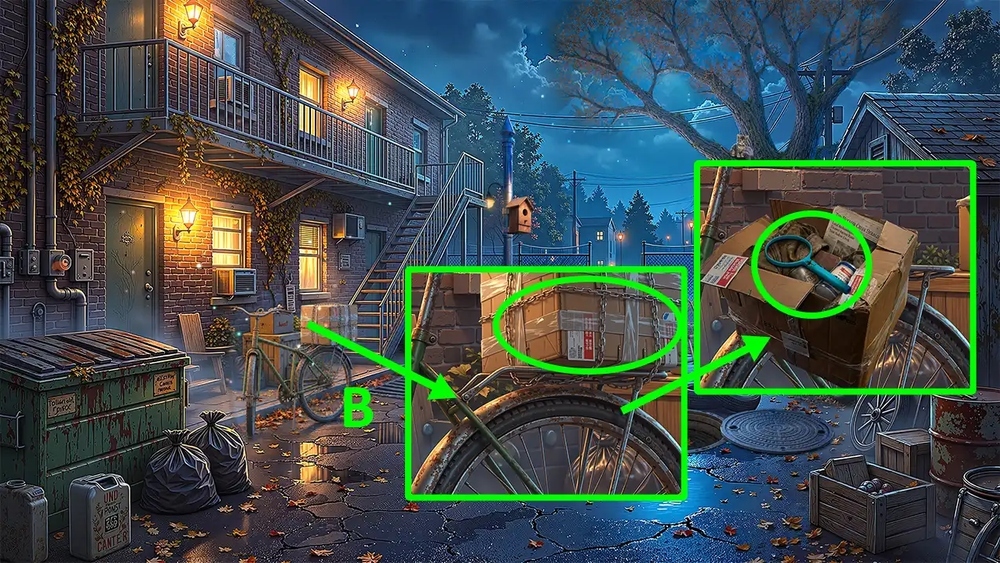
- Use CUTTERS on the chains, take RACKET and SOLVENT (B).
- Go to Hollow Creek Motel.
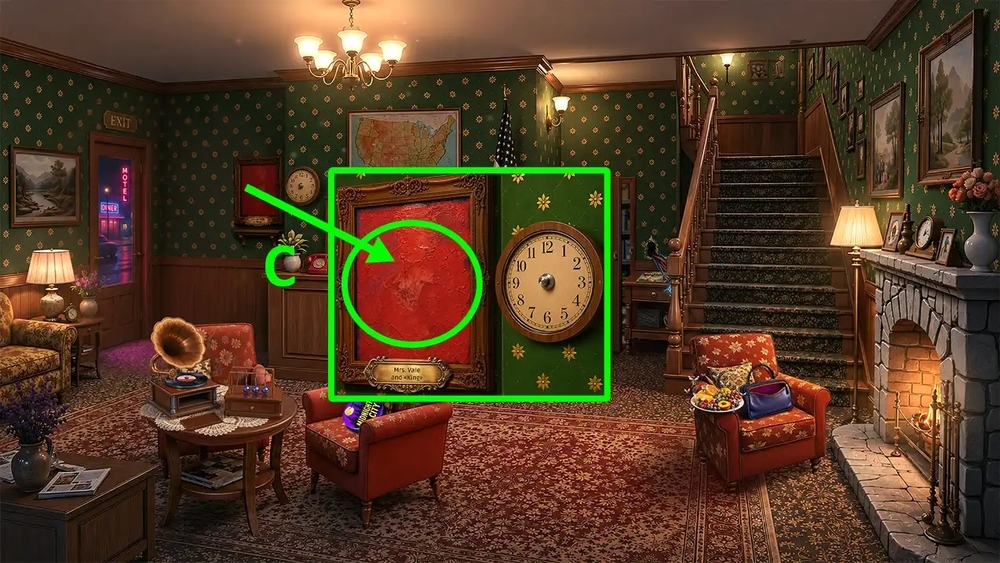
- Use SOLVENT and BRUSH on the portrait (C).

- Easy solution: Solution is random (D).
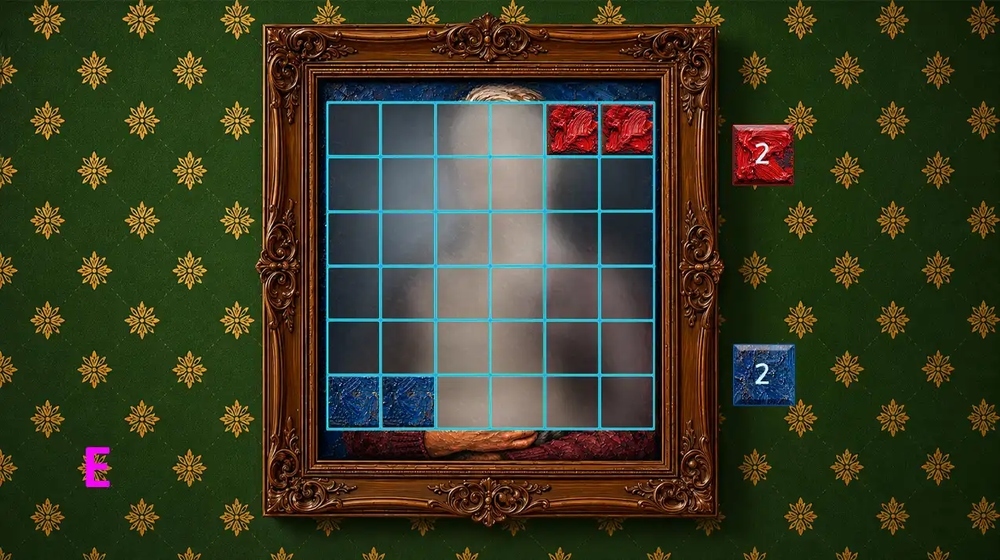
- Hard solution: Solution is random (E).
- Go to Parking Lot.
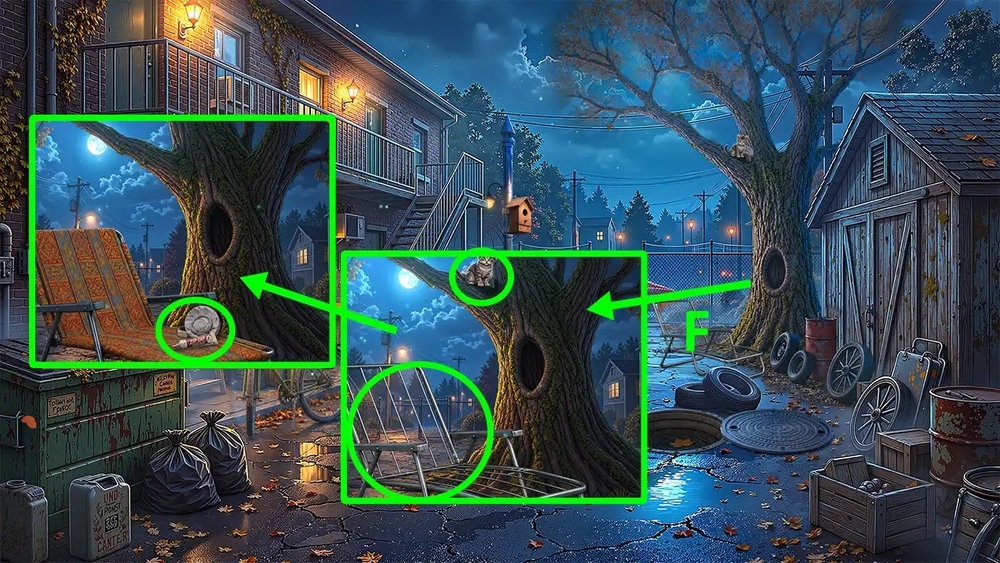
- Use DECK CHAIR FABRIC on the sun bed, take GLUE, BUST PARTS and SCREW (F).
- Use SCREW and SAW BLADE on CHAINSAW, earn CHAINSAW.
- Go to Water Tower.

- Use CHAINSAW on the fence (G).
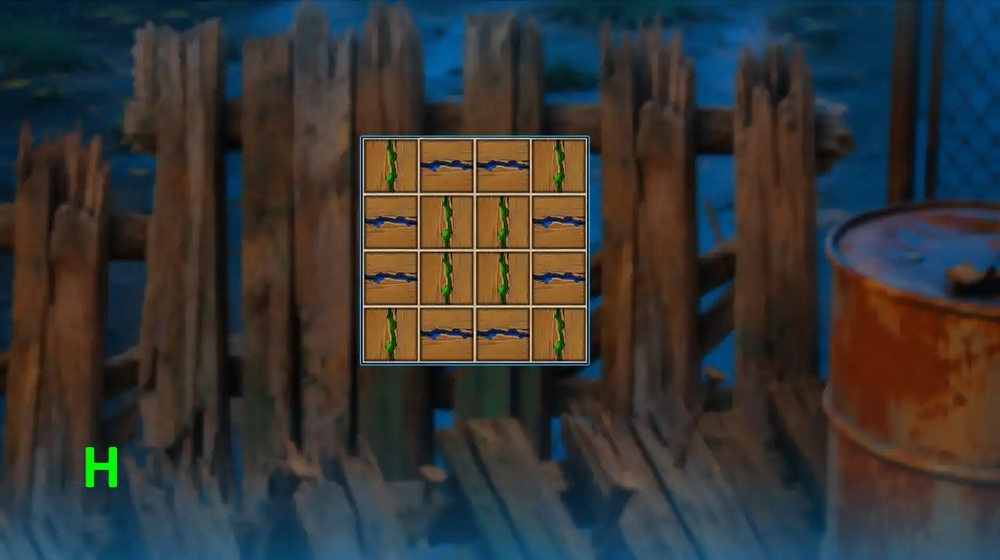
- Easy solution: Arrange all the puzzle pieces as shown in the image (H).
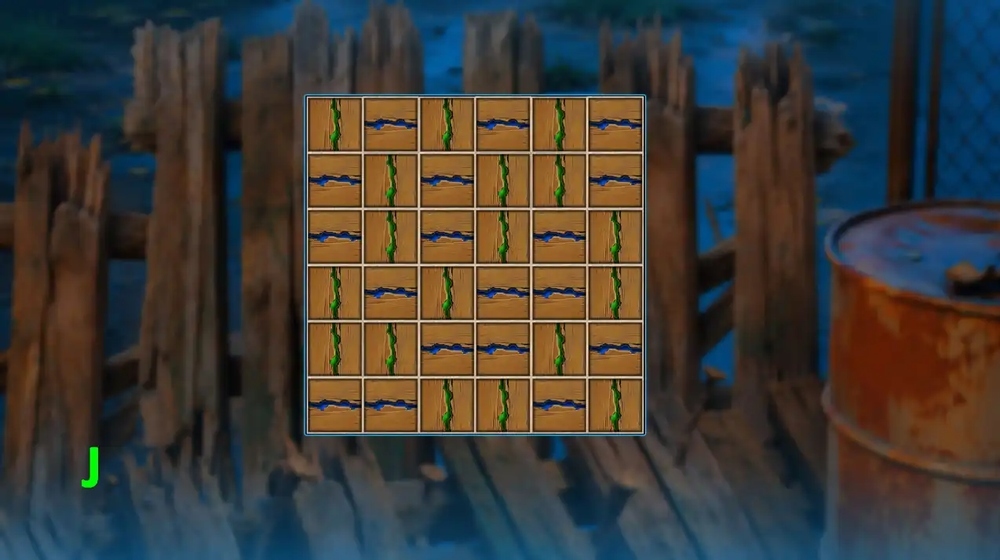
- Hard solution: Arrange all the puzzle pieces as shown in the image (J).

- Take MOSAIC PIECES 1/2 and SPUR (K).
- Use SPUR on CANNED FOOD, earn OPEN CANNED FOOD.
- Go to Carson Street.
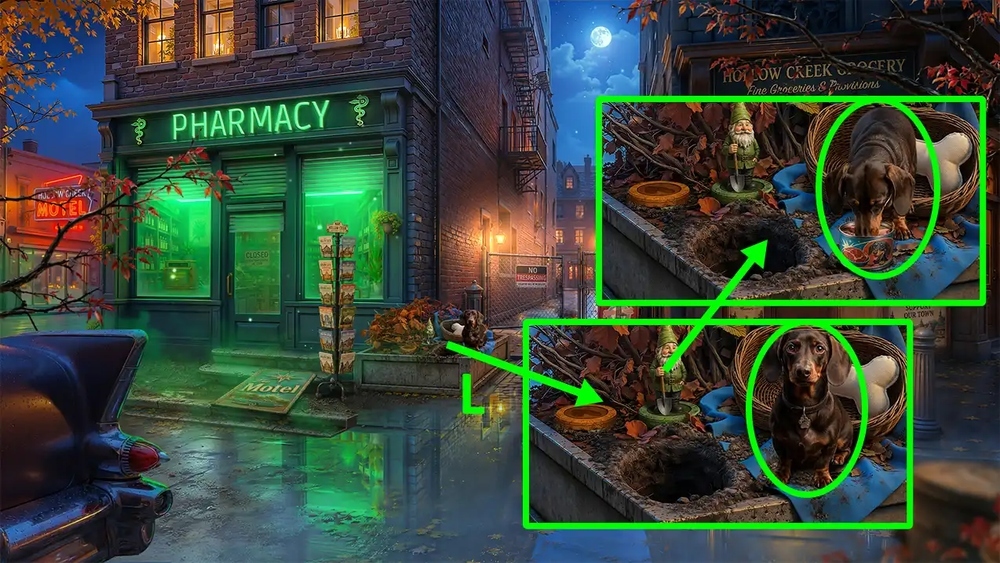
- Use OPEN CANNED FOOD on the dog, take DACHSHUND (L).
- Go to Abandoned Pavilion.
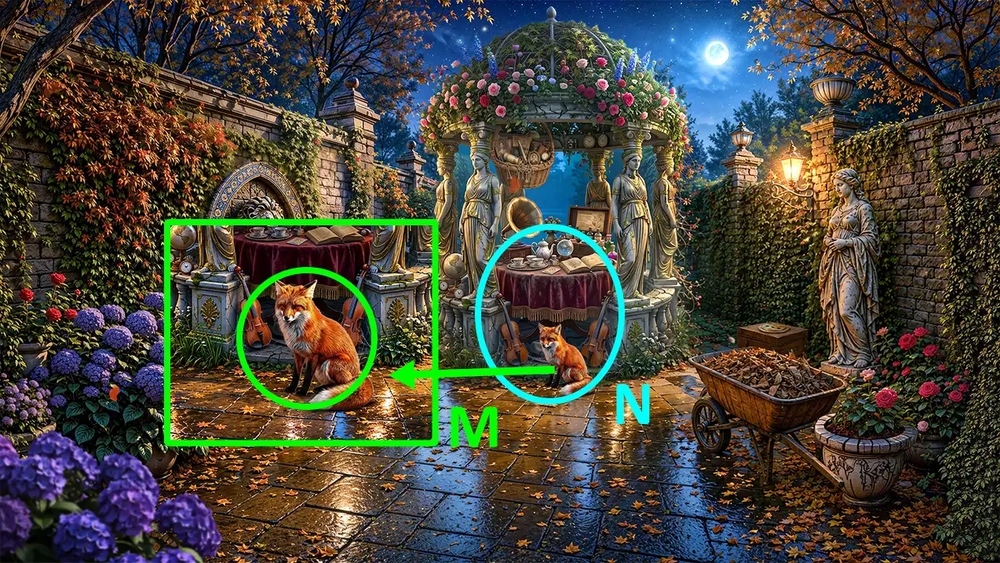
- Use DACHSHUND on the fox (M).
- Play puzzle, read the note, earn BALL (N).
- Go to Hollow Creek Motel.
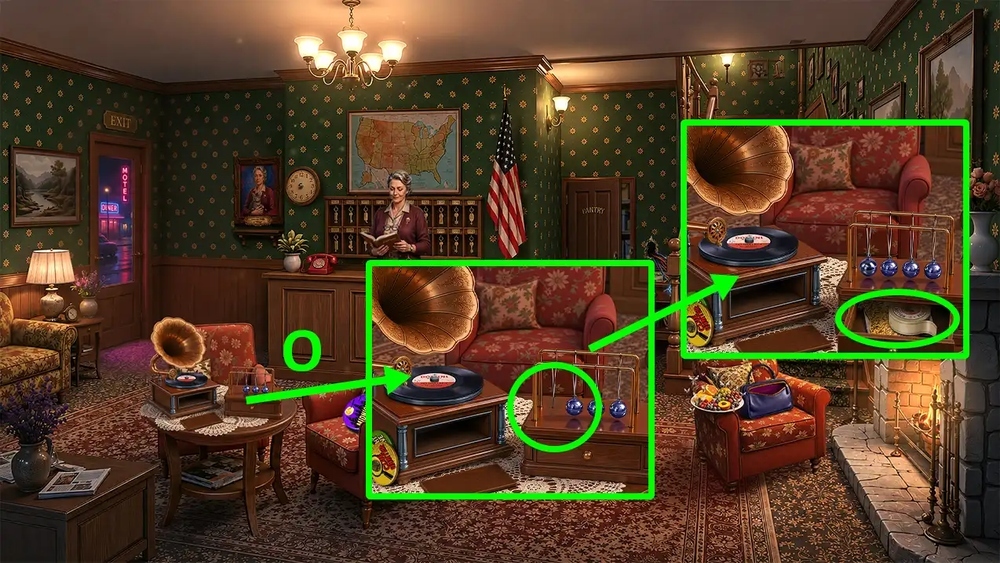
- Use BALL on the Newton’s cradle, take SCOTCH TAPE, GLOBE PART and MOSAIC PIECES 2/2 (O).
- Go to Abandoned Pavilion.
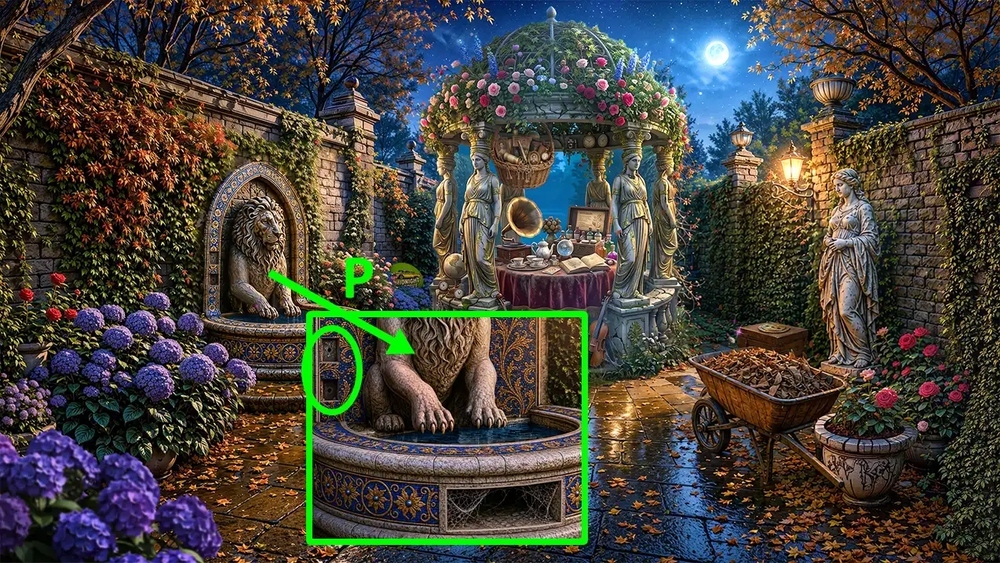
- Use MOSAIC PIECES 2/2 on the mosaic (P).
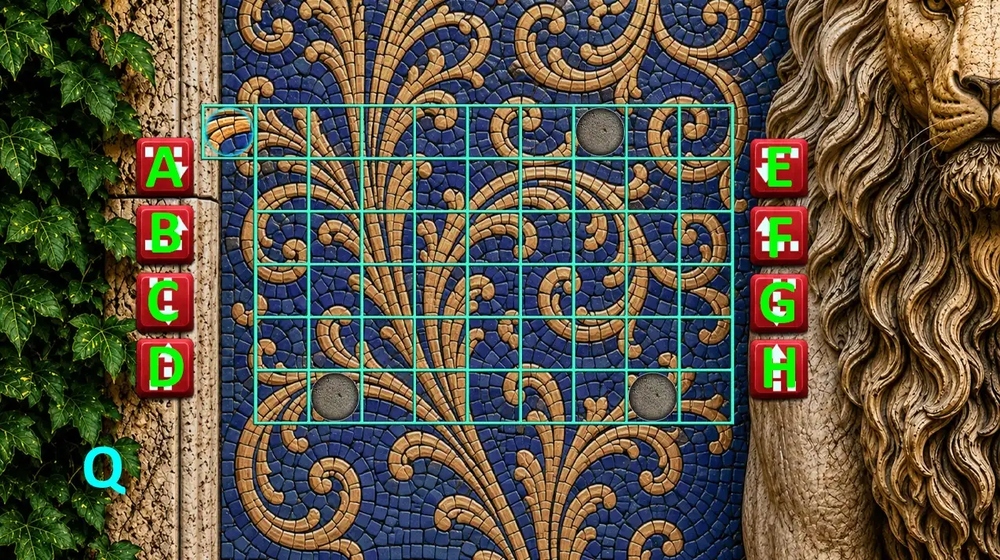
- Easy solution: A-C-G, A-C-B-C-A, Ax3-H-B (Q).
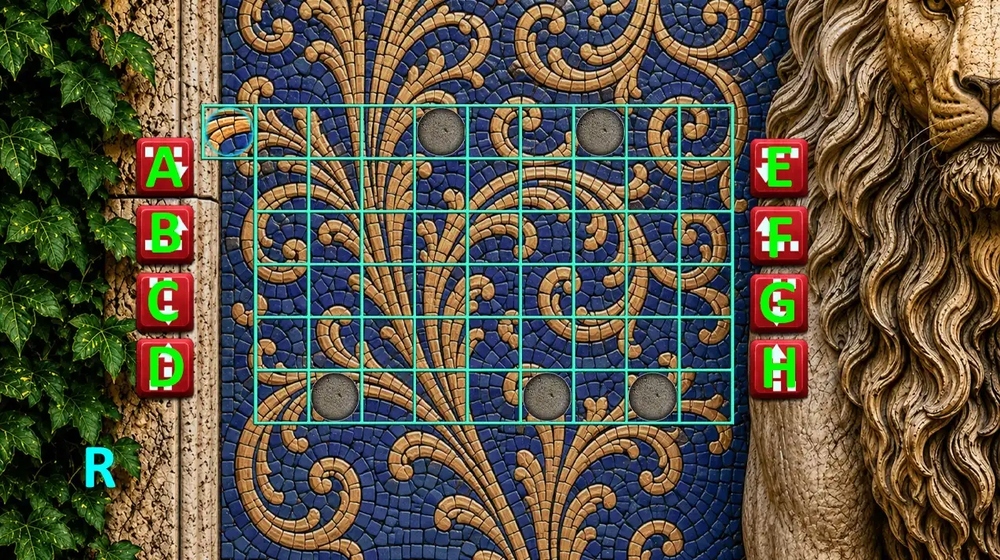
- Hard solution: A-C-G, A-C-B-C-A, Ax3-H-B, Ax4-E, A-B (R).
- Go forward.
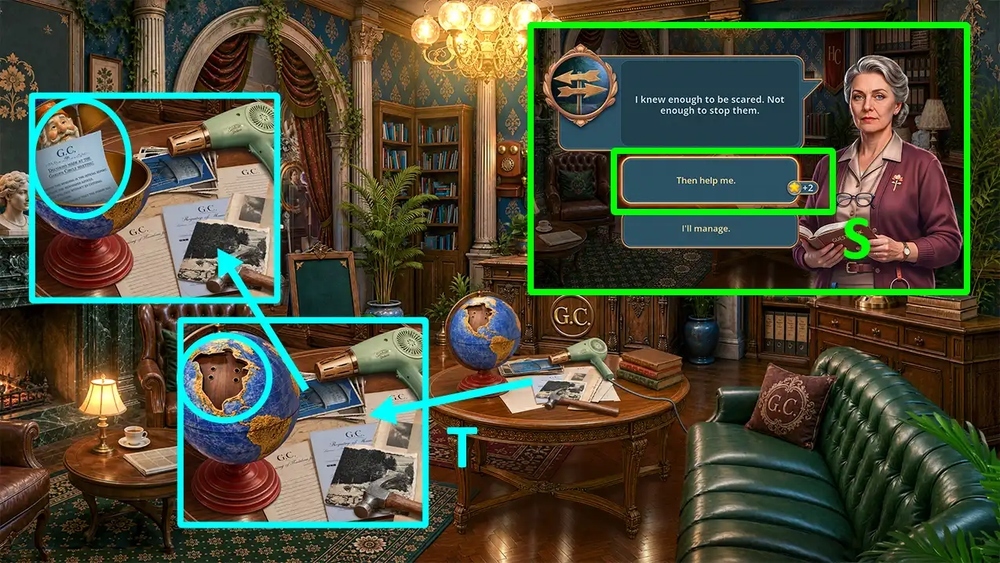
- Select this option (S).
- Use GLOBE PART on the globe, read the note, take GARDEN GNOME (T).
- Go to Carson Street.
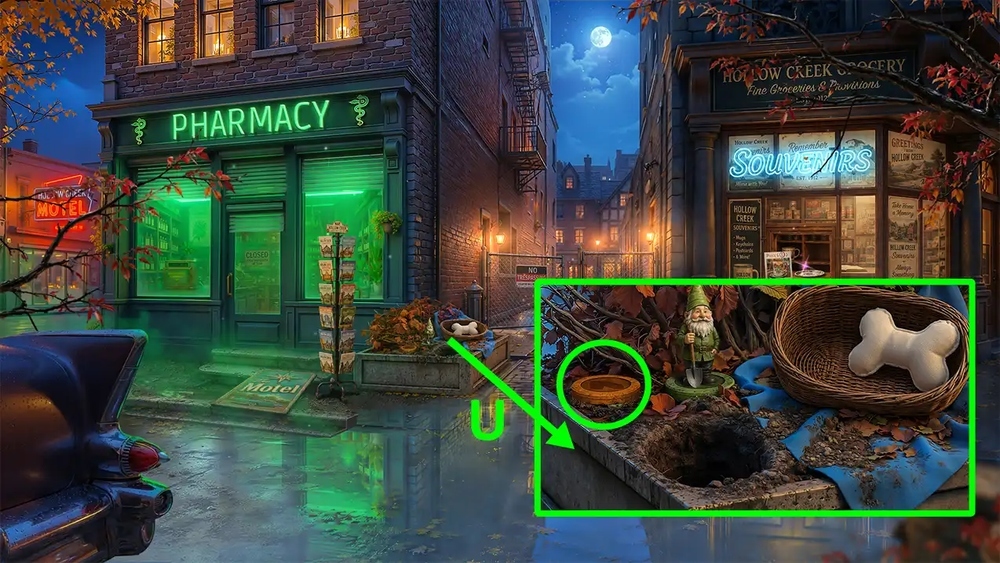
- Use GARDEN GNOME on the flower bed (U).

- Easy solution: E-C, D-C, B-C, A-C (V).
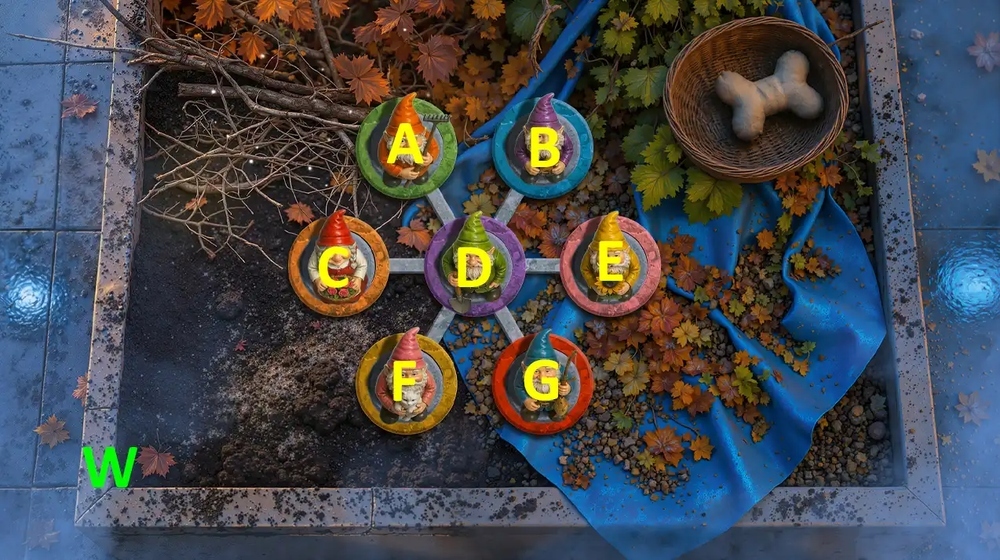
- Hard solution: A-D, C-D, G-D, B-D, E-D, F-D, E-D (W).
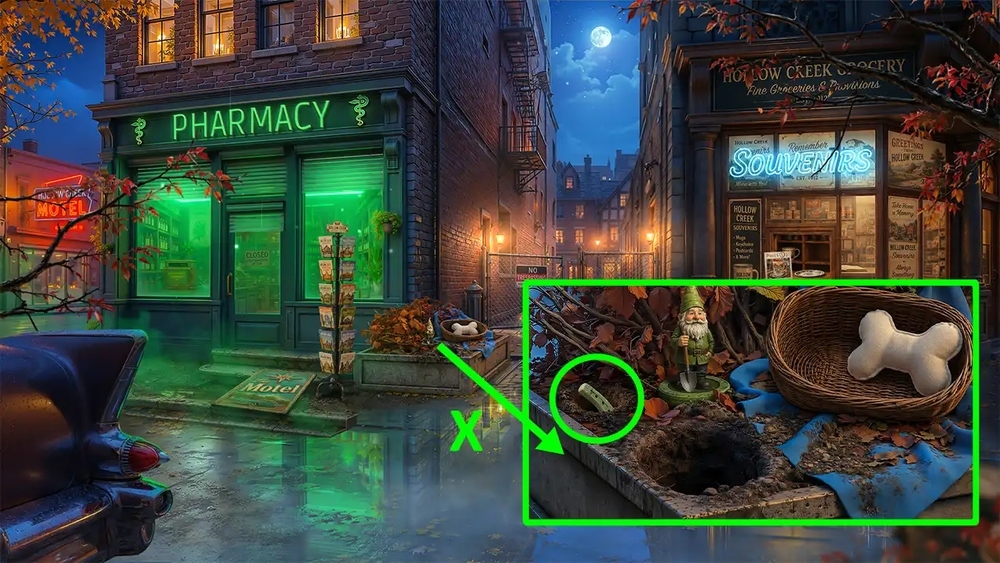
- Take WOODEN HORSESHOE (X).
- Go to Parking Lot.
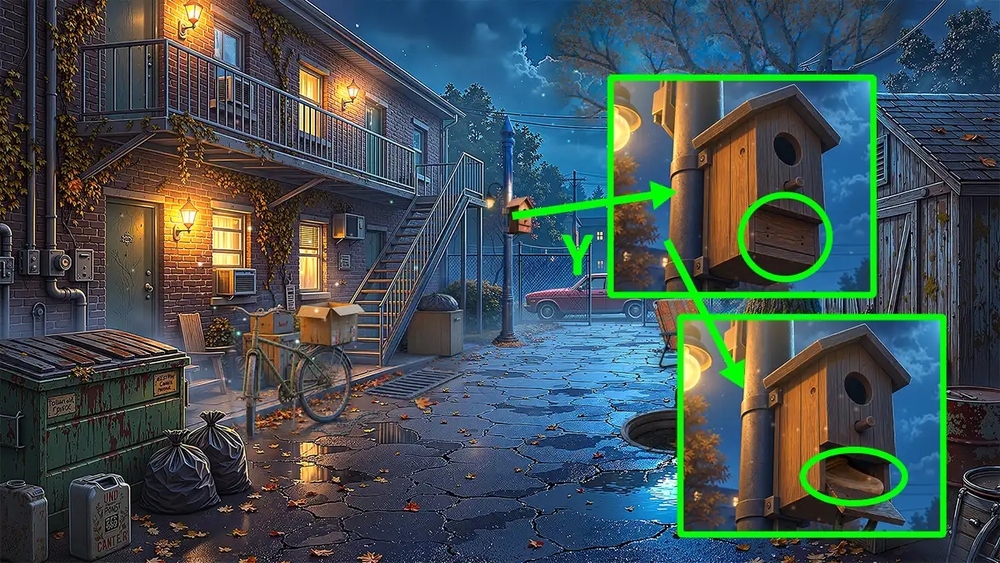
- Use WOODEN HORSESHOE and GLUE on the birdhouse, take NYLON SOCK (Y).
- Use NYLON SOCK and SCOTCH TAPE on RACKET, earn HOMEMADE SCOOP NET.
- Go to Water Tower.
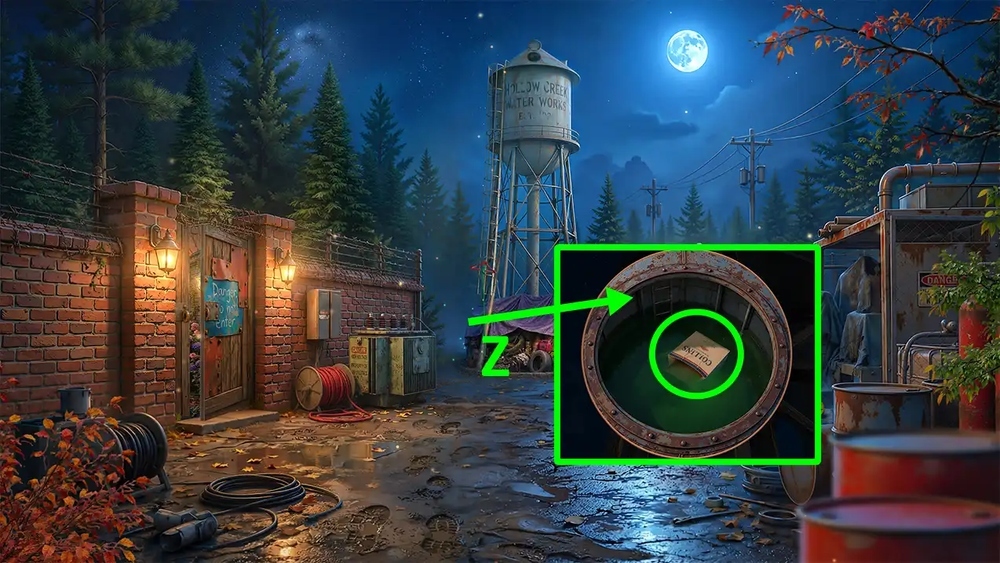
- Use HOMEMADE SCOOP NET on the tank, take BAG (Z).
- Go to Abandoned Pavilion.

- Play puzzle, earn LIGHTER (A).
- Go to Garden Circle Club.
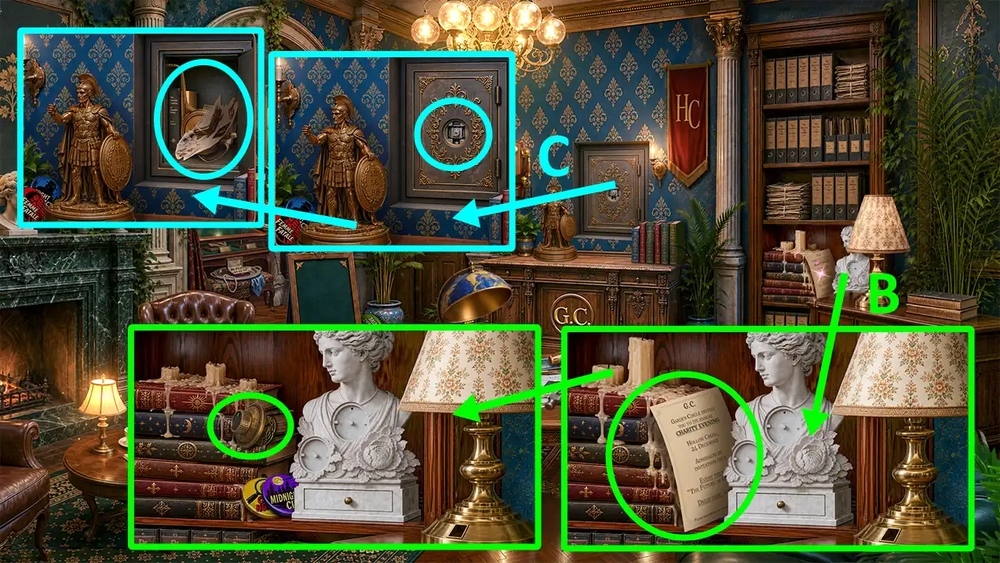
- Use LIGHTER on the candles, read the note, take SAFE DIAL (B).
- Use SAFE DIAL on the safe, take CASE NOTES 3/3 and OIL CAN (C).
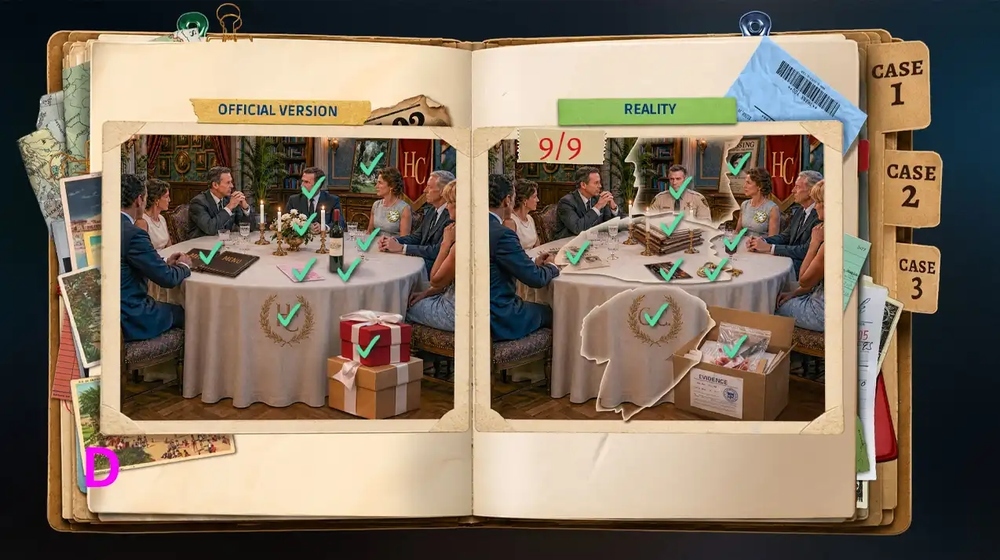
- Easy solution: Use the picture as a hint (D).
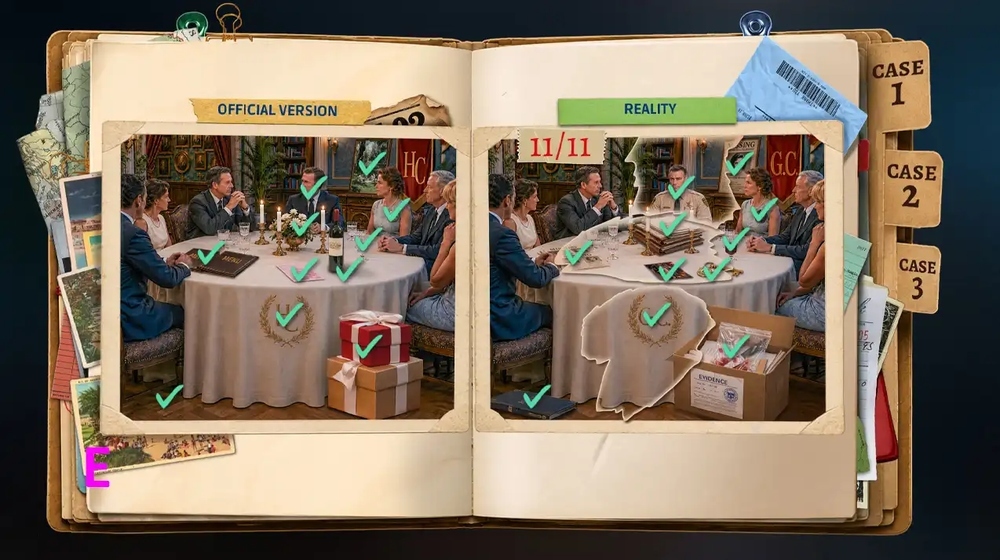
- Hard solution: Use the picture as a hint (E).

- Select this option (F).
- Go to Hollow Creek Motel.
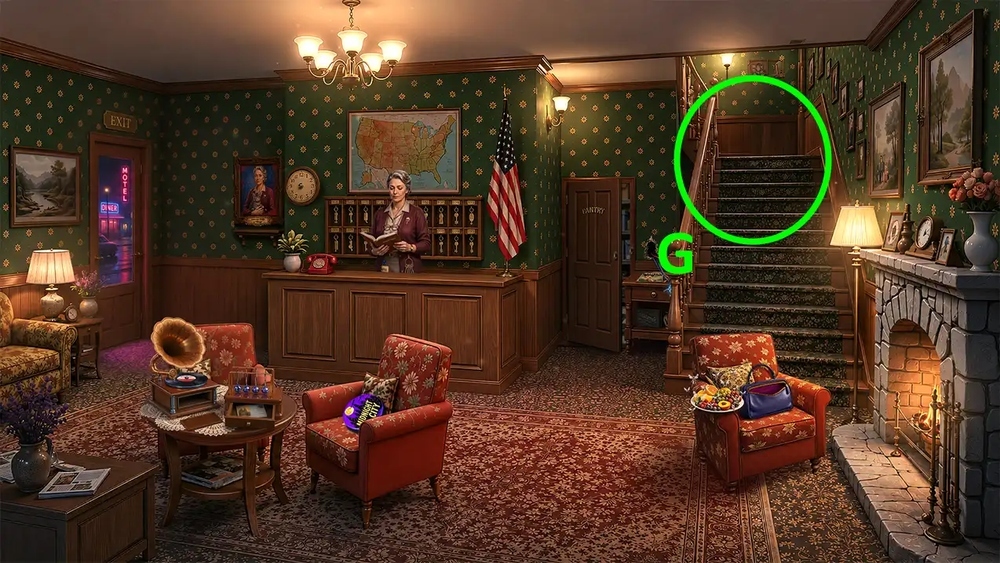
- Go forward (G).

- Take WATER, use OIL CAN on the window, take KNIFE (H).
- Use KNIFE on the pocket, take COMB (J).
- Go to Abandoned Pavilion.

- Use COMB on the switch, take PORTRAIT (K).
- Go to Garden Circle Club.
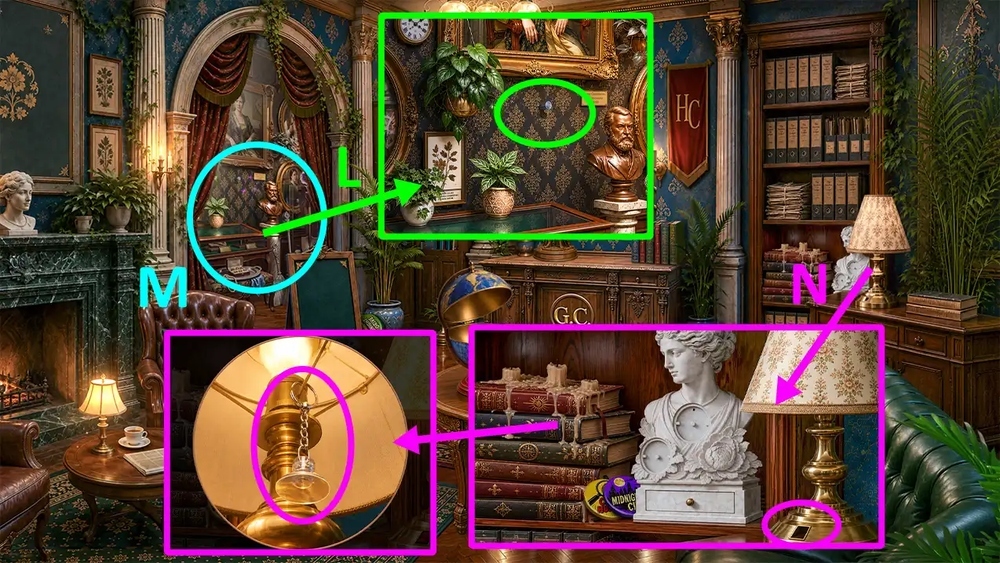
- Use PORTRAIT on the wall (L).
- Play puzzle, earn TOGGLE SWITCH (M).
- Use TOGGLE SWITCH on the lamp, take KEYCHAIN WITH SUCTION CUP (N).
- Go to My Room.

- Use KEYCHAIN WITH SUCTION CUP on the drawer, take TOY (O).
- Use TOY on the shards, take CLOCK HANDS 1/2 (P).
- Go to Carson Street.
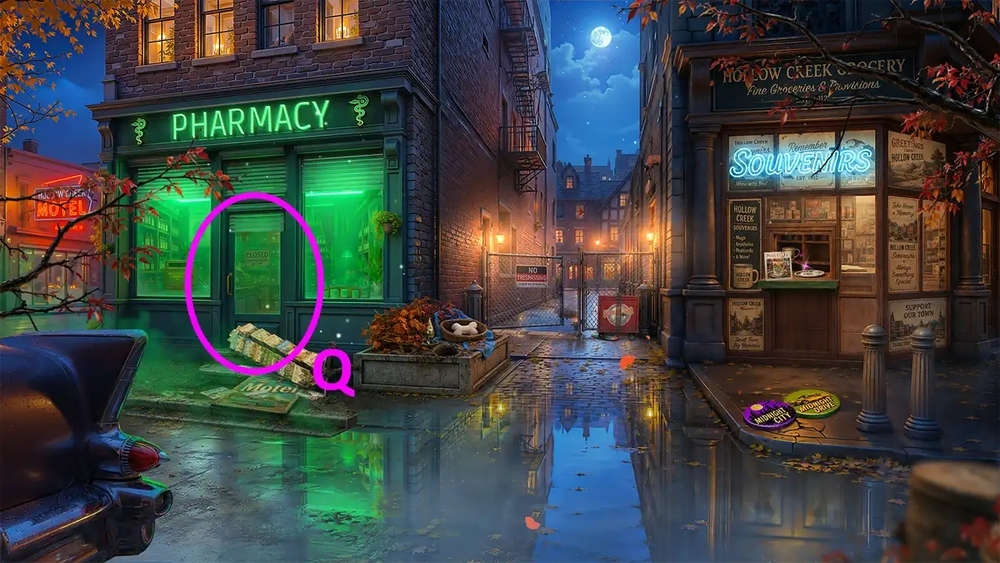
- Play puzzle, earn ANTISEPTIC (Q).
- Go to Hollow Creek Motel.
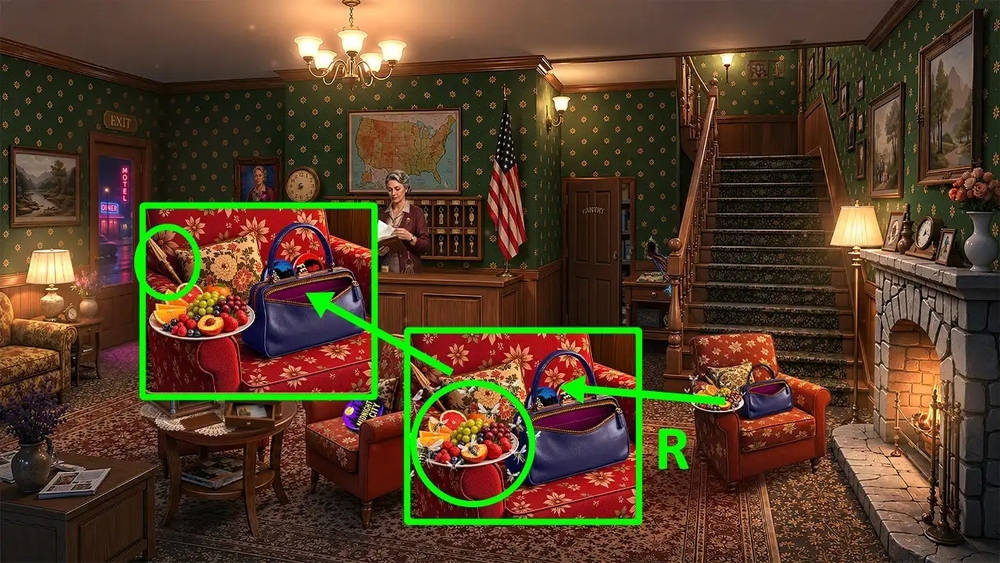
- Use ANTISEPTIC on the bees, take TOY SPEAR (R).
- Go to Garden Circle Club.

- Use TOY SPEAR on the figurine (S).
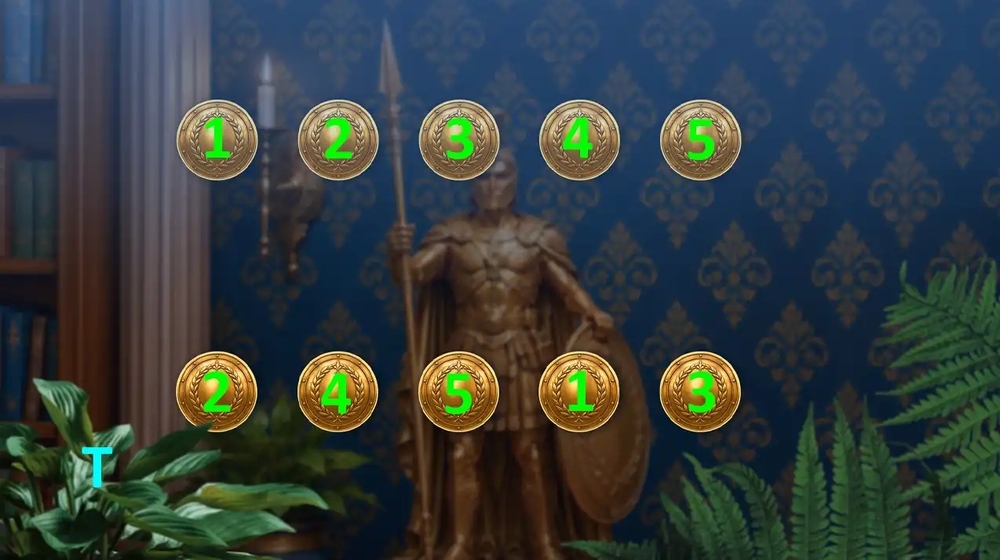
- Easy solution: 1-1, 2-2, 3-3, 4-4, 5-5 (T).
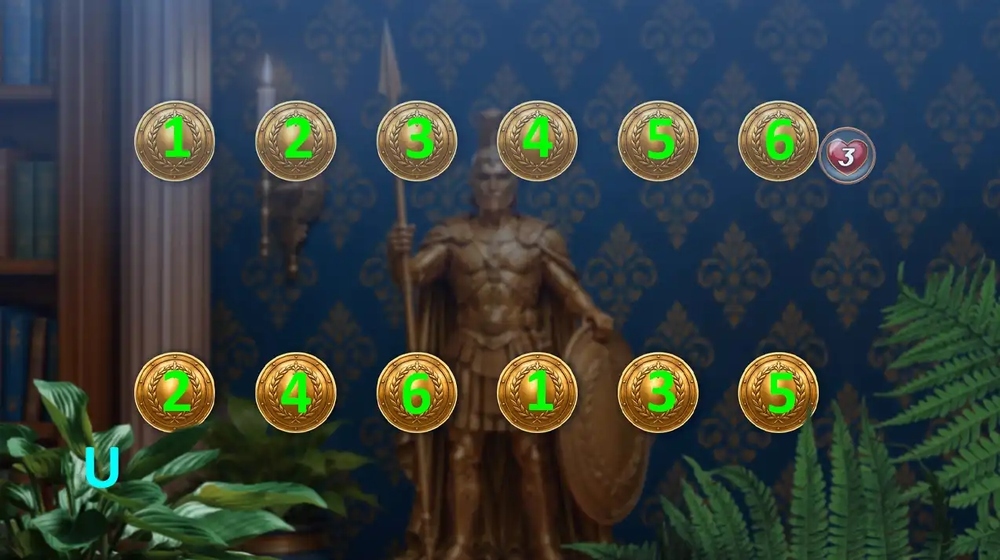
- Hard solution: 1-1, 2-2, 3-3, 4-4, 5-5, 6-6 (U).

- Take BUST PARTS 2/2 (V).
- Use BUST PARTS 2/2 on the bust, take SHELL (W).
- Go to Motel Storeroom.
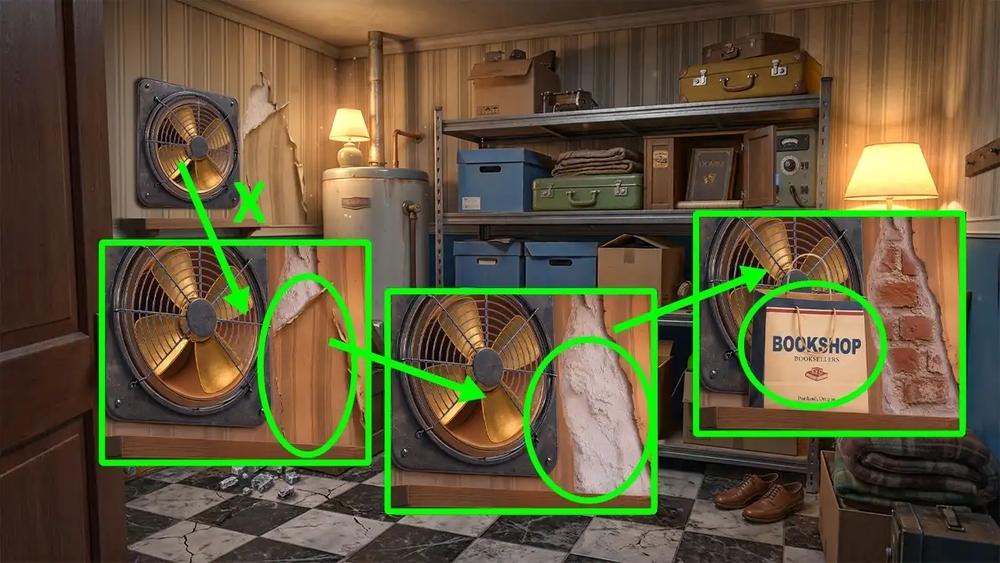
- Click on the wallpaper, use SHELL and BAG on the item, take BAG OF PLASTER (X).
- Go to Garden Circle Club.
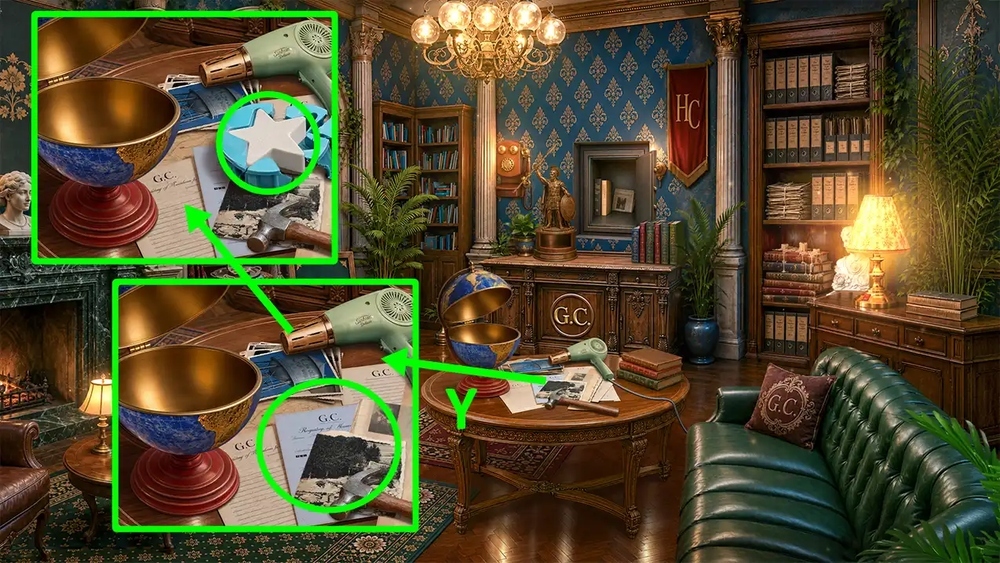
- Use BAG OF PLASTER, FORM and WATER on the desk with the documents, take STAR AMULET (Y).
- Go to My Room.
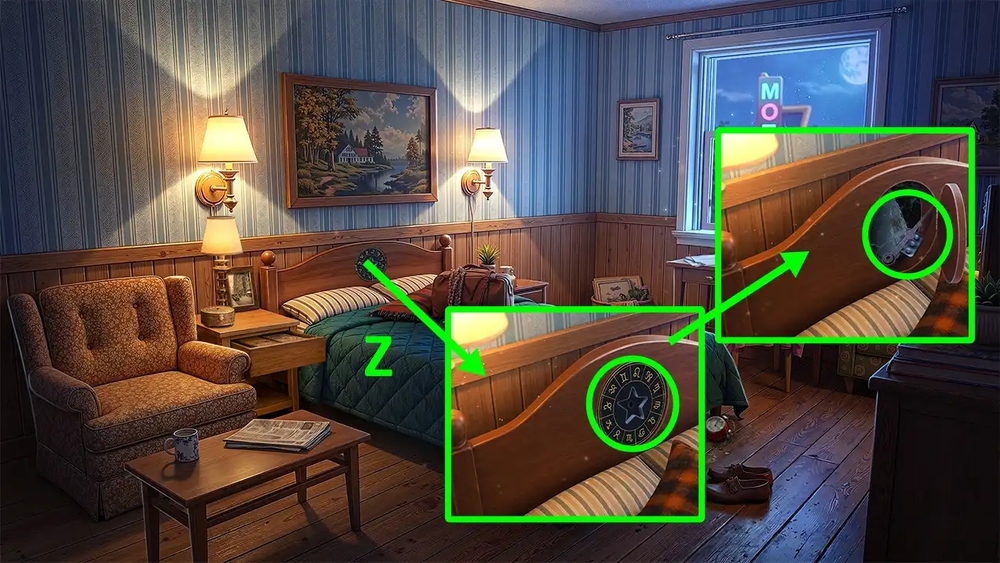
- Use STAR AMULET on the constellation, take CLOCK HANDS 2/2 (Z).
- Go to Garden Circle Club.
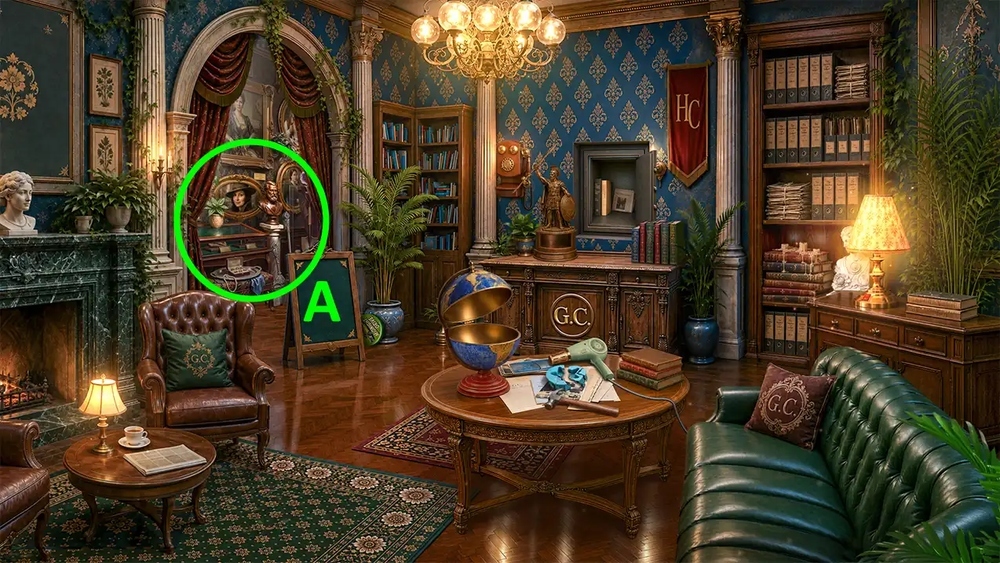
- Play puzzle, earn BALLERINA FIGURINE (A).
- Go to My Room.
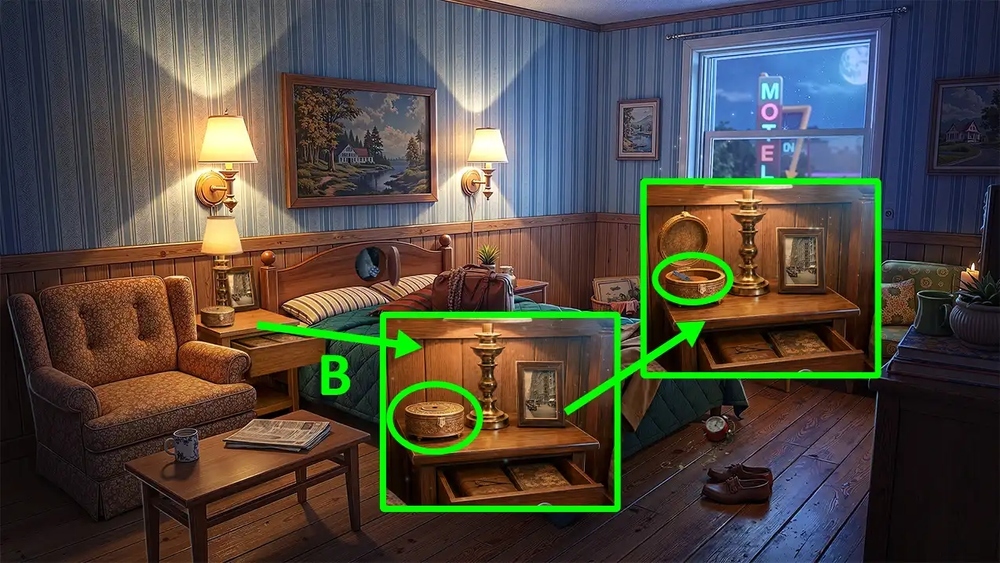
- Use BALLERINA FIGURINE on the box, take HAMMER (B).
- Go to Hollow Creek Motel.
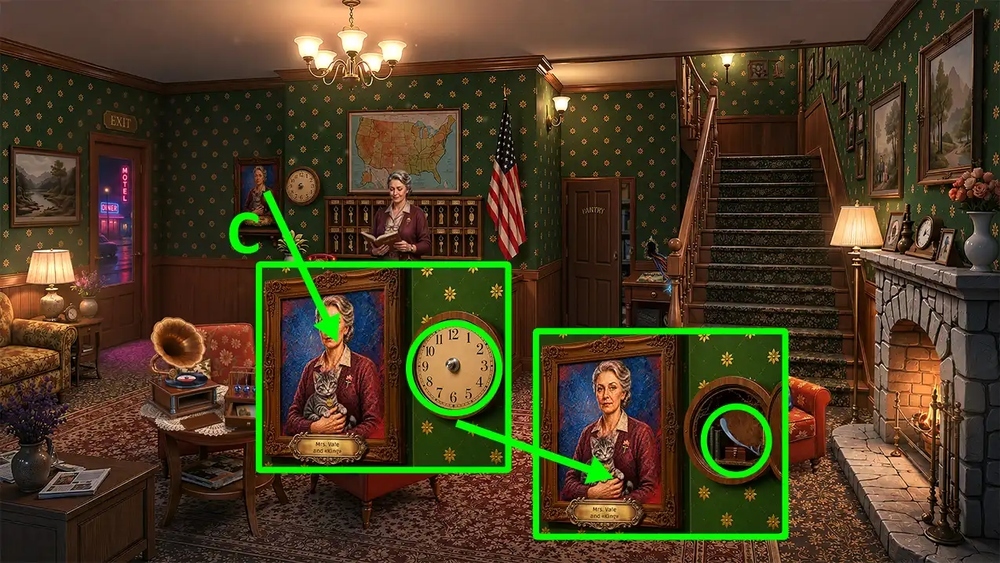
- Use CLOCK HANDS 2/2 on the clock face, take CARRIAGE LEVER (C).
- Go to My Room.
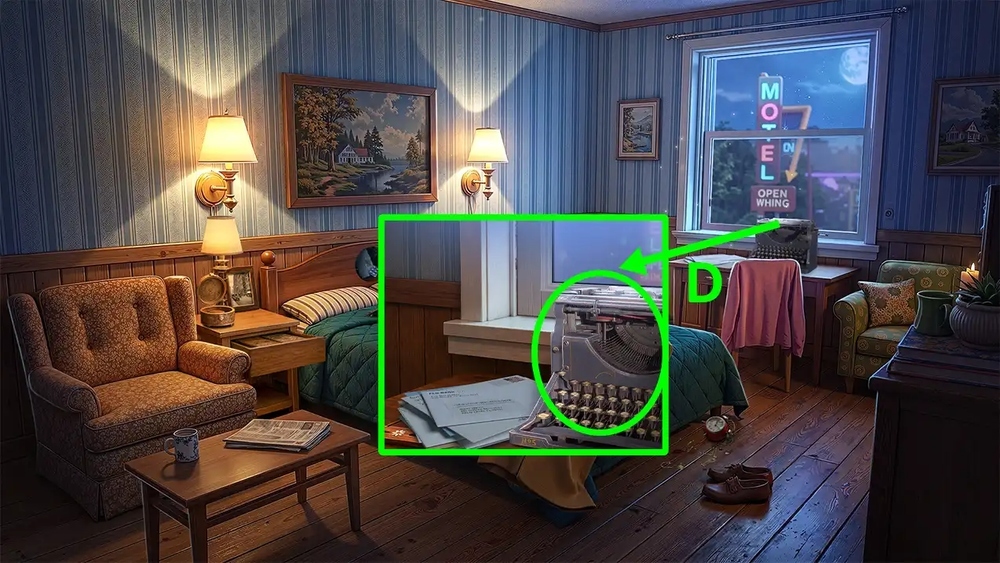
- Use CARRIAGE, CARRIAGE LEVER and HAMMER on the typewriter (D).
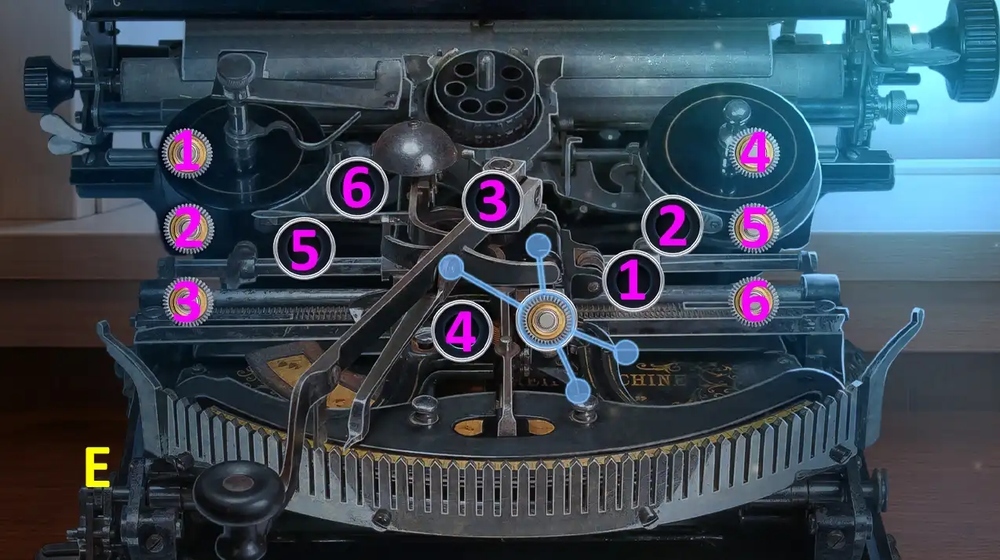
- Easy solution: 1-1, 2-2, 3-3, 4-4, 5-5, 6-6 (E).
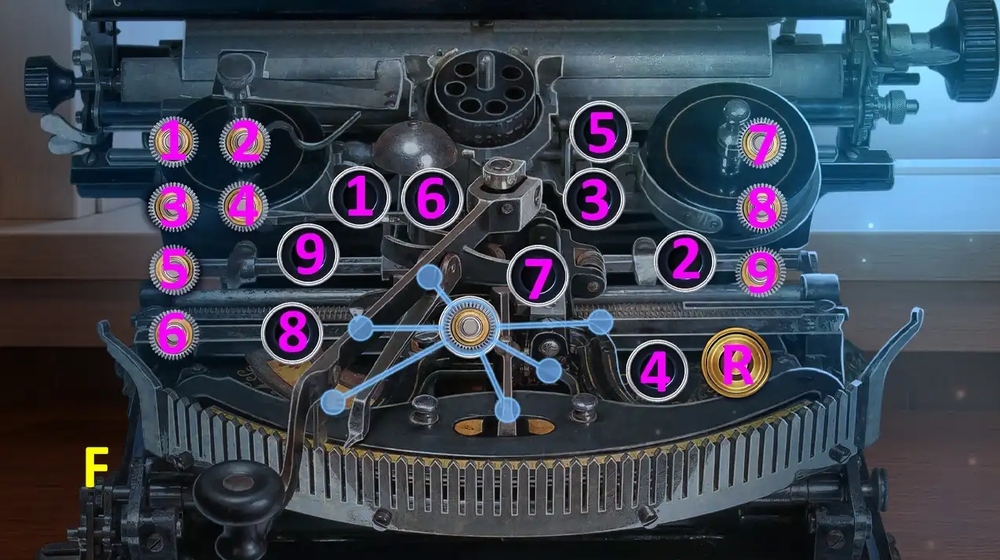
- Hard solution: 1-Rx6-1, 2-2, 3-3, 4-Rx1-4, 5-Rx5-5, 6-Rx7-6, 7-Rx2-7, 8-8, 9-Rx3-9 (F).
Congratulations! You have completed the game Unfinished Report 1: Eleanor Case.