Hidden Fame 1: Dark Secret – A detective adventure about crimes behind the scenes of the high-fashion industry. Will, a rookie journalist, is assigned to investigate the death of famous model Alice Winters, whose body was found in a river. Shortly before her death, the young woman had been working on a new collection for the prestigious fashion house Monique Waywright, so the journalist decides to start his investigation there. Posing as a public relations representative, Will gets the chance to interview employees and examine documents. It soon becomes clear that conflicts have long been brewing within the fashion house. Missing sketches, suspicious transactions, the misappropriation of others’ designs, and tense relationships among employees raise questions about what was really going on behind closed doors. Moreover, shortly before her death, Alice was planning to leave the fashion house and had been trying to tell a friend something important. Vivienne, a talented seamstress who worked alongside Monique for many years and knew the victim well, becomes involved in the investigation. The three of them were once partners in building the fashion business, but over time, the relationship between the former colleagues soured. Now Vivienne is receiving threats and fears she might be the next victim. Joining forces, she and Will try to piece together the events of the last days of Alice’s life and figure out who stood to gain from her murder. The trail leads the protagonists to a prestigious fashion show at an art gallery. There, the investigation takes an unexpected turn; new clues are discovered among the guests and staff, and the crime attracts the attention of the police. Will gradually realizes that something much more serious lies behind the conflicts within the fashion house, and that influential people are willing to go to great lengths to protect their reputations and prevent the scandal from becoming public. If you’re stuck on a puzzle or don’t know where to find certain items, you can check out the walkthrough for Hidden Fame 1: Dark Secret and uncover the truth.
Hidden Fame 1: Dark Secret – Walkthrough
Here you can see the complete walkthrough for Hidden Fame 1: Dark Secret, namely all chapters, including the bonus chapter, in pictures.
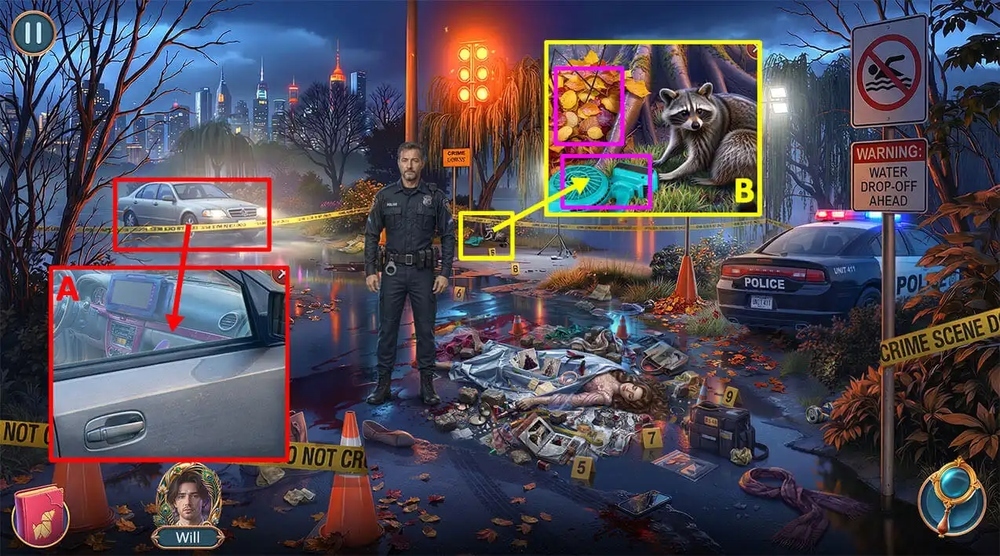
- Click on the car door, read the letter on the tablet, take GRABBER HAND (A).
- Take LEAF BLOWER, JUMPER, use LEAF BLOWER on the leaves, take BRASS RING, DEER KEYCHAIN (B).
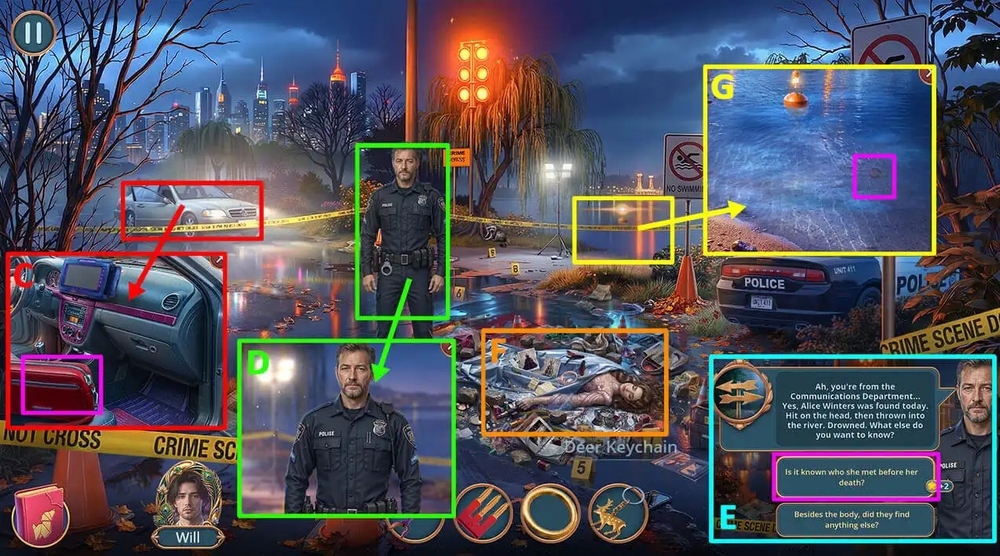
- Click on the bag, use DEER KEYCHAIN on the bag, click on the ID, take FAKE ID (C).
- Use FAKE ID on the police officer (D).
- Select this option (E).
- Play puzzle, earn RACKET (F).
- Use RACKET on the shiny item, earn EARRING (G).
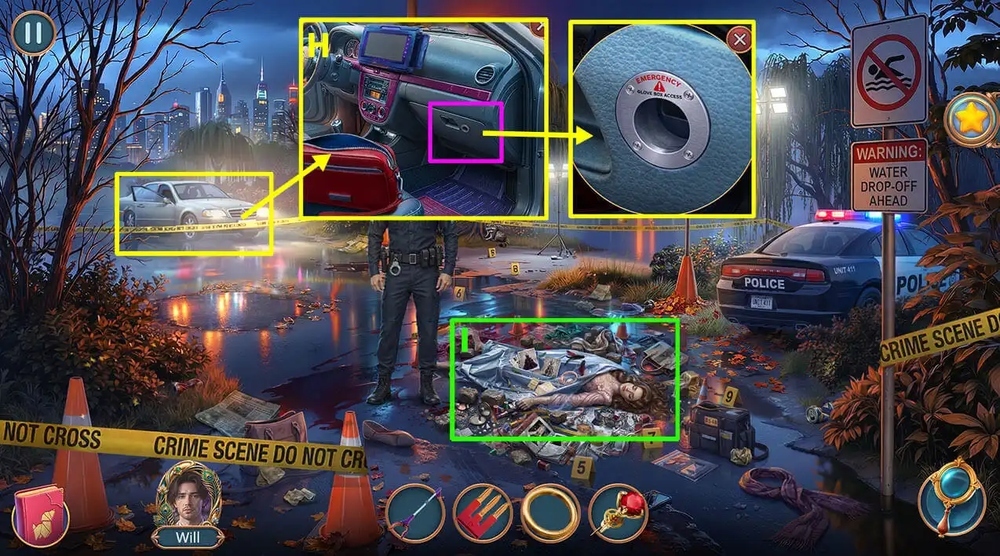
- Click on the glove compartment, use EARRING on the gap, take TWEEZERS (H).
- Play puzzle, earn ADDRESS (I).
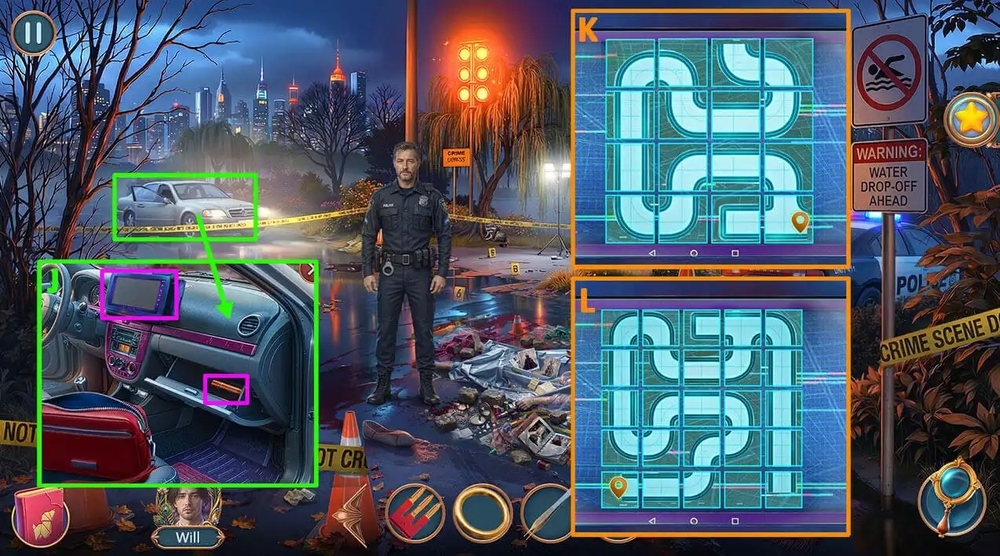
- Take and use the battery on the navigator, use ADDRESS on the navigator (J).
- Easy solution: Follow the instructions in the image (K).
- Hard solution: Follow the instructions in the image (L).
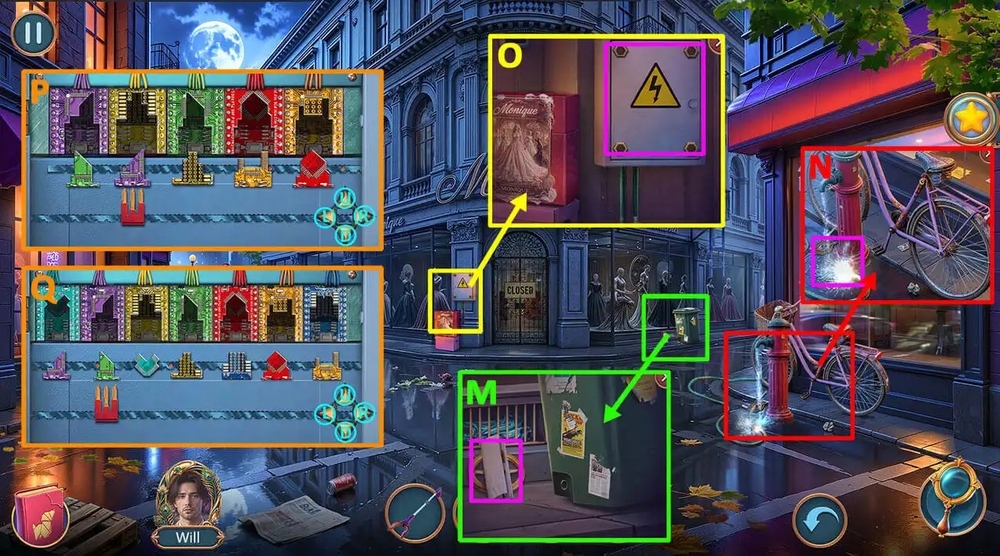
- Examine the scheme, take WIRING DIAGRAM, SEWING MACHINE VALVE (M).
- Use GRABBER HAND on the wires, take COPPER FEATHERS 1/2, HEX KEY (N).
- Use HEX KEY on the screws, use WIRING DIAGRAM, JUMPER on the panel (O).
- Easy solution: Click R – U – L (5 times) – D – L – U – D – R (19 times) – U – L – D – L – U – D – L (12 times) – U – R (12 times) – D – R (4 times) – U – D – L (12 times) – U – R (5 times) – D – L (3 times) – U (P).
- Hard solution: Click L – U – R (5 times) – D – L (4 times) – U – R (3 times) – D – R (5 times) – U – R – D – R (13 times) – U – L (13 times) – D – L (5 times) – U – L (5 times) – D – L (4 times) – U – R (5 times) – D – R (13 times) – U – L – D – R (5 times) – U (Q).
- Take PENCIL, SPREADER.
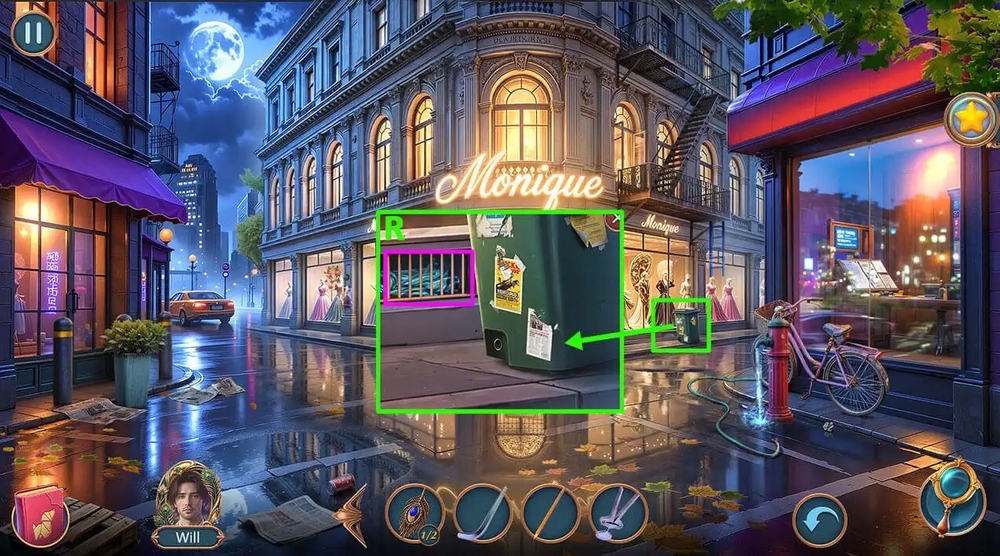
- Use SPREADER on the grid, take SCARF (R).
- Go back.
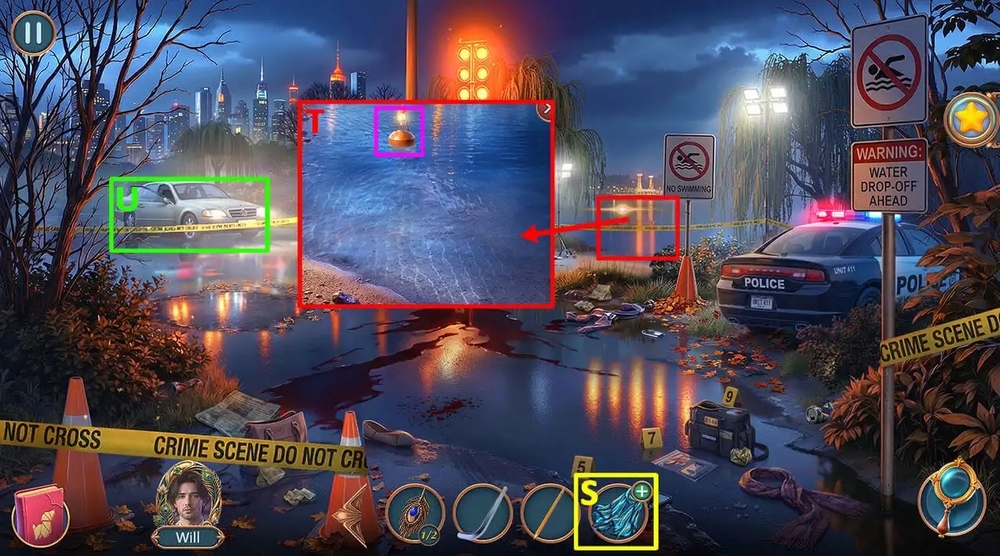
- Use BRASS RING on SCARF, earn SCARF WITH RING (S).
- Use SCARF WITH RING on the buoy in the distance, take map, take LIGHT BULB (T).
- Go forward (U).

- Use LIGHT BULB on the lamp socket (V).
- Play puzzle, earn HAIR DRYER (W).
- Use HAIR DRYER on the glue, use TWEEZERS on the poster, take WHEEL (X).
- Use WHEEL, PEN on the trash can (Y).
- Go forward (Z).
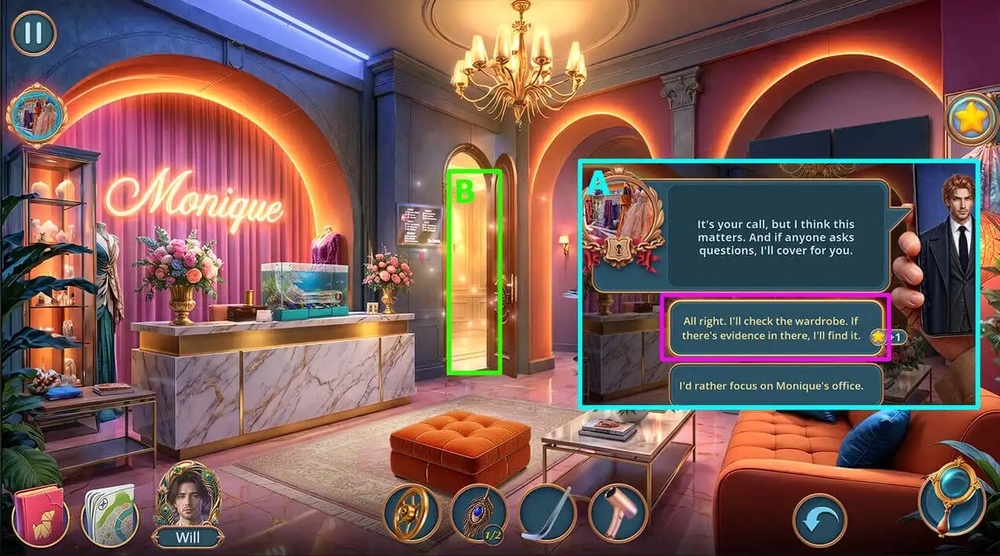
- Select this option (A).
- Go forward (B).
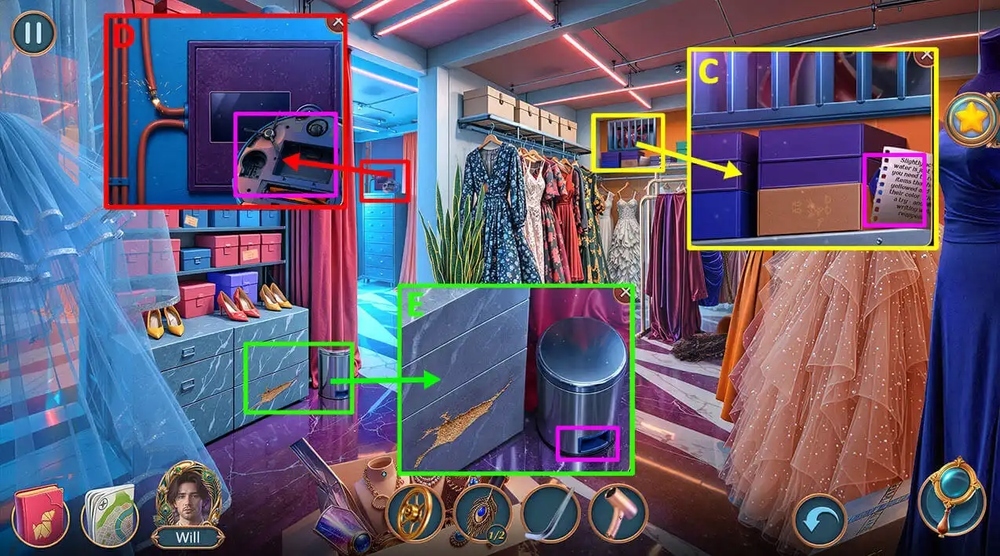
- Read the note, take PEDAL (C).
- Take ROBOT VACUUM CLEANER BODY (D).
- Use PEDAL on the trash can, take SHOE HEEL, BATTERY (E).

- Use SHOE HEEL on the fan, take WHEEL (F).
- Use WHEEL, BATTERY on ROBOT VACUUM CLEANER BODY, earn ROBOT VACUUM CLEANER (G).
- Use ROBOT VACUUM CLEANER on the ground, take HEAT-SHRINKING TUBE, GOLD NEEDLE AMULET (H).
- Go back.
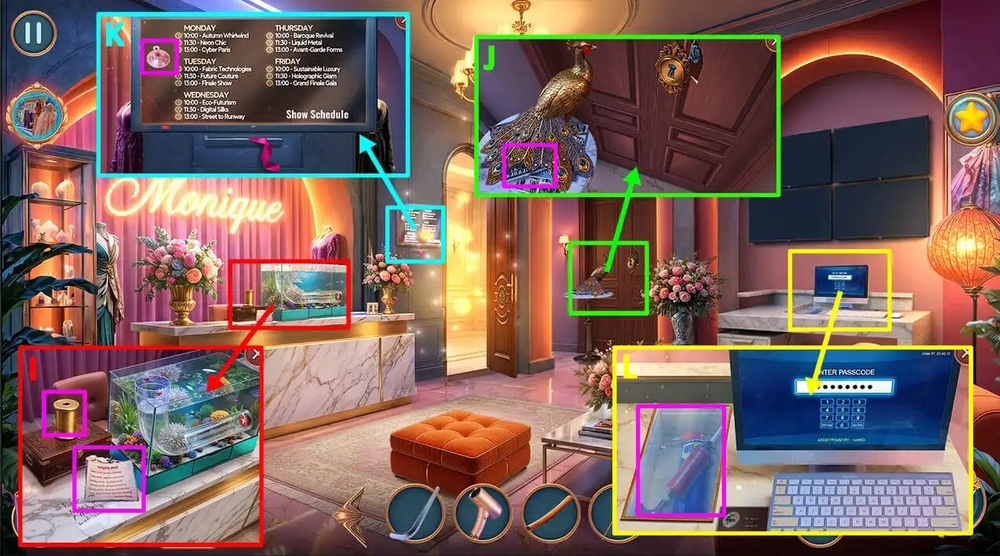
- Read the note, take COPPER FEATHERS 2/2, CAMERA BODY, use GOLD NEEDLE AMULET on the golden spool of thread, take WASHING BAND (I).
- Use COPPER FEATHERS 2/2 on the pheasant’s tail, take RING (J).
- Use RING on the suction cup, take SUCTION CUP (K).
- Use SUCTION CUP on the glass lid, take PUMP, WD-40 SPRAY (L).
- Go back.
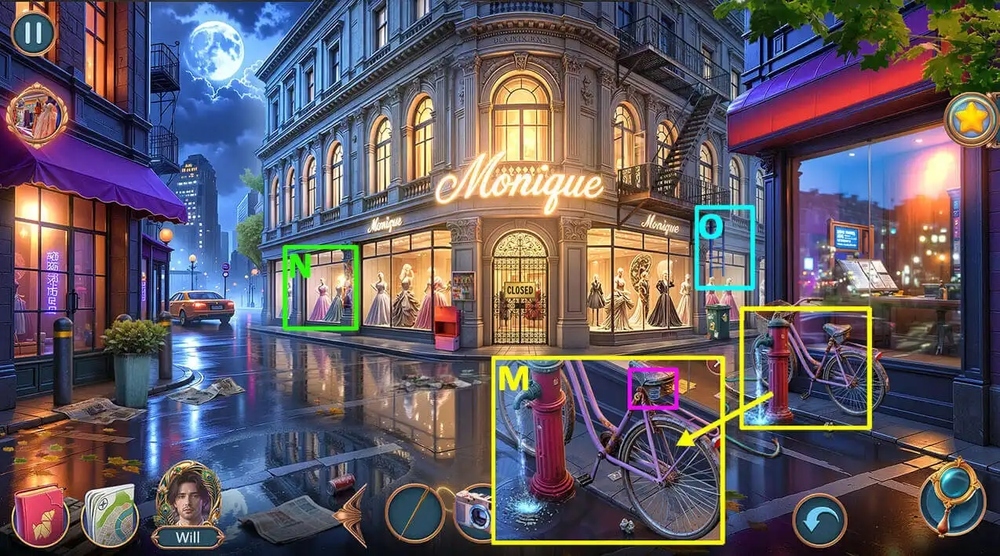
- Use WD-40 SPRAY, HEX KEY on the bicycle seat, earn SPRING (M).
- Play puzzle, earn REMOTE (N).
- Go forward (O).
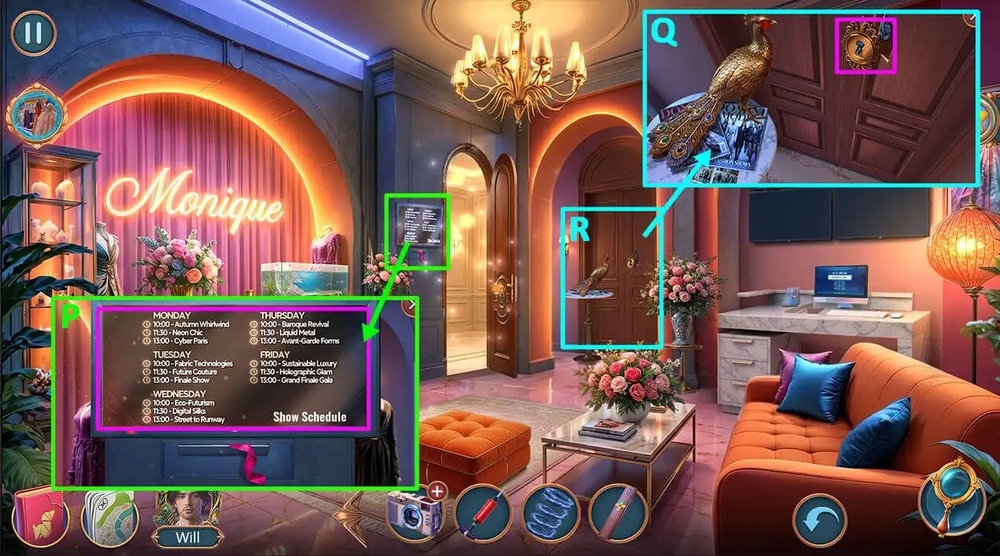
- Use REMOTE on the monitor, click on the button on the remote 3 times, take RIBBON (P).
- Use SPRING, RIBBON on the gap, take and use the key on the door (Q).
- Go forward (R).
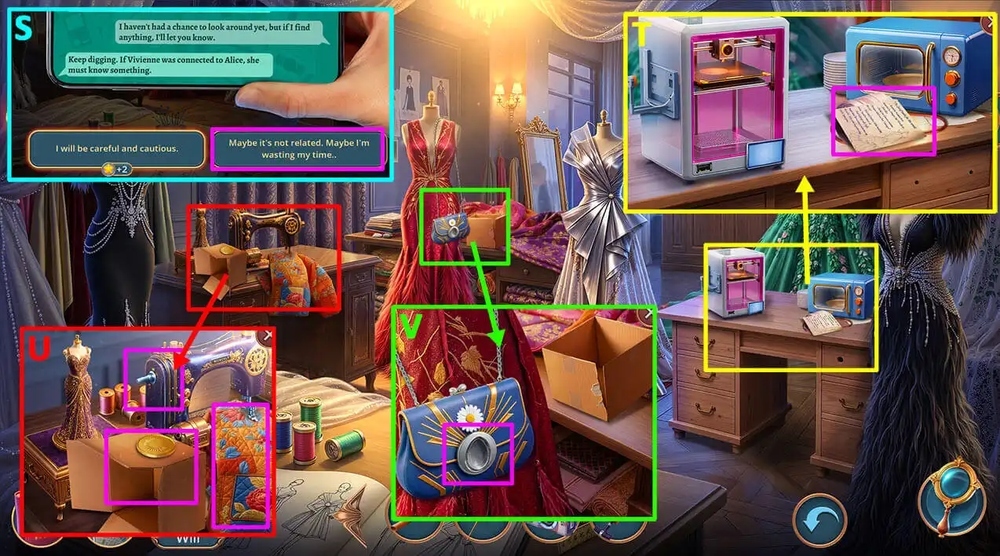
- Click on the phone, select this option, click on the phone (S).
- Read the note, take LENS, BELT (T).
- Take COIN, BOXES WITH FITTINGS 1/2, use SEWING MACHINE VALVE, BELT on the sewing machine, click on the jacket 2 times, take AMBER WITH FLOWER (U).
- Use AMBER WITH FLOWER on the lock, take SOFT BOX, MEMORY CARD (V).
- Go back.
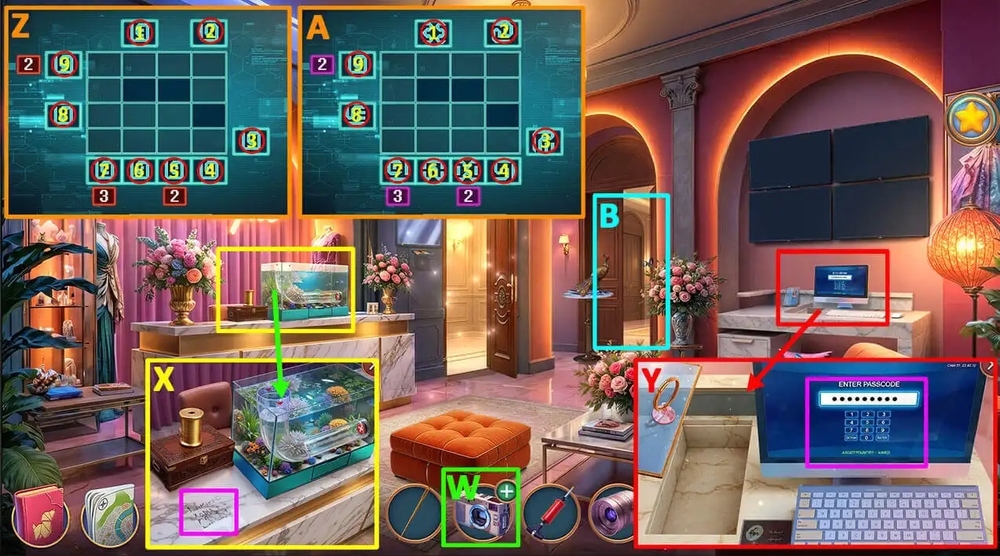
- Use MEMORY CARD, LENS on CAMERA BODY, earn WORKING CAMERA (W).
- Use WORKING CAMERA on the scratched-out letters, examine the photo, click on the photo, take PHOTO WITH CODE (X).
- Use PHOTO WITH CODE on the all-in-one computer (Y).
- Easy solution: Click 7-8-7-7-1-9-9-2-4-5-3-5-6 (Z).
- Hard solution: Click 4-5-6-3-5-7-8-7-7-1-9-9-2 (A).
- Take CLOSET KEY.
- Go forward (B).
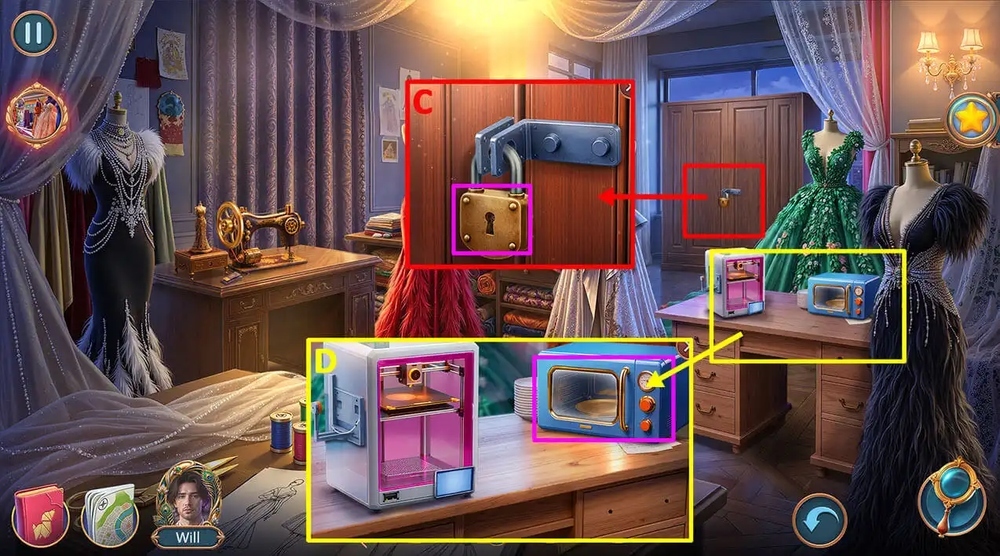
- Use CLOSET KEY on the lock, take POPCORN (C).
- Click on the microwave door, use POPCORN on the microwave, take POPCORN (D).
- Go to Riverbank.
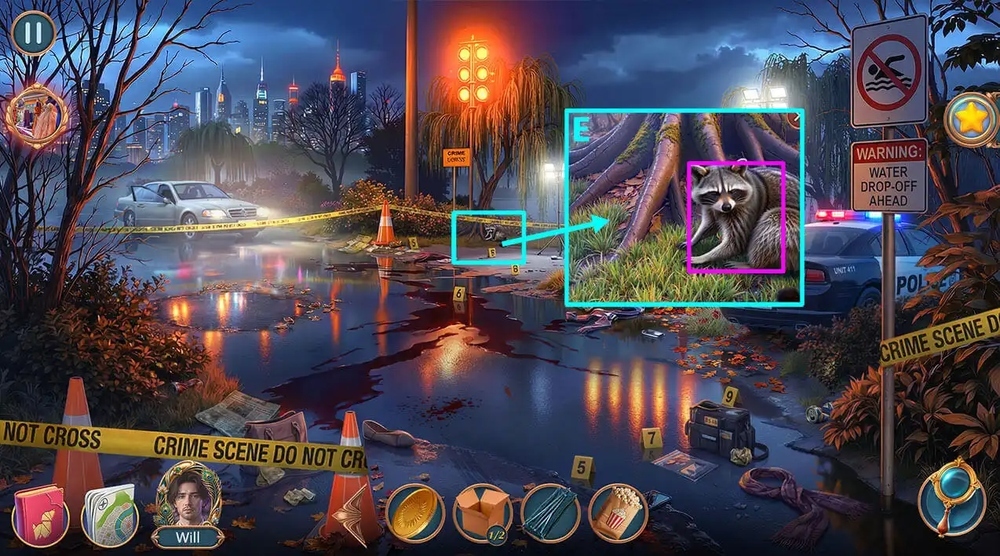
- Use POPCORN on the raccoon, take PAPER KNIFE, COIL, WIND-UP DIVER (E).
- Go to Inside Fashion House.
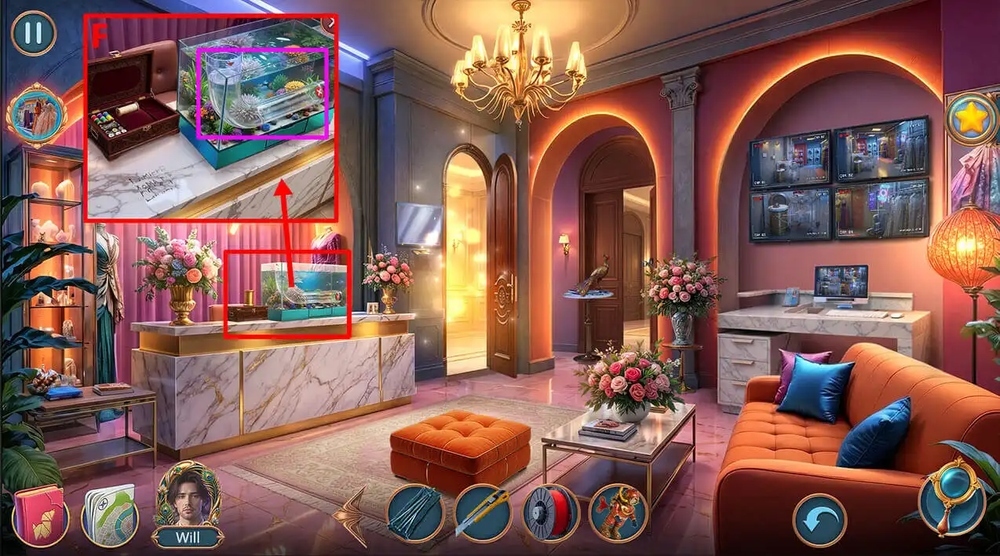
- Use WIND-UP DIVER on the fishing tank, take STAPLER (F).
- Go to Wardrobe.
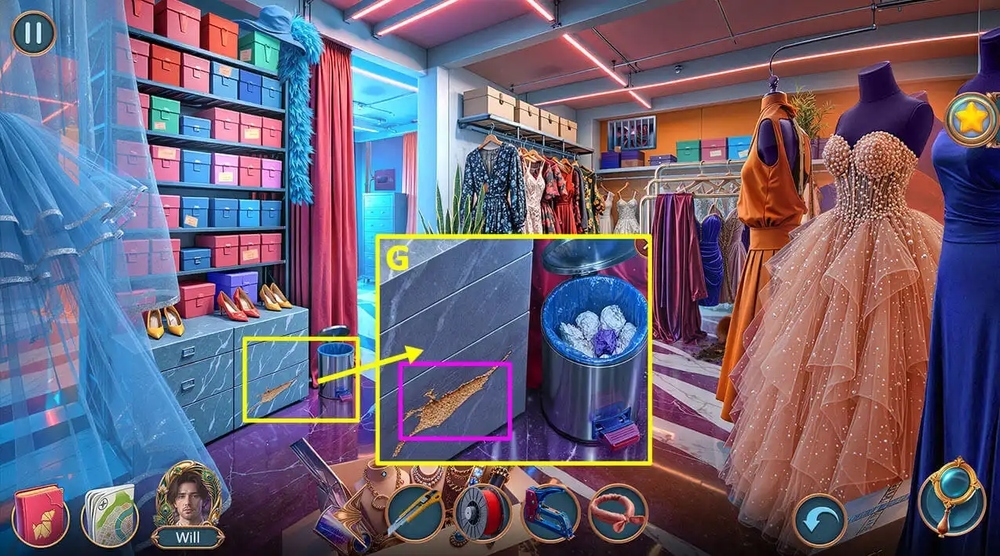
- Use WASHING BAND, STAPLER on the pull-out drawer, take BOTTLE OF WATER, TIE CLIP (G).
- Go to Vivienne’s Workshop.
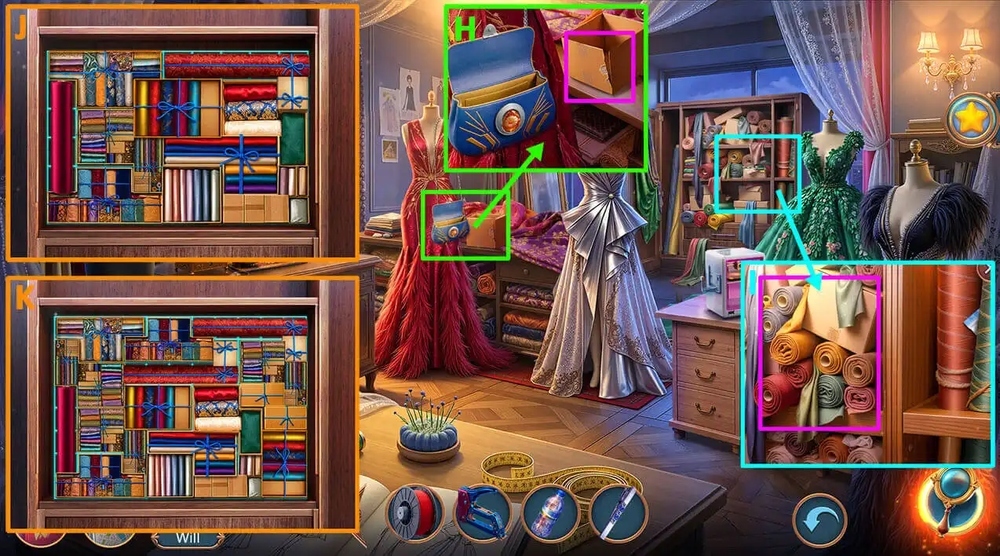
- Use STAPLER on the box, take BOXES WITH FITTINGS 2/2 (H).
- Use TIE CLIP on the stuck bag, take CITRIC ACID, use BOXES WITH FITTINGS 2/2 on the rolls (I).
- Easy solution: Follow the instructions in the image (J).
- Hard solution: Follow the instructions in the image (K).
- Take WINDING KEY.
- Go to Wardrobe.

- Use CITRIC ACID, BOTTLE OF WATER on the writings on the box, earn HINT (L).
- Use HAIR DRYER, HEAT-SHRINKING TUBE on the wire, use HINT on the safe (M).
- Easy solution: Follow the instructions in the image (N).
- Hard solution: Follow the instructions in the image (O).
- Read the note.
- Go to Vivienne’s Workshop.
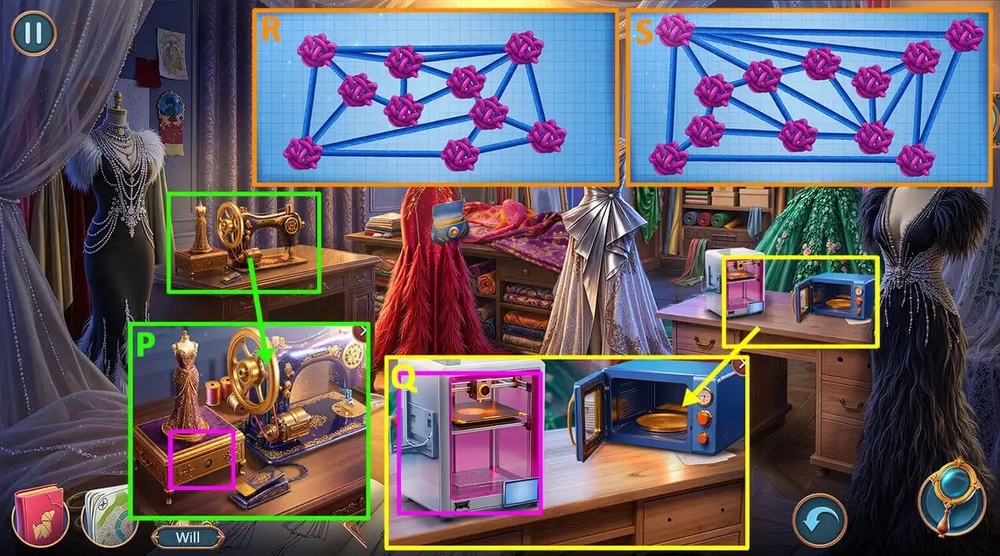
- Use WINDING KEY on the box, take FLASH DRIVE (P).
- Use COIL, FLASH DRIVE on the printer (Q).
- Easy solution: Follow the instructions in the image (R).
- Hard solution: Follow the instructions in the image (S).
- Take the handle and use it on the holes in the drawer, read the note, click on the note, read the letter with a threat.
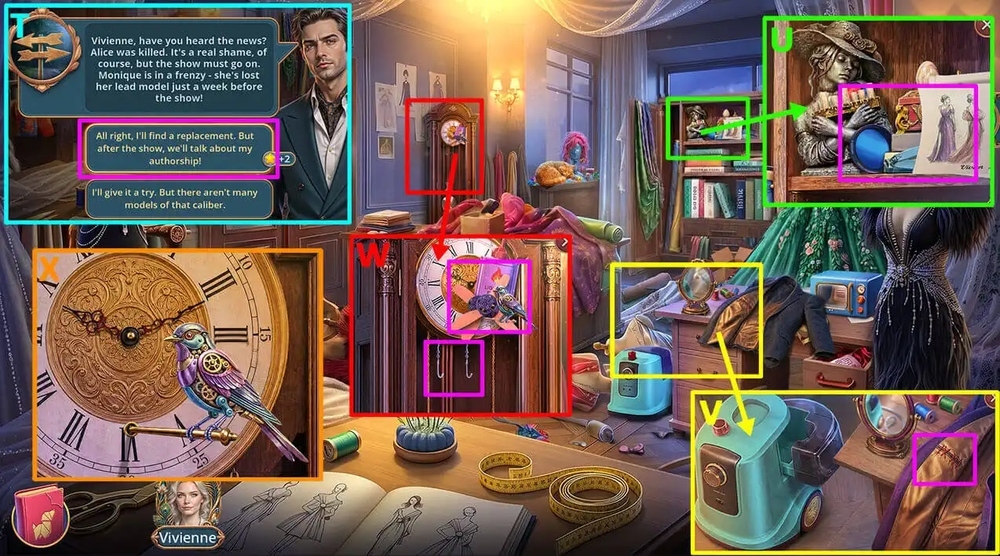
- Select this option (T).
- Read the note, take NAIL CLIPPERS, COLORED LIGHT FILTERS 1/3 (U).
- Use NAIL CLIPPERS on the seam, take LIGHTER, WEIGHTS (V).
- Take PROPELLERS, LIGHTER FLUID, use WEIGHTS on the clock (W).
- Easy/Hard solution: Follow the instructions in the image (X).
- Take PIECE OF FELT, LIP OIL.
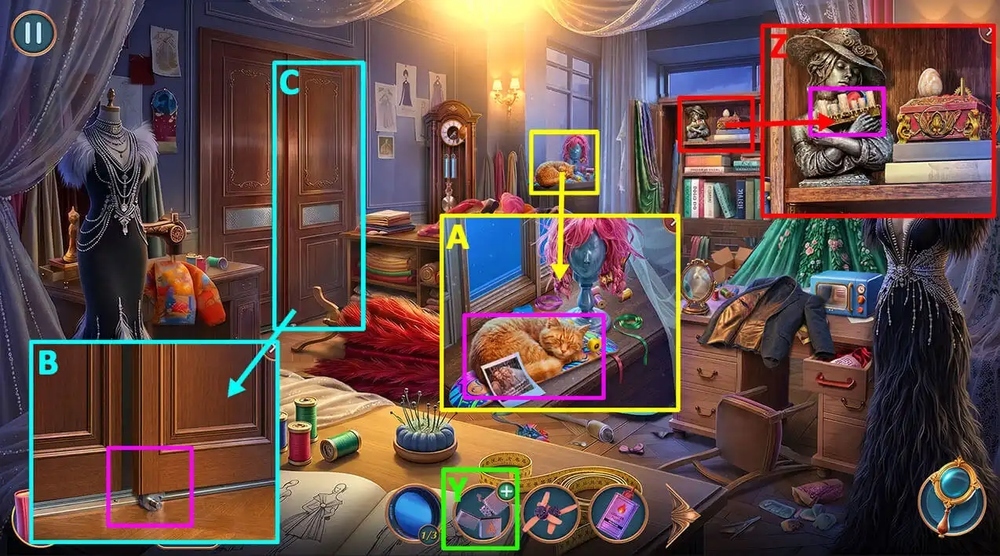
- Use LIGHTER FLUID, PIECE OF FELT on LIGHTER, earn WORKING LIGHTER (Y).
- Use WORKING LIGHTER on the candles, take COLORED LIGHT FILTERS 2/3, LASER POINTER (Z).
- Examine the photo, use LASER POINTER on the cat, take CAMERA WITH CAPTURE, SKATEBOARD (A).
- Use SKATEBOARD on the sliding door (B).
- Go forward (C).
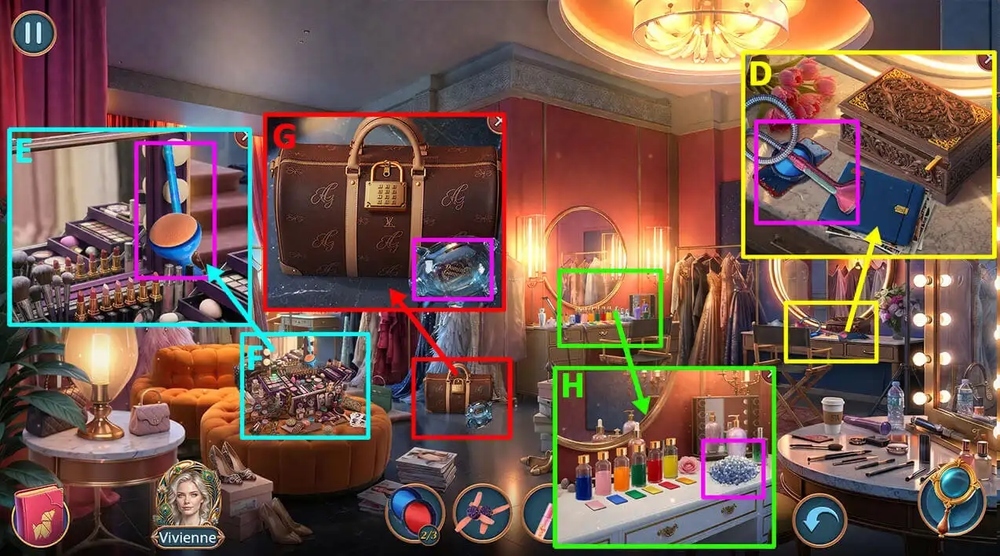
- Take HOSE, COLORED LIGHT FILTERS 3/3, WET PHONE (D).
- Take SPONGE, GLOW STICK, use COLORED LIGHT FILTERS 3/3 on the light bulbs (E).
- Play puzzle, earn PAPERWEIGHT (F).
- Use PAPERWEIGHT on the glass piggy bank, take BELL TONGUE, BAG (G).
- Use BAG on the silica gel, earn BAG OF SILICA GEL (H).
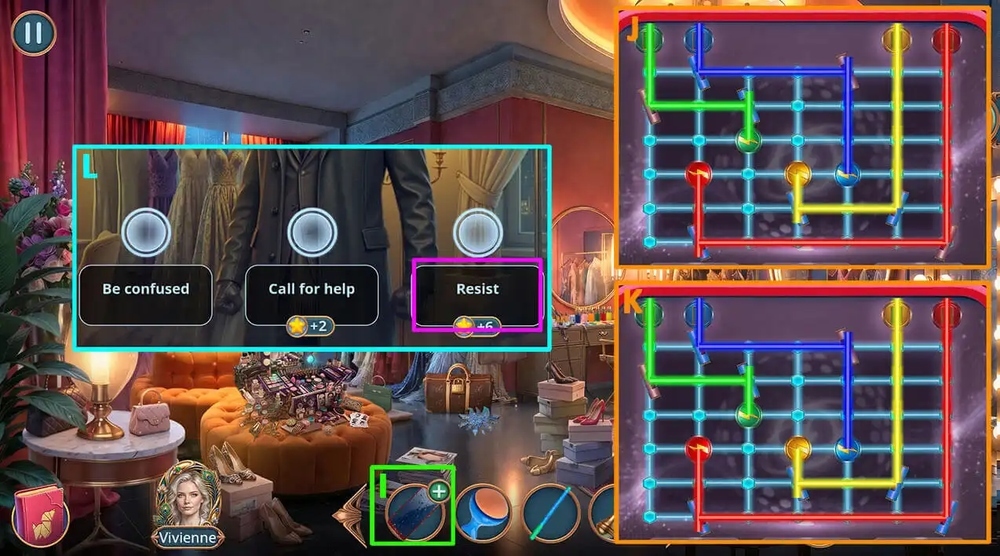
- Use BAG OF SILICA GEL on WET PHONE (I).
- Easy solution: Follow the instructions in the image (J).
- Hard solution: Follow the instructions in the image (K).
- Select this option (L).

- Use LIP OIL on the on handcuffs (M).
- Take LABELS 1/2, QUADCOPTER FRAME (N).
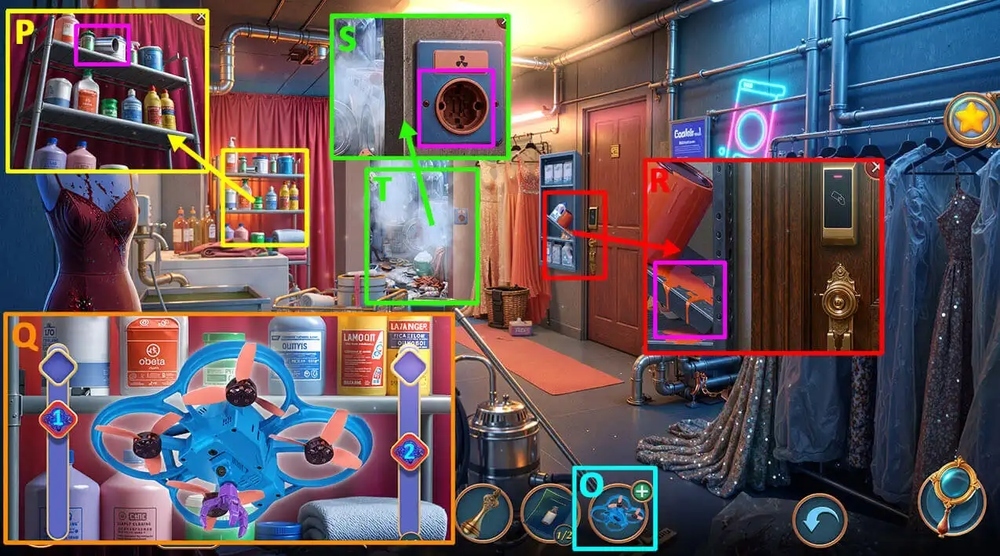
- Use PROPELLERS, CAMERA WITH CAPTURE on QUADCOPTER FRAME, earn QUADCOPTER WITH GRIPPER (O).
- Use QUADCOPTER WITH GRIPPER on the pipe (P).
- Easy/Hard solution: Click on the screen when sliders 1 and 2 are in the necessary positions shown in the image (Q).
- Earn METAL PIPE.
- Use METAL PIPE on the fallen shelf, take BUTTON (R).
- Use BUTTON on the place for a button (S).
- Play puzzle, earn LIQUID IRON (T).
- Go to Vivienne’s Workshop.
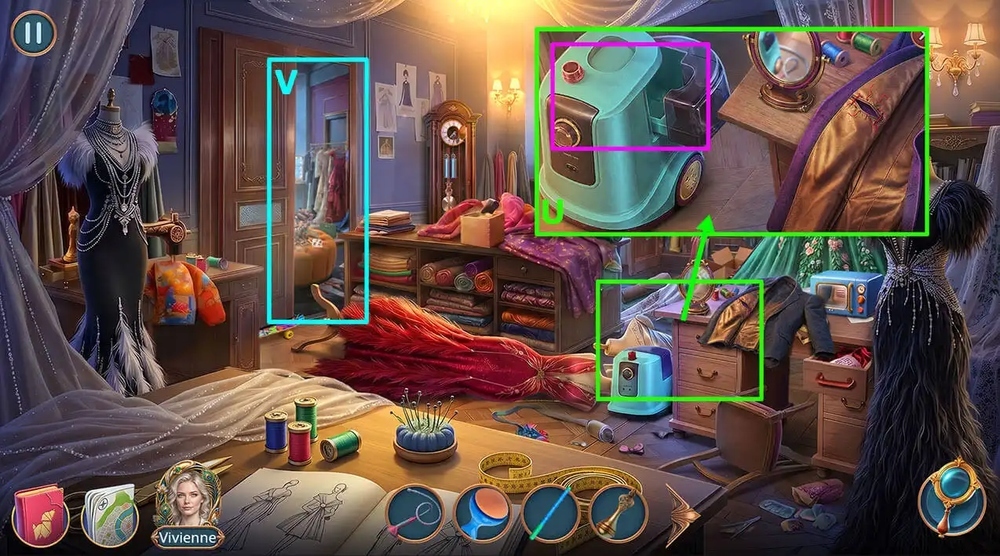
- Use HOSE, LIQUID IRON on the steamer (U).
- Go forward (V).
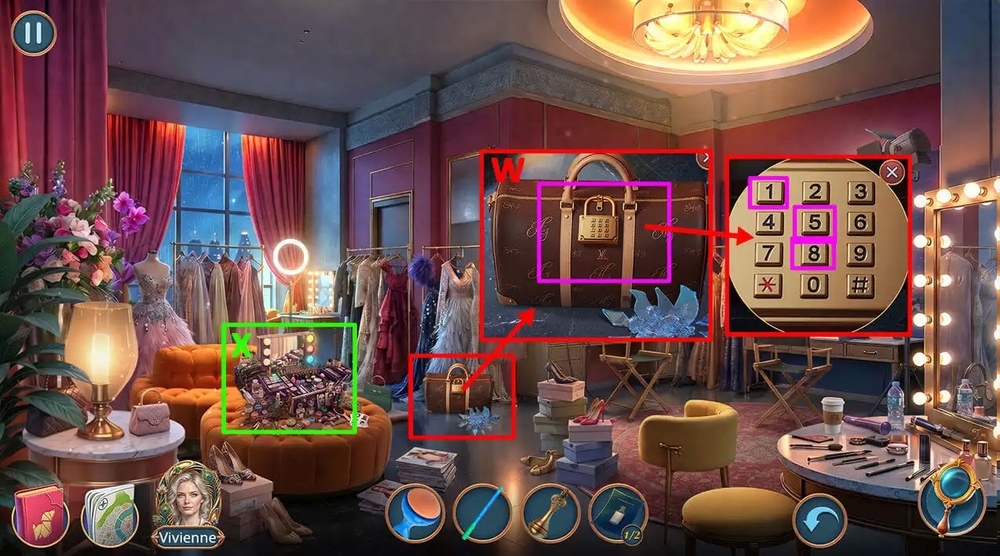
- Click on the bag, click 1-5-8, take BAKING SODA (W).
- Play puzzle, earn TRIMMER (X).
- Go back.

- Use TRIMMER on the wig, take TOY WOODPECKER (Y).
- Use TOY WOODPECKER on the stand (Z).
- Easy solution: L – 1 – R – 2 – R (2 times) – 5 – L (3 times) – 3 – 4 – L – 10 – R (2 times) – 9 – L (2 times) – 8 – L (2 times) – 7 – R (2 times) – 6 – R (2 times) (A).
- Hard solution: R – 2 – L (2 times) – 1 – R – 3 – R (2 times) – 6 – L (3 times) – 4 – 5 – L – 11 – 12 – R (2 times) – 10 – L (2 times) – 9 – L (2 times) – 8 – R (2 times) – 7 – R (2 times) (B).
- Take HORSE FIGURINE.
- Go forward (C).
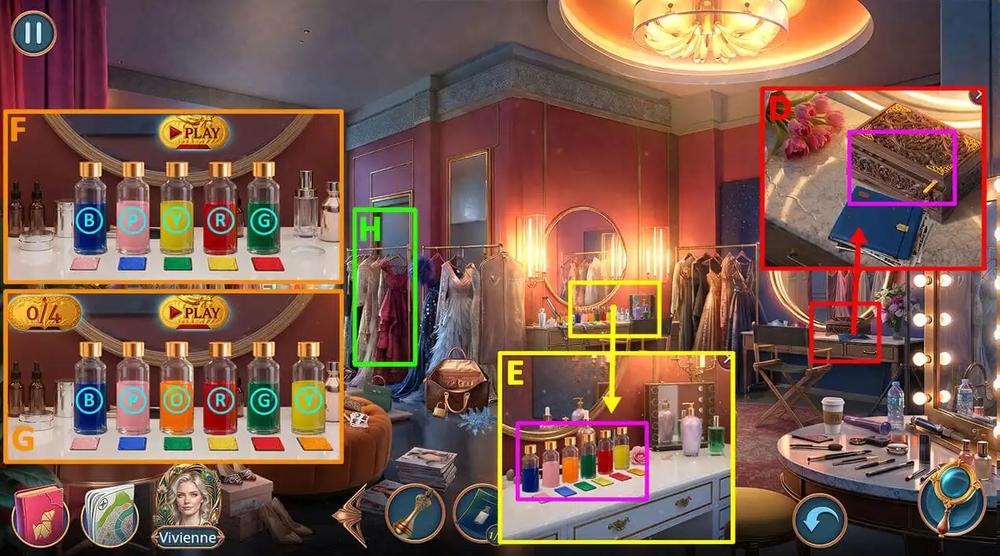
- Use HORSE FIGURINE on the chute, take RAZOR BLADE, LABELS 2/2 (D).
- Use LABELS 2/2 on the bubbles (E).
- Easy solution: Swap B-P, Y-R, R-G, click PLAY (F).
- Hard solution: Swap B-P, O-Y, G-R, click PLAY (G).
- Take ACETONE.
- Go forward (H).
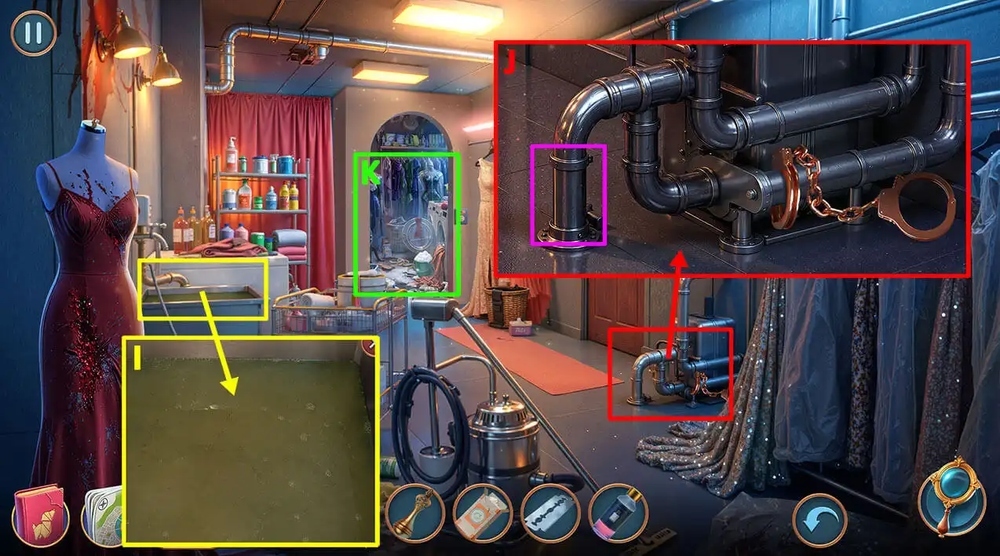
- Use BAKING SODA, ACETONE on the water, take ACETYLENE TORCH (I).
- Use ACETYLENE TORCH on the pipe, take SMOKE BOMB (J).
- Play puzzle, earn CROWN-SHAPED PENDANT (K).
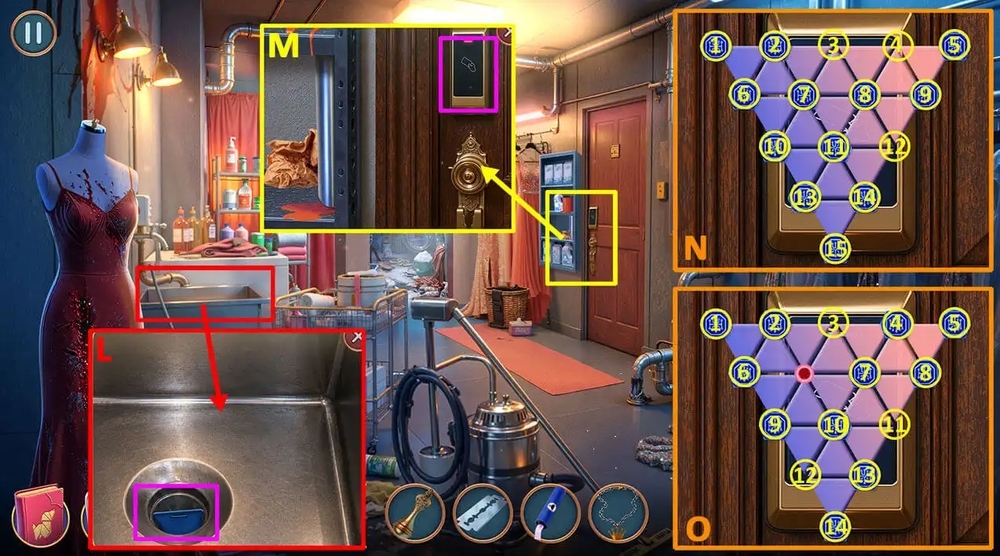
- Use CROWN-SHAPED PENDANT on the pass, earn ELECTRONIC PASS (L).
- Use ELECTRONIC PASS on the door (M).
- Easy solution: Click 1-3, 3-12, 6-8, 9-7, 13-6, 14-9, 5-12, 12-10, 6-13, 15-10, 10-3 (N).
- Hard solution: Click 1-3, 4-2, 5-11, 6-12, 11-3, 2-4, 12-7, 4-10, 14-11, 11-9 (O).
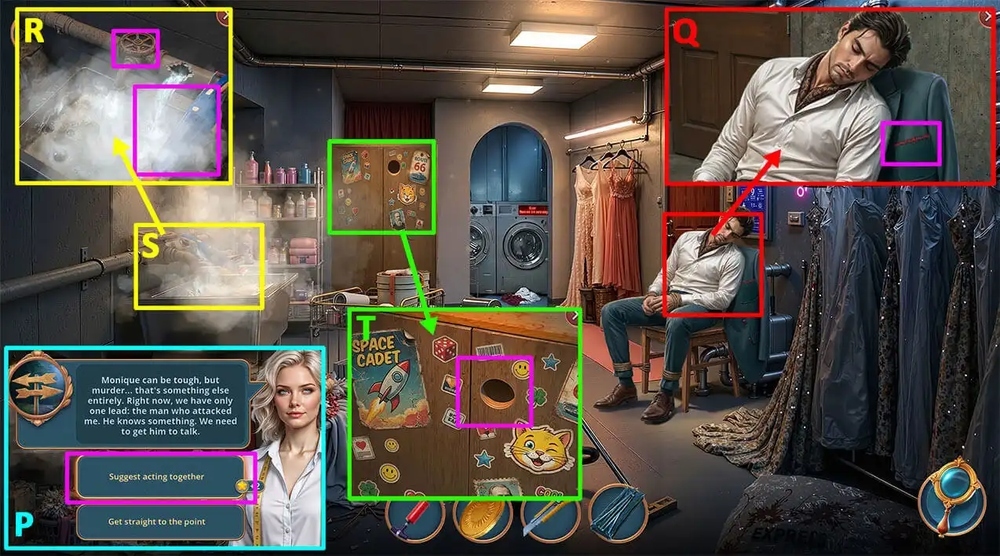
- Select this option (P).
- Use PAPER KNIFE on the seam, take ID BADGE, CAR KEY, MULTITOOL (Q).
- Take VACUUM CLEANER, BELT, use MULTITOOL on the tap (R).
- Play puzzle, earn BALLOON (S).
- Use BALLOON, PUMP on the hole, take EMPTY BUCKET (T).
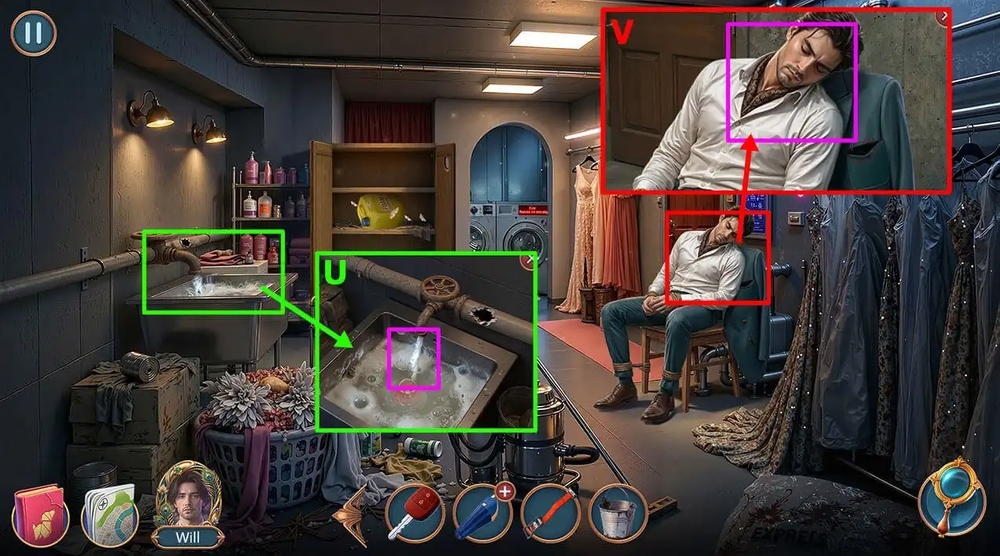
- Use EMPTY BUCKET on the stream of water, take WATER (U).
- Use WATER on Mike (V).
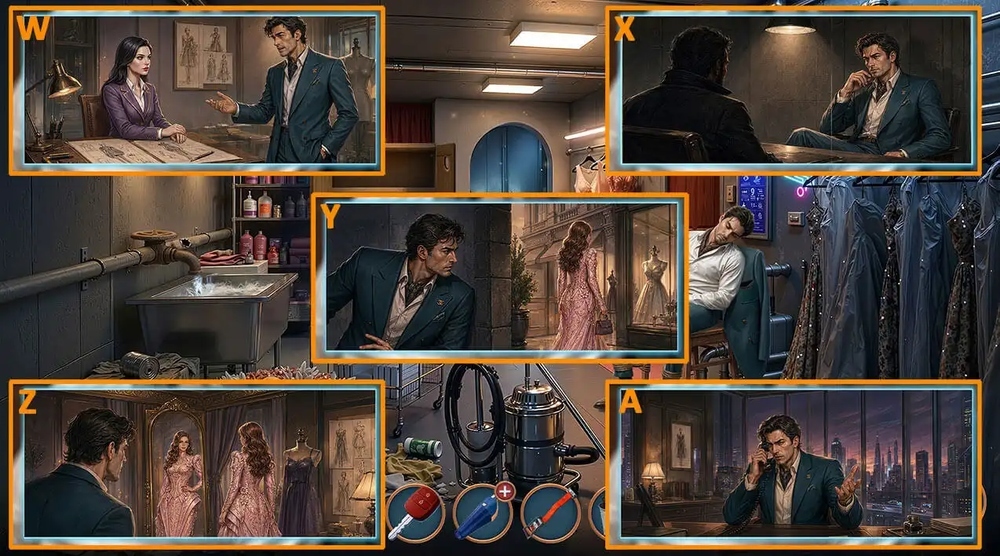
- Easy solution: Follow the instructions in the image (W-X-Z).
- Hard solution: Follow the instructions in the image (W-X-Y-Z-A).
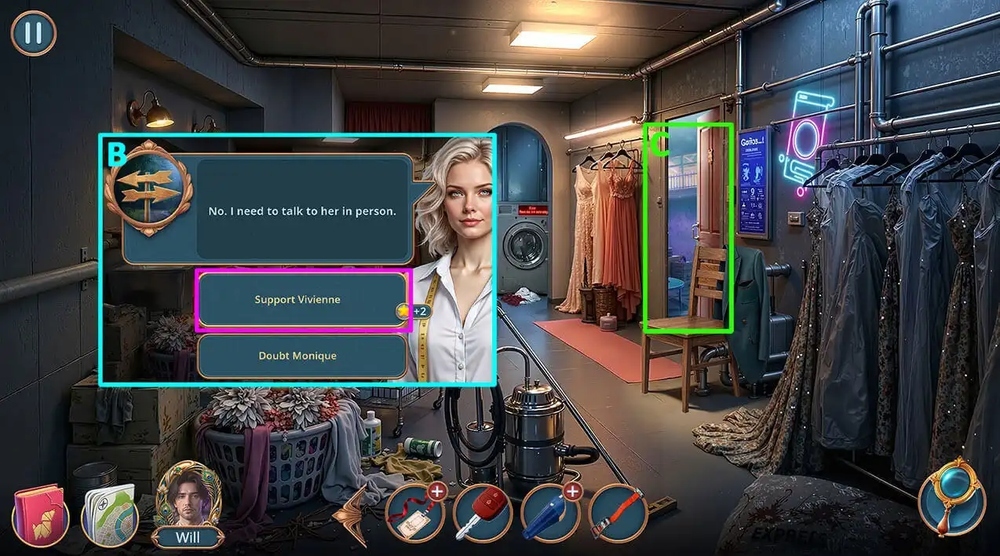
- Select this option (B).
- Go forward (C).
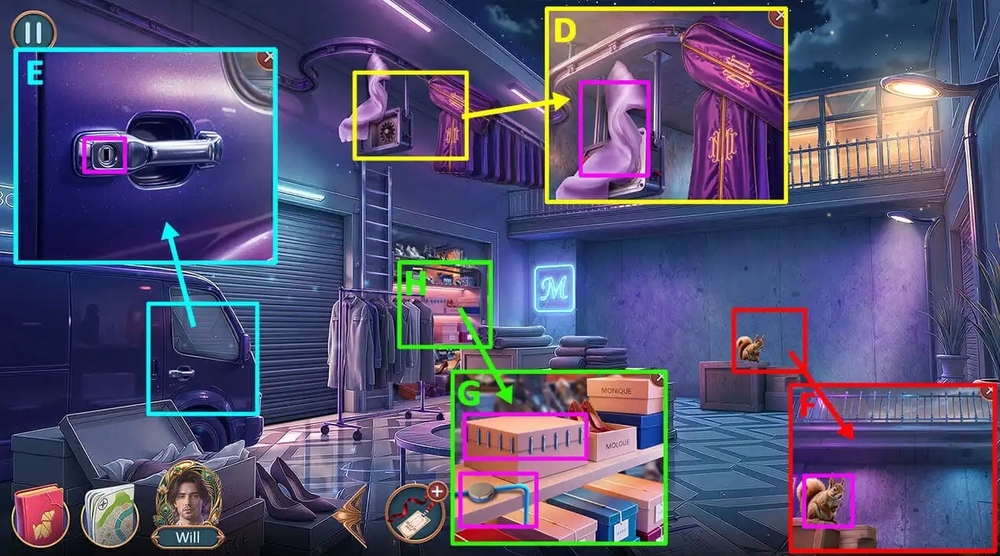
- Take SHEET (D).
- Use CAR KEY on the car door, take PAPER CLIP, PISTACHIOS (E).
- Use PISTACHIOS on the squirrel, take STAPLE REMOVER (F).
- Take MAGNET, PLASTIC STRAW, use STAPLE REMOVER on the box (G).
- Play puzzle, earn TARPAULIN COVER (H).
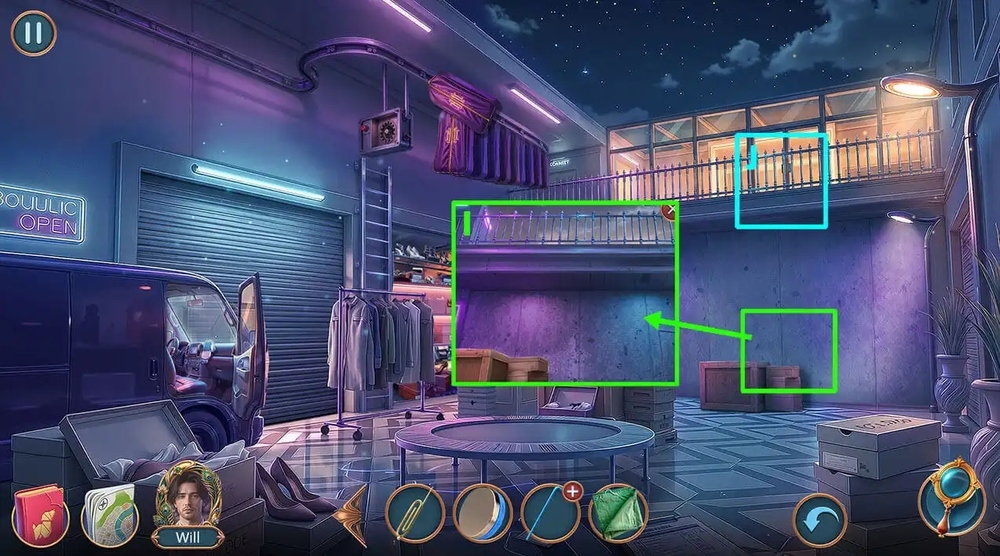
- Use SHEET, TARPAULIN COVER on the balcony (I).
- Go forward (J).
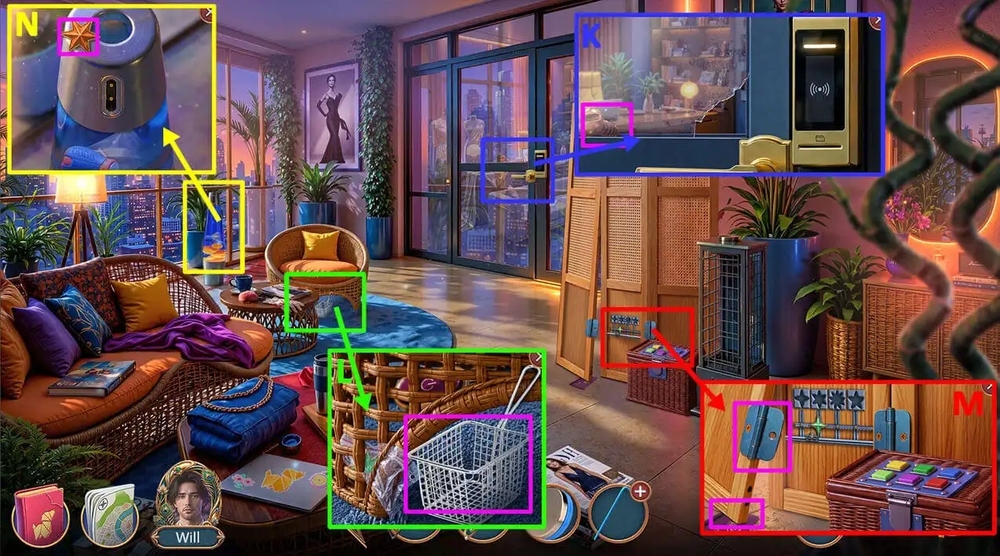
- Use MAGNET on the screw behind the glass, take SCREW (K).
- Take DEEP FRYER BASKET (L).
- Use SCREW, COIN on the loop, take EMERGENCY PICTOGRAM CARD (M).
- Take DECORATIONS 1/3 (N).
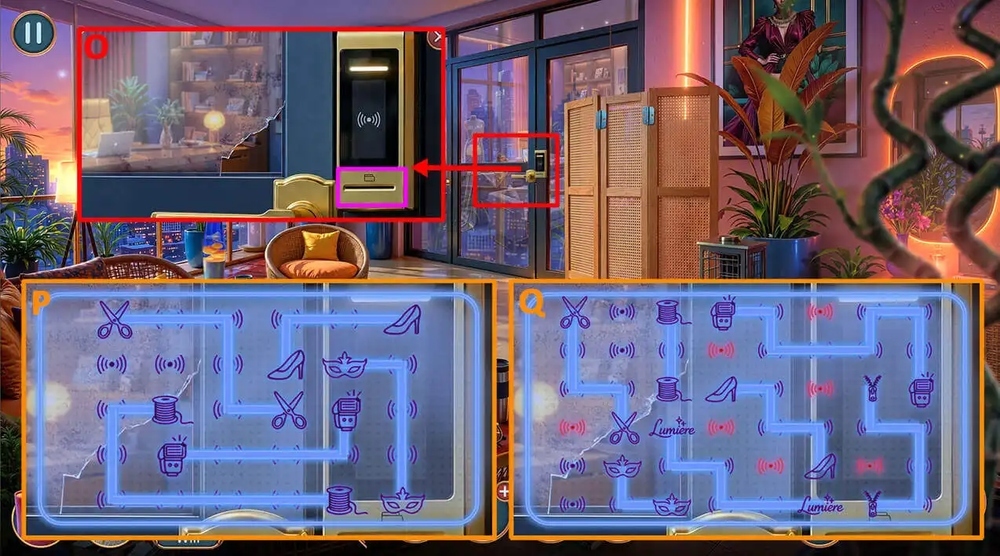
- Use EMERGENCY PICTOGRAM CARD on the electronic lock slot (O).
- Easy solution: Follow the instructions in the image (P).
- Hard solution: Follow the instructions in the image (Q).
- Go forward.
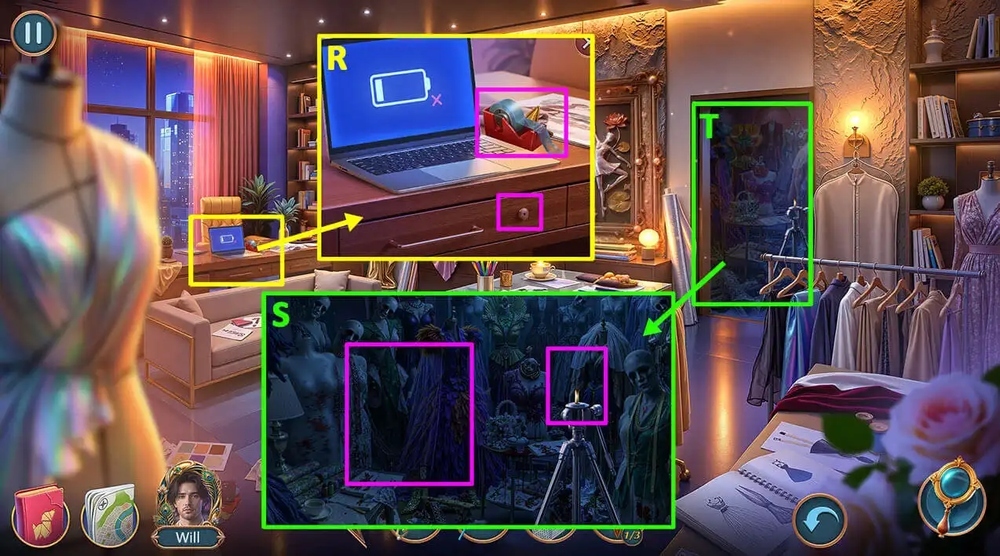
- Take DUCT TAPE, DECORATIONS 2/3, use PAPER CLIP on the hole, take NIGHT VISION CAMERA (R).
- Use NIGHT VISION CAMERA, SOFT BOX on the darkness (S).
- Play puzzle, earn DIAMOND EARRING (T).
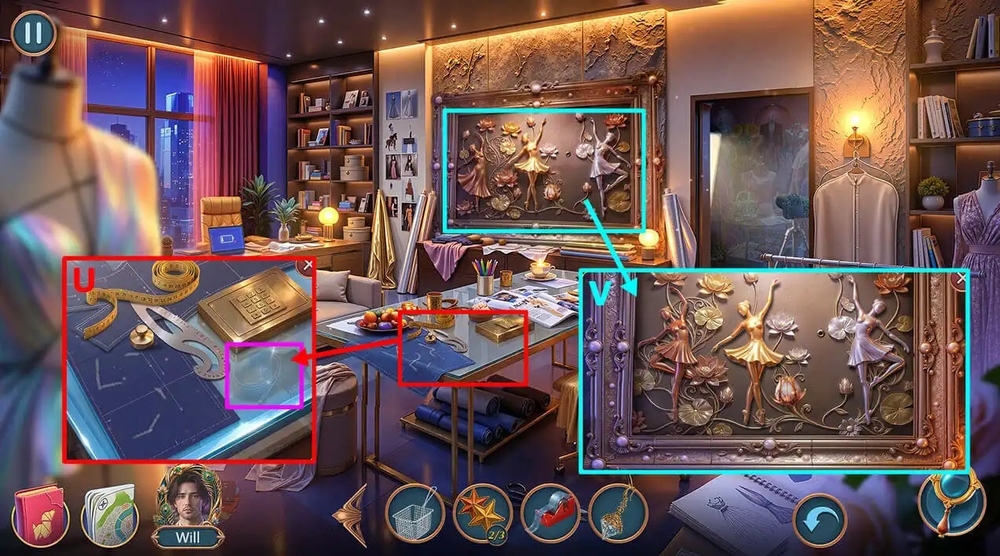
- Use DIAMOND EARRING on the glass, take LAPTOP CHARGING CABLE, UV LAMP (U).
- Use UV LAMP on the panel, take BRACELET (V).
- Go to Backroom.
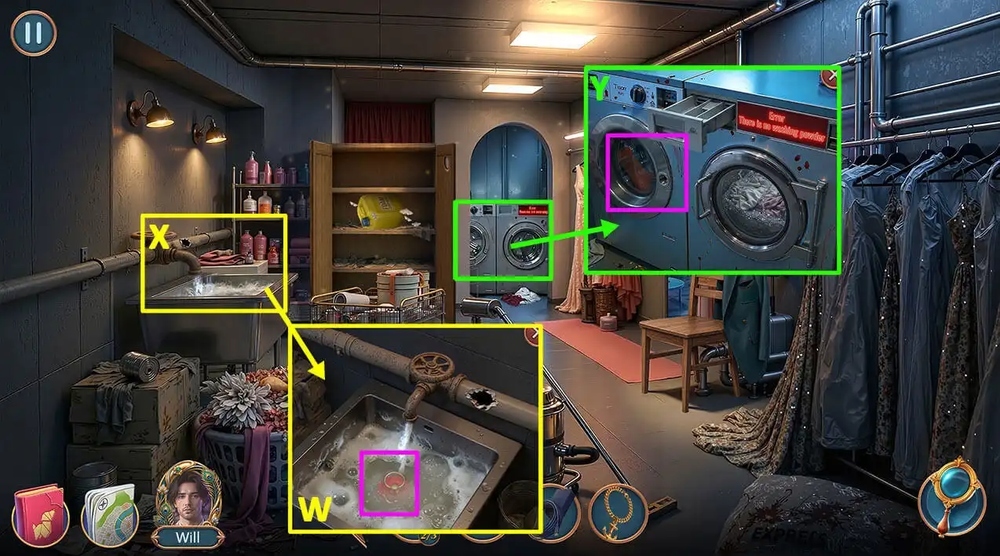
- Use BRACELET on the drain plug (W).
- Play puzzle, earn HANDLE (X).
- Use HANDLE on the left side of the washing machine compartment, take STOCKING (Y).
- Go to Open Terrace.
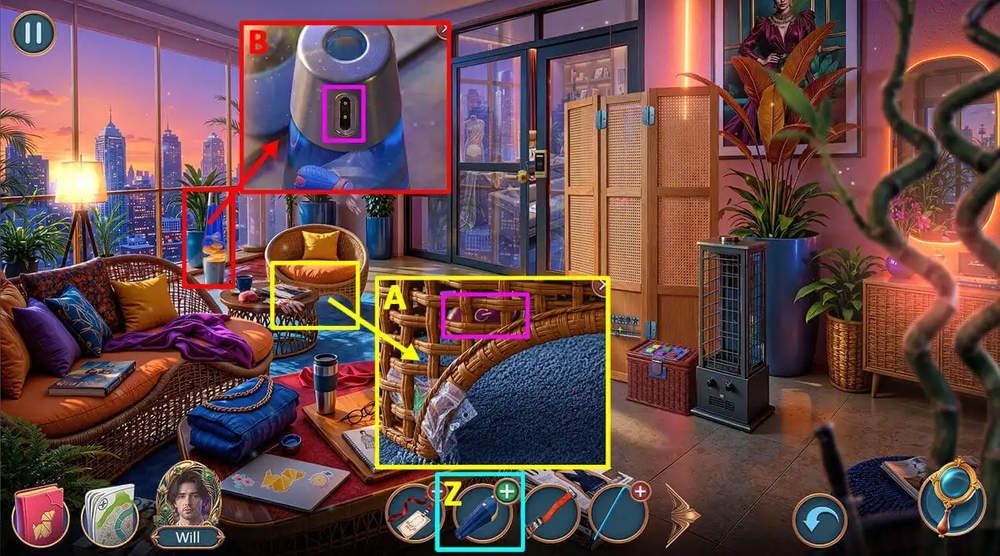
- Use STOCKING on VACUUM CLEANER, earn VACUUM CLEANER (Z).
- Use VACUUM CLEANER on the button, take LAMP BUTTON (A).
- Use LAMP BUTTON on the empty nest, take MONIQUE’S FLASH DRIVE (B).
- Go forward.
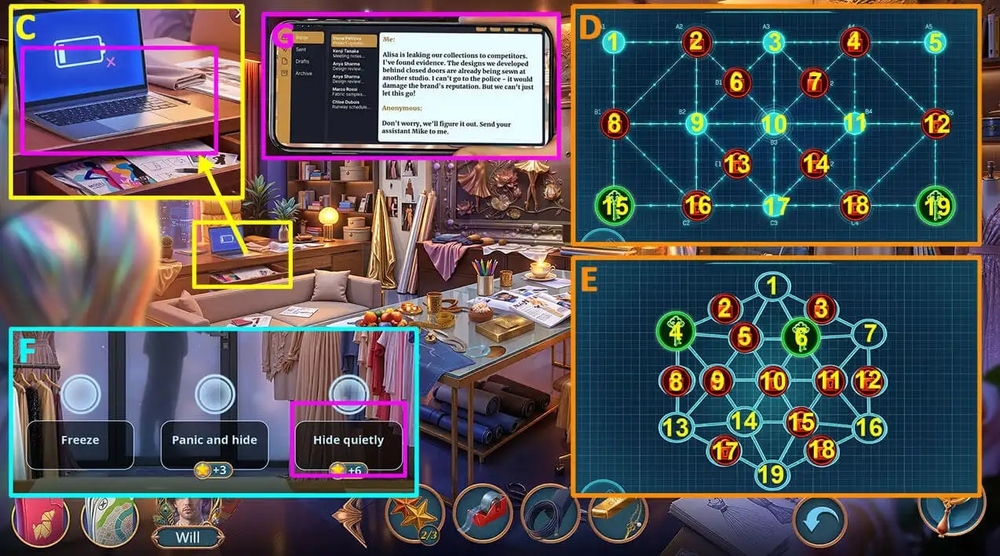
- Use LAPTOP CHARGING CABLE on the laptop, use MONIQUE’S FLASH DRIVE on the laptop’s port (C).
- Easy solution: Click 15-17, 17-9, 9-3, 3-11, 11-17, 19-5, 5-3, 3-1, 1-15, 17-19 (D).
- Hard solution: Click 4-13, 13-19, 19-16, 16-7, 7-1, 1-4, 6-16, 16-14, 4-6, 14-4, 6-14 (E).
- Read the messages on the laptop’s screen.
- Select this option (F).
- Click 2 times on the phone, wait for the message with the map, click on the phone 2 times, earn SHOW’S ADDRESS (G).
- Go to Fashion House Backyard.
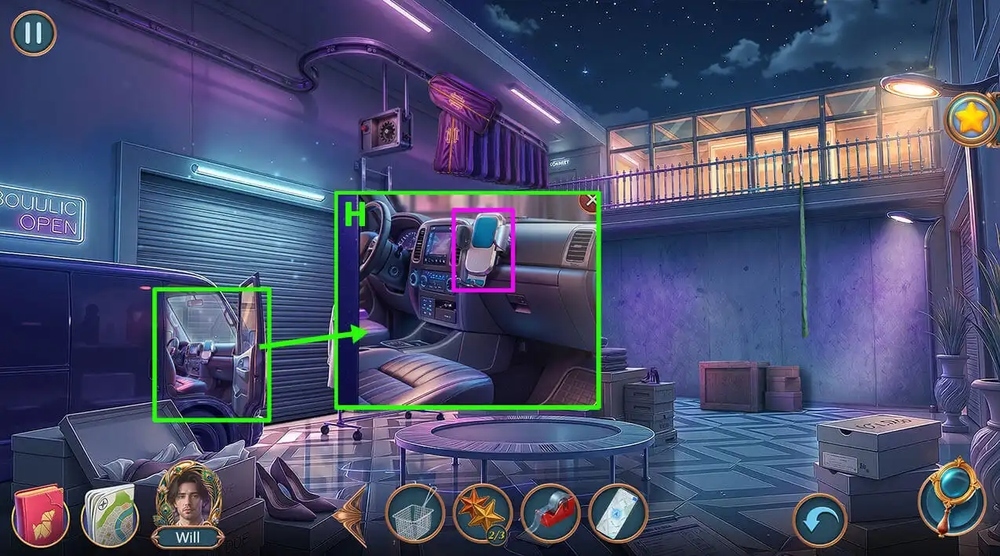
- Use SHOW’S ADDRESS on the phone holder (H).
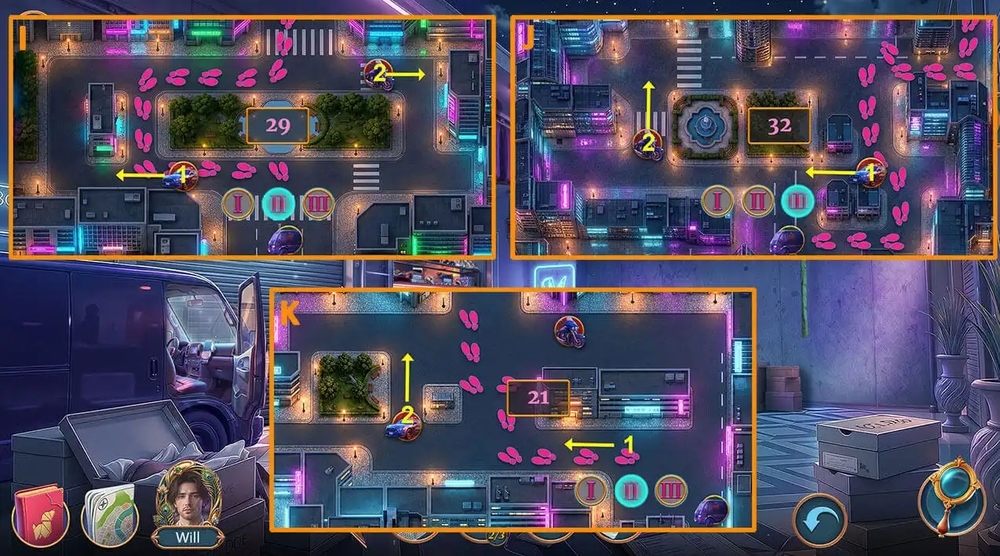
- Easy/Hard solution: Step 1 – Click II, when icons 1 and 2 move in those directions (I), Step 2 – Click III, when icons 1 and 2 move in those directions (J), Step 3 – Click II, when icons 1 and 2 move in those directions (K).
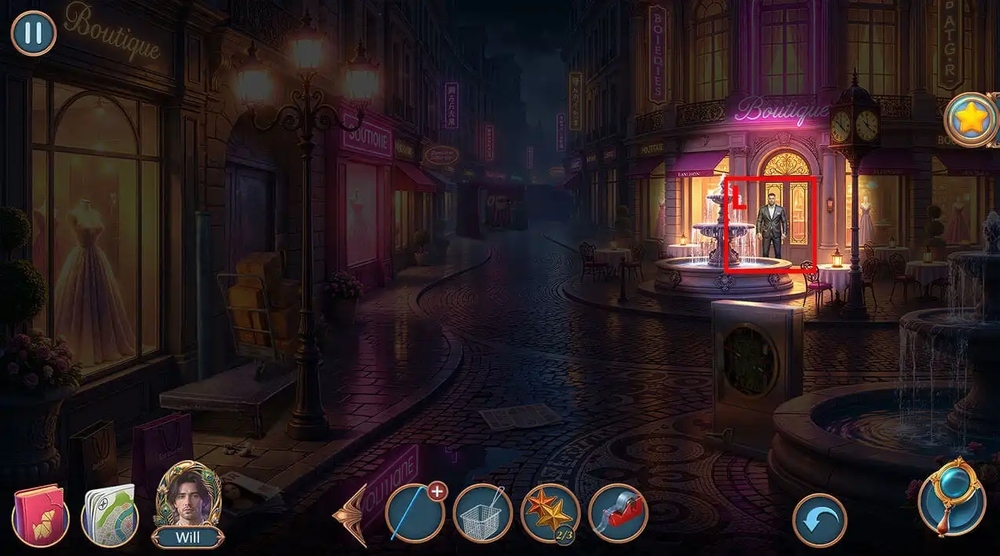
- Click on the security guard (L).
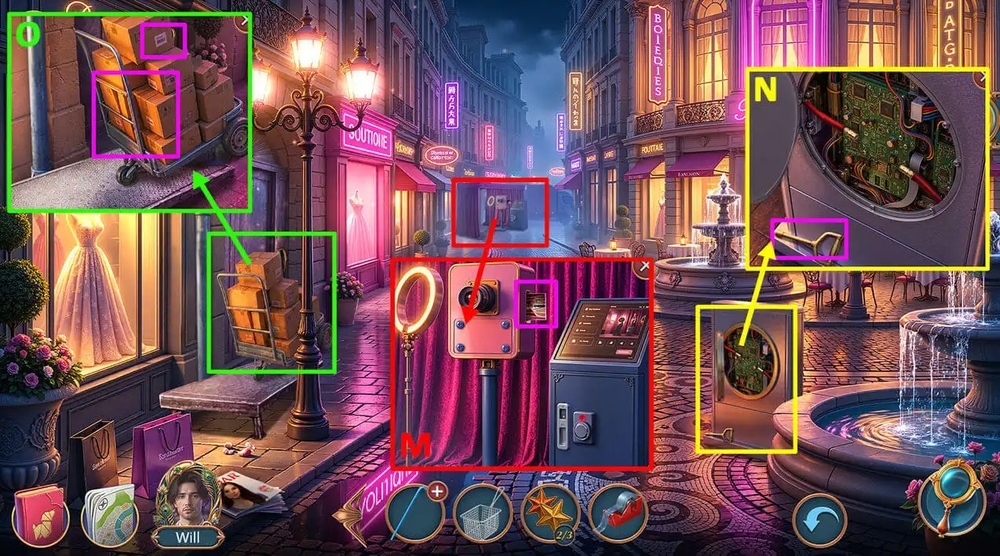
- Take ELEVATOR LEVER (M).
- Take MY PHOTO (N).
- Use BELT on the cart, take BOTTLE OF WATER, WALKIE-TALKIE, use ELEVATOR LEVER on the elevator control panel (O).

- Easy solution: Drag 5-6-7-8-9-10, 14-15-16-17-18-19, 10-11-12-13-14-15, 3-4-5-6-7-8, 19-20-5, 15-16-17, 8-9-10, 5-6-7, 17-18-19, 10-11-12, 7-8-9, 19-20-5, 12-13-21-22-23-24-25-26, 9-10, 15-14 (P).
- Hard solution: Drag 11-10, 13-21-22-23-24, 9-10-11-12-13-14, 5-6-7-8-9-10-11, 14-15-16-17, 11-12-13-14, 3-4-5-20-19, 5-6-7, 17-18-19-20, 14-15-16-17, 7-8-9-10, 20-5-4-3-2-1, 17-18-19-20-5-6-7, 21-13-14-15-6, 10-11-12, 7-8-9, 16-17-18, 12-13-21-22-23-24-25-26, 9-10-11-12-13-14, 18-19-20-5-6-7, 14-15-16-17-18-19, 7-8-9-10, 19-20 (Q).
- Go forward (R).
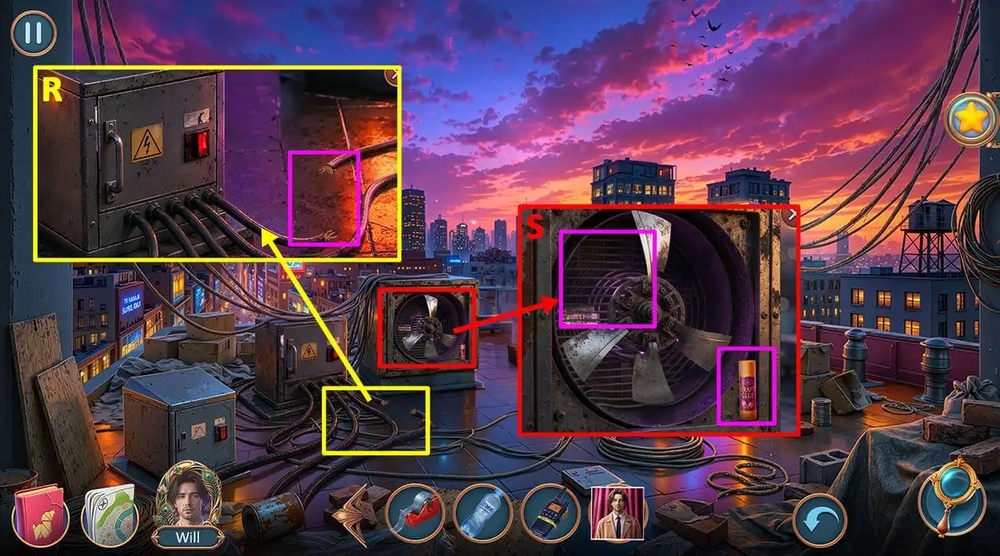
- Use BOTTLE OF WATER on the torn wire, take FAN BLADES (R).
- Take GLUE, use FAN BLADES on the fan, read the note (S).
- Go to Monique’s Office.
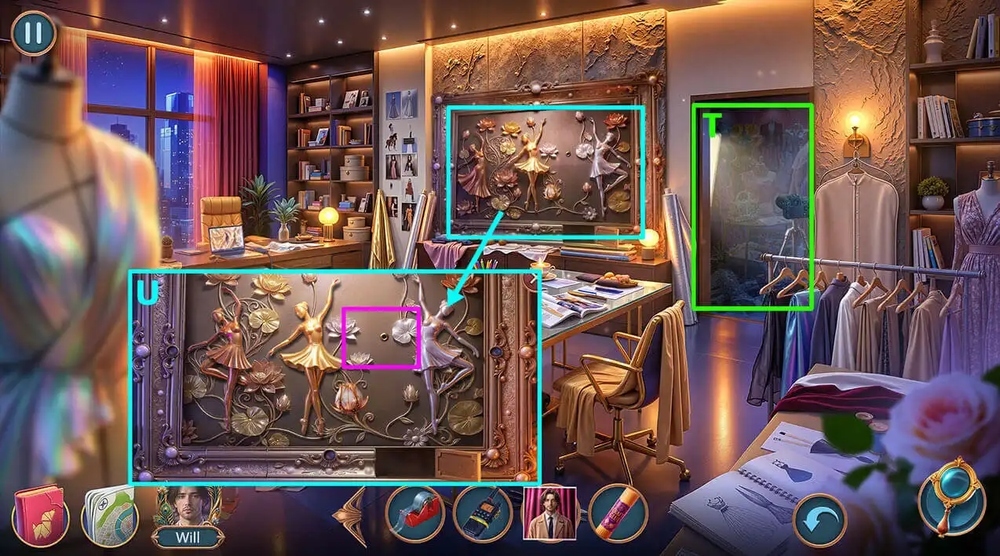
- Play puzzle, earn DANCING FIGURINE (T).
- Use DANCING FIGURINE on the slot, take LUMIERE STAMP (U).
- Go to La Mode Boulevard.
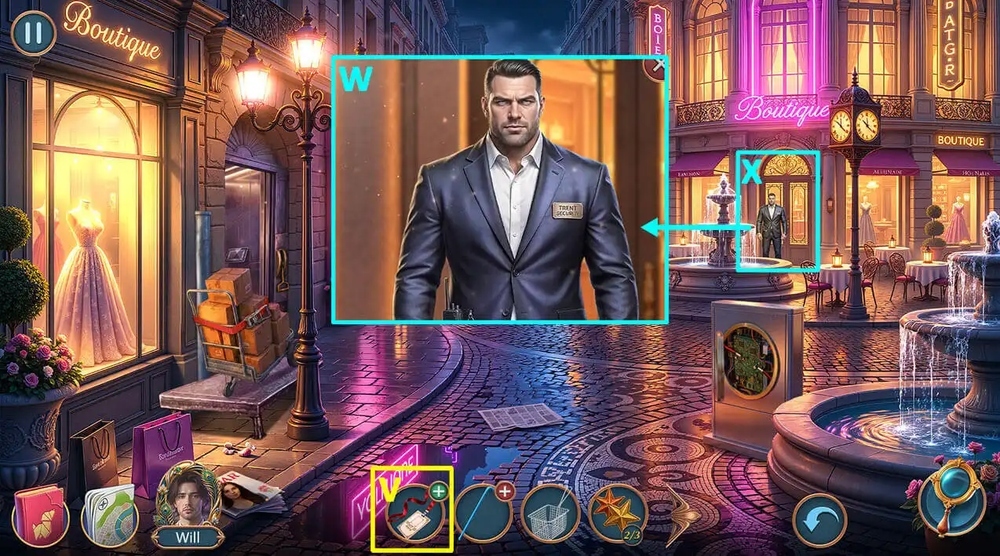
- Use LUMIERE STAMP, MY PHOTO, GLUE on ID BADGE, earn STAFF ID BADGE (V).
- Use STAFF ID BADGE on the security guard (W).
- Go forward (X).
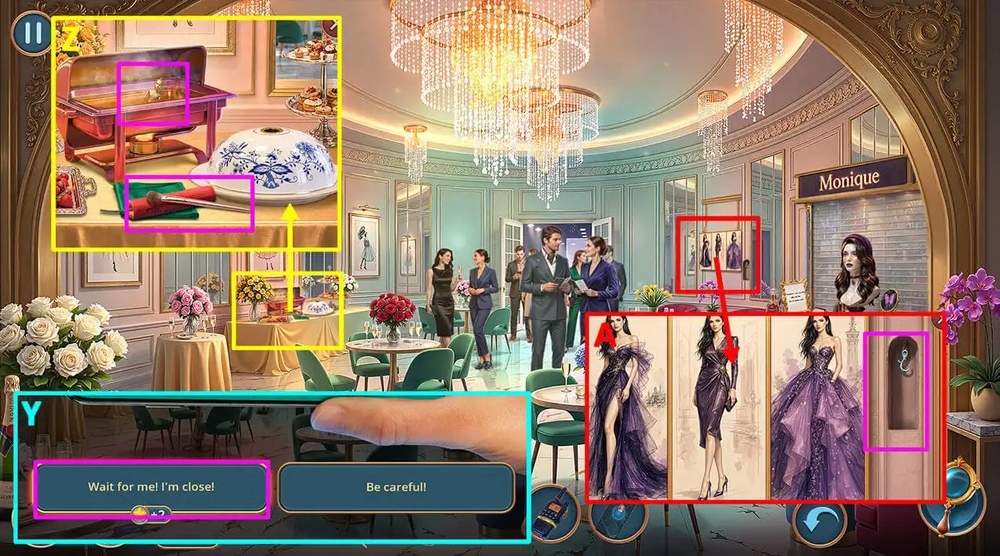
- Select this option, click on the phone’s screen 7 times, earn VIVIENNE’S LOCATION (Y).
- Take MAKE-UP BRUSH, FIRECRACKER, use DEEP FRYER BASKET on the vat of oil, earn GOLDEN PUPPET (Z).
- Use GOLDEN PUPPET on the chain, take MEGAPHONE (A).
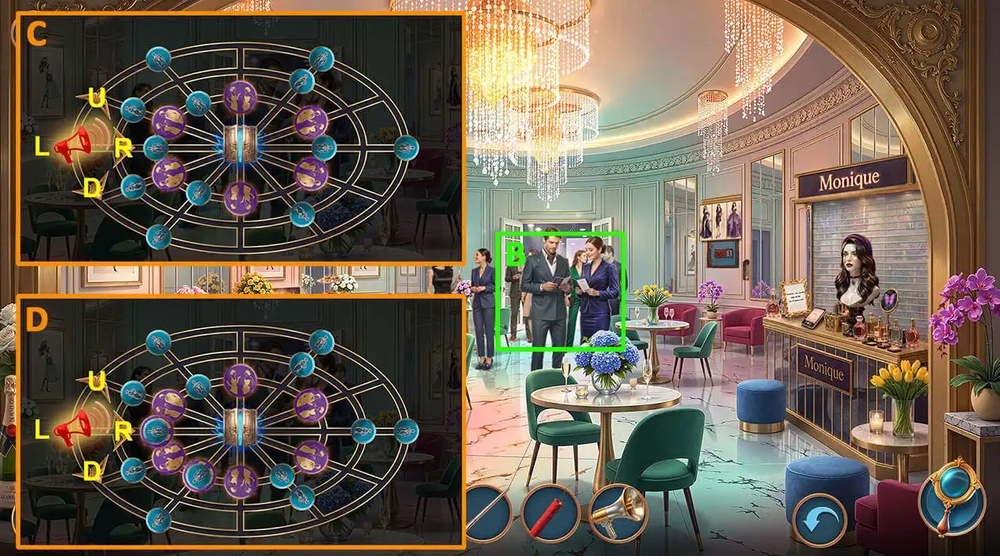
- Use MEGAPHONE on the crowd by the aisle (B).
- Easy solution: Click U, R, D, R (2 times) (C).
- Hard solution: Click U (7 times), R, D (3 times), R (2 times) (D).
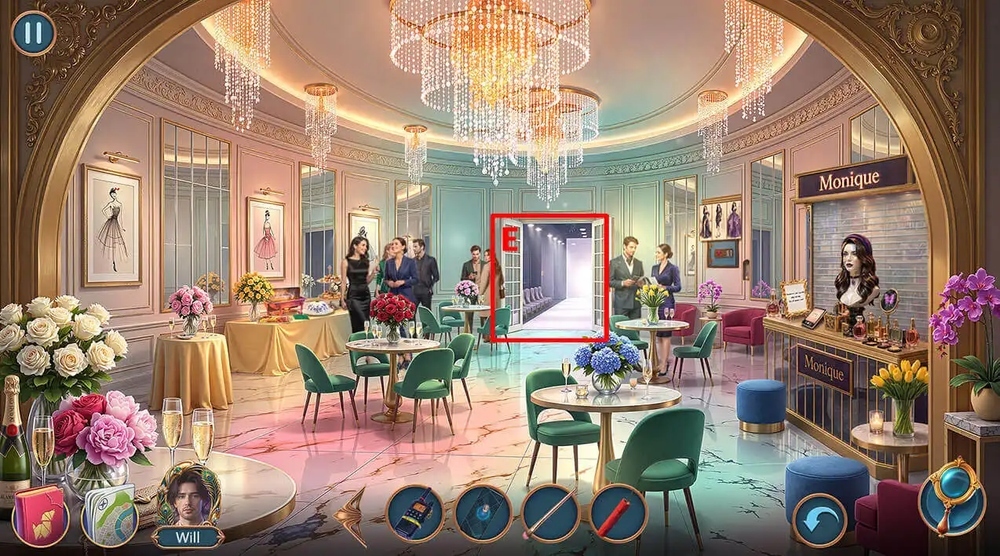
- Go forward (E).
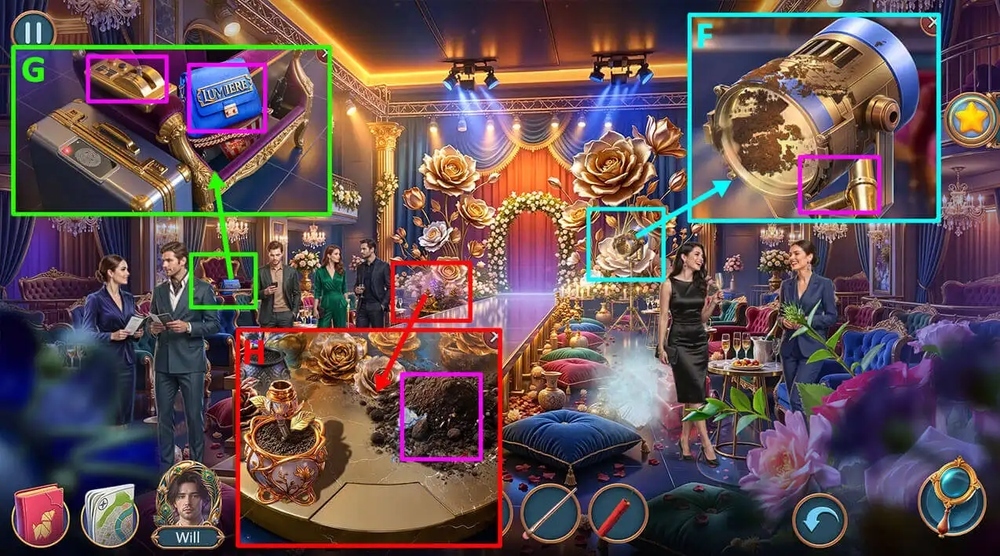
- Take CHAIR LEVER (F).
- Take MONIQUE’S BAG, use CHAIR LEVER on the mechanism, earn POPCORN BUCKET (G).
- Use POPCORN BUCKET on the dirt (H).
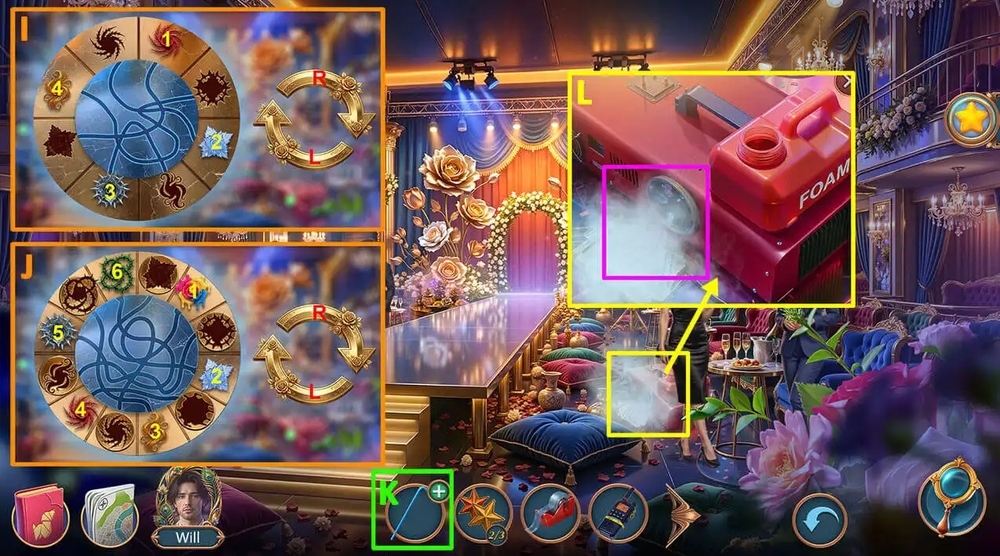
- Easy solution: Click L – 1 – 4 – L (2 times) – 2 – 4 (I).
- Hard solution: Click 5 – R – 3 – L (2 times) – 4 – 6 – L – 1 – L – 2 (J).
- Take SPRING.
- Use SPRING on PLASTIC STRAW, earn HOMEMADE RAMROD (K).
- Use HOMEMADE RAMROD on the special effects machine’s tube, examine the list, take SHADY DELIVERIES INFORMATION (L).
- Go to Fashion House Backyard.
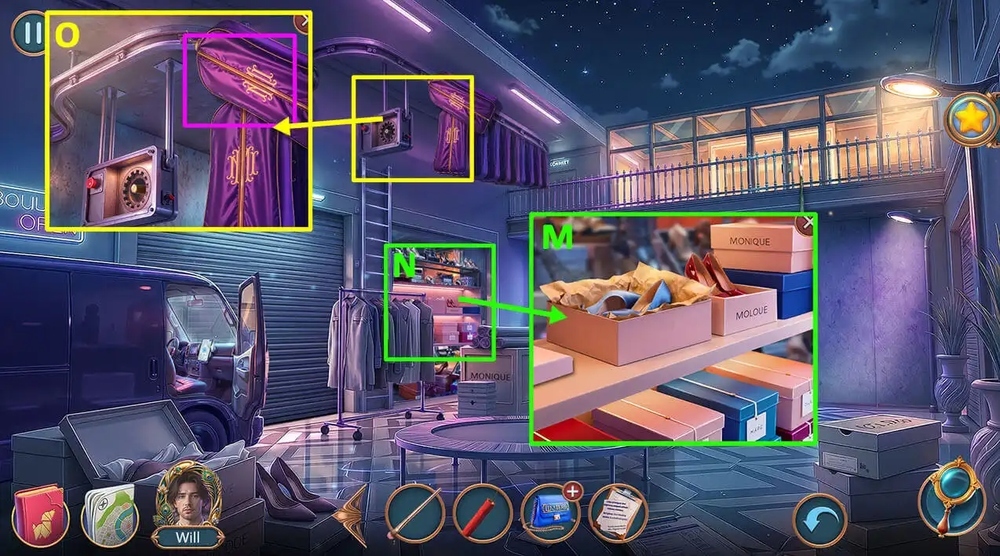
- Use SHADY DELIVERIES INFORMATION on the shoe department (M).
- Play puzzle, earn SHOEHORN (N).
- Use SHOEHORN on the stuck case, take BROKEN UMBRELLA, RELAY (O).
- Go to Rooftop.
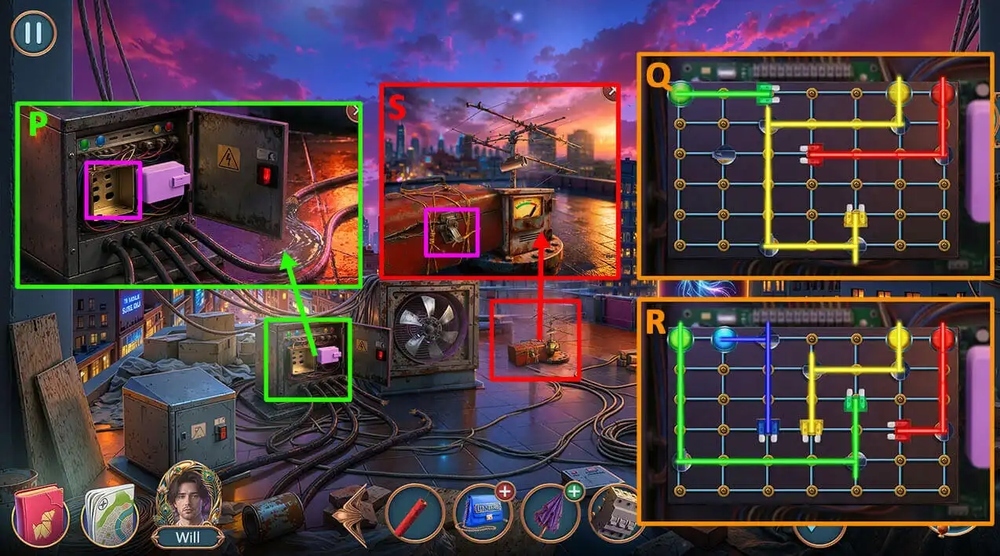
- Use RELAY on the cable box (P).
- Easy solution: Follow the instructions in the image (Q).
- Hard solution: Follow the instructions in the image (R).
- Take CLIPPERS.
- Use CLIPPERS on the wire, take TAILOR’S CHALK (S).
- Go to Monique’s Office.

- Use TAILOR’s CHALK on the pattern (T).
- Easy solution: Click 1 (3 times), 2 (3 times), 3, PLAY, earn B1, B2, B3, B4 (U).
- Hard solution: Click 2 (2 times), 3, 4 (2 times), 5 (3 times), 6, PLAY, earn B1, go to 1, click 2, 3 (2 times), earn B2, B3, B4 (V).
- Take MILLING CUTTER.
- Use MILLING CUTTER on the bud, earn MILLING CUTTER, MECHANICAL LOTUS BUD (W).
- Go to Podium.
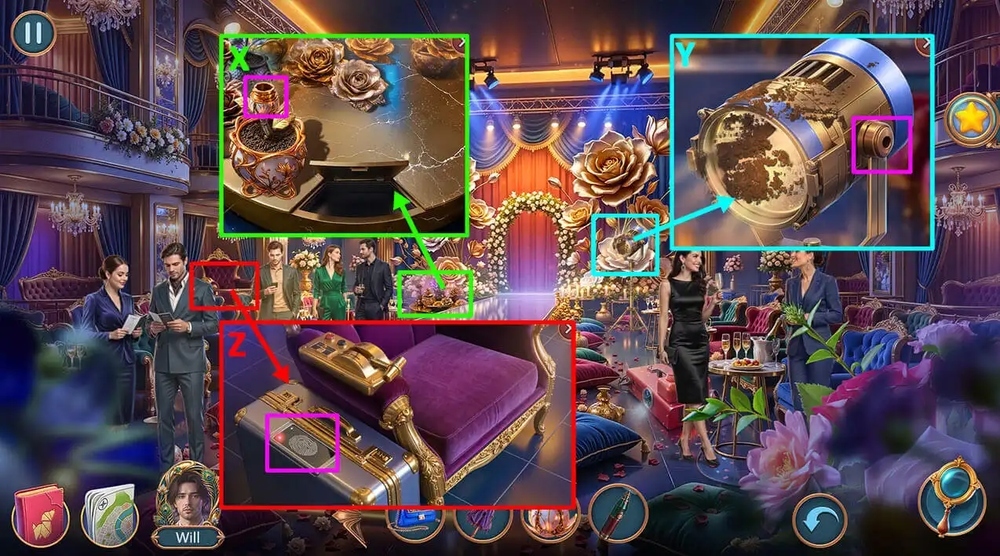
- Use MECHANICAL LOTUS BUD on the empty stem, take STAND SCREW (X).
- Use STAND SCREW on the projector, use DUCT TAPE on the print, earn FINGERPRINT (Y).
- Use FINGERPRINT on the suitcase’s touchscreen panel, take BRAND PROMO CARD (Z).
- Go back.
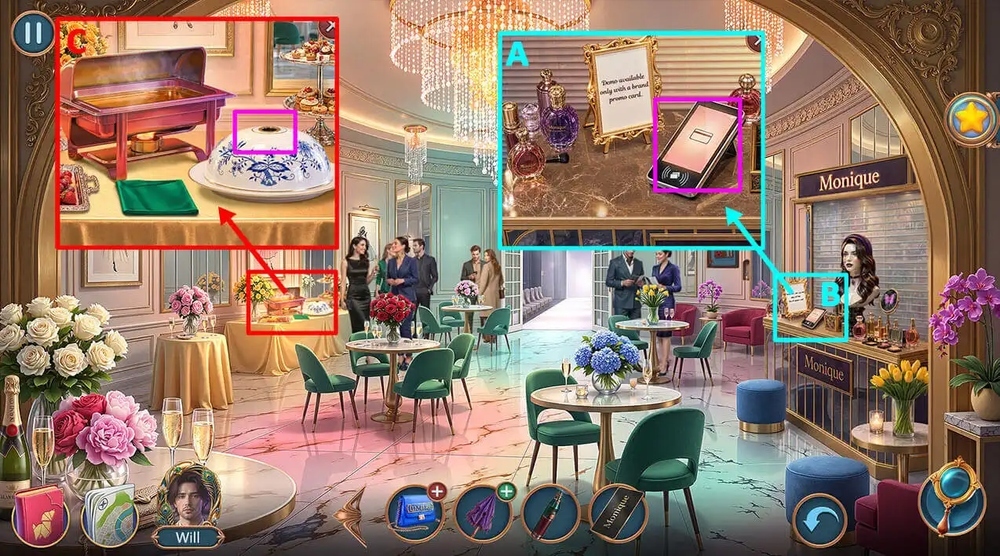
- Use BRAND PROMO CARD on the reader (A).
- Play puzzle, earn SPIRAL SHELL (B).
- Use SPIRAL SHELL on the lid, take FUNNEL, STICK (C).
- Go to Open Terrace.
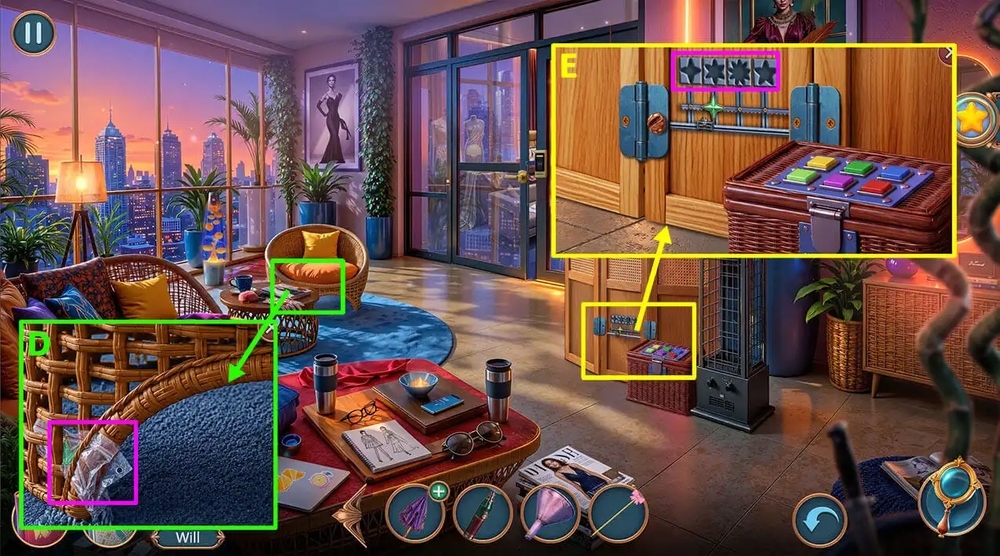
- Use STICK on the bag, earn DECORATIONS 3/3 (D).
- Use DECORATIONS 3/3 on the dividing screen (E).
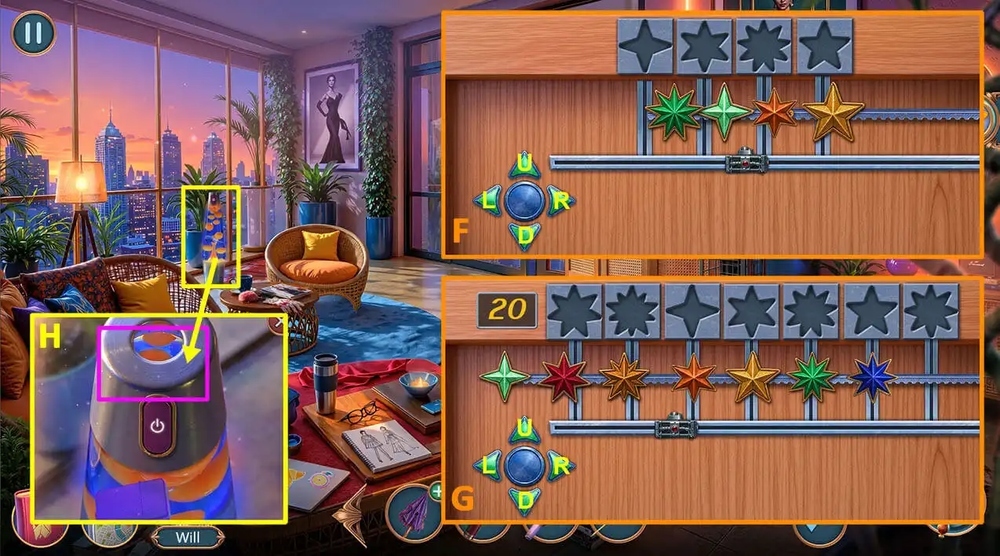
- Easy solution: Click U – L – D – R (9 times) – U – L (6 times) – D – L (6 times) – U – L – D – L (5 times) – U – R (17 times) – D – L (5 times) – U (F).
- Hard solution: Click R (14 times) – U – R – D – L (19 times) – U – D – L (6 times) – U – R (5 times) – D – R (13 times) – U – D – R (18 times) – U – D – L (11 times) – U – R (6 times) – D – L – U – R (7 times) – D L (25 times) – U (G).
- Take MAGNETIC PROBE.
- Use MAGNETIC PROBE on the lava lamp, earn LIGHTER, SCREWDRIVER (H).
- Go to La Mode Boulevard.
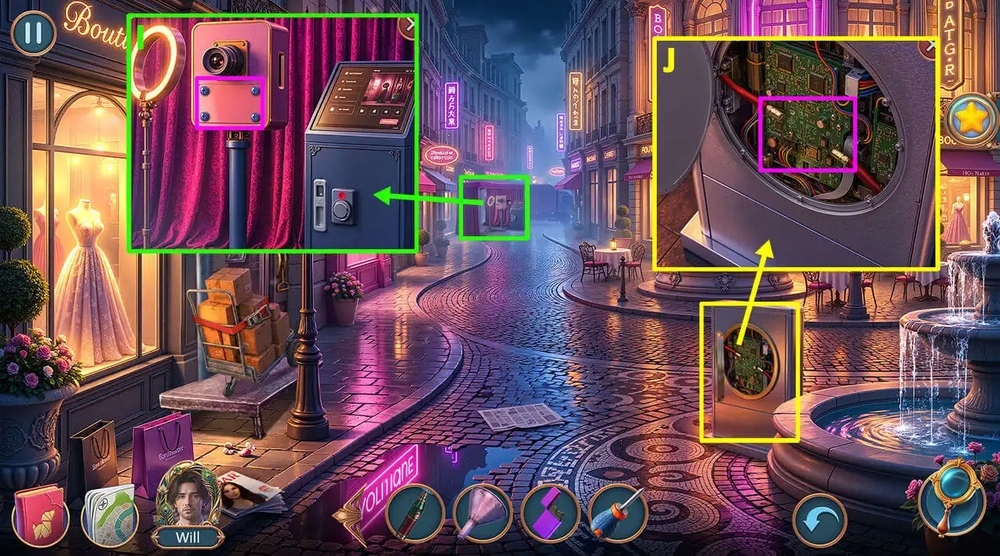
- Use SCREWDRIVER on the bolts, take WIRE (I).
- Use WIRE on the screen (J).
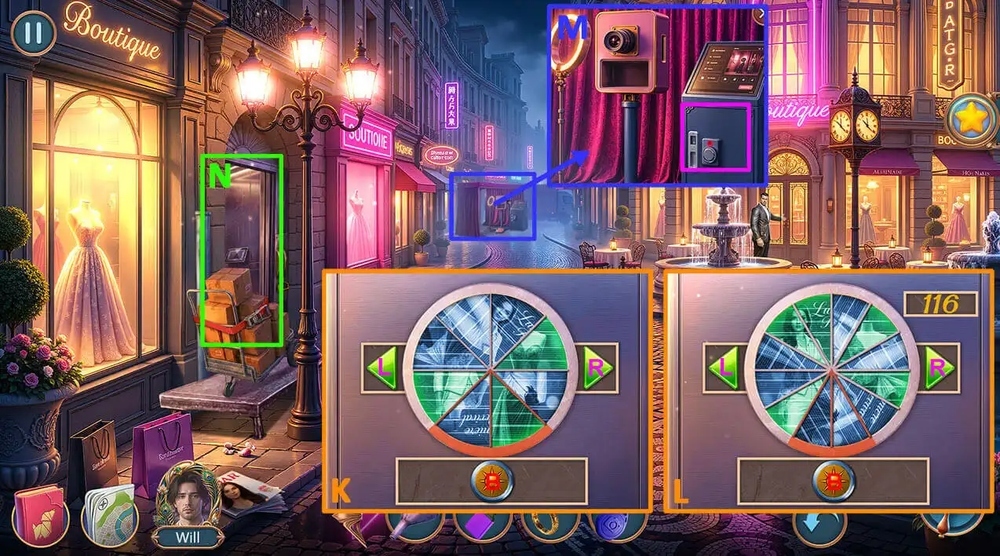
- Easy solution: Click L (5 times), B, L, B, R (4 times), B, L, B, L, B, R, B, R (3 times), B, L, B, L, B, R, B, L, L (K).
- Hard solution: Click B – L – B – L – B – L – B – R (2 times) – B – R (4 times) – B – L – B – L – B – L – B – R (6 times) – B – R – B – R – B – R (2 times) – B – R – B – R (2 times) – B – R (2 times) – B – R – B – L (2 times) – B – L (3 times) (L).
- Take DIAMOND RING, TABLET KEY.
- Use TABLET KEY on the reader, take FOIL (M).
- Go forward (N).
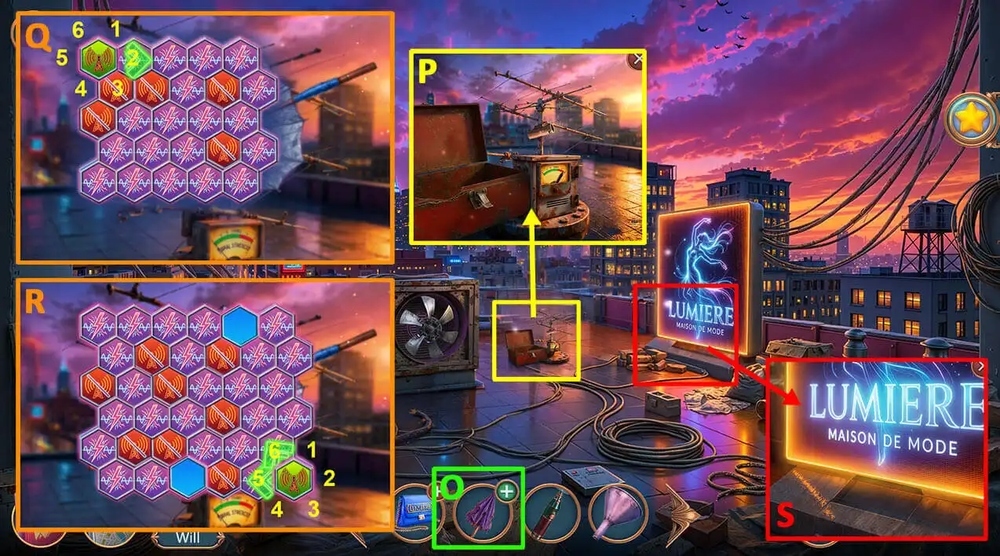
- Use FOIL, DUCT TAPE on BROKEN UMBRELLA, earn FOIL UMBRELLA (O).
- Use WALKIE-TALKIE, UMBRELLA on the antenna (P).
- Easy solution: Click 2, 3, 4, 3, 4, 5, 1, 3, 2, 1, 5, 1 (Q).
- Hard solution: Click 5, 6, 2, 1, 5, 6, 2, 1, 5, 1, 5, 1, 5, 3, 5, 4, 3, 2, 1, 6, 1, 6 (R).
- Take BRIGHTNESS CONTROLS.
- Use BRIGHTNESS CONTROLS on the holographic sign, take HOSE, METAL PLATE (S).
- Go to Fashion House Backyard.
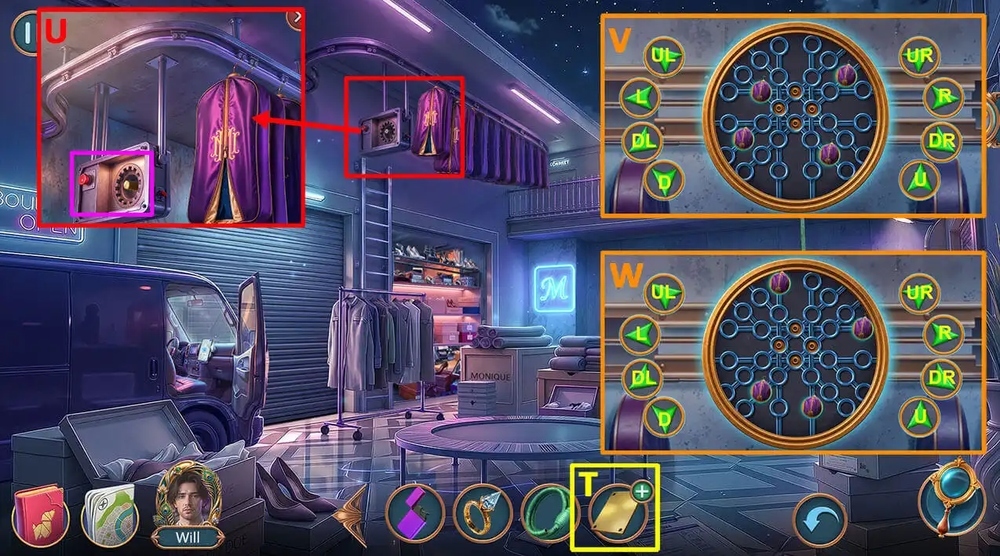
- Use MILLING CUTTER on METAL PLATE, earn GEAR (T).
- Use GEAR on the mechanism (U).
- Easy solution: Click UR (5 times), DR, UR (2 times), LR (2 times), DL (4 times), UR (2 times) (V).
- Hard solution: Click UR (4 times), L, UR (2 times), U (3 times), D, UR, D, UR (2 times), DL (2 times) (W).
- Take CHIP, KEY CHAIN.
- Go to Gallery Show.
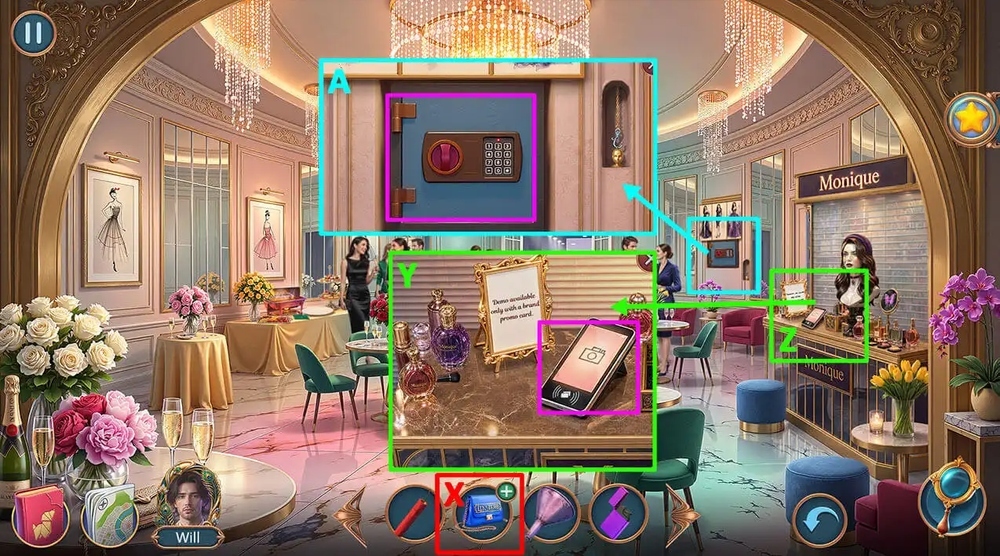
- Use KEY CHAIN on MONIQUE’S BAG, examine the photo, take REFERENCE PHOTO (X).
- Use REFERENCE PHOTO on the stand (Y).
- Play puzzle, earn EYESHADOW (Z).
- Use EYESHADOW, MAKE-UP BRUSH on the safe, read the note, take OXYGEN POWDER (A).
- Go to Backroom.
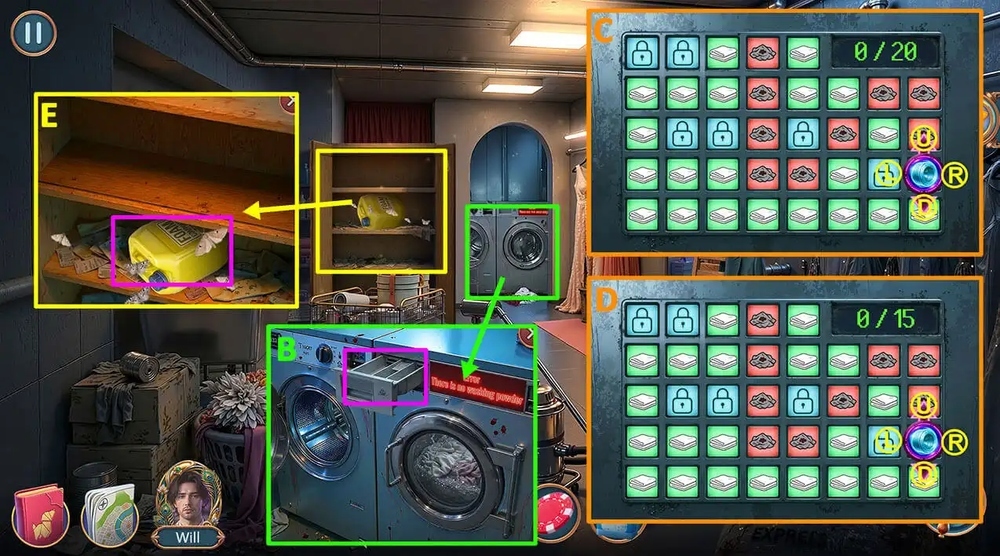
- Use OXYGEN POWDER on the right side of the washing machine compartment (B).
- Easy solution: Click U (2 times) – L (2 times) – D – U – L – U – L – R – D – L – D (2 times) – R (C).
- Hard solution: Click U (2 times) – L (2 times) – D – U – L – U – L – R – D – L – D (2 times) – R (D).
- Take CLEAN COLLAR, LAVANDER SACHET.
- Use LAVANDER SACHET on the moth, take EMPTY CANISTER (E).
- Go to Podium.

- Use EMPTY CANISTER, FUNNEL, HOSE on the special effects machine, take FOAM COMPOUND (F).
- Use FOAM COMPOUND, CLEAN COLLAR on the dirt on the spotlight (G).
- Use VIVIENNE’S LOCATION on the passage to the backstage area (H).
- Easy/Hard solution: Make your way to the door after collecting the key cards. Use the map on the image as a guide (I).
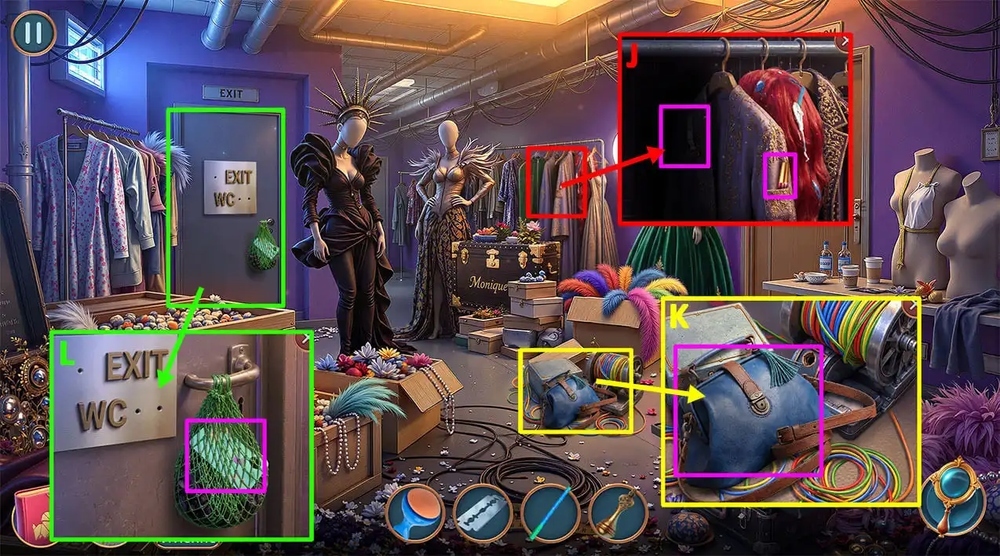
- Take MASCARA, use GLOW STICK on the dark space, take THIN SPATULA (J).
- Take MY BAG (K).
- Use RAZOR BLADE on the shopping bag, earn FOUNDATION PALETTE (L).
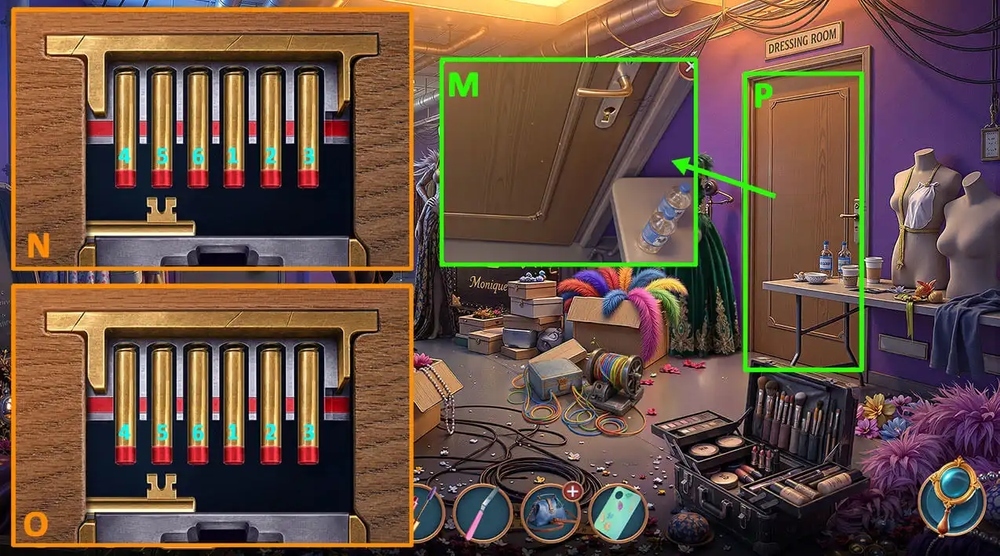
- Use FOUNDATION PALETTE, THIN SPATULA on the door (M).
- Easy solution: Click 1-2-3-4-5-6 (N).
- Hard solution: Click 1-2-3-4-5-6 (O).
- Go forward (P).

- Select this option (Q).
- Take SILICONE GUN, ARROW SIGNS 1/2, use SPONGE on the pin, take FACE SERUM (R).
- Use FACE SERUM on the joints, take GLOVES (S).
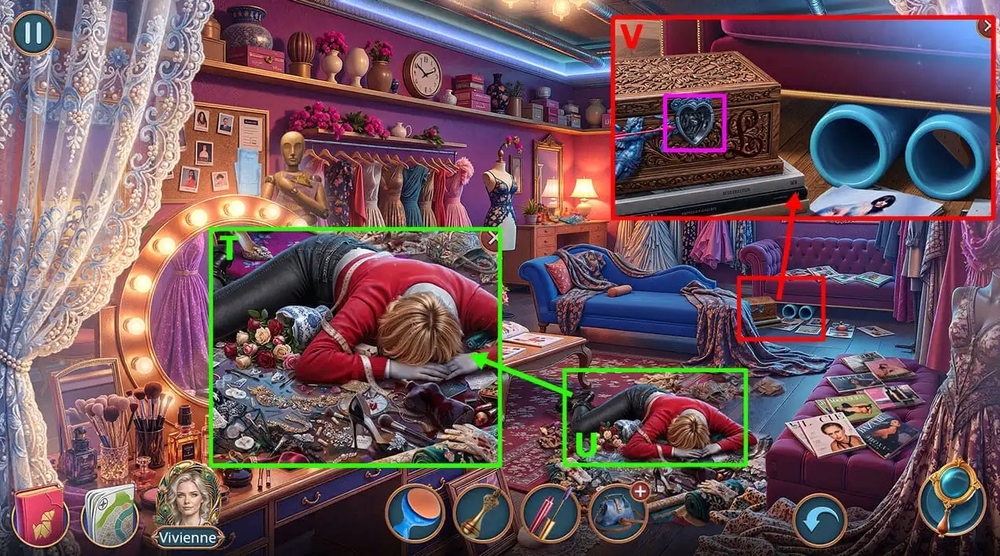
- Use GLOVES on the body (T).
- Play puzzle, earn LINDA’S PENDANT (U).
- Use LINDA’S PENDANT on the box, take ARROW SIGNS 2/2 (V).
- Go back.
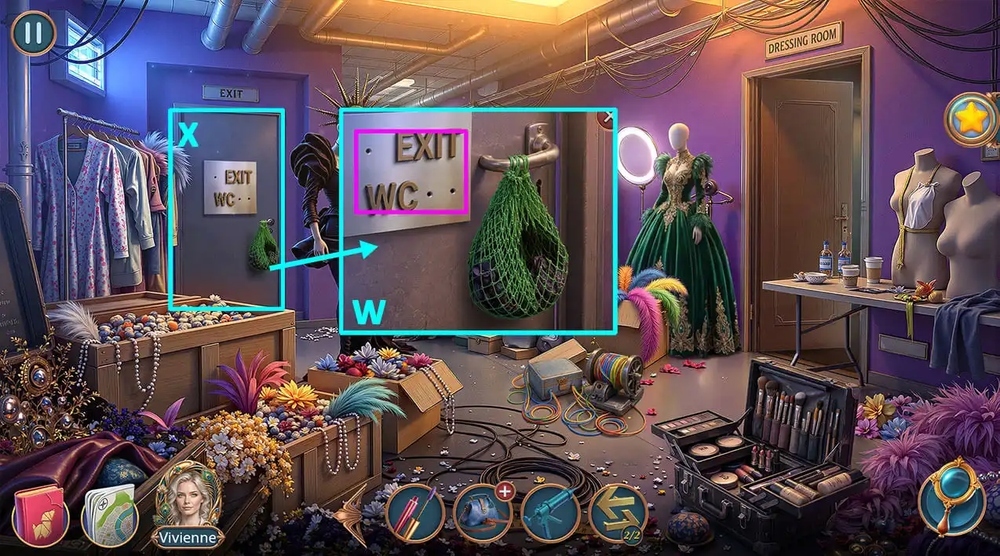
- Use ARROW SIGNS 2/2 on the places for arrows (W).
- Go forward (X).
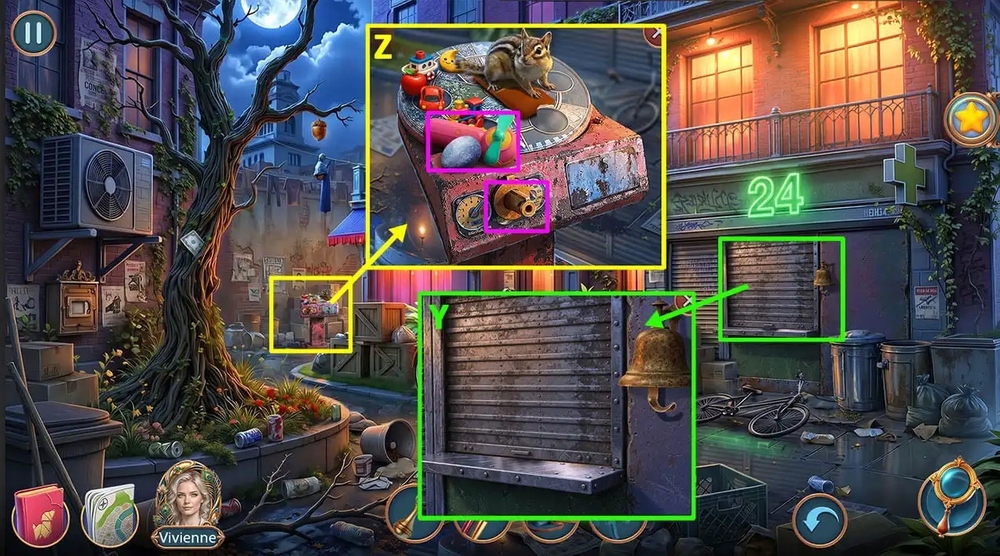
- Use BELL TONGUE on the bell, take CAROUSEL WHEEL (Y).
- Take REGULAR STONE, HAND FAN, use CAROUSEL WHEEL on the machine (Z).
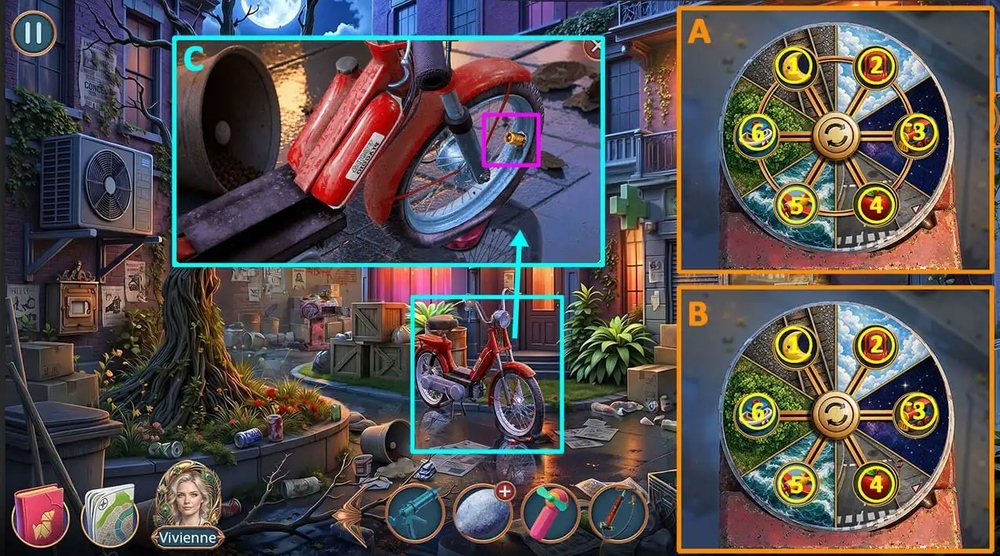
- Easy solution: Swap 2-3, 4-5, 1-2, 5-6, 3-4, 2-3 (A).
- Hard solution: Swap 1-4, 1-4, 6-3, 6-3, 6-3, 1-4, 2-5, 2-5 (B).
- Take PUMP.
- Use PUMP on the wheel, take MAGNET (C).
- Go to Dressing Room.
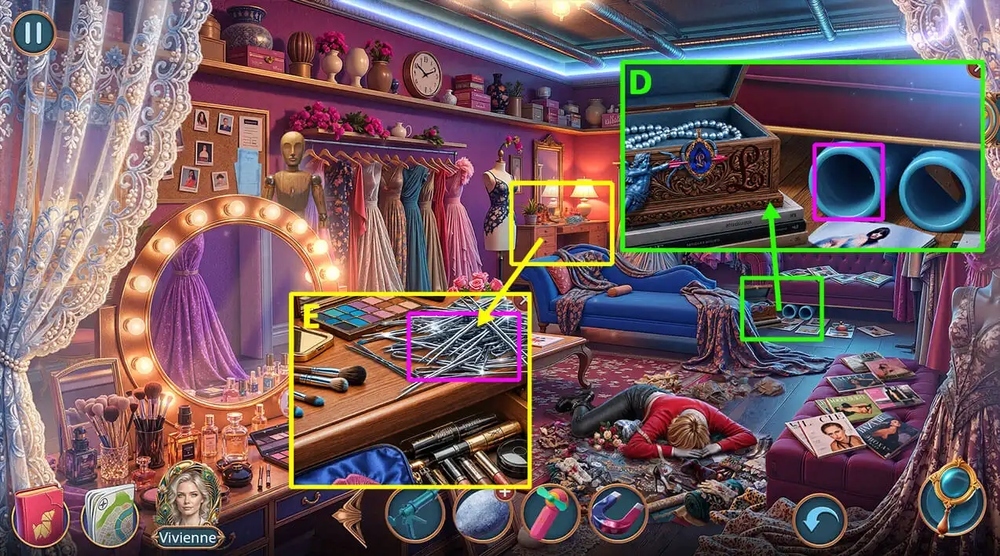
- Use MAGNET on the sharp pins, take WIND-UP MOUSE (D).
- Use WIND-UP MOUSE on the pipe under the sofa (E).
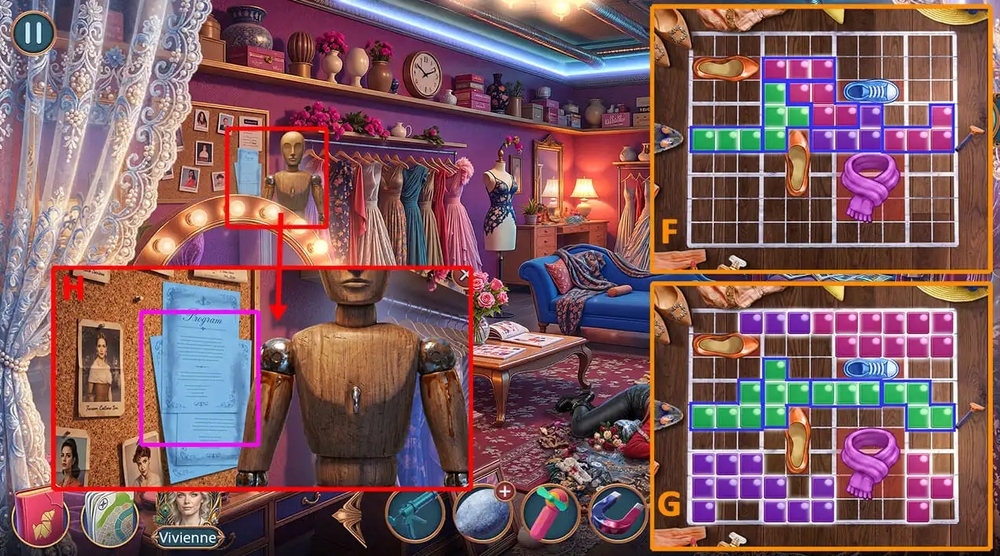
- Easy solution: Follow the instructions in the image (F).
- Hard solution: Follow the instructions in the image (G).
- Take SCRAPER.
- Use SCRAPER on the program sheets, take EYELASH CURLER (H).
- Go to Courtyard.
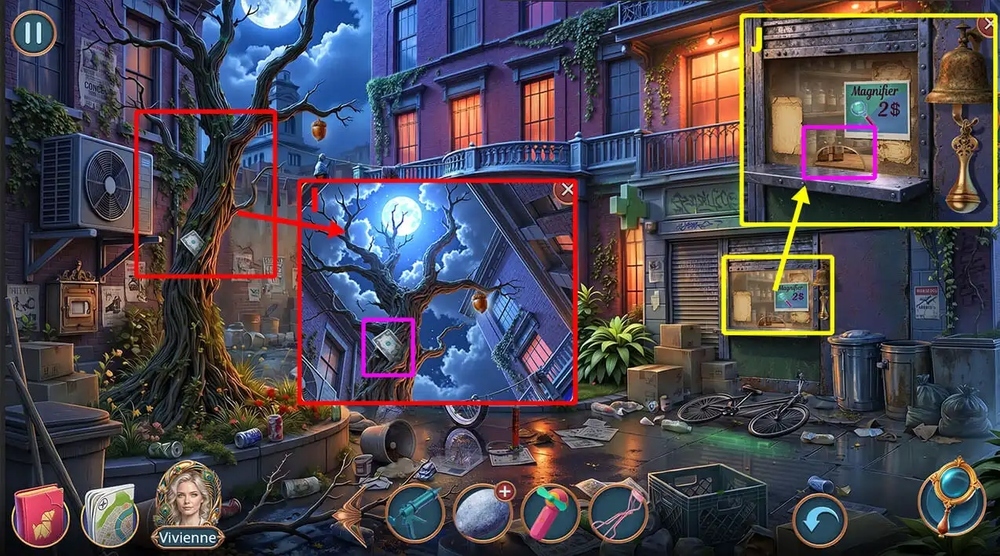
- Use EYELASH CURLER on the banknote, earn BANKNOTE (I).
- Use BANKNOTE on the pharmacy window, take MAGNIFYING GLASS (J).
- Go to Dressing Room.

- Use MAGNIFYING GLASS on the body (K).
- Play puzzle, examine the personalized cufflink and take it, earn MOPED KEY (L).
- Select this option (M).
- Go to Courtyard.
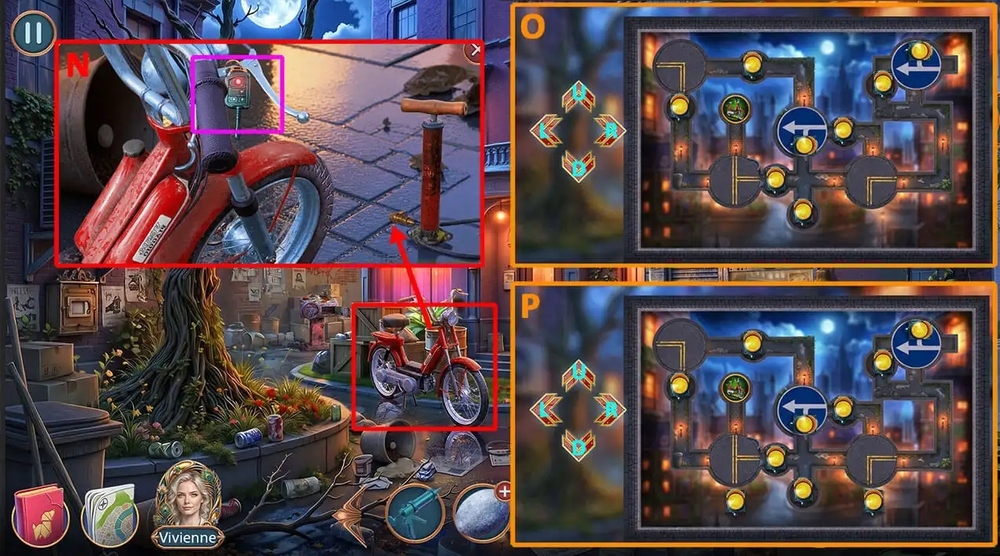
- Use MOPED KEY on the moped (N).
- Easy solution: Click D, R, R, D, U, U, U, L, R, D, R, R, L, R, D, R, U, L, U, L, D, R, R, D, U, D, L, L, L, L, L, U (O).
- Hard solution: Click D, R, R, D, U, U, U, L, R, D, D, U, L, R, R, U, L, U, L, D, R, R, D, U, D, L, R, L, L, L, L, D, U, L, U (P).

- Take MAILBOX FLAG (Q).
- Use MAILBOX FLAG on the metal pin, take SEALED DVD BOX, GLITTER (R).
- Use GLITTER on REGULAR STONE, earn SHINY STONE (S).
- Take PHOENIX FEATHERS 1/3, use SHINY STONE on the magpie, take PIN (T).
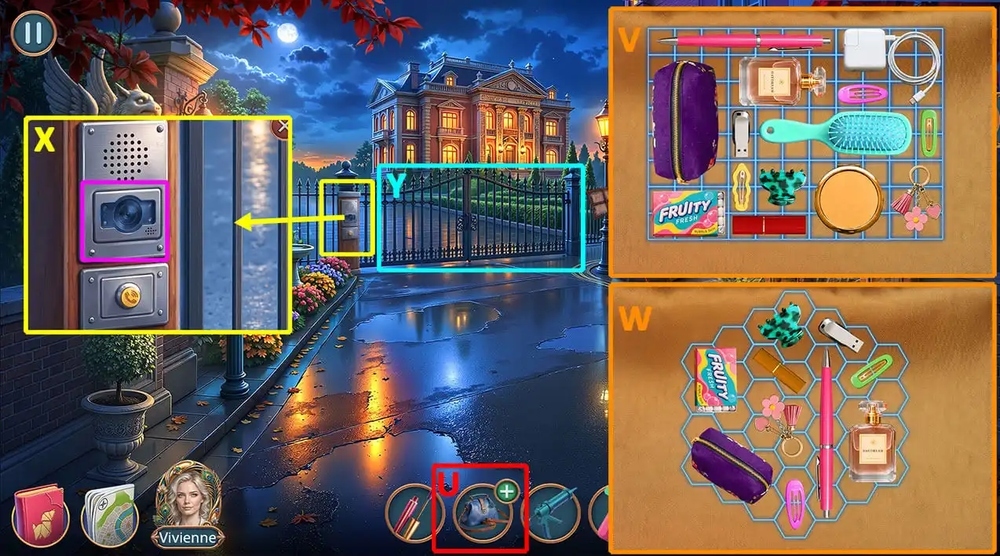
- Use PIN on MY BAG (U).
- Easy solution: Follow the instructions in the image (V).
- Hard solution: Follow the instructions in the image (W).
- Take INVITATION FROM MONIQUE.
- Use INVITATION FROM MONIQUE on the intercom camera (X).
- Go forward (Y).

- Use HAND FAN on the cloud of pollen (Z).
- Play puzzle, earn MOON MORNING GLORY (A).
- Take SCREW, COFFEE HOLDER, use MOON MORNING GLORY on the empty stand, take SPARE HOUSE KEY (B).
- Use SPARE HOUSE KEY on the door’s lock (C).
- Go forward (D).
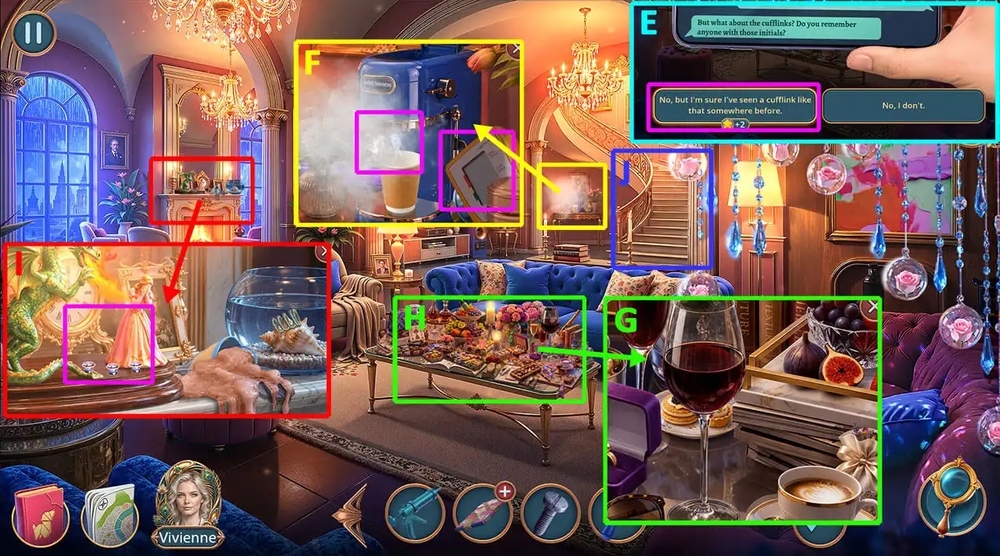
- Click on the phone twice, select this option, click on the phone (E).
- Take BLOOD PRESSURE MONITOR, TELESCOPE MAGNIFYING LENSES 1/2, use COFFEE HOLDER on the coffee machine, take UV LAMP (F).
- Use UV LAMP on the table (G).
- Play puzzle, earn KNIGHT FIGURINE (H).
- Use KNIGHT FIGURINE on the stand, take STICKY CLOTHING ROLLER (I).
- Go forward (J).

- Take MATTIFYING WIPES, MICROCURRENT MASSAGER, use STICKY CLOTHING ROLLER on the shards, take ELECTRONIC KEY (K).
- Use ELECTRONIC KEY on the reader (L).
- Easy solution: Follow the instructions in the image (M).
- Hard solution: Follow the instructions in the image (N).
- Go forward (O).
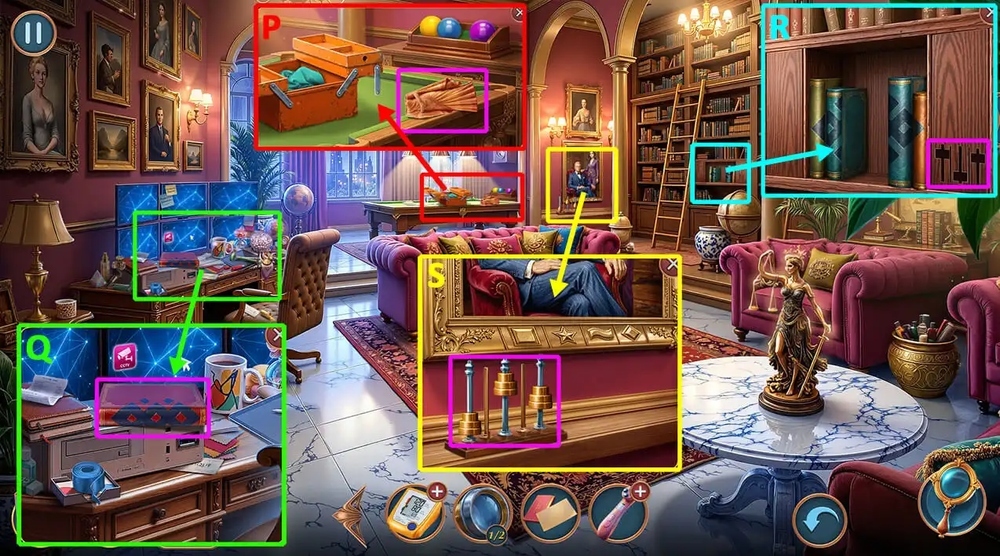
- Take BROKEN FIGURINE (P).
- Take BOOKS 1/2 (Q).
- Use MASCARA, MATTIFYING WIPES on the carved drawing, take IMPRINT (R).
- Use IMPRINT on the pillars, take BOOKS 2/2 (S).
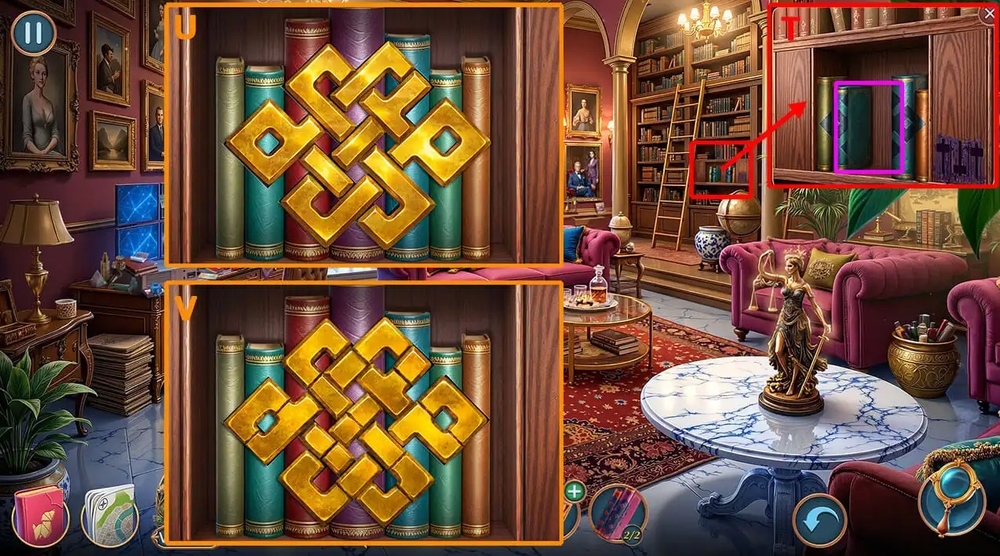
- Use BOOKS 2/2 on the shelf (T).
- Easy solution: Follow the instructions in the image (U).
- Hard solution: Follow the instructions in the image (V).
- Take PHOENIX FEATHERS 2/3, BOOMERANG.
- Go to Courtyard.
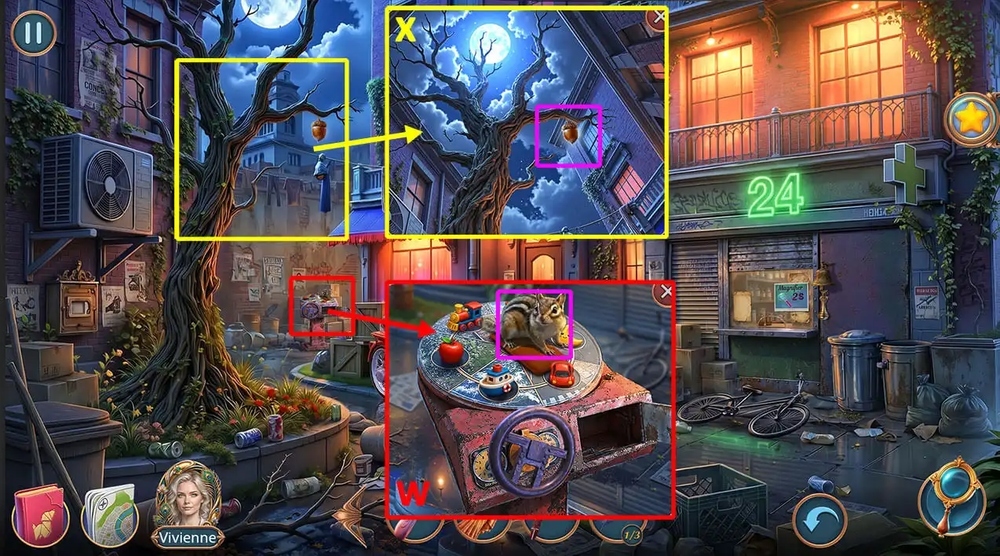
- Use BOOMERANG on the acorn on the branch, earn ACORN (W).
- Use ACORN on the squirrel, examine the phone, click on the screen, take PHONE WITH SMART HOUSE APP (X).
- Go to Second Floor Hallway.
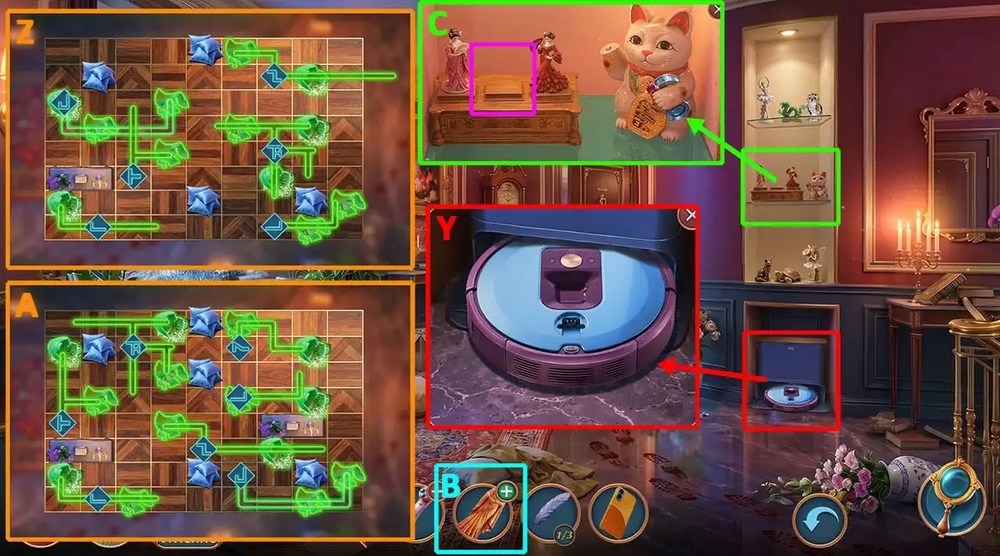
- Use PHONE WITH SMART HOUSE APP on the robot vacuum cleaner (Y).
- Easy solution: Follow the instructions in the image (Z).
- Hard solution: Follow the instructions in the image (A).
- Take BLOOD PRESSURE TUBE, STATUETTE SHARD.
- Use STATUETTE SHARD, SILICONE GUN on BROKEN FIGURINE, earn INDIAN FIGURINE (B).
- Use INDIAN FIGURINE on the empty space on the shelf, take WET WIPES (C).
- Go back.
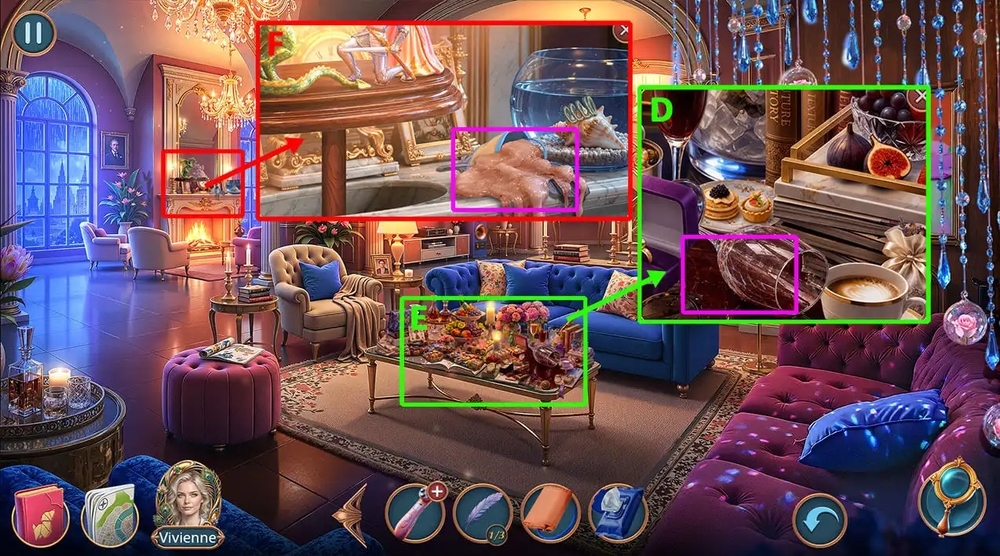
- Use WET WIPES on the stain on the table (D).
- Play puzzle, earn THERMAL BRUSH (E).
- Use THERMAL BRUSH on the hardened wax, take COFFEE MACHINE FILTER, PHOENIX FEATHERS 3/3 (F).
- Go to Driveway to Monique’s House.
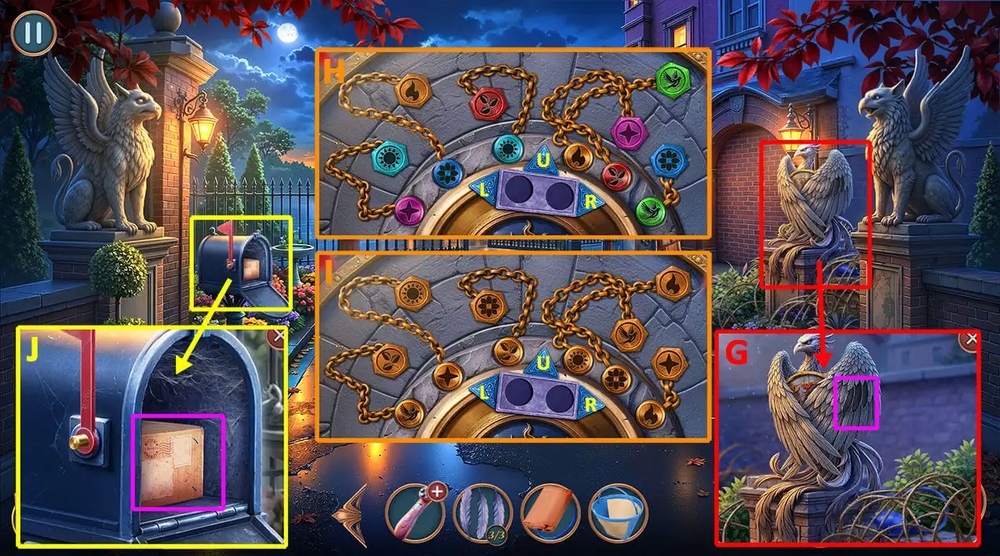
- Use PHOENIX FEATHERS 3/3 on the statuette (G).
- Easy solution: Click U, L, L, U, R, R, R, R, U, L, L, U (H).
- Hard solution: Click U, L, L, U, R, R, R, R, U, L, L, U (I).
- Take CLAW RING.
- Use CLAW RING on the package, take NEW MOUSE (J).
- Go to Large Office.
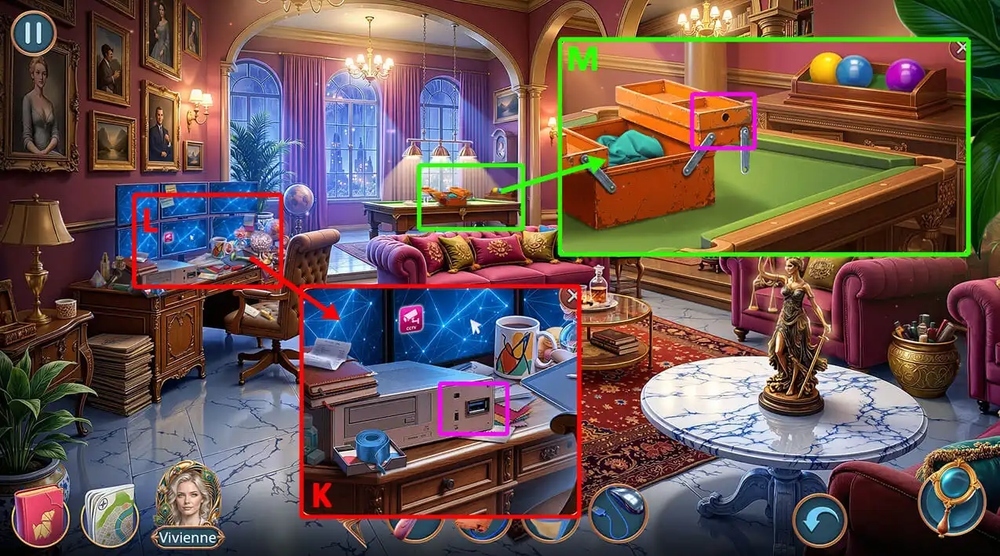
- Use NEW MOUSE on the computer (K).
- Play puzzle, take a look at the photo on the monitor, take COLLECTIBLE COIN (L).
- Use SCREW, COLLECTIBLE COIN on the shelf, take GARDEN RAKE (M).
- Go to Greenhouse near the House.
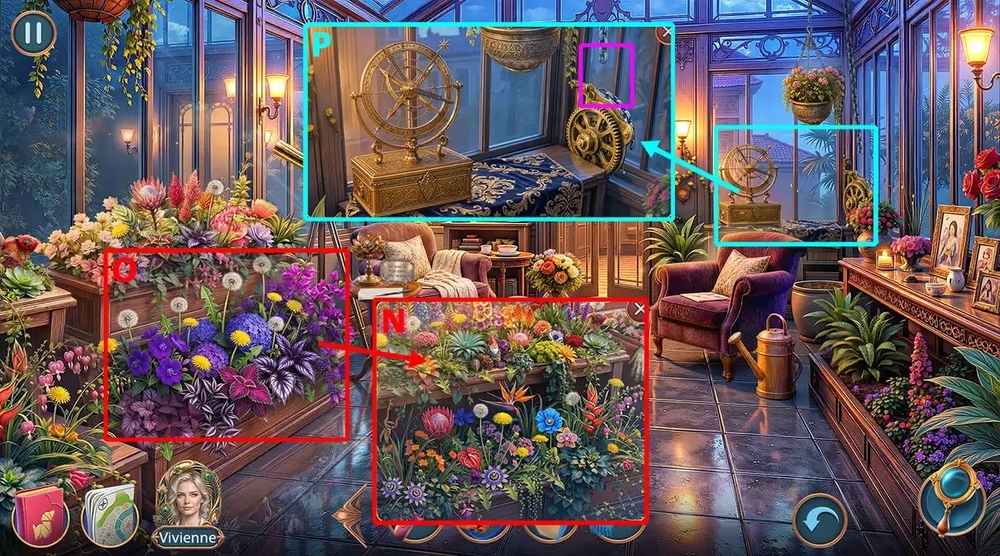
- Use GARDEN RAKE on the dandelions (N).
- Play puzzle, earn BANGLE BRACELET (O).
- Use BANGLE BRACELET on the broken chain, take POWDER, BATTERY (P).
- Go back.
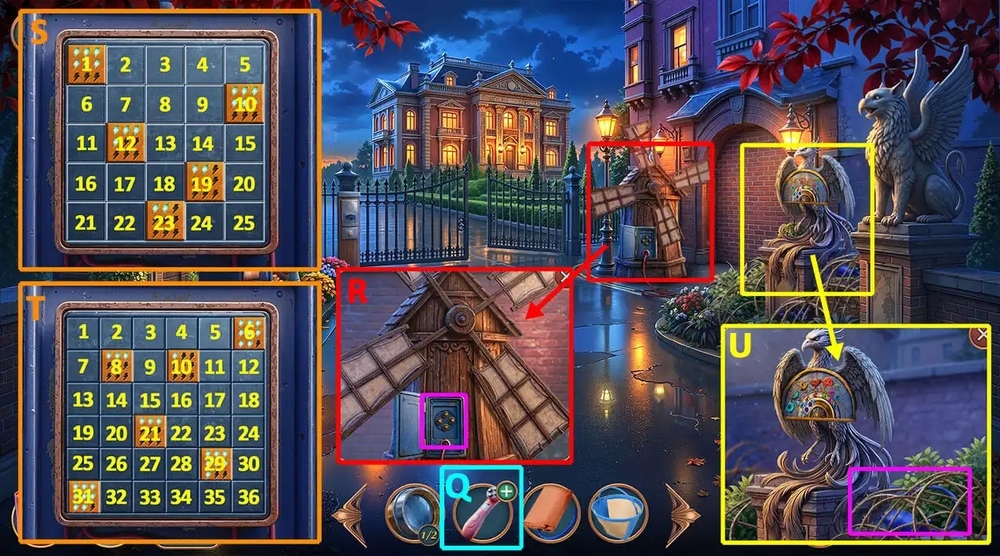
- Use BATTERY on MICROCURRENT MASSAGER, earn MICROCURRENT FACE MASSAGER (Q).
- Use MICROCURRENT FACE MASSAGER on the mill’s panel (R).
- Easy solution: Click 1-11-4, 10-25-5-8, 12-17-7-14, 19-24-18, 23-21 (S).
- Hard solution: Click 6-1-24, 8-7-20, 10-16, 21-9-22, 29-30-11-26, 31-13-36 (T).
- Take BRANCH CUTTER.
- Use BRANCH CUTTER on the bushes, take BLOOD PRESSURE CUFF (U).
- Go to Living Room.

- Use BLOOD PRESSURE CUFF, BLOOD PRESSURE TUBE on BLOOD PRESSURE MONITOR, earn WORKING BLOOD PRESSURE MONITOR (V).
- Use WORKING BLOOD PRESSURE MONITOR on the stuck door, take BLUSH BRUSH, COFFEE BEANS (W).
- Use COFFEE BEANS, COFFEE MACHINE FILTER on the coffee machine (X).
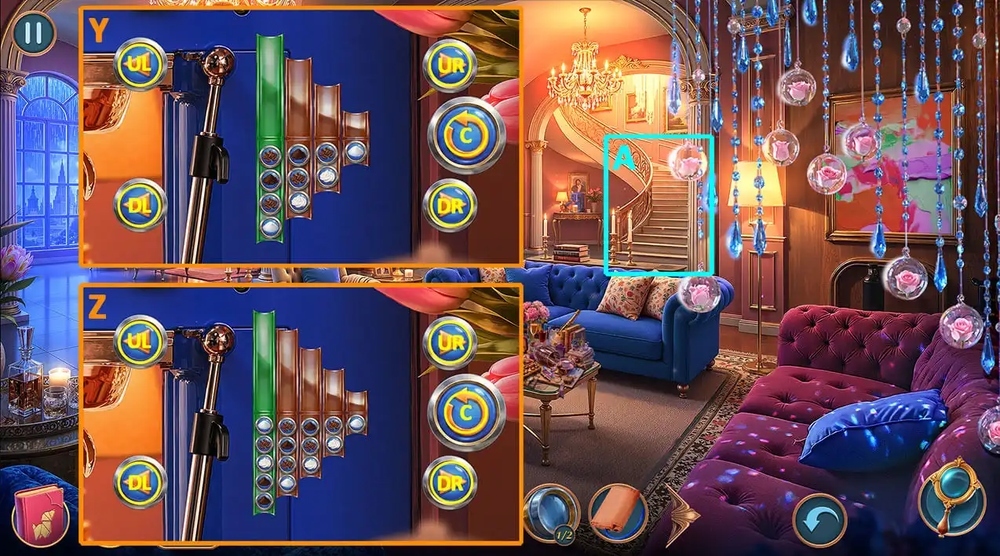
- Easy solution: Click UR-C, UL-UL-UL-UL-C, UL-UL-UR-C, UR-UR-C, UR-UR-UR-UR-C, UR-UR-UL-UL-C, UR-UR-UR-C, UR-UR-C, UL-UR-UR-C (Y).
- Hard solution: Click UR-UR-UR-UR-C, UL-UL-UL-UL-UR-C, UR-UR-UL-C, UR-UR-C, UR-UR-UR-UR-UL-C, UL-UR-UR-UL-UL-C, UL-UL-UL-UL (Z).
- Take HOT COFFEE.
- Go forward (A).
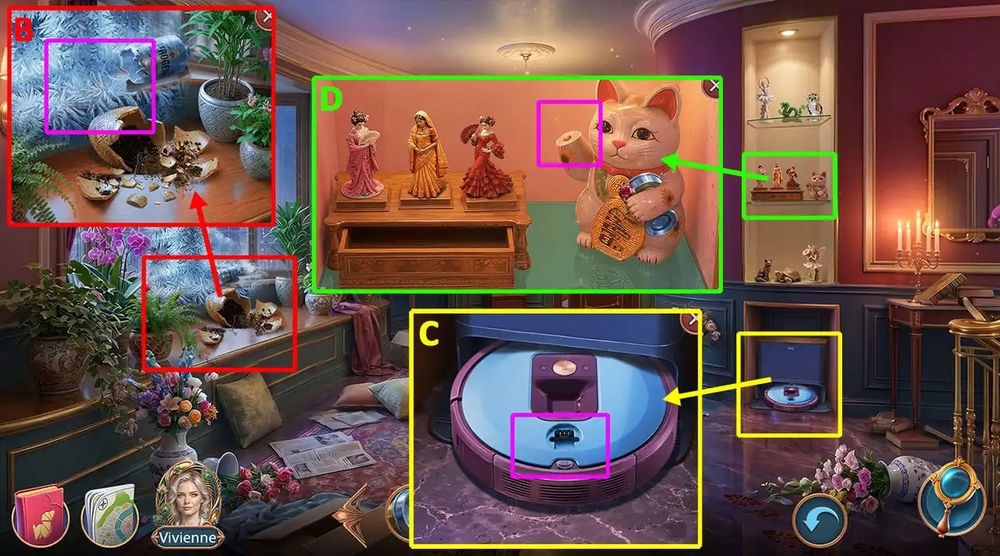
- Use HOT COFEE on the ice, take VACUUM CLEANER FILTER BUTTON (B).
- Use VACUUM CLEANER FILTER BUTTON on the robot vacuum cleaner, take LUCKY CAT’S PAW (C).
- Use LUCKY CAT’S PAW on the maneki-neko, take EARRING, TELESCOPE MAGNIFYING LENSES 2/2 (D).
- Go to Greenhouse near the House.
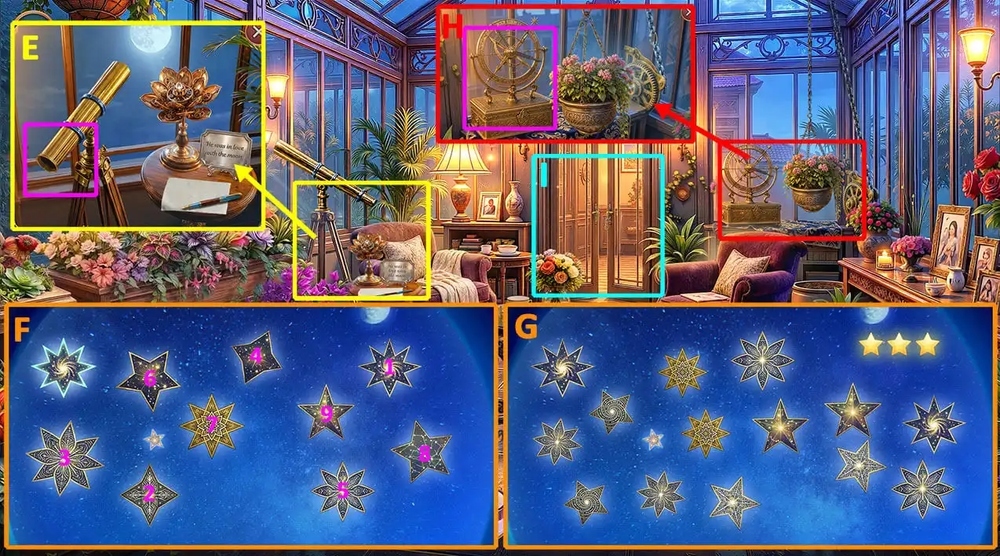
- Use TELESCOPE MAGNIFYING LENSES 2/2 on the telescope (E).
- Easy solution: Click 1 – 2 – 3 – 4 – 5 – 6 – 7 – 8 – 9 (F).
- Hard solution: Solution is random (G).
- Take BIG DIPPER CONSTELLATION.
- Use BIG DIPPER CONSTELLATION on the astrolabe, take DISCHARGED PHONE, MP3 PLAYER WITH USB DRIVE (H).
- Go forward (I).
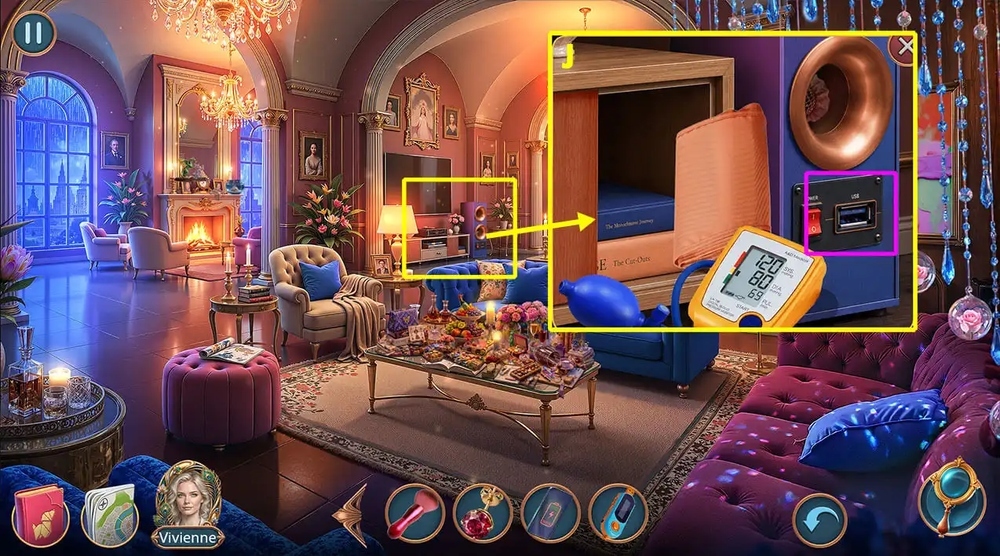
- Use MP3 PLAYER WITH USB DRIVE on the stereo system (J).
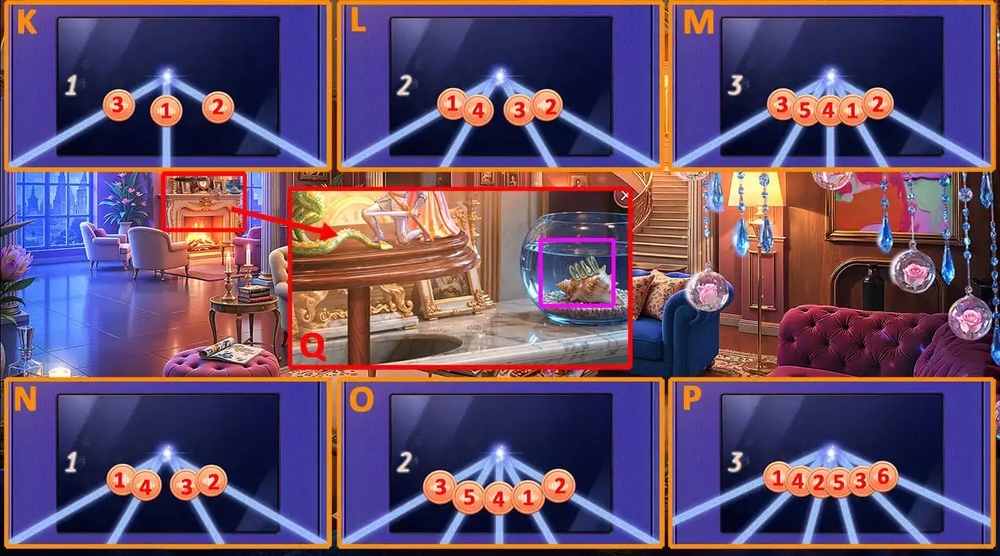
- Easy solution: Stage 1 – Click 1-2-3 (K), Stage 2 – Click 1-2-3-4 (L), Stage 3 – Click 1-2-3-4-5 (M).
- Hard solution: Stage 1 – Click 1-2-3-4 (N), Stage 2 – Click 1-2-3-4-5 (O), Stage 3 – Click 1-2-3-4-5-6 (P).
- Take WIG CAP.
- Use WIG CAP on the spring in the aquarium, take WIRE (Q).
- Go to Show’s Backstage.
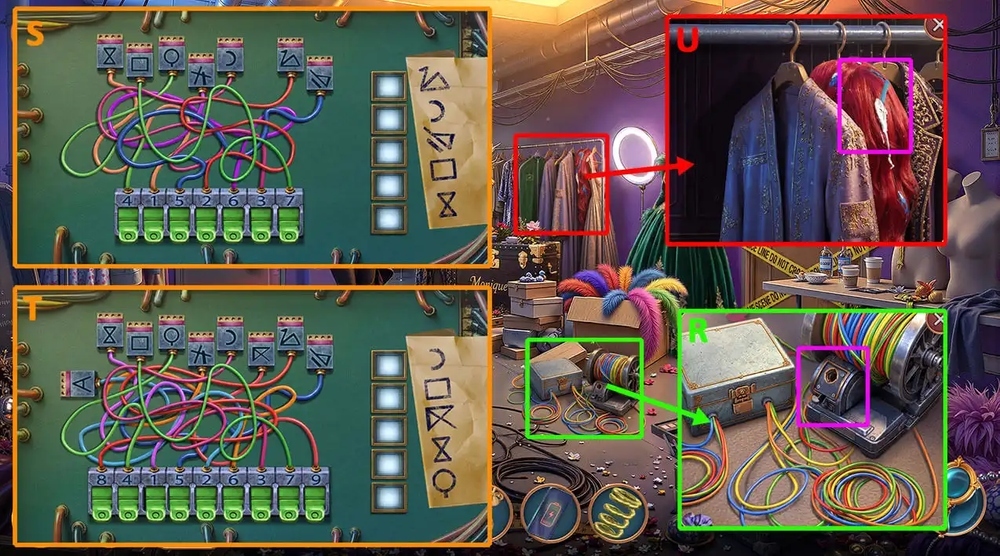
- Use WIRE, EARRING on the empty button slot (R).
- Easy solution: Click 2-3-5-7-1 (S).
- Hard solution: Click 3-7-9-1-4 (T).
- Take HANGER, HOT HAIR STRAIGHTENER.
- Use HOT HAIR STRAIGHTENER on the wig with the paint, earn EYEBROW RAZOR (U).
- Go to Large Office.

- Use EYEBROW RAZOR on SEALED DVD BOX, read the note, take DISK FROM MYSTERIOUS PACKAGE (V).
- Use DISK FROM MYSTERIOUS PACKAGE on the disk drive (W).
- Play puzzle, watch the surveillance footage, take BILLIARD BALL (X).
- Use BILLIARD BALL on the empty space on the stand (Y).
- Examine the four photos and their captions (Z).
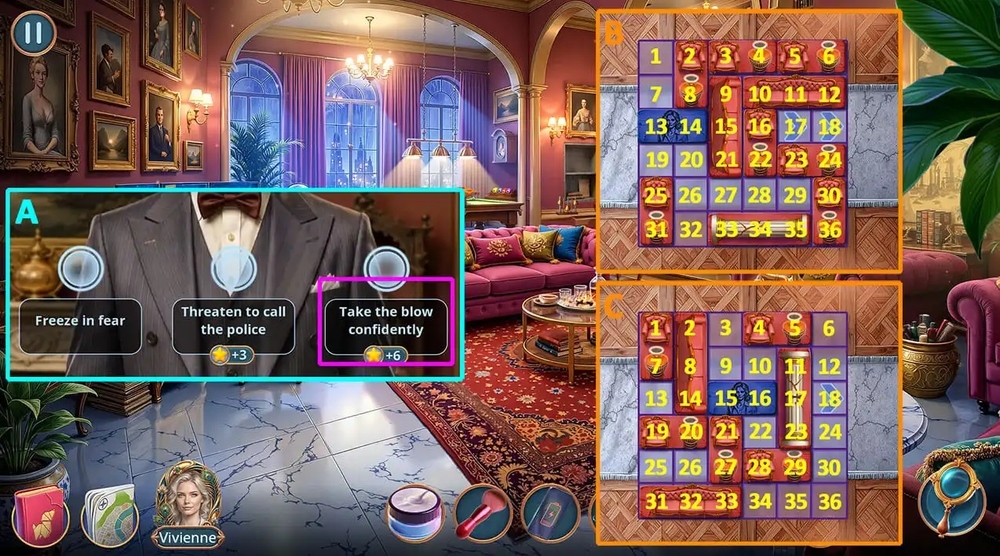
- Select this option (A).
- Easy solution: Drag 25-19, 33-31, 22-34, 23-22, 21-27, 10-9, 30-12, 23-24, 28-16, 33-36, 27-33, 14-15, 19-1, 22-28, 15-17, 21-15, 34-31, 28-34, 23-22, 18-36, 17-18 (B).
- Hard solution: Drag 33-36, 27-33, 20-22, 14-32, 15-13, 4-2, 11-5, 22-24, 27-9, 23-21, 28-27, 17-29, 3-6, 9-3, 14-16, 20-2, 34-31, 29-35, 16-18 (C).
- Walkthrough Bonus Chapter, at the link below.