Adventure Seekers 2: Restless Waters (Bonus Chapter) – Raphael and Inara are about to embark on an investigation tied to an ancient legend about the Whale Guardian. This time, their journey leads them to an abandoned chapel, where ancient documents and evidence of events that took place many years ago have been preserved. While exploring the chapel, Raphael discovers a confessional and records indicating that the local monks knew of the existence of an ancient sea spirit. However, it remains unclear what role they played in its history whether they tried to banish the Guardian or, on the contrary, summoned it themselves. The answers may lie in an ancient book dedicated to the nature of this creature. According to its entries, the Whale Guardian protects the local waters from evil, but its peace depends on an ancient artifact located in an underwater sanctuary. When the relic disappears, the spirit flies into a rage, unleashing destructive waves and endangering ships and coastal settlements. Raphael and Ina must piece together the events of the past, discover what happened in the chapel, and uncover the connection between the monks, the ancient sanctuary, and the Guardian Whale. Continue the investigation, find the missing evidence, and help the heroes finally resolve this long-standing conflict to restore peace to the islands.
Bonus Chapter Walkthrough
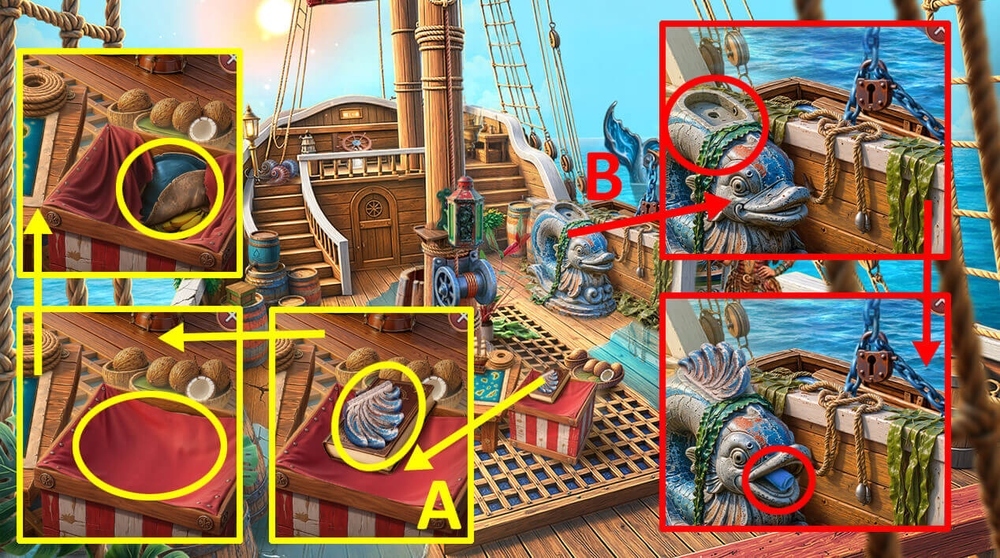
- Take FIN, read ship’s log, use SPUR on canvas, take TRICORN HAT and WOODEN SPOKES 1/2 (A).
- Use FIN on the figurine of a sea animal, take TIDE CHART (B).
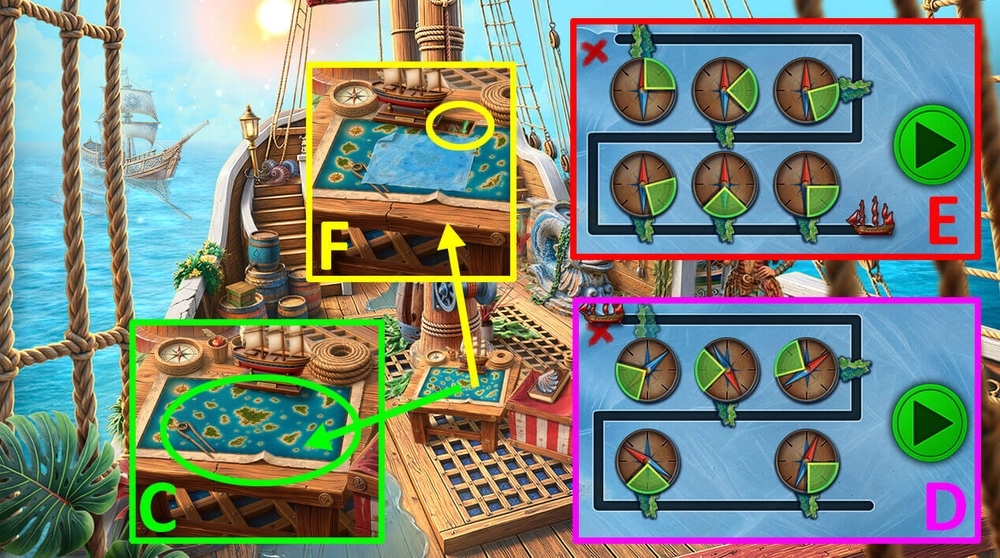
- Use TIDE CHART on the map (C).
- Easy solution: Use the picture as a hint (D).
- Hard solution: Use the picture as a hint (E).
- Take TAP HANDLE (F).
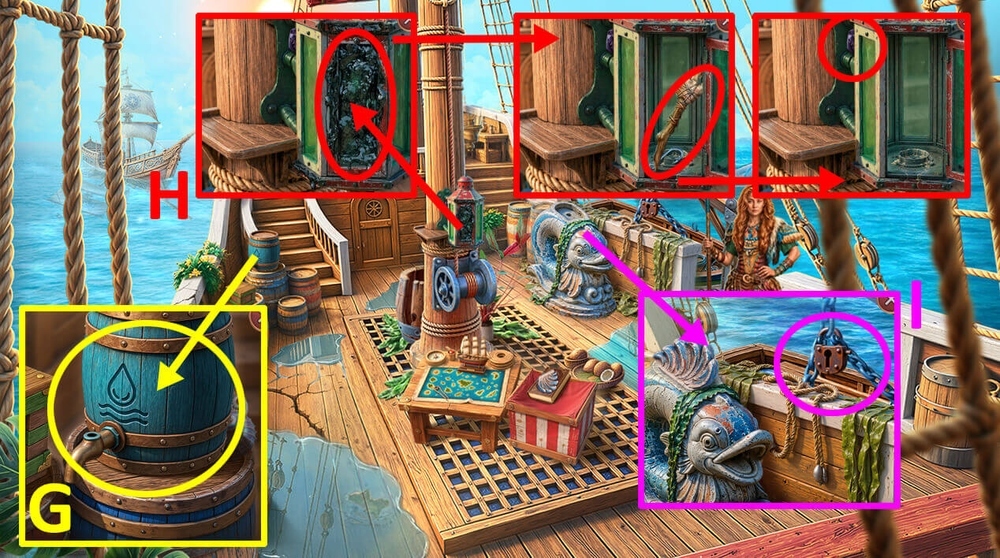
- Use EMPTY DECANTER and TAP HANDLE on the barrel of water, earn WATER (G).
- Use SHIRT SLEEVE and WATER on the dirty glass, take CRAB CLAW HANDLE and FISHHOOK, use CRAB CLAW HANDLE on the stuck stone, earn OBSIDIAN EYE (H).
- Use FISHHOOK on the lock with chains (I).
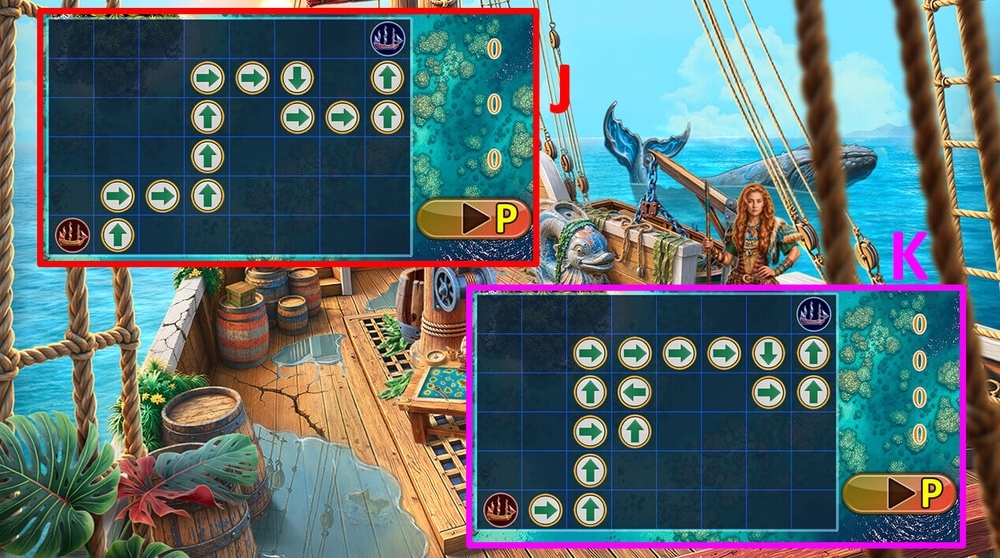
- Easy solution: Arrange the pieces as shown in the picture and press P (J).
- Hard solution: Arrange the pieces as shown in the picture and press P (K).
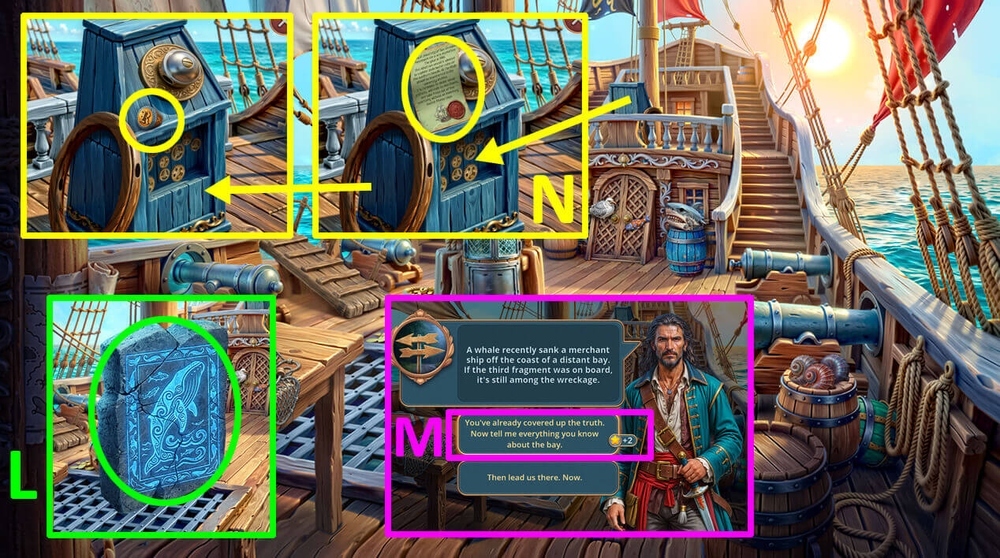
- Take TABLET FRAGMENTS 2/3 (L).
- Select this option (M).
- Read the note, take CAPTAIN’S RING (N).
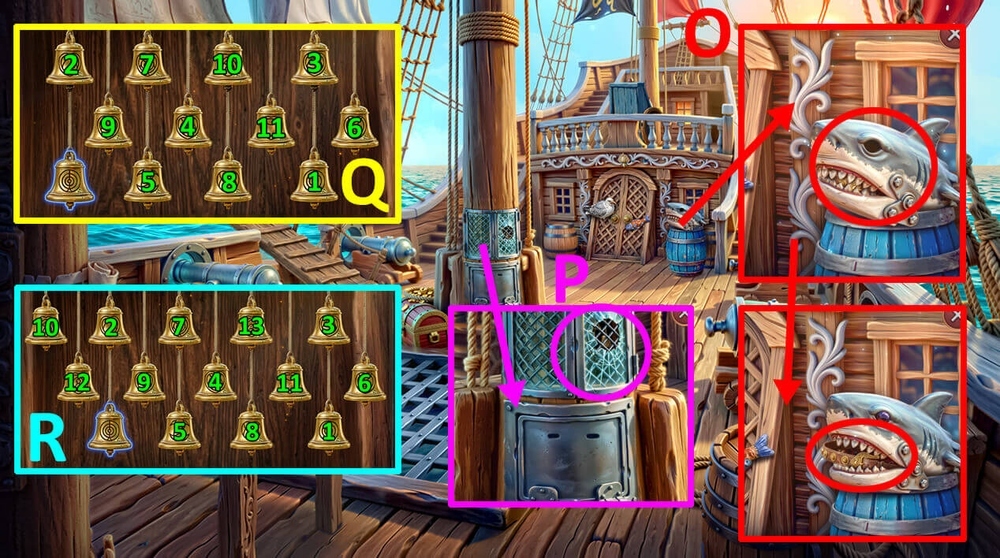
- Use OBSIDIAN EYE on the shark’s head, take LEATHER BELT (O).
- Use LEATHER BELT on the broken glass (P).
- Easy solution: Click: 1, 2, 3, 4, 5, 6, 7, 8, 9, 10, 11 (Q).
- Hard solution: Click: 1, 2, 3, 4, 5, 6, 7, 8, 9, 10, 11, 12, 13 (R).
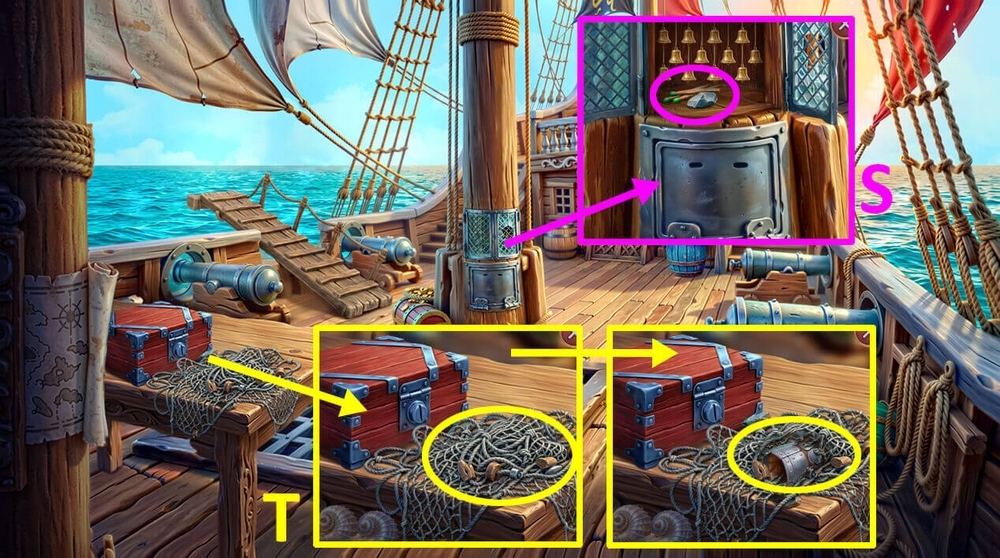
- Take MATCHES (S).
- Use MATCHES on the wrapped nets, earn MATCHES, take KNIGHT’S GAUNTLET and ANCHOR FRAGMENT (T).
- Go back.
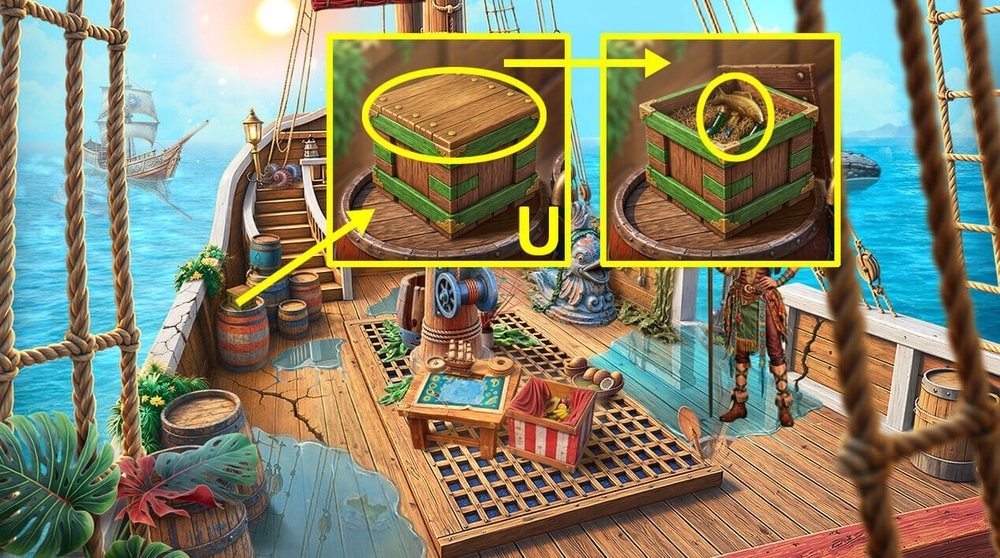
- Use ANCHOR FRAGMENT on the wooden box, take CORKSCREW (U).
- Use CORKSCREW on SEALED FISH OIL, earn FISH OIL.
- Go forward.
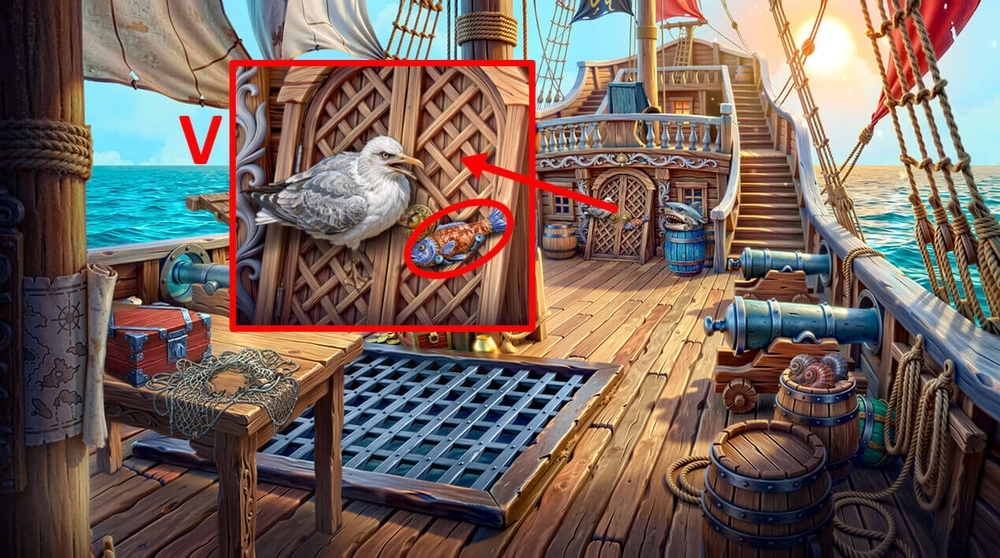
- Use FISH OIL on the bird toy (V).
- Go forward.

- Take ROPE, use CAPTAIN’S RING on the tube, read the note, take HINT (W).
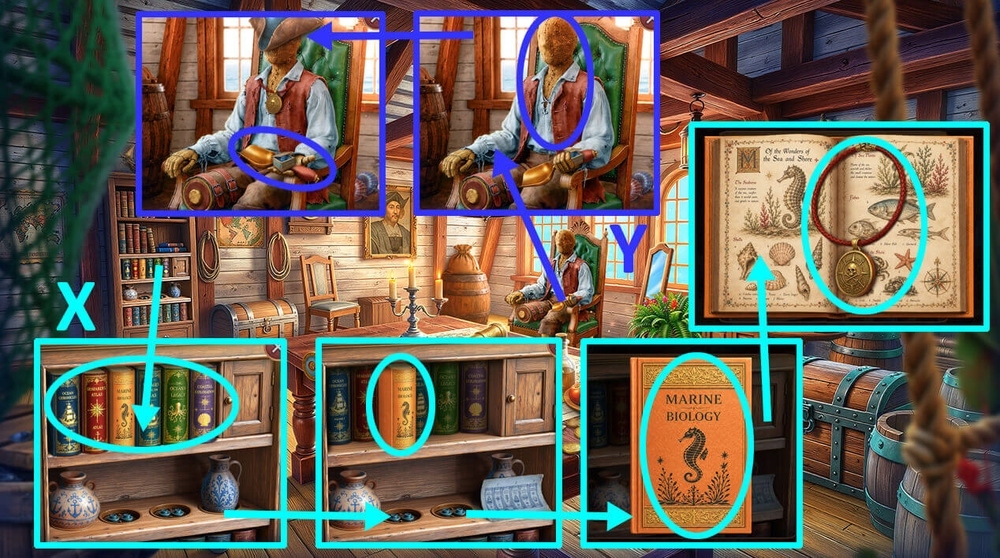
- Use HINT on the bookshelf, open the yellow book, take CAPTAIN’S MEDALLION (X).
- Use TRICORN HAT and CAPTAIN’S MEDALLION on the captain’s mannequin, take GUNPOWDER and TROWEL (Y).
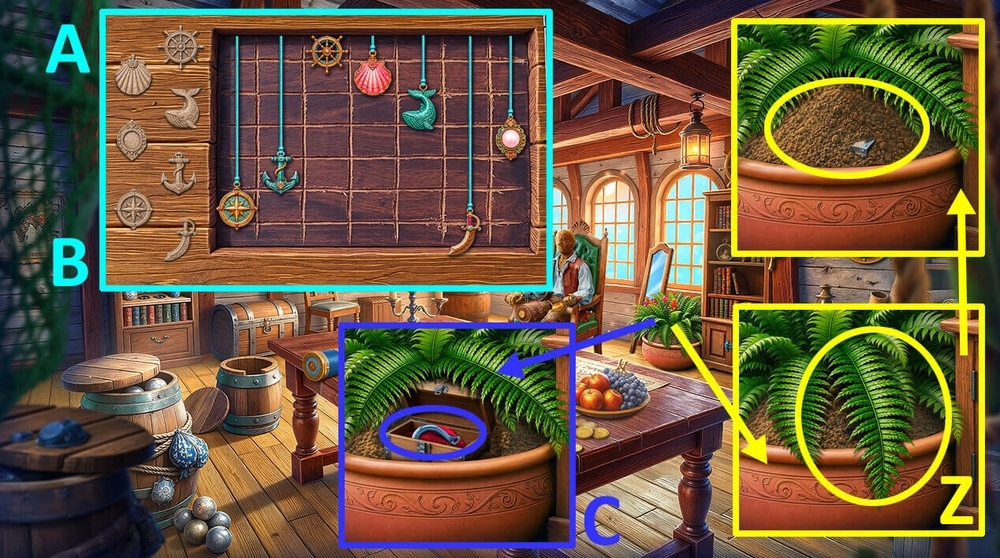
- Tap on the fern, use TROWEL on the dirt in a flower pot (Z).
- Easy solution: Use the picture as a hint (A).
- Hard solution: Use the picture as a hint (B).
- Take RING WITH HOOKS (C).
- Go back.
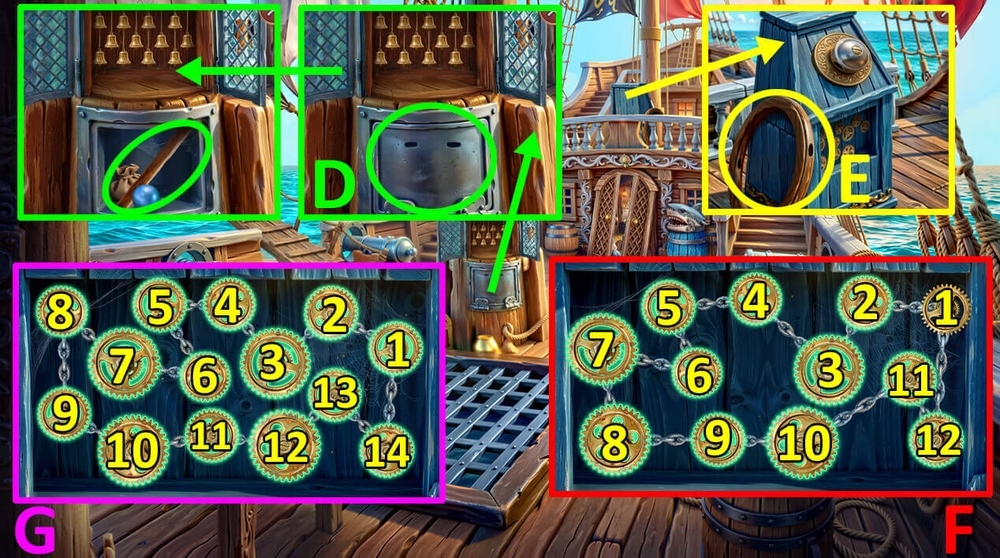
- Use RING WITH HOOKS on the door, take PEARLS 1/2 and WOODEN SPOKES 2/2 (D).
- Use WOODEN SPOKES 2/2 on the steering wheel (E).
- Easy solution: Click: 1, 2, 3, 4, 5, 6, 7, 8, 9, 10, 11, 12, 1 (F).
- Hard solution: Click: 1, 2, 3, 4, 5, 6, 7, 8, 9, 10, 11, 12, 13, 14, 1 (G).
- Go to the Cove Among the Rocks.
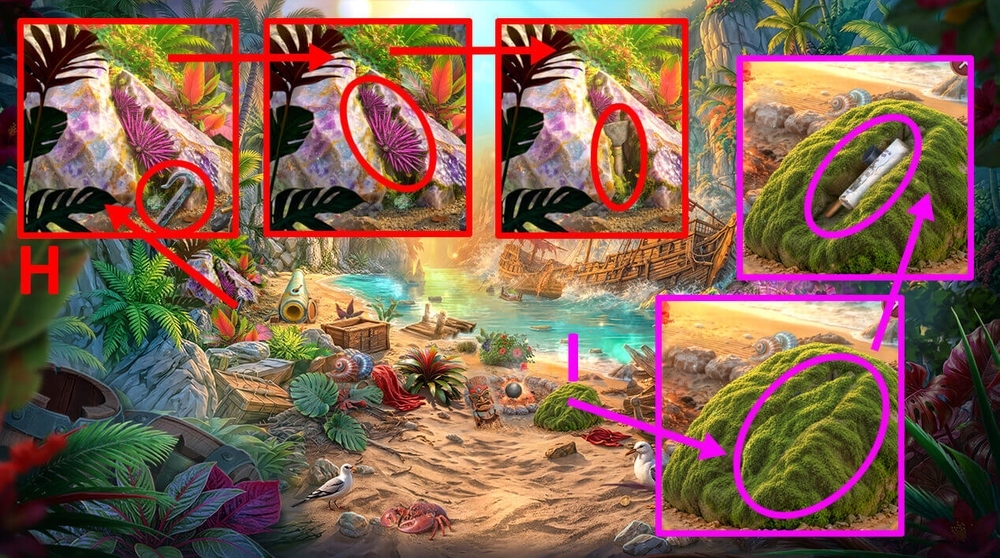
- Take PIN, use KNIGHT’S GAUNTLET on the thorny plant, take SCRAPER (H).
- Use SCRAPER on the moss, read the note, take MALLET (I).
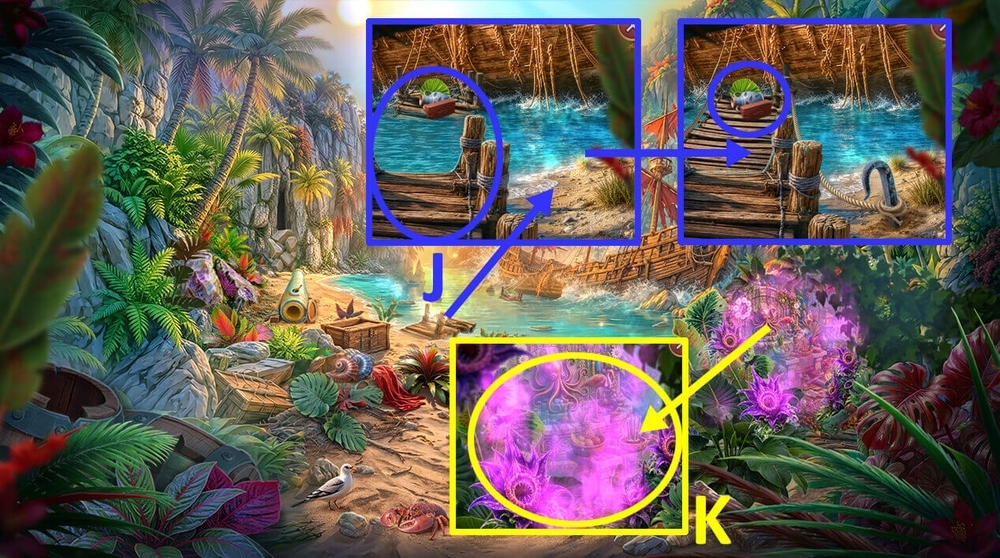
- Use ROPE, PIN and MALLET on the broken floating bridge, take BRICK, CLAY JUGS 1/2 and PALM LEAF (J).
- Use PALM LEAF on the poisonous pollen (K).
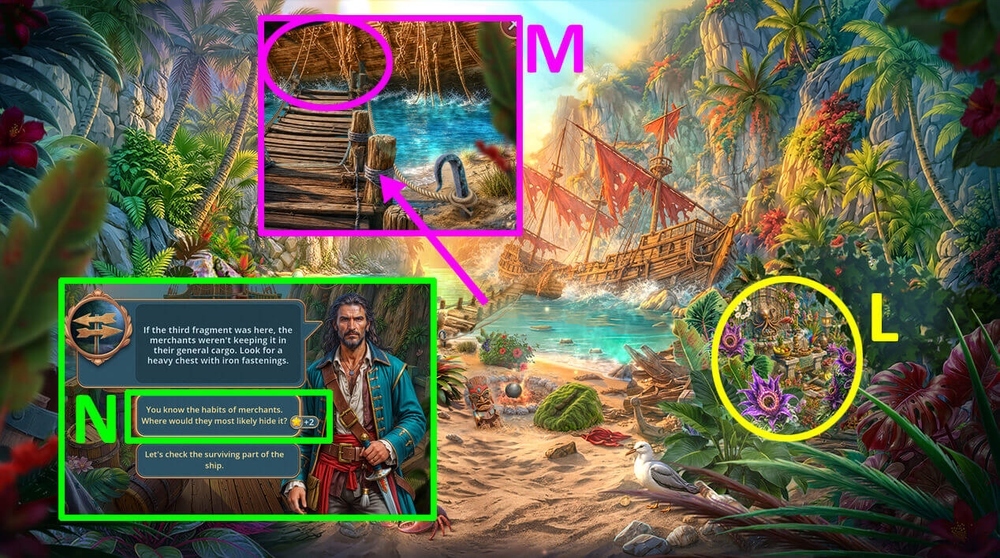
- Play puzzle, earn SHIP’S GANGPLANK (L).
- Use SHIP’S GANGPLANK on the wrecked ship (M).
- Go forward.
- Select this option (N).
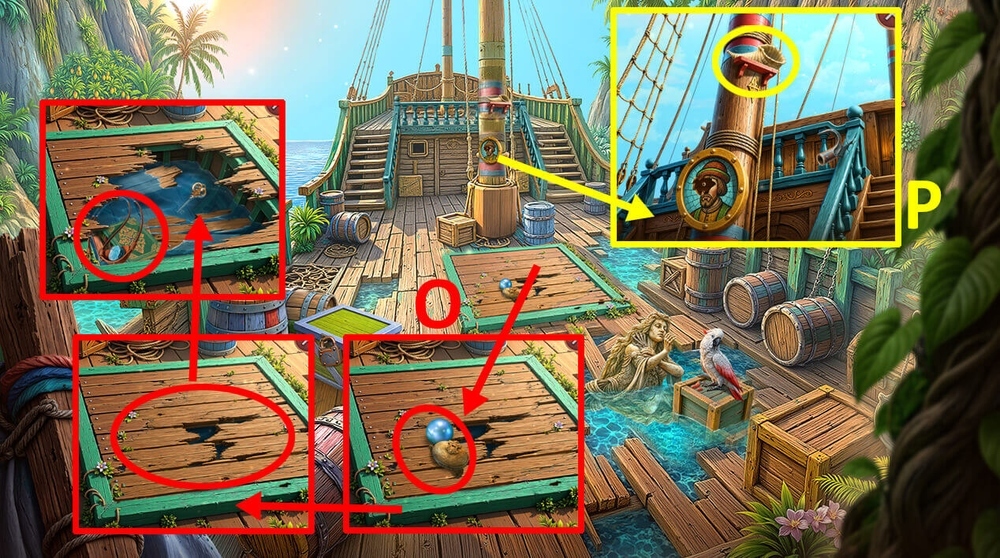
- Take SEALED PENDANT and PEARLS 2/2, use BRICK on the boards, take SLINGSHOT WITH STONE, take and read Professor Valdez’s diary (O).
- Use SLINGSHOT WITH STONE on the shell at the top of the mast, earn TWISTED SHELL-HORN (P).
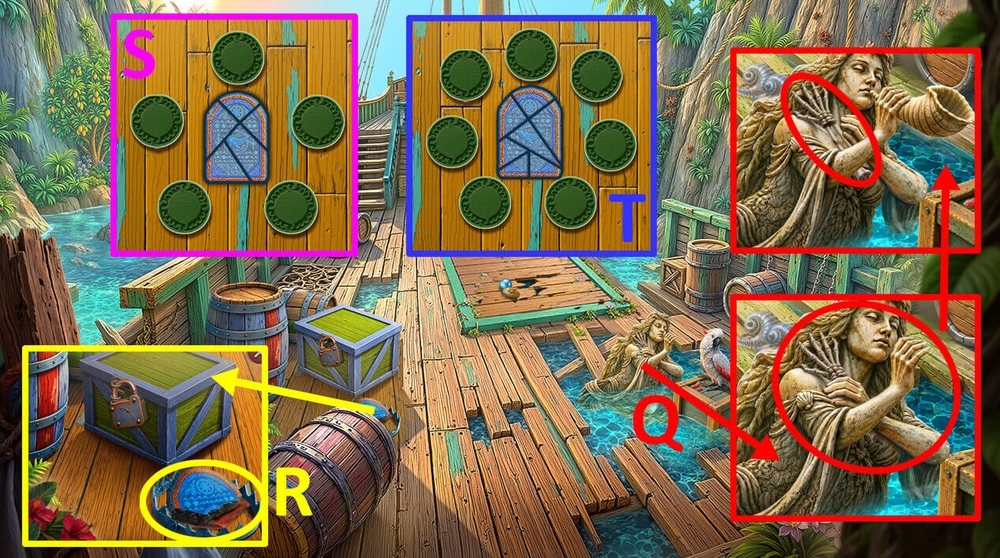
- Use TWISTED SHELL-HORN on the siren statue, take BONE HAND (Q).
- Use BONE HAND on the trap (R).
- Easy solution: Use the picture as a hint, earn TABLET FRAGMENTS 3/3 and WET SAIL (S).
- Hard solution: Use the picture as a hint, earn TABLET FRAGMENTS 3/3 and WET SAIL (T).
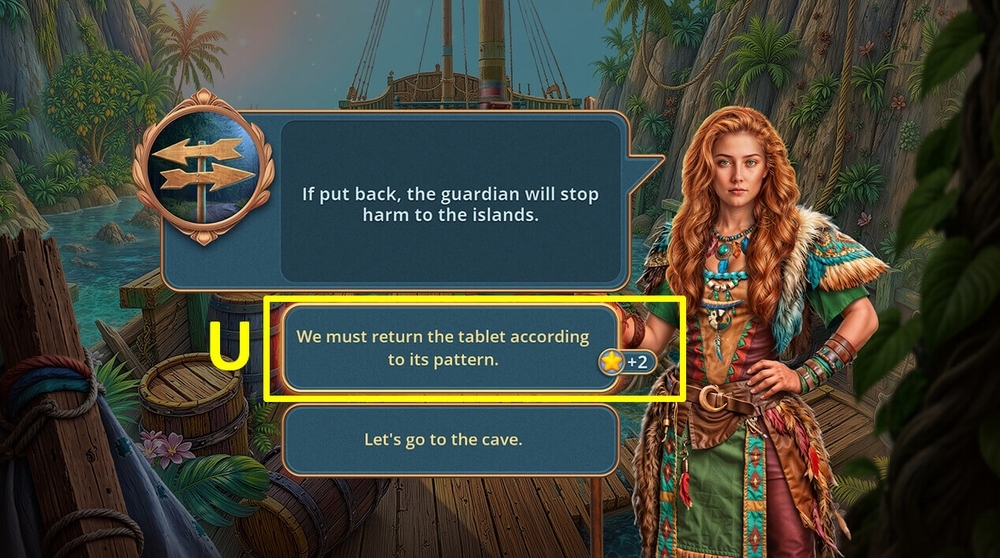
- Select this option (U).
- Go back.
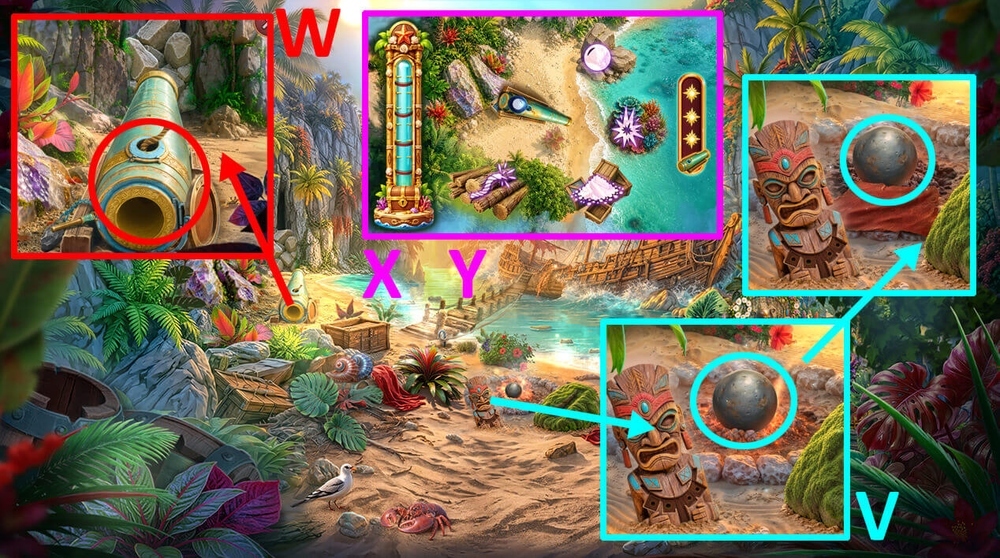
- Use WET SAIL on the fire, take CANNONBALL (V).
- Use GUNPOWDER and CANNONBALL on the cannon (W).
- Easy solution: Solution is random (X).
- Hard solution: Solution is random (Y).
- Go to the Cave in the Rocks.
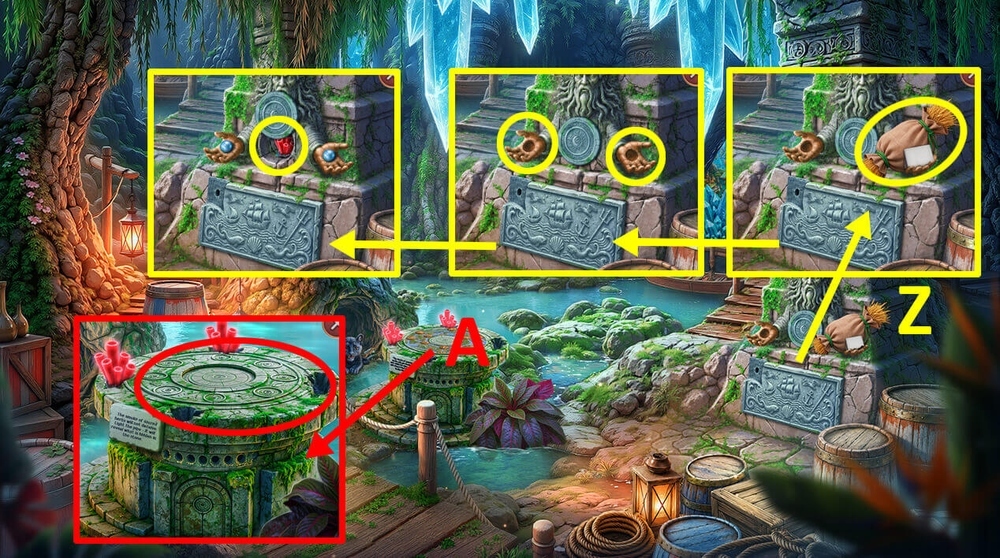
- Read the note, take STRAW BAGS 1/2 and TOTEM SKETCH, use PEARLS 2/2 on the idol, take GLOWING CORALS (Z).
- Use GLOWING CORALS on the altar (A).
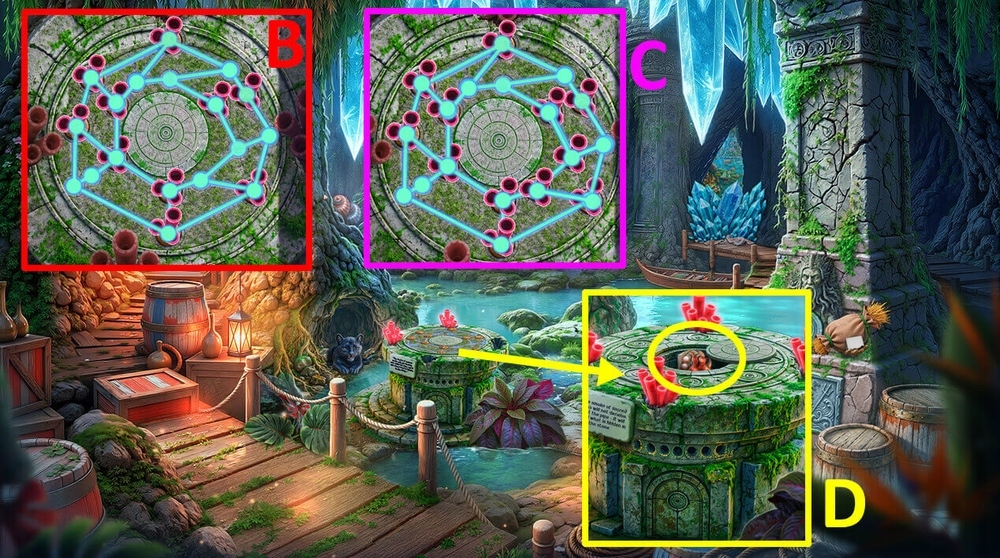
- Easy solution: Use the picture as a hint (B).
- Hard solution: Use the picture as a hint (C).
- Take HOOK PAW and PEARL NECKLACE (D).
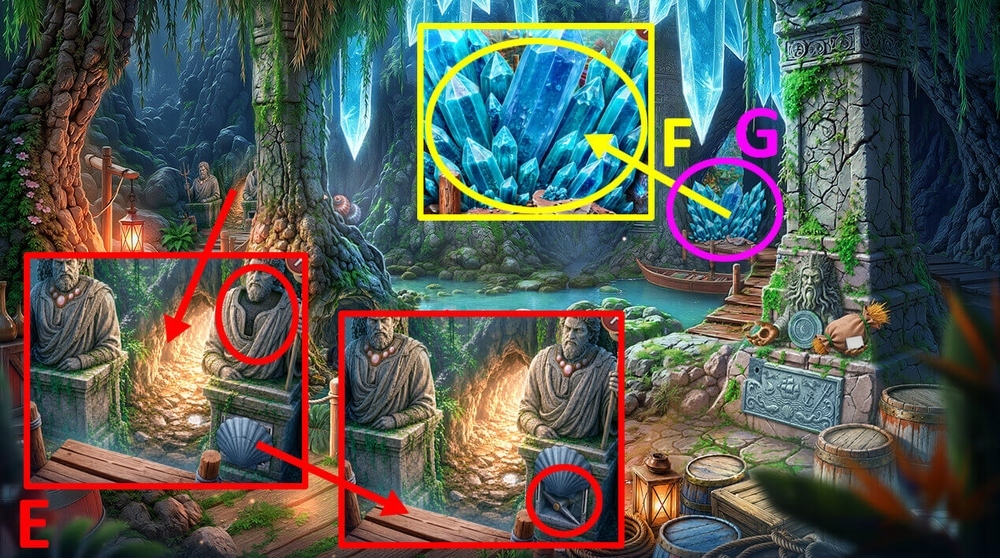
- Use PEARL NECKLACE on the statue, take PICKAXE (E).
- Use PICKAXE on the crystals (F).
- Play puzzle, earn TAR PLUG (G).
- Go to the Captain’s Cabin.
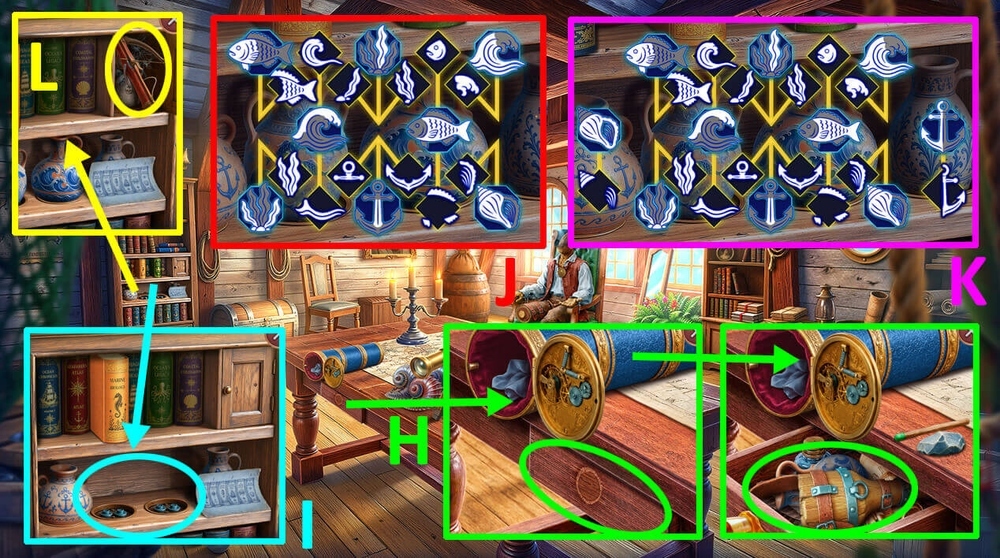
- Use MATCHES and TAR PLUG on the desk drawer, take WOODEN LEG and CLAY JUGS 2/2 (H).
- Use CLAY JUGS 2/2 on the shelf with clay pots (I).
- Easy solution: Use the picture as a hint (J).
- Hard solution: Use the picture as a hint (K).
- Take CROSSBOW (L).
- Go to the Wrecked Merchant Ship.
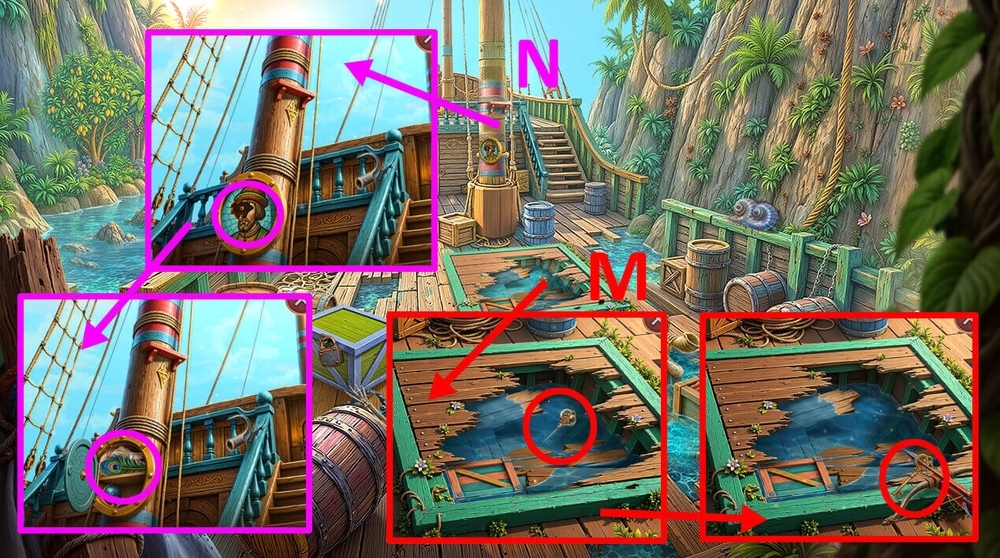
- Use CROSSBOW on the sunken key, take SMALL KEY (M).
- Use SMALL KEY on SEALED PENDANT, take PORTRAIT PART.
- Use PORTRAIT PART on the portrait, take PEACOCK FEATHER and SKULL (N).
- Use HOOK PAW, WOODEN LEG and SKULL on TOTEM SKETCH, earn PIRATE TOTEM.
- Go to the Cave in the Rocks.
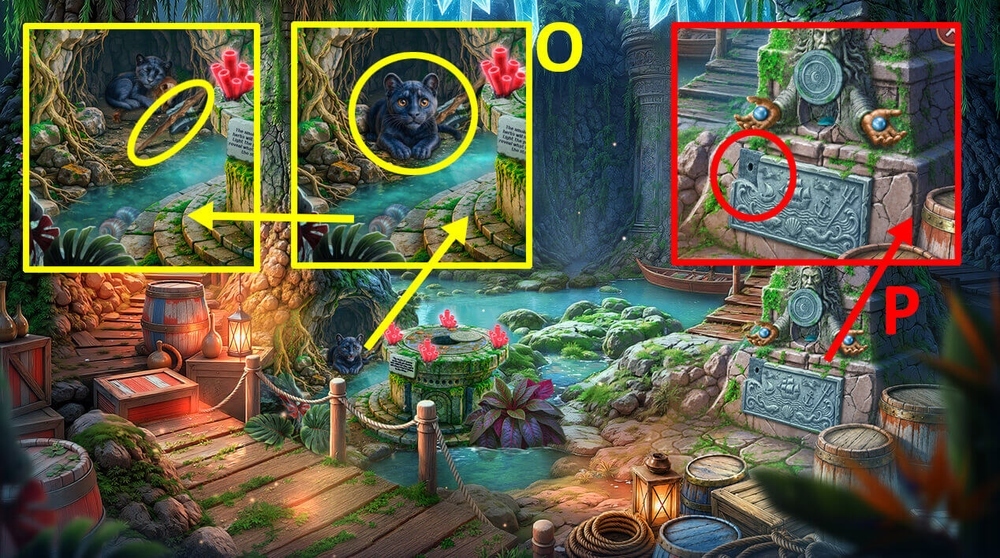
- Use PIRATE TOTEM on the small panther, take WOODEN STICK and STONE TILE (O).
- Use STONE TILE on the stone relief on the wall (P).
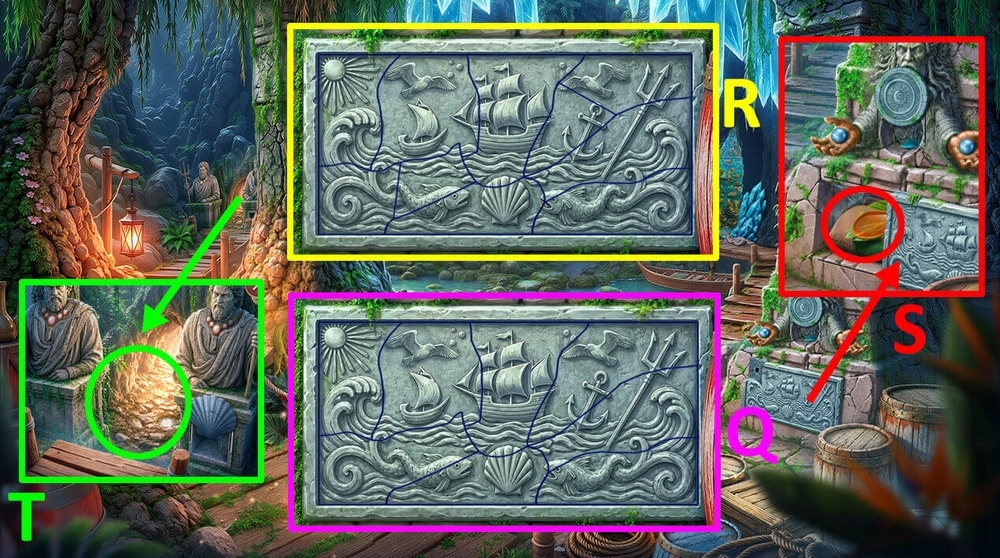
- Easy solution: Use the picture as a hint (Q).
- Hard solution: Use the picture as a hint (R).
- Take RESIN and STRAW BAGS 2/2 (S).
- Use STRAW BAGS 2/2 on the hole leading into the tunnel (T).
- Go forward.
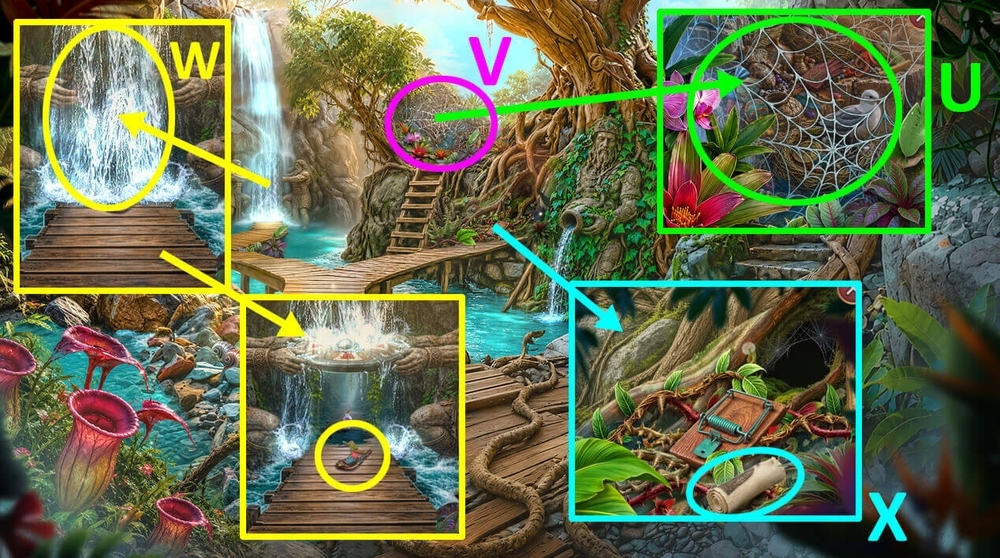
- Use PEACOCK FEATHER on the spider web (U).
- Play puzzle, earn SHIELD (V).
- Use SHIELD on the waterfall, take MUSKET BASE and NECKLACE (W).
- Read the note, take BARREL and TOW (X).
- Go to the Cove Among the Rocks.
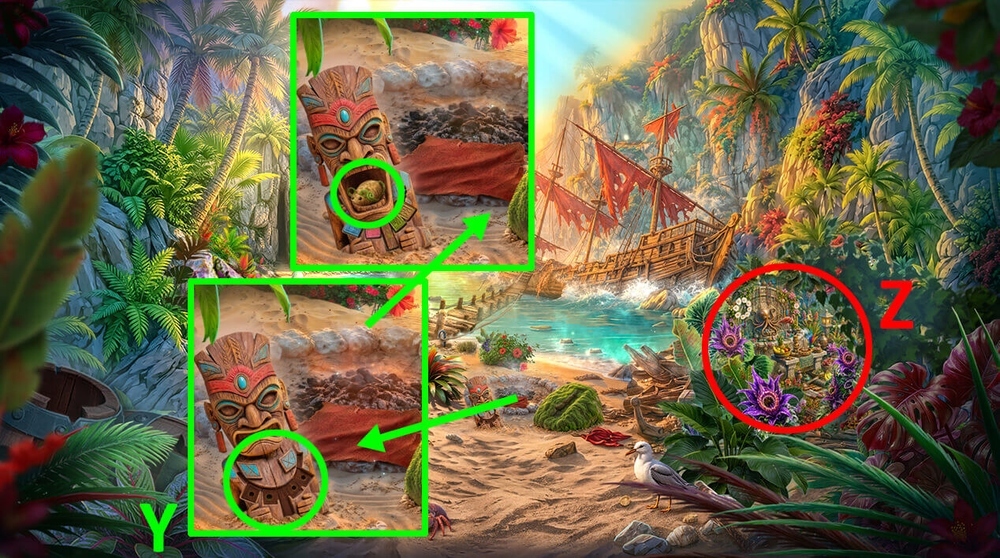
- Use NECKLACE on the wooden totem, take TOY MOUSE (Y).
- Play puzzle, earn CANDIED FRUIT (Z).
- Go to the Wrecked Merchant Ship.
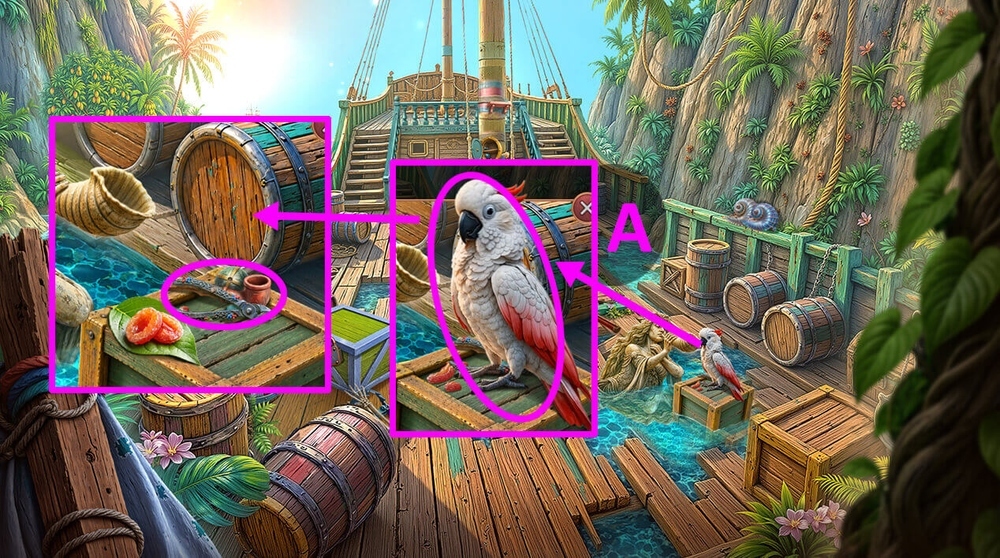
- Use CANDIED FRUIT on the parrot, take WIRE CUTTERS, PIPE and MUSKET BALL (A).
- Go to the Hidden Lagoon.
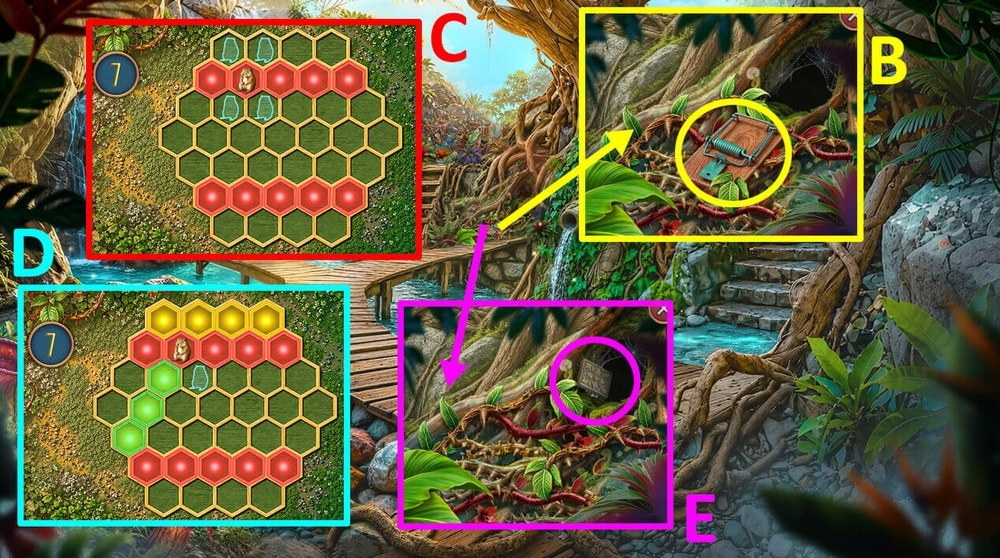
- Use TOY MOUSE on the mousetrap (B).
- Easy solution: Solution is random (C).
- Hard solution: Solution is random (D).
- Take STONE TILES 1/2 and FLINT (E).
- Use RESIN, TOW and FLINT on WOODEN STICK, earn TORCH.
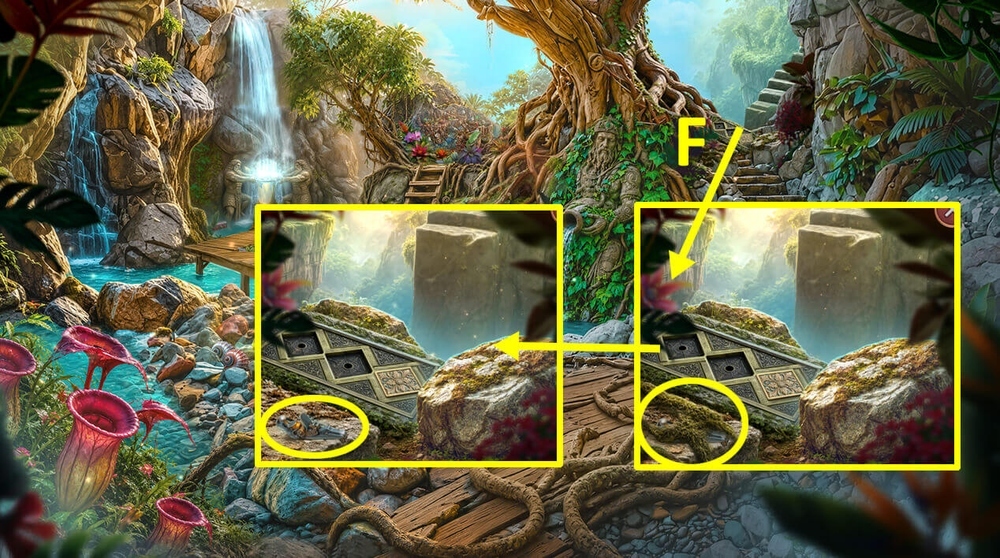
- Use TORCH on the moss, take MUSKET TRIGGER (F).
- Use MUSKET BASE, MUSKET BALL and MUSKET TRIGGER on BARREL, earn LOADED MUSKET.
- Go to the Wrecked Merchant Ship.
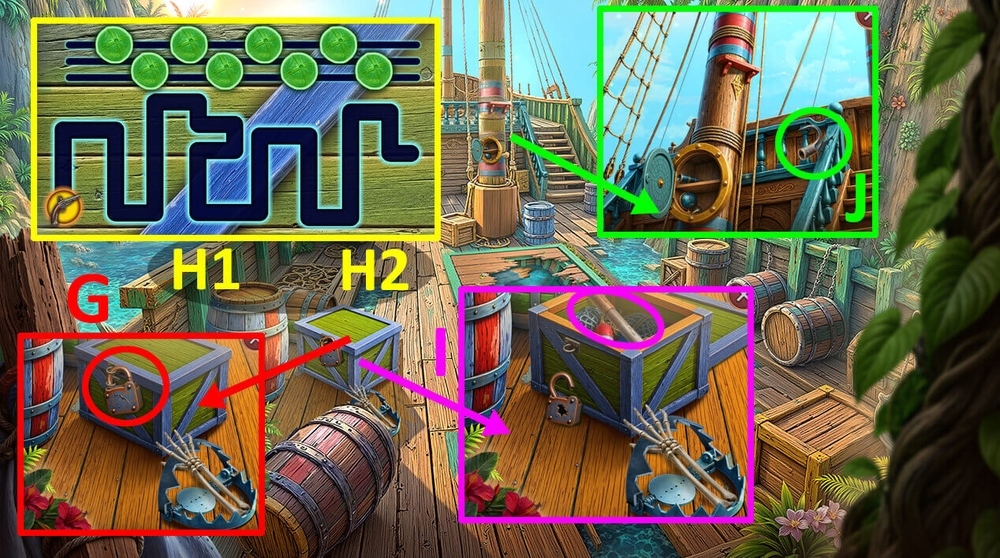
- Use LOADED MUSKET on the lock on the box (G).
- Easy solution: Solution is random (H1).
- Hard solution: Solution is random (H2).
- Take BOAT HOOK HANDLE (I).
- Use BOAT HOOK HANDLE on the hook stuck in the stair railing, earn BOAT HOOK (J).
- Go to the Hidden Lagoon.
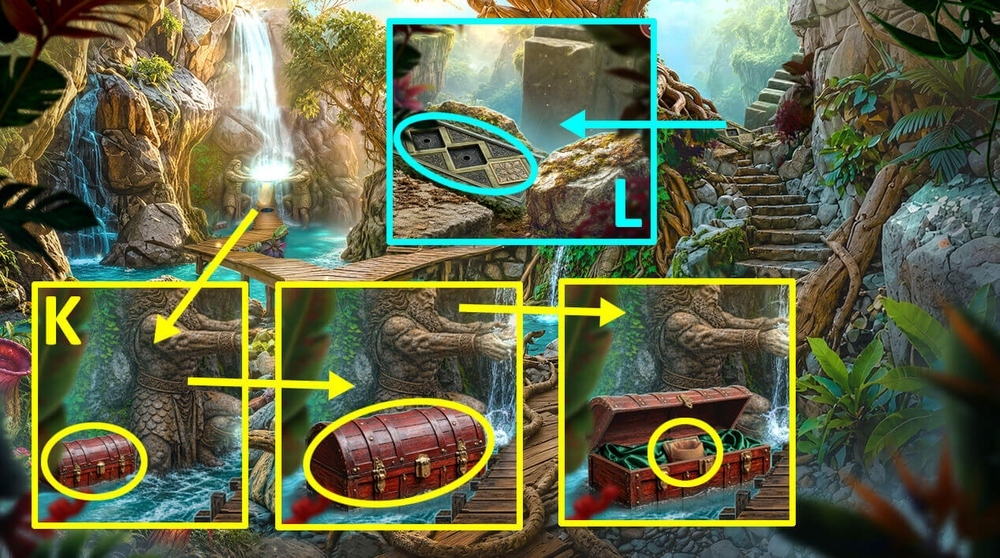
- Use BOAT HOOK on the chest in the water, tap on the chest lid, take BAG and STONE TILES 2/2 (K).
- Use STONE TILES 2/2 on the holes for the tiles (L).
- Go to the Underwater Sanctuary.
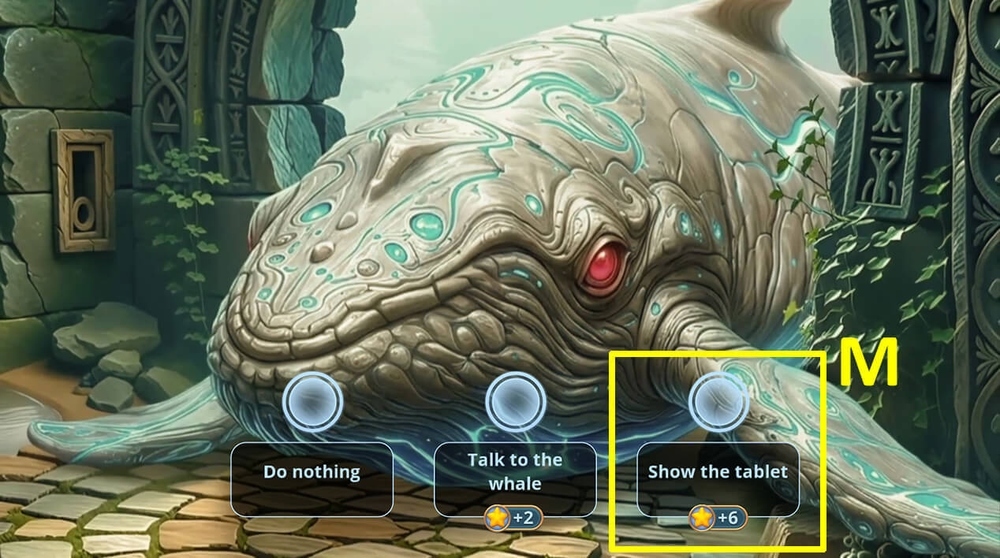
- Select this option (M).
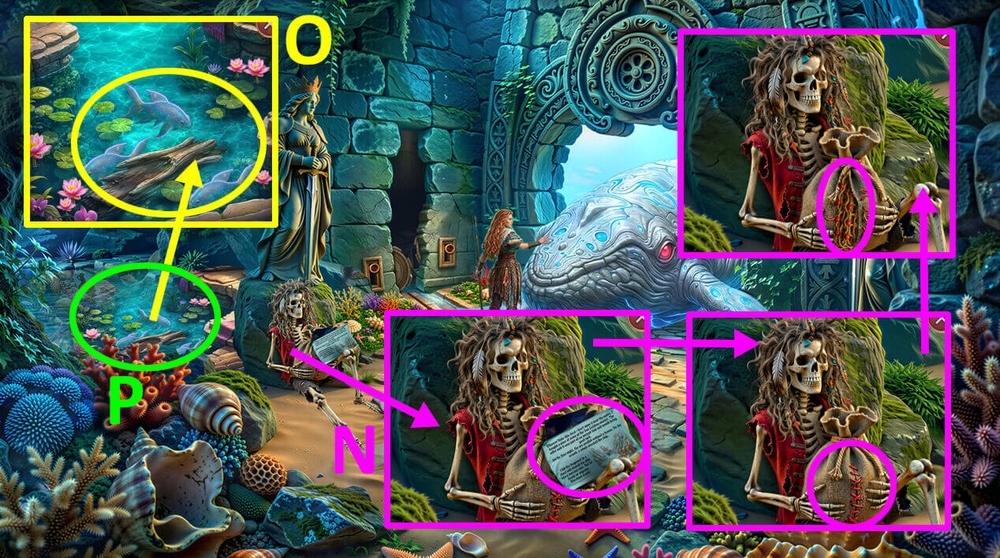
- Read the note, take INSTRUCTION and PRESSURE SCREW, use WIRE CUTTERS on the stitches on the bag, take NET (N).
- Use NET on fish (O).
- Play puzzle, earn GLOWING FISH (P).
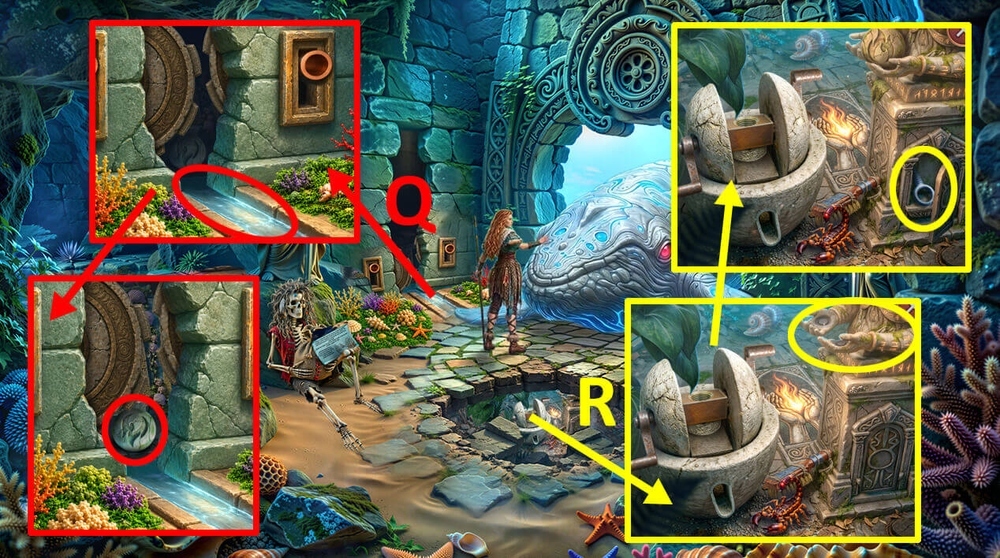
- Use GLOWING FISH on the stone canal, take FIRE DISC (Q).
- Use FIRE DISC on the statue, take SCREW (R).
- Go to the Captain’s Cabin.
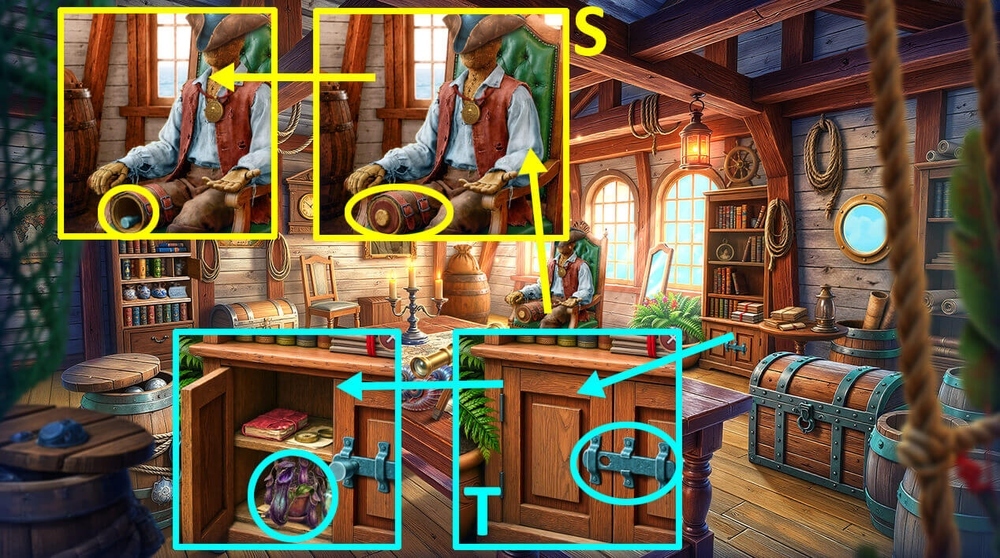
- Use SCREW on the cork, take HANDLE (S).
- Use HANDLE on the latch on the door, take POISONOUS PLANT (T).
- Go to the Cave in the Rocks.
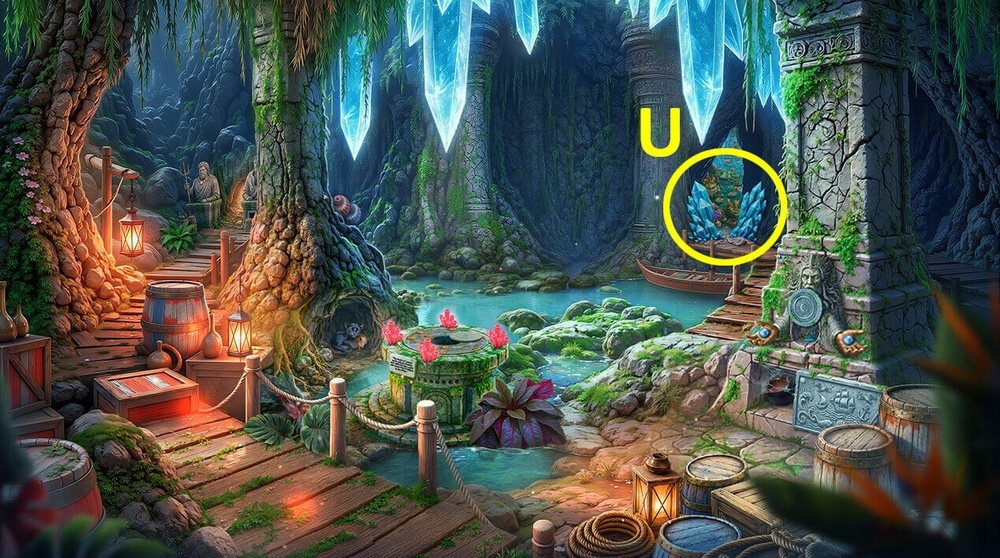
- Play puzzle, earn COIN (U).
- Go to the Deck of Esteban’s Ship.
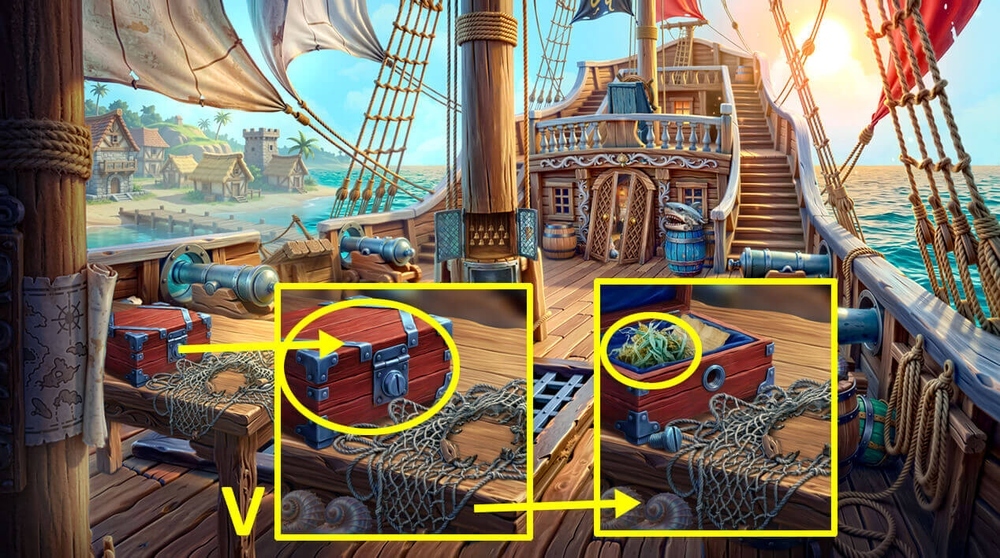
- Use COIN on the box lock, take DRIED SEAWEED (V).
- Use DRIED SEAWEED on PIPE, earn STUFFED PIPE.
- Go to the Cave in the Rocks.
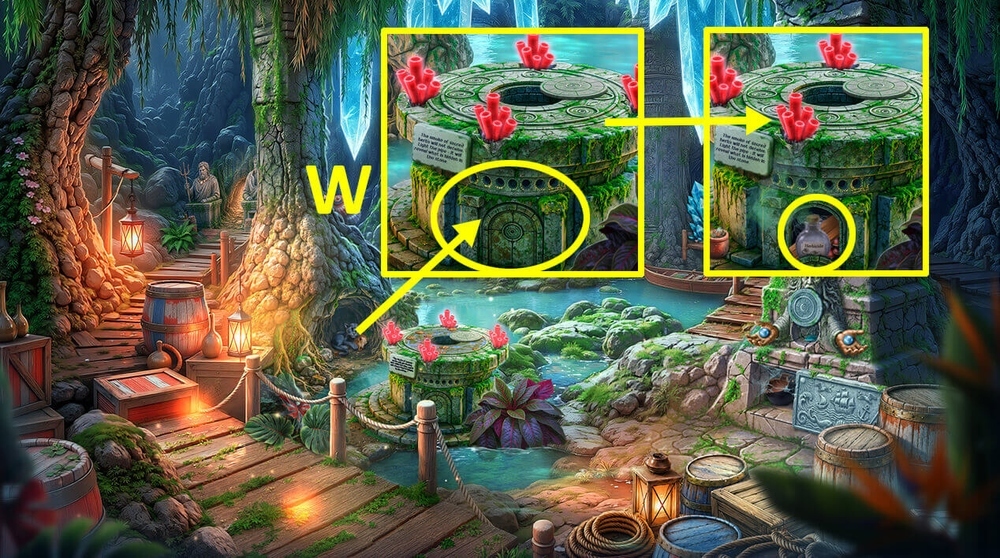
- Use STUFFED PIPE in the secret compartment in the altar, take EMPTY VIAL and PLANKS (W).
- Go to the Hidden Lagoon.

- Use PLANKS on the hole in the bridge (X).
- Easy solution: Use the picture as a hint (Y).
- Hard solution: Use the picture as a hint (Z).
- Take REAGENT (A).
- Go to the Underwater Sanctuary.
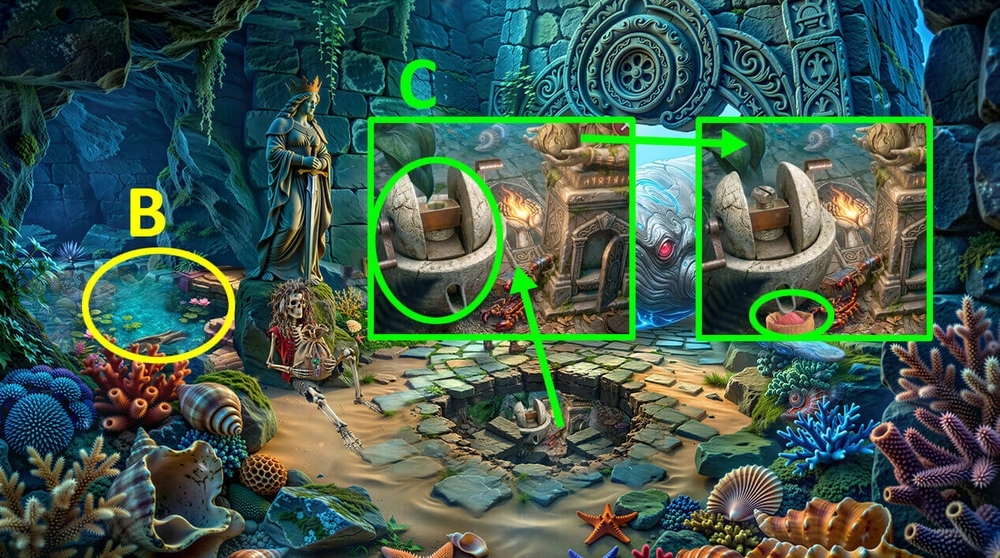
- Play puzzle, earn CORAL (B).
- Use BAG, PRESSURE SCREW and CORAL on the press, take CORAL DUST (C).
- Use POISONOUS PLANT, EMPTY VIAL, REAGENT and CORAL DUST on INSTRUCTION, earn WEED KILLER.
- Go back.
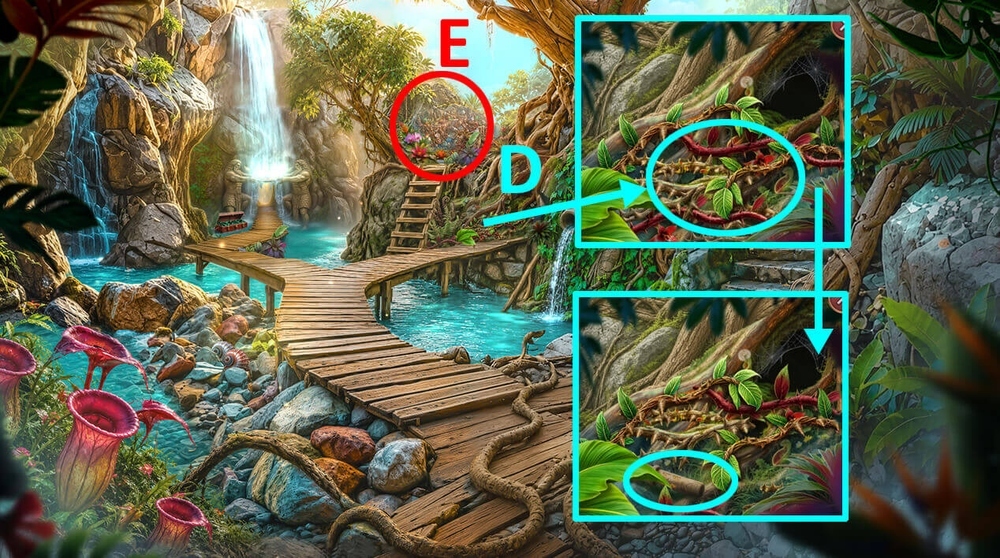
- Use WEED KILLER on the weeds, take STONE LEVERS 1/2 (D).
- Play puzzle, earn HEAVY GOBLET (E).
- Go forward.
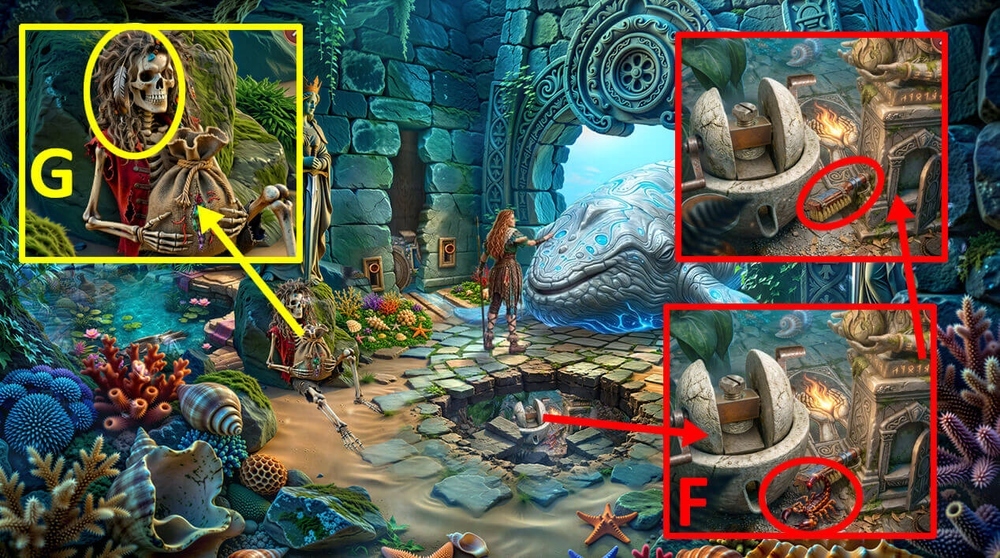
- Use HEAVY GOBLET on the scorpion, take PALM BRUSH (F).
- Use PALM BRUSH on the hair, earn STONE LEVERS 2/2 (G).
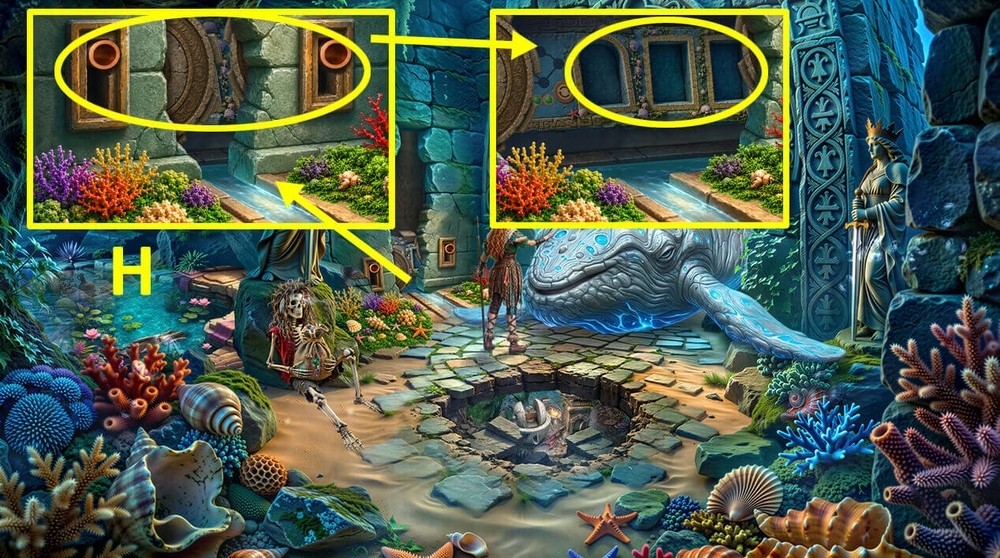
- Use STONE LEVERS 2/2 on the holes in the wall, use TABLET FRAGMENTS 3/3 on the slots for them (H).
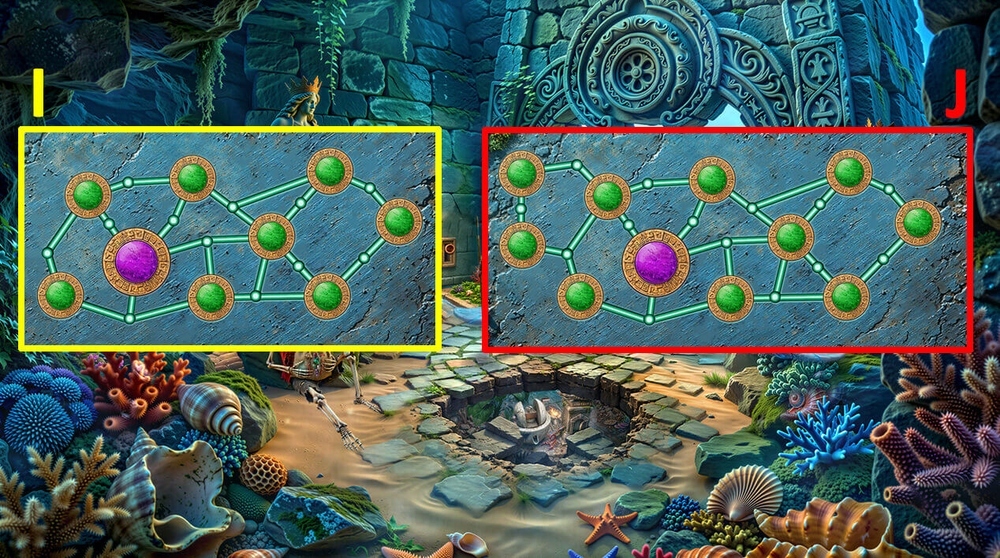
- Easy solution: Use the picture as a hint (I).
- Hard solution: Use the picture as a hint (J).
Congratulations! You have completed the game Adventure Seekers 2: Restless Waters.