Mind Echoes 3: Broken Vow – Continues Mark’s story after the main investigation has concluded. Even after Jarrett’s exposure, the danger hasn’t gone away, fragments of Lydia’s soul are still trapped inside the skeleton, and now they must be freed to stop the butler once and for all and protect Samantha from the consequences of an ancient curse. Lydia can summon the skeleton briefly, so Mark will have to use this time to gather her soul into a special vial. The search will lead the hero to additional rooms in the mansion, where magical mechanisms and new challenges await him. One of the notes he finds will reveal information about spirits bound to bones they fear incense, and its smoke can calm these otherworldly beings. Using this clue, Mark must direct the streams of incense along the correct path, bypass the ghostly energy, and restore the magical symbols. One of the trials will even require you to recreate the pattern shown by Lydia in a mirror image. Once all the necessary elements are gathered, Mark will be able to restore Lydia’s soul and face Jarrett in a decisive showdown. However, the final battle will require a difficult choice you’ll have to decide whether to protect Samantha, seek Jamie’s help, or act on your own. The decisions you make will determine how the story ends and whether you’ll finally be able to rid yourself of the consequences of the Moonwood curse.
Bonus Chapter Walkthrough

- Talk with Samantha, earn MAGIC MIRROR.
- Take TILE SHARDS (A).
- Take PIG FIGURINE, use CHAIN on the mechanism (B).
- Use PIG FIGURINE on the WINE BOTTLE, take KEY (C).
- Use KEY on the lock (D).
- Play puzzle, earn FILE (E).
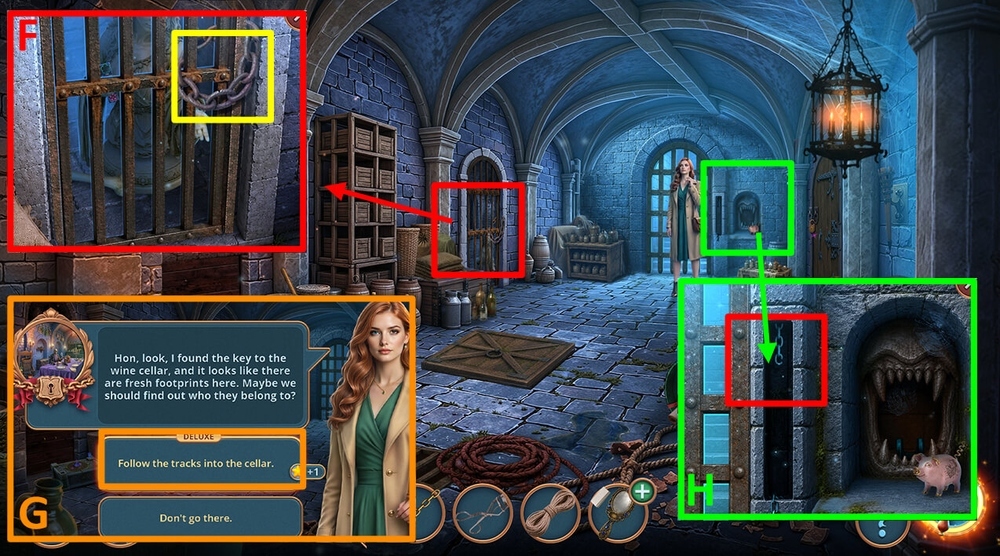
- Use FILE on the chain, take BONE (F).
- Select this option (G).
- Use BONE on the mechanism (H).
- Go to Wine Cellar.
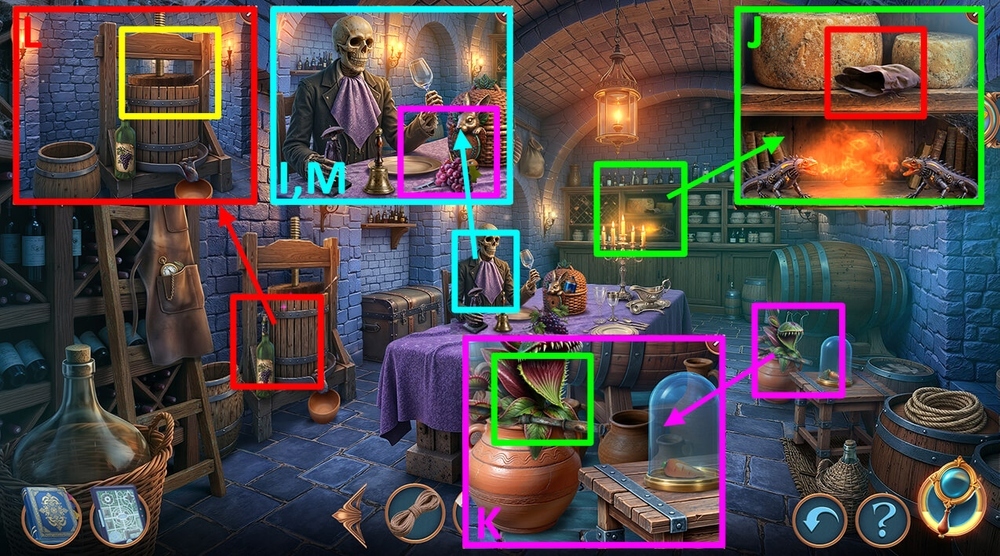
- Take GRAPES and PARMESAN KNIFE (I).
- Take SPICE POUCH, use PARMESAN KNIFE on the cheese, take PIECE OF SPOILED PARMESAN (J).
- Use PIECE OF SPOILED PARMESAN on the flower, take PRESS HANDLE (K).
- Use PRESS HANDLE on the press, take SPICE SCOOP, use GRAPES on the barrel (L).
- Use PIECE OF SPOILED PARMESAN on the skeleton (M).
- Go to Mansion’s Sanctuary.
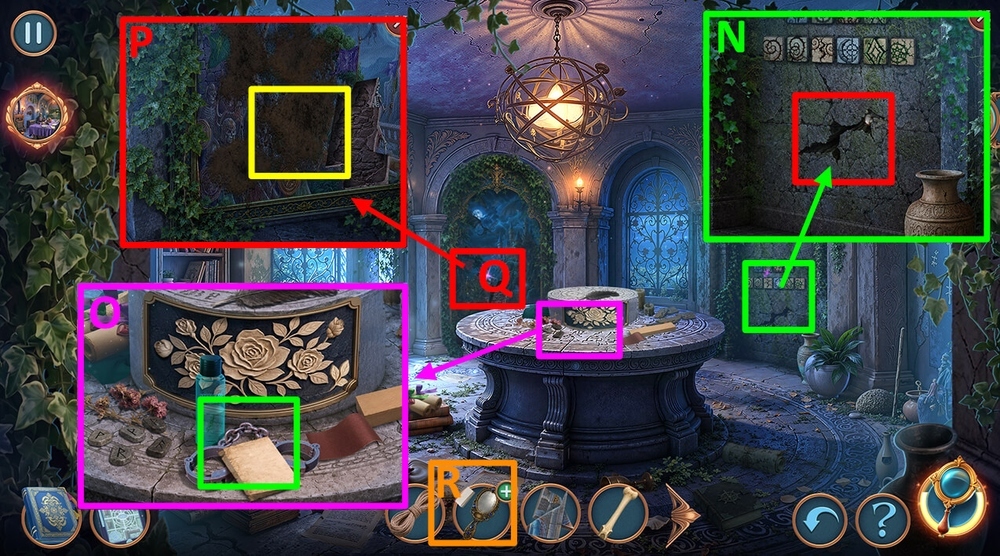
- Use EYELASH CURLER on the crack, earn COTTON (N).
- Take and read the note, take SHACKLES and MICELLAR WATER (O).
- Use MICELLAR WATER and COTTON on the wall (P).
- Play puzzle, earn MAGIC AGATE (Q).
- Use MAGIC AGATE on the MAGIC MIRROR (R).
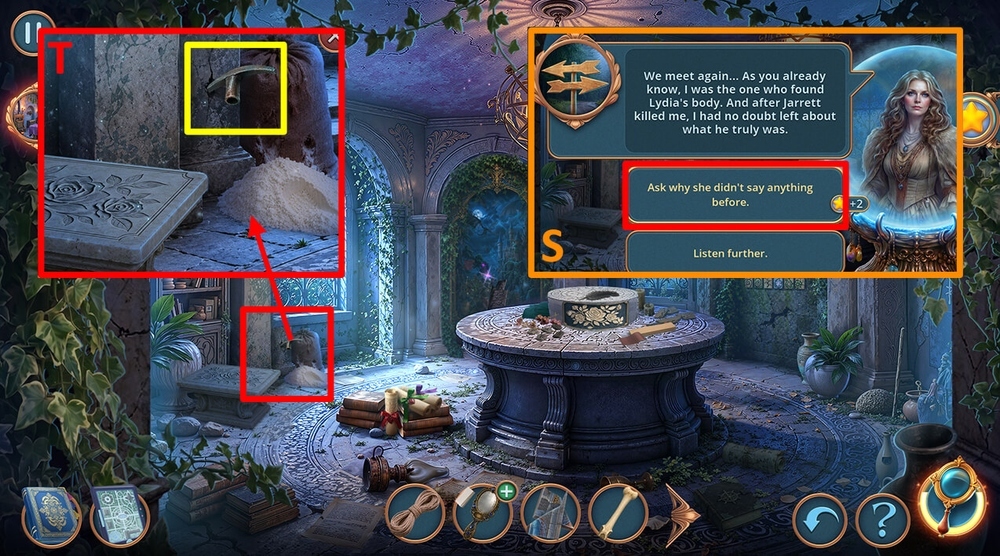
- Select this option, earn HANDLE (S).
- Use HANDLE on the pick, take PICKAXE, use SPICE POUCH and SPICE SCOOP on the flour, take BONE DUST (T).
- Go to WINE CELLAR.
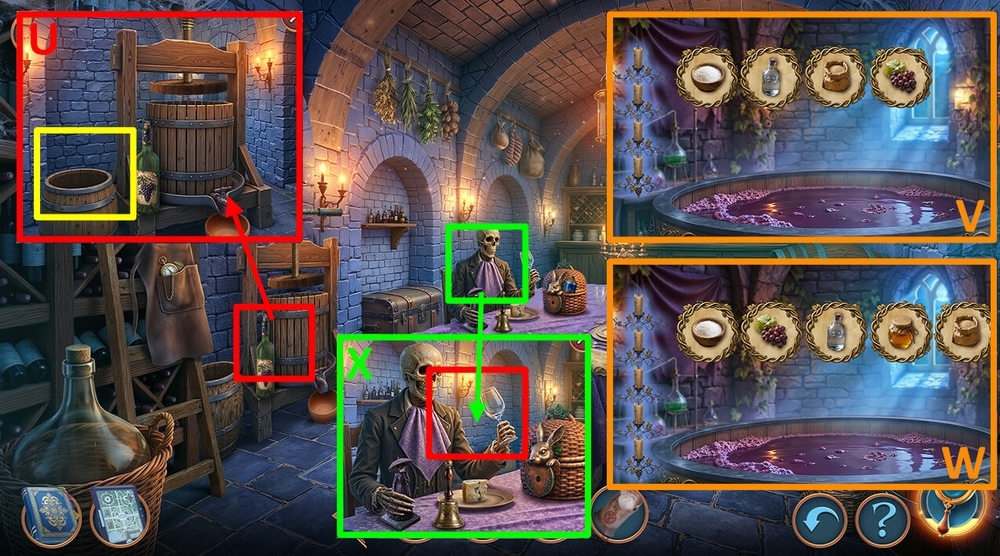
- Use BONE DUST on the barrel (U).
- Easy solution: Click on the ingredients: 1-grapes, rice, yeast, alcohol, 2-yeast, grapes, alcohol, rice, take WINE (V).
- Hard solution: Click on the ingredients: 1-grapes, rice, yeast, alcohol, honey, 2-yeast, honey, alcohol, grapes, rice, take WINE (W).
- Use WINE on the skeleton, take LADY FIGURINE (X).
- Go to Mansion’s Sanctuary.
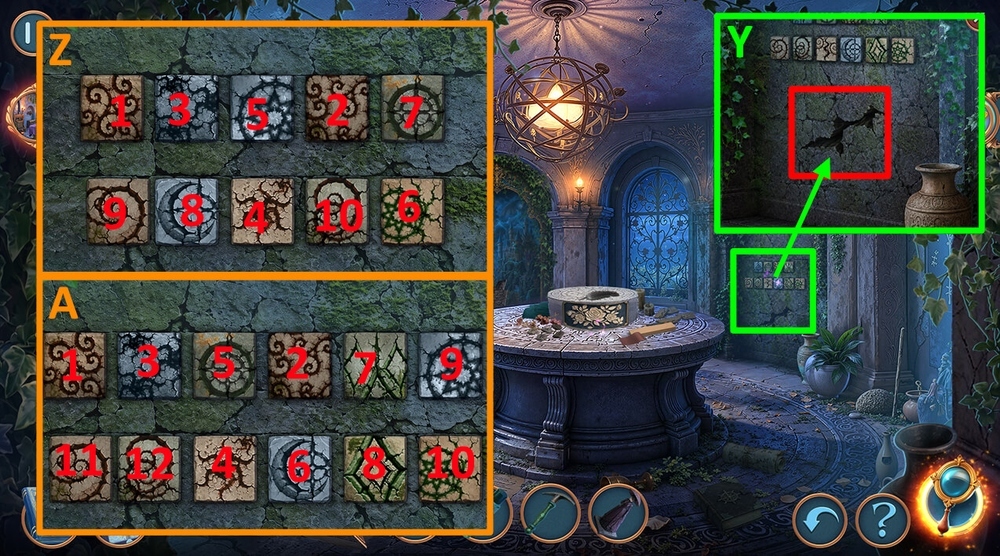
- Use PICKAXE on the wall (Y).
- Easy solution: Tap on the segments in the order shown in the picture (Z).
- Hard solution: Tap on the segments in the order shown in the picture (A).
- Go forward.
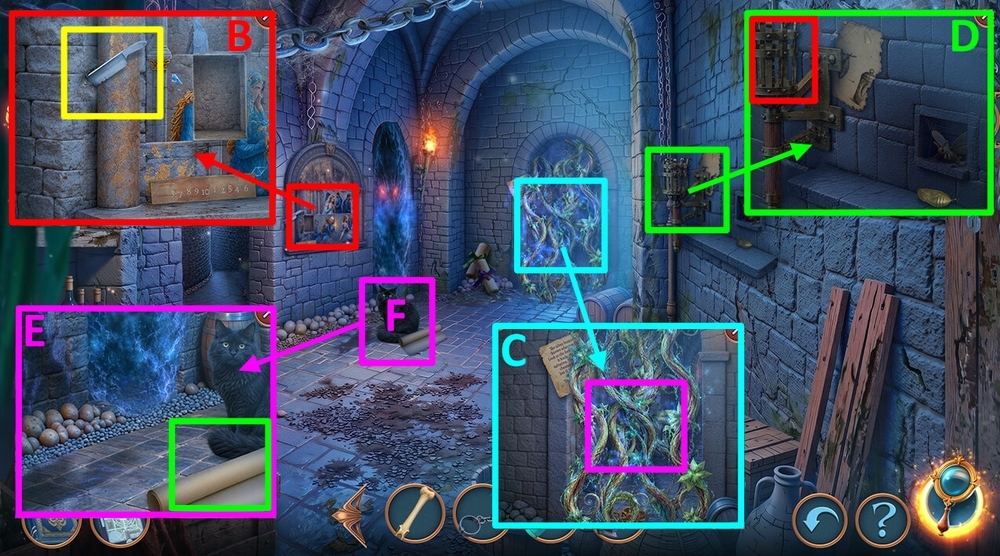
- Use ROPE on the knife, earn RAZOR (B).
- Use RAZOR on the vines, take and read the note, take GEAR and FLINT AND STEEL (C).
- Use FLINT AND STEEL on the torch, take TOY MOTH (D).
- Take MANSION BLUEPRINTS, use TOY MOTH on the cat (E).
- Play puzzle, earn DRY PLASTER (F).
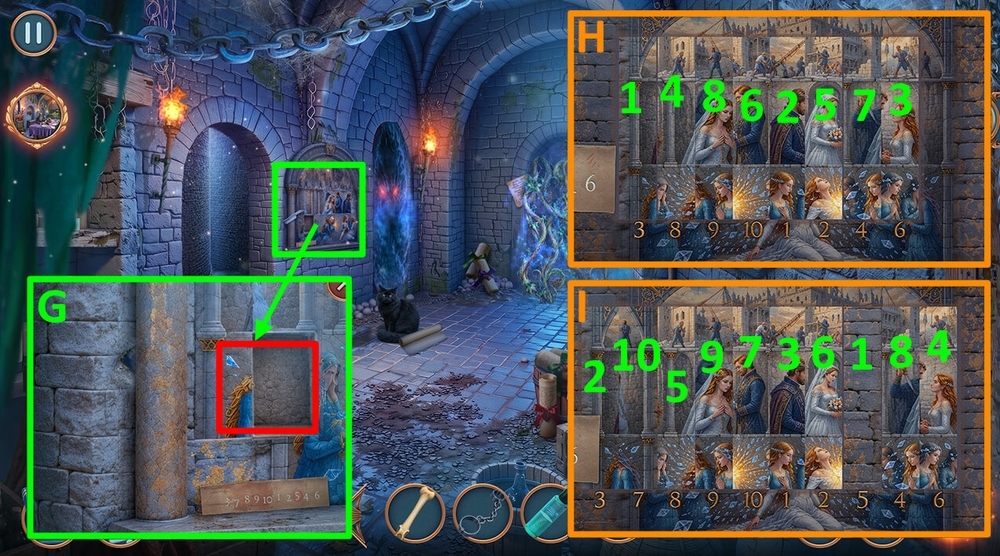
- Use TILE SHARDS, MICELLAR WATER and DRY PLASTER on the wall (G).
- Easy solution: Tap on the segments in the order shown in the picture (H).
- Hard solution: Tap on the segments in the order shown in the picture (I).
- Go forward.
- Use SHACKLES on the lever, take STAND FIXTURE (J).

- Take TORN PHOTOGRAPH, use STAND FIXTURE on the stand, take ROSE (K).
- Take BELT (L).
- Take DIARY (M).
- Go to Mansion Basement.
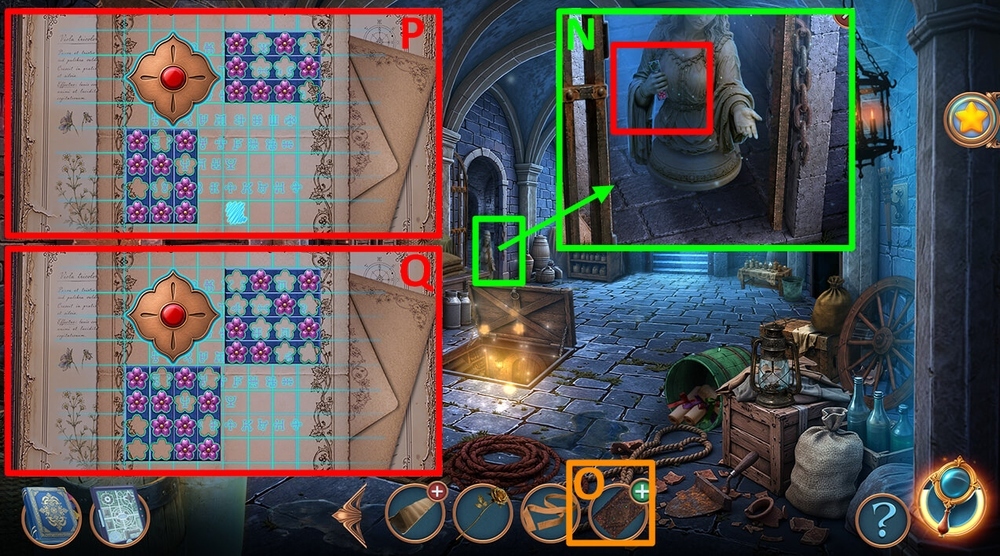
- Use ROSE on the statue, take DECODER (N).
- Use DECODER on the DIARY (O).
- Easy solution: place the bars as shown in the picture, tap the button “Check”, read the note, take PHOTO PIECES 1/3 and LYDIA’S TIARA (P).
- Hard solution: place the bars as shown in the picture, tap the button “Check”, read the note, take PHOTO PIECES 1/3 and LYDIA’S TIARA (Q).
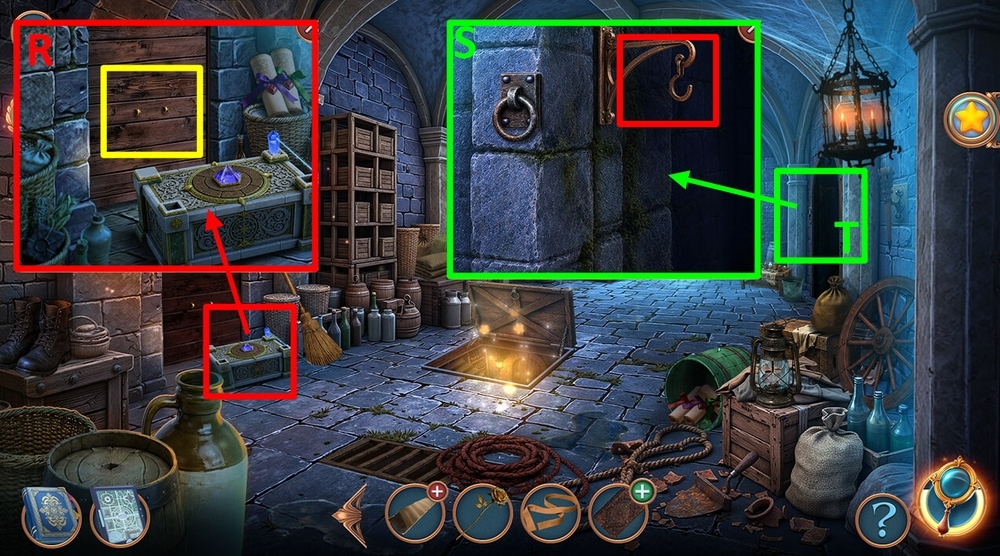
- Use LYDIA’S TIARA on the door, take OIL LAMP (R).
- Use OIL LAMP on the hook (S).
- Play puzzle, earn TIME CAPSULE (T).
- Go to SECRET PASSAGES.
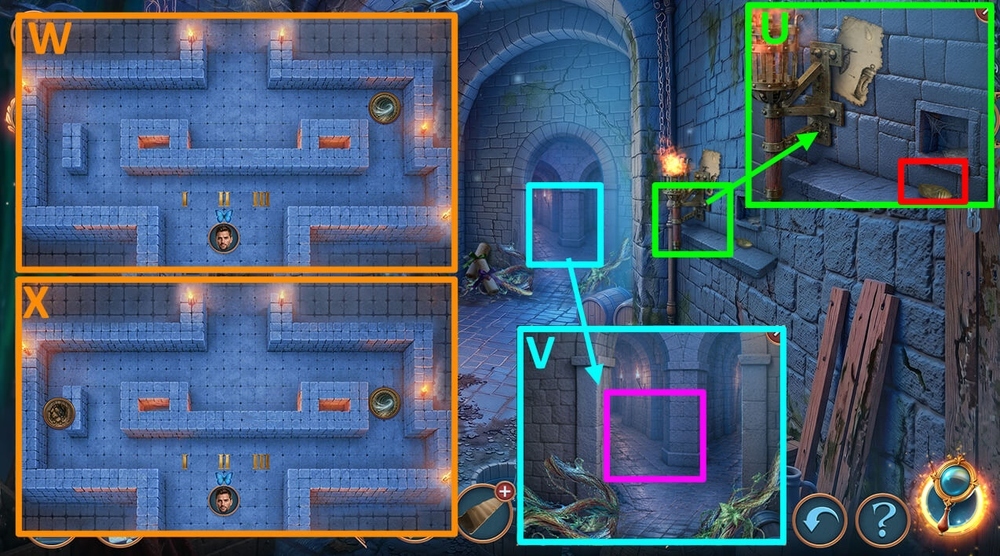
- Use TIME CAPSULE on the cocoon, take GUIDING BUTTERFLY (U).
- Use GUIDING BUTTERFLY on the labyrinth (V).
- Easy solution: choice the path at the right time (W).
- Hard solution: choice the path at the right time (X).
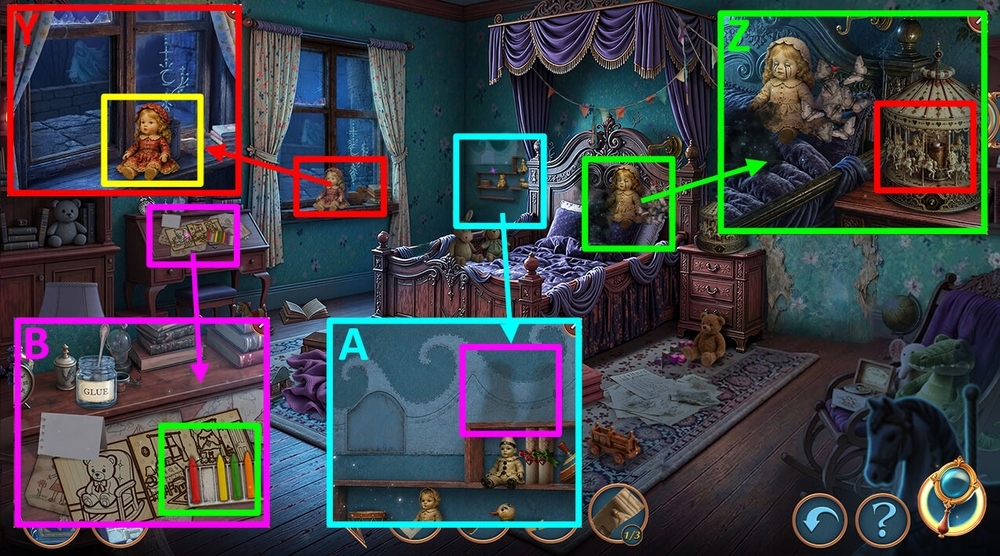
- Take DOLLS 1/2 and SOLVENT (Y).
- Use GEAR on the lamp, take SAILBOAT (Z).
- Use SAILBOAT on the painted waves, take DARTS 1/3 and WAX CRAYON (A).
- Use WAX CRAYON on the table (B).
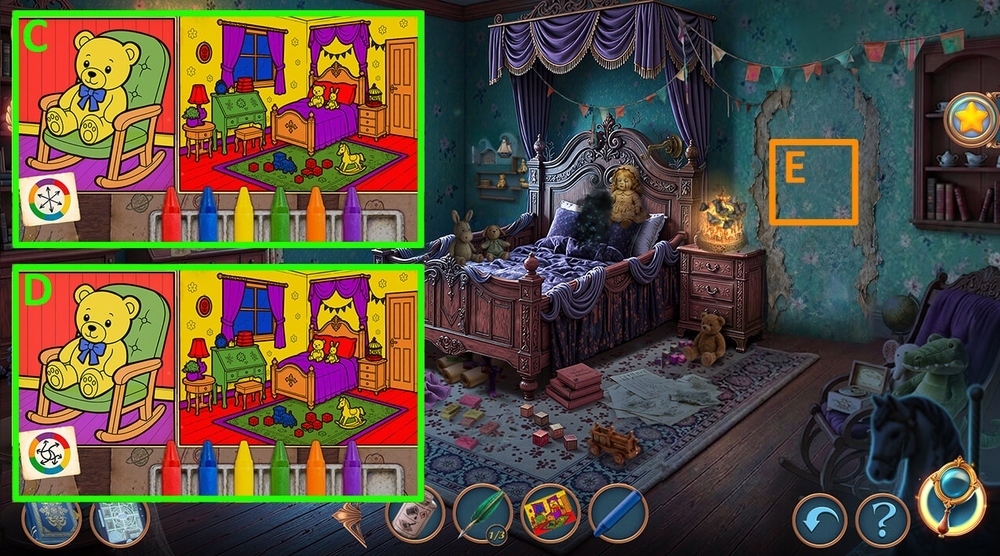
- Easy solution: Color the picture as shown in the picture, take JAMIE’S DRAWINGS (C).
- Hard solution: Color the picture as shown in the picture, take JAMIE’S DRAWINGS (D).
- Use JAMIE’S DRAWINGS on the room (E).
- Go forward.
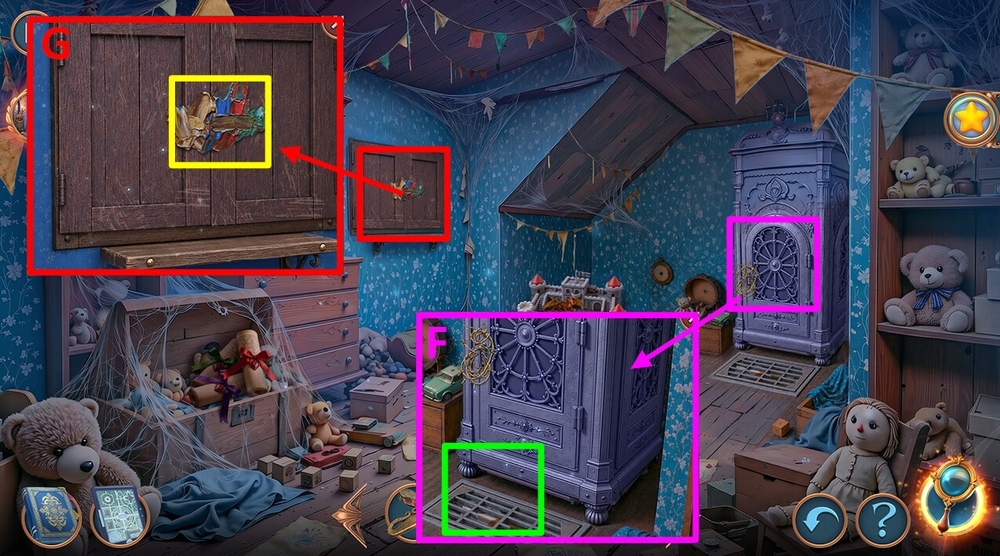
- Use BONE and BELT on the grid, take FLOUR, DARTS 2/3 and APRON (F).
- Use APRON and SOLVENT on the dye, take PHOTO PIECES 2/3 and FRESCO PIECE (G).
- Go to Mansion’s Sanctuary.
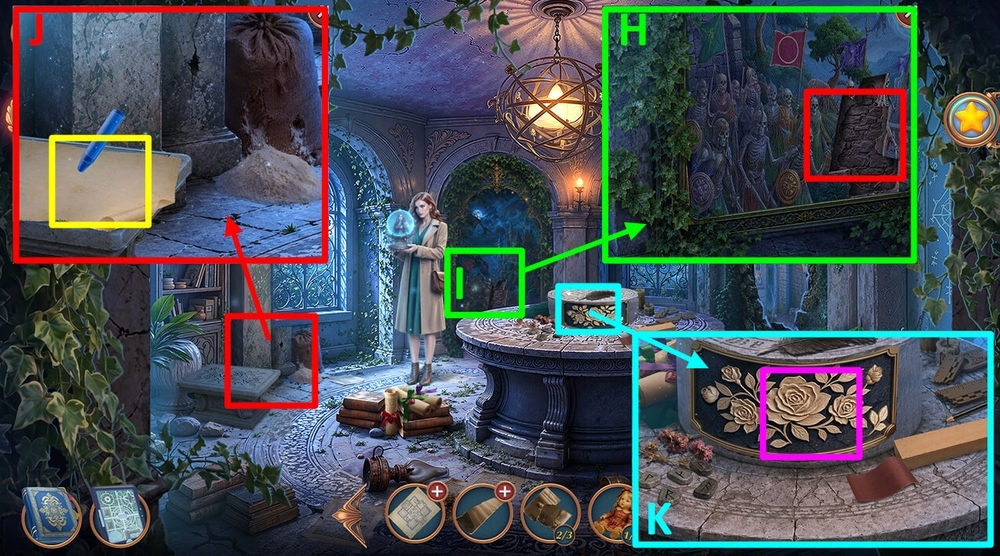
- Use FRESCO PIECE on the fresco (H).
- Play puzzle, earn EMPTY PARCHMENT (I).
- Use EMPTY PARCHMENT and WAX CRAYON on the pattern, take PATTERN (J).
- Use PATTERN on the door, take CAP, use LADY FIGURINE on the count figurine, take DIAMOND (K).
- Go to WINE CELLAR.
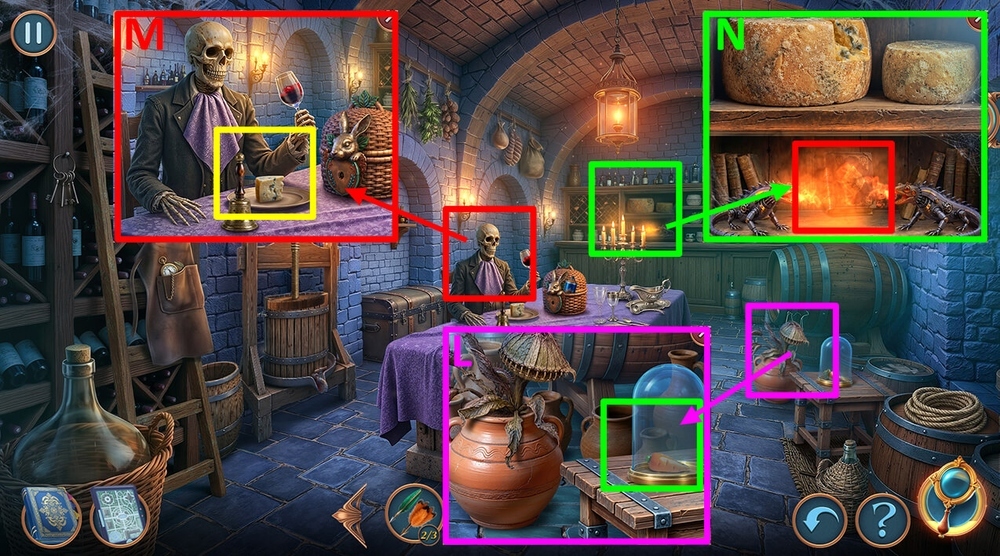
- Use DIAMOND on the glass, take CARROT AMULET (L).
- Use CARROT AMULET on the slot, take FREEZING SPRAY (M).
- Use FREEZING SPRAY on the fire-breathing lizards, take and read the note (N).
- Go to Lydia’s Old Room.
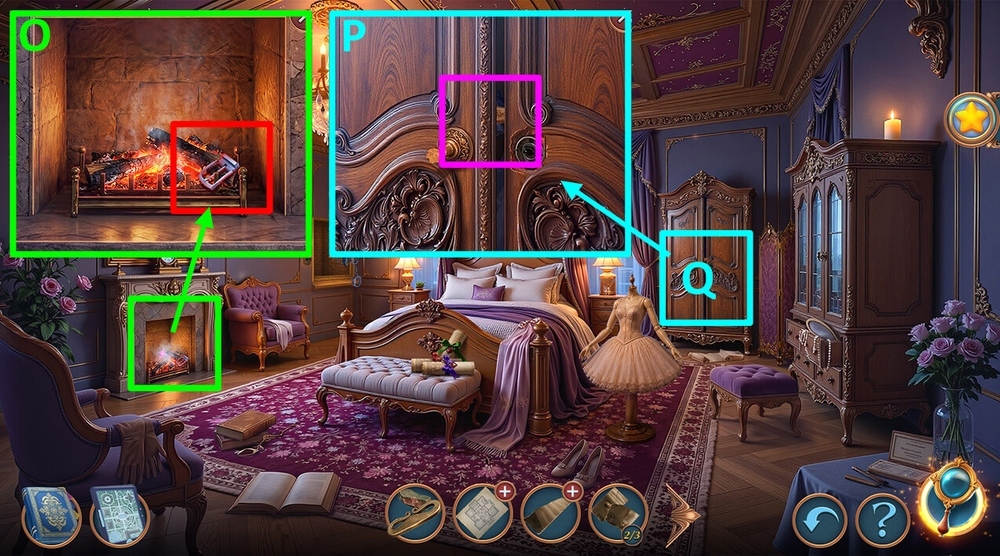
- Use CAP on the coals, take METAL BELT BUCKLE (O).
- Use METAL BELT BUCKLE on the door (P).
- Play puzzle, earn TOY CASTLE TOWER (Q).
- Go to Abandoned Closet.
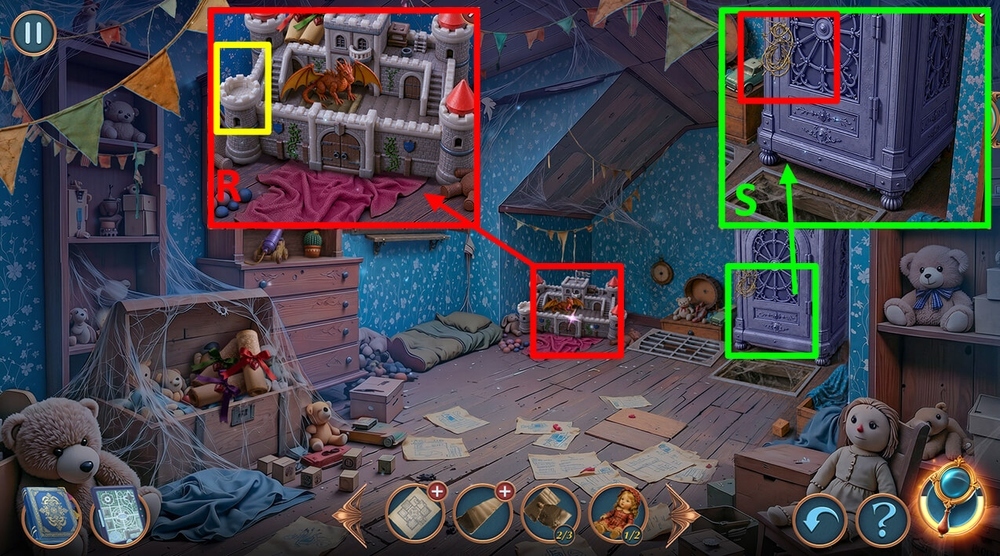
- Use TOY CASTLE TOWER on the castle, take GELATIN, TRACING PAPER, and CUTTERS (R).
- Use CUTTERS on the wire (S).
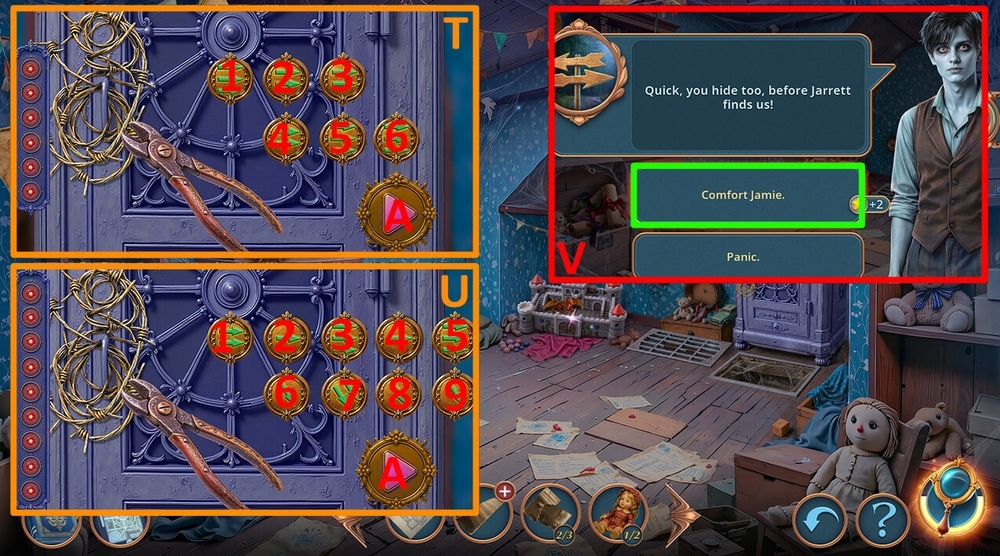
- Easy solution: Tap the buttons in the following order: 1×2-2-3-4×2-5-6×2-A (T).
- Hard solution: Tap the buttons in the following order: 2-5×2-6×2-9-A (U).
- Select this option, earn DREAMCATCHER (V).
- Go back.
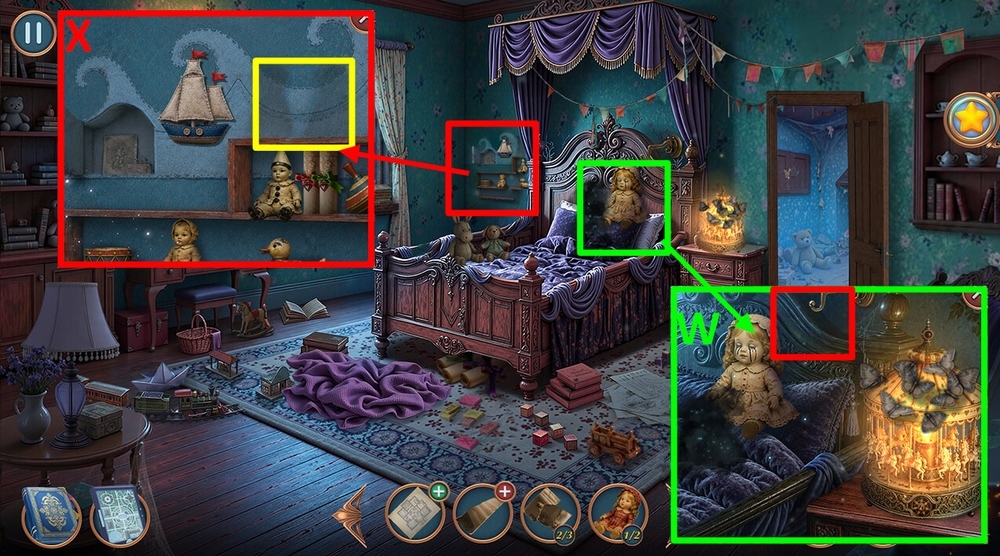
- Use DREAMCATCHER on the hook, take DOLLS 2/2 (W).
- Use DOLLS 2/2 on the doll’s shadow (X).
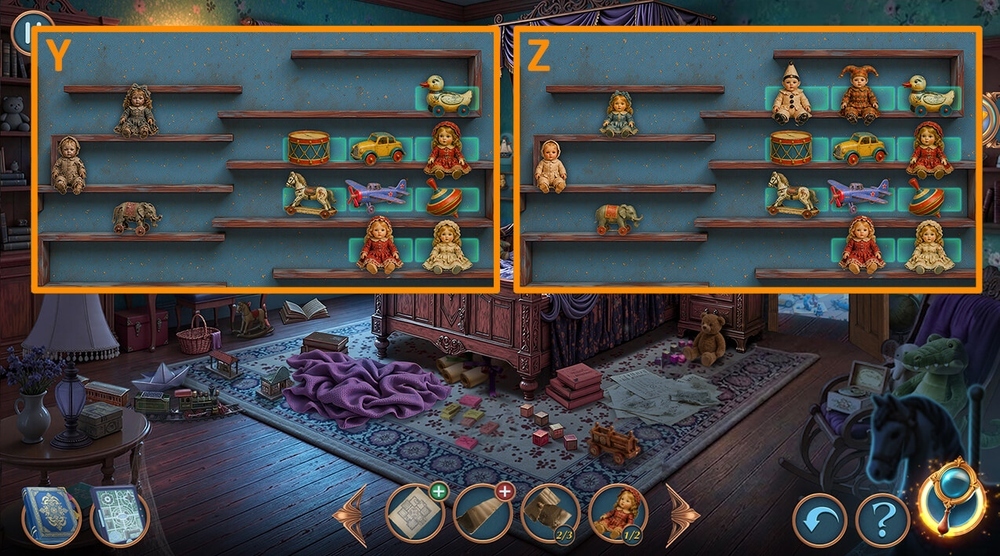
- Easy solution: Arrange the toys as shown in the picture, take DRIVE COIL and PET BRUSH (Y).
- Hard solution: Arrange the toys as shown in the picture, take DRIVE COIL and PET BRUSH (Z).
- Go to Secret Passages.
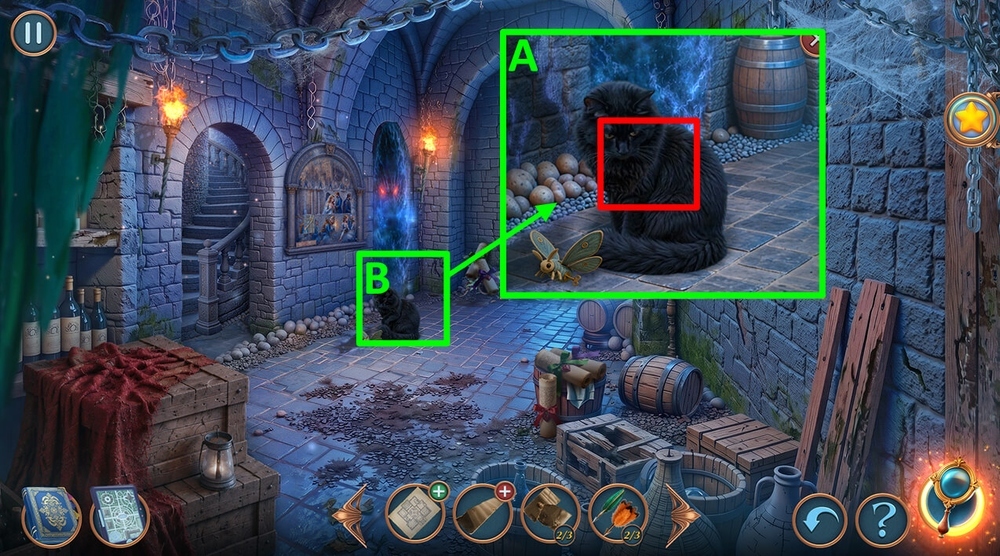
- Use PET BRUSH on the cat (A).
- Play puzzle, earn CARVING KIT (B).
- Go back.
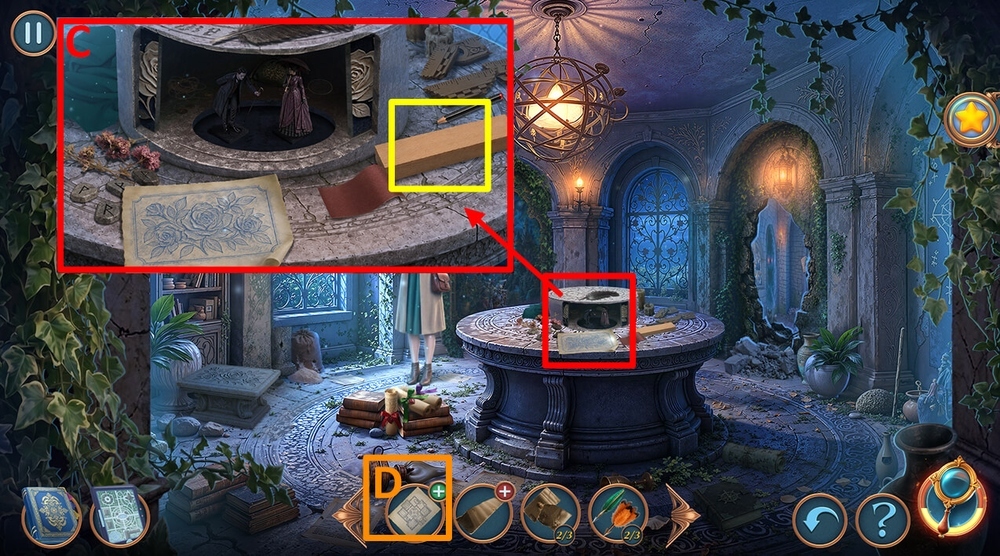
- Use CARVING KIT on the wooden blank, take DRAWING RULER (C).
- Use DRAWING RULER and TRACING PAPER on the MANSION BLUEPRINTS (D).
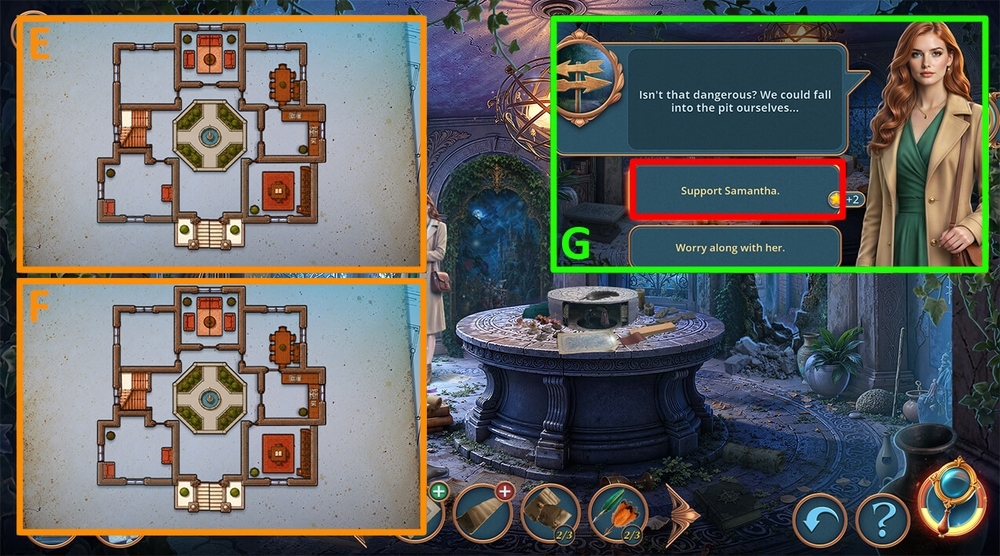
- Easy solution: Arrange the parts of the building as shown in the picture (E).
- Hard solution: Arrange the parts of the building as shown in the picture (F).
- Select this option, earn BALL (G).
- Go to Abandoned Closet.
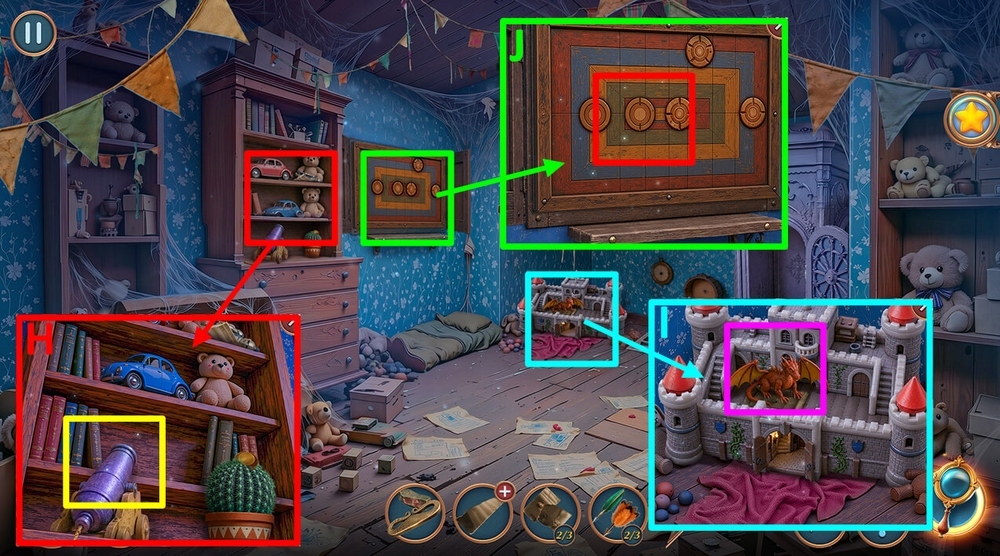
- Use BALL and FLINT AND STEEL on the cannon, take PHOTO PIECES 3/3 and KNIGHT TOY (H).
- Use KNIGHT TOY on the dragon toy, take HOOK, CRYSTALS 1/2 and DARTS 3/3 (I).
- Use DARTS 3/3 on the target (J).
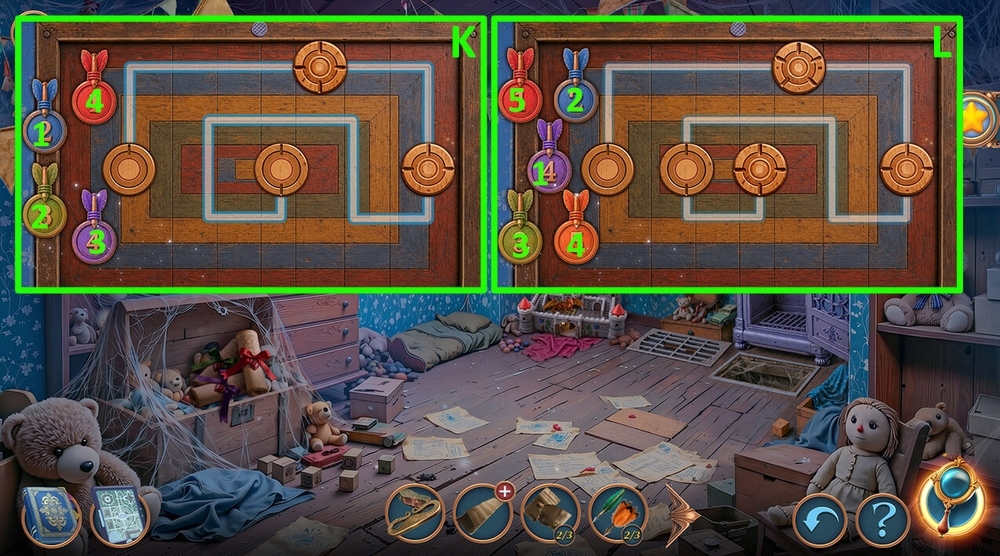
- Easy solution: Tap the buttons in the order shown in the picture, take ELEPHANT FIGURINE and GLYCERIN (K).
- Hard solution: Tap the buttons in the order shown in the picture, take ELEPHANT FIGURINE and GLYCERIN (L).
- Go back.

- Use FLOUR, GELATIN and GLYCERIN on the jar, take HOMEMADE GLUE (M).
- Use HOMEMADE GLUE and PHOTO PIECES on the TORN PHOTOGRAPH, earn WEDDING PHOTO (N).
- Go to Lydia’s Old Room.
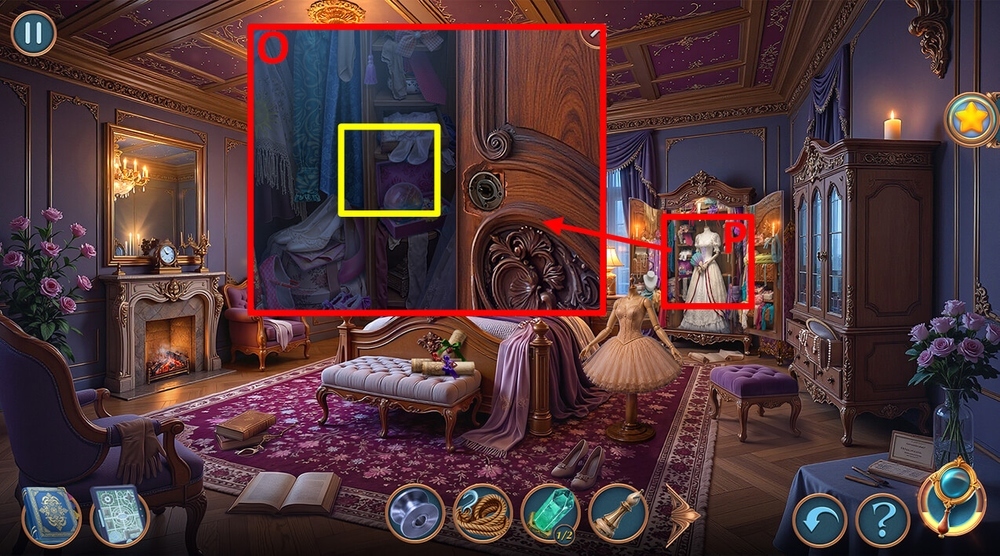
- Use WEDDING PHOTO on the wardrobe (O).
- Play puzzle, earn HAIR CLIP (P).
- Go to Abandoned Closet.
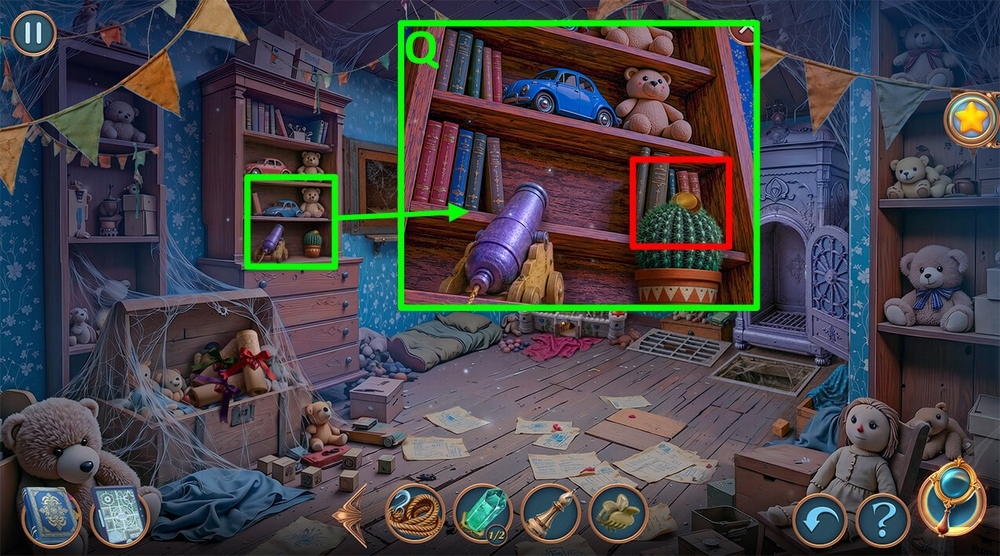
- Use HAIR CLIP on the cactus, earn CONTROL BUTTON (Q).
- Go to Lydia’s Old Room.
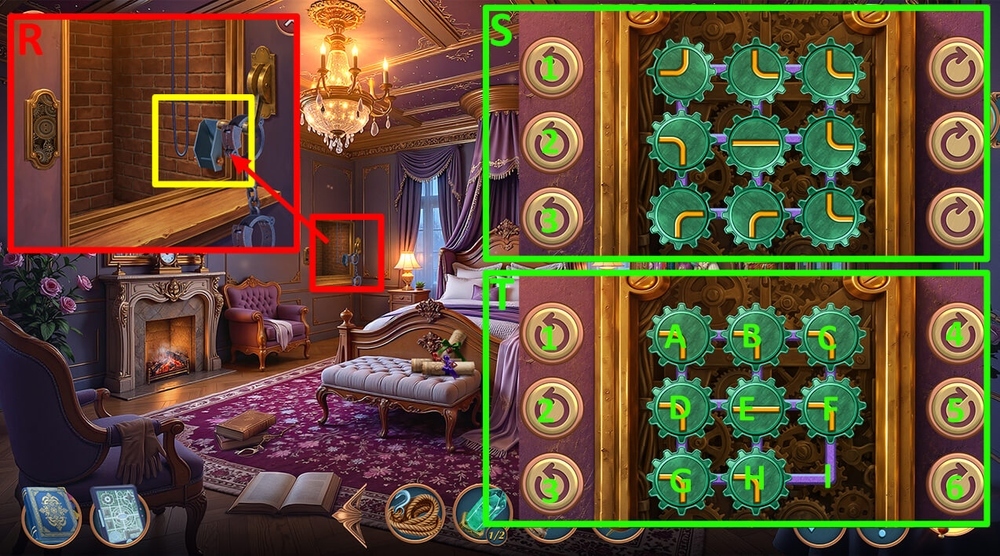
- Use DRIVE COIL and CONTROL BUTTON on the elevator (R).
- Easy solution: Tap the buttons in the following order: 1×2-2×2-3 (S).
- Hard solution: Tap the buttons in the following order: 6-F-6-C-B-E-F-C-1-F-E-4-B-1-C-F-5×2-C (T).
- Go forward.
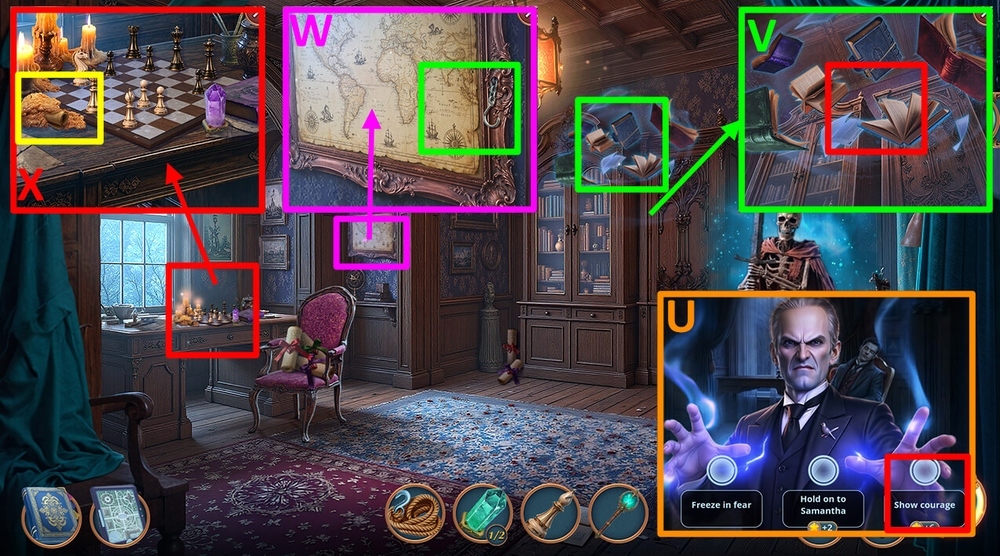
- Select this option, earn SOUL CATCHER (U).
- Use HOOK on the flying book, take PISTOL WITH SUCTION CUP and COMPASS (V).
- Use COMPASS on the chain, take METAL COMB (W).
- Take CRYSTALS 2/2, use METAL COMB on the wax, take and read the note, take INCENSE (X).
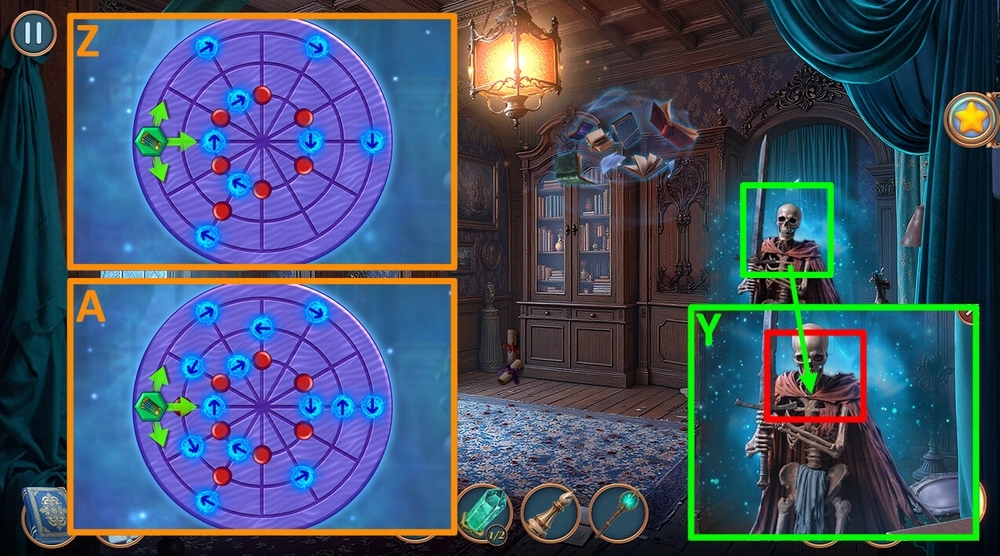
- Use INCENSE on the skeleton (Y).
- Easy solution: Tap the arrows in the following order: up(x3)-down-left-down(x2), take SILVER TRAY (Z).
- Hard solution: Tap the arrows in the following order: up(x3)-down-left-down(x2) , take SILVER TRAY (A).
- Go back.
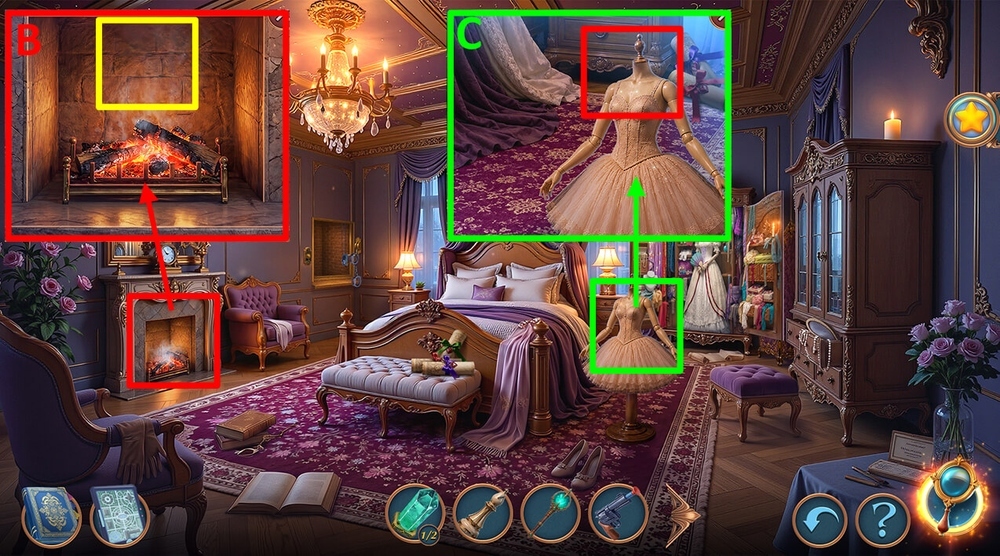
- Use SILVER TRAY on the fireplace, use PISTOL WITH SUCTION CUP on the item, earn MANNEQUIN HEAD (B).
- Use MANNEQUIN HEAD on the mannequin (C).

- Easy solution: Tap on the shadows in the order shown in the picture, take CHESS PIECE (D).
- Hard solution: Tap on the shadows in the order shown in the picture, take CHESS PIECE (E).
- Go forward.
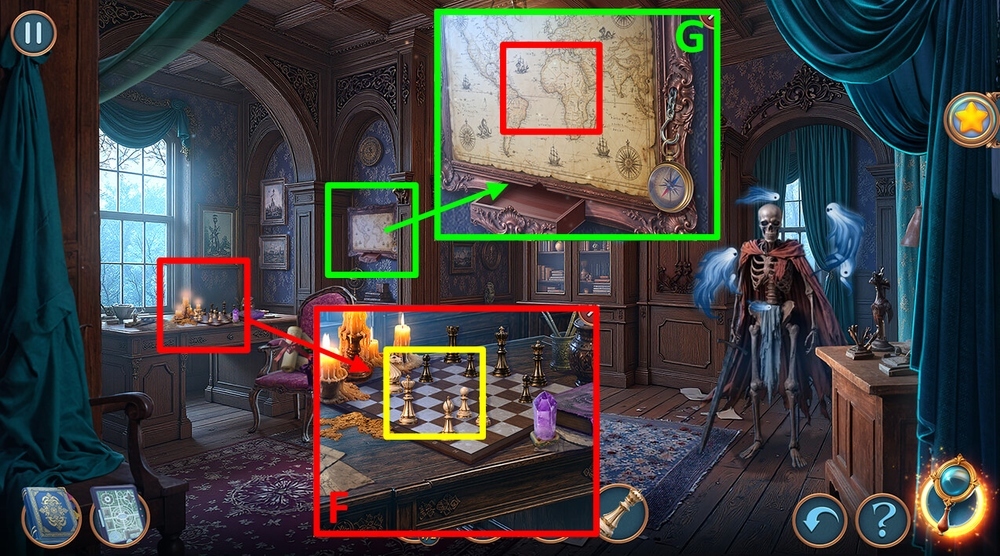
- Use CHESS PIECE and ELEPHANT FIGURINE on the chessboard, take HOT AIR BALLOON (F).
- Use HOT AIR BALLOON on the map, take SMALL MIRROR (G).
- Go to Mansion Basement.
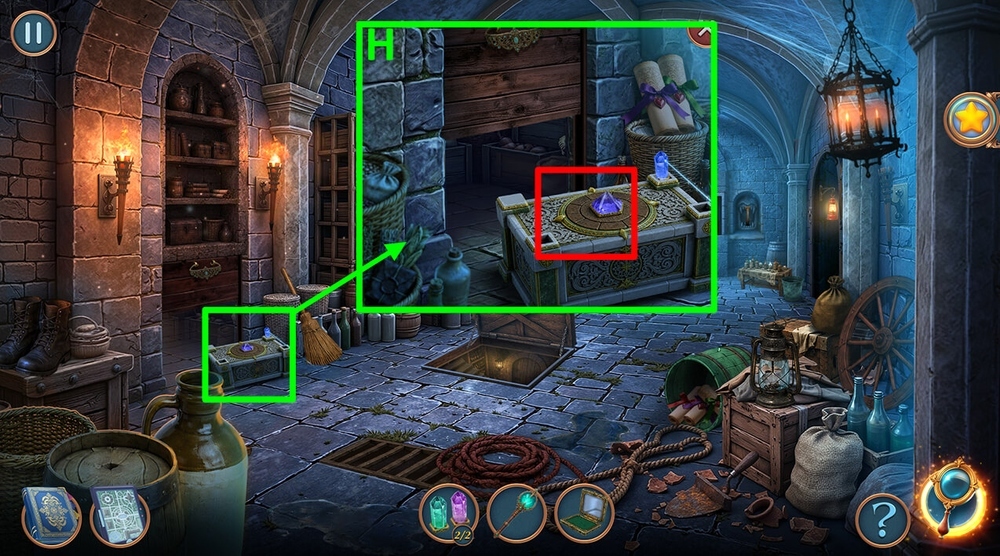
- Use SMALL MIRROR and CRYSTALS on the lid, take HENNA (H).
- Go to Abandoned Room.
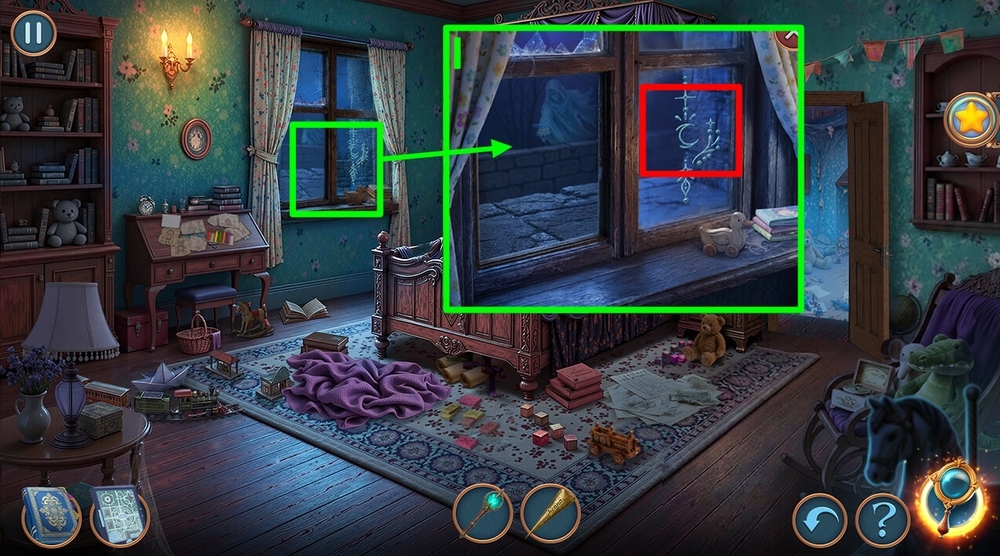
- Use HENNA on the symbol, take KEY (I).
- Go to Count’s Study.
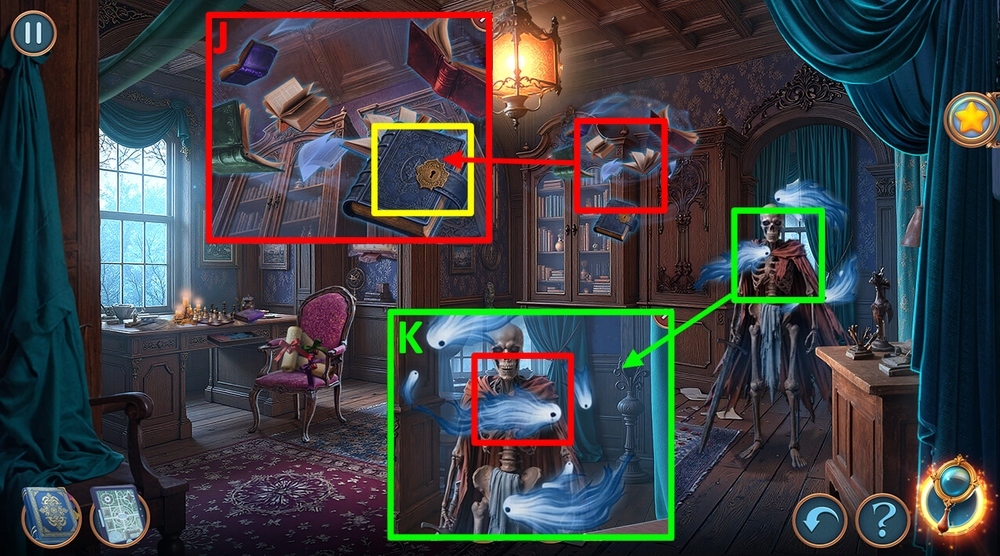
- Use KEY on the lock, take and read the note, take SOUL FLASK (J).
- Use SOUL CATCHER and SOUL FLASK on the souls, earn LYDIA’S SOUL (K).
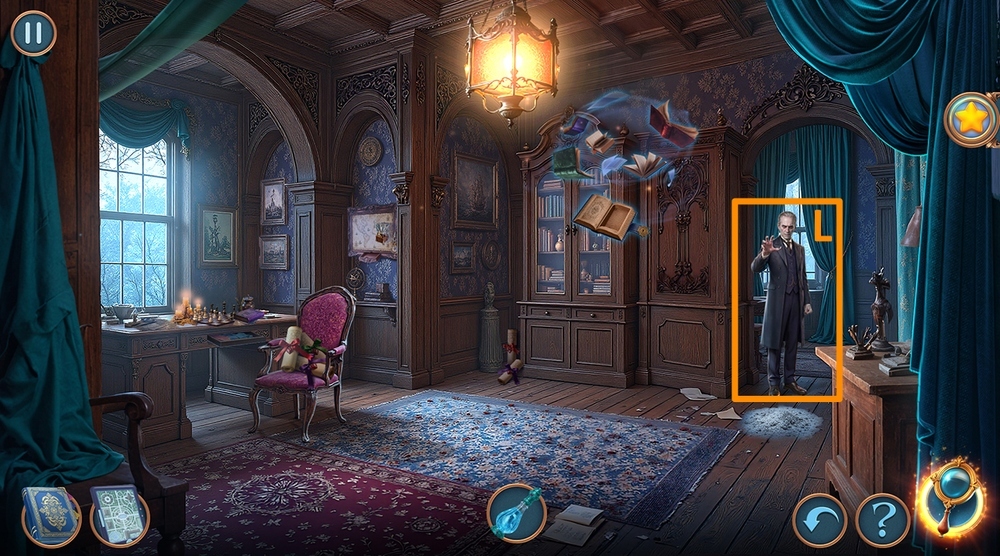
- Use LYDIA’S SOUL on Jarrett (L).
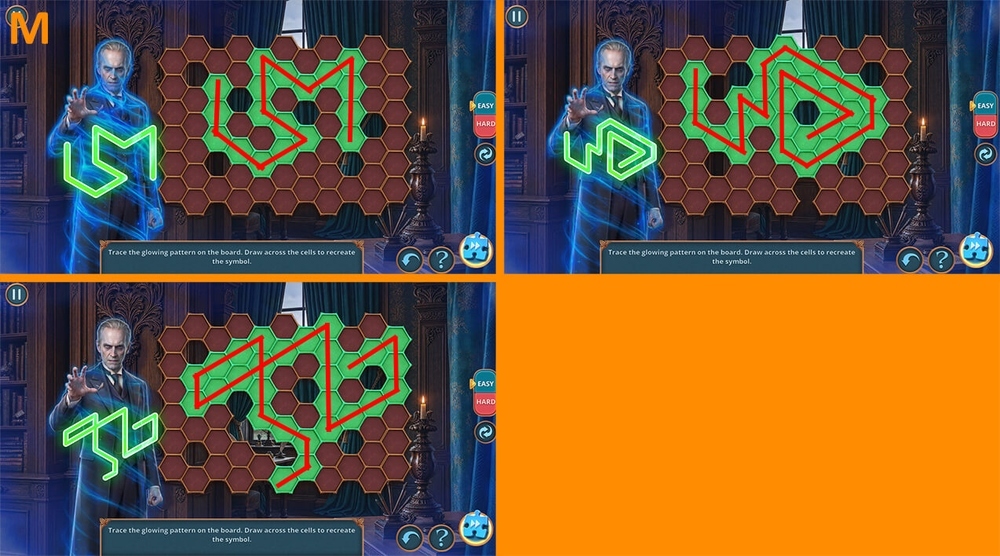
- Easy solution: Follow the arrows in the pictures (M).
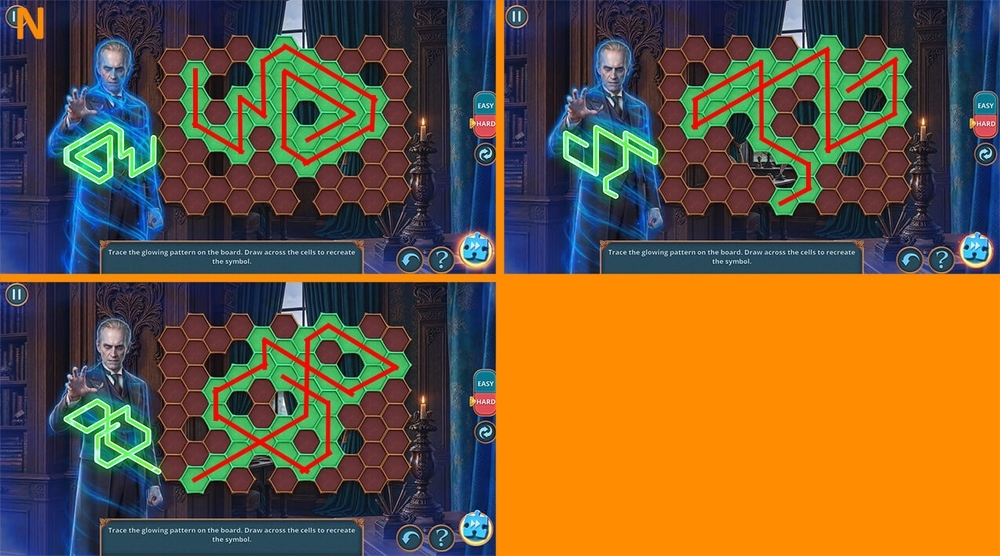
- Hard solution: Follow the arrows in the pictures (N).
Congratulations! You have completed the game Mind Echoes 3: Broken Vow.