Mind Echoes 3: Broken Vow – Mark must unravel the history of the ancient Moonwood estate and rescue his wife, Samantha. The couple arrives there on their boss’s orders to strike a deal with Count Hermann von Graven. However, a heavy downpour triggers landslides, blocking the roads, and the guests are forced to spend the night at the mansion. Instead of the owner, they are greeted by the butler, Jarrett, who explains that the count is feeling unwell and will not be able to receive visitors until the next day. From the very first hours of their stay, strange things begin to happen. Some of Mark’s documents suddenly catch fire, someone takes the car keys, and a silent boy appears in the hallways a boy whose existence Jarrett categorically denies. Samantha also sees the child and even feels as though she has met him before. Soon, Mark notices that the faces in the old portraits are changing, and the image of one of the girls bears a striking resemblance to his wife. Hidden rooms and passageways leading to forgotten parts of the estate are discovered behind ordinary doors. When Samantha vanishes without a trace, Mark sets out to find her and discovers an antique clock capable of transporting him to another era. In the past, he meets Margaret, a healer whose soul is trapped inside a crystal ball. She explains that Moonwood has been caught between two worlds following a tragedy involving Hermann von Graven. During a lunar eclipse, the boundary between the past and the present becomes particularly thin, and Mark has the opportunity to discover what happened many years ago. Gradually, the story of the count and Lydia Evermont unfolds they had planned to marry despite Jarrett’s objections. The butler considered the young woman unworthy of the heir to a noble family, and his long-standing oath to the von Graven family turned out to be linked to the tragic events at the mansion. To save Samantha, Mark must follow in Lydia’s footsteps, find records of an ancient ritual in the family crypt, and restore a damaged crystal ball. Upon returning to Moonwood, the hero continues to gather evidence against Jarrett. A mysterious boy named Jamie plays a key role in the investigation; all along, he has been trying to warn Mark of the danger. After restoring Jamie’s ability to speak, the hero learns that the child witnessed a crime committed many years ago. It also turns out that the count’s memories were deliberately altered, which is why Herman still doesn’t know the whole truth about Lydia’s fate. Now Mark must restore the estate owner’s memory, deal with the consequences of an ancient ritual, and figure out why the past continues to influence the lives of those still living. If you’re stuck on a puzzle or don’t know where to find certain items, you can check out the walkthrough for Mind Echoes 3: Broken Vows on our website and help Mark uncover the mystery of the curse that prevents the dead from finding peace.
Mind Echoes 3: Broken Vow – Walkthrough
Here you can see the complete walkthrough for Mind Echoes 3: Broken Vow, namely all chapters, including the bonus chapter, in pictures.
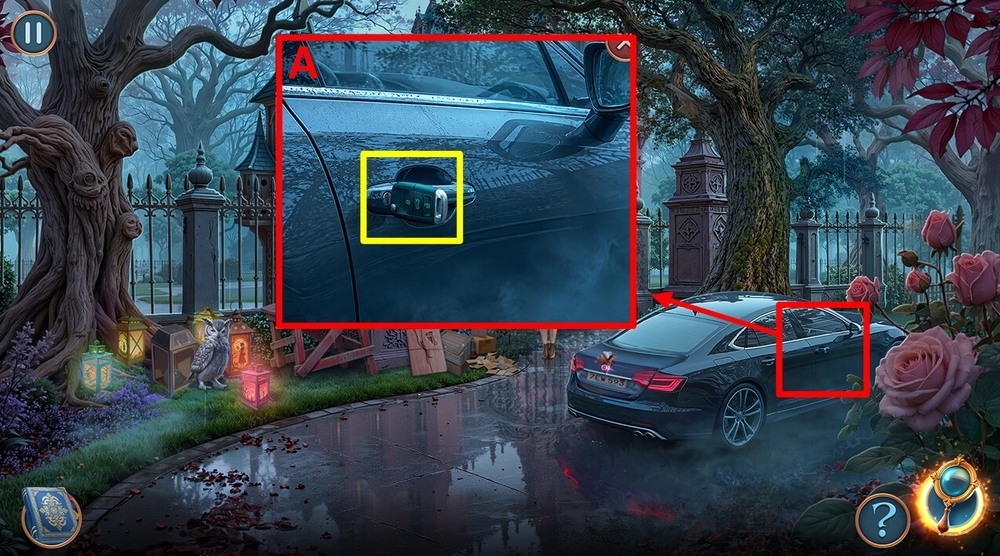
- Take CAR KEY, use CAR KEY on the car door (A).
- Go forward.
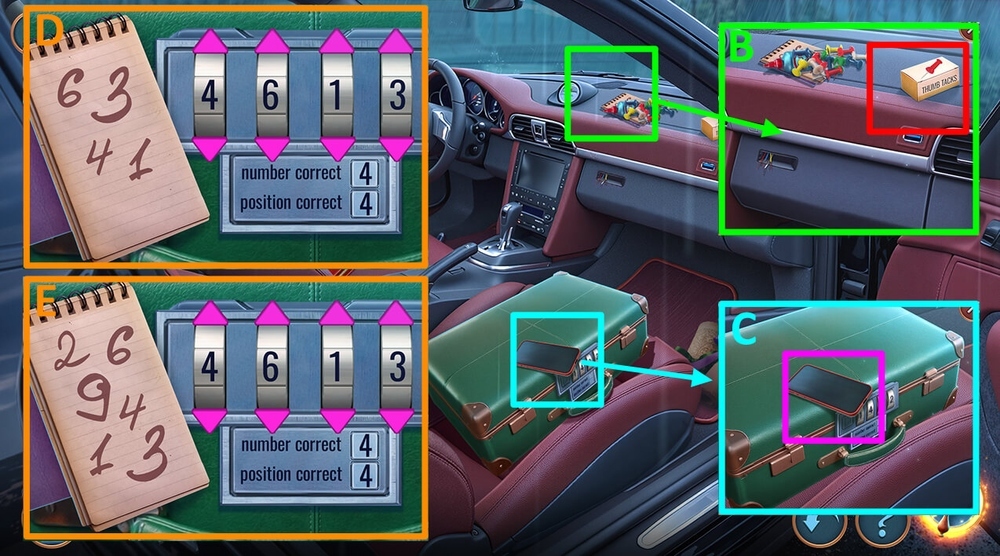
- Take THUMBTACK BOX, use THUMBTACK BOX on the pins, take GLUE and NOTEPAD (B).
- Take DISCHARGED PHONE, use NOTEPAD on the case (C).
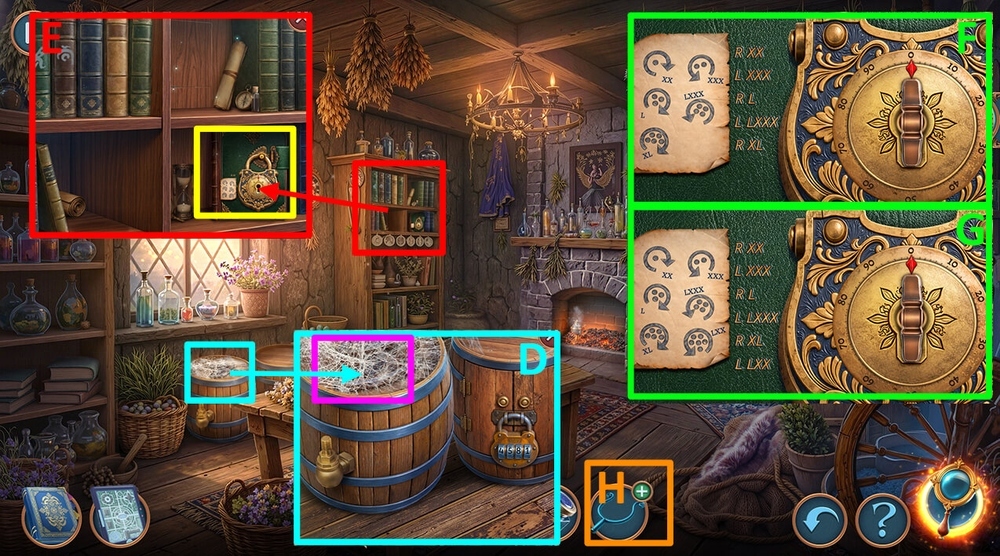
- Easy solution: Set the numbers as shown in the picture, take and read the note, take DRIVER’S LICENCE and SUCTION CUP KEYCHAIN (D).
- Hard solution: Set the numbers as shown in the picture, take and read the note, take DRIVER’S LICENSE and SUCTION CUP KEYCHAIN (E).
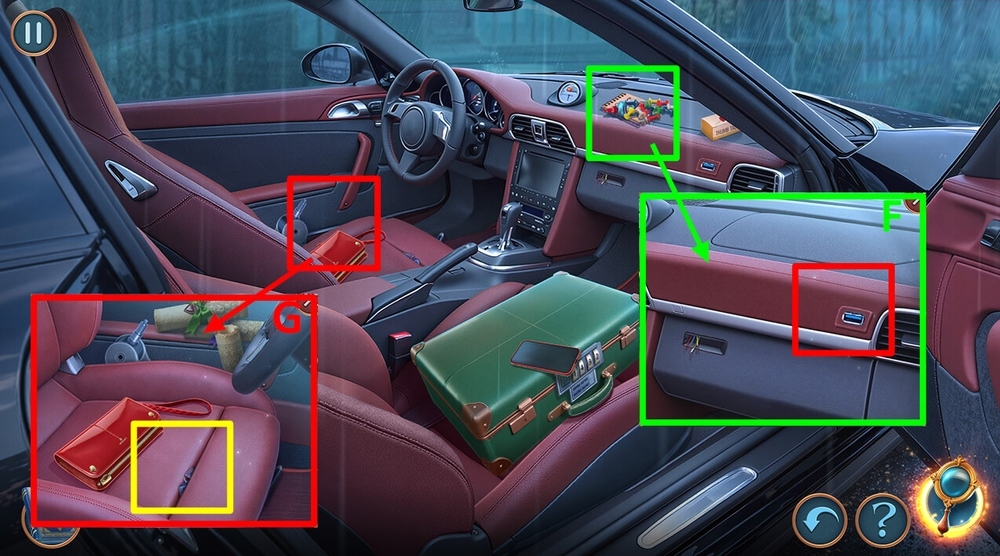
- Use DISCHARGED PHONE on the USB port, use SUCTION CUP KEYCHAIN on the glove compartment, take FAKE VAMPIRE TEETH (F).
- Use FAKE VAMPIRE TEETH on CAR KEYS, earn CAR KEYS (G).
- Go back.
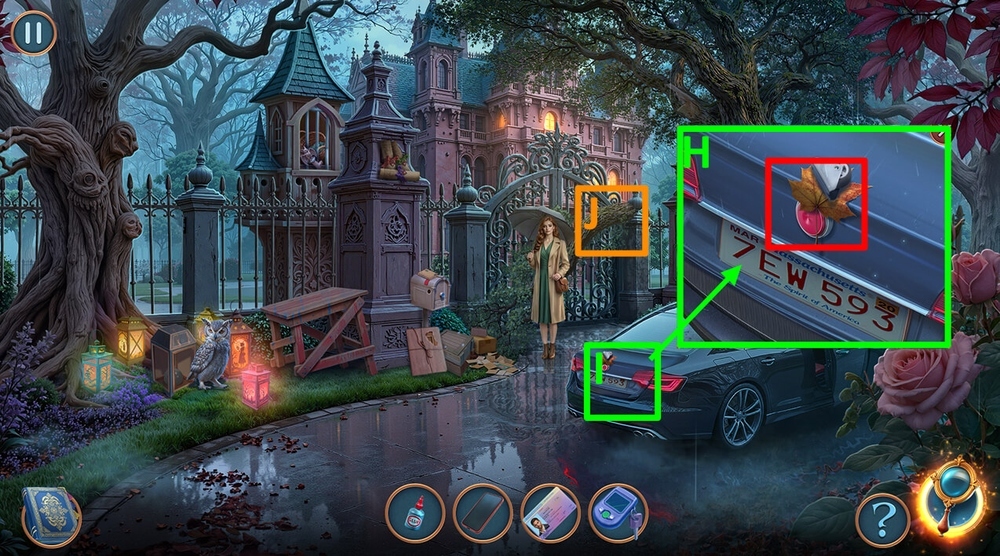
- Take WHEEL and MAPLE LEAF, use CAR KEYS on the car trunk (H).
- Play puzzle, earn TOW CABLE (I).
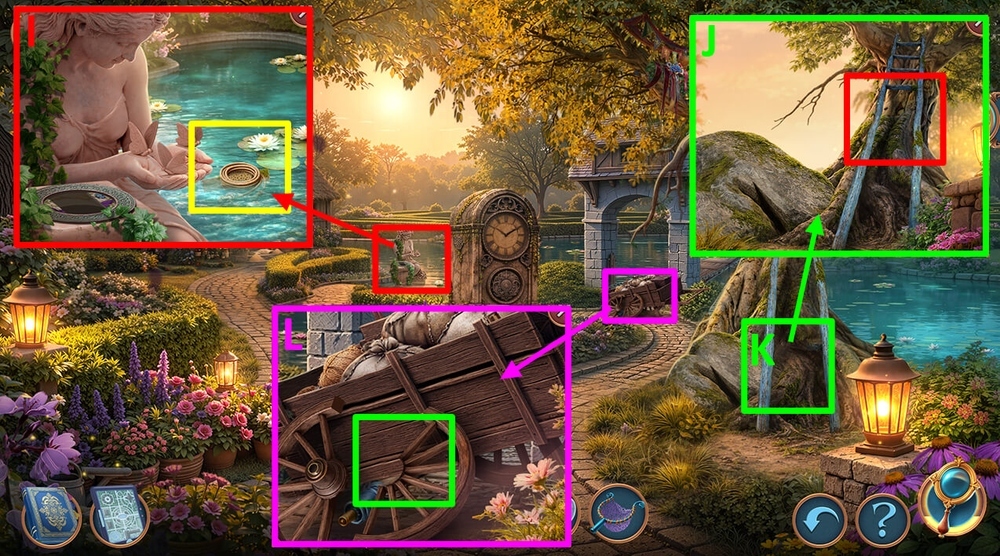
- Use TOW CABLE on the fallen tree (J).
- Go forward.
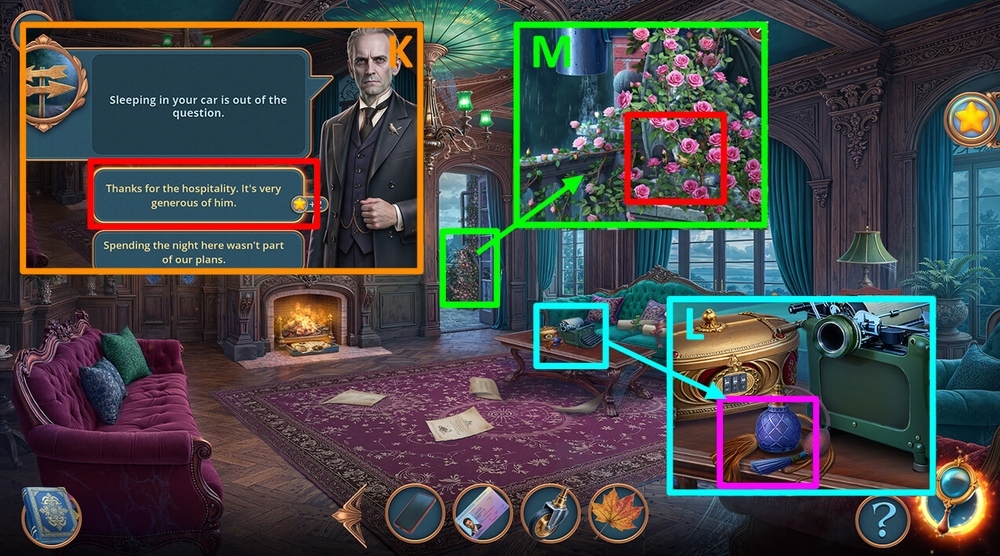
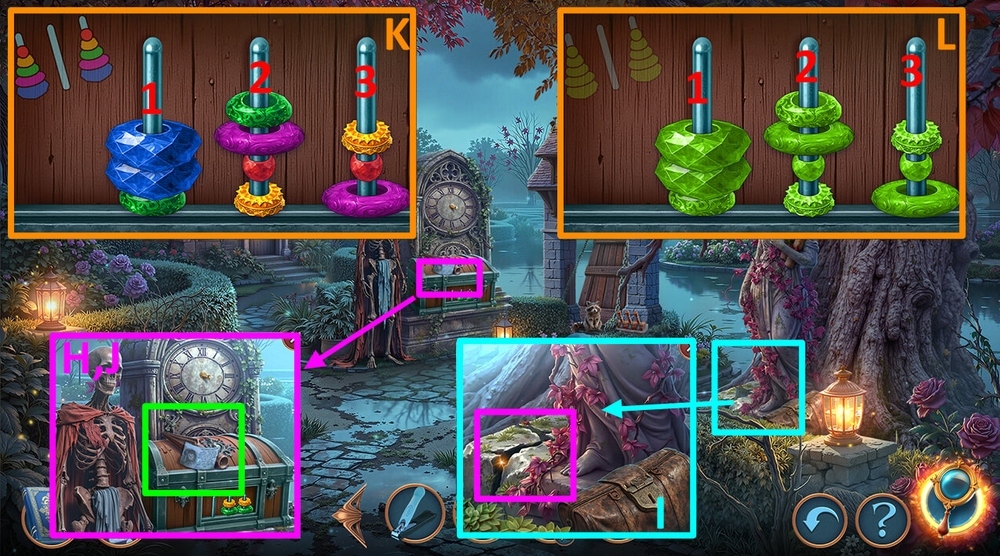
- Select this option (K).
- Take PERFUME, BULB SPRAYER and TASSEL (L).
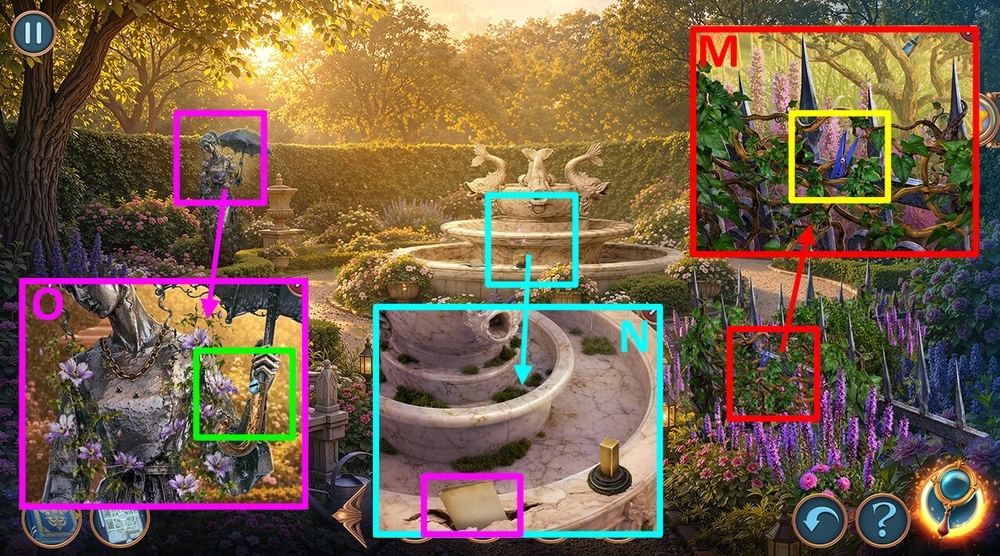
- Use TASSEL on the plants, take the map and HARP PART (M).
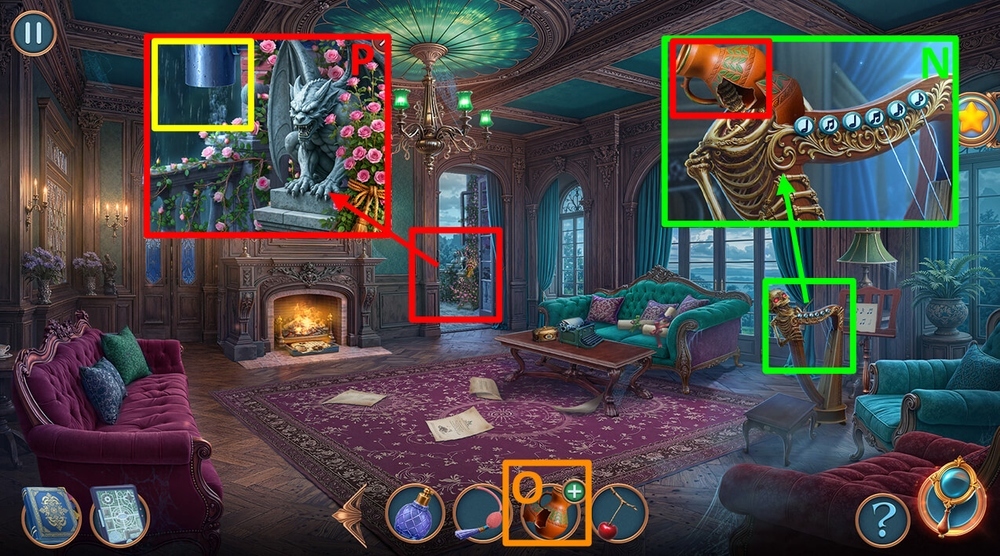
- Take LEAKY JUG, use HARP PART on the harp, take CHERRY (N).
- Use GLUE on LEAKY JUG, earn JUG (O).
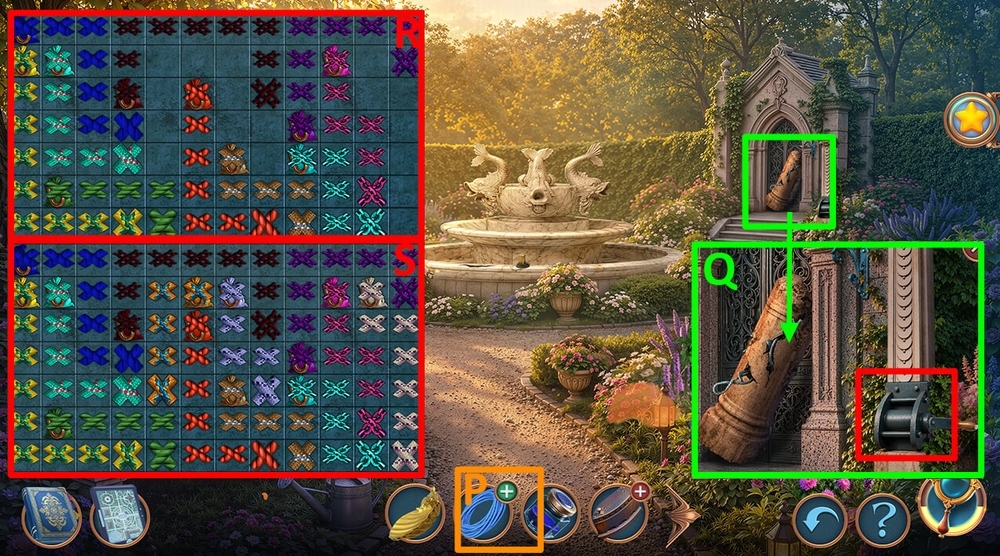
- Use JUG on the water stream (P).
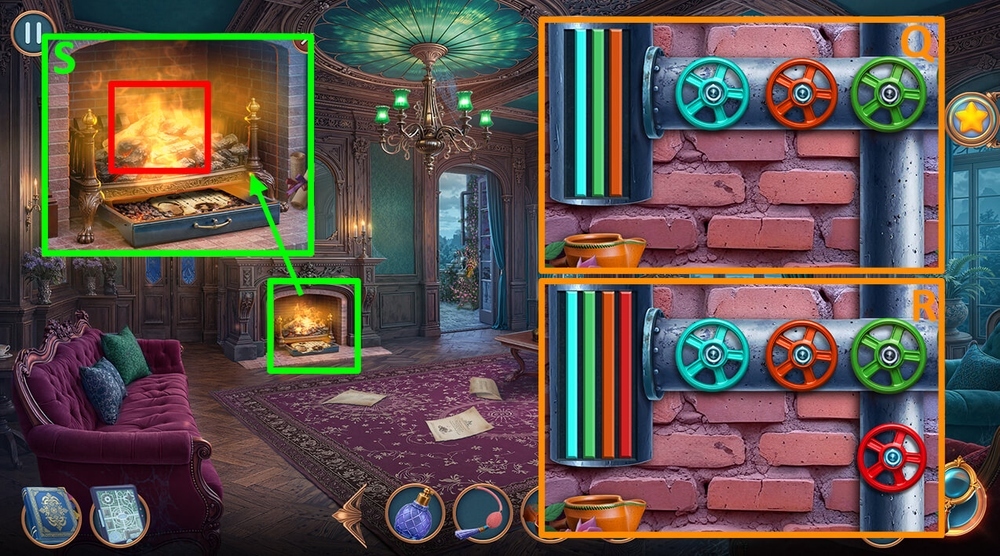
- Easy solution: Follow the instructions for the mini-game, earn JUG OF WATER (Q).
- Hard solution: Follow the instructions for the mini-game, earn JUG OF WATER (R).
- Use JUG OF WATER on the fireplace, take BURNT DOCUMENTS (S).
- Go forward.
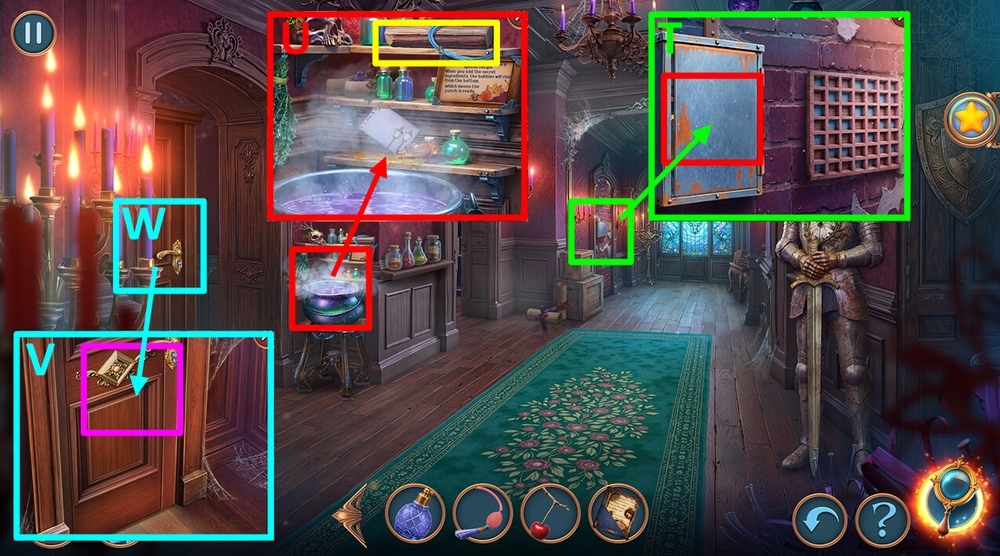
- Use DRIVER’S LICENSE on the lock, take DRY FLOWER BUD (T).
- Take STRINGS 1/3 and FIREWOOD 1/2, use MAPLE LEAF, PERFUME, CHERRY and DRY FLOWER BUD on the cauldron, take HAIRPIN (U).
- Use BURNT DOCUMENTS and HAIRPIN on the door, take and use key on the door (V).
- Play puzzle, earn LIT CANDELABRUM (W).
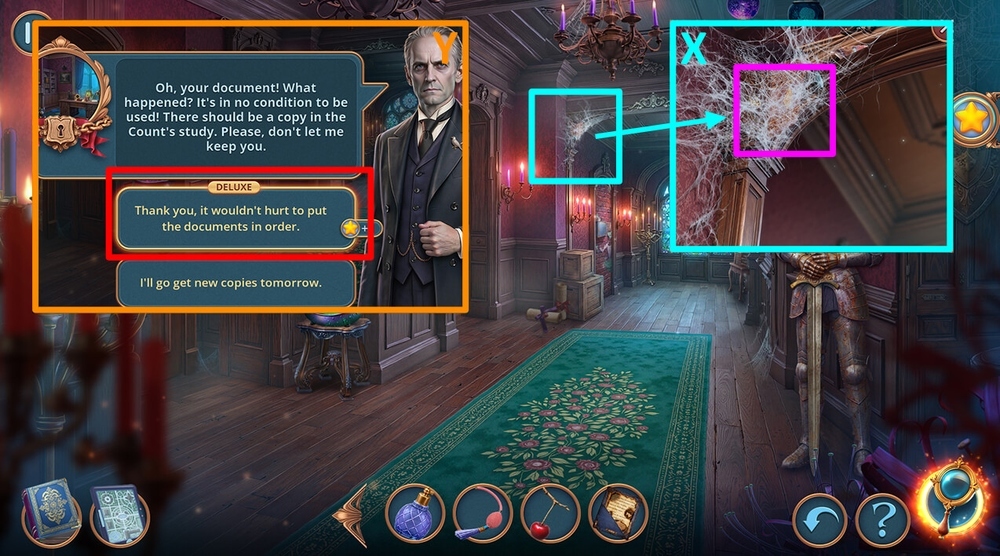
- Use LIT CANDELABRUM on the spiderweb, take PORTRAITS 1/2 and STRINGS 2/3, take and read the note (X).
- Select this option (Y).
- Go to Count’s Study.
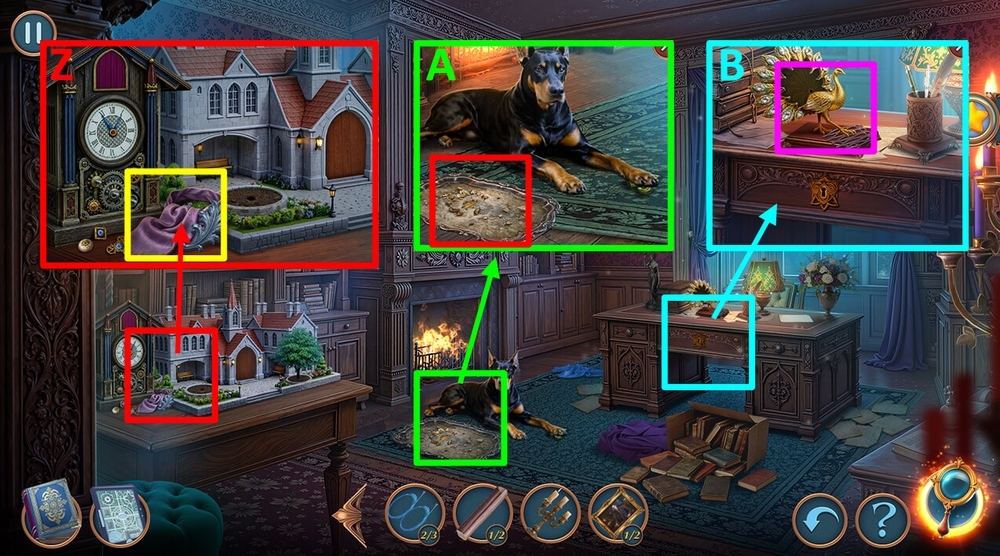
- Take FRAME PARTS 1/2 and TIE (Z).
- Use TIE on the dirty tray, take GOLDEN FEATHERS (A).
- Use GOLDEN FEATHERS on the statue, take COMB (B).
- Go to Guest Room.
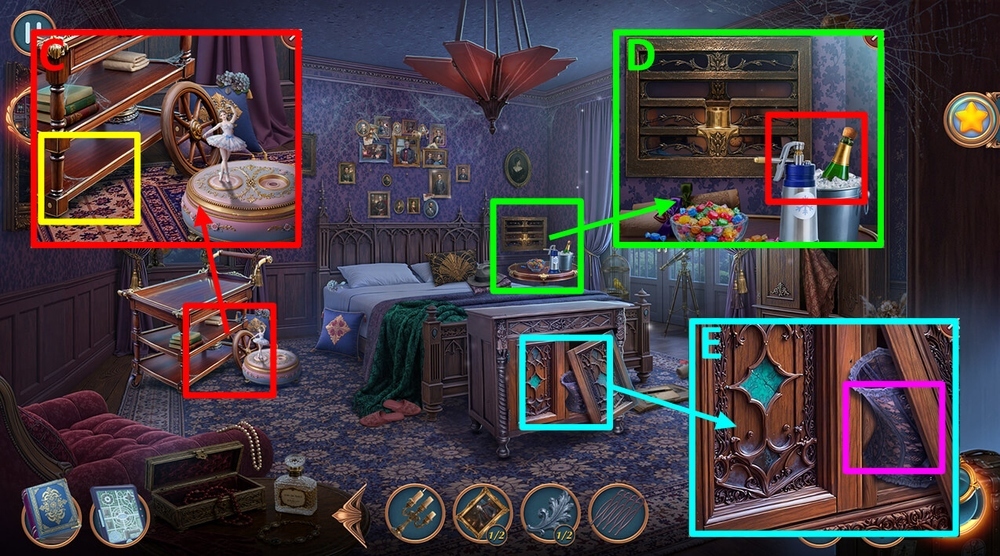
- Use WHEEL on the table, take WING NUT (C).
- Take LIQUID NITROGEN, use WING NUT on the lattice, take STRINGS 3/3 (D).
- Take CORSET (E).
- Go to Living Room.
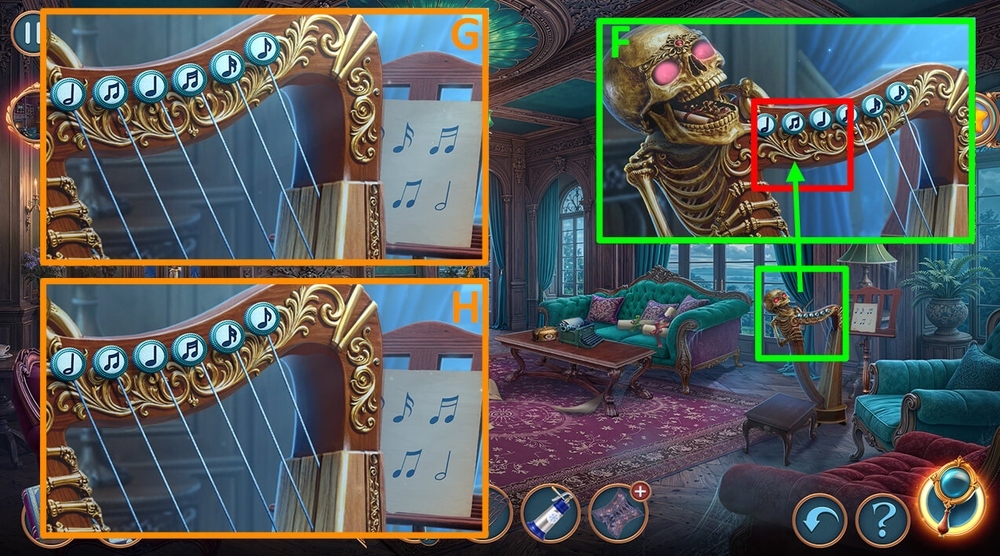
- Use STRINGS 3/3 on the harp (F).
- Easy solution: Tap on the notes in the order in which they appear in the picture, take HEAVY FIGURINE and PAPER CLIP (G).
- Hard solution: Tap on the notes in the order in which they appear in the picture, take HEAVY FIGURINE and PAPER CLIP (H).
- Go to Inside Our Car.
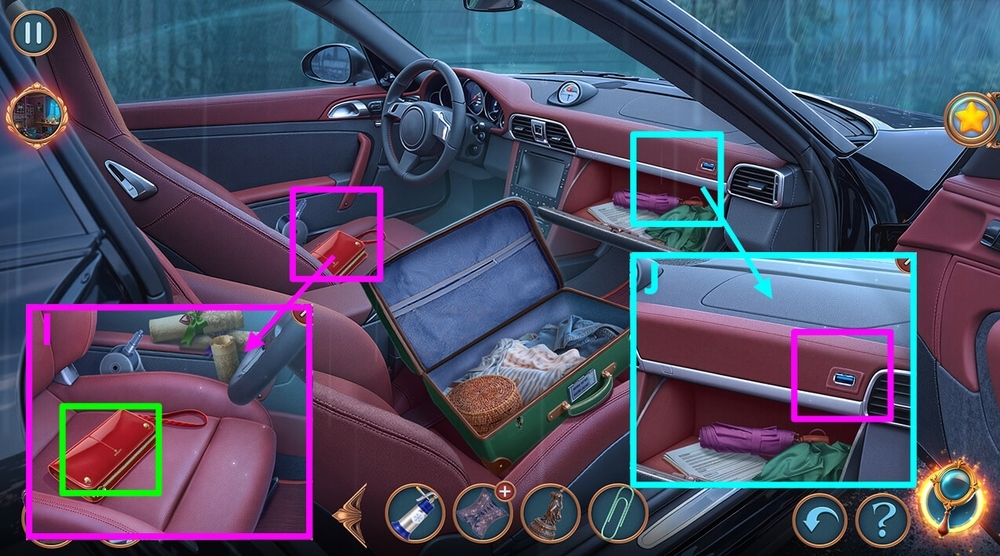
- Use PAPER CLIP on the wallet, take PHONE CHARGER (I).
- Use PHONE CHARGER on the USB port, take CHARGED PHONE (J).
- Go back.
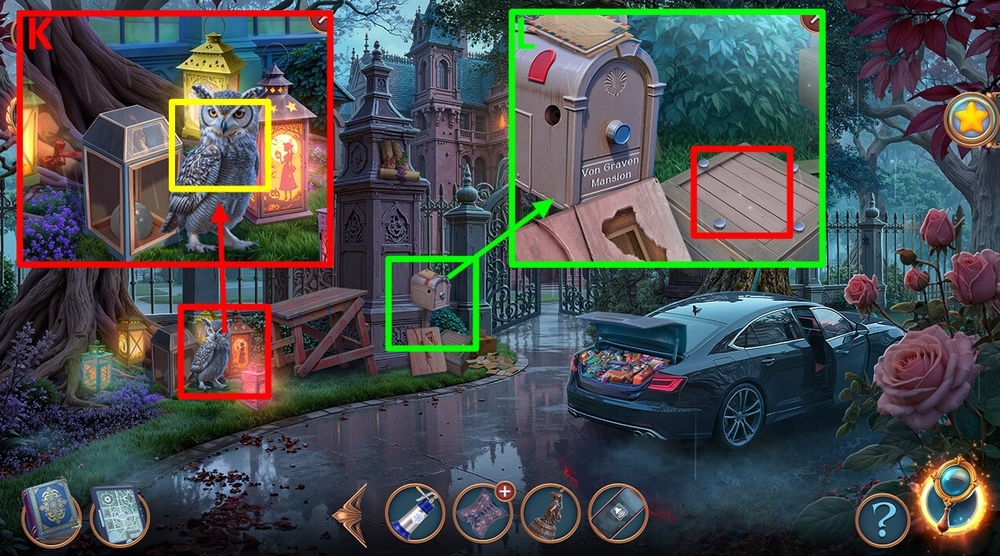
- Use CHARGED PHONE on the owl, take LIPSTICK (K).
- Take and read the note, use COMB on the nails, take SCREWDRIVER, use LIPSTICK on the painting (L).
- Go to Count’s Study.
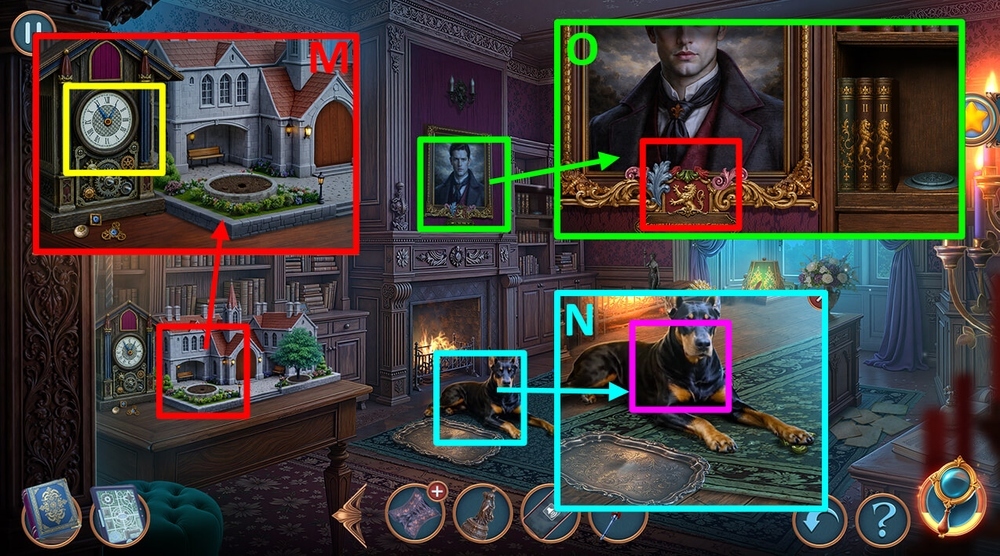
- Use SCREWDRIVER on the clock, take BONE-SHAPED COOKIE (M).
- Use BONE-SHAPED COOKIE on the dog, take FRAME PARTS 2/2 (N).
- Use FRAME PARTS on the frame, take TYPEWRITER PLATEN (O).
- Go to Living Room.
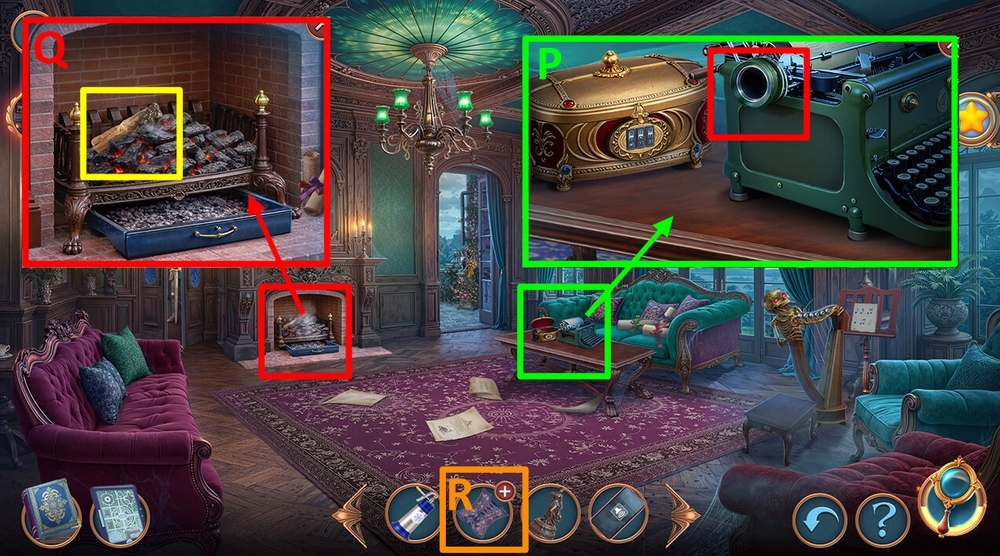
- Use TYPEWRITER PLATEN on the typewriter, take TREE, tap on the lock, take KNIGHT’S GAUNTLET (P).
- Use KNIGHT’S GAUNTLET on the fireplace, earn FIREWOOD 2/2 (Q).
- Use FIREWOOD 2/2 on the CORSET, earn IMPROVISED SUPPORT (R).
- Go to Count’s Study.
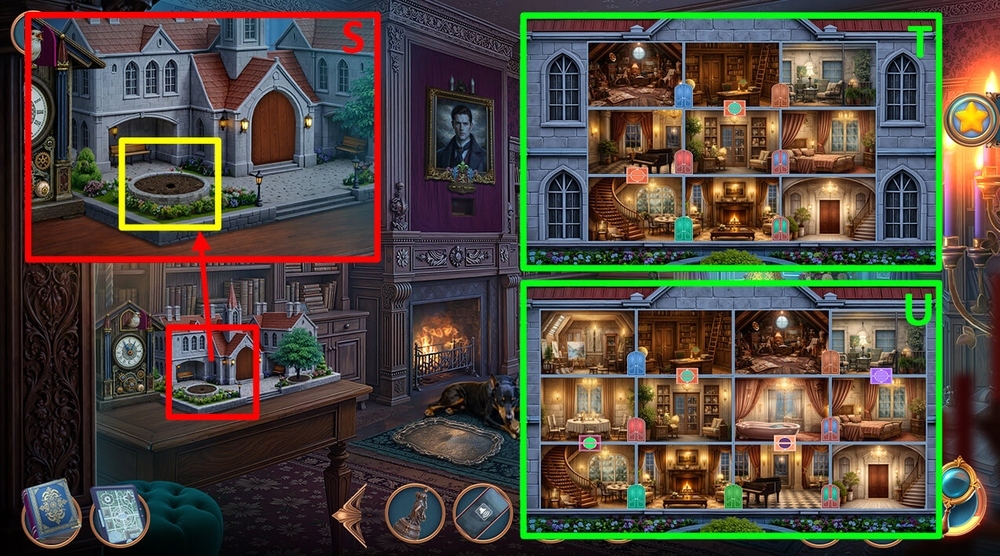
- Use TREE on the slot (S).
- Easy solution: Arrange the rooms as shown in the picture, take BOOK NOOK (T).
- Hard solution: Arrange the rooms as shown in the picture, take BOOK NOOK (U).
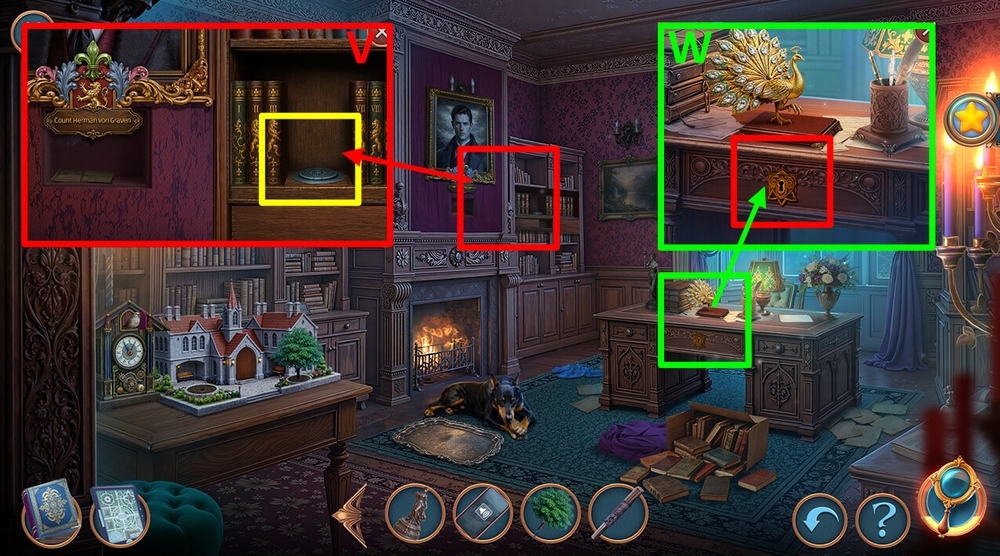
- Use BOOK NOOK on the shelf, take STAMP KEY (V).
- Use STAMP KEY on the lock, take and read the note (W).
- Go to Mansion Gate.
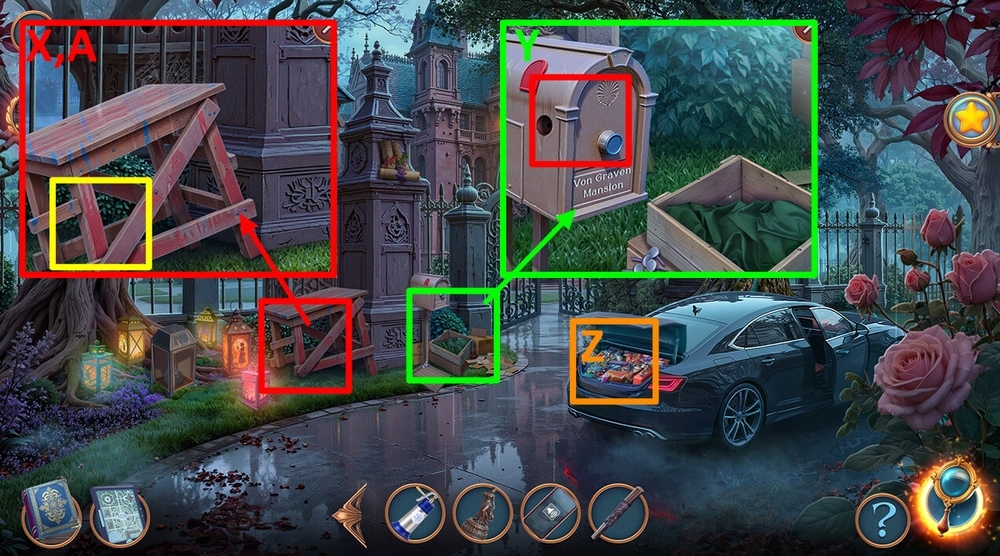
- Use IMPROVISED SUPPORT on the scaffolding, take MAILBOX FLAG (X).
- Use MAILBOX FLAG on the mailbox, take RIBBON (Y).
- Play puzzle, earn JACK (Z).
- Use JACK on the lattice, take CUFFLINKS (A).
- Go to Guest Room.
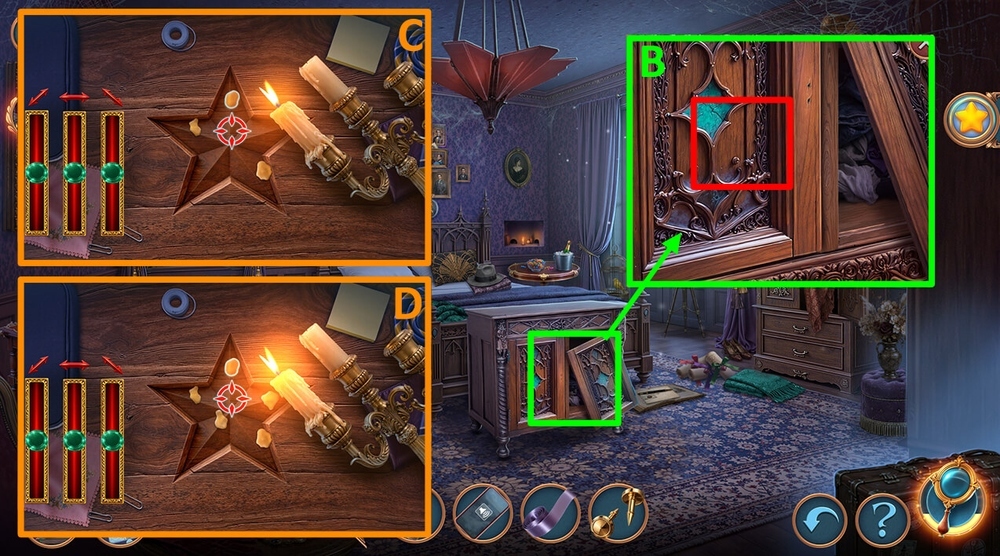
- Use HEAVY FIGURINE, CUFFLINKS and RIBBON on the door, take BRACELETS 1/2 and BROKEN SHIELD, use LIT CANDELABRUM on the empty star-shaped slot (B).
- Easy solution: Set the sliders to the desired position, take WAX STAR AMULET (C).
- Hard solution: Set the sliders to the desired position, take WAX STAR AMULET (D).
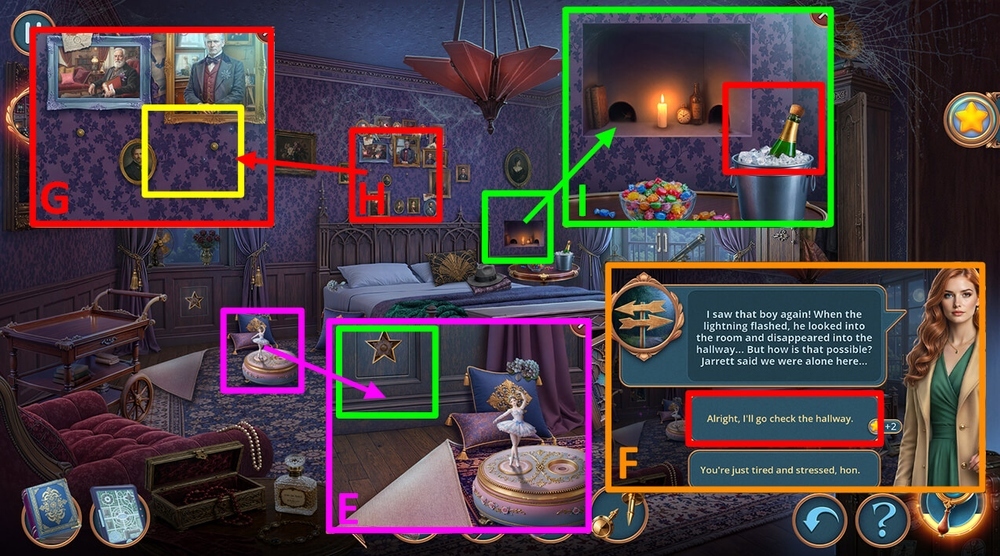
- Use WAX STAR AMULET on the slot, take PORTRAITS 2/2 (E).
- Select this option (F).
- Use PORTRAITS 2/2 on the empty space (G).
- Play puzzle, earn NIGHTINGALE BROOCH (H).
- Use NIGHTINGALE BROOCH on CORK, earn BAMBOO CORK (I).
- Go back.

- Use BROKEN SHIELD on the cauldron, BAMBOO CORK on the BROKEN SHIELD, take LANTERN DRAWING, use BULB SPRAYER on the oil spot, earn OIL (J).
- Use OIL on the knight, take SWORD HANDLE (K).
- Go to Inside Our Car.
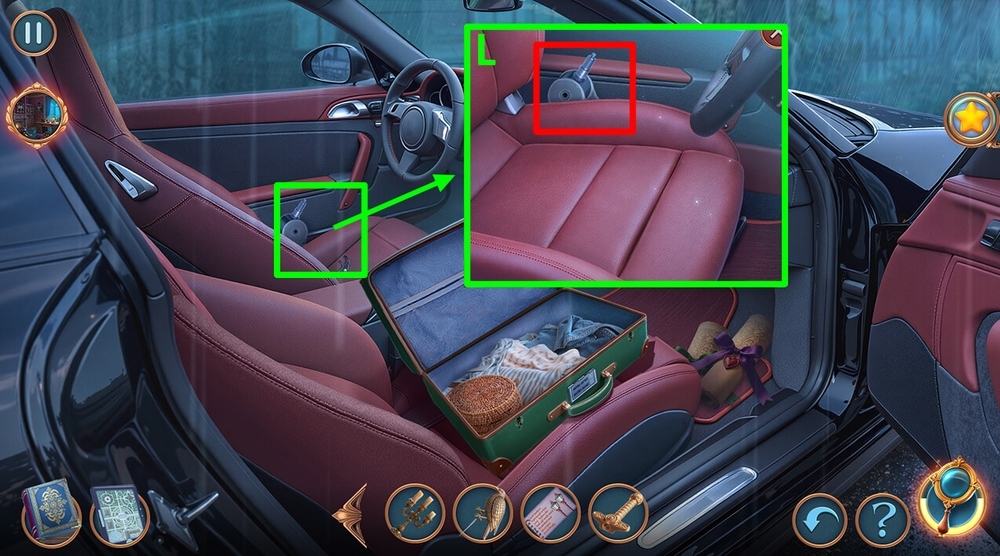
- Use SWORD HANDLE on the mechanism, take PAPERKNIFE (L).
- Go back.

- Use LANTERN DRAWING and PAPERKNIFE on the lantern, take CAST IRON and BRACELETS 2/2 (M).
- Go to Guest Room.
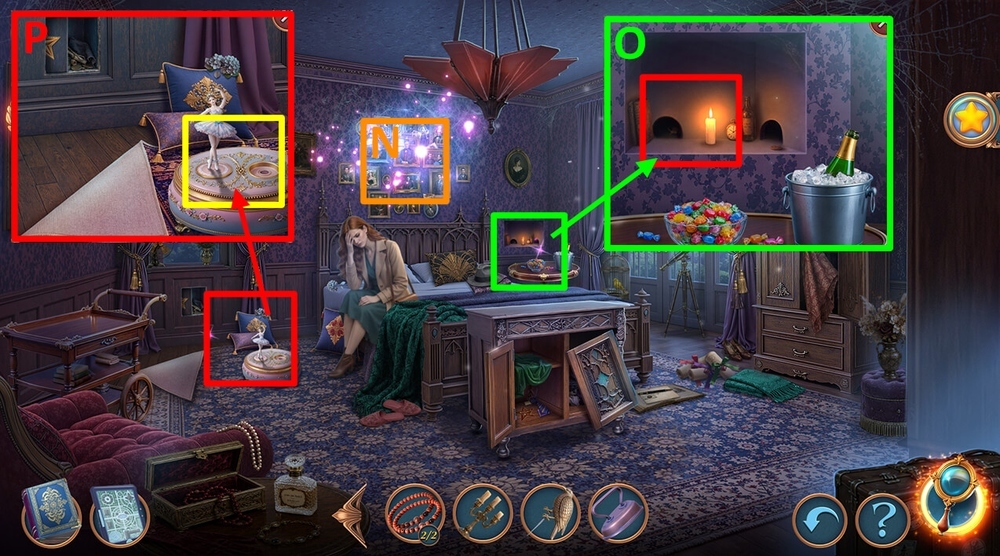
- Play puzzle, earn WIND-UP MOUSE (N).
- Use WIND-UP MOUSE on the hole, take BALLERINA FIGURINE (O).
- Use BALLERINA FIGURINE on the casket (P).
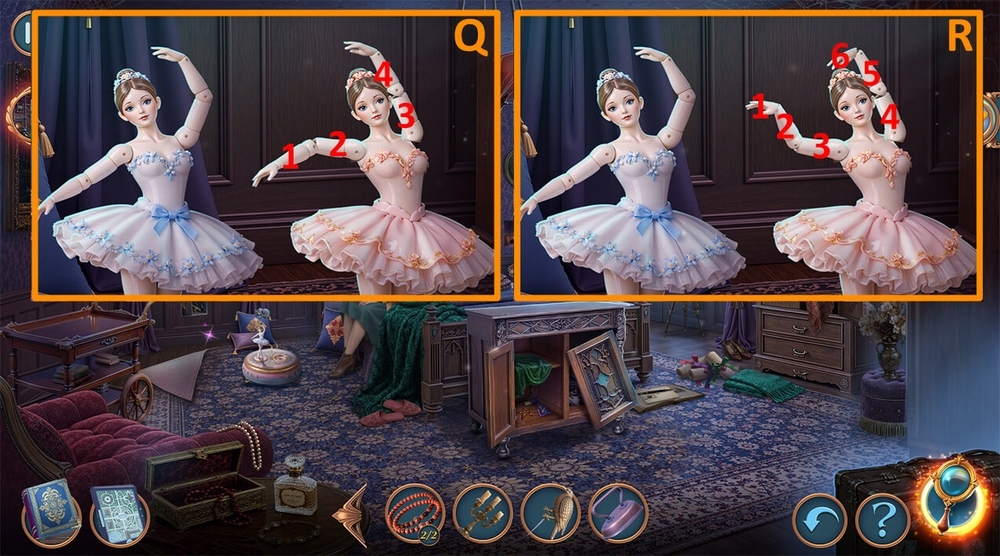
- Easy solution: Tap on the figure’s limbs in the following order: 2-3 , take KNIGHT’S CREST (Q).
- Hard solution: Tap on the figure’s limbs in the following order: 4-3×3-2×2-1-5×2-6×2 , take KNIGHT’S CREST (R).
- Go back.

- Use KNIGHT’S CREST on the knight, take SHACKLES (S).
- Use SHACKLES on the board, take PLUCKED FEATHER DUSTER, take and read the note (T).
- Play puzzle (U).
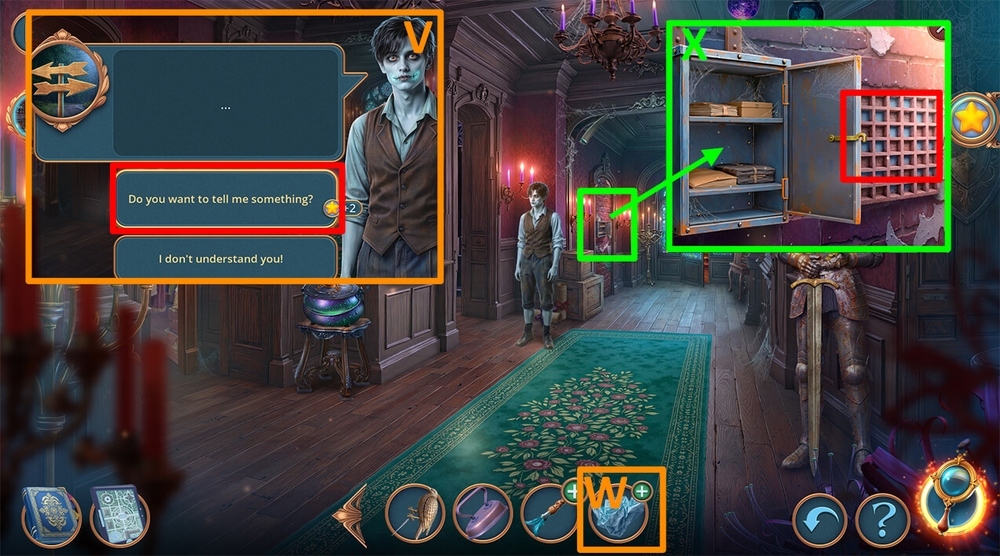
- Select this option, earn CRUMPLED PAPER (V).
- Tap on the CRUMPLED PAPER, take PASSWORD (W).
- Use PASSWORD on the wall (X).
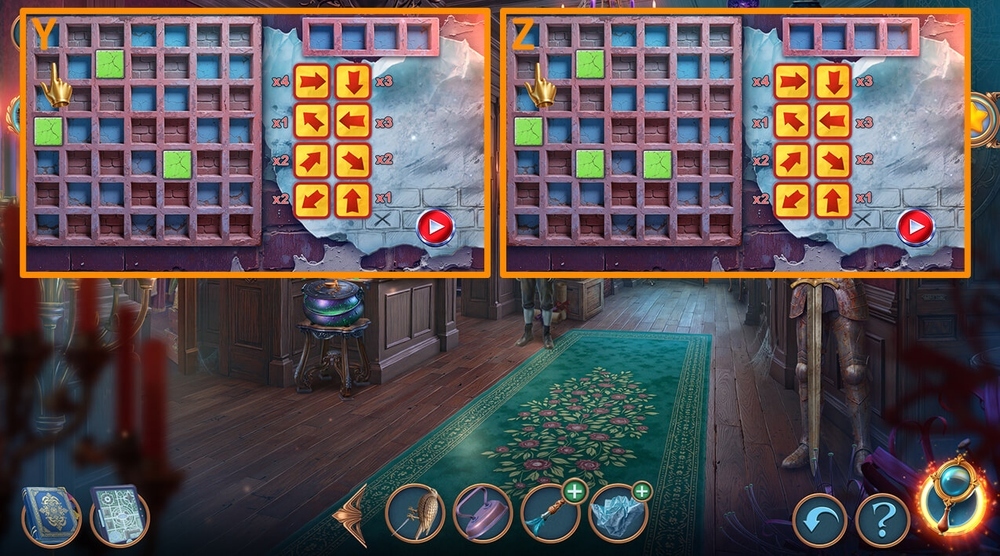
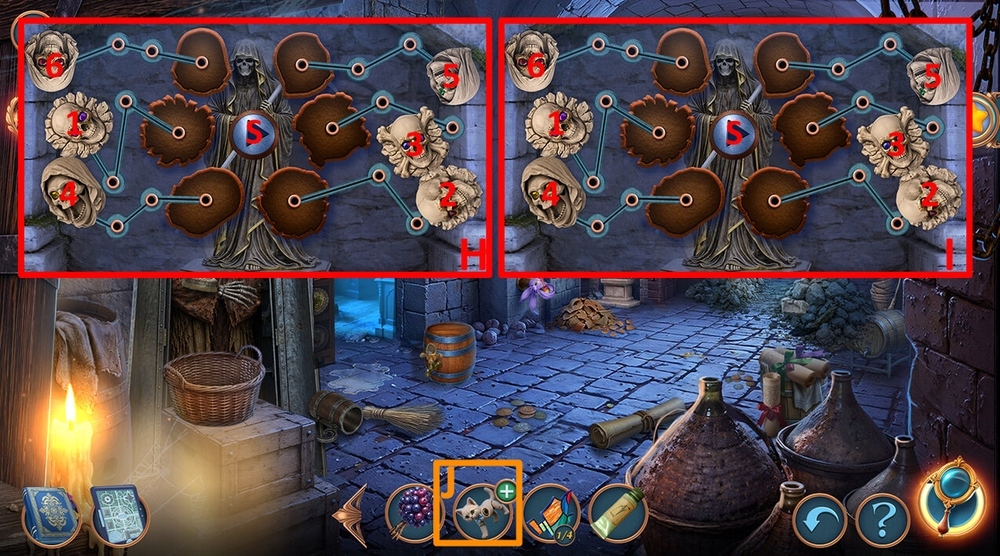
- Easy solution: Arrange the arrows as shown in the picture, tap the button “Play” (Y).
- Hard solution: Arrange the arrows as shown in the picture, tap the button “Play” (Z).
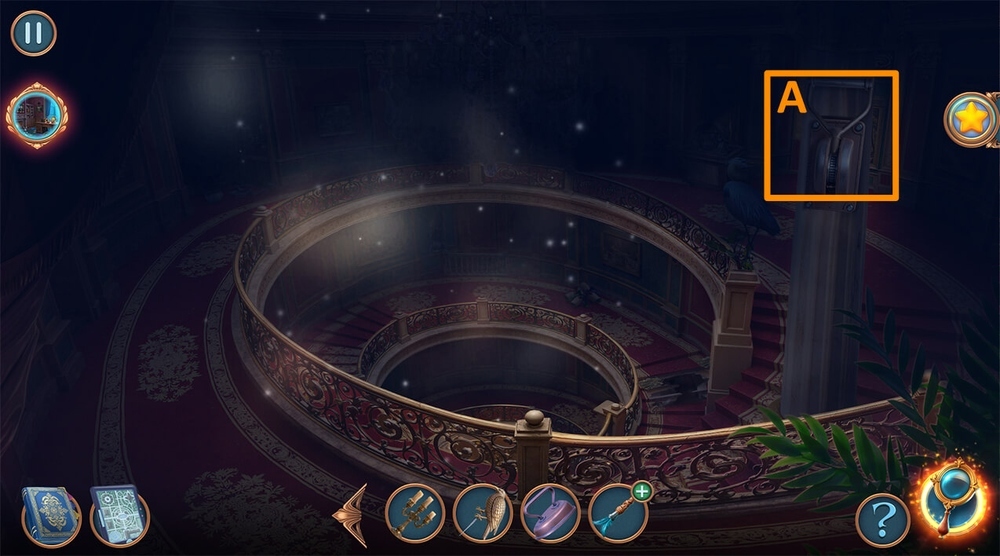
- Use CHARGED PHONE on the darkness, tap on the lever (A).

- Use CAST IRON on the nail, take BROOM (B).
- Take and read the note, take WITCH’S HAT, use LIT CANDELABRUM on the skeleton, take SAW (C).
- Use SAW on the ladder, earn BROKEN RAILING (D).
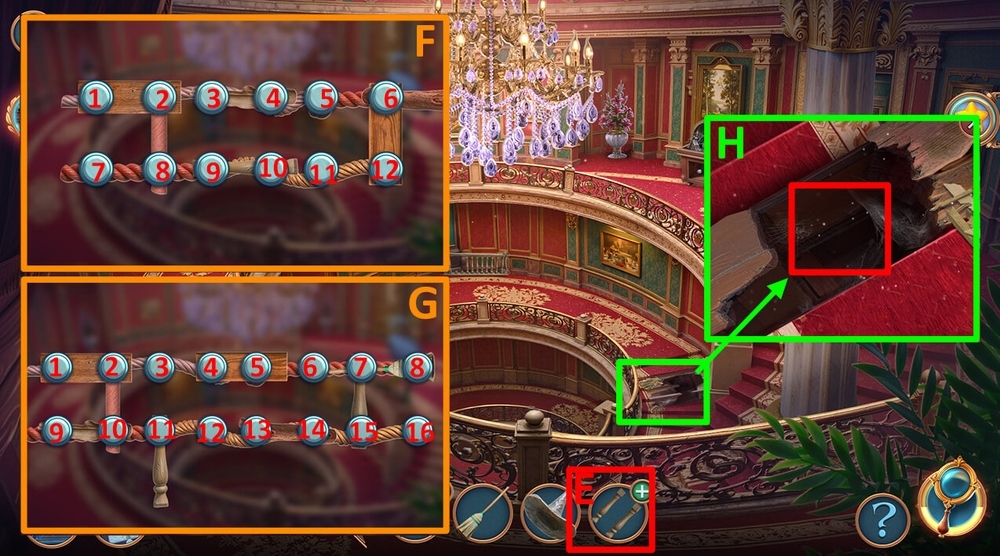
- Use BRACELETS 2/2 and BROOM on BROKEN RAILING (E).
- Easy solution: Tap the buttons in the following order: 1×3-3×3-10×3-6×2-5×3-6×2 , earn HANDMADE LADDER (F).
- Hard solution: Tap the buttons in the following order: 8-14×3-10×3-11×2-12×3-1×3-4-5-4×2 , earn HANDMADE LADDER (G).
- Use HANDMADE LADDER on the hole (H).
- Go forward.

- Take BLUEPRINT PARTS 1/2 and RAVEN PANEL (I).
- Use GLUE and RAVEN PANEL on the PLUCKED FEATHER DUSTER, earn FEATHER DUSTER (J).
- Use FEATHER DUSTER on the spiderweb (K).
- Play puzzle (L).
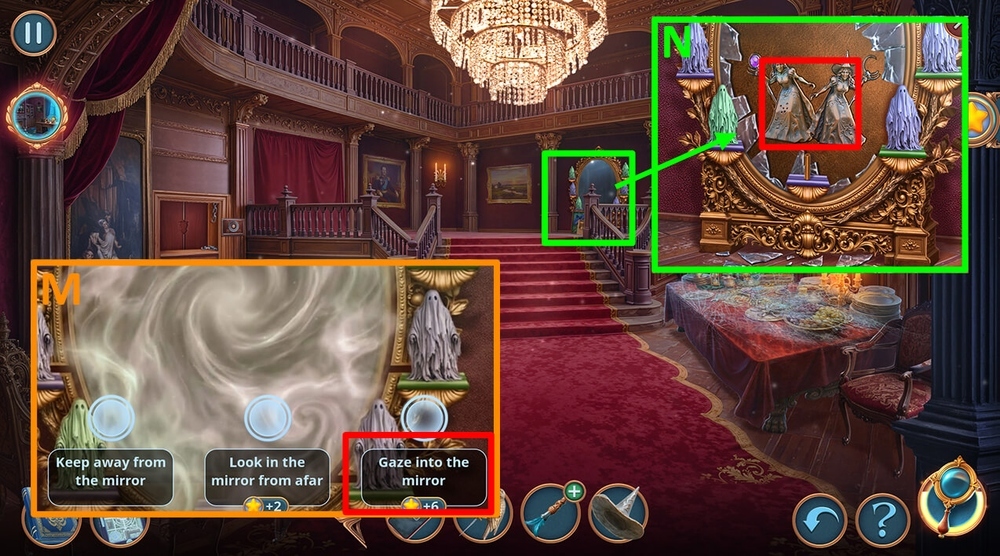
- Select this option (M).
- Use CHARGED PHONE on the mirror, earn WITCHES’ PHOTO (N).
- Go back.
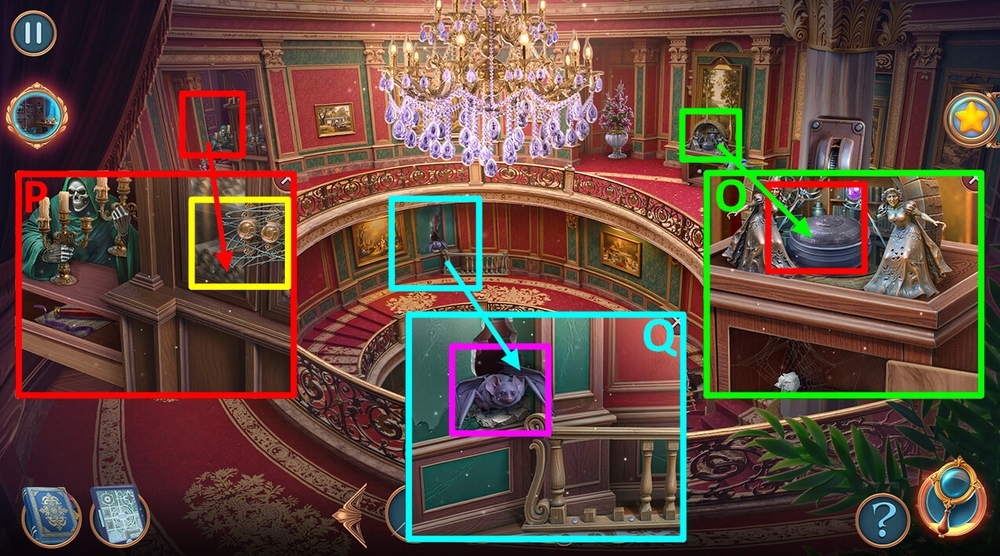
- Use WITCHES’ PHOTO on the witches, take WIRE CUTTERS, use WITCH’S HAT on the witch (O).
- Use WIRE CUTTERS on the wire, take BLUEPRINT PARTS 2/2, MARKER and HALF OF APPLE (P).
- Use HALF OF APPLE on the bat (Q).
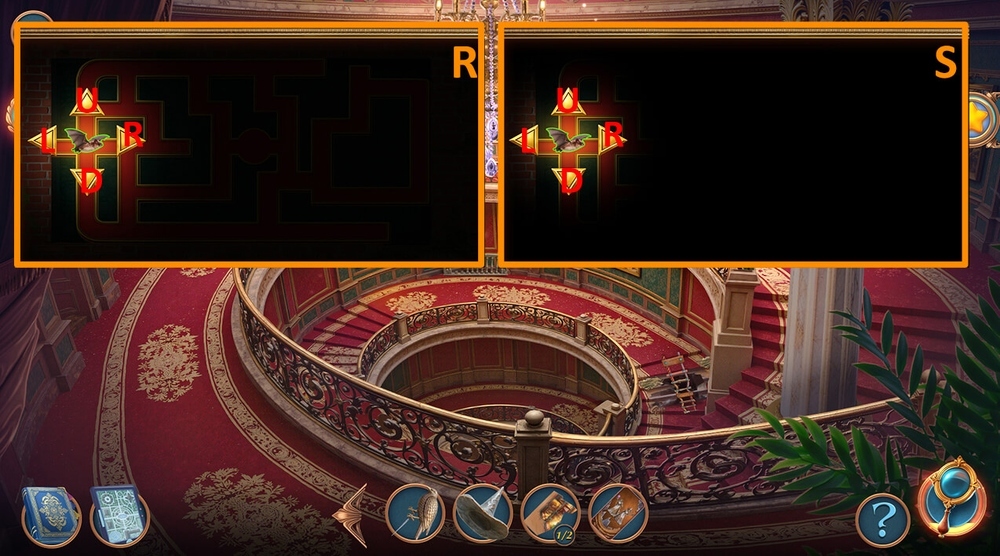
- Easy solution: Tap the arrows in the following order: Ux2-Rx2-D-R-D-R , take SNOW WHITE NAPKIN and HOT THERMOS (R).
- Hard solution: Tap the arrows in the following order: Ux2-Rx3-D-R-Dx2-R-U-R-U-R-D-R , take SNOW WHITE NAPKIN and HOT THERMOS (S).
- Go forward.
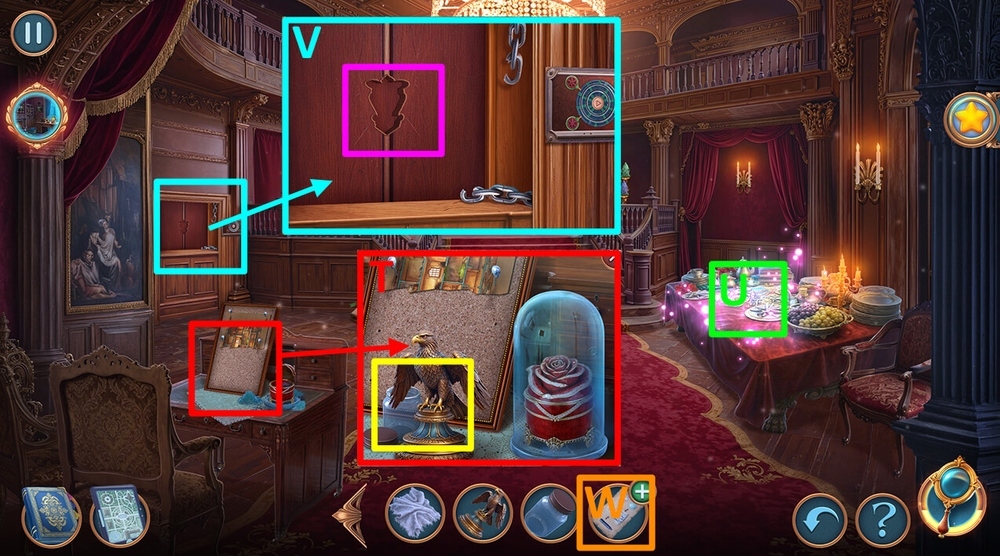
- Take EAGLE FIGURINE and EMPTY JAM JAR, use LIQUID NITROGEN and HOT THERMOS on the glass, take FIGURINE INSTRUCTION (T).
- Play puzzle, earn SIGNET RING (U).
- Use SIGNET RING on the door, take BOARDS 1/3 and GLOWING GLASS EYE (V).
- Use MARKER, SNOW WHITE NAPKIN and GLOWING GLASS EYE on FIGURINE INSTRUCTION, earn GHOST (W).
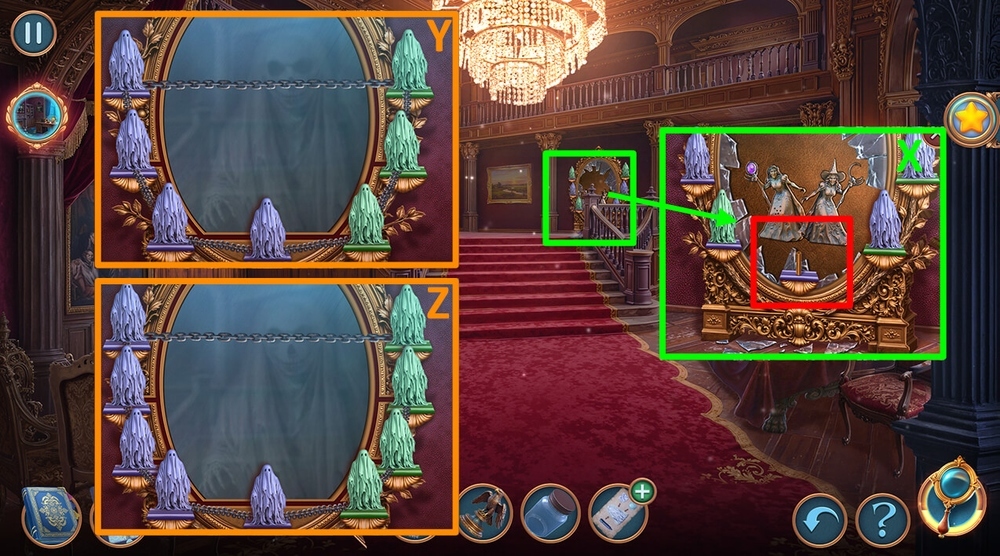
- Use GHOST on the mirror (X).
- Easy solution: Arrange the pieces as shown in the picture, take MAGIC BALL (Y).
- Hard solution: Arrange the pieces as shown in the picture, take MAGIC BALL (Z).
- Go back.
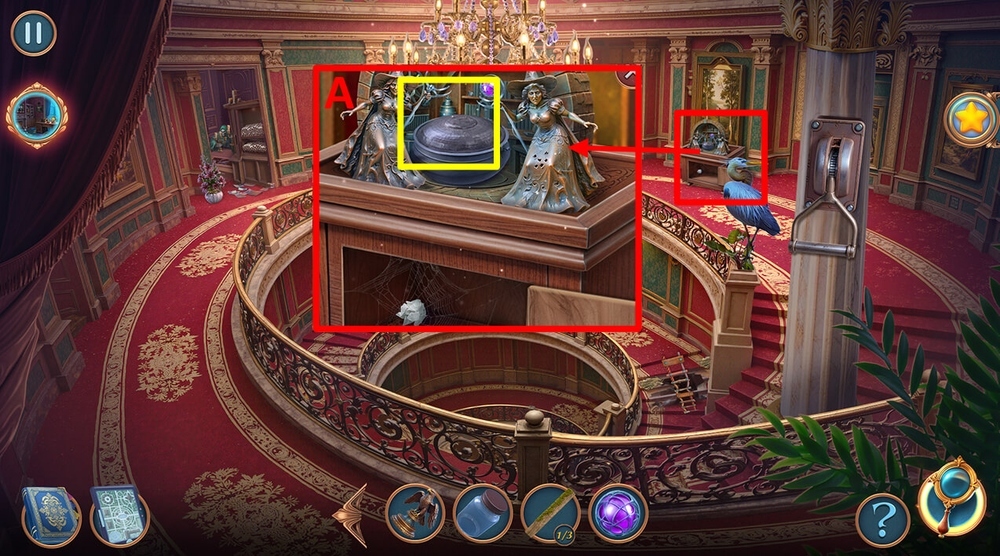
- Use MAGIC BALL on the staff, take SEALED TUBE, NAIL CLIPPER and BOW TIE (A).
- Go forward.
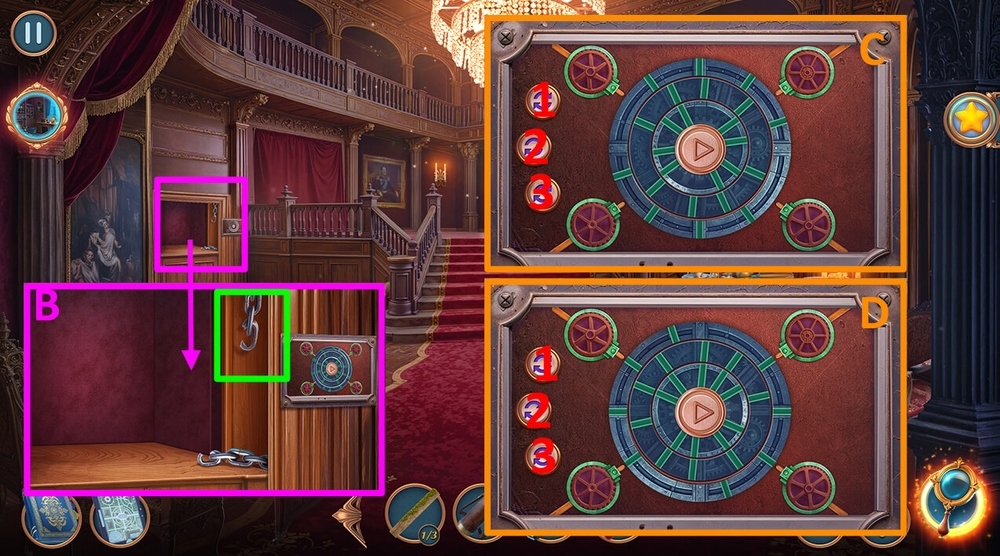
- Use BOW TIE on the chain (B).
- Easy solution: Tap the buttons in the following order: 1×3-2×10-3×6 , take MONOCLE (C).
- Hard solution: Tap the buttons in the following order: 1×6-2×9-3×2 , take MONOCLE (D).
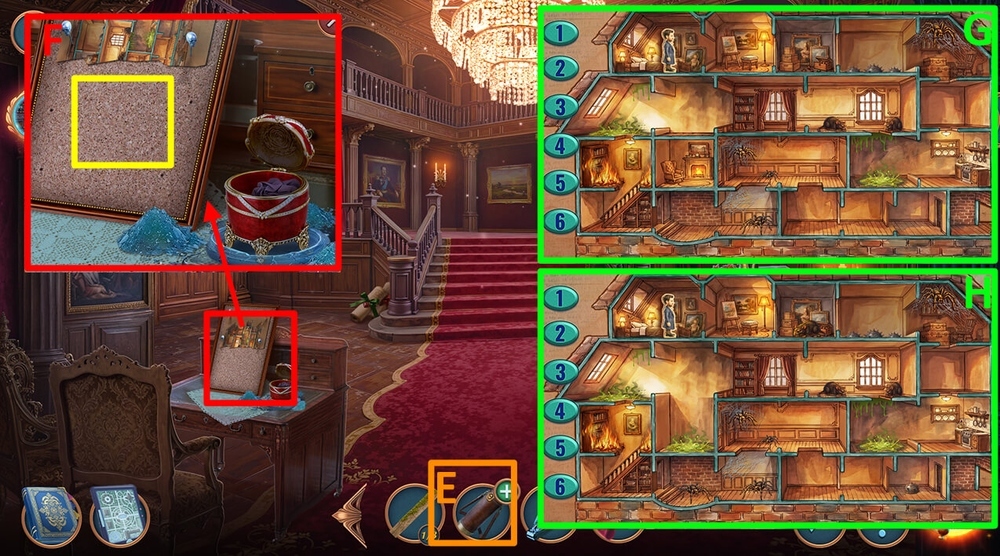
- Use NIGHTINGALE BROOCH and MONOCLE on the SEALED TUBE, take SILVER PINS (E).
- Use BLUEPRINT PARTS 2/2 and SILVER PINS on the scheme (F).
- Easy solution: Tap the buttons in the following order: 2-4-3-5-6-1 (G).
- Hard solution: Tap the buttons in the following order: 1-5-3-4-6-2 (H).
- Talk with Jamie, earn GARDEN DRAWING.
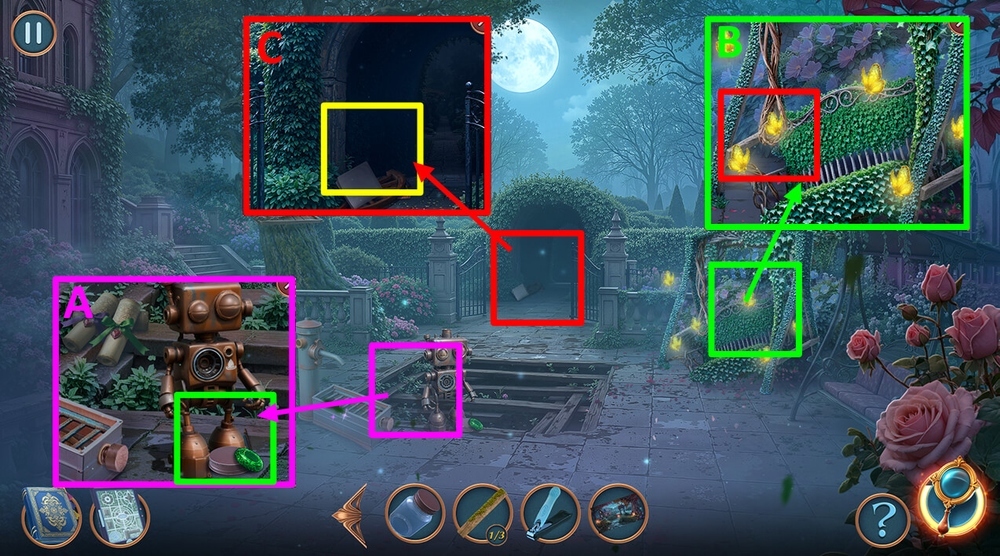
- Take GEMSTONES 1/2 and JAR LID (A).
- Use JAR LID and EMPTY JAM JAR on the butterflies, earn JAR OF BUTTERFLIES (B).
- Take and read the note, take WHEEL PART and SCARF, use JAR OF BUTTERFLIES on the dark (C).

- Use SCARF on the blackthorn, take LABYRINTH MAP (D).
- Use LABYRINTH MAP on the labyrinth (E).
- Easy solution: Tap the arrows in the following order: D-Rx2-U-Rx2-D-R-U-R (F).
- Hard solution: Tap the arrows in the following order: D-Rx2-U-Rx2-D-R-U-R (G).
- Use GARDEN DRAWING on the garden.
- Take and read the note, take SPEAR TIP (H).
- Use SPEAR TIP and EAGLE FIGURINE on the stone, take SHELL-SHAPED SAUCER and GEMSTONES 2/2 (I).
- Use GEMSTONES 2/2 on the chest (J).
- Easy solution: Tap on the columns in the following order:1-2-(3-1)x3-2-3-1-3-2-3-1-2-1-3-1-2-1-3-(2-1)x2-3-1-2-3-(1-2)x2-3-1-2-3(2-1)x2-3-1-2-3-(1-2)x2-3-1-2-1-2-3, take SATIN RIBBON and STRAWBERRY (K).
- Hard solution: Tap on the columns in the following order:1-2-(3-1)x3-2-3-1-3-2-3-1-2-1-3-1-2-1-3-(2-1)x2-3-1-2-3-(1-2)x2-3-1-2-3(2-1)x2-3-1-2-3-(1-2)x2-3-1-2-1-2-3, take SATIN RIBBON and STRAWBERRY (L).

- Use STRAWBERRY on the raccoon, take HAND CREAM (M).
- Use HAND CREAM on the lock (N).
- Play puzzle, earn CLOCK HANDS (O).
- Use CLOCK HANDS on the clock (P).
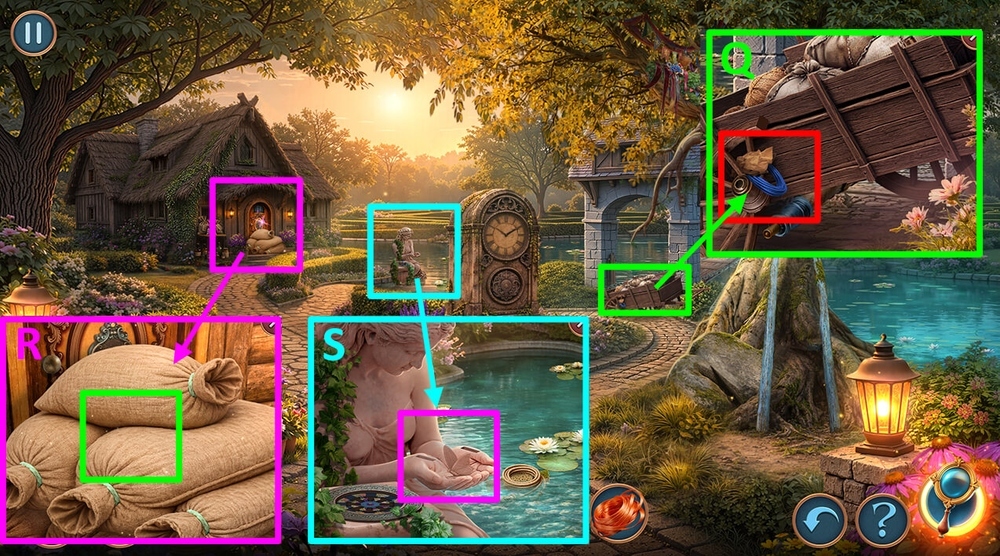
- Take and read the note, take ROPE and STONE BUTTERFLIES 1/2, use WHEEL PART on the carriage (Q).
- Use NAIL CLIPPER on the ropes, take BOARDS 2/3 and STONE BUTTERFLIES 2/2 (R).
- Use STONE BUTTERFLIES 2/2 on the statue (S).

- Easy solution: Tap the buttons in the following order: 11-Lx2-12-Lx2-13-Lx2-14-Lx2-15-Lx2-16-21-Lx2-22-Lx2-23-Lx2-24-Lx2-25-Lx2-26-Lx3 , take INK and MAGNET (T).
- Hard solution: Tap the buttons in the following order: 11-Rx3-12-Lx2-13-Lx2-14-Rx3-15-Lx2-16-R-17-R-18-R-21-Rx2-22-Rx3-23-28-L-27-26-Lx2-25-24-R , take INK and MAGNET (U).
- Use MAGNET on the KNOCKER, earn KNOCKER (V).
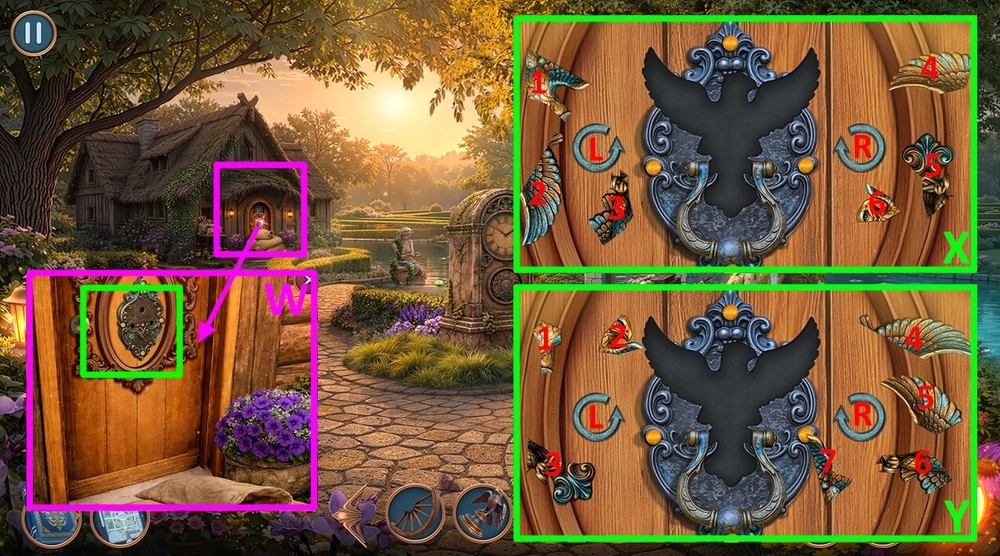
- Use KNOCKER on the door (W).
- Easy solution: Rx2, place 6 to right slot, R, 4, 2, R, 3, 5, R, 1 (X).
- Hard solution: place 7 to right slot, L, 2, L, 6, L, 4, L, 1, Lx2, 5, L, 3 (Y).
- Go forward.
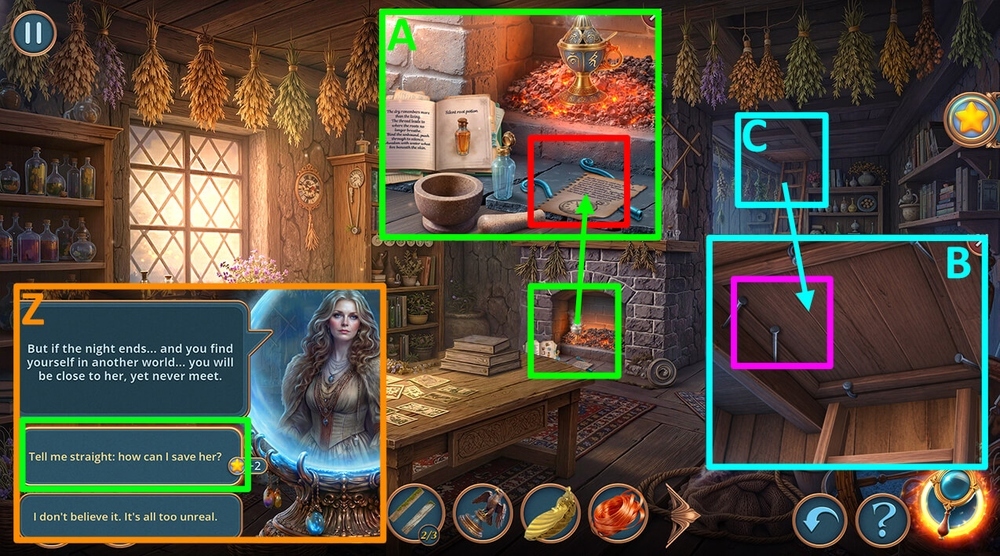
- Select this option (Z).
- Take and read the note, take METAL GRIP PART (A).
- Use EAGLE FIGURINE on the lid, earn NAILS (B).
- Play puzzle, earn HERBS (C).
- Use HERBS on the spiderweb, take BROKEN CAST IRON and KEY (D).
- Use KEY on the lock (E).
- Easy solution: Follow the hint, take SUCTION CUP and NAPKIN (F).
- Hard solution: Follow the hint, take SUCTION CUP and NAPKIN (G).
- Use SATIN RIBBON and NAPKIN on the METAL GRIP PART, earn HOMEMADE NET (H).
- Go back.
- Use HOMEMADE NET on the items, earn BOARDS 3/3, LASSO and SPONGE (I).
- USE BOARDS 3/3, NAILS and EAGLE FIGURINE on the broken ladder (J).
- Play puzzle, earn BELT (K).
- Use BELT on the carriage (L).
- Go forward.
- Take CLOTHESPIN (M).
- Take and read the note, use CLOTHESPIN on the crack, earn COIN (N).
- Use COIN on the bolt, take METAL HANDLE (O).
- Use METAL HANDLE on the rope, earn ROPE WITH HOOK (P).
- Use ROPE WITH HOOK on the mechanism (Q).
- Easy solution: Lay out the paths as shown in the picture (R).
- Hard solution: Lay out the paths as shown in the picture (S).
- Go forward.
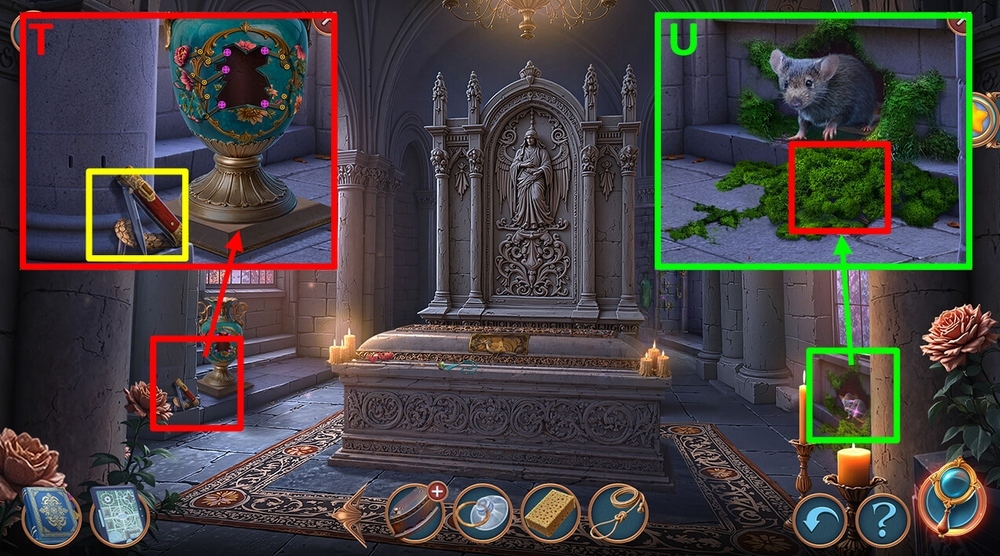
- Take BROKEN FOLDING KNIFE and NIGHTINGALE SYMBOLS 1/2 (T).
- Use SHELL-SHAPED SAUCER on the moss, take NIGHTINGALE SYMBOLS 2/2 (U).
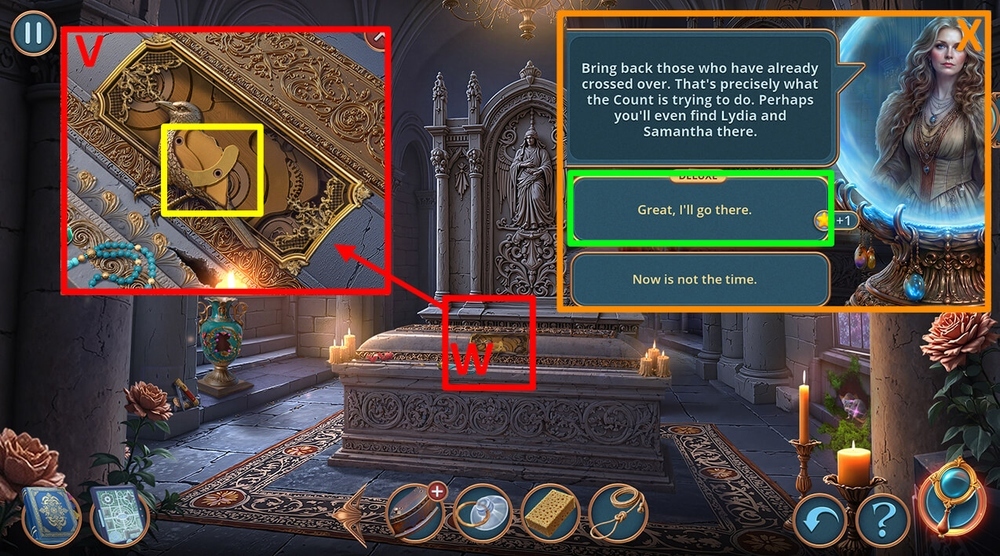
- Use NIGHTINGALE SYMBOLS 2/2 on the slot (V).
- Play puzzle, earn DIADEM (W).
- Select this option (X).
- Go forward.
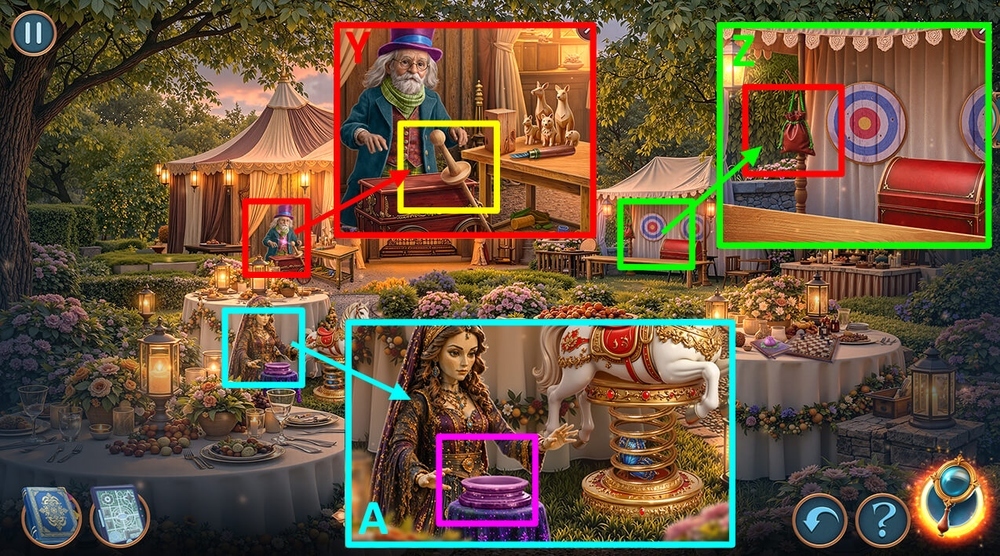
- Take TRAINING SWORD (Y).
- Use TRAINING SWORD on the bag, take CRYSTAL BALL (Z).
- Use CRYSTAL BALL on the statue, take CARVING INSTRUCTION (A).
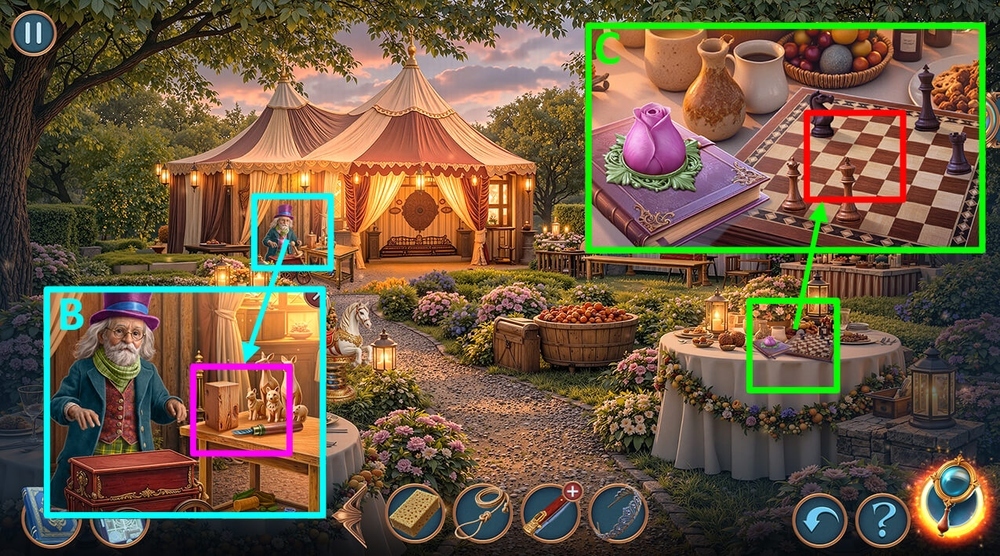
- Use CARVING INSTRUCTION on the tools, take CHESS PIECE (B).
- Use CHESS PIECE on the chessboard, take SALT CRYSTAL (C).
- Go back.
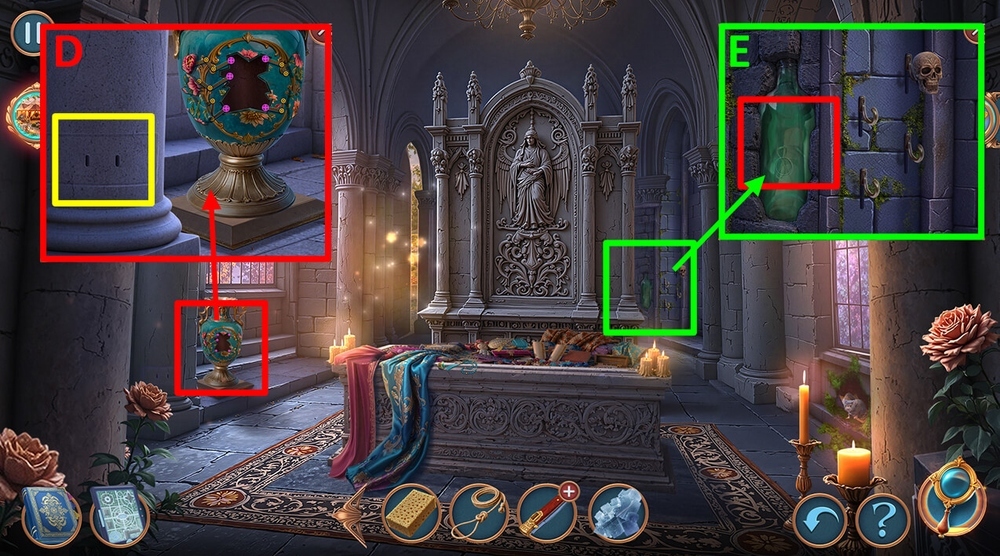
- Use DIADEM on the lid, take OIL and DIAMOND RING (D).
- Use SUCTION CUP and DIAMOND RING on the glass, take and read the note, take SCREWS 1/2 and HEART-SHAPED PENDANT 1/2 (E).
- Go to Maze Garden.
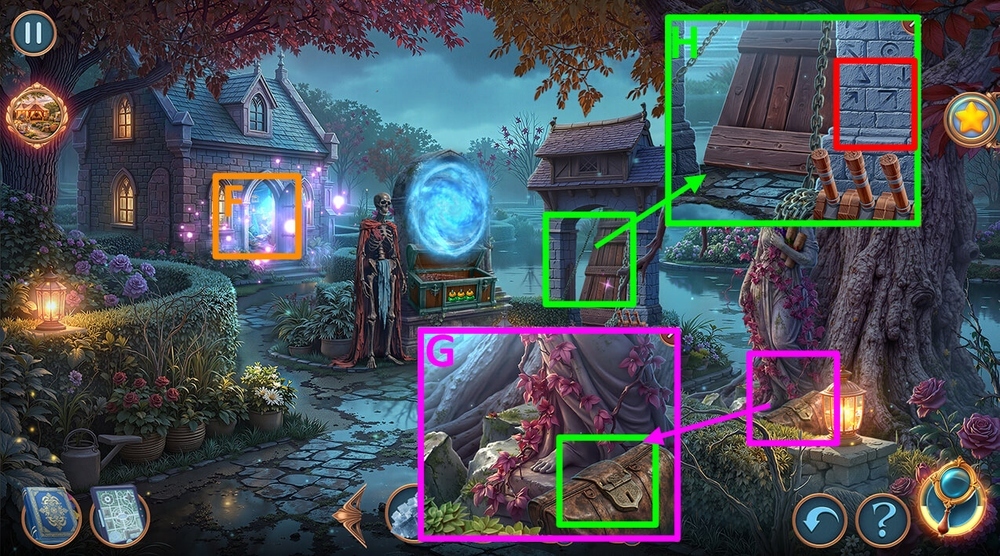
- Play puzzle, earn CUFFLINK (F).
- Use CUFFLINK on the bag, take BUTTON and STENCIL (G).
- Use INK, SPONGE and STENCIL on the symbols (H).
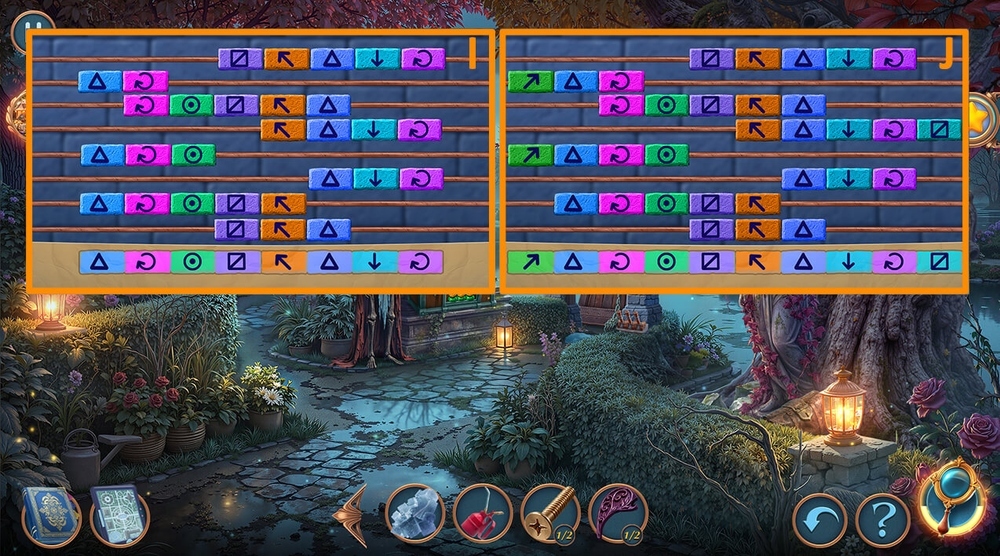
- Easy solution: Arrange the sliders as shown in the picture (I).
- Hard solution: Arrange the sliders as shown in the picture (J).
- Go to Old Dead Tree.
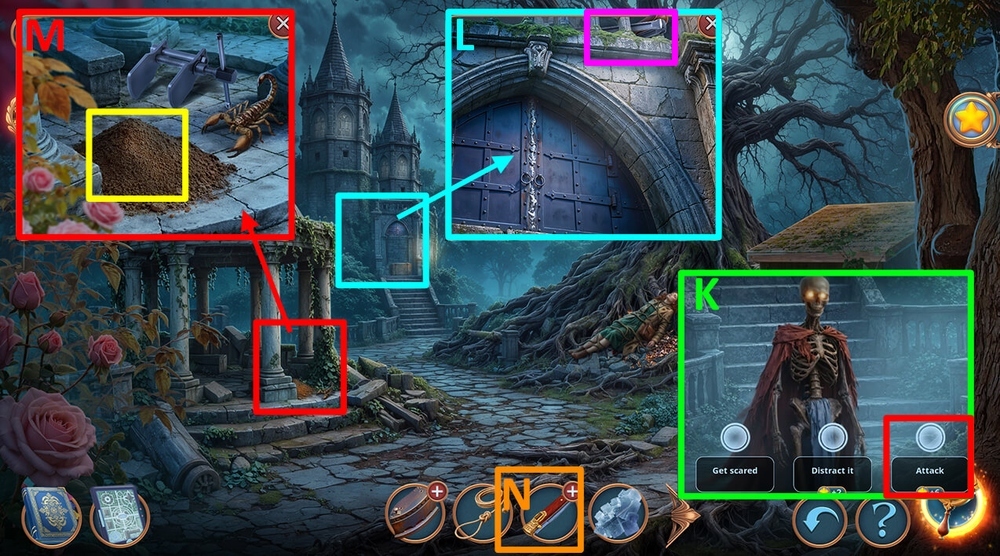
- Select this option (K).
- Use LASSO on the items, earn SCOOP and FORCEPS (L).
- Use SCOOP on the ground, take BUTTON (M).
- Use BUTTON on the BROKEN FOLDING KNIFE, earn FOLDING POCKET KNIFE (N).
- Go to Old Fountain Walkway.
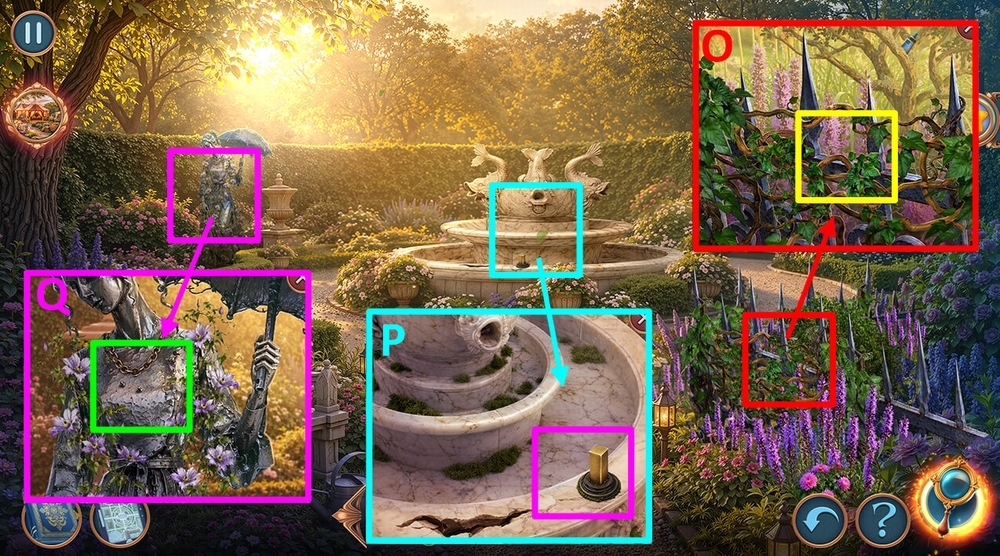
- Use FOLDING POCKET KNIFE on the vines, take COIN WITH HOLE (O).
- Use COIN WITH HOLE on the pin, take DOOR HANDLE and HEART-SHAPED PENDANT 2/2, use SALT CRYSTAL on the water, earn THROWING KNIFE (P).
- Use HEART-SHAPED PENDANT 2/2 on the statue (Q).
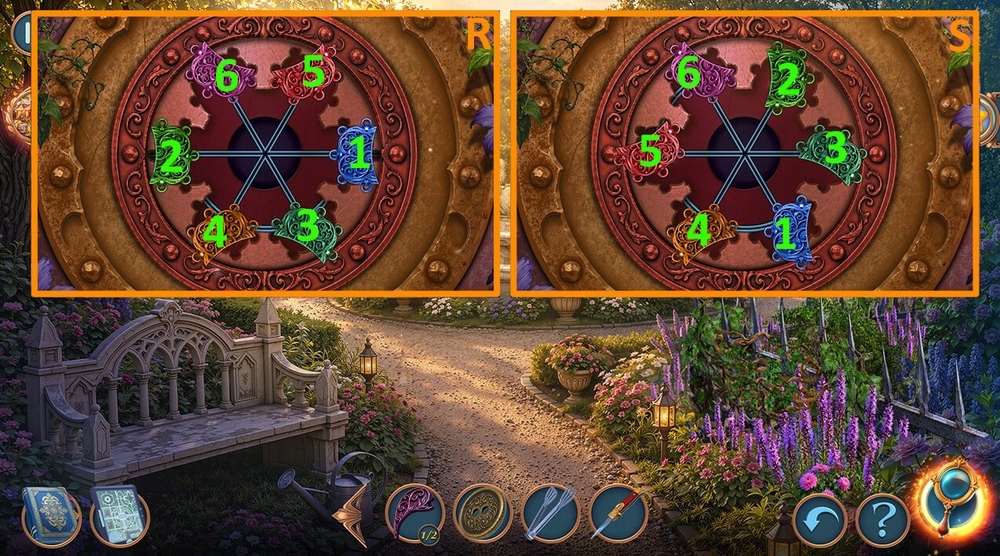
- Easy solution: Swap the following pieces: 3-4-5-3-6-4-6-5-2-1 , take HANDLE (R).
- Hard solution: Swap the following pieces: 2-4-2-1-2-6-2-5-2-3-6-1-1-5-1-3-3-5-3-6-4-3-4-6-5-4 , take HANDLE (S).
- Go to Old Festival Row.
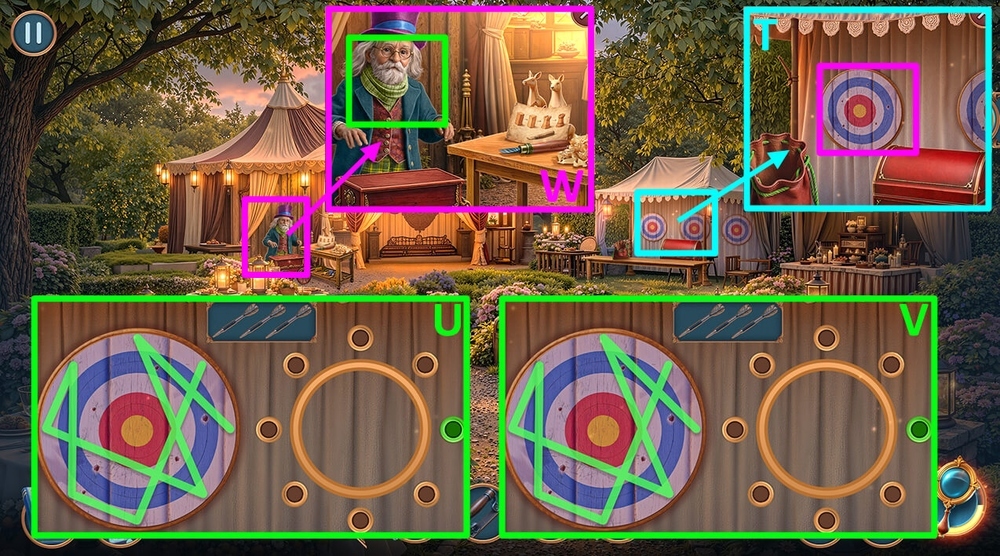
- Use THROWING KNIFE on the targets (T).
- Easy solution: Tap on the symbols in the order shown in the hint, take STREET ORGAN (U).
- Hard solution: Tap on the symbols in the order shown in the hint, take STREET ORGAN (V).
- Use STREET ORGAN on the musician statue, take HAT (W).
- Go to Old Dead Tree.
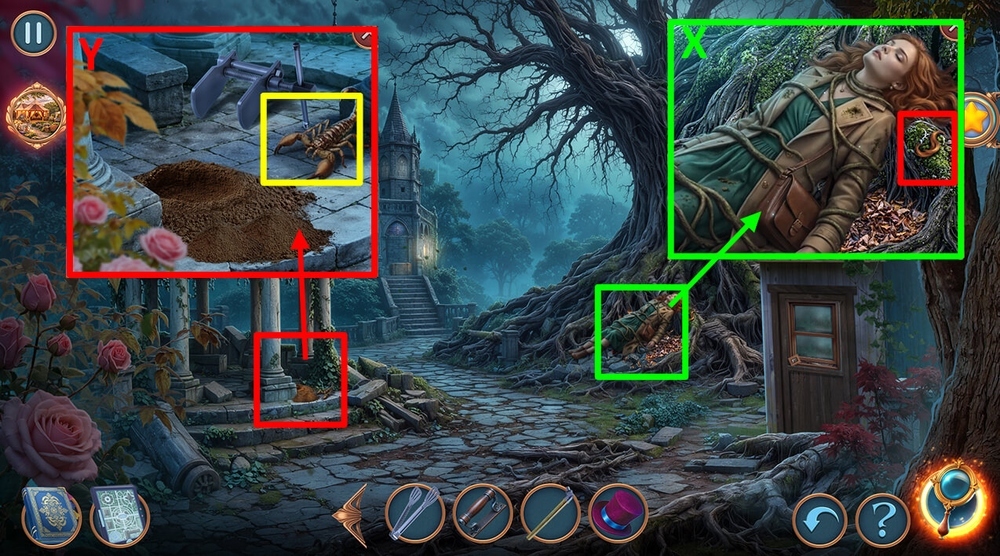
- Take SAMANTHA’S HAIR (X).
- Use HAT on the scorpion, take SPREADER (Y).
- Go to Old Festival Row.
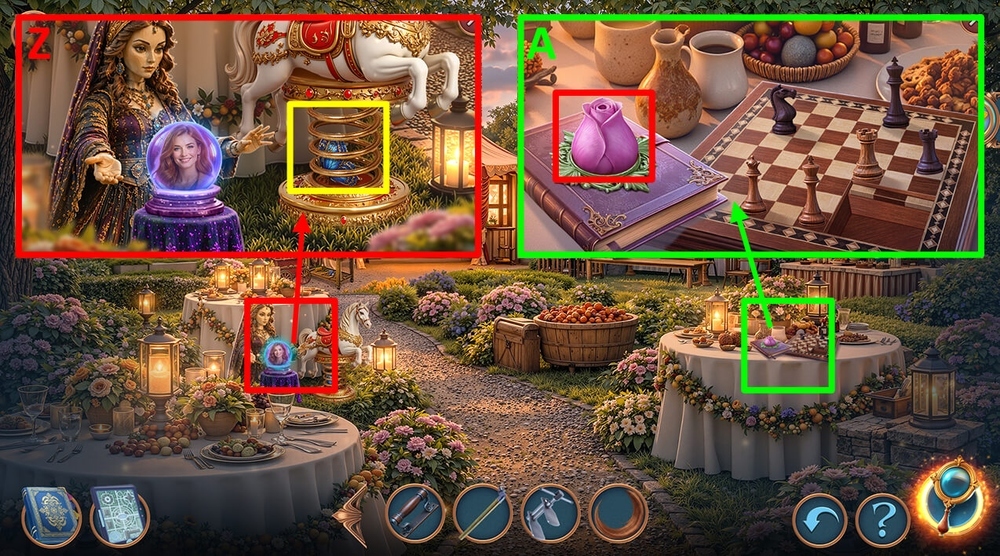
- Use SPREADER on the spring, take MAGIC BUTTERFLY (Z).
- Use MAGIC BUTTERFLY on the lock, take and read the note (A).
- Go to Terrace.
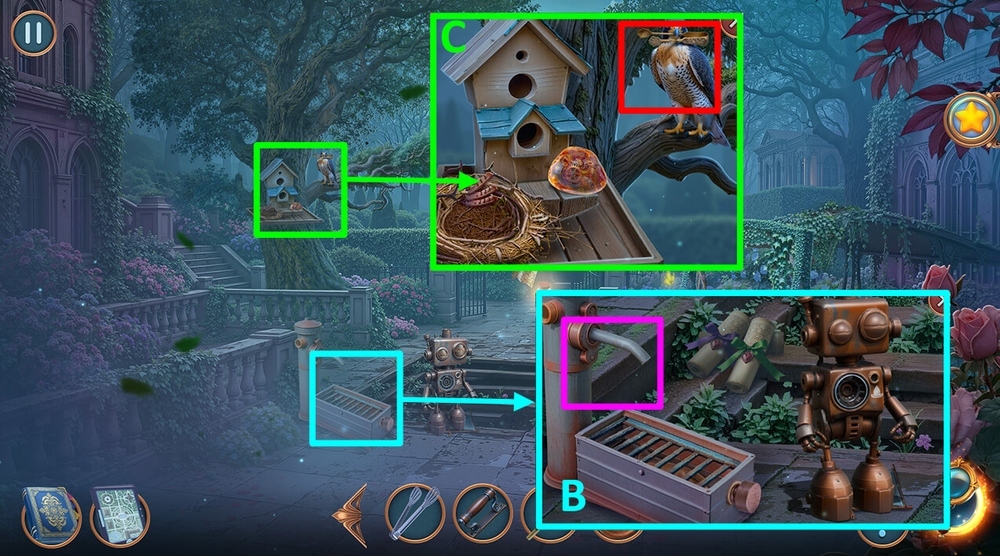
- Use HANDLE on the drain, take FALCONRY GLOVE (B).
- Use FALCONRY GLOVE on the falcon (C).
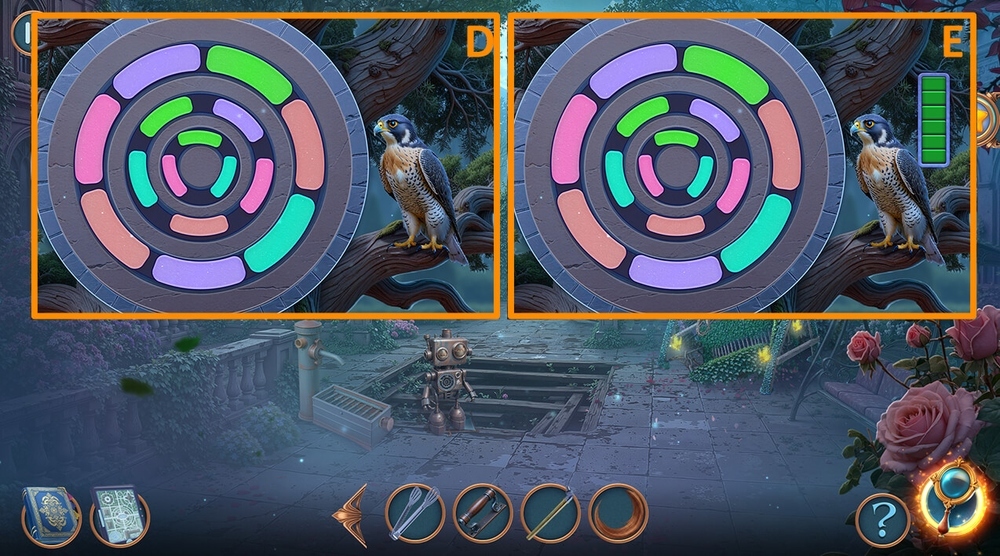
- Easy solution: The hint is shown in the picture, earn SUGAR TONGS (D).
- Hard solution: The hint is shown in the picture, earn SUGAR TONGS (E).
- Go to Old Healer’s Hideout.
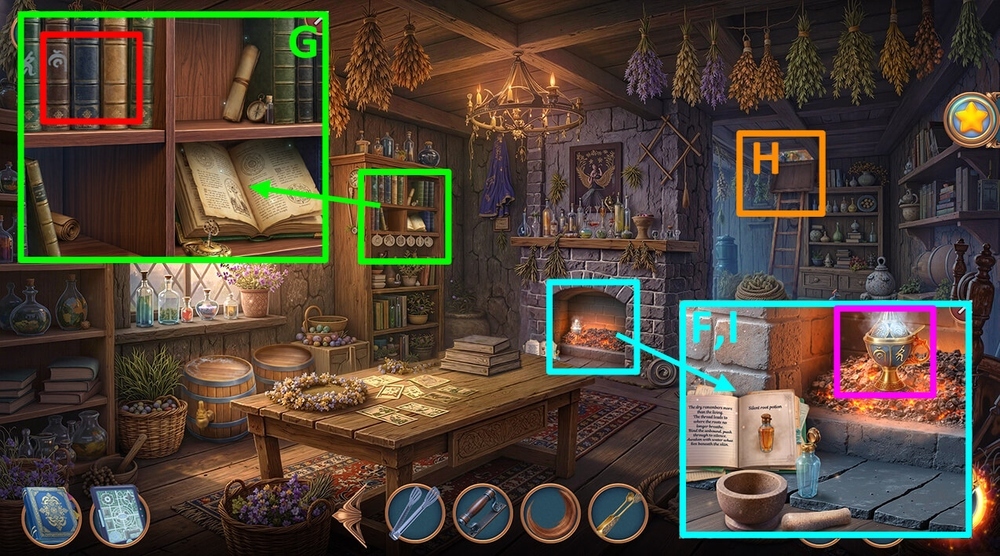
- Use SUGAR TONGS on the coals, earn METAL SMOKER (F).
- Use METAL SMOKER on the symbols, take THREADS (G).
- Play puzzle, earn BAY LEAVES (H).
- Use SAMANTHA’S HAIR, BAY LEAVES and THREADS on the instruction, earn POTION (I).
- Go to Old Dead Tree.
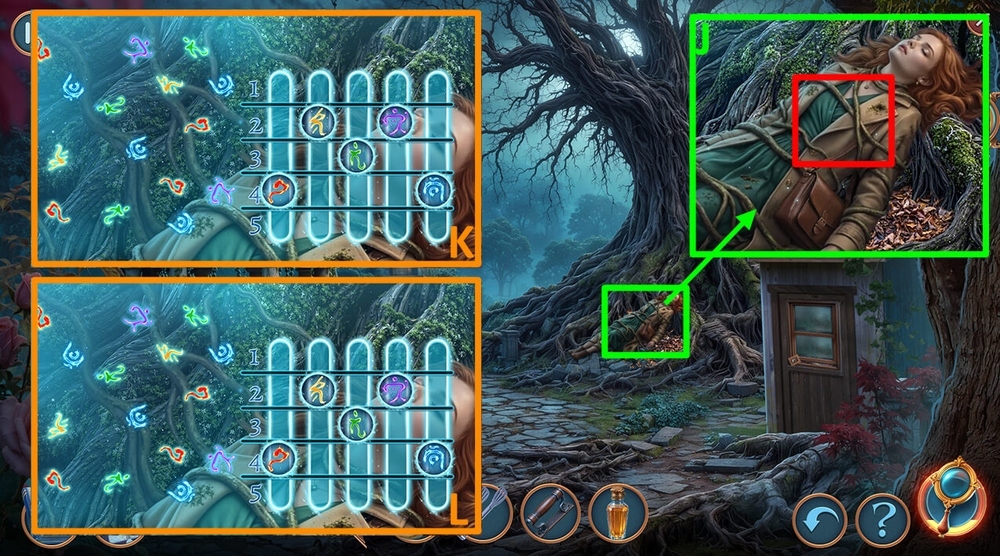
- Use POTION on the character (J).
- Easy solution: Arrange the sliders as shown in the picture (K).
- Hard solution: Arrange the sliders as shown in the picture (L).
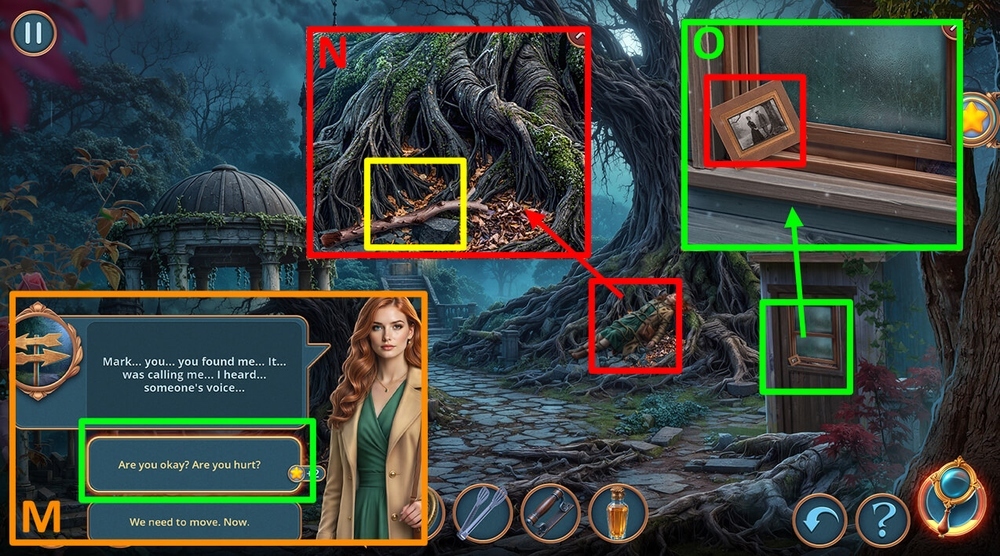
- Select this option, earn BROKEN BALL (M).
- Take STICK (N).
- Take and read the note, use STICK on the window, take BROKEN SHIP and SHARDS (NO).
- Go to Old Von Graven Crypt.
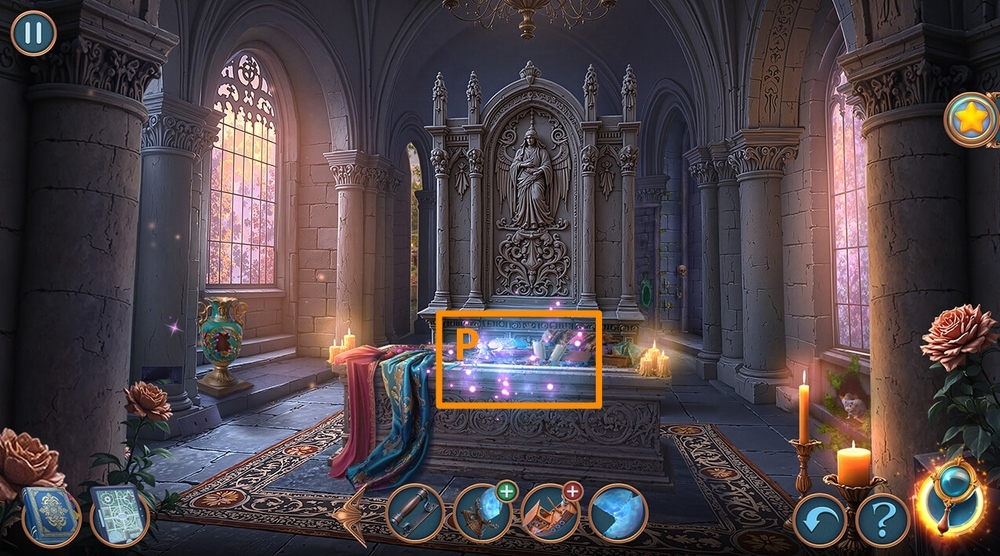
- Play puzzle, earn OLD HEART LOCK (P).
- Go to Terrace.
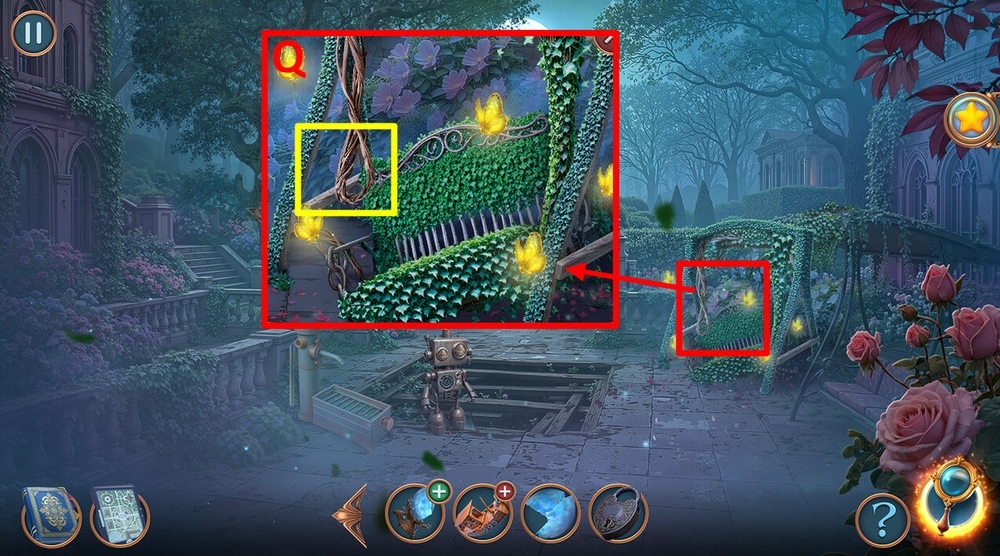
- Use OLD HEART LOCK on the vines, take MUSHROOM TREAT (Q).
- Go to Old Von Graven Crypt.
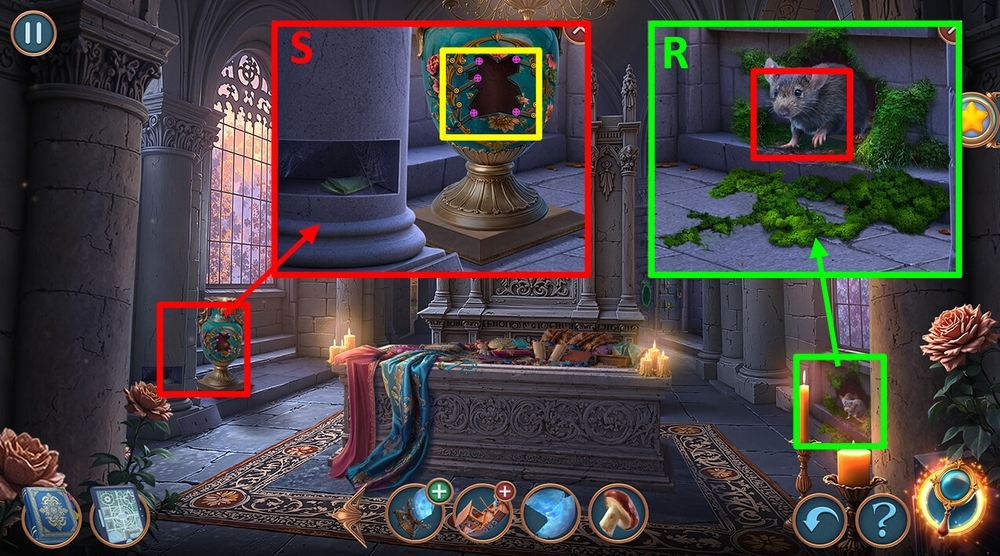
- Use MUSHROOM TREAT on the mouse, take STONE SKULLS 1/3 and VASE HINT (R).
- Use VASE HINT on the vase (S).
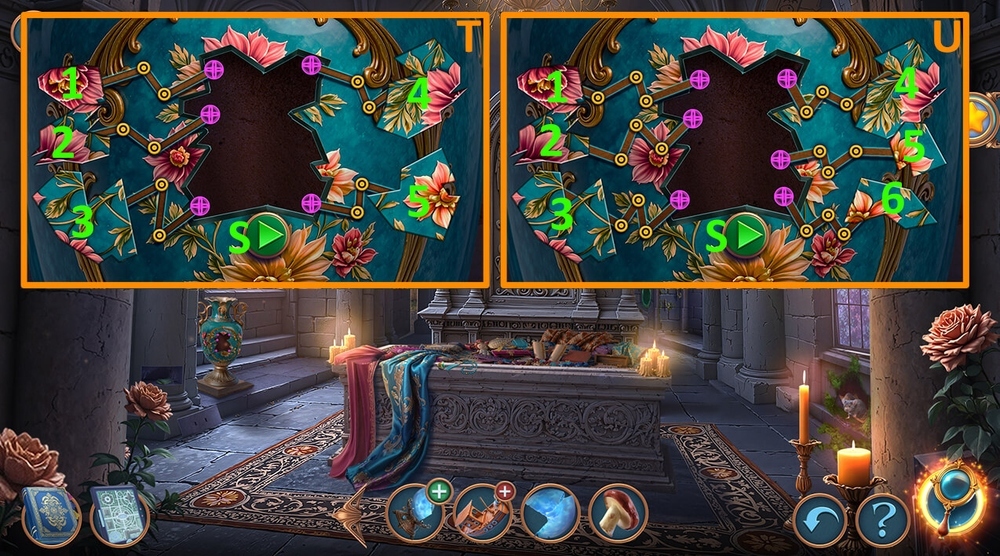
- Easy solution: Tap the buttons in the following order: 1×3-2-3×2-4×3-5×3-S , take FUR RUG (T).
- Hard solution: Tap the buttons in the following order: 1×2-2×2-3-4×2-5×3-6×2-S , take FUR RUG (U).
- Go to Old Fountain Walkway.
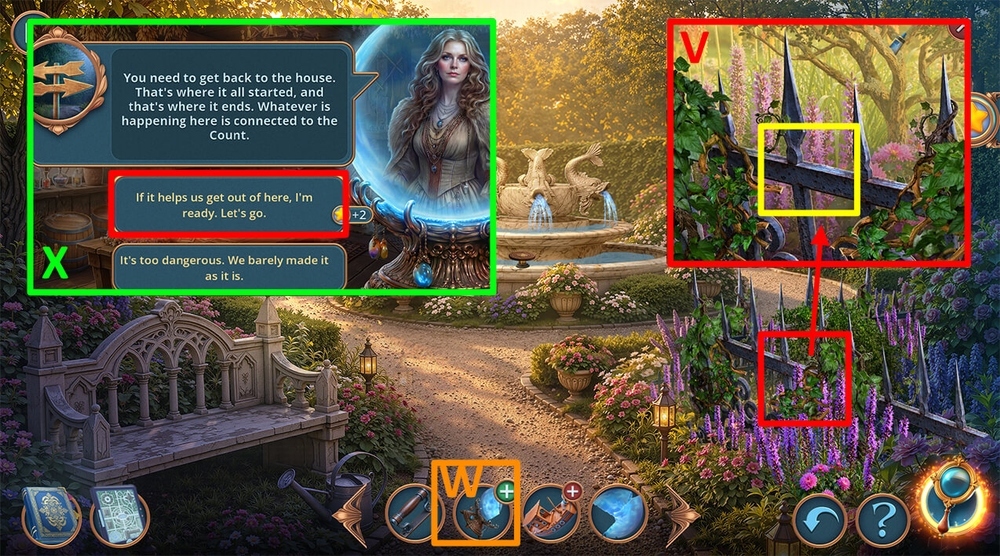
- Use FUR RUG on the stakes, take GLUE (V).
- Use SHARDS and GLUE on the BROKEN BALL (W).
- Select this option (X).
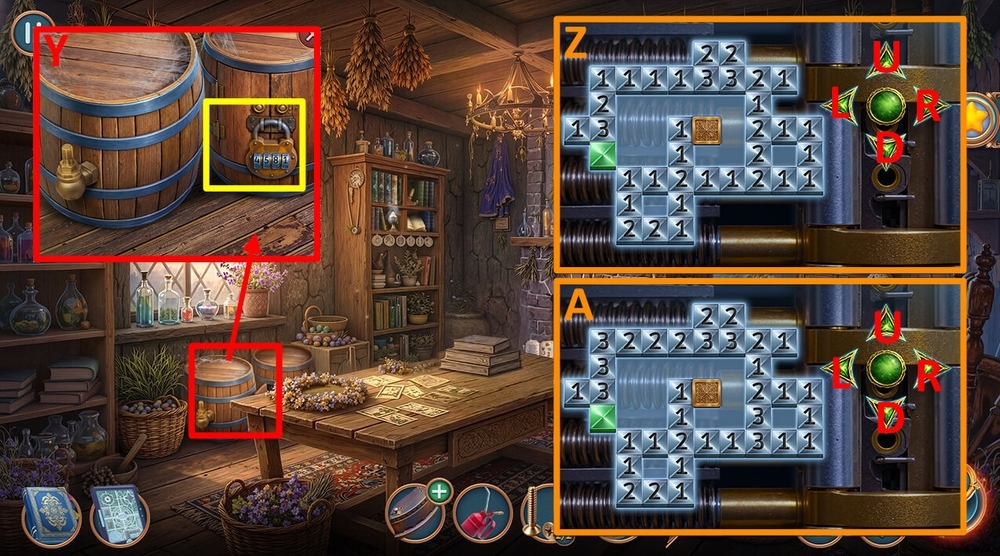
- Tap on the lock (Y).
- Easy solution: Tap the arrows in the following order: D-L-Dx4-Lx2-R-L-Ux2-Rx7-Ux2-Lx2-Dx2-Ux4-R-Lx2-U-L-D-R-U-L-D-R-Lx5-Dx2-L-R-U-Dx2 , take SPUR and SCREWS 2/2 (Z).
- Hard solution: Tap the arrows in the following order: D-L-Dx4-Lx2-R-L-Ux2-Rx7-Ux2-Lx2-Dx2-U-D-Ux4-R-Lx2-U-L-D-R-U-L-D-R-Lx3-R-Lx3-R-L-D-U-Dx2-L-R-U-Dx2 , take SPUR and SCREWS 2/2 (A).
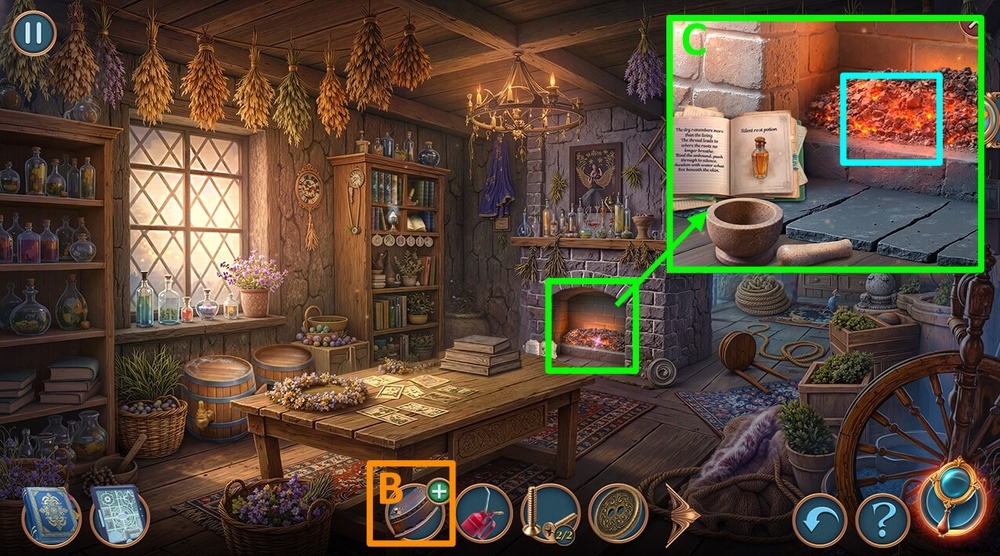
- Use SCREWS 2/2 and DOOR HANDLE on BROKEN CAST IRON, earn CAST IRON (B).
- Use CAST IRON on the coals, earn RED-HOT IRON (C).
- Go to Terrace.
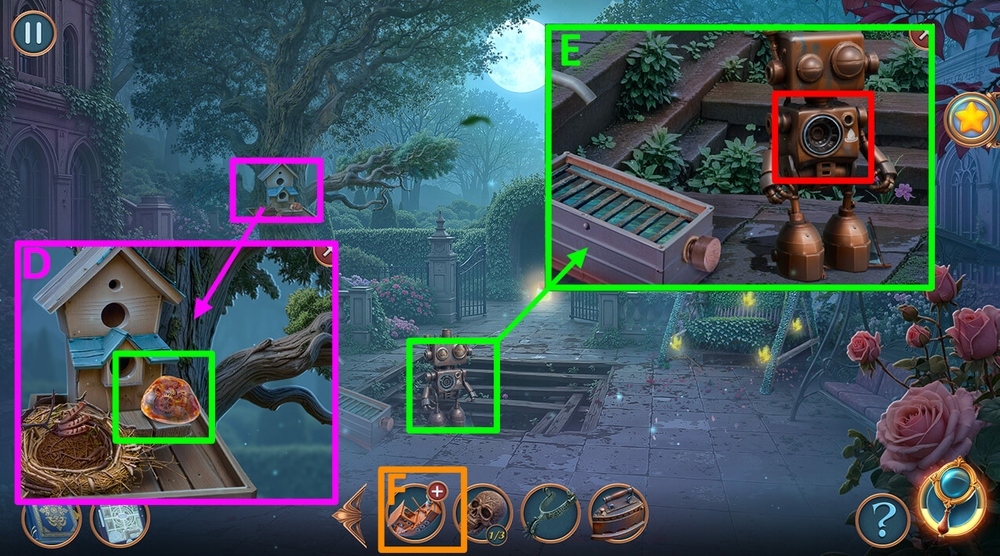
- Use RED-HOT IRON on the amber, take MECHANICAL HEART (D).
- Use OIL and MECHANICAL HEART on the robot, take MAST WITH SAIL (E).
- Use MAST WITH SAIL on BROKEN SHIP, earn SHIP FIGURINE (F).
- Go to Old Dead Tree.
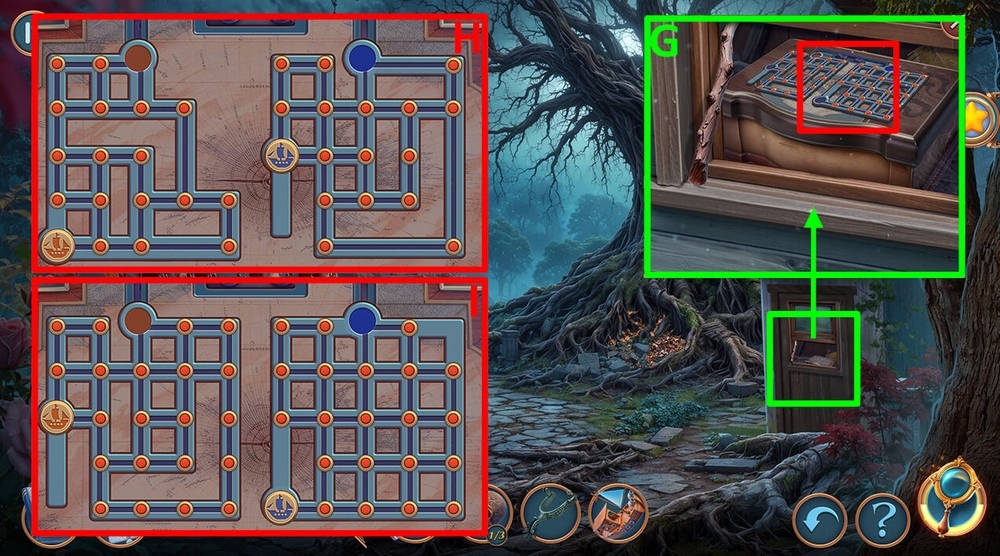
- Use SHIP FIGURINE on the board (G).
- Easy solution: U(up),R(right),L(left),D(down), tap the arrows in the following order: left chip-R-U-L-U-Rx2-Dx2-R-U-L-U-Lx3-U-Rx2, right chip-Ux2-R-D-Rx2-Dx2-L-U-L-Dx2-R-Ux2-U , take CIGAR CASE and SOLDERING IRON (H).
- Hard solution: U(up),R(right),L(left),D(down), tap the arrows in the following order: left chip-Ux2-R-Dx4-Rx3-Ux4-L-Dx3-L-Ux3, right chip-R-Ux2-L-Ux2-R-D-R-Dx3-Rx2-U-L-U-R-U-L-U-L , take CIGAR CASE and SOLDERING IRON (I).
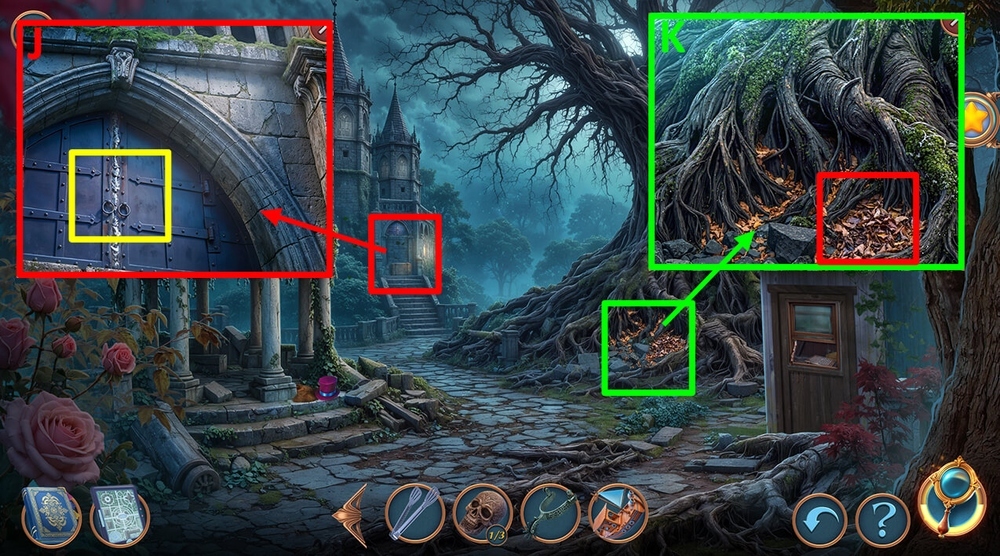
- Use SOLDERING IRON on the door, take RAKE (J).
- Use RAKE on the leaves, take STONE SKULLS 2/3 (K).
- Go to Old Maze Garden.
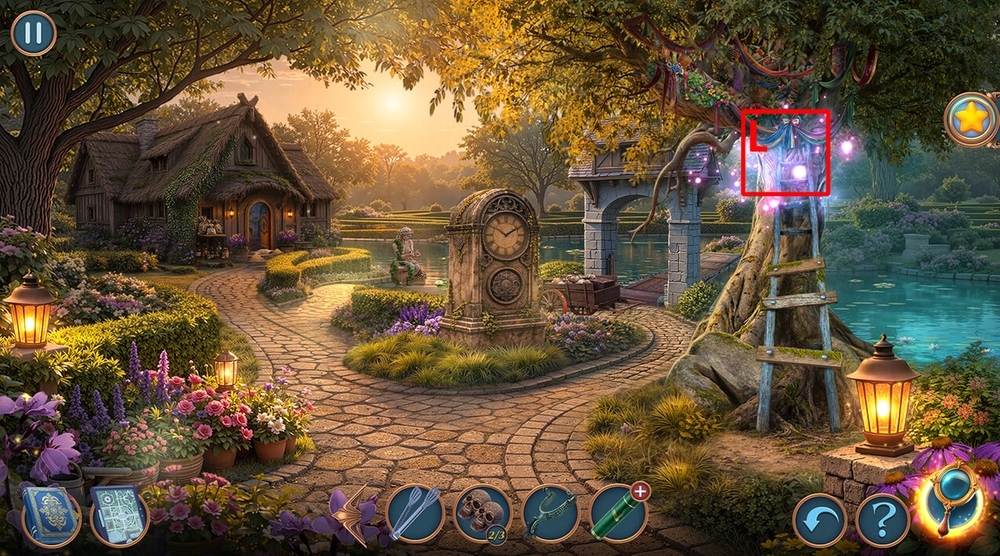
- Play puzzle, earn CRAB-VALVE (L).
- Go to Old Healer’s Hideout.
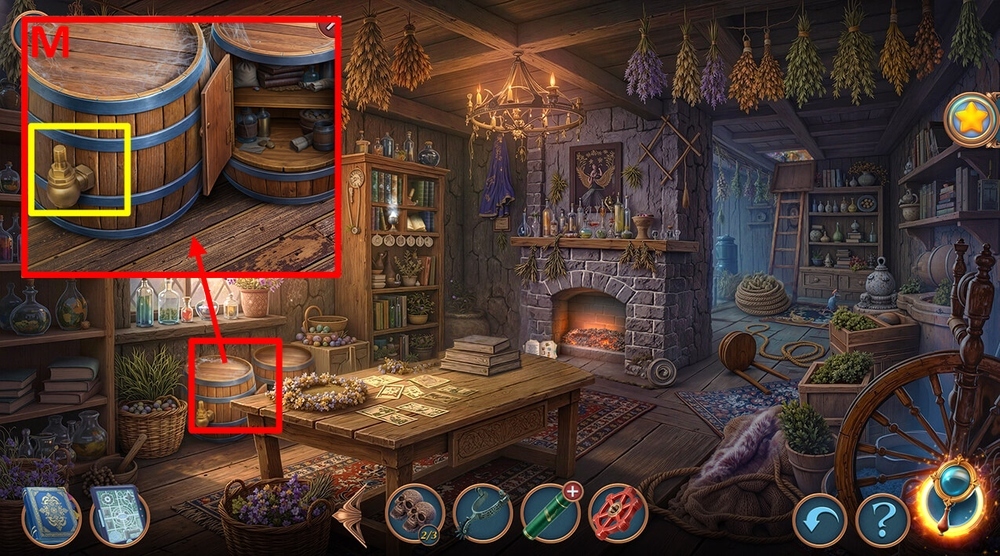
- Use CRAB-VALVE on the barrel, take STONE SKULLS 3/3 (M).
- Go to Old Von Graven Crypt.
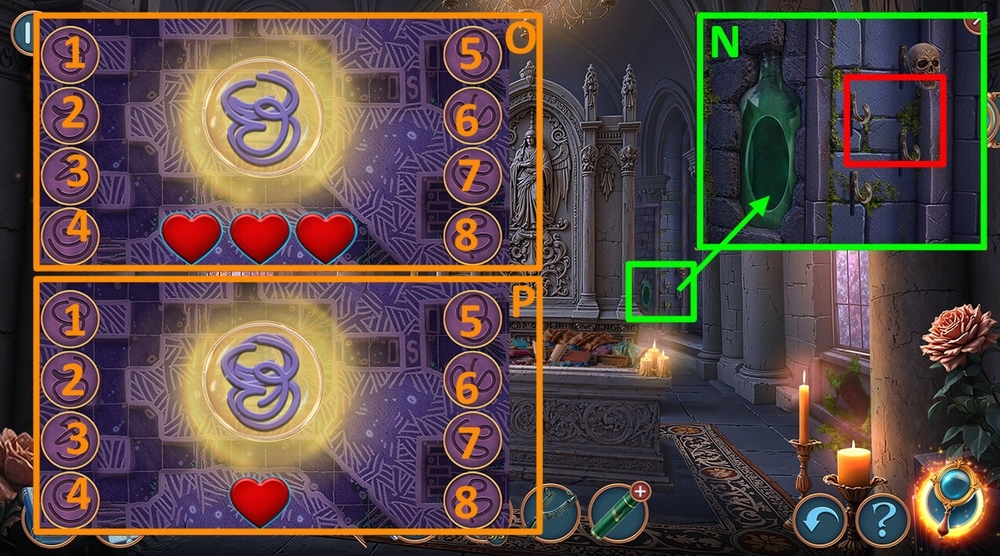
- Use STONE SKULLS 3/3 on the hooks (N).
- Easy solution: Tap on the symbols in the following order: 1-2-3-7-2-5-6-8-4-7 (O).
- Hard solution: Tap on the symbols in the following order: 1-2-5-3-6-7-2-3-5-3-6-8-1-4-7 (P).
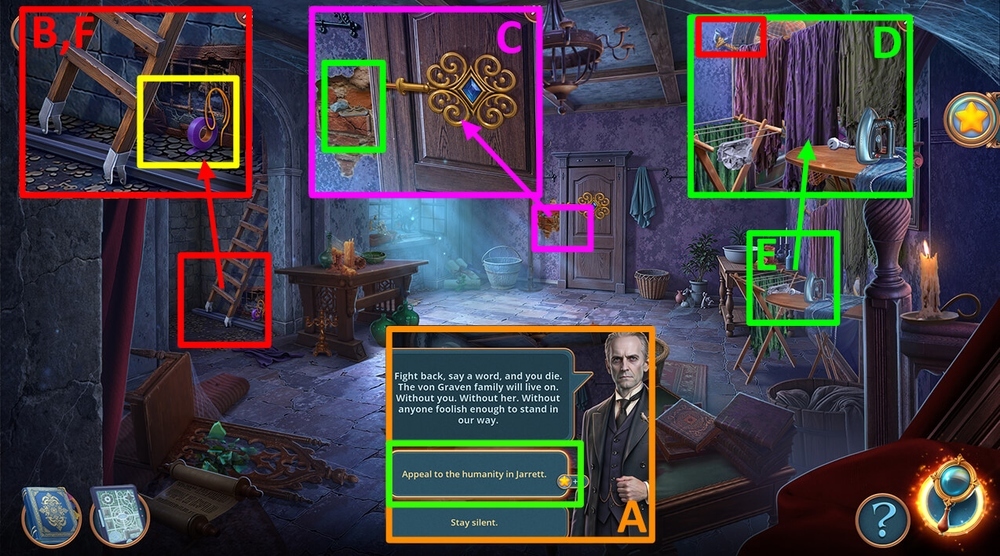
- Select this option (A).
- Take PENDANT LACE and TAPE, use FORCEPS on the IRON CONE, earn IRON CONE (B).
- Take FLINT AND STEEL, use IRON CONE and SPUR on the wall, take WHEEL and PLIERS (C).
- Use PLIERS on the rope (D).
- Play puzzle, earn SPINNING TOP (E).
- Use SPINNING TOP and WHEEL on the ladder (F).
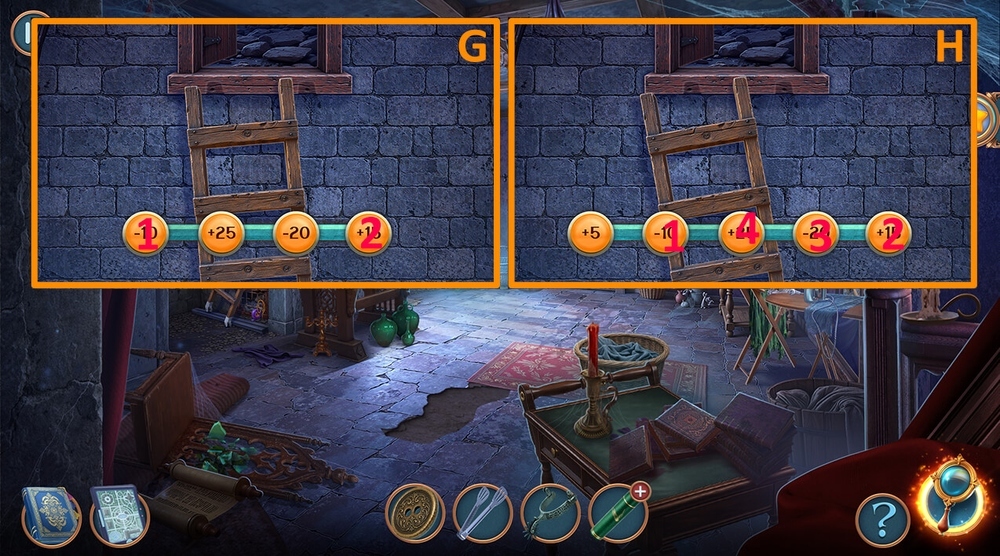
- Easy solution: Tap the buttons in the order shown in the picture (G).
- Hard solution: Tap the buttons in the order shown in the picture (H).
- Go forward.
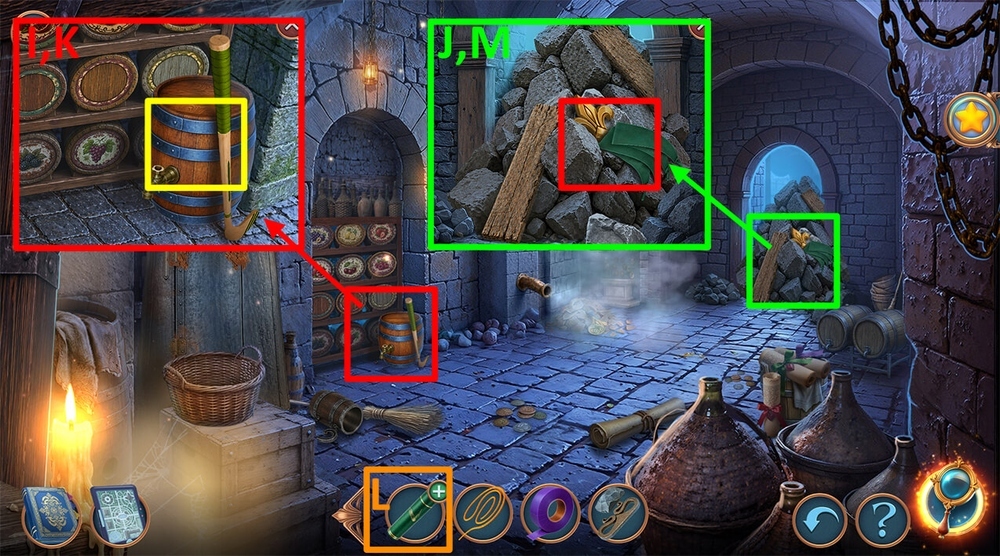
- Take CRICKET BAT (I).
- Take CURTAIN HOLDER and GOLDEN PATTERNS 1/3, use CRICKET BAT on the stone, take BARREL TAP (J).
- Use BARREL TAP and COIN on the barrel, take SALTPETER (K).
- Use PENDANT LACE and SALTPETER on CIGAR CASE, earn EXPLOSIVES (L).
- Use EXPLOSIVES and FLINT AND STEEL on the blocked path (M).
- Go forward.
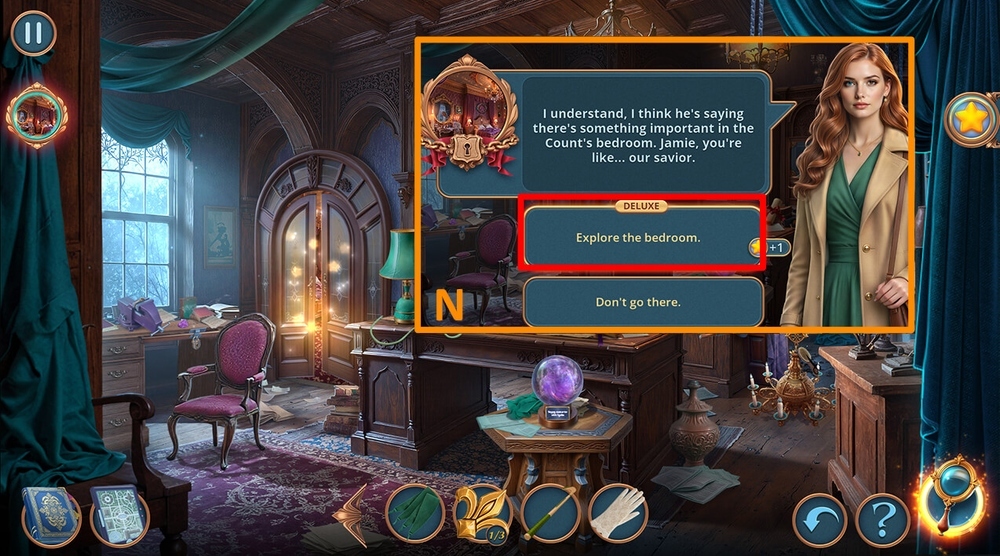
- Select this option (N).
- Go forward.
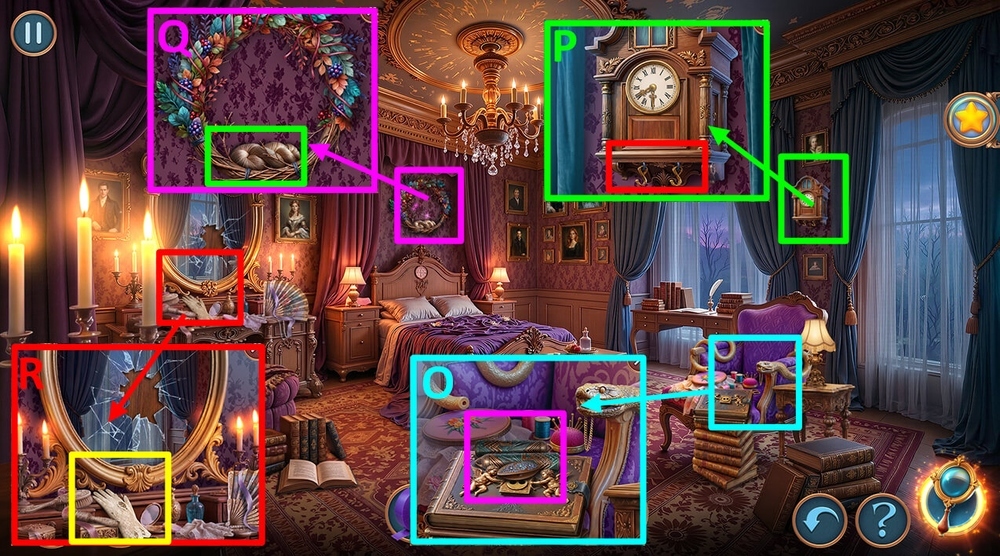
- Take TATTING SHUTTLES 1/2 and CLOCK WEIGHTS (O).
- Use CLOCK WEIGHTS on the hooks, take TATTING SHUTTLES 2/2 and EUCALYPTUS LEAVES (P).
- Take TATTING THREAD, use EUCALYPTUS LEAVES on the wreath (Q).
- Use TATTING THREAD and TATTING SHUTTLES 2/2 on the glove, earn LACE GLOVE (R).
- Go back.
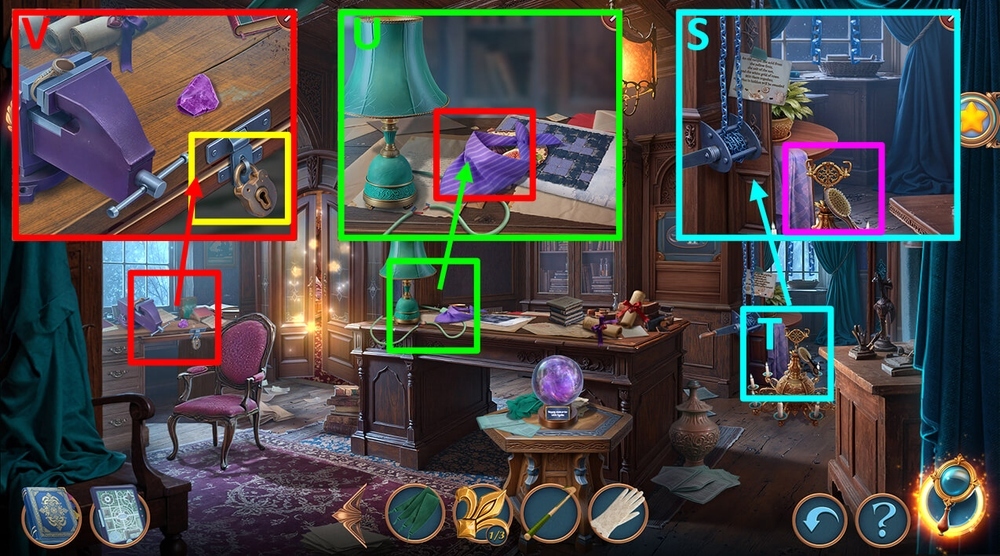
- Take SCISSORS and HAIRBRUSH, use CURTAIN HOLDER on the chains (S).
- Play puzzle, earn LAMP BUTTON (T).
- Take TIE and WINE TAGS 1/3, use LAMP BUTTON and TAPE on the lamp, take SMALL KEY (U).
- Use SMALL KEY on the lock, take RATTLE (V).
- Go back.
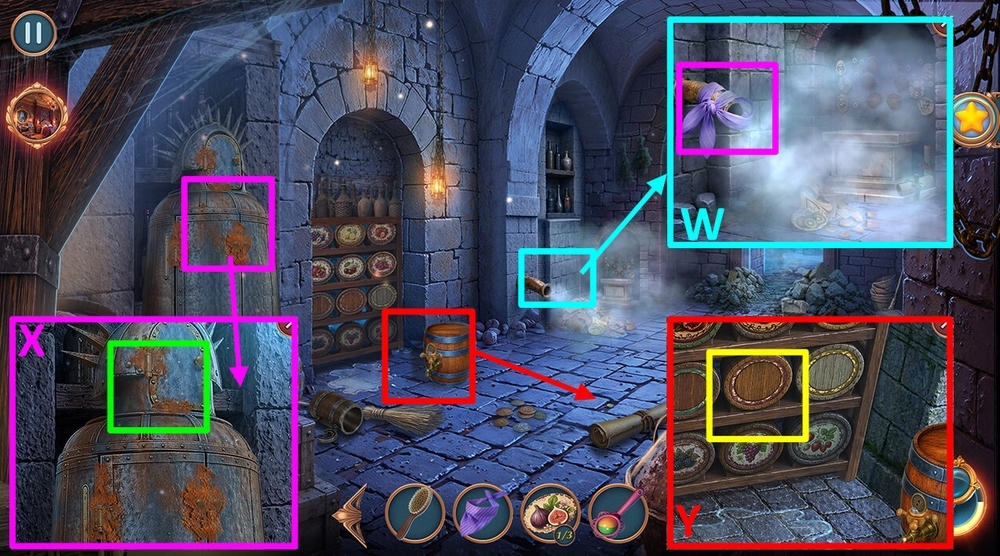
- Use TIE and RATTLE on the pipe, take GOLDEN PATTERNS 2/3, WINE TAGS 2/3 and ANTI-RUST FOAM (W).
- Use ANTI-RUST FOAM on the rust, take WINE TAGS 3/3 (X).
- Use WINE TAGS 3/3 on the barrels (Y).
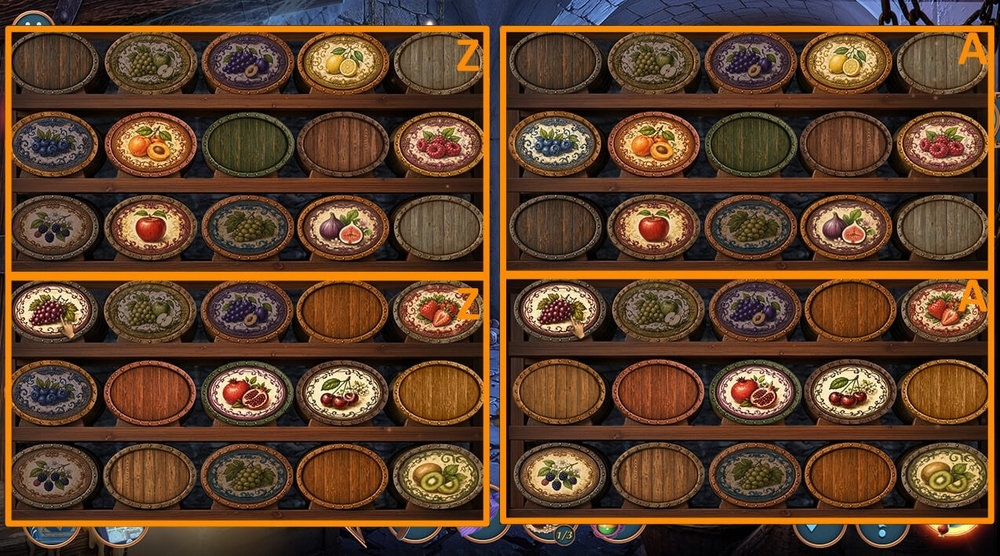
- Easy solution: Place the barrels as shown in the picture (Z).
- Hard solution: Place the barrels as shown in the picture (A).
- Go to Old Library.
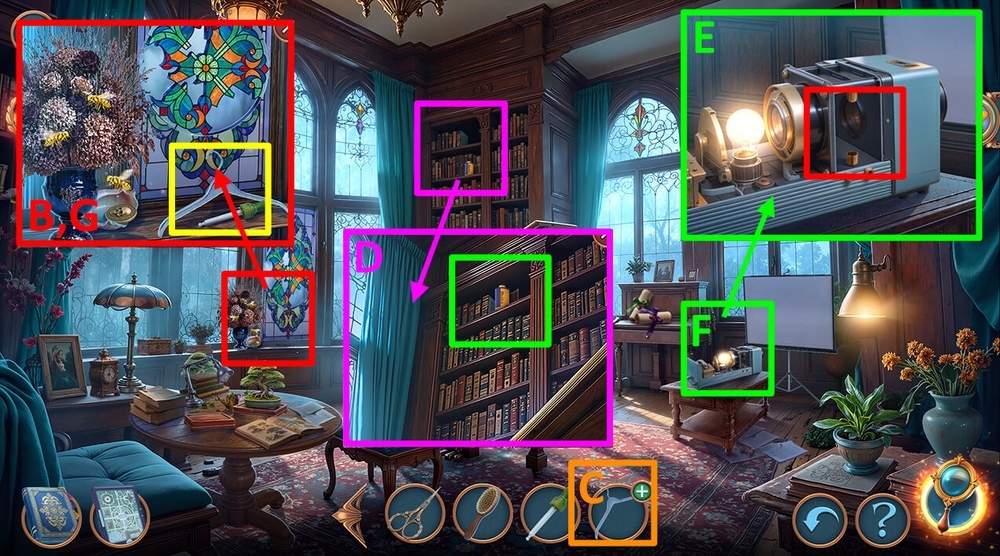
- Take EMPTY PIPETTE and METAL HANGER (B).
- Use CRICKET BAT on METAL HANGER, earn LONG HOOK (C).
- Use LONG HOOK on FILM SLIDES, earn FILM SLIDES (D).
- Use FILM SLIDES on the projector (E).
- Play puzzle, earn BOX OF CHOCOLATES (F).
- Use BOX OF CHOCOLATES on the wasps, take MORBID COINS 1/2 and DEEP SHELL (G).
- Go to Servant’s Entrance.
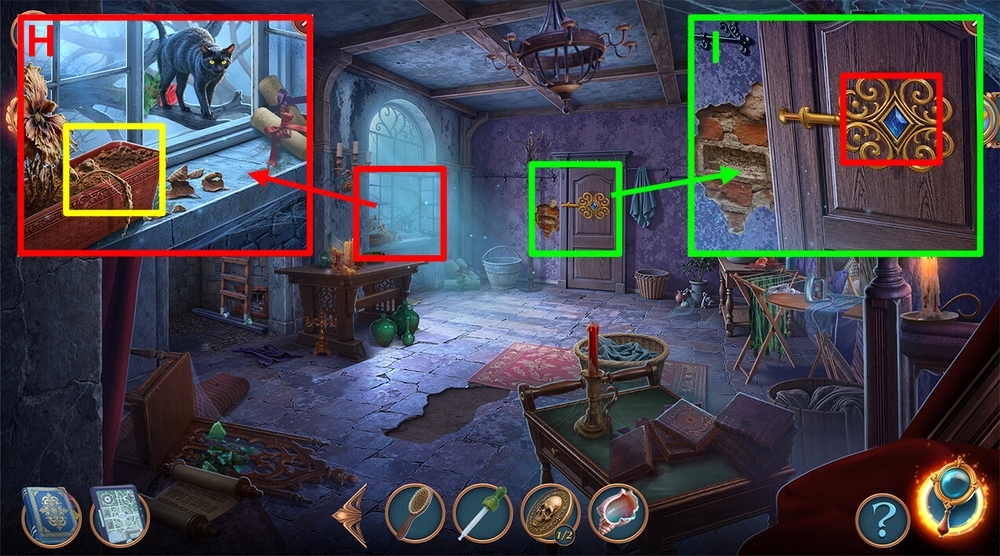
- Use DEEP SHELL on the pot, take GOLDEN PATTERNS 3/3 (H).
- Use GOLDEN PATTERNS 3/3 on the door (I).
- Go to Butler’s Room.
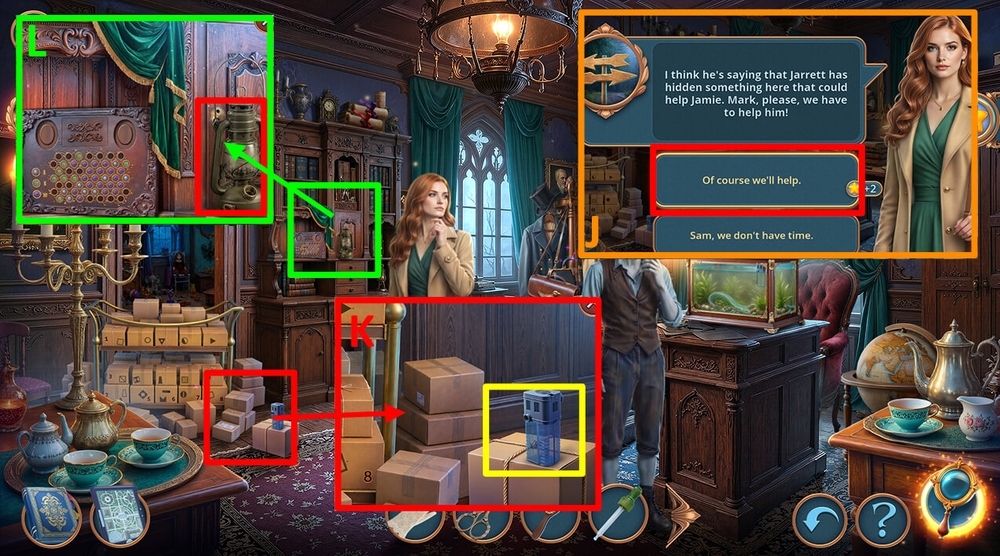
- Select this option (J).
- Take AQUARIUM FILTER, use SCISSORS on the ropes, take OLD GLASSES (K).
- Take OIL LAMP, use OLD GLASSES on the door, take SUPPLY RECORDS (L).
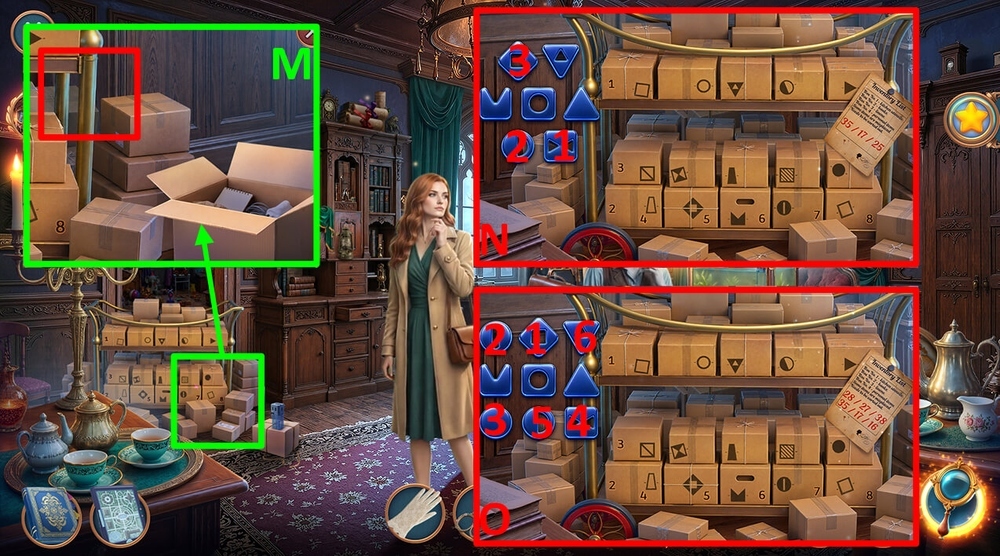
- Use SUPPLY RECORDS on the boxes (M).
- Easy solution: Tap the buttons in the following order: (N).
- Hard solution: Tap the buttons in the following order: (O).
- Go forward.
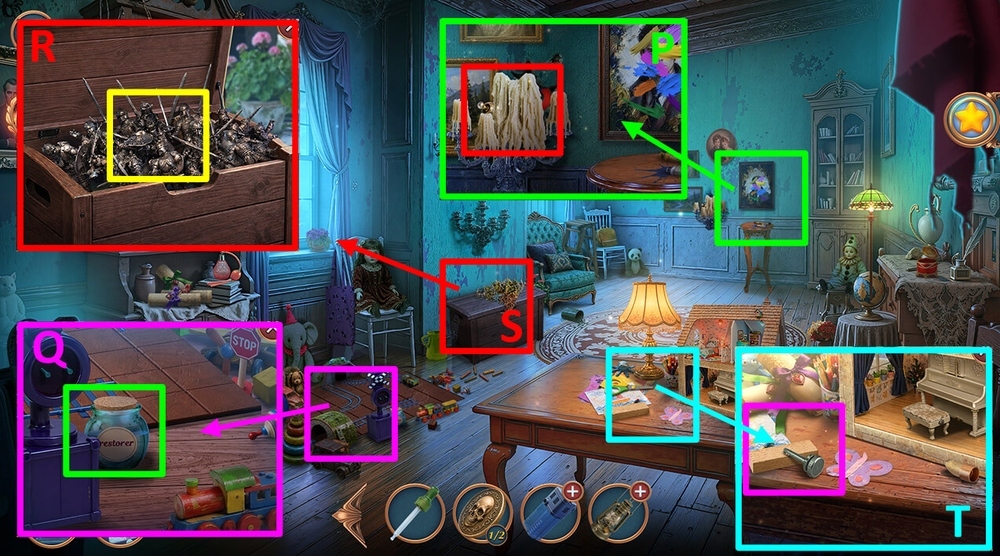
- Take JOINT, use HAIRBRUSH on the wax, take MAGNET (P).
- Take RESTORING SOLUTION (Q).
- Use MAGNET on the soldiers (R).
- Play puzzle, earn WOOD CUTTER (S).
- Take LAMP LEVER, use WOOD CUTTER on the wood, take BRUSH (T).
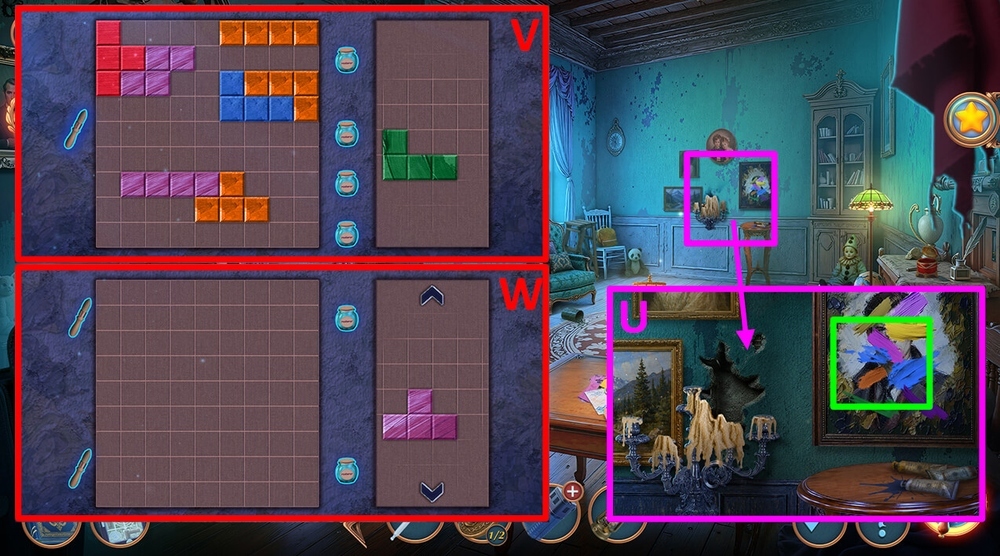
- Use RESTORING SOLUTION and BRUSH on the paint (U).
- Easy solution: build a path of blocks (V).
- Hard solution: build a path of blocks (W).
- Go forward.
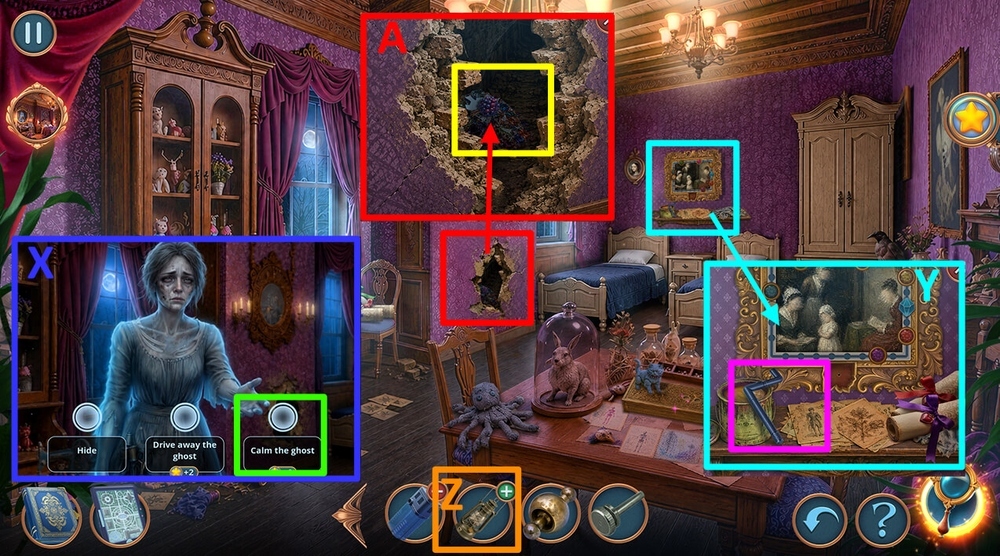
- Select this option (X).
- Take FILTER TUBE, use EMPTY PIPETTE on the jar, earn PAINT OIL (Y).
- Use LAMP LEVER and PAINT OIL on OIL LAMP, earn OIL LAMP (Z).
- Use OIL LAMP on the darkness, take SEWING MACHINE VALVE and BERRIES, use LACE GLOVE on the shards, earn MIRROR SHARD (A).

- Take BROKEN FIGURINE, use SEWING MACHINE VALVE on the machine, take STAINED GLASS PIECES 1/4 and MORBID COINS 2/2 (B).
- Go to Count’s Old Bedroom.
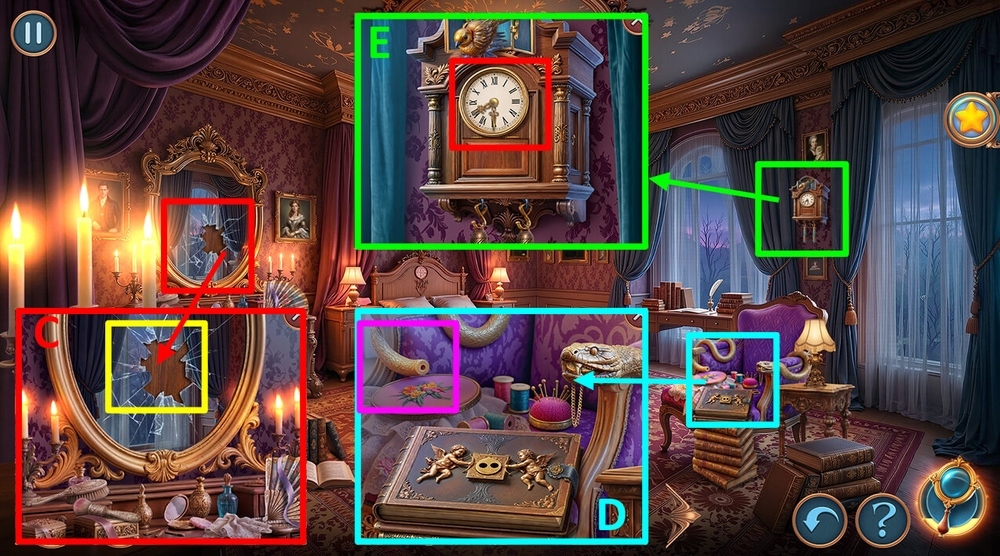
- Use MIRROR SHARD on the mirror, take RATTLESNAKE TAIL (C).
- Use RATTLESNAKE TAIL on the statue, take LYDIA’S POCKET WATCH (D).
- Use LYDIA’S POCKET WATCH on the clock, take GLUE (E).
- Go to Secret Passages.
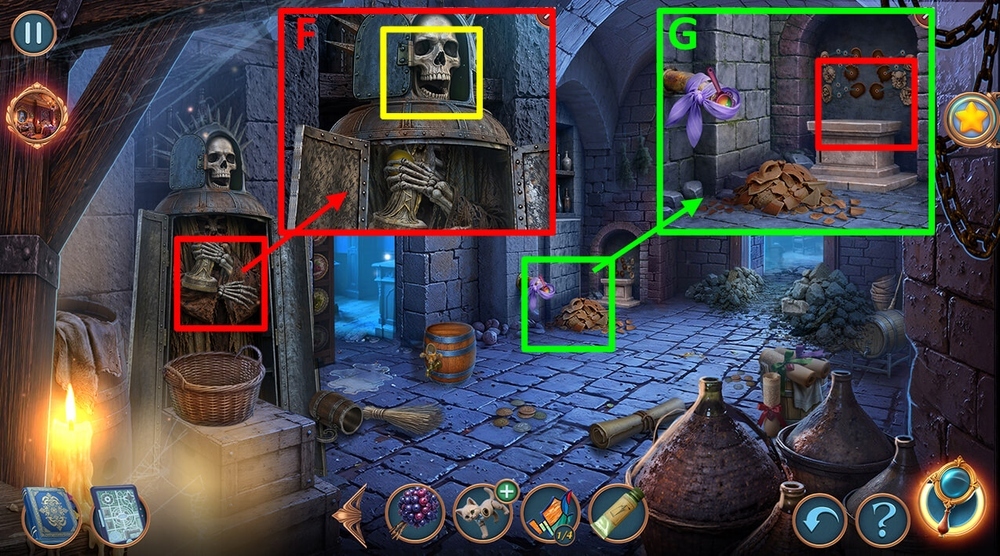
- Use MORBID COINS 2/2 on the skull, take LEMON and BUST OF DEATH (F).
- Use BUST OF DEATH on the holder (G).
- Easy solution: Tap the buttons in the following order: 1-2×4-3×3-4×2-5-6×3 , take STAINED GLASS PIECES 2/4 and FIGURINE PAW (H).
- Hard solution: Tap the buttons in the following order: 1×3-2-3×2-4×3-5-6 , take STAINED GLASS PIECES 2/4 and FIGURINE PAW (I).
- Use JOINT and FIGURINE PAW on the BROKEN FIGURINE, earn KITTEN FIGURINE (J).
- Go to Servant’s Old Room.
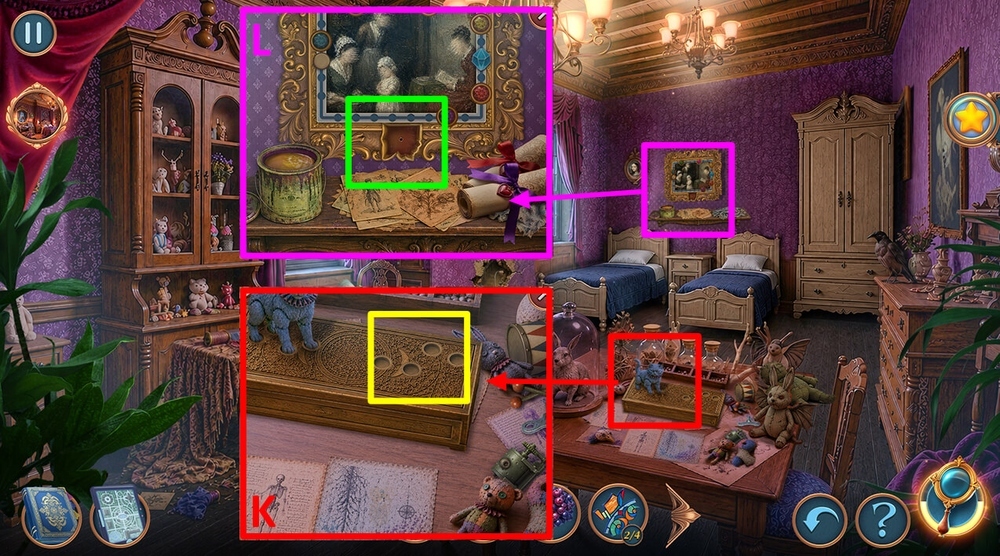
- Use KITTEN FIGURINE on the slot, take MILK, COUNT AND LYDIA’S AMULETS 1/2 and FRAME PART (K).
- Use FRAME PART on the frame (L).
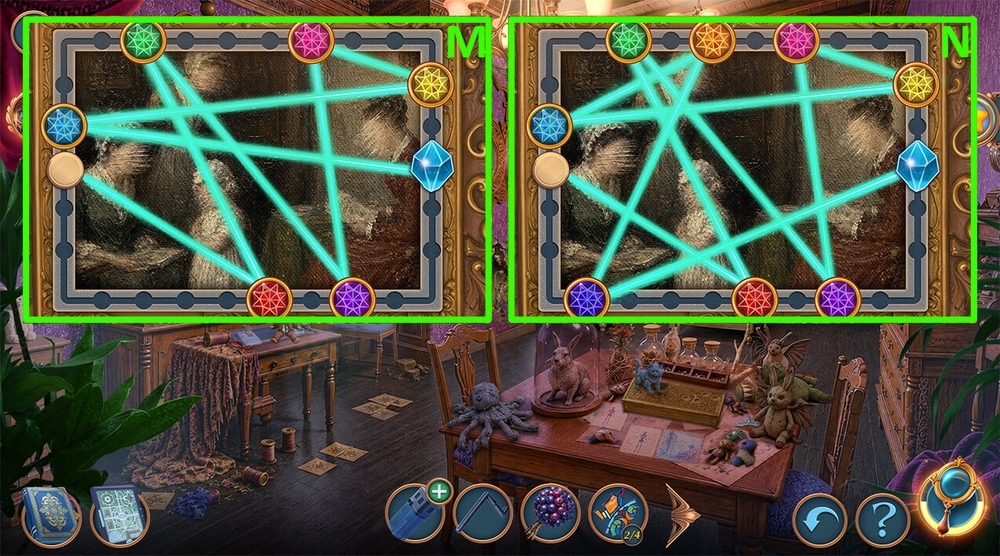
- Easy solution: Arrange the stones as shown in the picture, take STAINED GLASS PIECES 3/4 and GOLDEN TWIG AMULET (M).
- Hard solution: Arrange the stones as shown in the picture, take STAINED GLASS PIECES 3/4 and GOLDEN TWIG AMULET (N).
- Go to Butler’s Room.
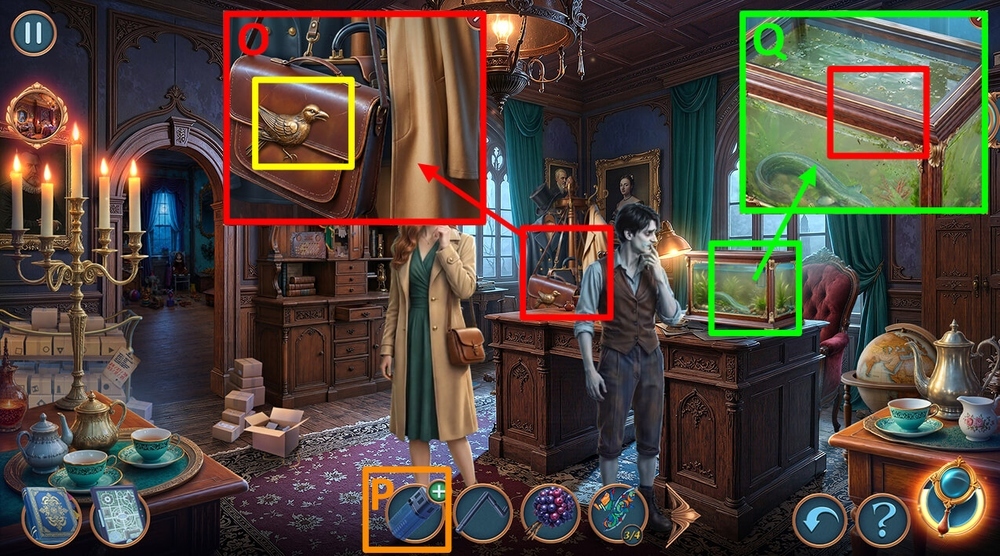
- Use GOLDEN TWIG AMULET on the slot, take TOY PART and FILTER SPONGE (O).
- Use FILTER SPONGE and FILTER TUBE on the AQUARIUM FILTER, earn AQUARIUM FILTER (P).
- Use AQUARIUM FILTER on the aquarium, take CORAL (Q).
- Go to Count’s Study.
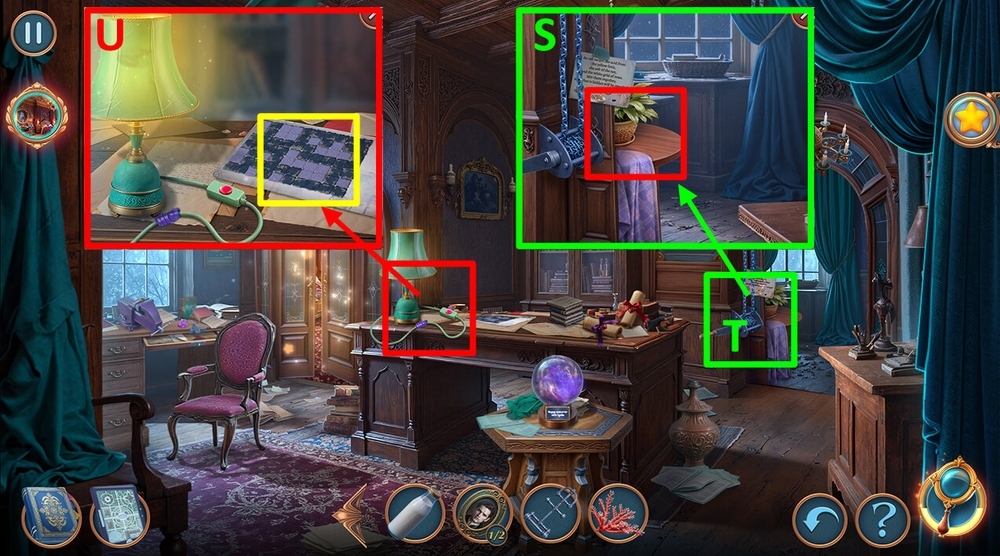
- Use LEMON, MILK and CORAL on the table (S).
- Play puzzle, earn INK DEVELOPER (T).
- Use INK DEVELOPER on the note (U).
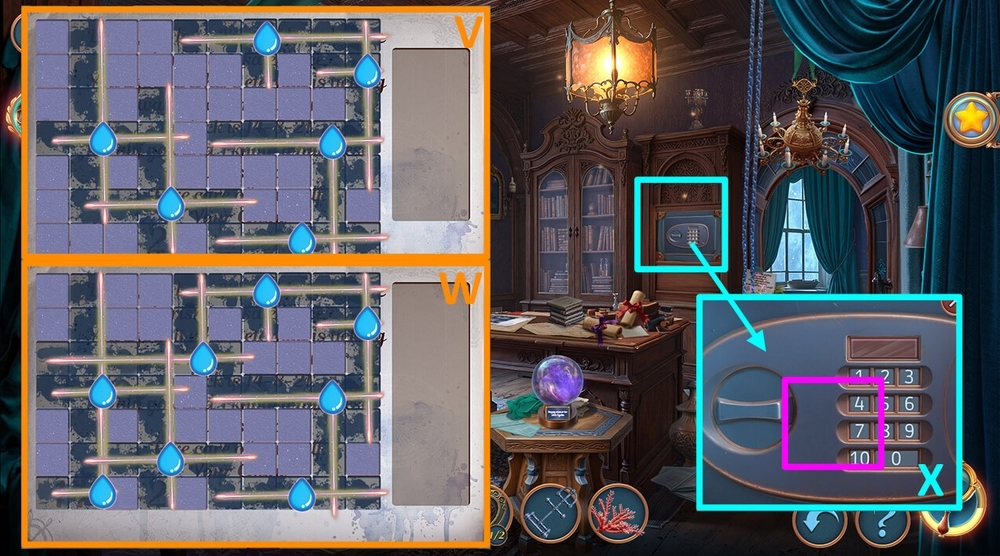
- Easy solution: Arrange the drops as shown in the picture, take SAFE CODE (V).
- Hard solution: Arrange the drops as shown in the picture, take SAFE CODE (W).
- Use SAFE CODE on the safe, take WINE BOTTLE and STAINED GLASS PIECES 4/4 (X).
- Go to Old Library.
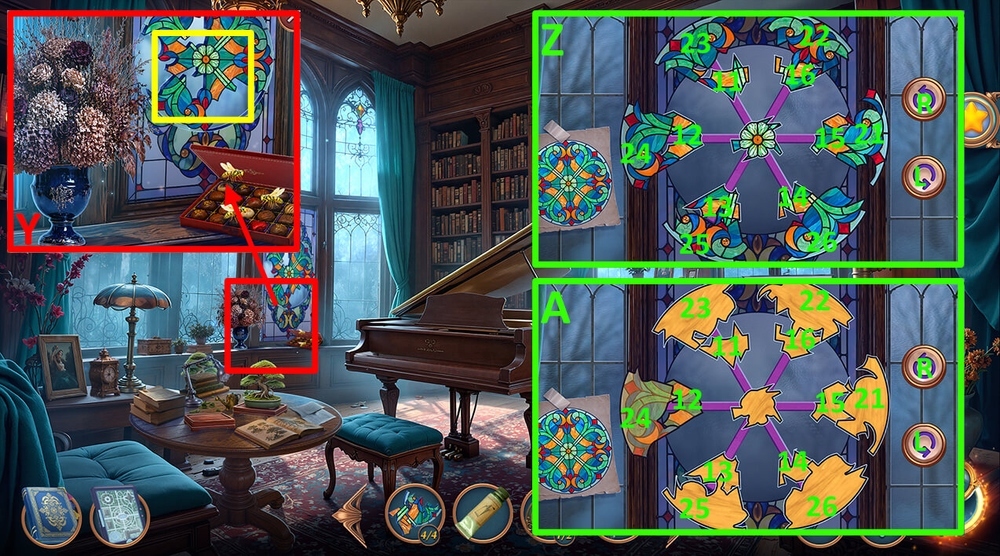
- Use STAINED GLASS PIECES 4/4 on the window (Y).
- Easy solution: Tap the buttons in the following order: L-11-14-Lx2-12-15-Lx2-16-13-24-21-Rx2-23-26-Rx2-22-25-R , take CHAIN and FAKE TREE (Z).
- Hard solution: Tap the buttons in the following order: L-11-14-Lx2-12-15-Lx2-16-13-24-21-Rx2-23-26-Rx2-22-25-R , take CHAIN and FAKE TREE (A).

- Use FAKE TREE on the stand, take COAT PATTERN and RAILROAD PARTS (B).
- Go to Servant’s Quarters.
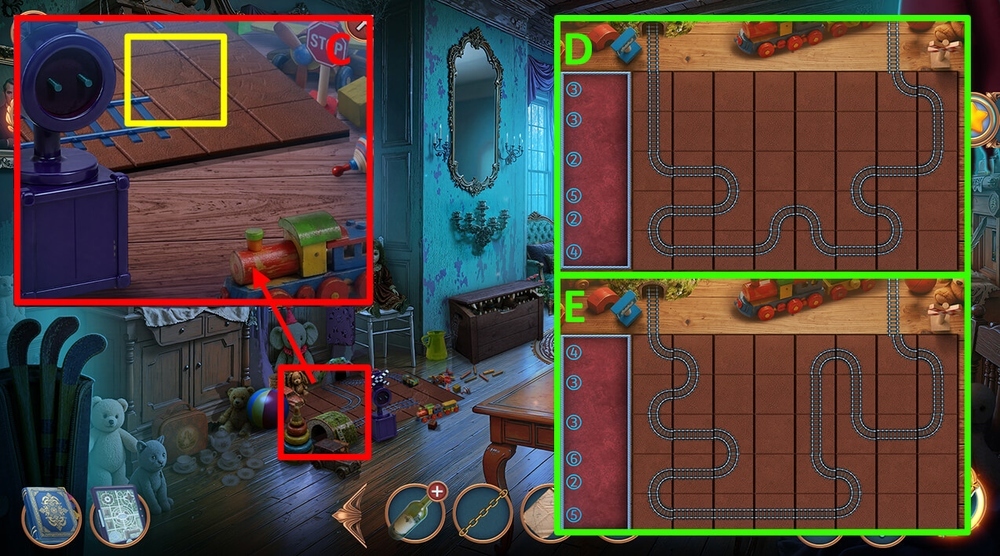
- Use RAILROAD PARTS on the railroad (C).
- Easy solution: Arrange the pieces as shown in the picture, take WIND-UP SUBMARINE and SCREWDRIVER (D).
- Hard solution: Arrange the pieces as shown in the picture, take WIND-UP SUBMARINE and SCREWDRIVER (E).
- Go back.
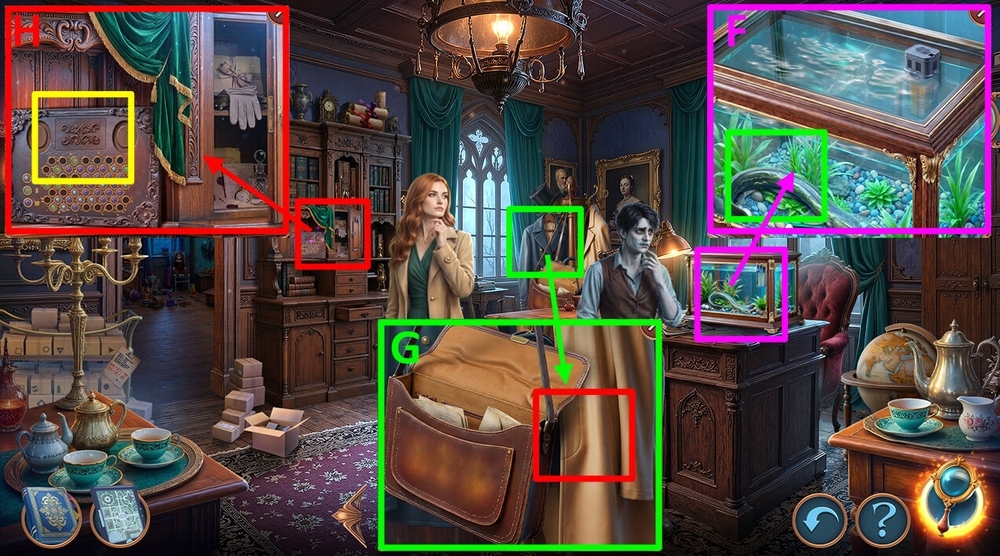
- Use WIND-UP SUBMARINE on the eel, take RIPPER (F).
- Use COAT PATTERN on the coat, use RIPPER on the pocket, take ORIGAMI and COUNT AND LYDIA’S AMULETS 2/2 (G).
- Use COUNT AND LYDIA’S AMULETS 2/2 on the cache (H).
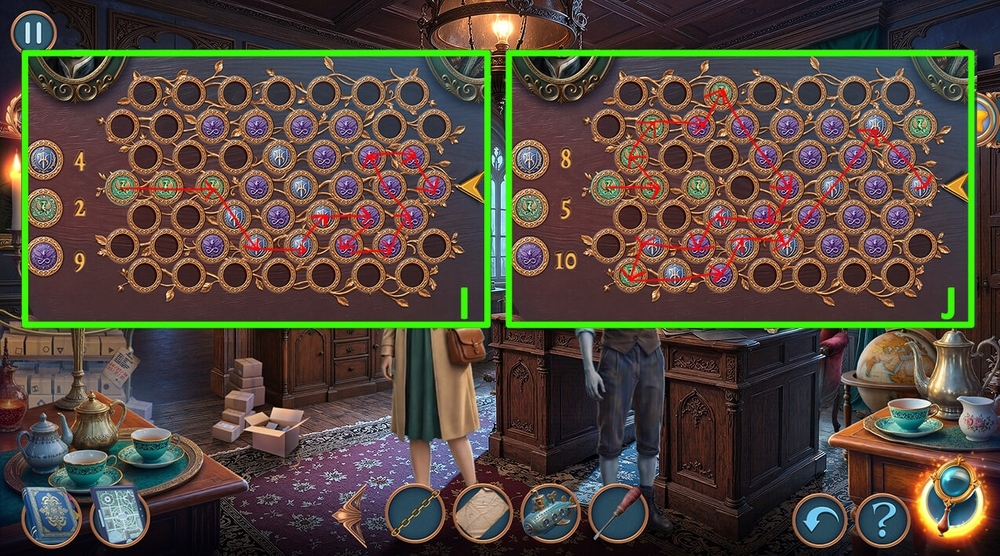
- Easy solution: Follow the arrows in the picture, take LYDIA’S HAIRPIN, note and IRIDIUM SCISSORS (I).
- Hard solution: Follow the arrows in the picture, take LYDIA’S HAIRPIN, note and IRIDIUM SCISSORS (J).
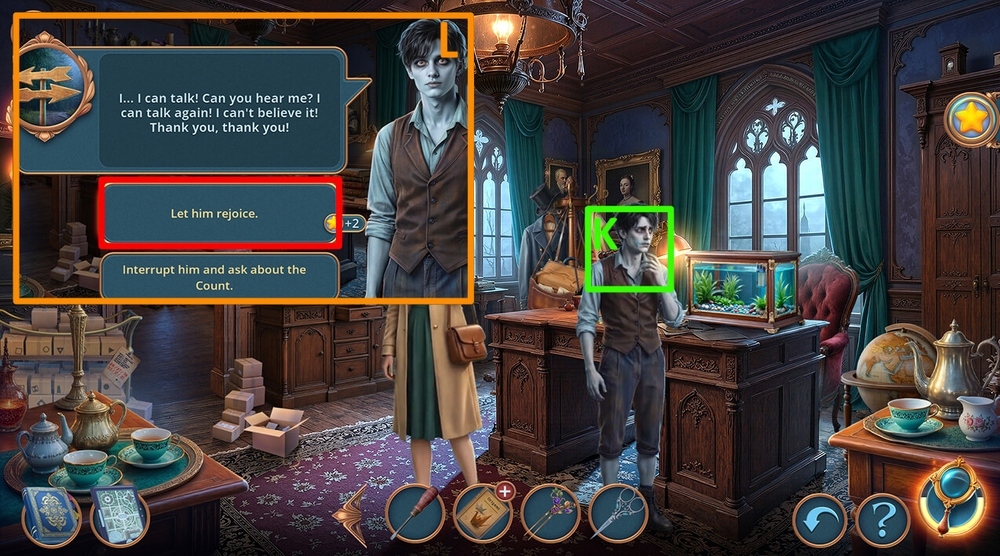
- Use IRIDIUM SCISSORS on Jamie (K).
- Select this option, earn GOLDEN NEEDLE and THREADS (L).
- Go to Servant’s Old Room.

- Use GLUE on the shards, take HEART AMULET, use GOLDEN NEEDLE and THREADS on the toy, take MONKEY TOY (M).
- Use TOY PART, SCREWDRIVER and MONKEY TOY on the instruction (N).
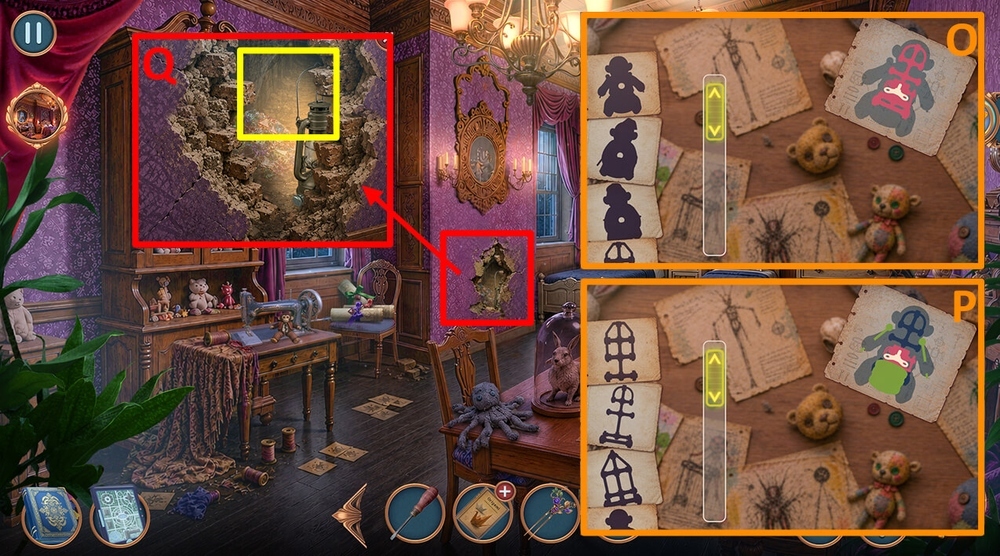
- Easy solution: Use the note as a hint, take WIND-UP MONKEY (O).
- Hard solution: Use the note as a hint, take WIND-UP MONKEY (P).
- Use WIND-UP MONKEY on the break, take BICYCLE REFLECTOR (Q).
- Go to Count’s Old Bedroom.
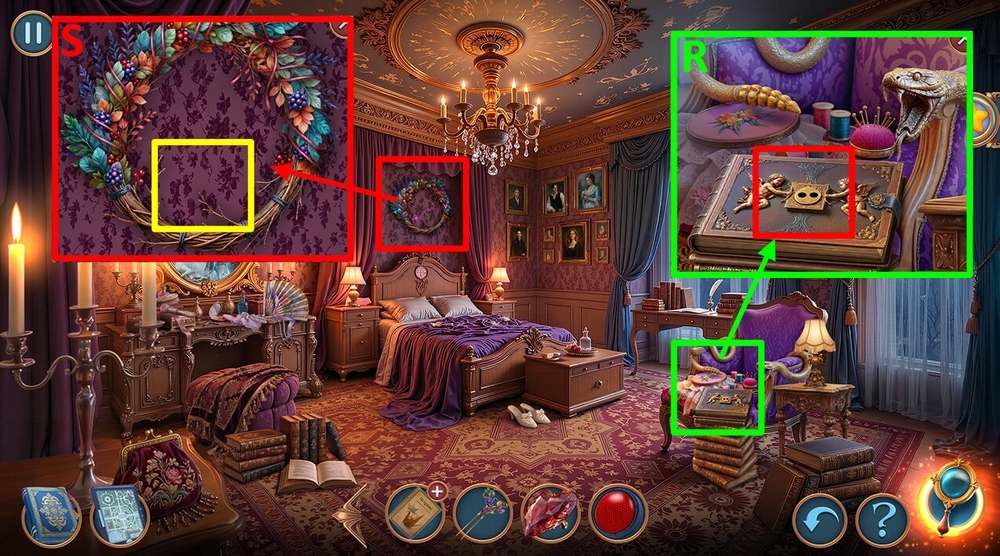
- Use HEART AMULET on the lock, take LYDIA’S PHOTO (R).
- Use BERRIES and LYDIA’S PHOTO on the wreath (S).
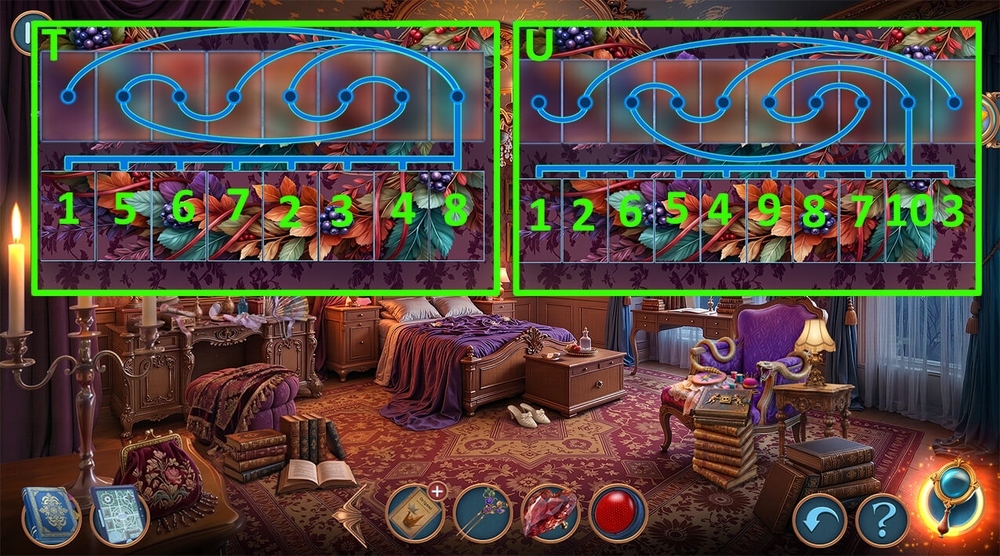
- Easy solution: Tap on the shards in the order shown in the picture (T).
- Hard solution: Tap on the shards in the order shown in the picture (U).
- Go to Servant’s Quarters.
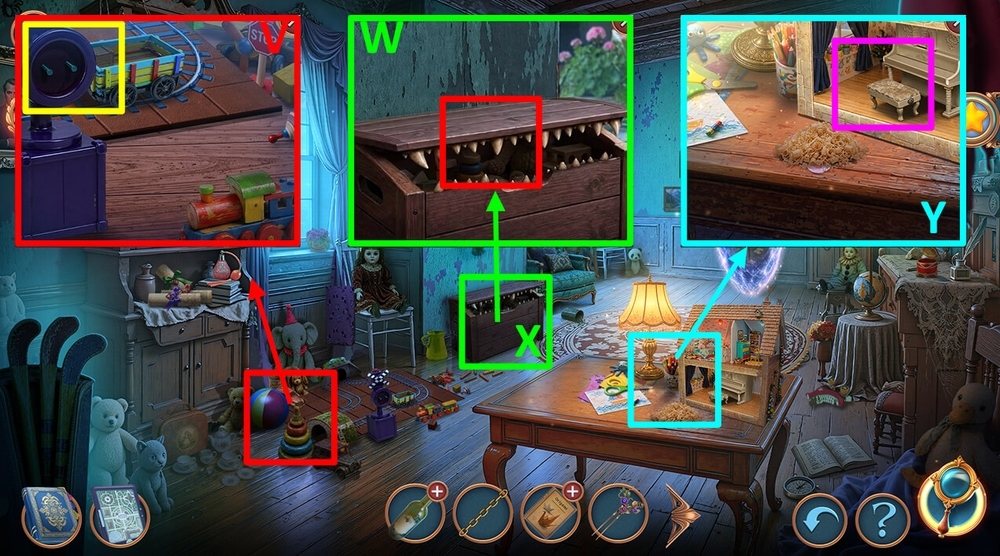
- Use BICYCLE REFLECTOR on the semaphore, take GRIP and WEDDING VEIL PIECE (V).
- Use GRIP on the chest (W).
- Play puzzle, earn PIANIST DOLL (X).
- Use PIANIST DOLL on the piano, take LYDIA’S MELODY (Y).
- Go to Old Library.
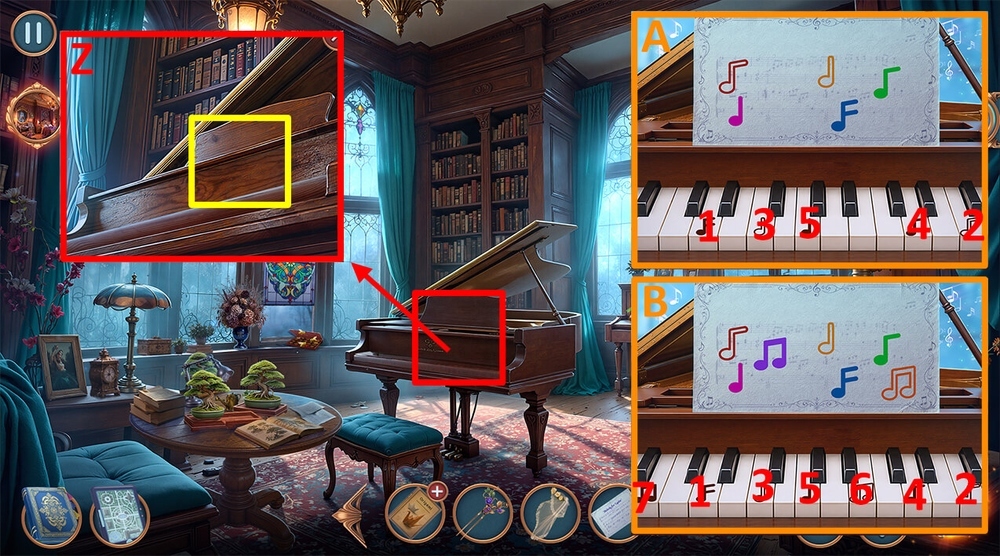
- Use LYDIA’S MELODY on the piano (Z).
- Easy solution: Tap the buttons as shown in the picture, take EYELASH CURLER and PROJECTOR LAMP (A).
- Hard solution: Tap the buttons as shown in the picture, take EYELASH CURLER and PROJECTOR LAMP (B).
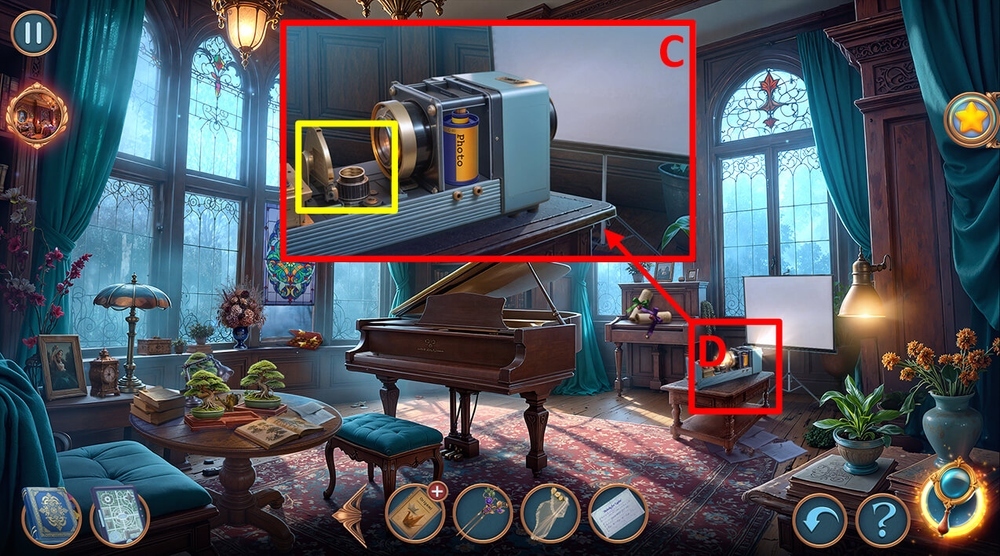
- Use PROJECTOR LAMP on the projector (C).
- Play puzzle, take EXTENSION CORD (D).
- Go to Servant’s Entrance.
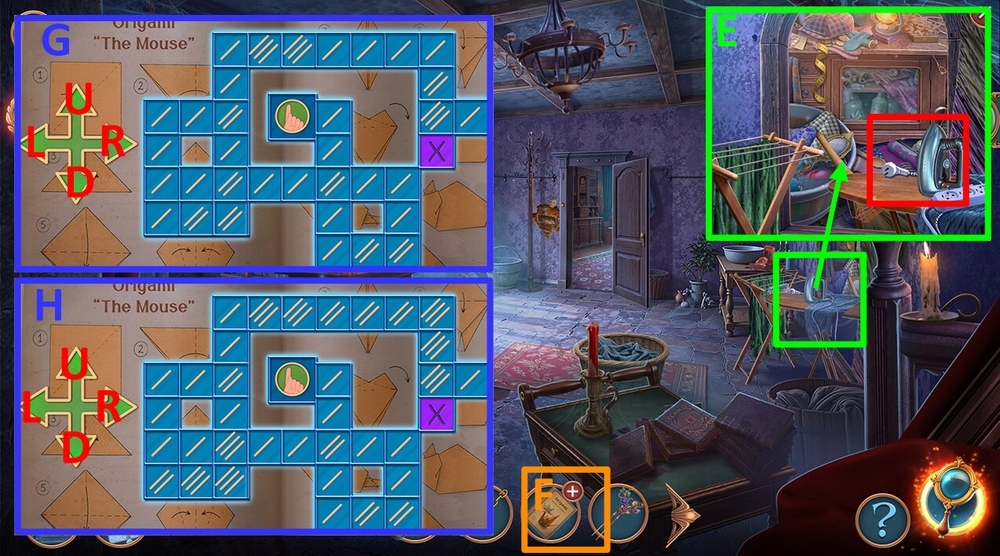
- Use EXTENSION CORD on the iron, take NEWSPAPER SHEET (E).
- Use NEWSPAPER SHEET on the ORIGAMI (F).
- Easy solution: Tap the arrows in the following order: R-Dx4-Rx2-L-R-Ux2-Lx5-D-Lx2-Rx2-U-Lx2-Ux2-Rx2-D-Ux3-Rx2-L-R-L-Rx5-Dx2-R-L-U-Dx2 , earn PAPER MOUSE (G).
- Hard solution: Tap the arrows in the following order: R-Dx4-Rx2-L-R-Ux2-Lx5-D-Lx2-R-L-Rx2-U-D-U-Lx2-Ux2-Rx2-D-Ux3-Rx2-L-R-L-Rx3-L-Rx3-L-R-D-U-Dx2-R-L-U-Dx2 , earn PAPER MOUSE (H).
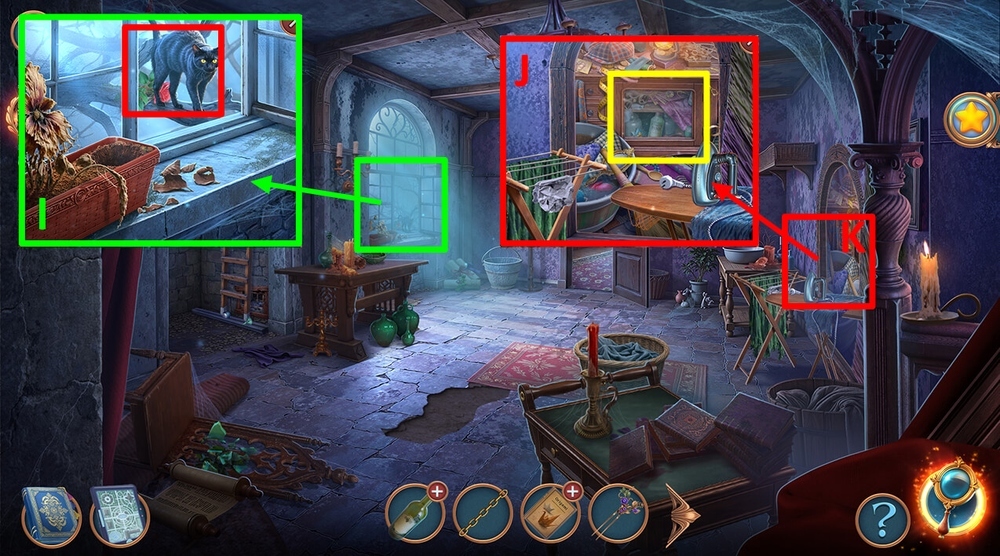
- Use PAPER MOUSE on the cat, take RED ROSE, ROPE and SUCTION CUP KEYCHAIN (I).
- Use SUCTION CUP KEYCHAIN on the glass (J).
- Play puzzle, earn JEWELRY ENGRAVER (K).
- Go to Count’s Study.
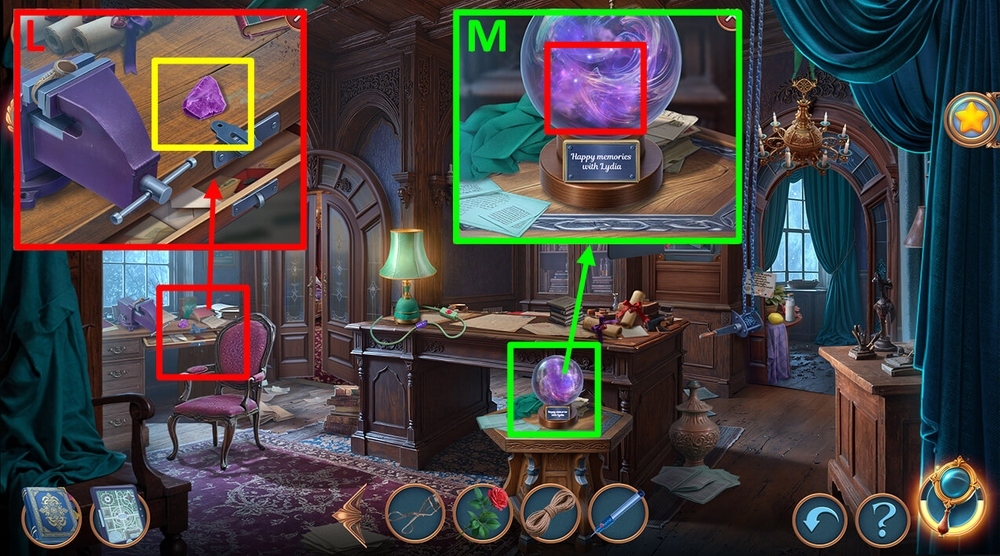
- Use JEWELRY ENGRAVER on the stone, take WEDDING RING (L).
- Use LYDIA’S HAIRPIN, RED ROSE, WEDDING VEIL PIECE, and WEDDING RING on the magic ball (M).
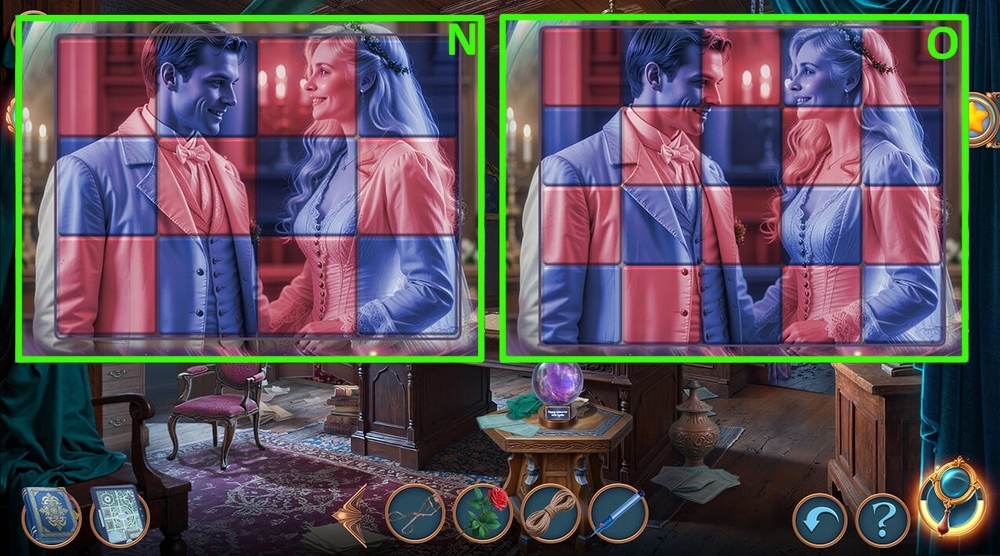
- Easy solution: Right image shown in the picture (N).
- Hard solution: Right image shown in the picture (O).
- Walkthrough Bonus Chapter, at the link below.