Hidden Fame 1: Dark Secret (Bonus Chapter) – Continues the investigation into Alice’s death and reveals new details surrounding Linda’s murder. There’s only a week left until Monique Waywright’s major fashion show, but after a string of tragedies, the preparations have turned into a real ordeal. The collection’s lead model has died, the staff fears for their safety, and Monique herself has no intention of canceling the event to which she has devoted so many years. Vivienne is forced to continue working on the collection while simultaneously trying to make sense of what is happening. She learns the details of the harassment Alice faced; shortly before her death, Alice had wanted to leave the fashion house and was counting on her old friend’s help. Meanwhile, Will finds himself in danger he is kidnapped and the journalist must find a way to escape before the criminals get their hands on others connected to the investigation. After Linda’s murder, suspicion falls on Monique and Vivienne. Both find themselves at the center of a police investigation, and new evidence points to a link between the crime and the sale of designer blueprints. Will finds a cufflink with the initials S.U. and begins to investigate Monique’s circle. By examining photographs, documents, and surveillance footage, the characters gradually uncover evidence of employees being followed, planted evidence, and orders to eliminate unwanted individuals. Sterling Waywright draws particular attention, as his influence turns out to be far greater than anticipated. Vivienne finds a recording that may confirm his involvement in the murder, but openly confronting him is no easy task. Sterling is used to controlling not only the business but also his own daughter’s life, and now he’s trying to force Vivienne to abandon the investigation. The situation becomes even more complicated when Monique chooses Vivienne as the lead model for the new collection and tasks her with presenting it on the runway. You’ll need to help the characters make sense of the new clues, reconstruct the events of the crimes, and figure out who’s behind what’s happening at the fashion house. Vivienne will have to decide what to do with the evidence she’s gathered, and Monique will finally have to come to terms with her own relationship with her father.
Bonus Chapter Walkthrough
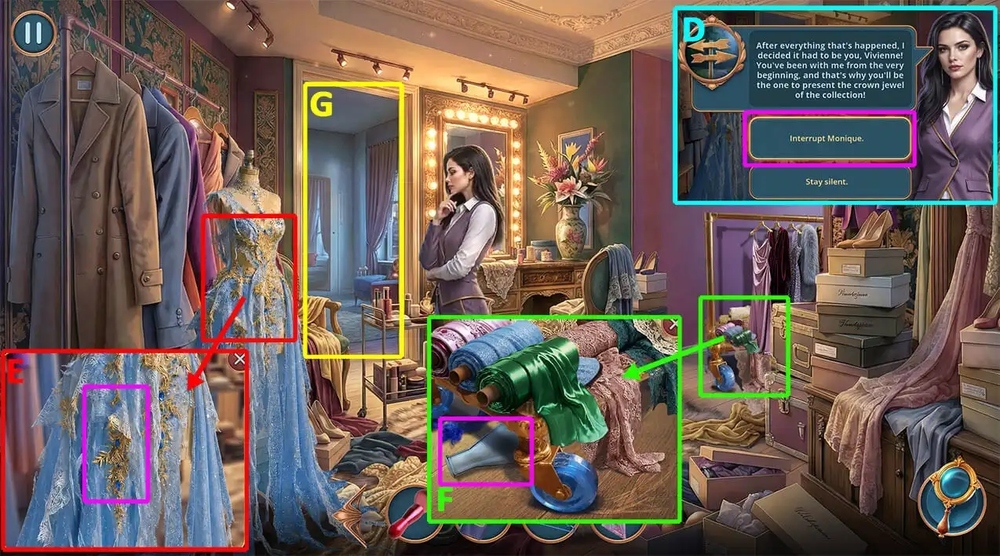
- Select this option, earn DRESS PATTERN (D).
- Use DRESS PATTERN on the dress, take MUSIC FLASH DRIVE (E).
- Take FLASK (F).
- Go forward (G).
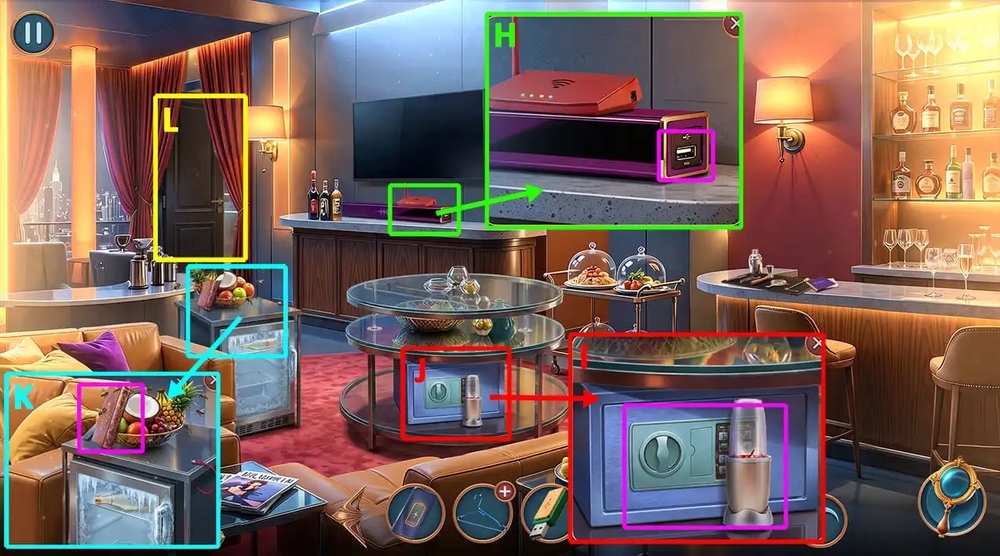
- Use MUSIC FLASH DRIVE on the sound bar, take SPONGE, LOCK PICKS 1/2 (H).
- Take PORTABLE BLENDER, use POWDER, BLUSH BRUSH on the safe (I).
- Play puzzle, earn JAM (J).
- Use JAM on the wasps, take BOOK, LOCK PICKS 2/2 (K).
- Go forward (L).
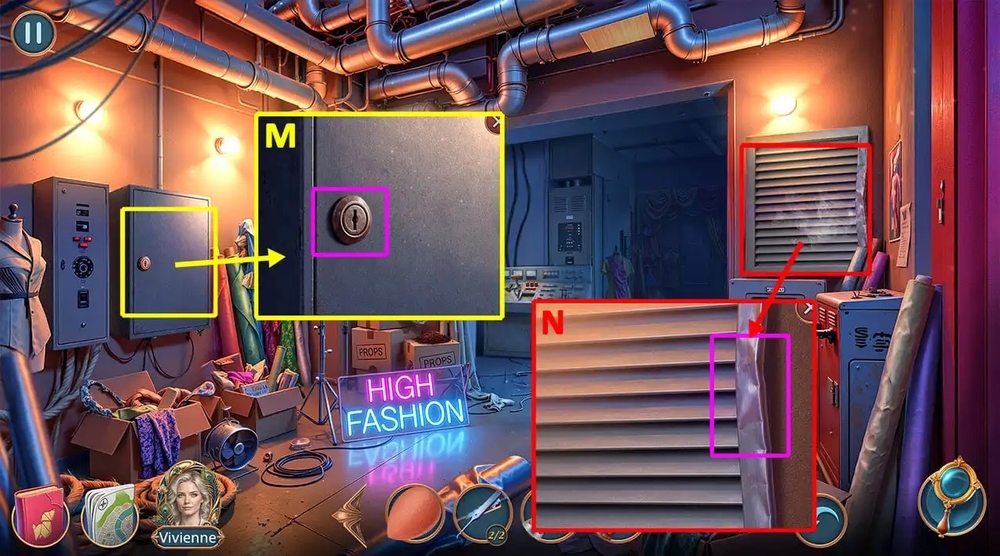
- Use LOCK PICKS 2/2 on the junction box, take CHISEL (M).
- Use CHISEL, BOOK on the grid, take DIELECTRIC SCREWDRIVER (N).
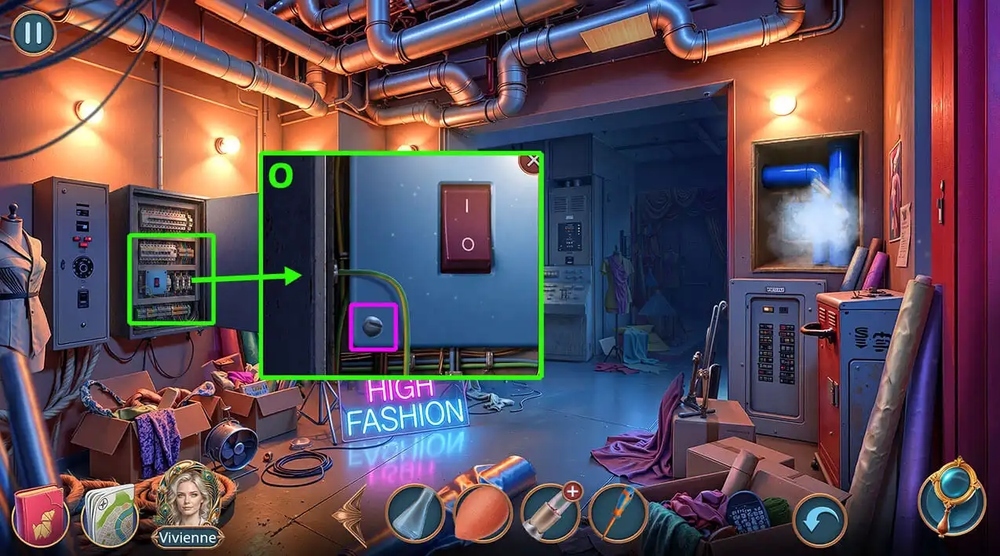
- Use DIELECTRIC SCREWDRIVER on the circuit breaker bolt (O).
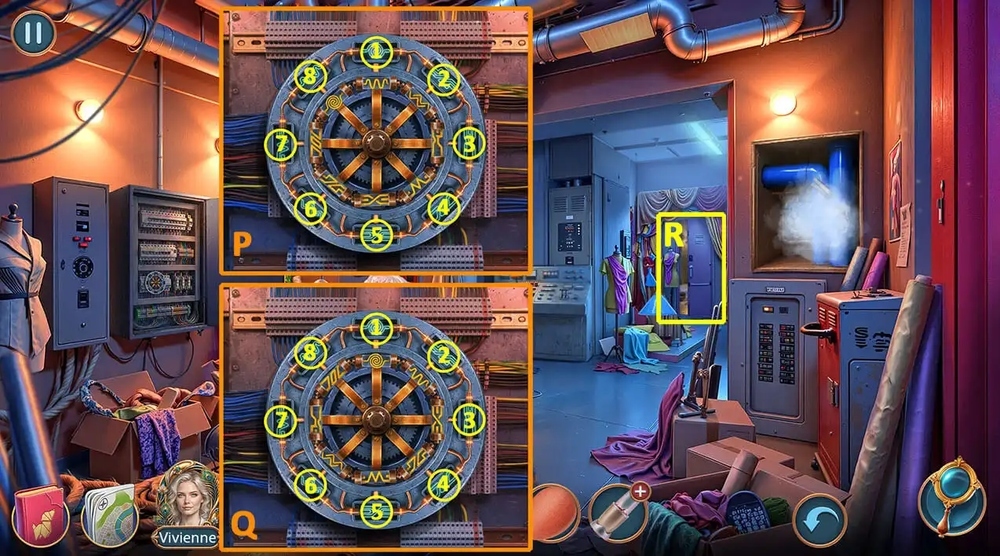
- Easy solution: Click 3, 1, 8, 7, 6, 4, 8 (2 times), 2, 3, 2, 3 (2 times), 2 (2 times), 3 (2 times), 3, 5, 2 (P).
- Hard solution: Click 1, 6, 2, 5, 2, 8, 5, 3 (Q).
- Go forward (R).
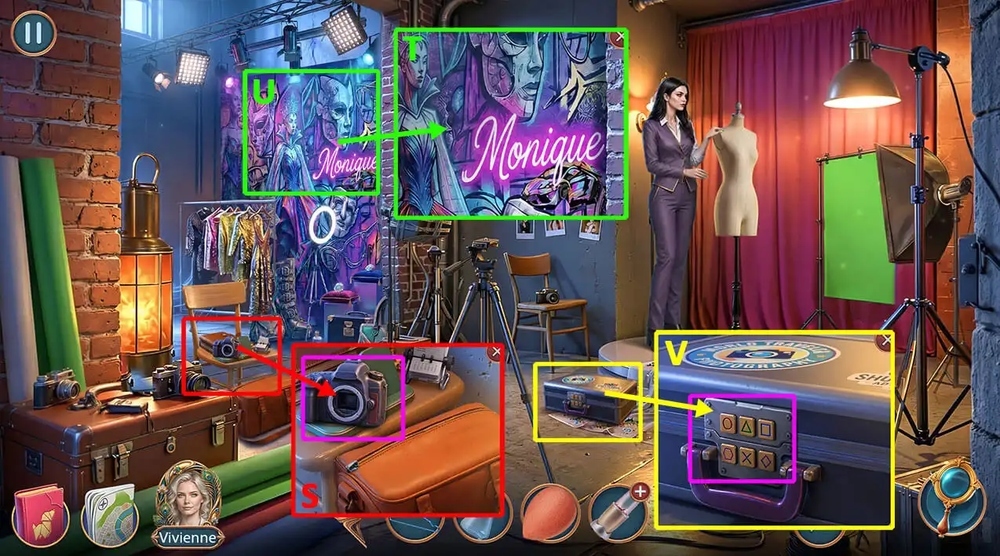
- Take CAMERA, use DISCHARGED PHONE on the magnetic charger, take CHARGED PHONE (S).
- Use CHARGED PHONE on the wall with graffiti (T).
- Play puzzle, earn CODE (U).
- Use CODE on the case, read the note, take CORKSCREW (V).
- Go to Show Dressing Room.
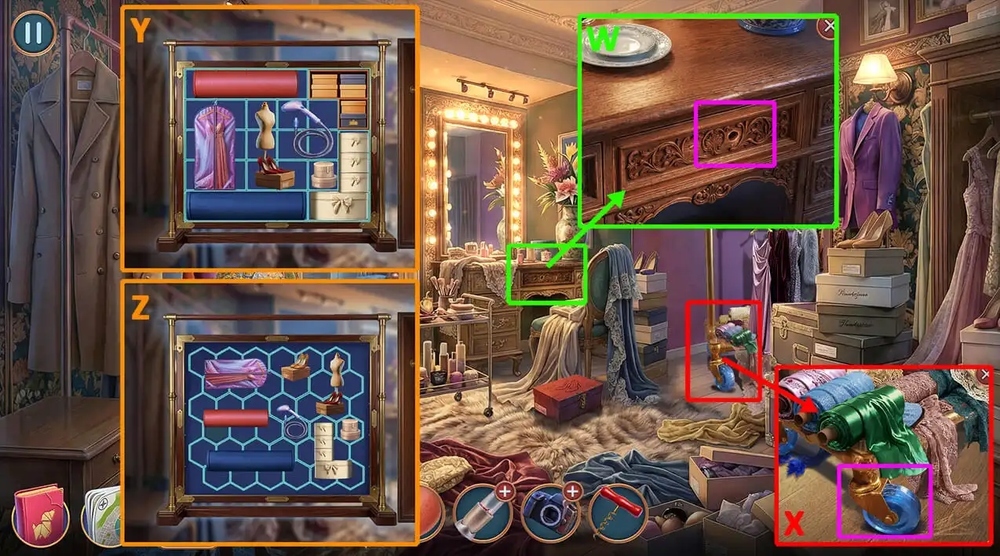
- Use CORKSCREW on the drawer, take TOOTHBRUSH, SEWING KIT, PENCIL (W).
- Use PENCIL on the hanger’s wheel (X).
- Easy solution: Follow the instructions in the image (Y).
- Hard solution: Follow the instructions in the image (Z).
- Take ENZYME POWDER, FEATHER BOA.
- Go to Technical Corridor.
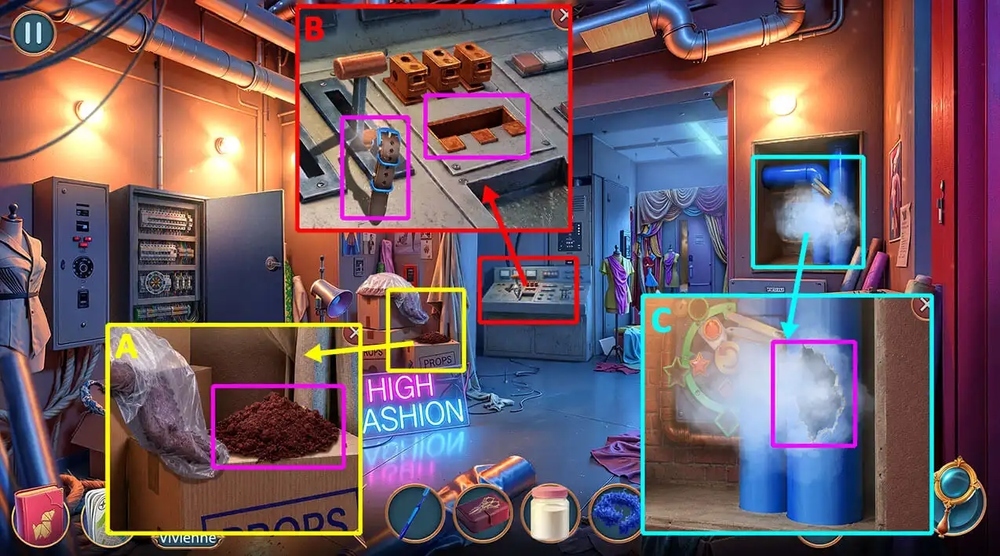
- Use FEATHER BOA to sweep away the scattered dirt, take CONNECTOR (A).
- Use CONNECTOR on the remote, take LEATHER STRAP (B).
- Use LEATHER STRAP, SPONGE on the pipe (C).

- Easy solution: Click 1 (2 times), 3 (2 times), 2, 1, 3, 2, 1, 3, 2, 1, 3, 2, 1 (2 times) (D).
- Hard solution: Click 3 (4 times), 2, 1, 3, 2, 1, 3 (3 times), 2, 1, 3 (3 times), 2, 1, 3, 2, 1 (2 times), 1, 3 (2 times), 2, 3, 2, 3 (4 times), 2, 3 (4 times) (E).
- Take NAIL CLIPPERS.
- Go forward (F).
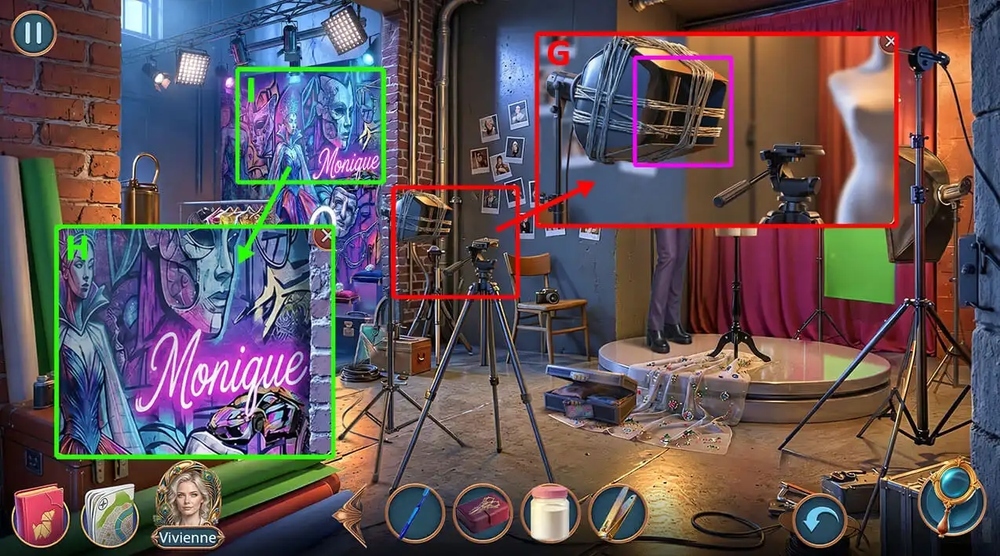
- Use NAIL CLIPPERS on the wire, take POLARIZING FILTER (G).
- Use POLARIZING FILTER on the wall with graffiti (H).
- Play puzzle, earn METAL BRACELET (I).
- Go to VIP Lounge Backstage.
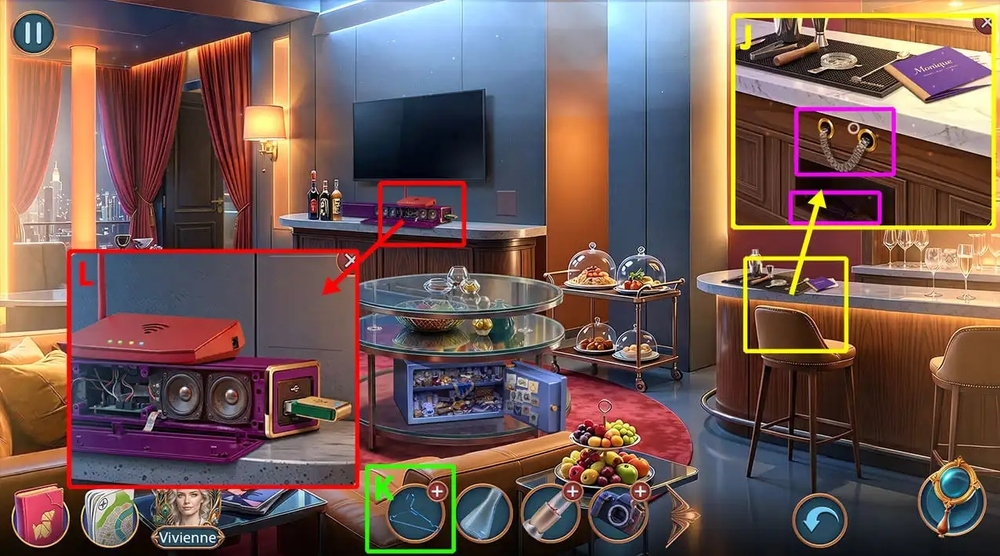
- Use METAL BRACELET on the metal contacts, take PLIERS (J).
- Use PLIERS on HANGER, earn ANTENNA (K).
- Use ANTENNA on the router (L).
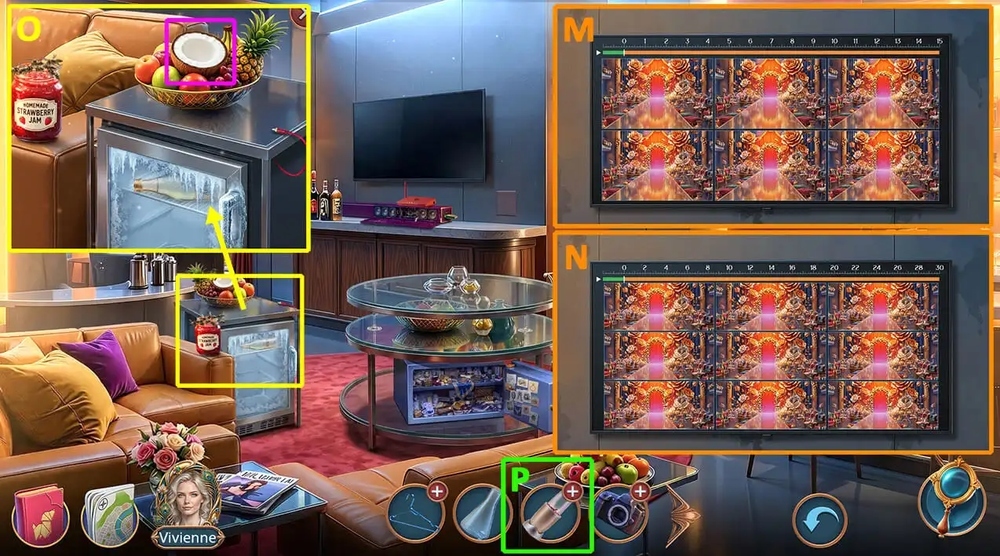
- Easy solution: Solution is random (M).
- Hard solution: Solution is random (N).
- Take LENS, SPOON.
- Use SPOON on the coconut, earn COCONUT FLAKES (O).
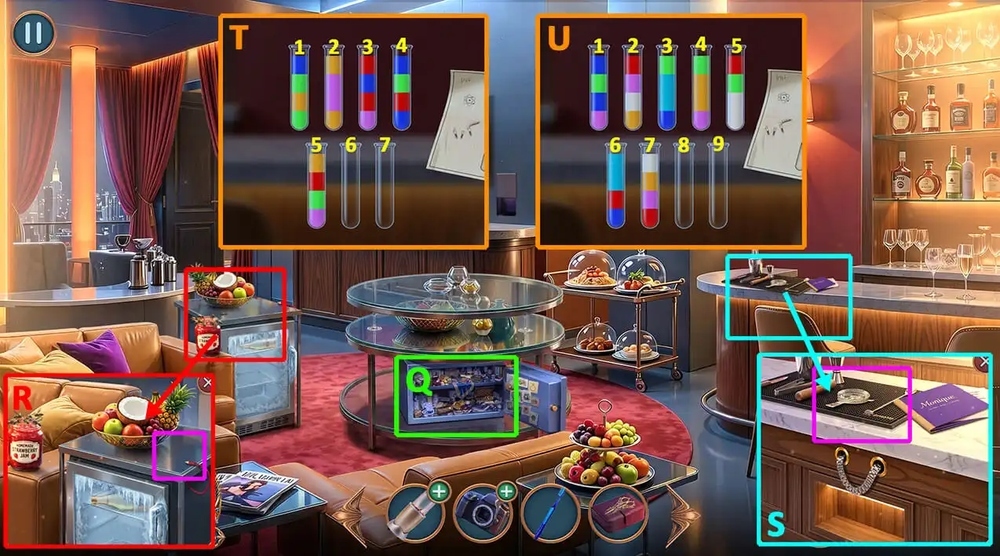
- Use COCONUT FLAKES on PORTABLE BLENDER, earn COCONUT OIL (P).
- Play puzzle, earn TEMPERATURE REGULATOR (Q).
- Use TEMPERATURE REGULATOR on the space above the refrigerator, take WATER (R).
- Use WATER, FLASK, ENZYME POWDER, COCONUT OIL on the bar counter (S).
- Easy solution: Click 5-7, 2-7, 2-6, 2-6, 2-7, 1-2, 4-2, 4-5, 4-1, 4-2, 3-4, 3-2, 3-4, 3-6, 1-4, 1-3, 1-7, 1-3, 5-3, 5-3, 5-3, 5-6 (T).
- Hard solution: Click 3-8, 4-8, 3-9, 3-9, 6-9, 6-9, 1-3, 1-8, 1-3, 5-1, 5-8, 7-5, 2-1, 2-1, 2-5, 7-2, 4-2, 4-2, 1-4, 7-4, 1-7, 1-7, 6-7, 6-3, 1-4 (U).
- Take FABRIC CLEANER.
- Go back.
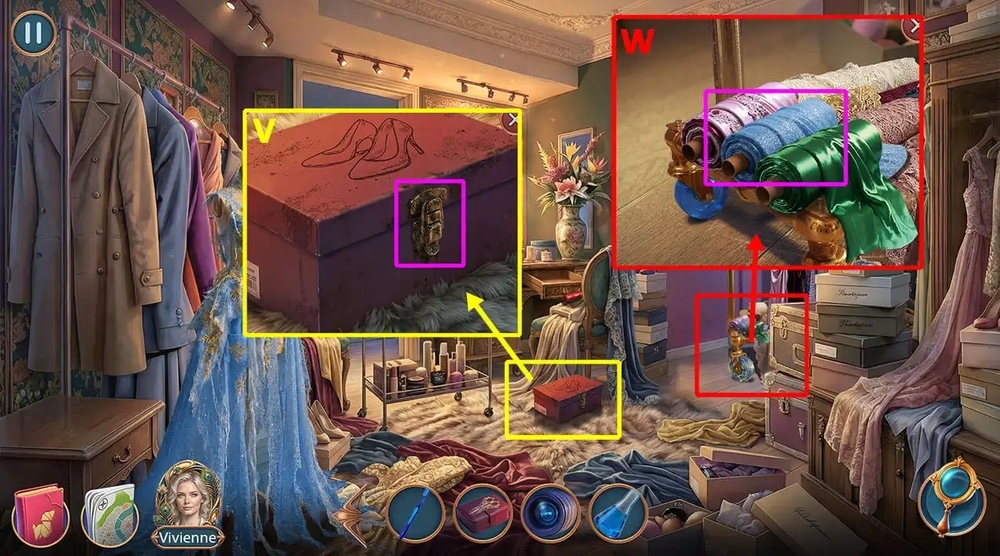
- Use FABRIC CLEANER, TOOTHBRUSH on the latch, take FABRIC SCRAP (V).
- Use FABRIC SCRAP on the pile of rolls, take FABRIC ROLL (W).
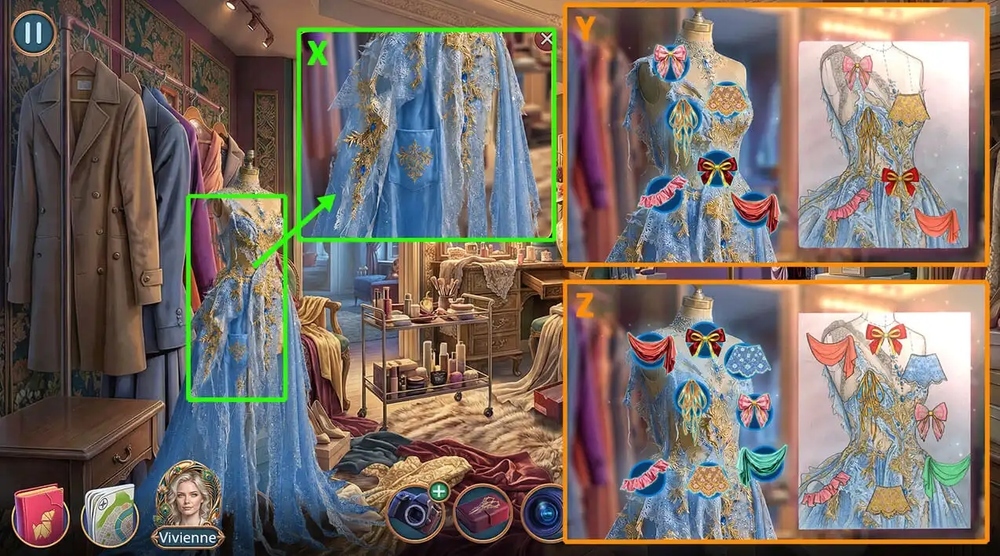
- Use FABRIC ROLL, SEWING KIT on the dress (X).
- Easy solution: Follow the instructions in the image (Y).
- Hard solution: Follow the instructions in the image (Z).
- Take FINISHED DRESS, THIN HAIRPIN.
- Go to Photo Studio.
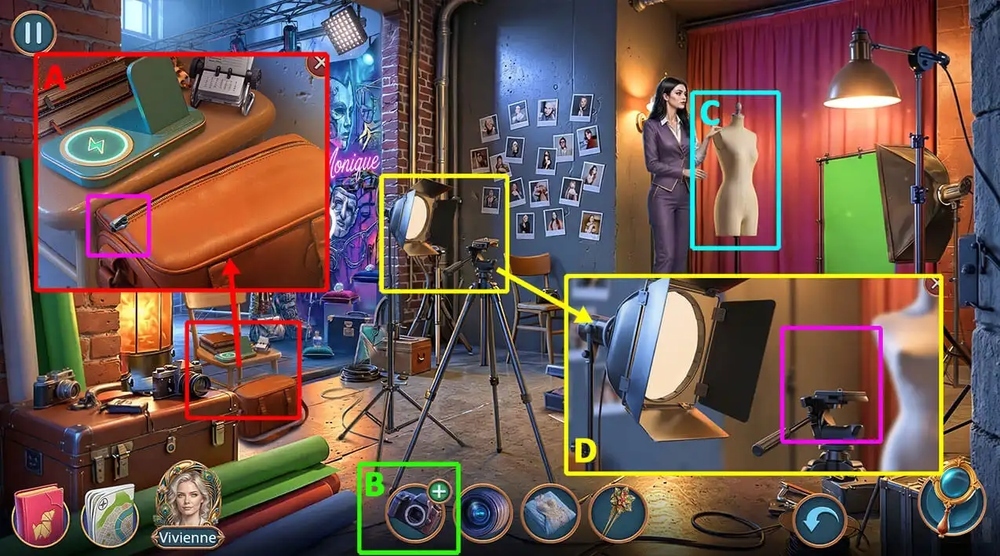
- Use THIN HAIRPIN on the slider, take FLASH (A).
- Use LENS, FLASH on CAMERA, earn CAMERA (B).
- Use FINISHED DRESS on the mannequin (C).
- Use CAMERA on the tripod (D).
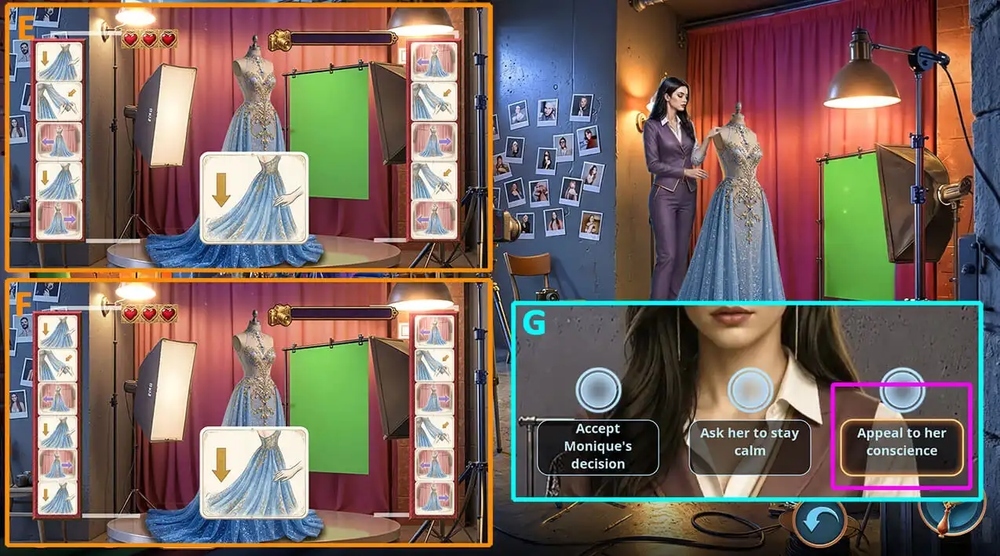
- Easy solution: Solution is random (E).
- Hard solution: Solution is random (F).
- Select this option (G).
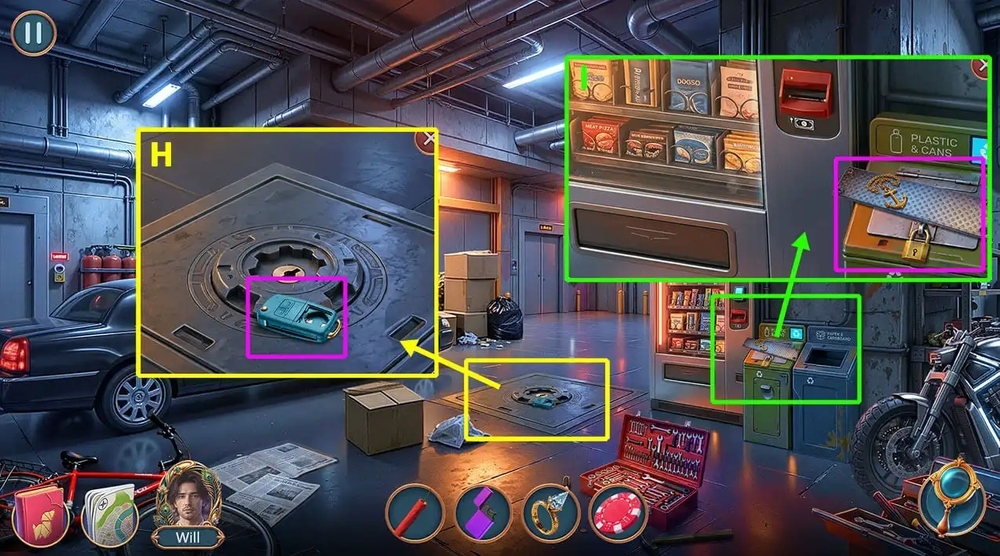
- Take DEAD CAR ALARM (H).
- Take ANCHOR KEYCHAIN, METAL STEPS 1/3, use FIRECRACKER, LIGHTER on the container’s lock, take BATTERY (I).
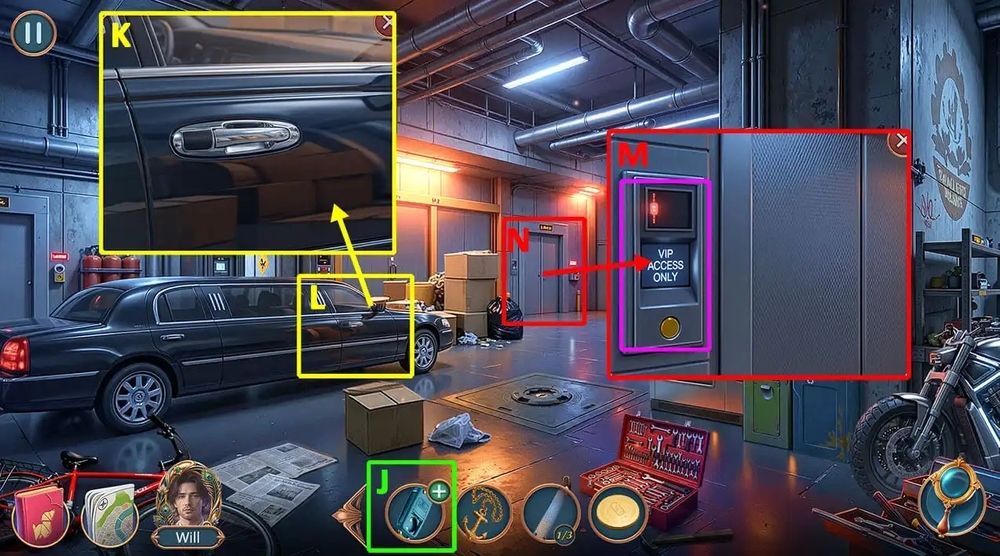
- Use BATTERY on DEAD CAR ALARM, earn KEYCHAIN ALARM (J).
- Use KEYCHAIN ALARM on the limousine door (K).
- Play puzzle, earn VIP CARD (L).
- Use VIP CARD on the call panel (M).
- Go forward (N).
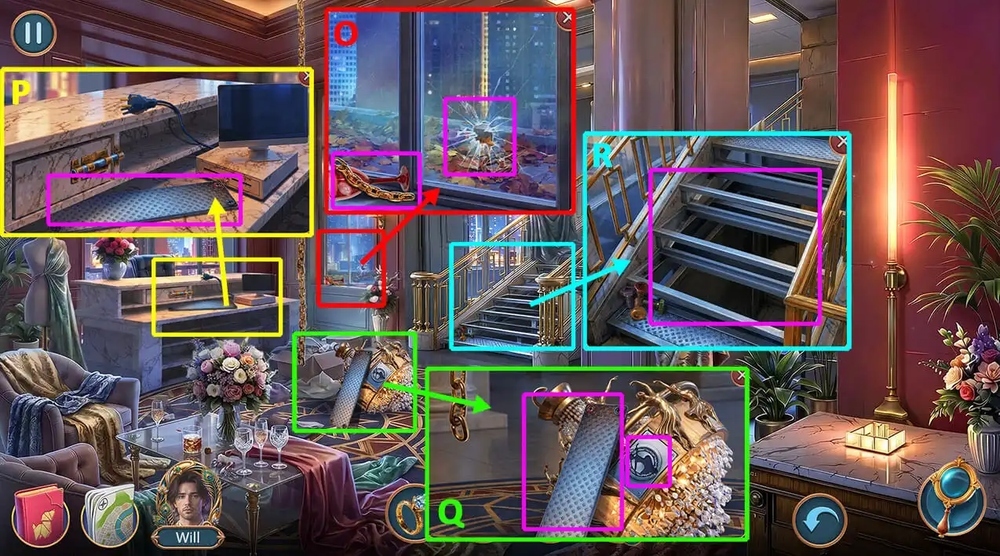
- Take CHAIN PART, WINE GLASS WITH FINGERPRINT, use DIAMOND RING on the window, take BALLERINA AMULET (O).
- Take METAL STEPS 2/3 (P).
- Take METAL STEPS 3/3, use BALLERINA AMULET on the empty slot, take COLD WELD (Q).
- Use METAL STEPS 3/3, GLUE on the gap in the stairs (R).
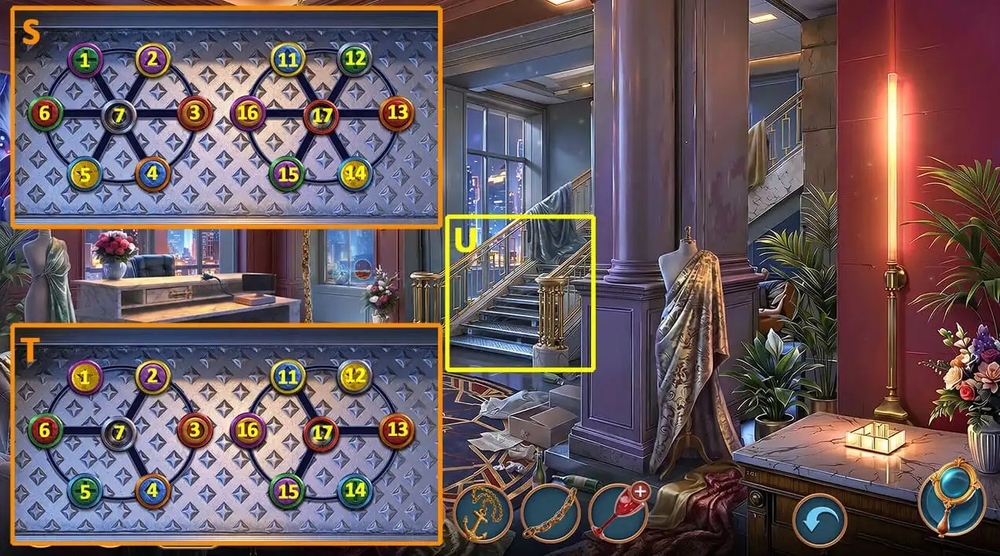
- Easy solution: Click 5, 4, 3, 2, 7, 1, 6, 7, 3, 2, 1, 6, 7, 2, 3, 7, 1, 6, 7, 16, 15, 17, 14, 13, 12, 11, 17, 15, 14, 13, 17, 15, 14, 17, 12, 13, 17, 14, 13, 12 (S).
- Hard solution: Click 6, 5, 4, 7, 2, 3, 4, 7, 2, 1, 6, 7, 2, 1, 6, 7, 4, 3, 2, 1, 6, 7, 2, 3, 4, 7, 2, 1, 6, 7, 11, 12, 13, 14, 15, 17, 11, 16, 15, 17, 11, 12, 13, 17, 11, 12, 13, 17, 11, 16, 15, 14, 13, 17, 11, 16, 15, 14, 13, 17, 12, 14, 13, 12 (T).
- Go forward (U).
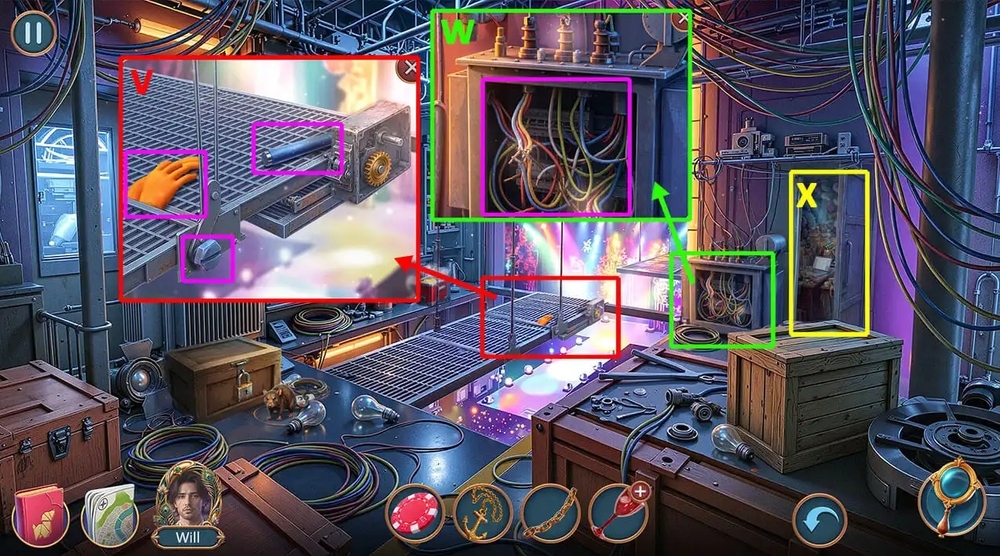
- Take TELESCOPIC SELFIE STICK, use CHIP on the bolt, take RUBBER GLOVES (V).
- Use RUBBER GLOVES on the sparking wires (W).
- Play puzzle, earn GEAR (X).
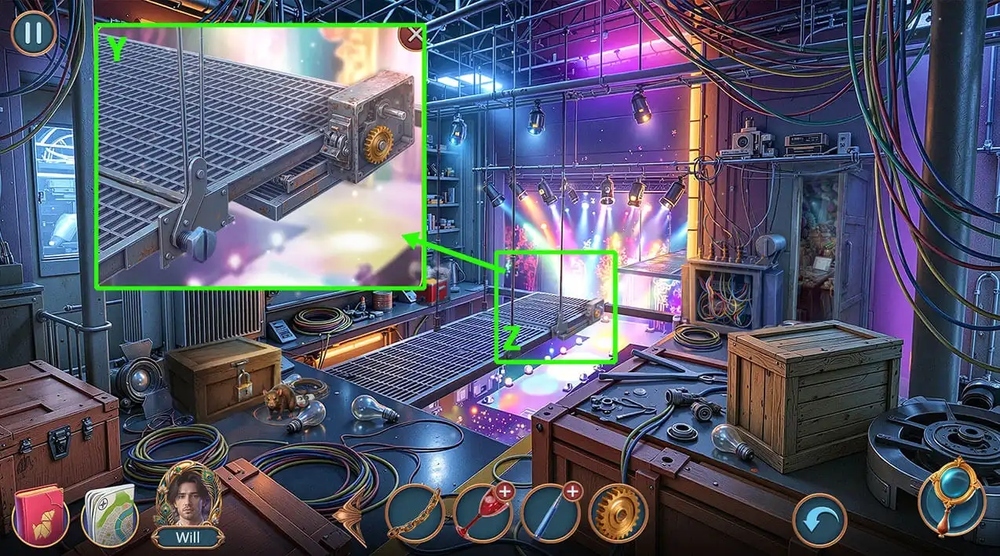
- Use GEAR on the mechanism’s control panel (Y).
- Go forward (Z).
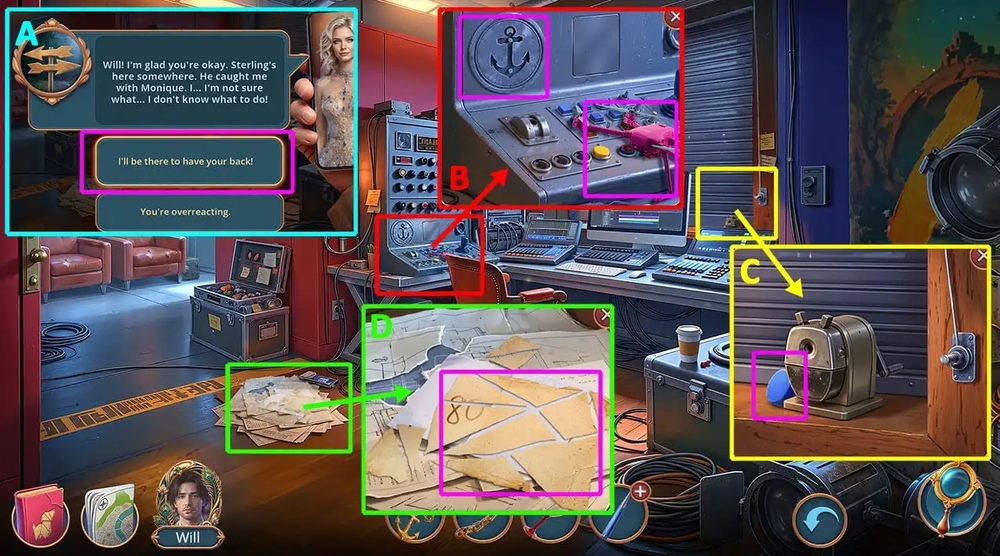
- Click on the phone, select this option (A).
- Take DRONE, use ANCHOR KEYCHAIN on the slot in the panel, take SCOTCH TAPE (B).
- Take CONTROL BUTTONS 1/3 (C).
- Use SCOTCH TAPE on the scraps of diagrams (D).
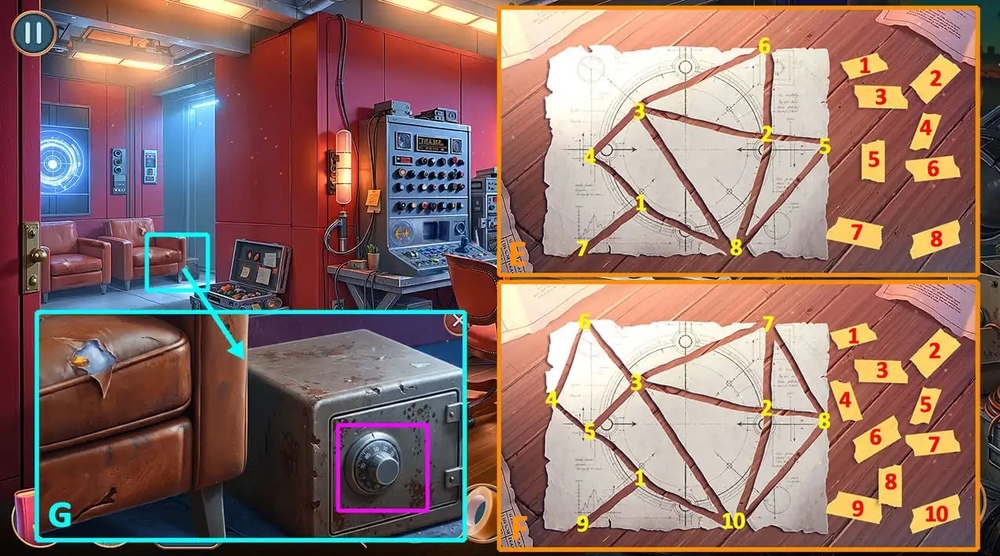
- Easy solution: Drag 1-1, 2-2, 3-3, 4-4, 5-5, 6-6, 7-7, 8-8 (E).
- Hard solution: Drag 1-1, 2-2, 3-3, 4-4, 5-5, 6-6, 7-7, 8-8, 9-9, 10-10 (F).
- Examine the paper sheet, take WARDROBE CODE.
- Use WARDROBE CODE on the safe, take FINGERPRINT KIT (G).
- Go to Underground Parking.
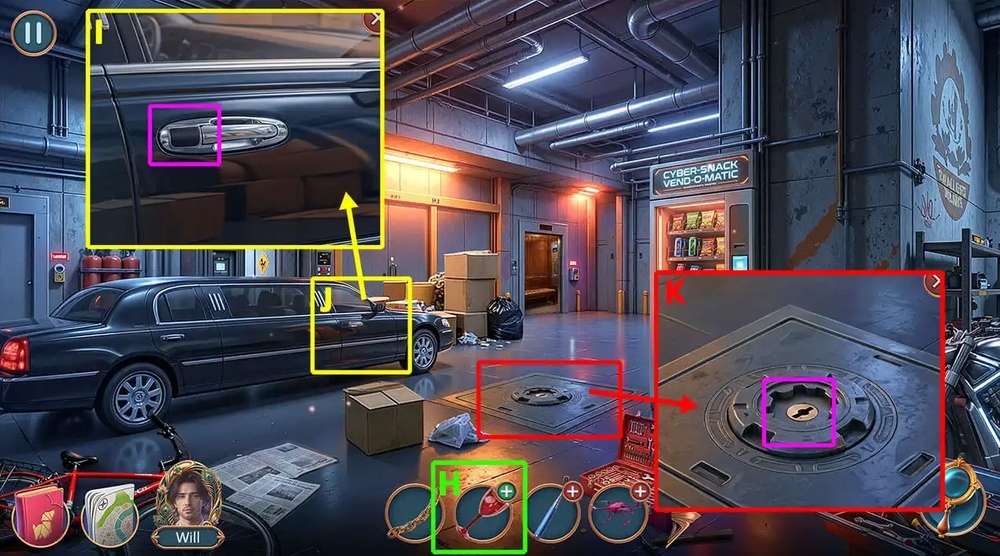
- Use FINGERPRINT KIT, SCOTCH TAPE on WINE GLASS WITH FINGERPRINT, earn STERLING’S FINGERPRINT (H).
- Use STERLING’S FINGERPRINT on the car door (I).
- Play puzzle, earn HATCH KEY (J).
- Use HATCH KEY on the hatch, take ROTOR (K).
- Go to Lighting Grid.
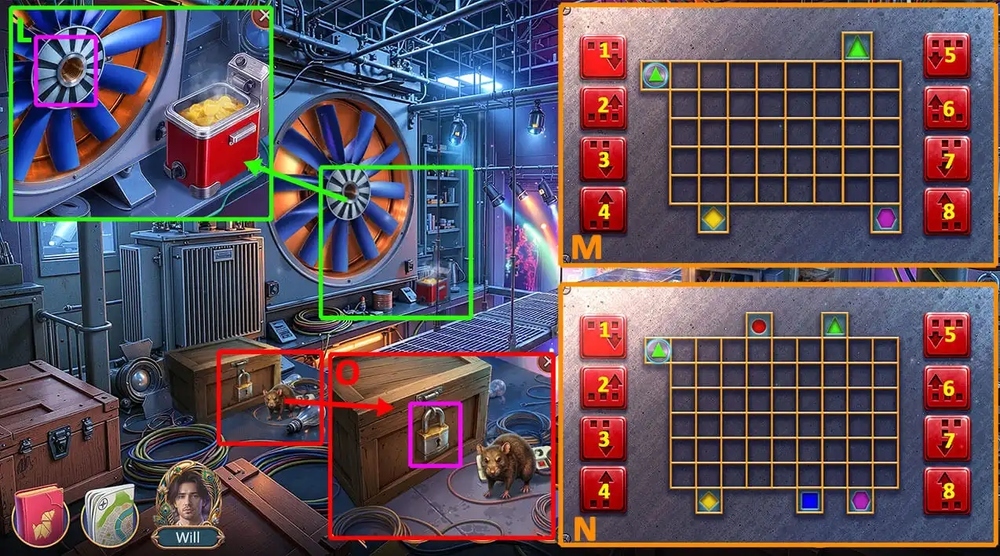
- Use ROTOR on the fan (L).
- Easy solution: Click 1-2-1-4, 1-1-1-1-8-7-1, 1-1-7-6-3 (M).
- Hard solution: Click 1-2-1-4, 1-1-1-1-5-8-7-1, 1-1-1-1-5-1, 1-1-7-7, 1-2-7-2-8 (N).
- Take CRATE KEY.
- Use CRATE KEY on the lock, take SELFIE STICK MOUNT (O).
- Go back.
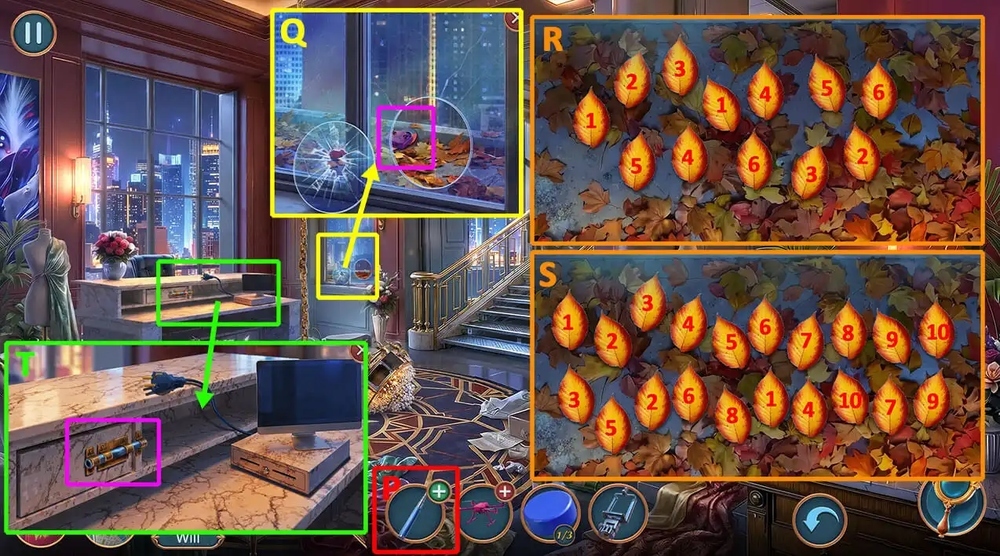
- Use SELFIE STICK MOUNT on TELESCOPIC SELFIE STICK, earn SELFIE STICK (P).
- Use SELFIE STICK on the window (Q).
- Easy solution: Click 1-1, 2-2, 3-3, 4-4, 5-5, 6-6, 7-7 (R).
- Hard solution: Click 1-1, 2-2, 3-3, 4-4, 5-5, 6-6, 7-7, 8-8, 9-9, 10-10 (S).
- Earn REMOTE CONTROL, MAGNET.
- Use MAGNET on the latch, take SCISSORS (T).
- Go to Lighting Room.
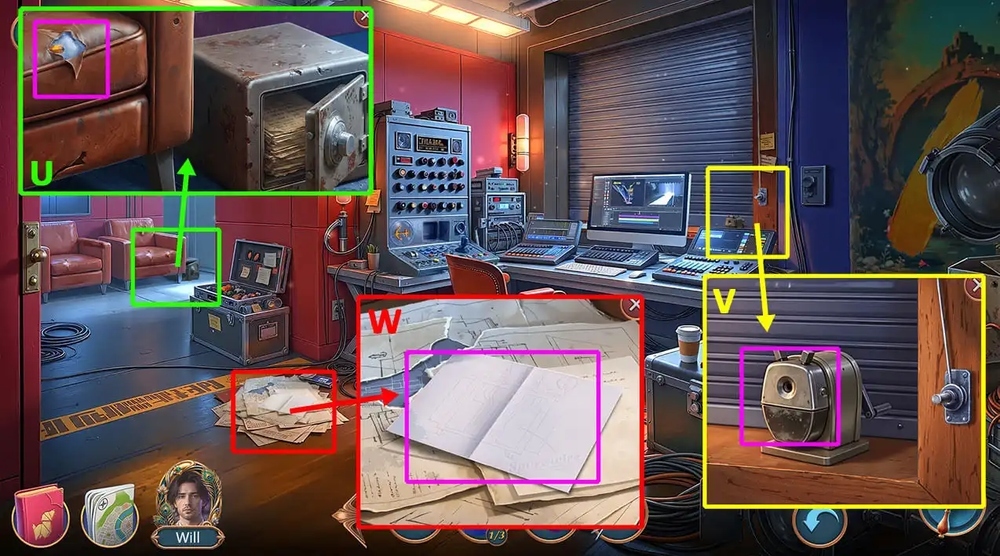
- Use SCISSORS on the torn upholstery of the chair, take BROKEN PENCIL (U).
- Use BROKEN PENCIL on the sharpener, take PENCIL (V).
- Use PENCIL on the blank sheet with dents, examine the wiring diagram, take WIRING DIAGRAM (W).
- Go back.
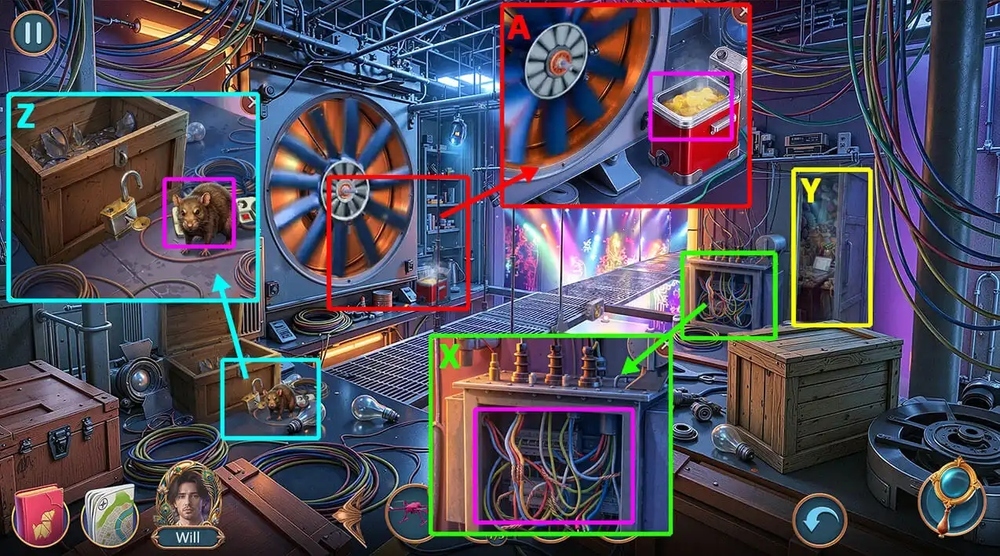
- Use WIRING DIAGRAM on the transformer box (X).
- Play puzzle, earn FRYER BASKET (Y).
- Use FRYER BASKET on the deep fryer, earn CHIPS (Z).
- Use CHIPS on the rat (A).
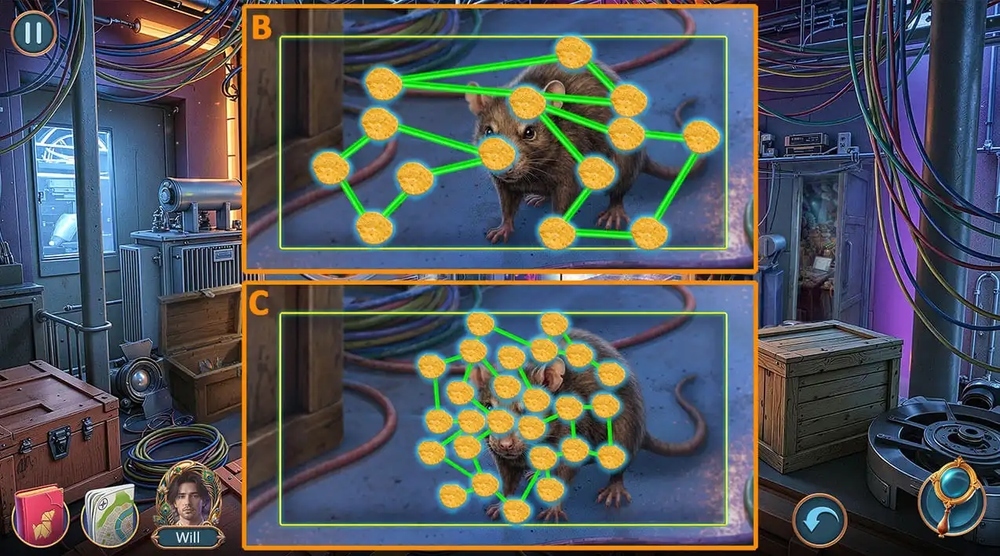
- Easy solution: Follow the instructions in the image (B).
- Hard solution: Follow the instructions in the image (C).
- Take EXTENSION CORD.
- Go back.
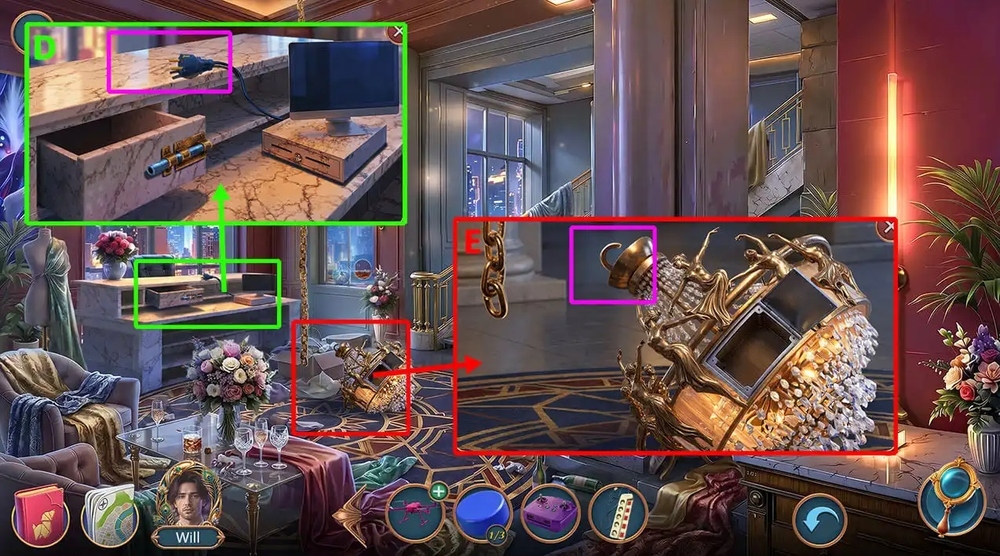
- Use EXTENSION CORD on the plug on the cash register screen, take CONTROL BUTTONS 2/3, CARABINER (D).
- Use CARABINER, CHAIN PART on the chandelier, take CAMERA (E).
- Go back.
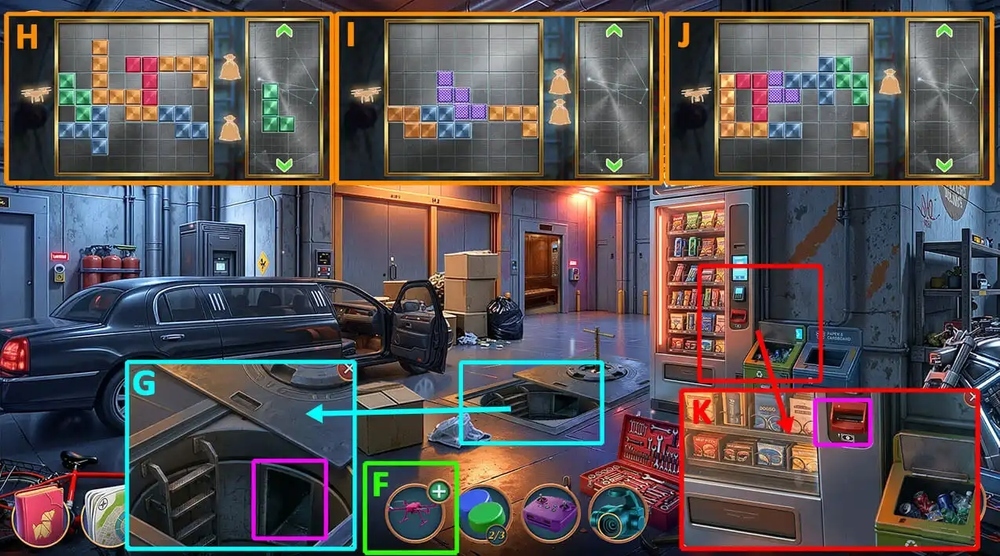
- Use CAMERA, REMOTE CONTROL on DRONE, earn MINI DRONE (F).
- Use MINI DRONE on the drain (G).
- Easy solution: Follow the instructions in the image (H).
- Hard solution: Follow the instructions in the images (I-J).
- Take CONTROL BUTTONS 3/3, BANKNOTE.
- Use BANKNOTE on the vending machine, take PINWHEEL SOUVENIR (K).
- Go to Lighting Room.
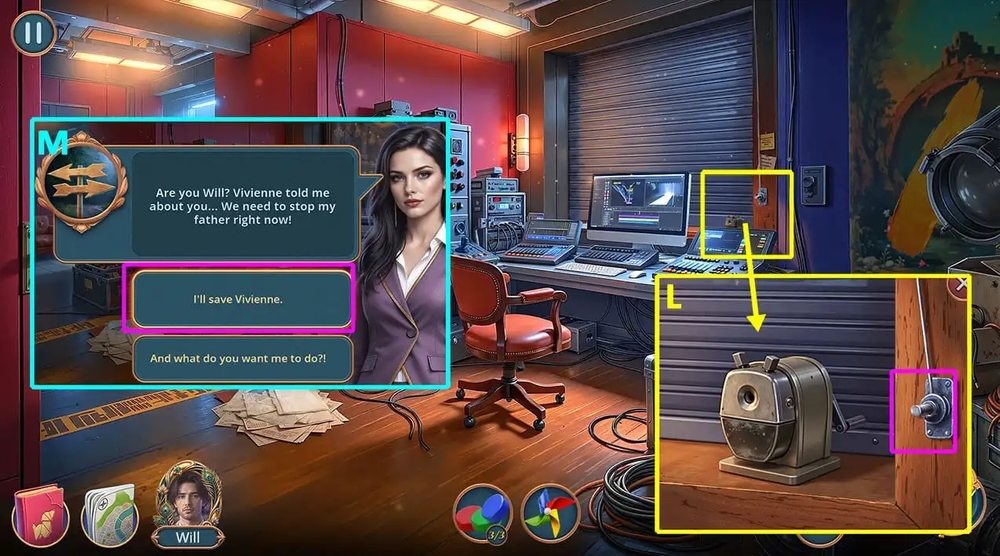
- Use PINWHEEL SOUVENIR on the roller shutter mechanism (L).
- Select this option, earn LIGHTING CONTROL LEVER (M).
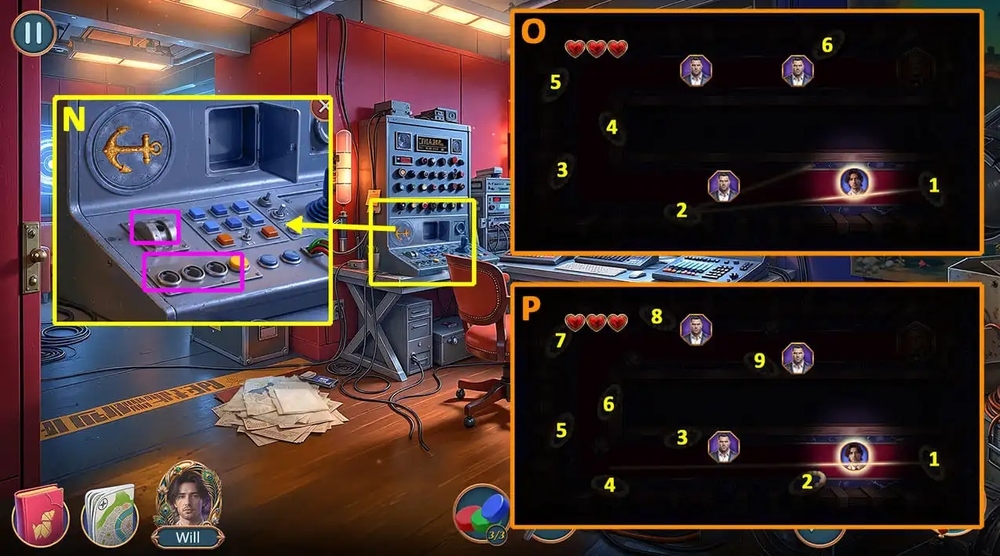
- Use LIGHTING CONTROL LEVER, CONTROL BUTTONS 3/3 on the spotlight control panel (N).
- Easy solution: Click 2 (2 times), 3, 4 (2 times), 5, go to the exit while avoiding the guards (O).
- Hard solution: Click 1 (2 times), 3 (2 times), 4, 7, 6, 5 (2 times), 8 (2 times), 9 (2 times), go to the exit while avoiding the guards (P).
Congratulations! You have completed the game Hidden Fame 1: Dark Secret.