Adventure Seekers 2: Restless Waters – Rafael and Inara head to the tropical port of Santa Marilla, hoping for a peaceful stopover amid vibrant markets and picturesque seascapes. However, instead of a carefree vacation, they discover a city gripped by fear. Fishing boats lie wrecked, merchants are afraid to go out to sea, and locals tell of a massive whale that suddenly appears off the coast and attacks ships. Some consider it a monster, others a curse, but Rafael and Inara suspect there is more to what is happening than meets the eye. As they question the locals and study ancient records, the travelers discover a legend about an ancient Guardian who once watched over the islands and protected fishermen from storms at sea. Don Elias, the keeper of traditions, explains that the balance was disrupted after a sacred relic disappeared from an old sanctuary. Now the whale is trying to recover what was lost, and its attacks are linked to the locations where fragments of the ancient artifact are found. The clues lead the heroes to an abandoned lighthouse, ruined settlements, and sunken merchant ships. Together with Captain Esteban Ruiz, they must uncover what role his maritime expedition played in these events and why the ancient relic ended up being broken into several pieces. As their investigation unfolds, Rafael and Inara uncover new evidence revealing the history of the sunken city and the underwater sanctuary. To stop the attacks and save the islanders, the heroes must gather the fragments of the slab and return it to its rightful place. But first, they must reach the sanctuary and uncover the Guardian’s true intentions. Explore the coastline and abandoned sites, uncover ancient secrets, and help Rafael and Inara restore the balance that has been disrupted. Your decisions will influence the course of the adventure and determine which of the three possible endings awaits the heroes. If you can’t solve a puzzle or don’t know where to find items, you can check out the walkthrough for Adventure Seekers 2: Restless Waters on our website to uncover all the secrets.
Adventure Seekers 2: Restless Waters – Walkthrough
Here you can see the complete walkthrough for Adventure Seekers 2: Restless Waters, namely all chapters, including the bonus chapter, in pictures.
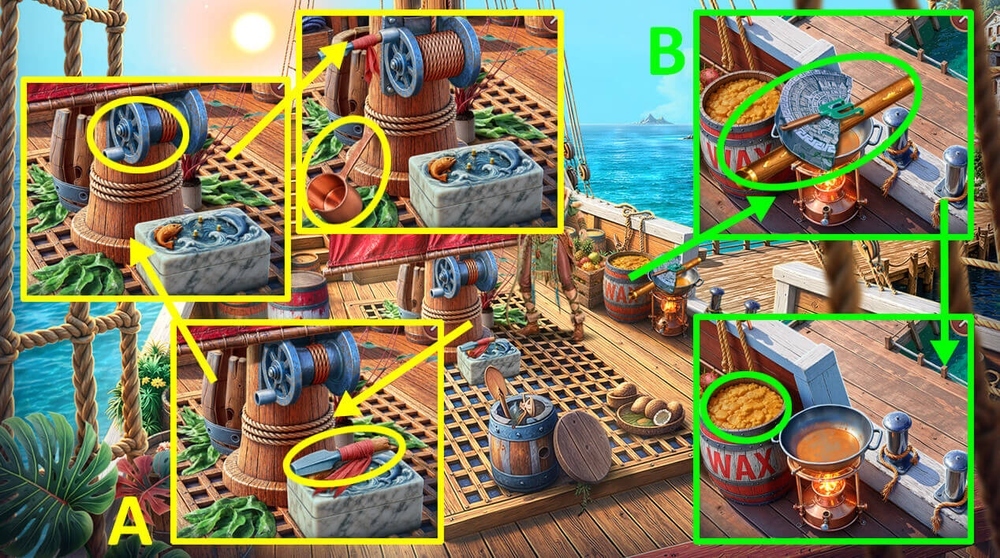
- Take SPEAR, use SPEAR on the winch, take LADLE (A).
- Take HAND RAKE, CALENDAR PART and SUPPORTS 1/2, use LADLE on the wax, earn MELTED WAX (B).
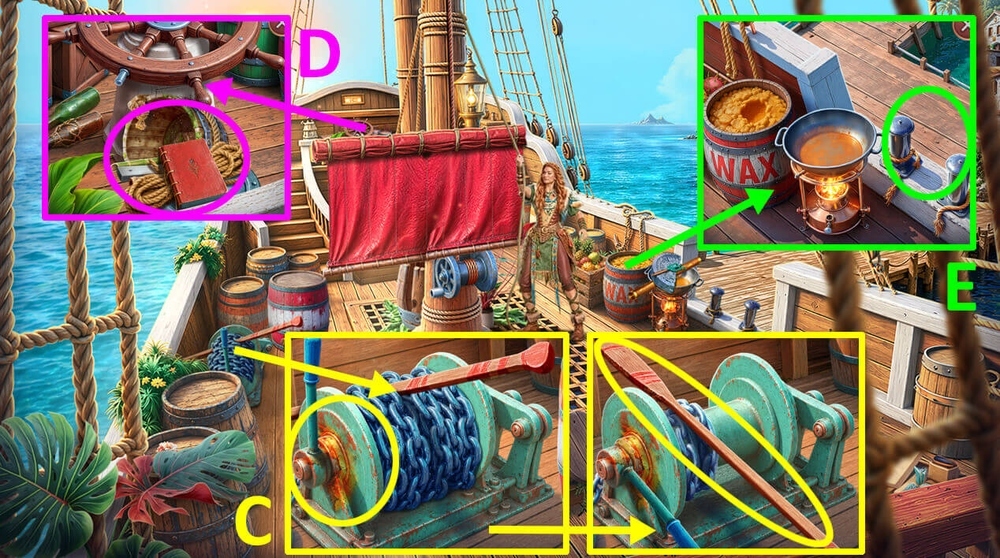
- Use MELTED WAX on the rust, take OAR (C).
- Read Raphael’s diary, take ROPE, BOARDS and BUCKET (D).
- Use ROPE and BOARDS on OAR, earn IMPROVISED LADDER.
- Use IMPROVISED LADDER on ship’s side (E).
- Go forward.
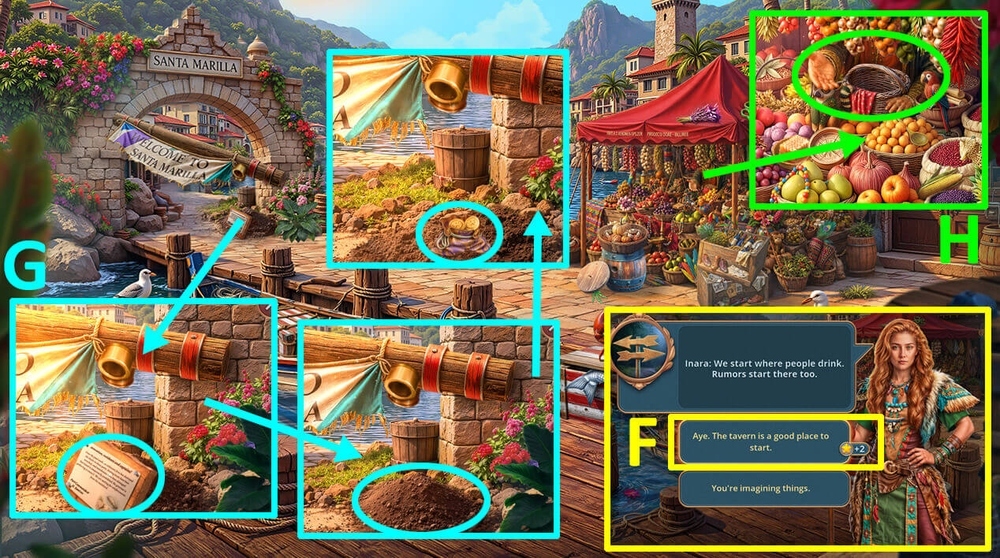
- Select this option (F).
- Read the notice on the board, use HAND RAKE on dirt, take LEATHER COIN PURSE (G).
- Use LEATHER COIN PURSE on the hand, earn LEATHER COIN PURSE (H).

- Play puzzle, earn SHARK TOOTH (I).
- Use SHARK TOOTH on nets, take JAR OF HONEY and SUPPORTS 2/2 (J).
- Use SUPPORTS 2/2 on the wooden beam (K).
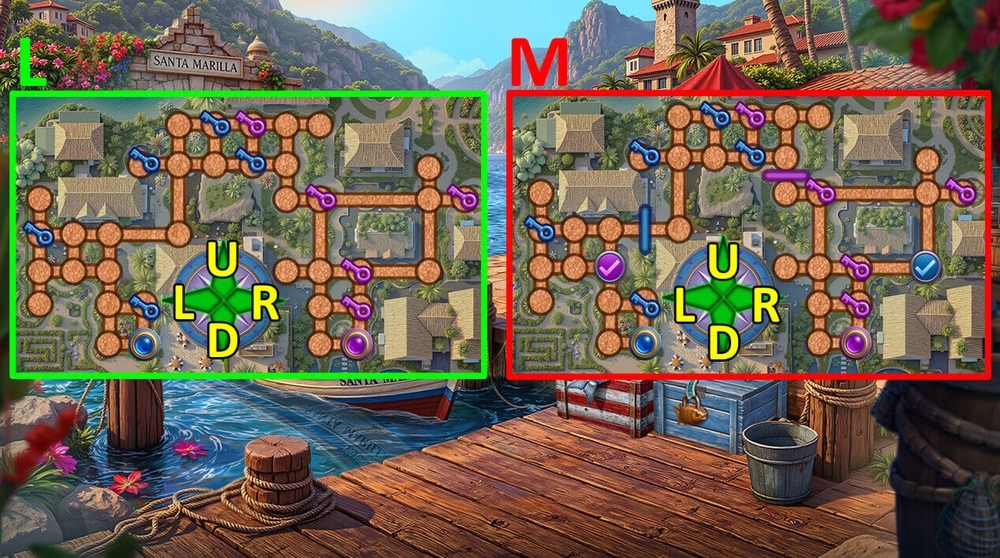
- Easy solution: Click: U, L, U, L*2, U*2, R*3, D, L, R*4, U*2, R*2, L*5, U, R*3, L, U (L).
- Hard solution: Click: U, L, U, R*3, L*2, U, R*4, U*2, R*2, L*5, U, R*3, L, U (M).
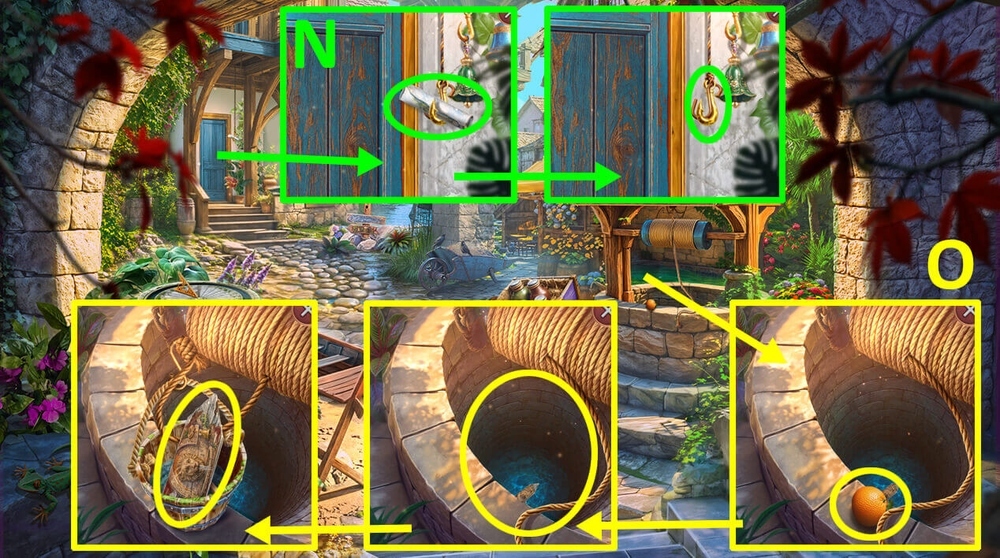
- Read the note, take OCTAGONAL HOOK (N).
- Take ORANGE, use BUCKET and OCTAGONAL HOOK on the well, take SIGN (O).
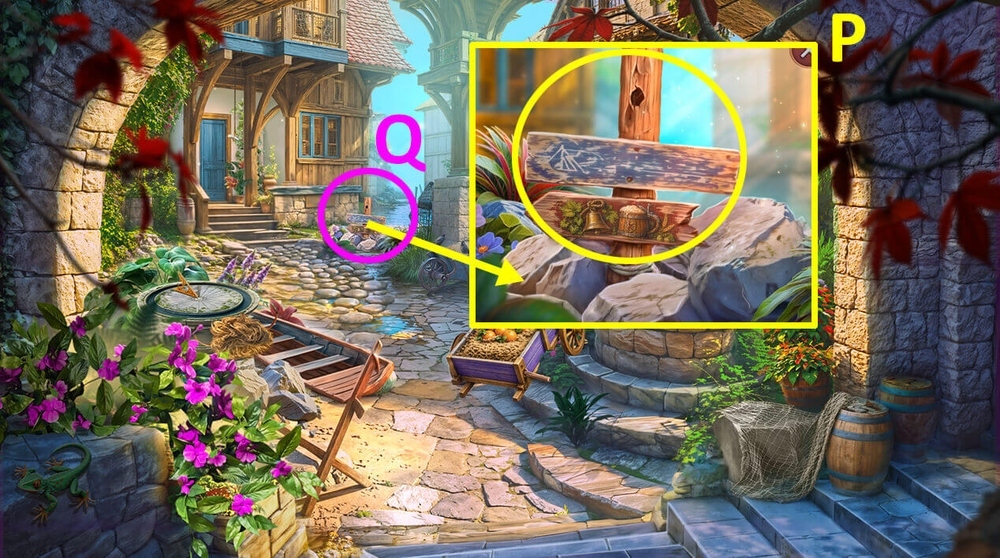
- Use SIGN on the signpost (P).
- Play puzzle, earn CARPENTER’S DRILL BIT (Q).
- Go back.
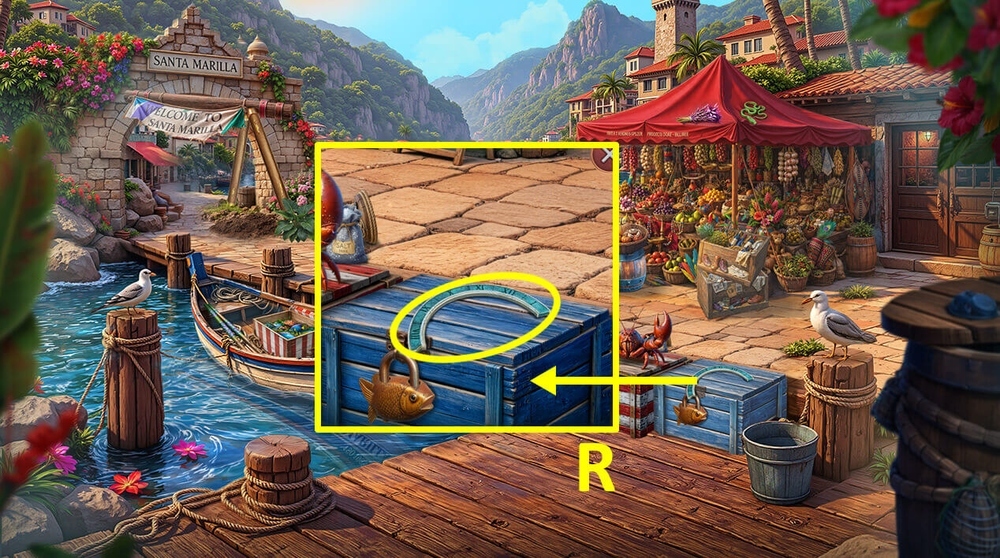
- Take SUNDIAL PART 1/2 (R).
- Go back.
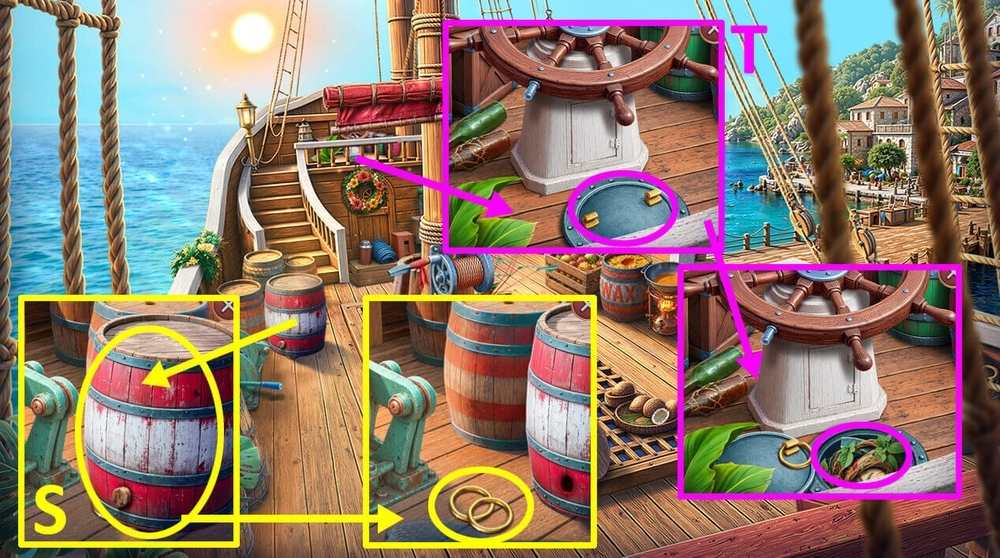
- Use CARPENTER’S DRILL BIT on the barrel, take RINGS (S).
- Use RINGS on hatch, take WILLOW VINE, map and SUNDIAL PART 2/2 (T).
- Go to Santa Marilla’s Streets.
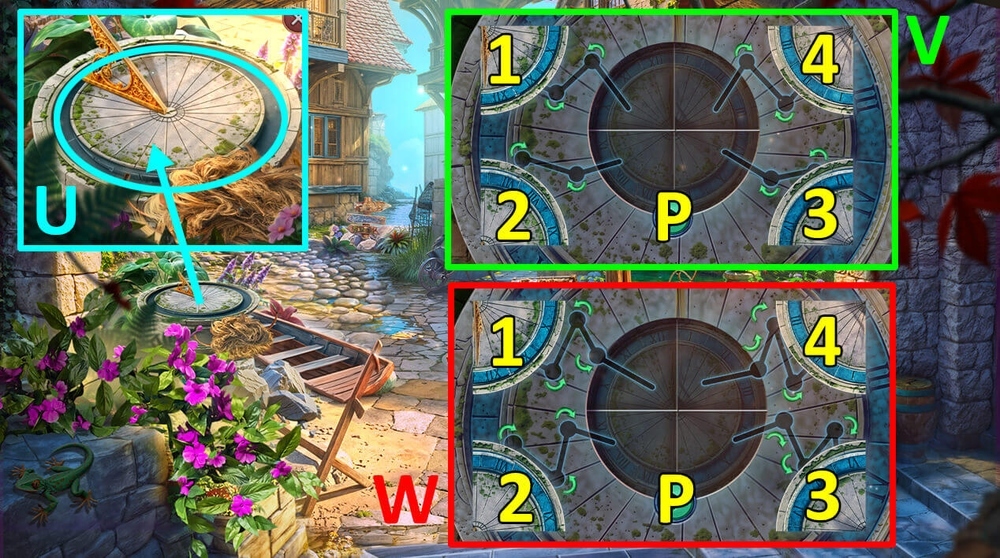
- Use SUNDIAL PART 2/2 on the dial (U).
- Easy solution: Click: 1, 1, 1, 2, 3, 3, 3, 4, 4, 4, P (V).
- Hard solution: Click: 1, 1, 1, 2, 3, 4, 4, 4, P (W).
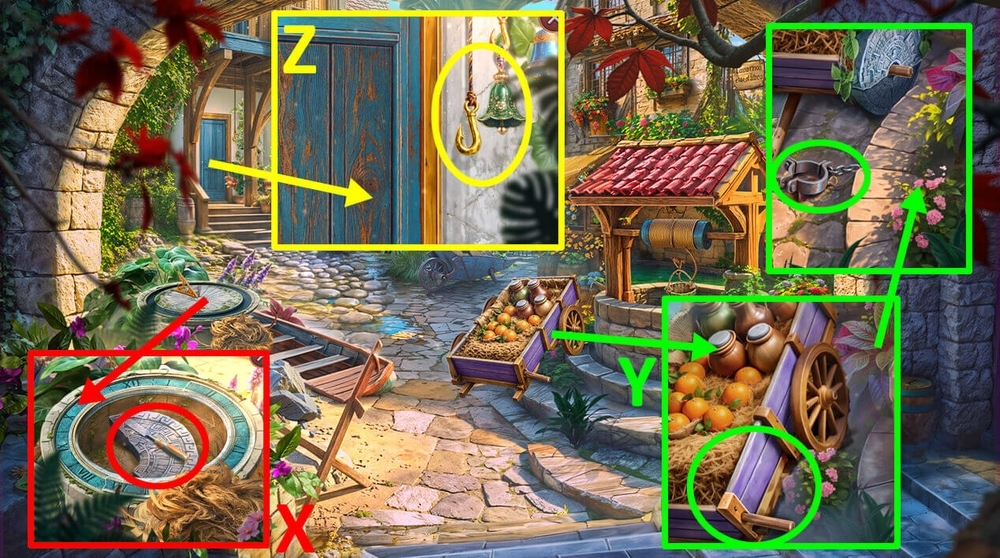
- Take CHISEL and SECOND CALENDAR PART (X).
- Use WILLOW VINE and SECOND CALENDAR PART on CALENDAR PART, earn STONE WHEEL CALENDAR.
- Use STONE WHEEL CALENDAR on the cart without a wheel, take SHACKLES and BELL (Y).
- Use BELL on the hook by the door (Z).
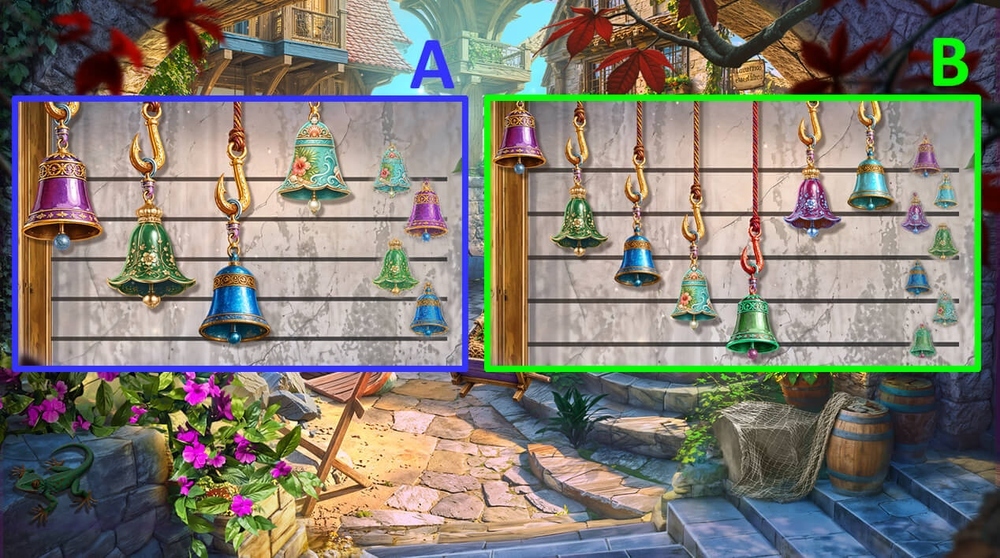
- Easy solution: Use the picture as a hint (A).
- Hard solution: Use the picture as a hint (B).
- Go forward.
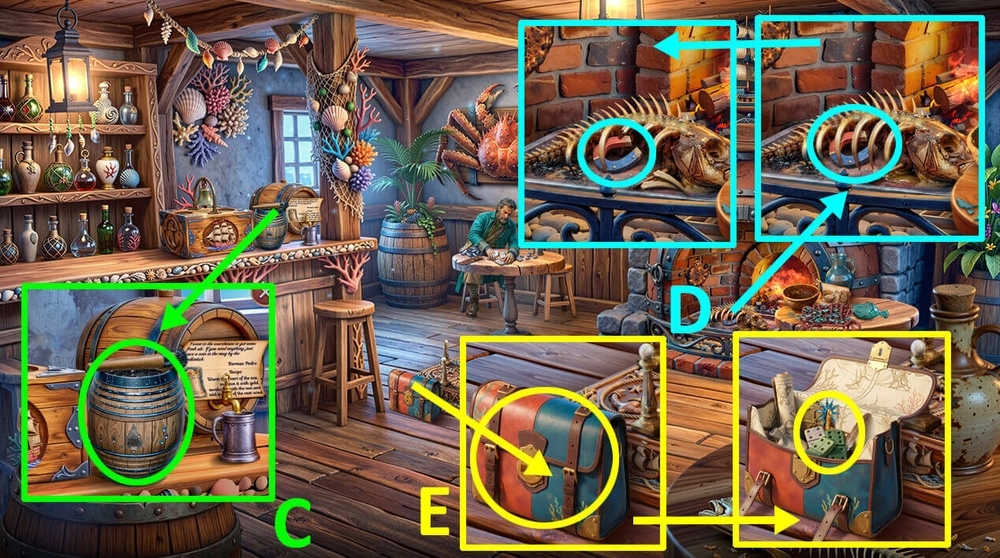
- Take BARREL OF TAR and SAILOR FIGURINE (C).
- Use SHACKLES on the fish skeleton, earn SHACKLES, take MAGNET (D).
- Use MAGNET on the bag, take DOMINOES and SPUR (E).
- Go to Santa Marilla’s Pier.
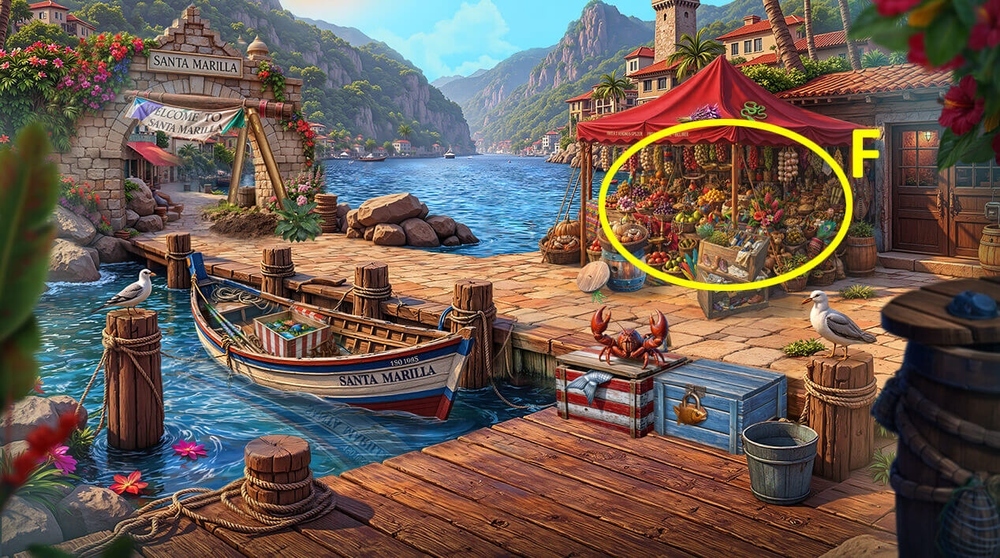
- Play puzzle, earn BOTTLE OF SPICES (F).
- Go to the “By the Pier” Pub.
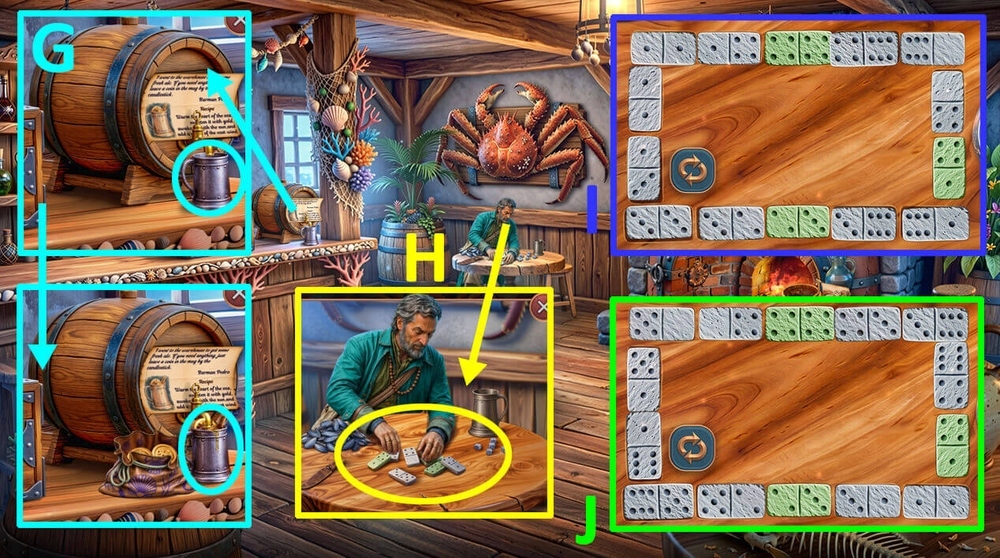
- Use LEATHER COIN PURSE, JAR OF HONEY, ORANGE and BOTTLE OF SPICES on the bar, take RUM DRINK (G).
- Use DOMINOES and RUM DRINK on the local resident (H).
- Easy solution: Use the picture as a hint (I).
- Hard solution: Use the picture as a hint (J).
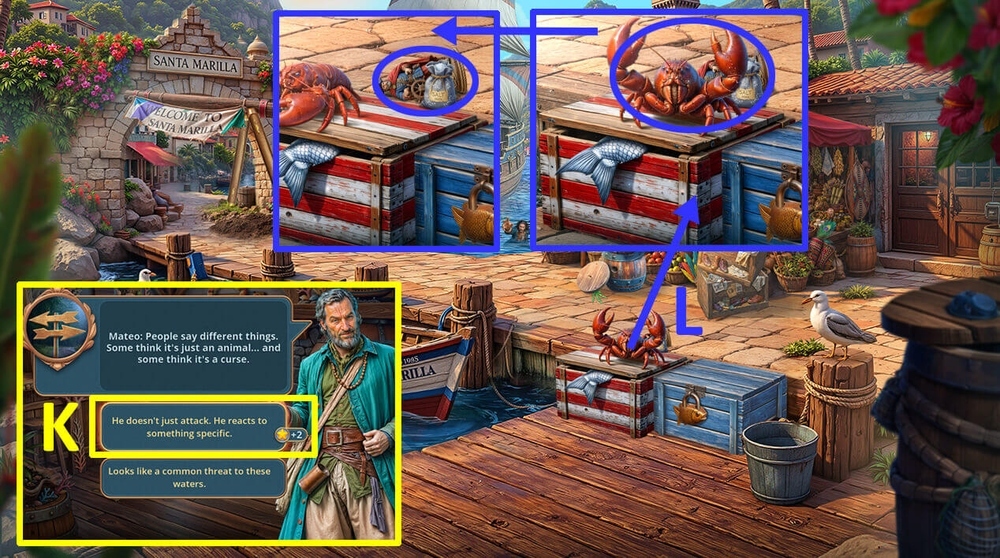
- Select this option, earn MUSSEL (K).
- Use MUSSEL on the lobster, take SEA SALT and CAPTAIN FIGURINE (L).
- Go to the “By the Pier” Pub.
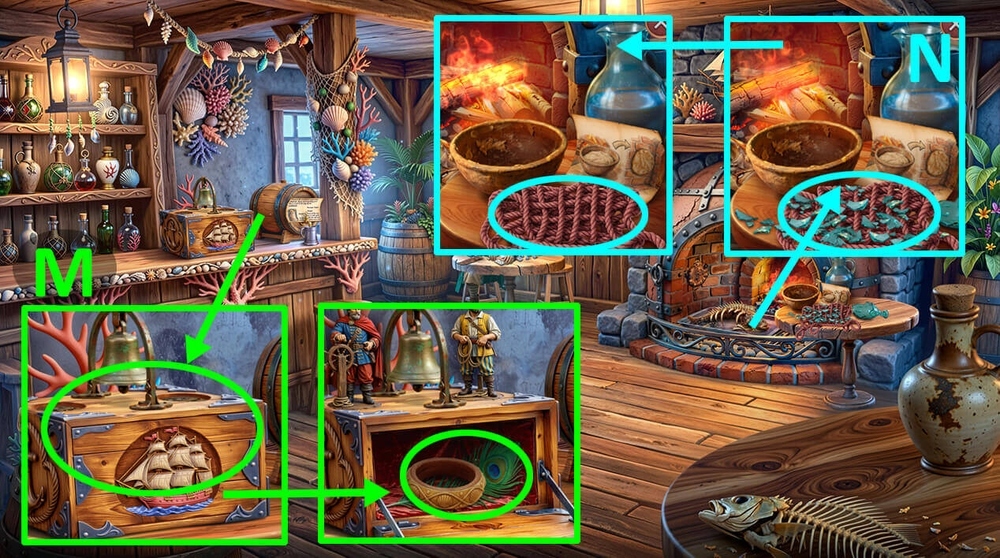
- Use SAILOR FIGURINE and CAPTAIN FIGURINE on the box, take WOODEN RINGS 1/3 and PEACOCK FEATHER (M).
- Use PEACOCK FEATHER on glass shards, take NET (N).
- Go to Santa Marilla’s Pier.
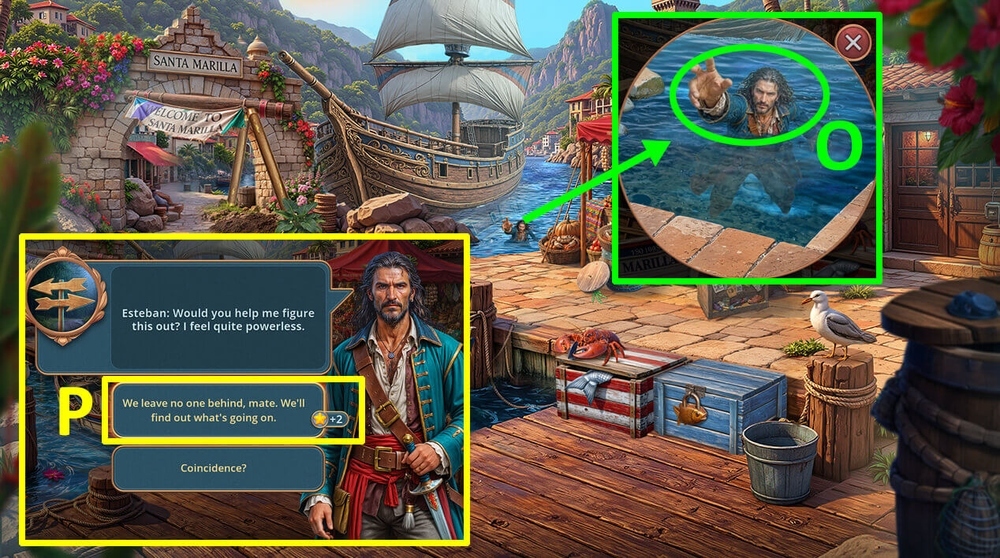
- Use NET on the captain (O).
- Select this option, earn THREE-PRONGED FORK (P).
- Go forward.
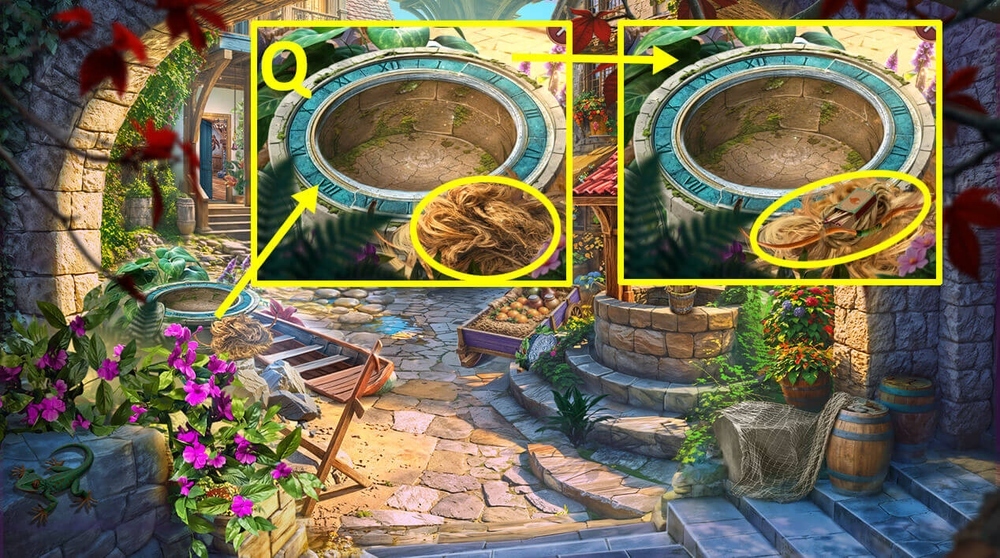
- Use THREE-PRONGED FORK on the ball of tow, take BOW, MATCHES and FLAX (Q).
- Go back.
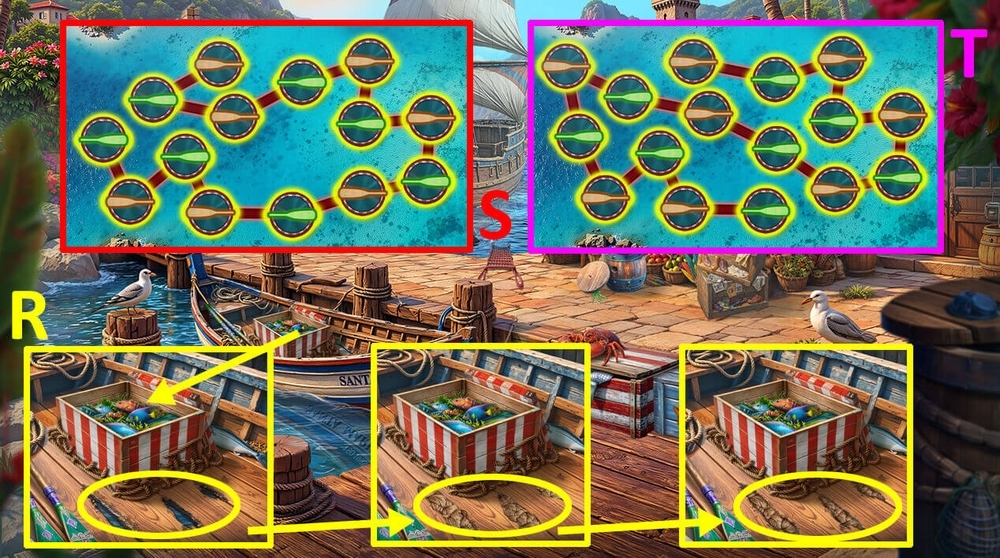
- Use FLAX on the punctured bottom of the boat, use CHISEL on the flax, use BARREL OF TAR on the punctured bottom of the boat (R).
- Easy solution: Use the picture as a hint (S).
- Hard solution: Use the picture as a hint (T).
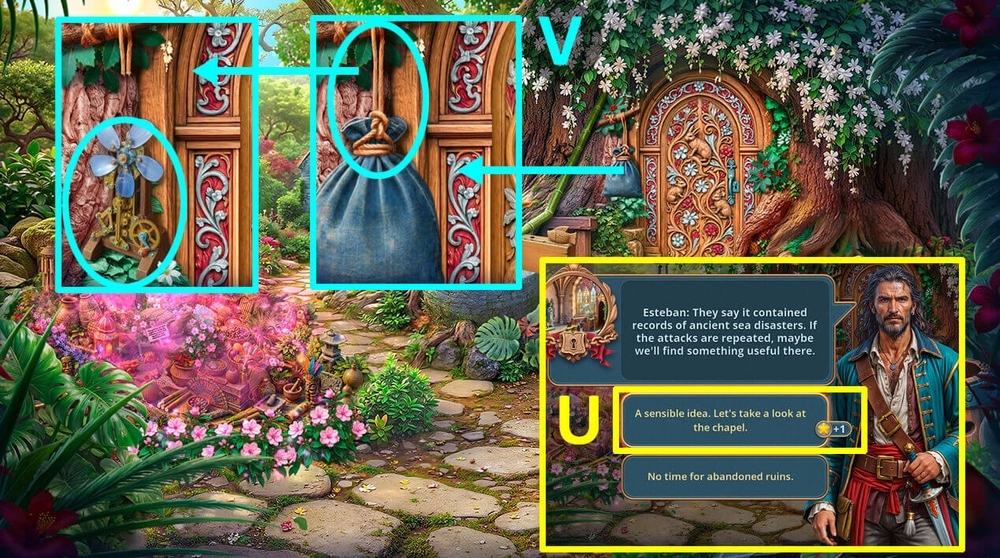
- Select this option (U).
- Use SPUR on the rope, take FLOWER FIGURINE (V).
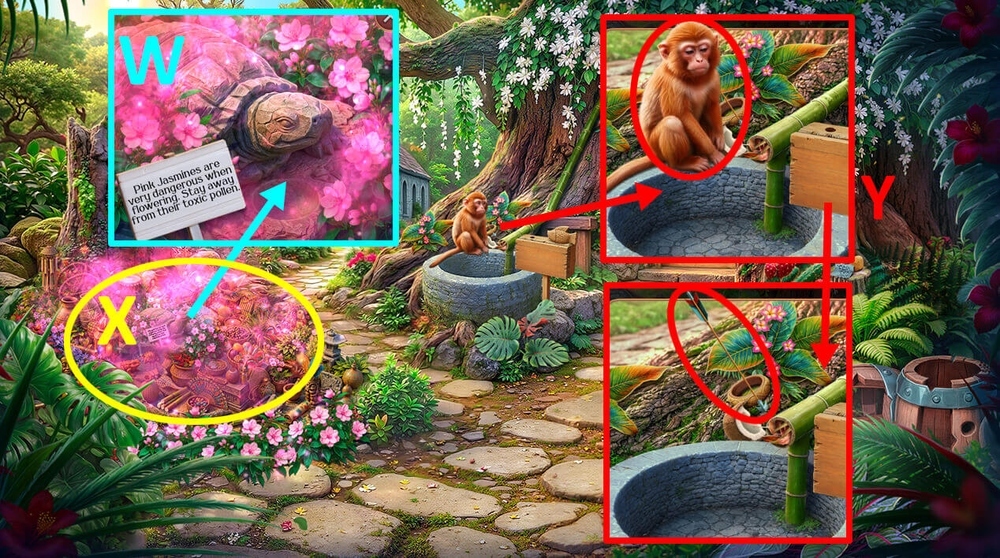
- Use FLOWER FIGURINE onto the hole in the ground (W).
- Play puzzle, earn BANANAS (X).
- Use BANANAS on the monkey, take ARROW and WOODEN RINGS 2/3 (Y).
- Go to the Abandoned Chapel.
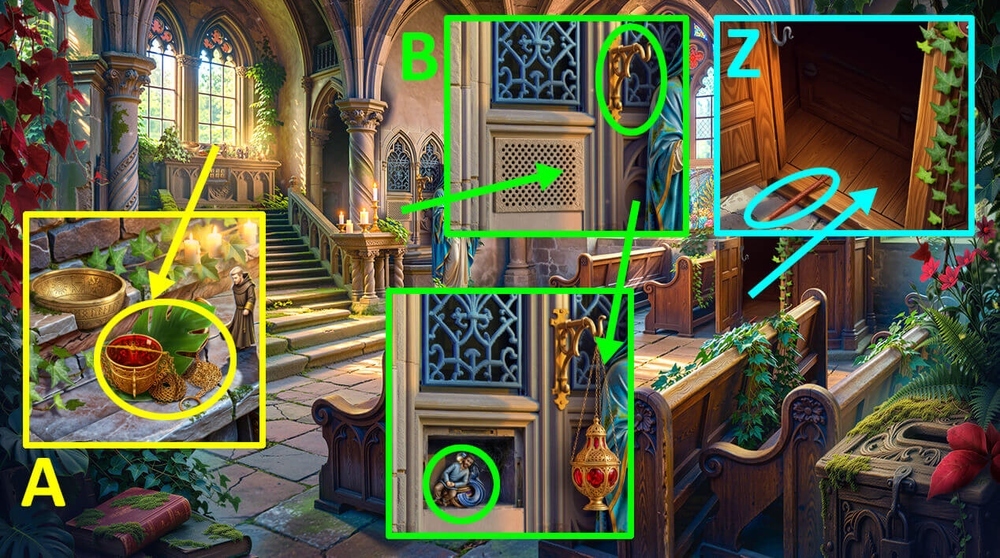
- Take BRUSH (Z).
- Take OIL LAMP, PALM LEAF and CENSER ON CHAINS (A).
- Use CENSER ON CHAINS on the special hook, take CARDBOARD FIGURINES, WICK and INK (B).

- Use PALM LEAF on the windowsill, use BRUSH and INK on the palm leaf, take SKETCH OF FRESCO PARTS (C).
- Use CARDBOARD FIGURINES on the empty slots for figures, take KEROSENE (D).
- Use MATCHES, WICK and KEROSENE on OIL LAMP, earn MATCHES and BURNING OIL LAMP.
- Use BURNING OIL LAMP on the dark confessional, take GLASS CARVING CHISEL (E).
- Go back.
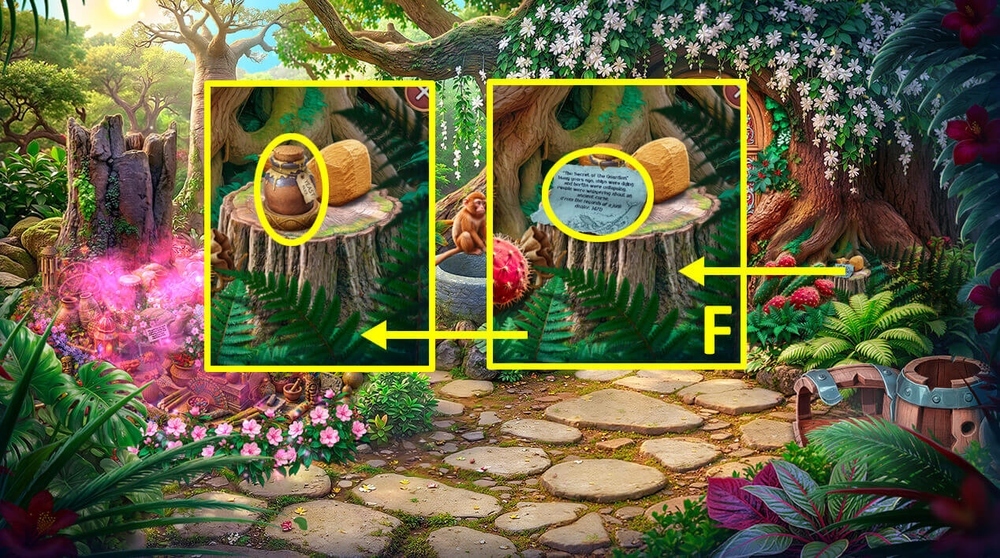
- Read the note, take YEAST and WOODEN RINGS 3/3 (F).
- Go to the “By the Pier” Pub.
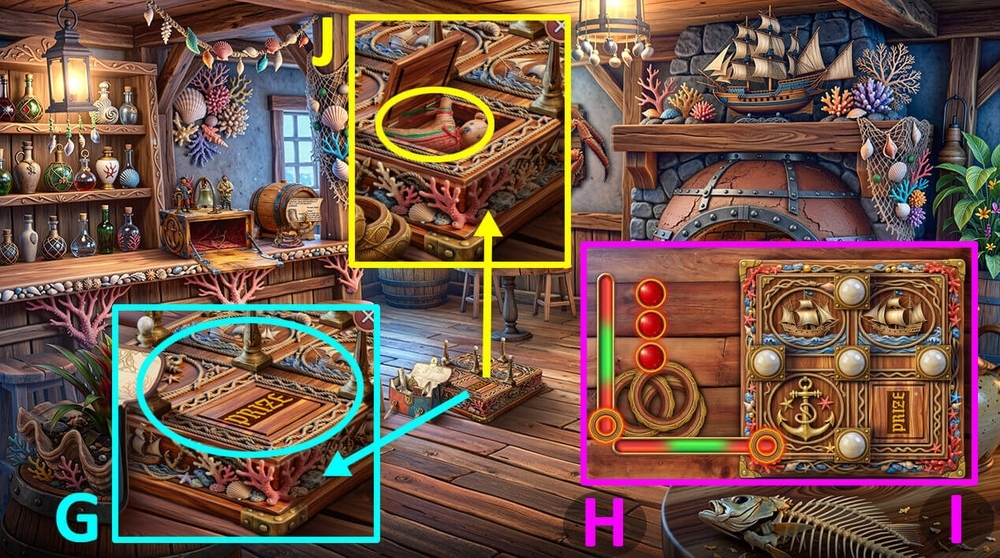
- Use WOODEN RINGS 3/3 on the game of ring toss (G).
- Easy solution: Solution is random (H).
- Hard solution: Solution is random (I).
- Take HAND PUPPET (J).
- Go to the Elder’s House.

- Use HAND PUPPET on the cactus, take FLOUR (K).
- Go to the “By the Pier” Pub.

- Use SEA SALT, YEAST and FLOUR on the clay bowl, earn FLOUR, take FRESHLY BAKED BREAD (L).
- Go to the Elder’s House.
- Use FRESHLY BAKED BREAD on the elder (M).
- Talk to Don Elias.
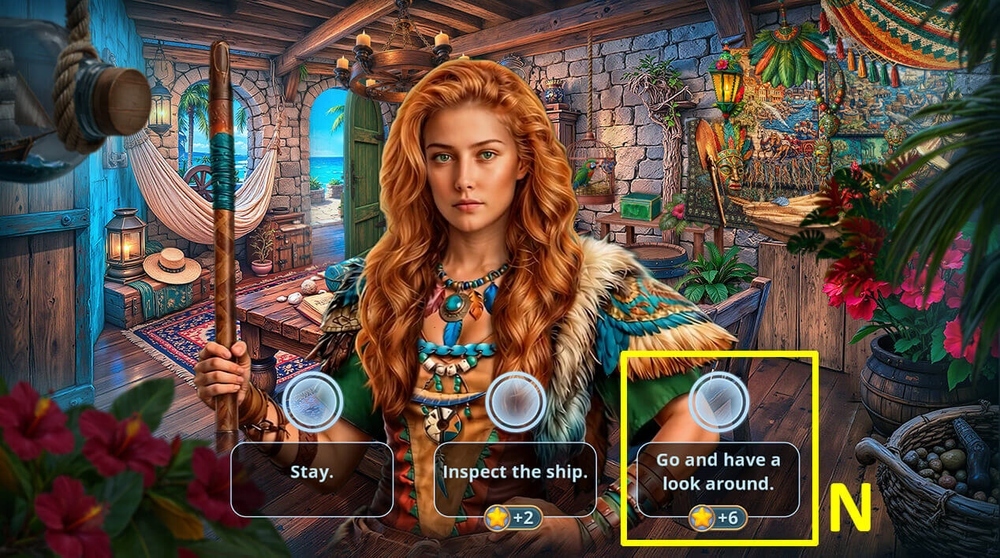
- Select this option (N).
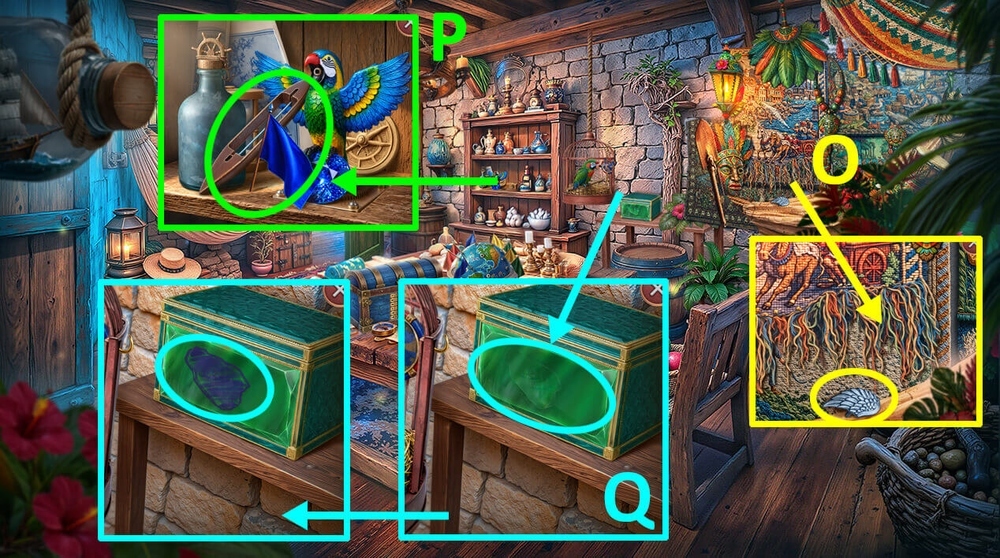
- Take WINGED MEDALLIONS 1/2 (O).
- Take FLAGS 1/2 and WEAVING SHUTTLE (P).
- Use SKETCH OF FRESCO PARTS on the glass, use GLASS CARVING CHISEL on the imprint on the glass, earn STAINED GLASS WINDOW PART (Q).
- Go forward.
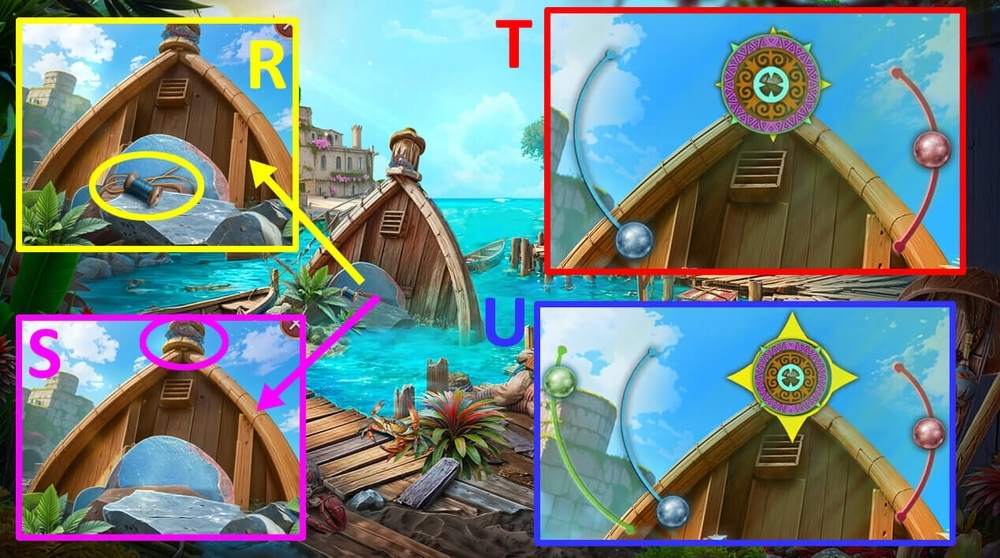
- Take THREADS and HORSEHAIR (R).
- Use ARROW and HORSEHAIR on BOW, earn BOW WITH ARROW.
- Use BOW WITH ARROW on objects on the top of a pile of rubble (S).
- Easy solution: Use the picture as a hint, earn CHAIN (T).
- Hard solution: Use the picture as a hint, earn CHAIN (U).
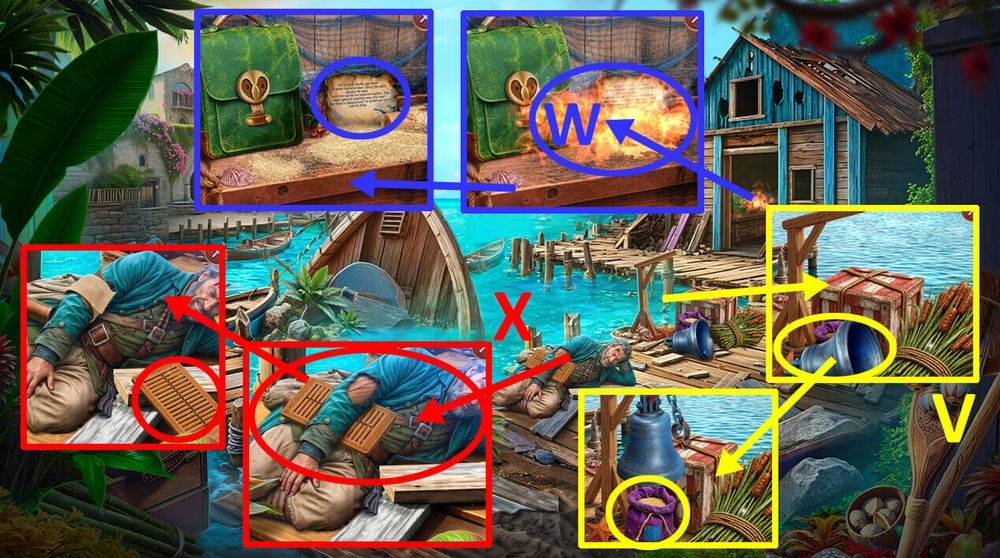
- Use CHAIN and SHACKLES on the fallen bell, take SANDBAG (V).
- Use SANDBAG on the fire, read the note, take BANDAGES (W).
- Use BANDAGES on Mateo’s wounded arm, take WEAVING REED (X).
- Go back.
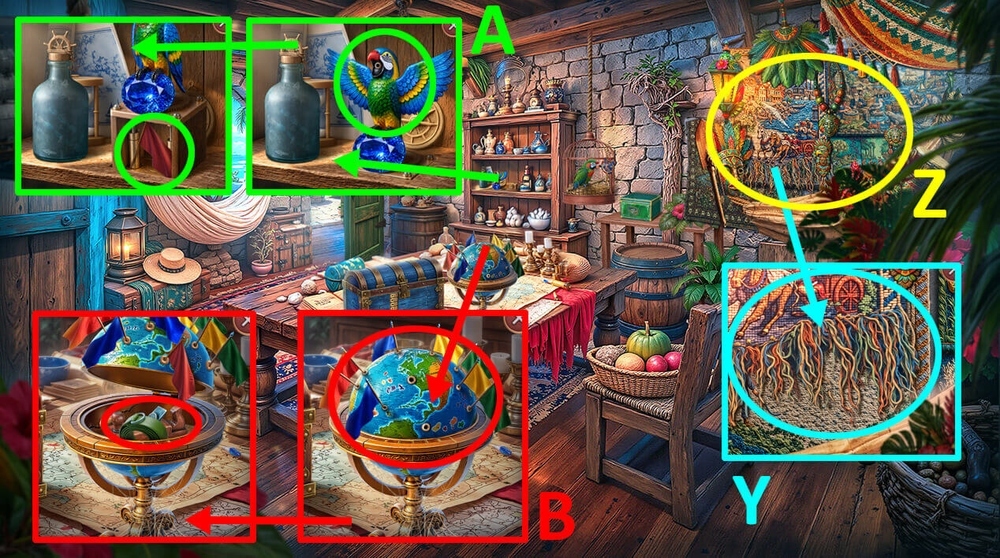
- Use WEAVING SHUTTLE, THREADS and WEAVING REED on the carpet (Y).
- Play puzzle, earn SAPPHIRE (Z).
- Use SAPPHIRE on the parrot figurine, take FLAGS 2/2 (A).
- Use FLAGS 2/2 on the globe, take BELT and JACK-PLANE (B).
- Go to the Abandoned Chapel.
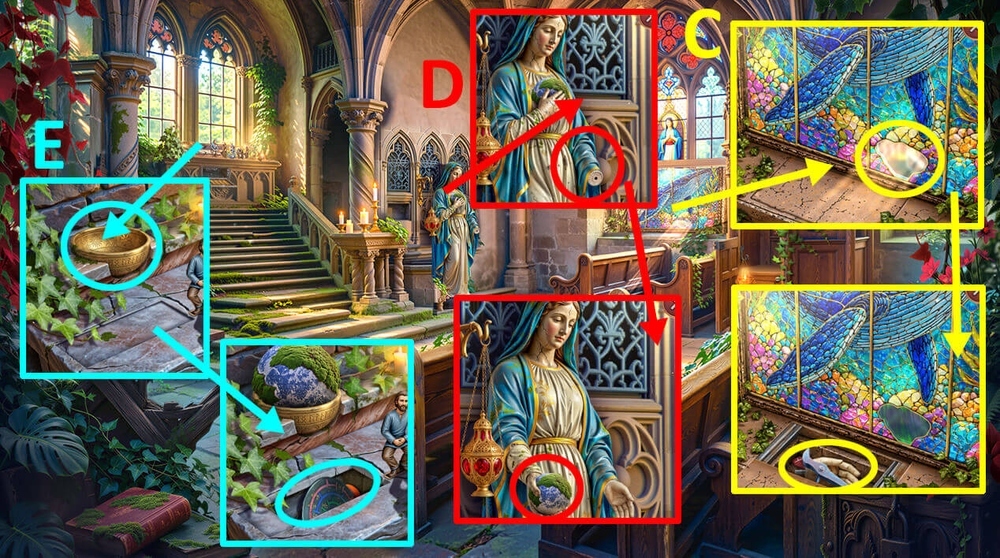
- Use STAINED GLASS WINDOW PART on the stained glass window, take BROKEN WIRE CUTTERS and STATUE’S HAND (C).
- Use STATUE’S HAND on the statue, take STONE SPHERE (D).
- Use STONE SPHERE on the bowl, take DECODER and CRAB CLAW (E).
- Go to Inside the Elder’s House.
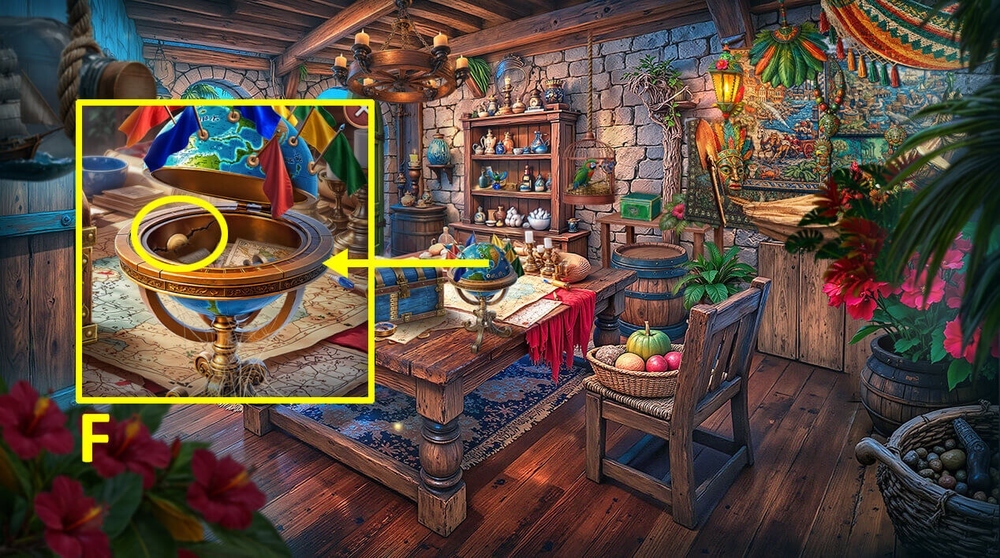
- Use CRAB CLAW on the coin, earn COIN (F).
- Go to the Abandoned Chapel.
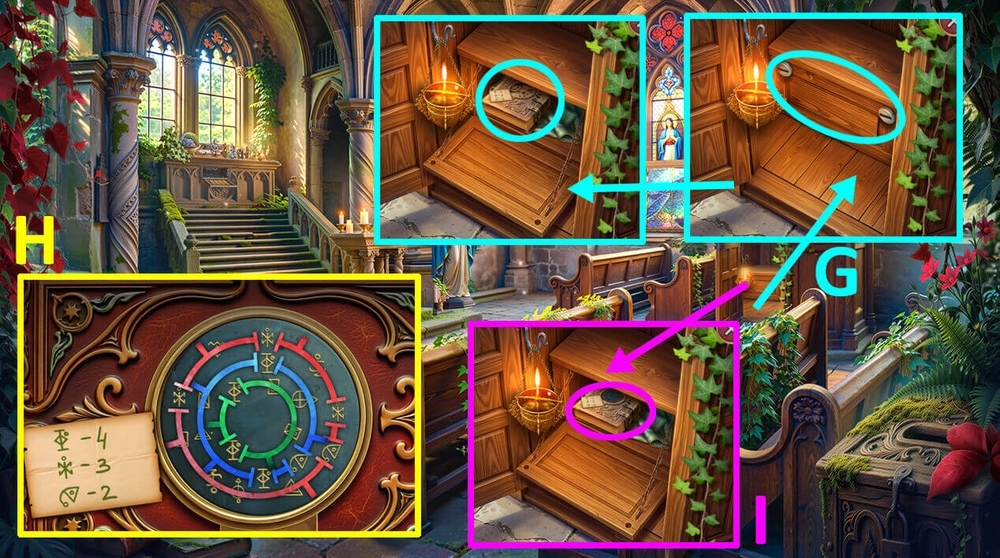
- Use COIN on the screws, use DECODER on the prayer book (G).
- Solution: Use the picture as a hint (H).
- Read the prayer book (I).
- Go back.
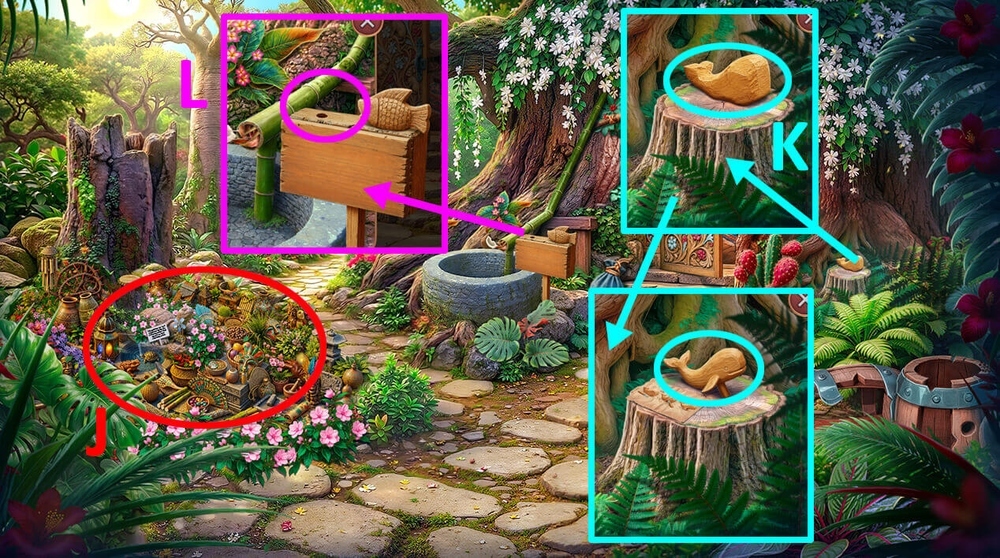
- Play puzzle, earn WHALE FIGURINE DIAGRAM (J).
- Use JACK-PLANE and WHALE FIGURINE DIAGRAM on the unfinished whale figurine, take WHALE FIGURINE (K).
- Use WHALE FIGURINE on the empty slot for the figurine (L).
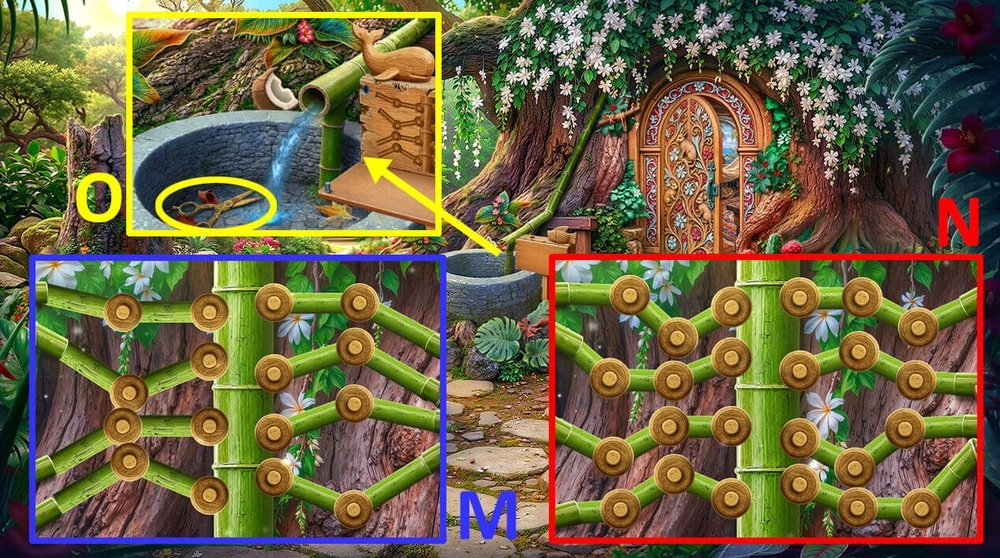
- Easy solution: Use the picture as a hint (M).
- Hard solution: Use the picture as a hint (N).
- Take SCISSORS (O).
- Go to the Lagoon’s Shipyard.
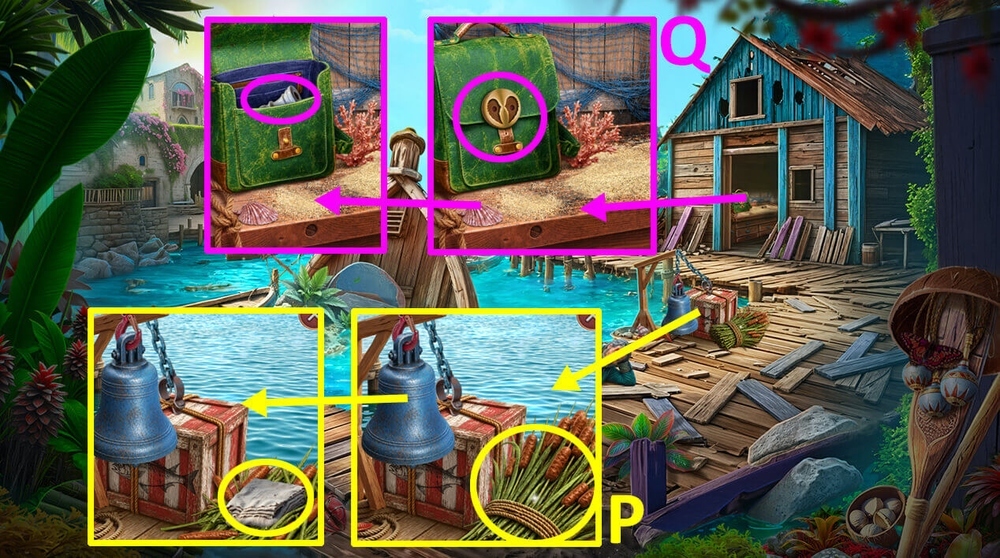
- Use SCISSORS on the cattails, take PIECE OF SAILCLOTH and WINGED MEDALLIONS 2/2 (P).
- Use WINGED MEDALLIONS 2/2 on the bag, take CHESS PIECE WITH HOLE (Q).
- Go to the Santa Marilla’s Streets.
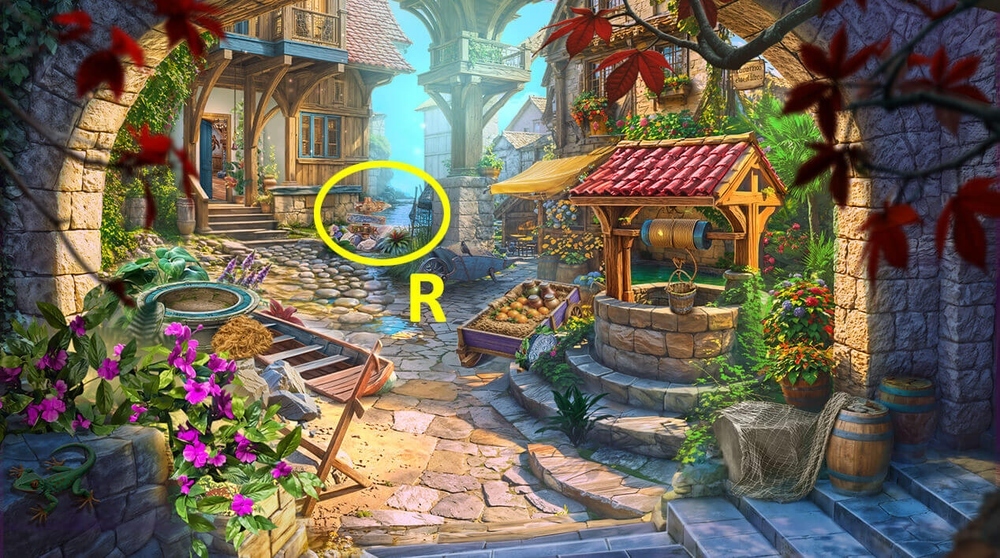
- Play puzzle, earn BRUSH (R).
- Go to Inside the Elder’s House.

- Use FLOUR on the glass jar, use BRUSH on the flour in a glass jar, take CODE (S).
- Use CODE on the chest with a combination lock (T).
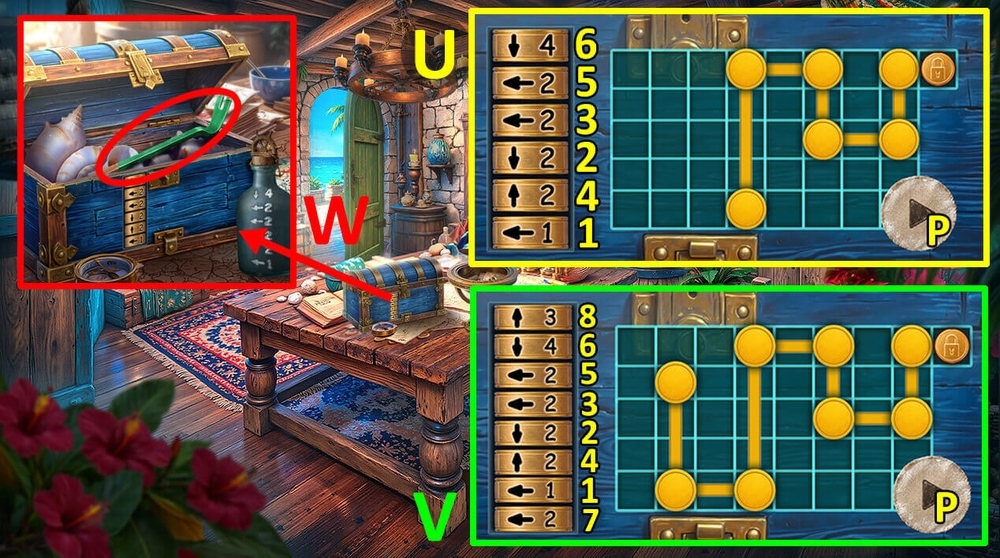
- Easy solution: Click: 1, 2, 3, 4, 6, P (U).
- Hard solution: Click: 1, 2, 3, 4, 6, 7, 8, P (V).
- Take CROWBAR (W).
- Go to Santa Marilla’s Pier.

- Use CROWBAR on the padlock on the box, take BRANCH and MIRROR (X).
- Go to Inside the Elder’s House.
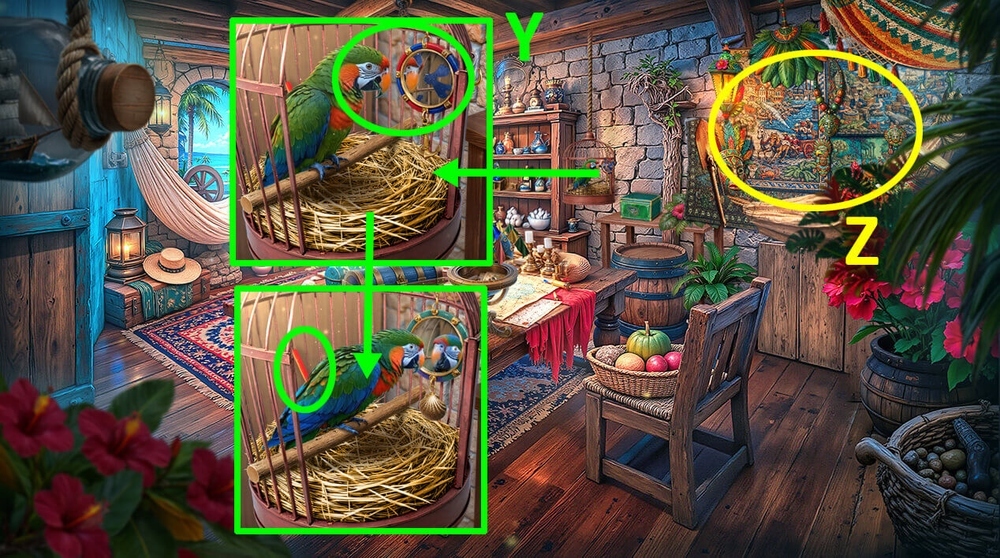
- Use MIRROR on the place with the broken mirror, take PENCIL (Y).
- Play puzzle, earn SHIP WHEEL PART (Z).
- Go to the My Ship’s Deck.
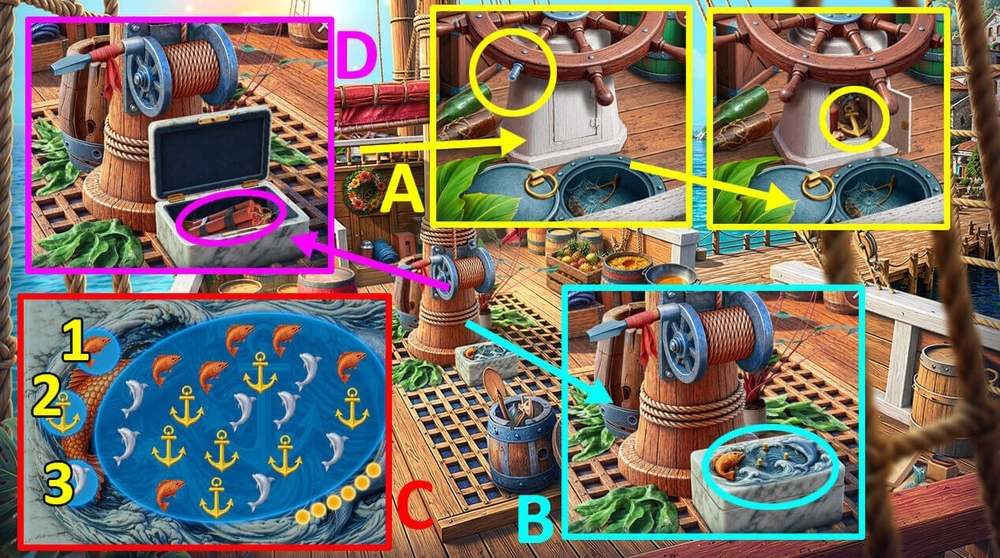
- Use SHIP WHEEL PART on the steering wheel, take ANCHOR AMULET (A).
- Use ANCHOR AMULET on the box (B).
- Solution: Click: 2, 3, 2, 1 (C).
- Take EXPLOSIVES (D).
- Go to the Lagoon’s Shipyard.
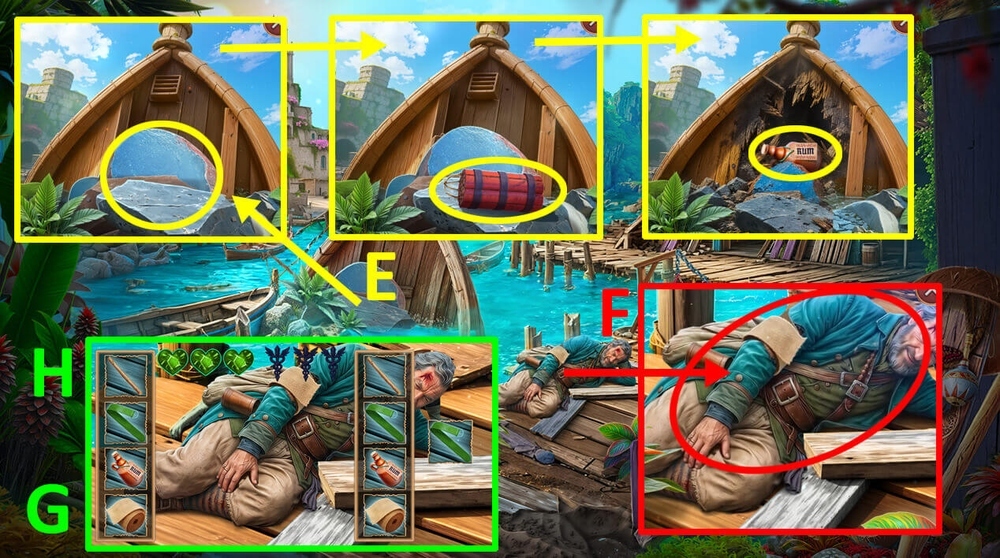
- Use EXPLOSIVES on the pile of rubble, use MATCHES on the explosives, take RUM (E).
- Use BELT, BRANCH and RUM on Mateo (F).
- Easy solution: Solution is random (G).
- Hard solution: Solution is random (H).
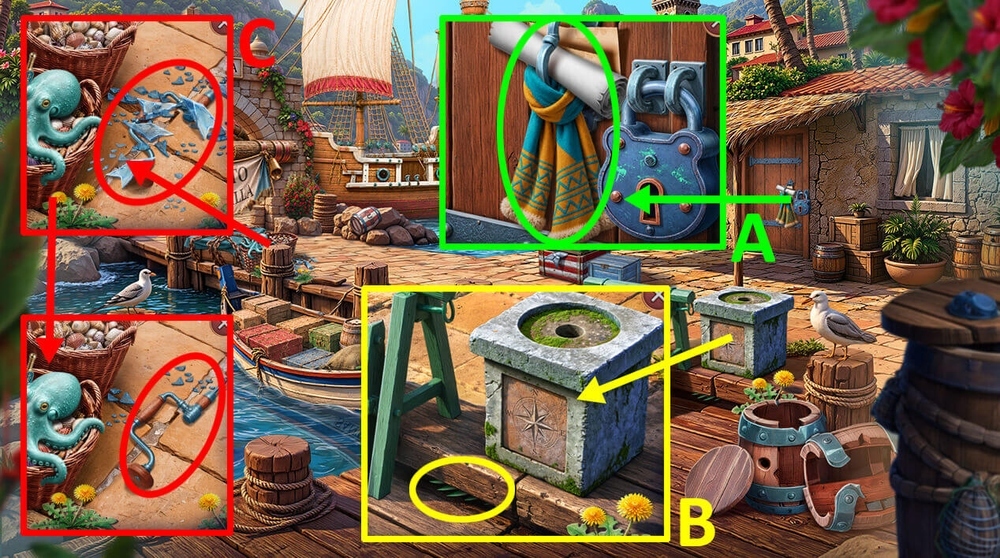
- Read the note, take SCARF, PAPER and HOOK (A).
- Use HOOK on the palm leaf stuck in the wooden pins, earn PALM LEAF (B).
- Use PALM LEAF on the shattered glass, take ANTIQUE HAND DRILL (C).
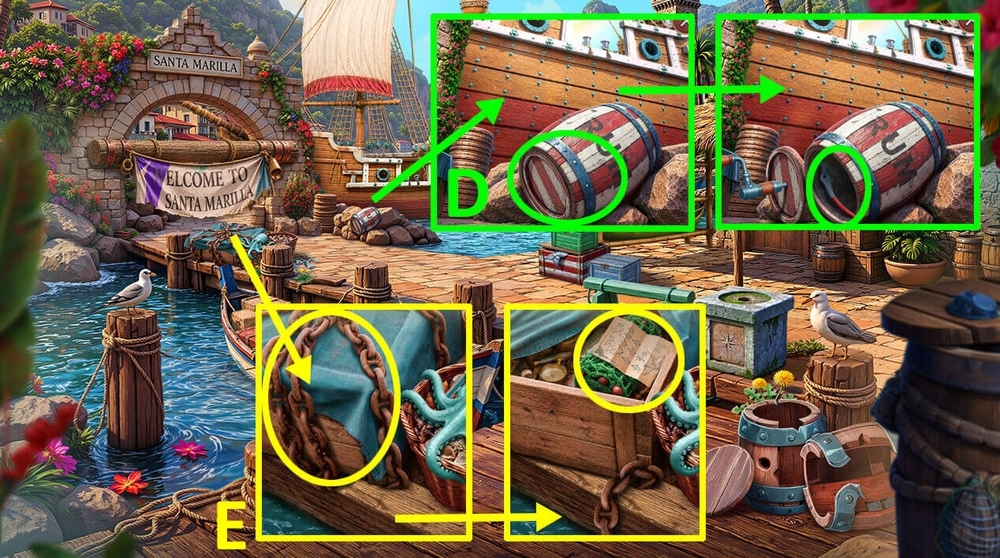
- Use ANTIQUE HAND DRILL on the barrel, take CUTTERS’ PART (D).
- Use CUTTERS’ PART on BROKEN WIRE CUTTERS, earn WIRE CUTTERS.
- Use WIRE CUTTERS on the chain, take ASSEMBLY SCHEME and TACKLE (E).
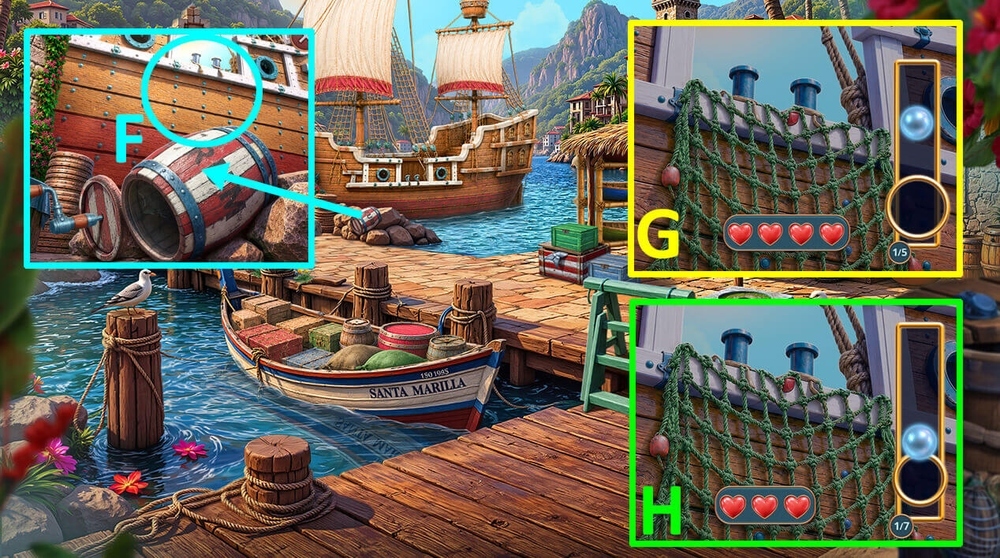
- Use TACKLE on the docked ship (F).
- Easy solution: Solution is random (G).
- Hard solution: Solution is random (H).

- Use CHESS PIECE WITH HOLE on the door, read the note, take OIL LANTERN and SAIL-RAISING WHEEL (I).
- Use SAIL-RAISING WHEEL on the block with wheels for hoisting the sail, earn RULER (J).
- Use ASSEMBLY SCHEME and RULER on PAPER, earn ORIGAMI BIRD.
- Use ORIGAMI BIRD on the seagull, take LARGE KEY (K).
- Go back.
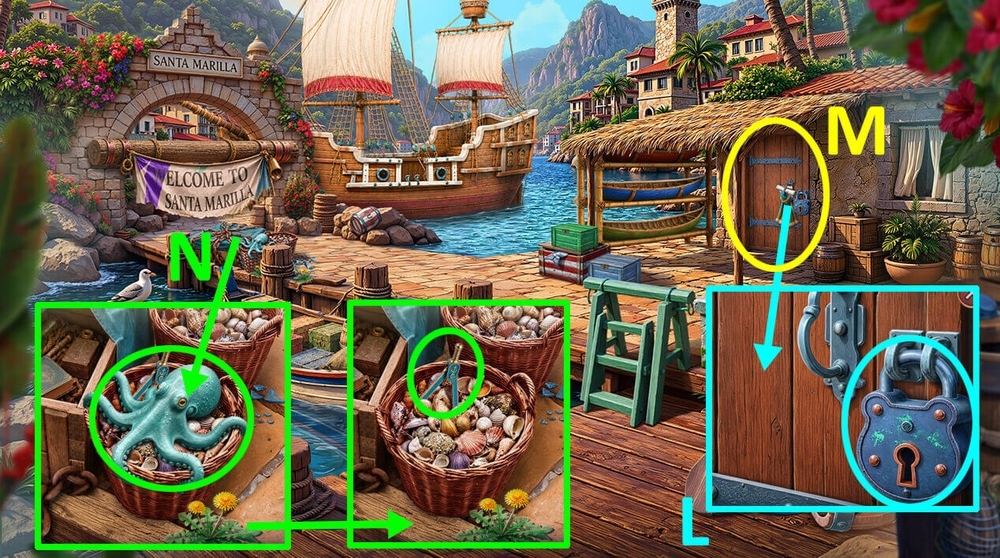
- Use LARGE KEY on the padlock (L).
- Play puzzle, earn FRESH WATER (M).
- Use FRESH WATER on the octopus, take DIVIDERS (N).
- Go forward.
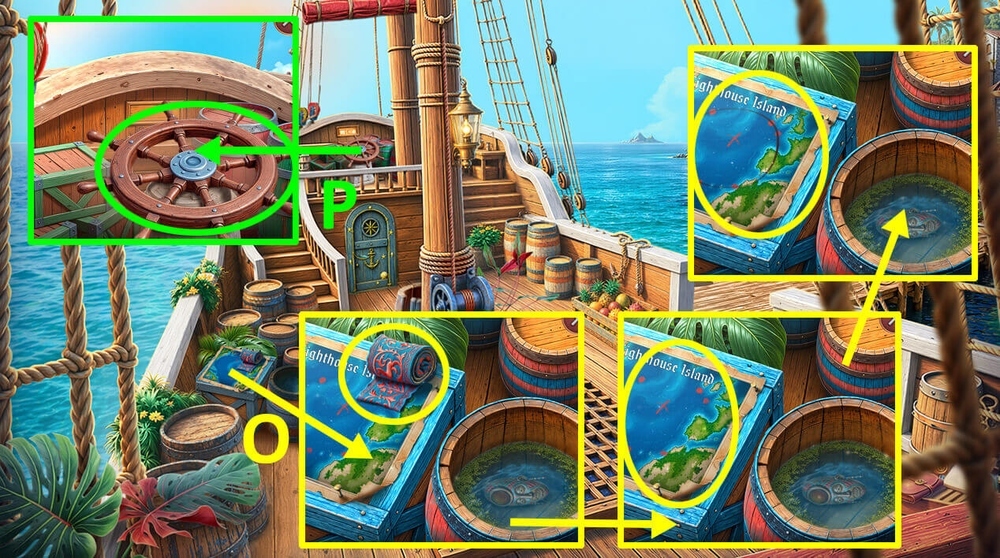
- Take PIECE OF CLOTH, use PENCIL and DIVIDERS on the map, earn PENCIL, take MAP PIECE WITH ROUTE (O).
- Use MAP PIECE WITH ROUTE on the steering wheel (P).
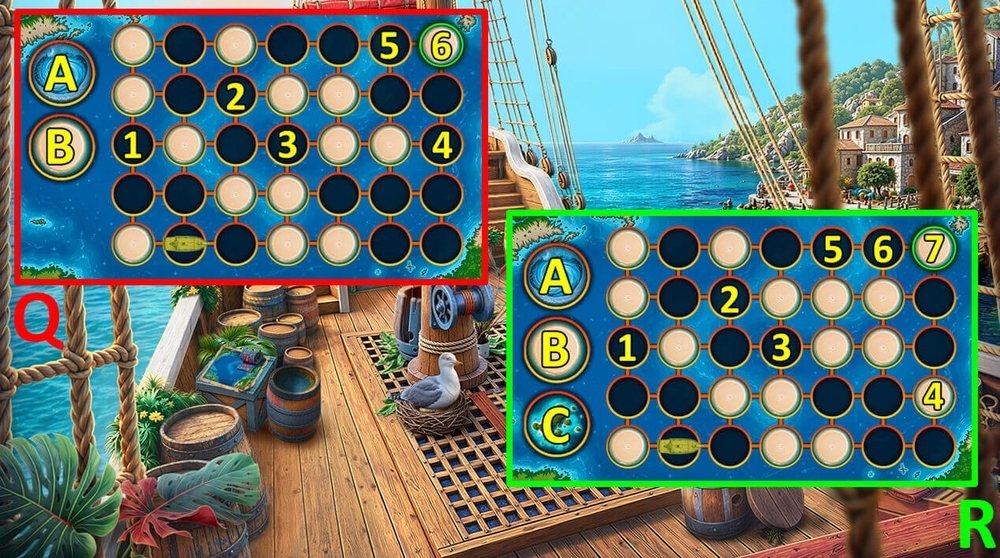
- Easy solution: Click: 1, A, 2, B, 3, A, 4, B, 5, A, 6 (Q).
- Hard solution: Click: 1, A, 2, B, 3, A, 4, C, 5, B, 6, A, 7 (R).
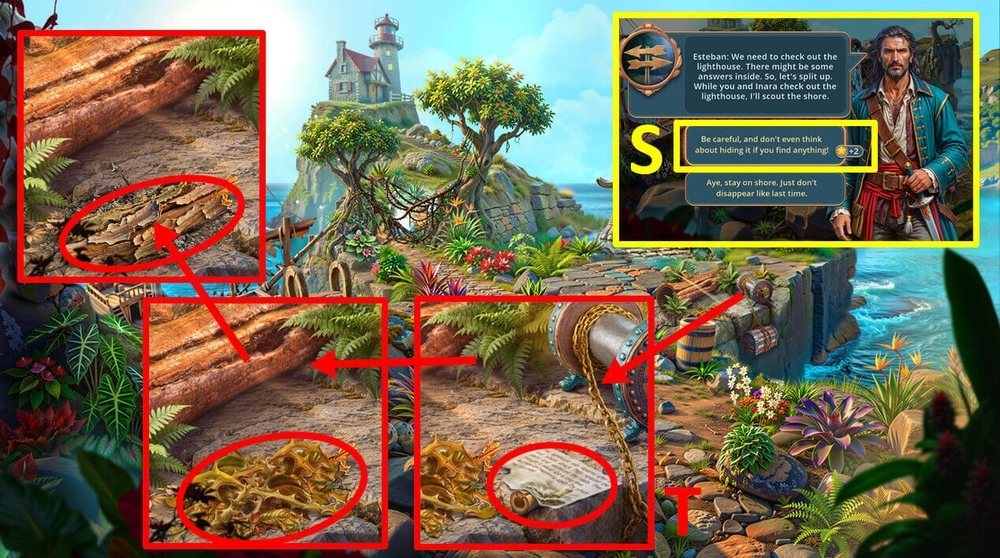
- Select this option, earn MIRROR (S).
- Read the note, take BAMBOO STICK, use MIRROR in the dry vines, take BARK (T).
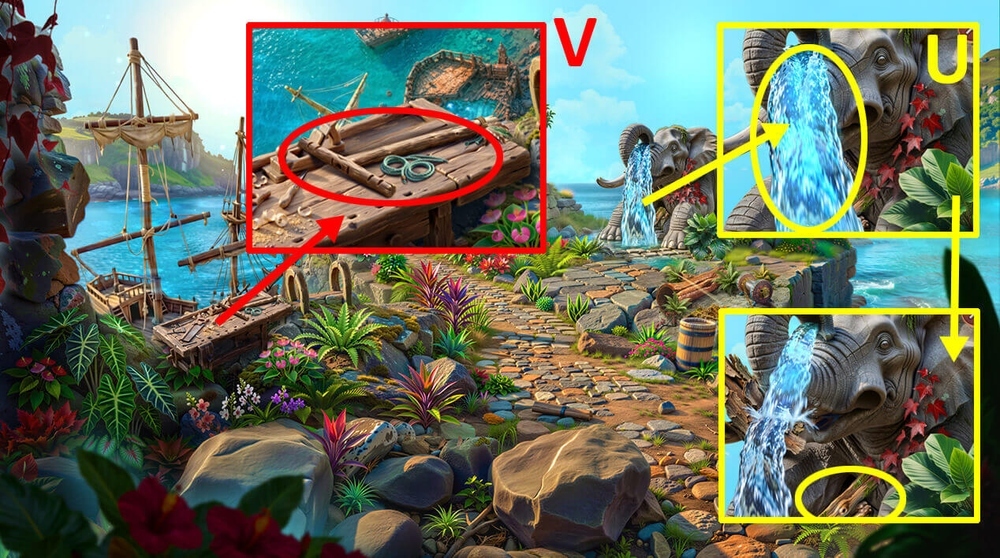
- Use BARK on the waterfall, take BROKEN SIGNPOST and BOARDS (U).
- Use BOARDS on the workbench with tools (V).
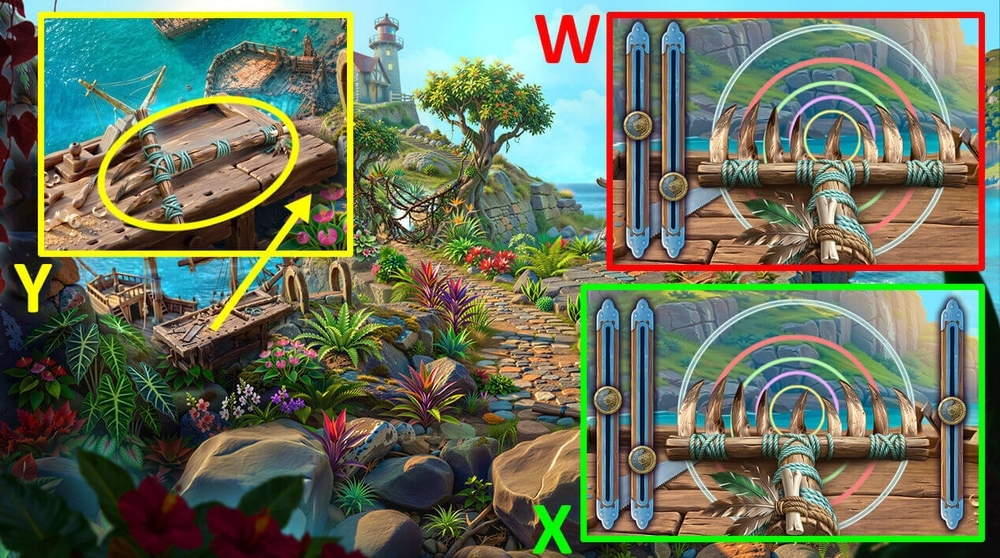
- Easy solution: Use the picture as a hint (W).
- Hard solution: Use the picture as a hint (X).
- Take RAKE (Y).
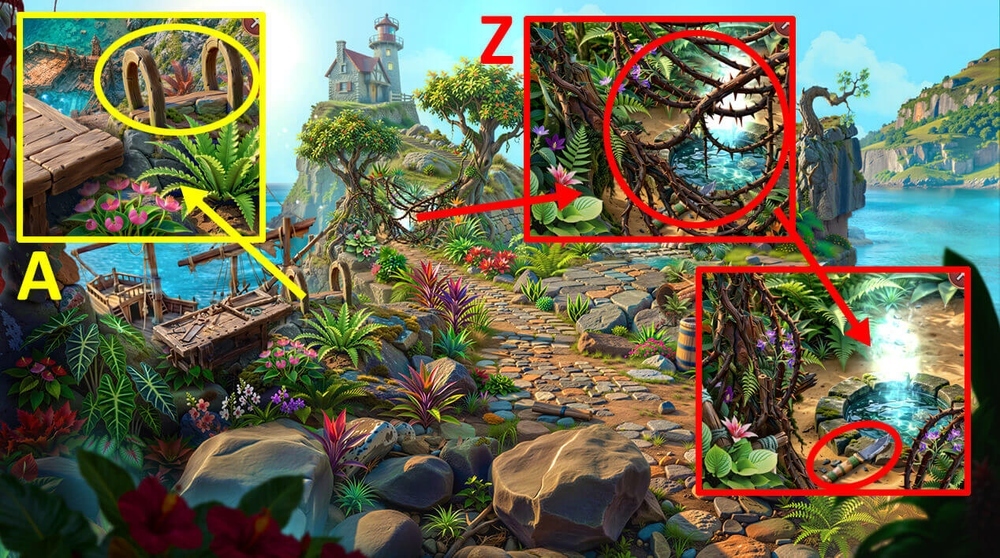
- Use RAKE on the prickly vines, take KNIFE (Z).
- Use PIECE OF SAILCLOTH, SCARF and KNIFE on PIECE OF CLOTH, earn ROPE LADDER.
- Use ROPE LADDER on the cliff (A).
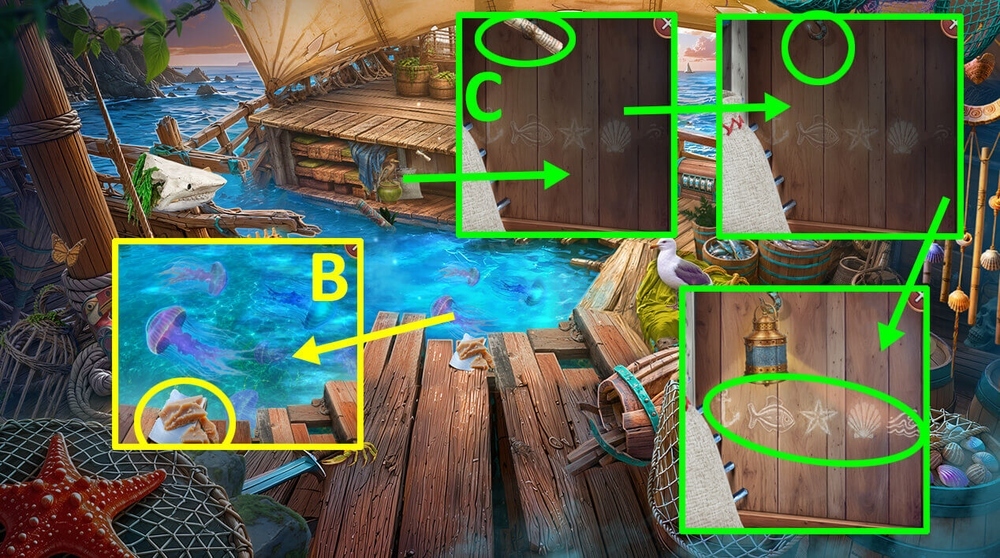
- Take WAX and PAPER (B).
- Read the note, use OIL LANTERN on the hook in the wall, use PENCIL and PAPER on the drawings on the wall, earn CODE (C).
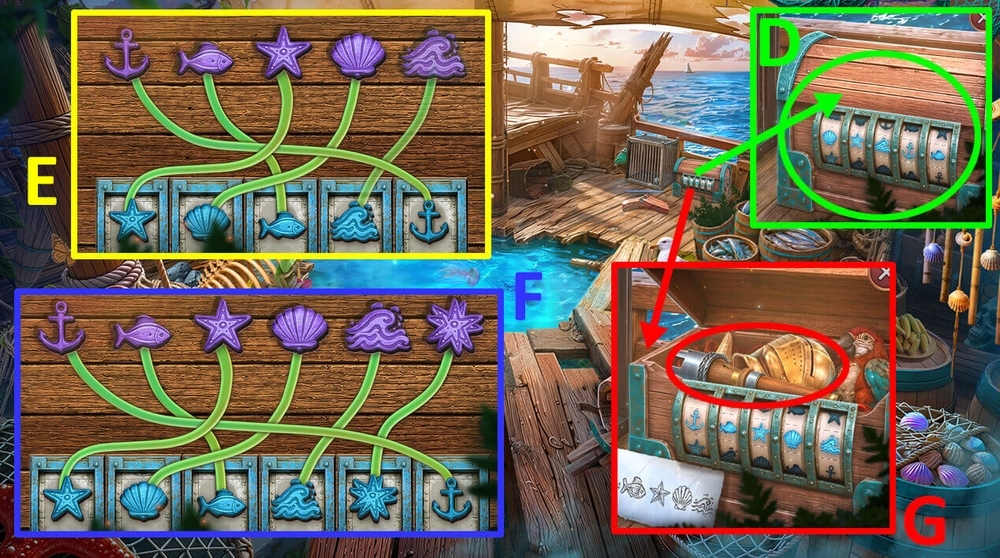
- Use CODE on the chest with code lock (D).
- Easy solution: Use the picture as a hint (E).
- Hard solution: Use the picture as a hint (F).
- Take TORCH and HELMET (G).
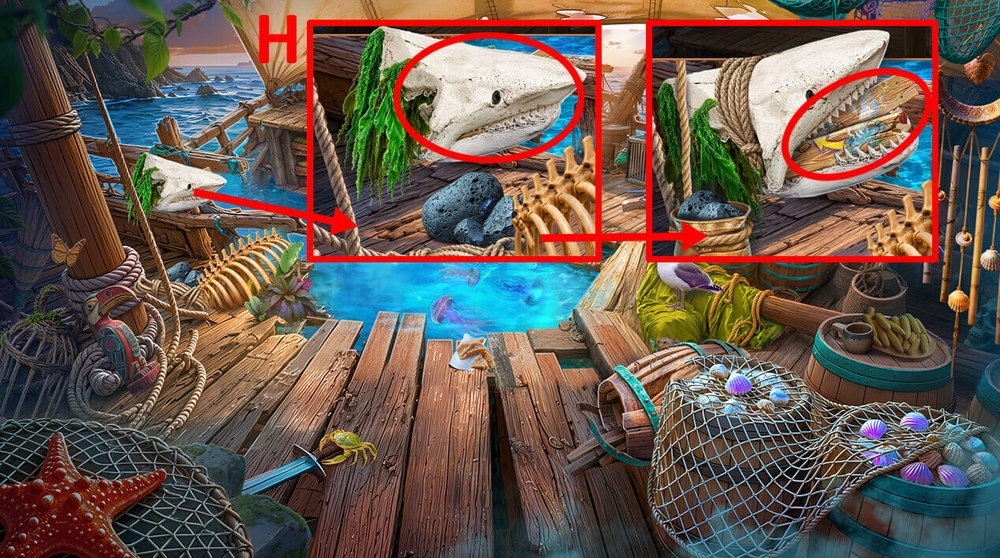
- Use HELMET on the shark’s head, take POINTERS and BONE (H).
- Go back.
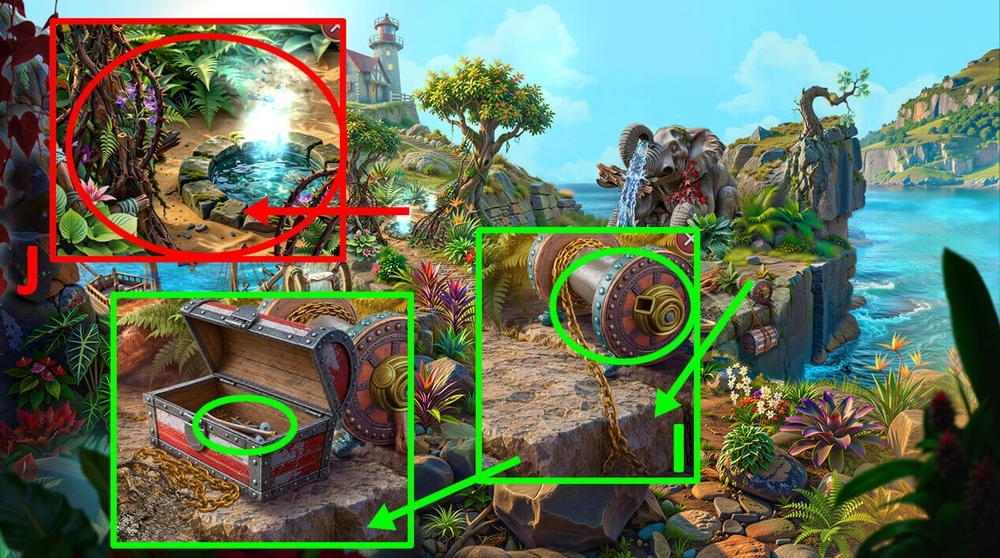
- Use BONE on the spot where the handle goes on the spool with the chain, take WICK and NAILS (I).
- Use POINTERS and NAILS on BROKEN SIGNPOST, earn WOODEN SIGNPOST.
- Use WOODEN SIGNPOST on the geyser (J).

- Easy solution: Click: R, U, R, D, R, D, R (K).
- Hard solution: Click: R, U, R, U, R, U, R (L).
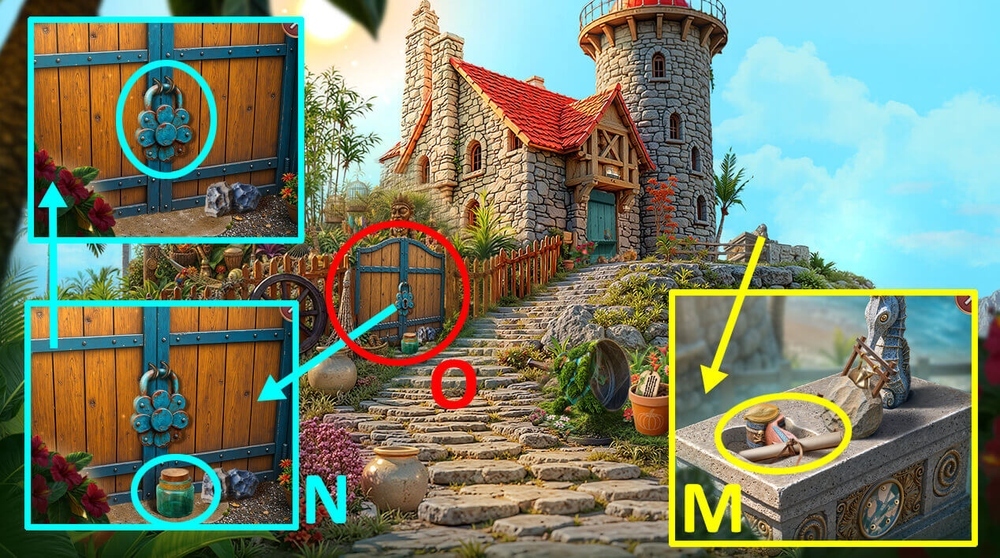
- Read the note, take PUMPKIN SEEDS 1/2, WOODEN BLOCK and GUNPOWDER (M).
- Use WAX, WICK and GUNPOWDER on BAMBOO STICK, earn EXPLOSIVES.
- Take JAR, use EXPLOSIVES on the padlock (N).
- Play puzzle, earn POSEIDON FIGURINE (O).
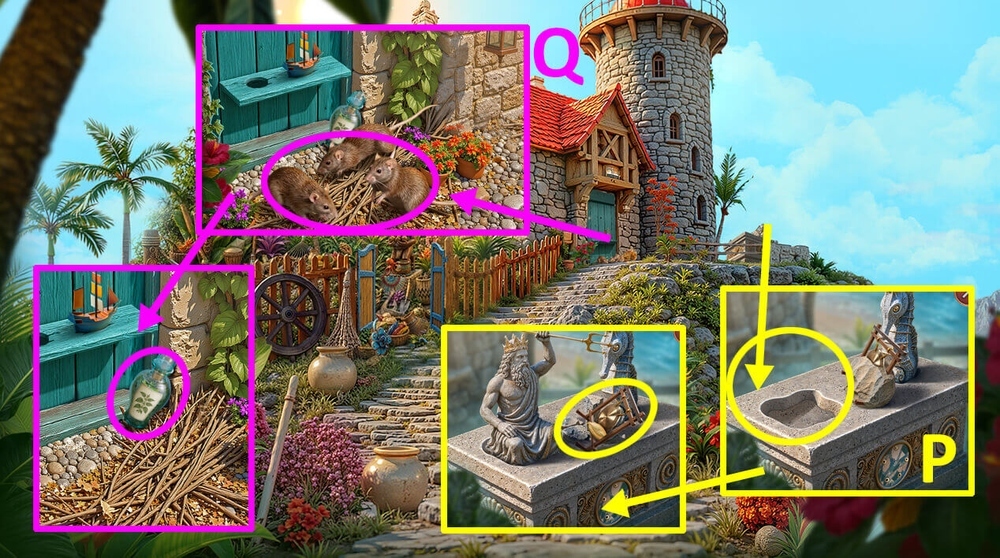
- Use POSEIDON FIGURINE on the stone pedestal, take PUMPKIN SEEDS 2/2 and GONG (P).
- Use TORCH and GONG on the rats, take NETTLE POTION (Q).
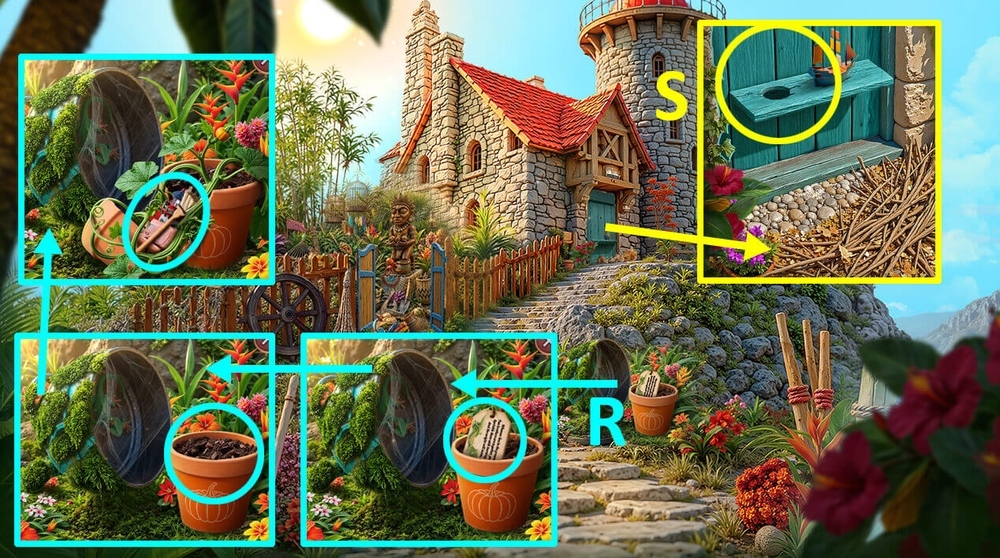
- Read the note, use PUMPKIN SEEDS 2/2 and NETTLE POTION on the pot with soil, take BRUSH, BROKEN WHALE FIGURINE and LIGHTHOUSE FIGURINE (R).
- Use LIGHTHOUSE FIGURINE on the door (S).
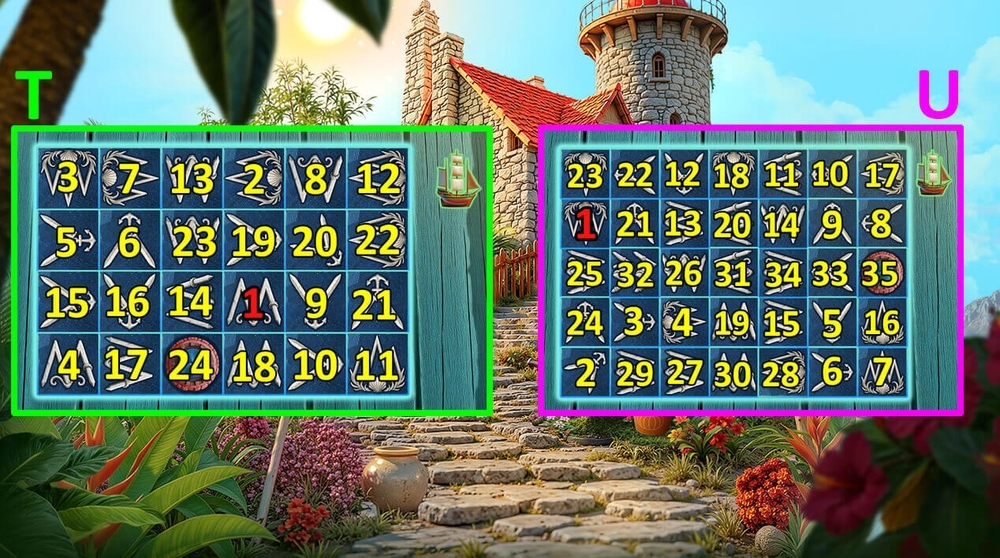
- Easy solution: Click: 1, 2, 3, 4, 5, 6, 7, 8, 9, 10, 11, 12, 13, 14, 15, 16, 17, 18, 19, 20, 21, 22, 23, 24 (T).
- Hard solution: Click: 1, 2, 3, 4, 5, 6, 7, 8, 9, 10, 11, 12, 13, 14, 15, 16, 17, 18, 19, 20, 21, 22, 23, 24, 25, 26, 27, 28, 29, 30, 31, 32, 33, 34, 35 (U).
- Go forward.

- Select this option (V).
- Take SLING and FRYING PAN (W).
- Use FRYING PAN on the nail, read keeper’s journal, take LIGHTER (X).
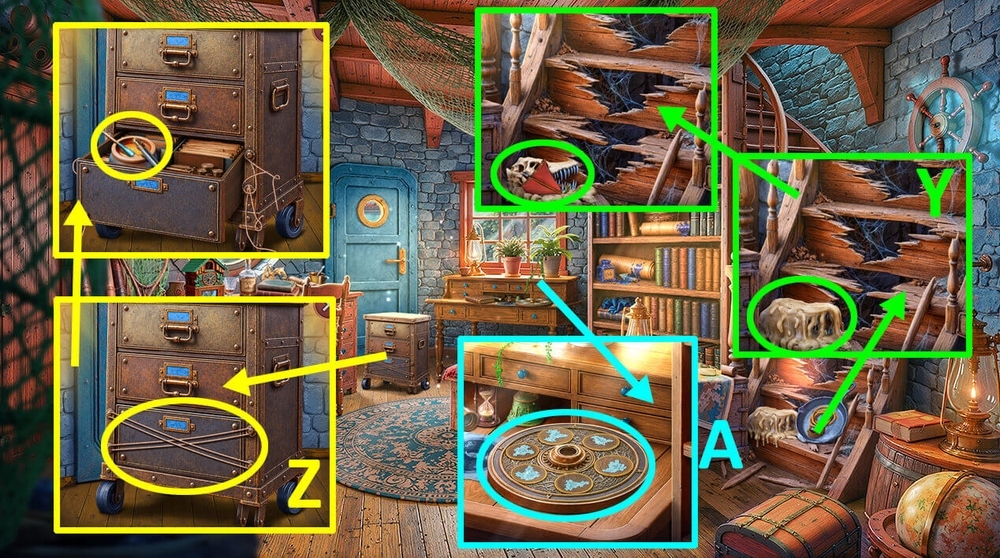
- Use LIGHTER on the wax, earn LIGHTER, take SAIL and CROCODILE SKULL (Y).
- Use CROCODILE SKULL on the cables, take PIN and RESIN (Z).
- Use BROKEN WHALE FIGURINE and RESIN on WOODEN BLOCK, earn WOODEN WHALE.
- Use WOODEN WHALE on the round wooden map (A).
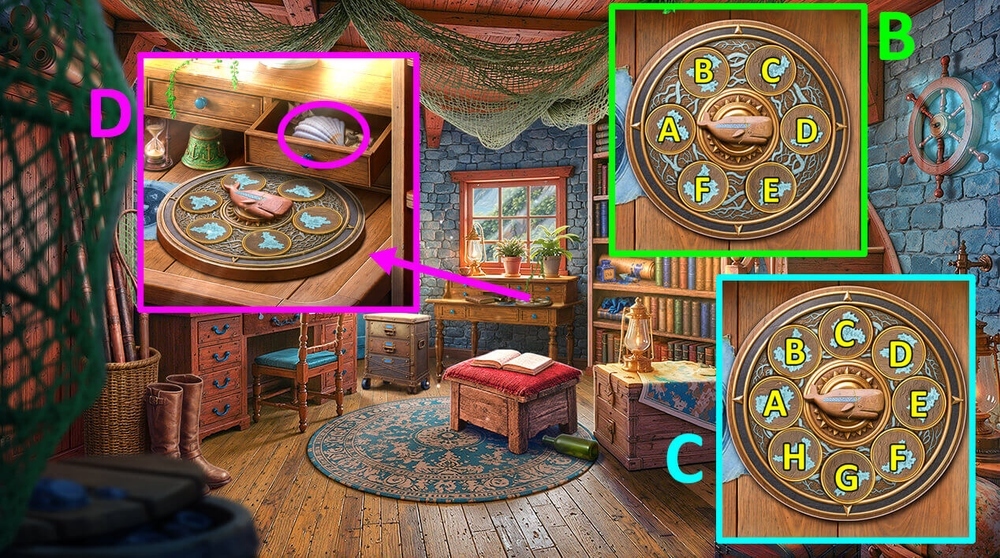
- Easy solution: Click: E, F*2, A*2, B*2, C*3, D*2 (B).
- Hard solution: Click: G, C*2, H*3, A*2, B*2, D*3, E*3 (C).
- Take SEASHELL (D).
- Go back.

- Use SEASHELL on the moss, use JAR on the termites, earn TERMITES (E).
- Go back.
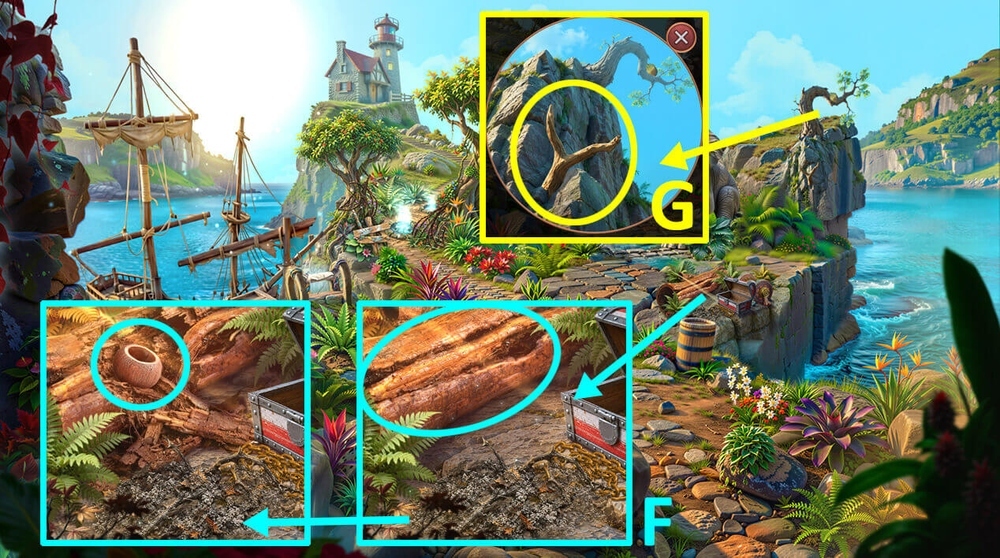
- Use TERMITES on the tree, take COCONUT (F).
- Use SLING and COCONUT on the objects stuck on the rock, earn WHALE OIL (G).
- Go forward.

- Play puzzle, earn ALCOHOL (H).
- Go forward.

- Use ALCOHOL on the sticky ink, take ARROWHEAD (I).
- Go to the Sunken Ship.

- Use ARROWHEAD on the sewn-up bag, take LATTICE (J).
- Go to the Lighthouse.
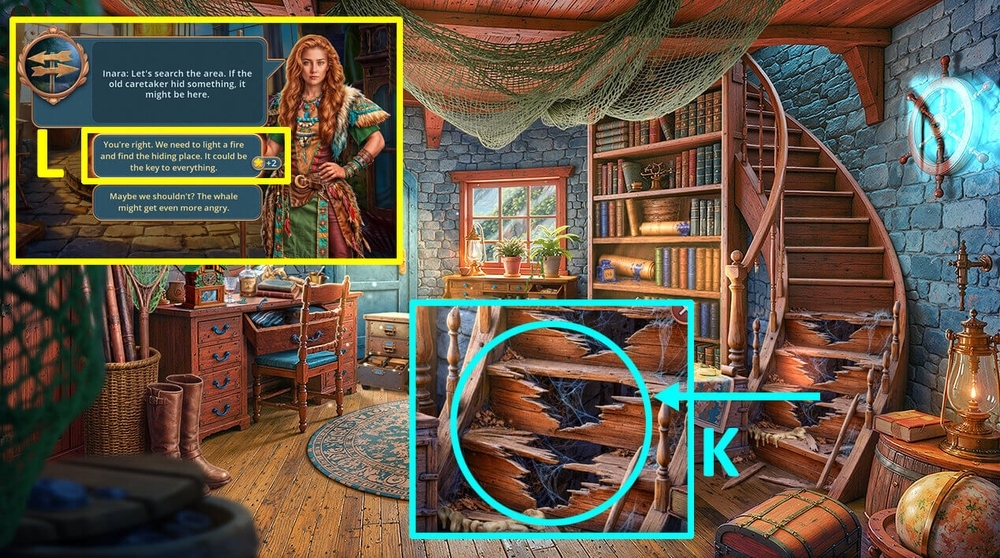
- Use LATTICE on the broken steps (K).
- Go forward.
- Select this option (L).
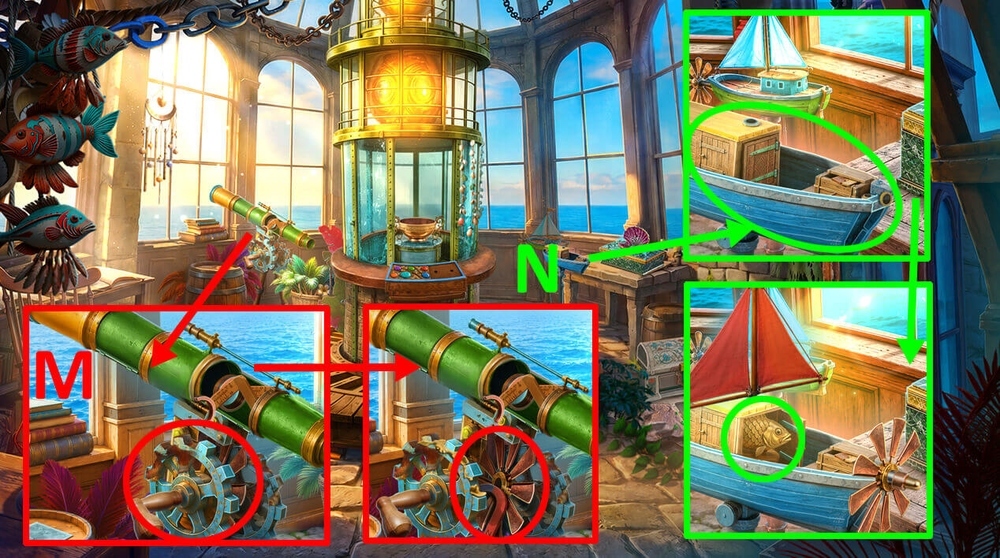
- Use BRUSH and WHALE OIL on the rust, take MAGNET and BLADES (M).
- Use SAIL, PIN and BLADES on the weather vane shaped like a little boat, take FISH FIGURINE and CAVIAR (N).
- Go to the Sunken Ship.
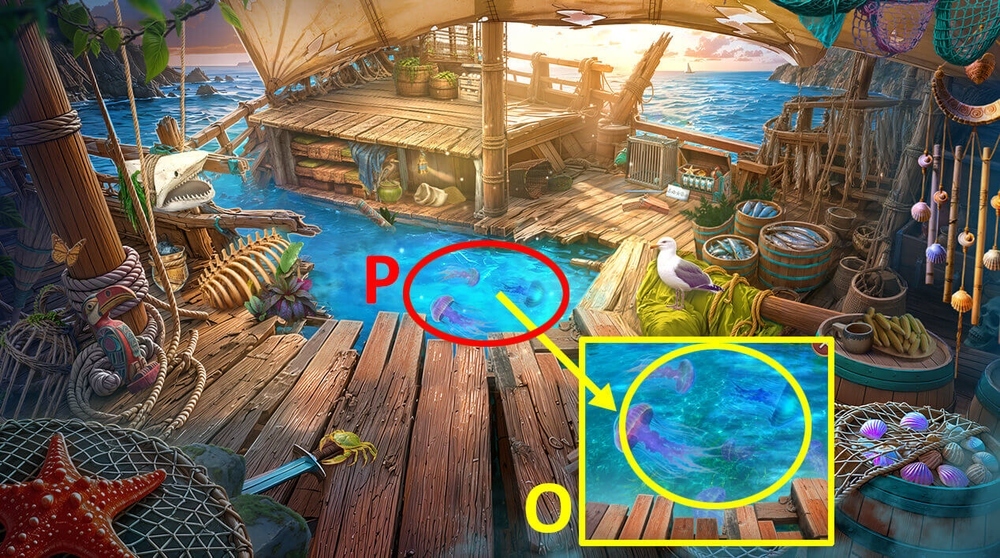
- Use CAVIAR on the jellyfish (O).
- Play puzzle, earn LIZARD FIGURINE (P).
- Go to the Lighthouse Top.
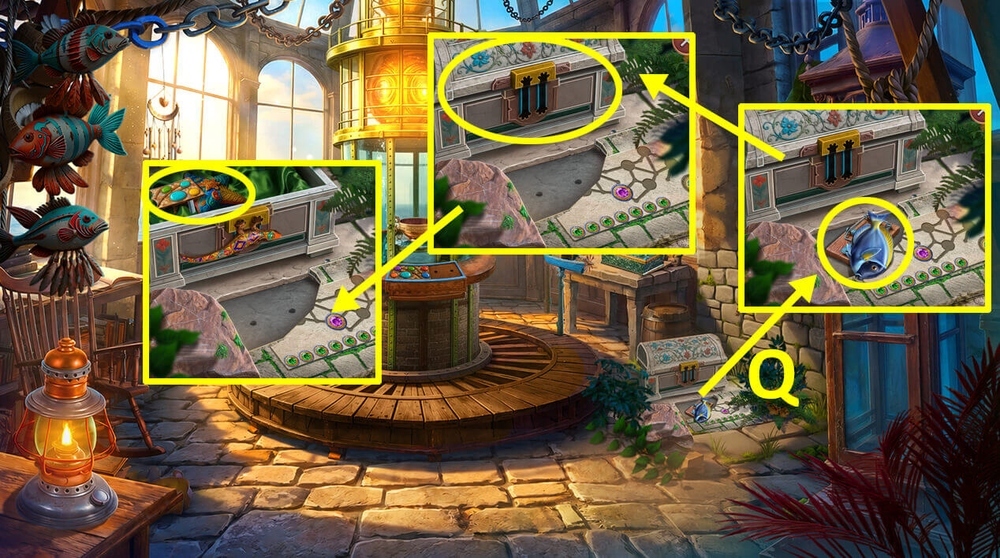
- Take DRIED FISH 1/2 and MOUSETRAP, use LIZARD FIGURINE on the chest, take MOSAIC FRAGMENT and STAR-SHAPED AMULET (Q).
- Go to the Near Lighthouse.
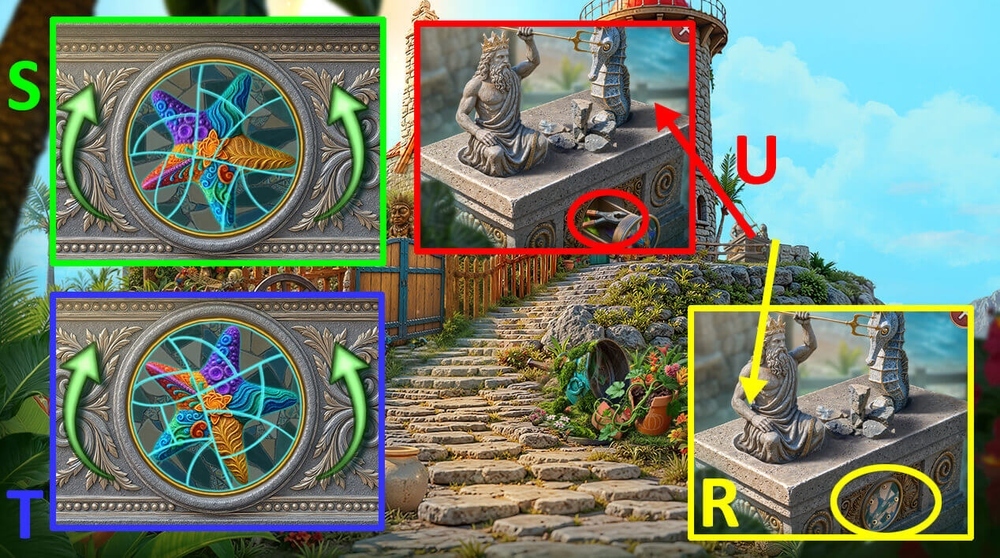
- Use STAR-SHAPED AMULET on the stone pedestal (R).
- Easy solution: Use the picture as a hint (S).
- Hard solution: Use the picture as a hint (T).
- Take PLIERS (U).
- Use PLIERS on MOUSETRAP, earn MOUSETRAP SPRING.
- Go forward.
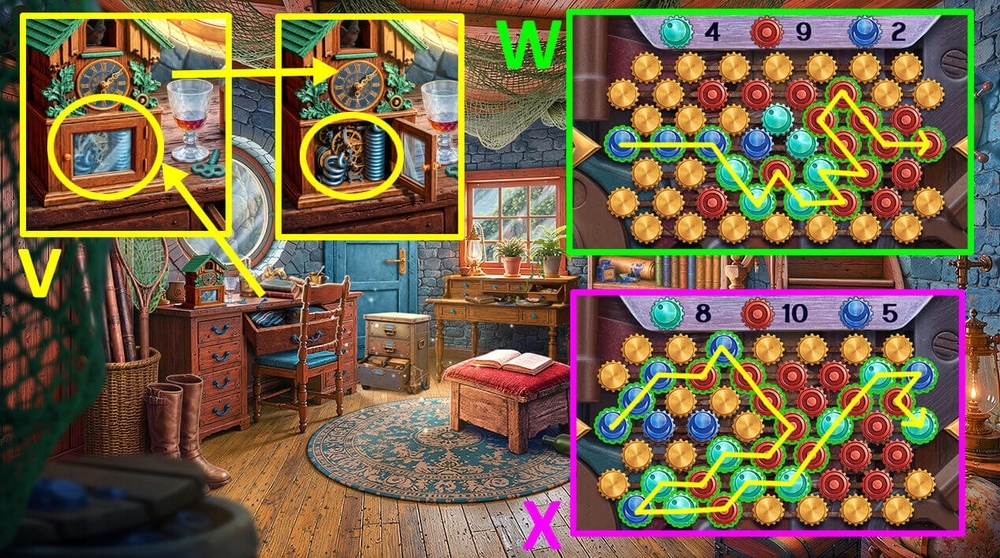
- Tap on the clock’s door, use MOUSETRAP SPRING on the watch with a broken spring (V).
- Easy solution: Use the picture as a hint (W).
- Hard solution: Use the picture as a hint (X).
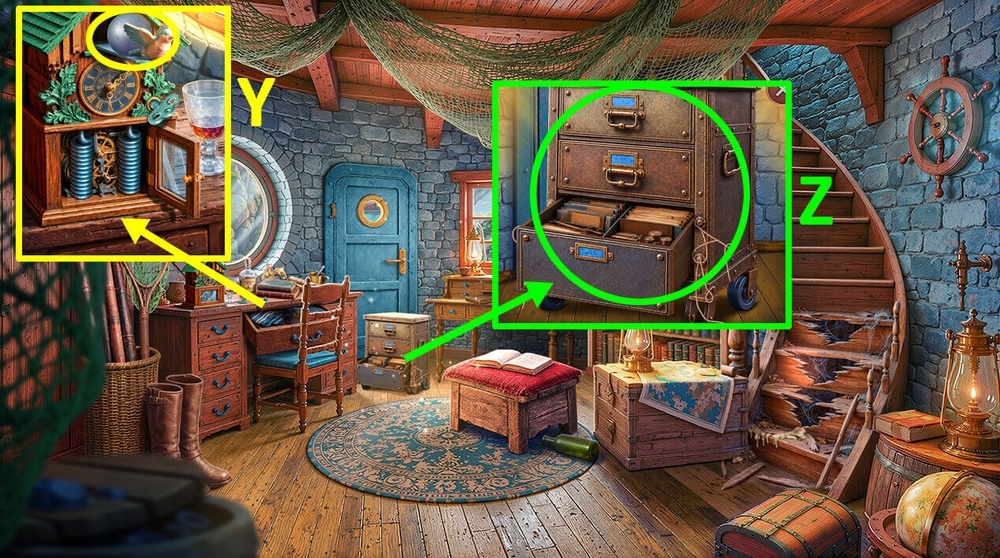
- Take BALL (Y).
- Use BALL on the cabinet on wheels (Z).
- Go to the Coastal Path.
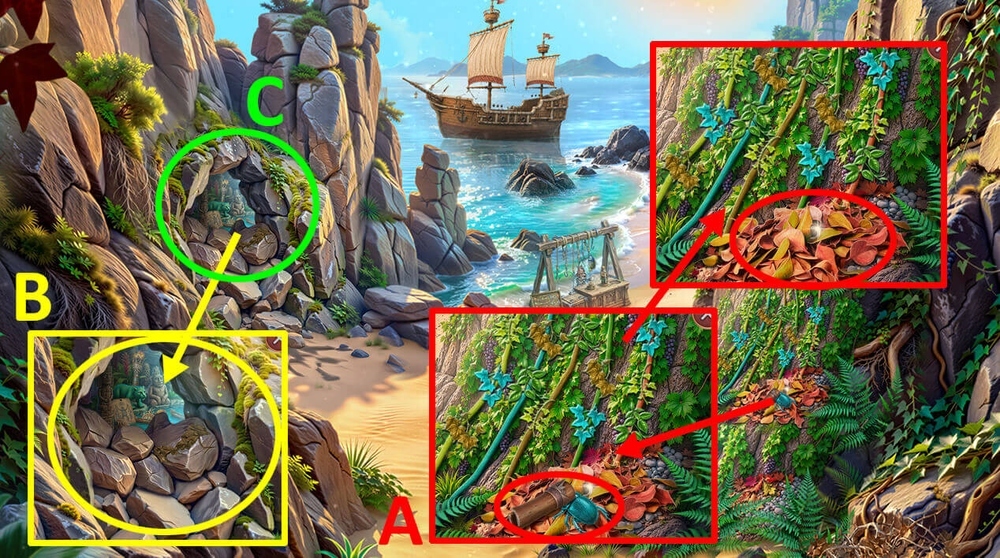
- Take HARPOON HANDLE and BEETLE FIGURINE, use MAGNET on the pile of dry leaves, earn CROWBAR (A).
- Use CROWBAR on the pile of rocks (B).
- Play puzzle, earn FLY FIGURINE (C).
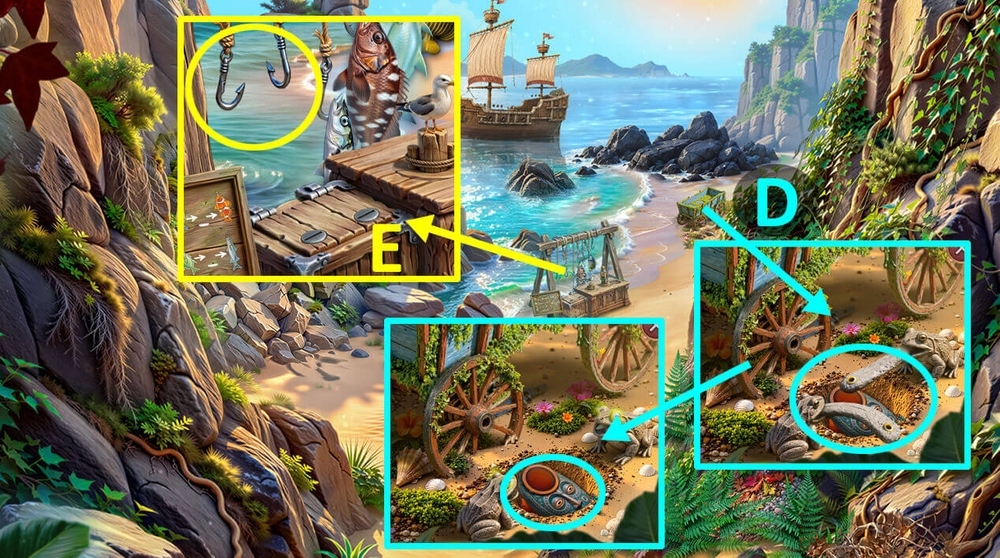
- Use BEETLE FIGURINE and FLY FIGURINE on the stone frogs, take MASKS 1/2 and DRIED FISH 2/2 (D).
- Use DRIED FISH 2/2 on the hooks (E).
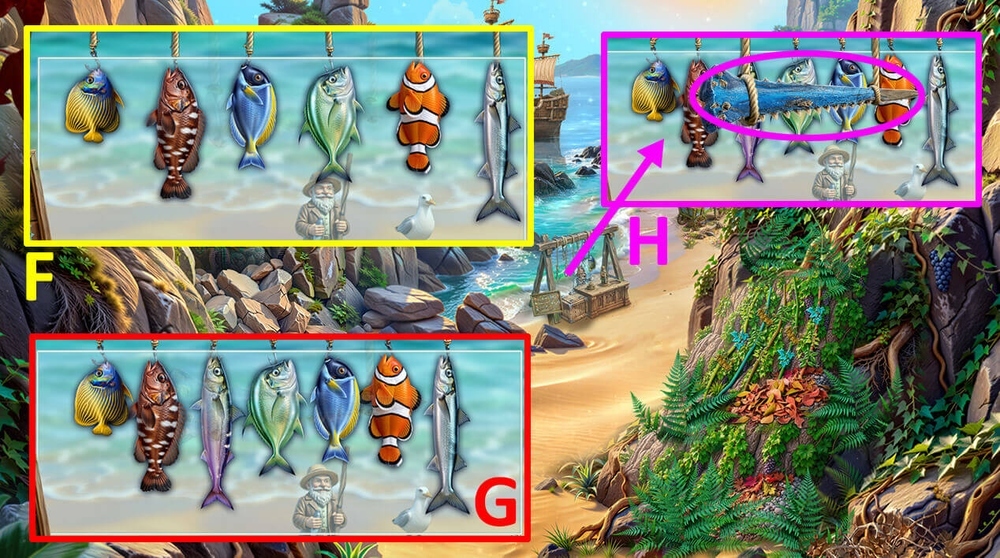
- Easy solution: Use the picture as a hint (F).
- Hard solution: Use the picture as a hint (G).
- Take SAWFISH’S NOSE (H).
- Go to the Sunken Ship.
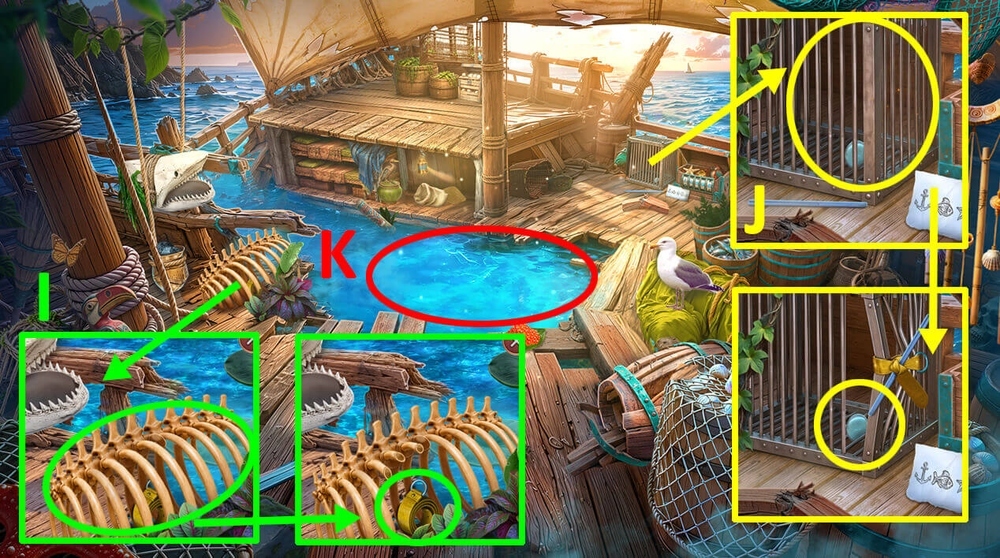
- Use SAWFISH’S NOSE on the bones, take BELT (I).
- Use BELT on the grid, take LENS (J).
- Play puzzle, earn PEARL (K).
- Go to the Lighthouse Top.
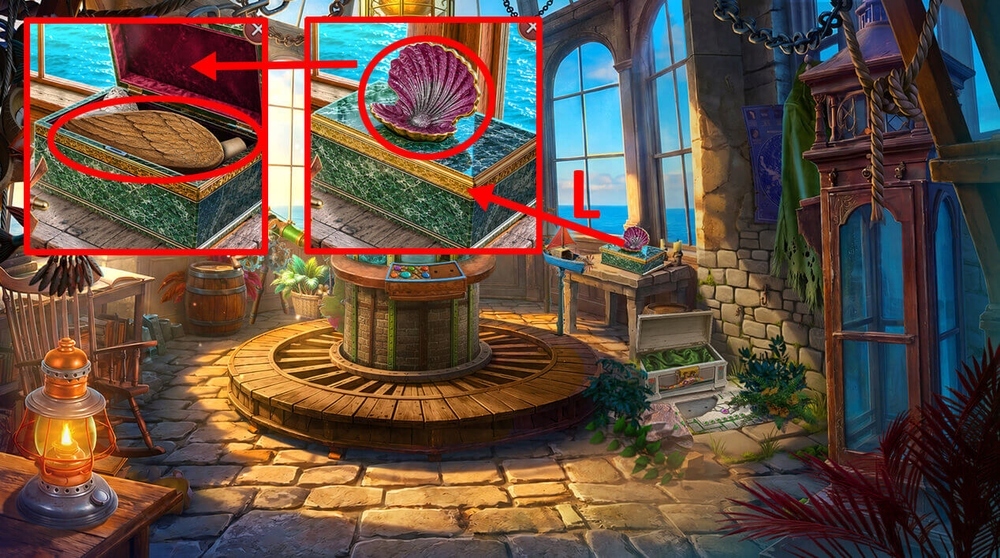
- Use PEARL on the box, take WOODEN WING (L).
- Go to the Sunken Ship.
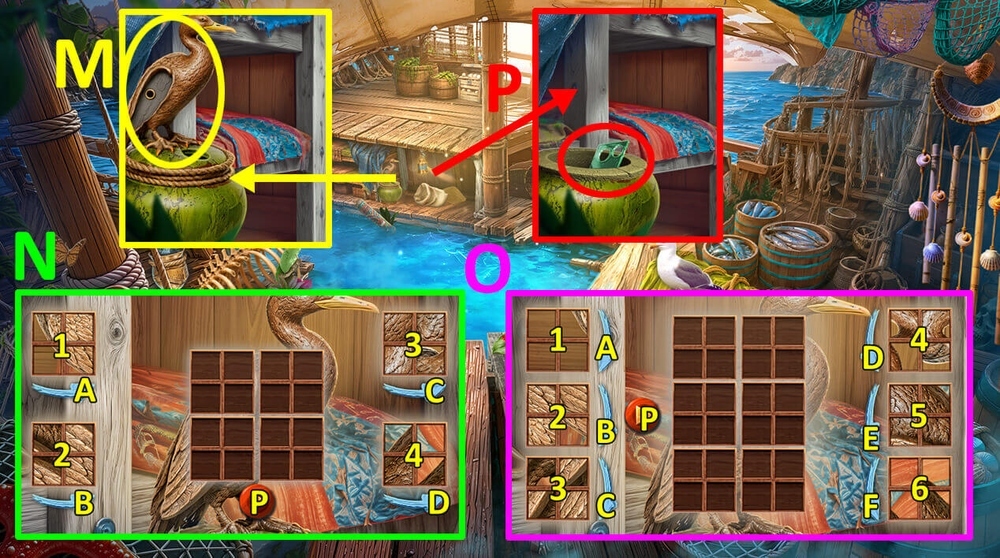
- Use WOODEN WING on the wooden bird (M).
- Easy solution: Click: 1, 1, 1, A, A, A, 2, B, B, C, C, 4, 4, D, D, D, P, P, P, P (N).
- Hard solution: Click: 1, 1, 1, A, 2, B, B, C, C, 4, 4, D, D, D, 5, 5, 5, E, E, E, 6, F, F, P, P, P, P, P, P (O).
- Take GLASS WITH HOLES (P).
- Go to the Lighthouse Top.
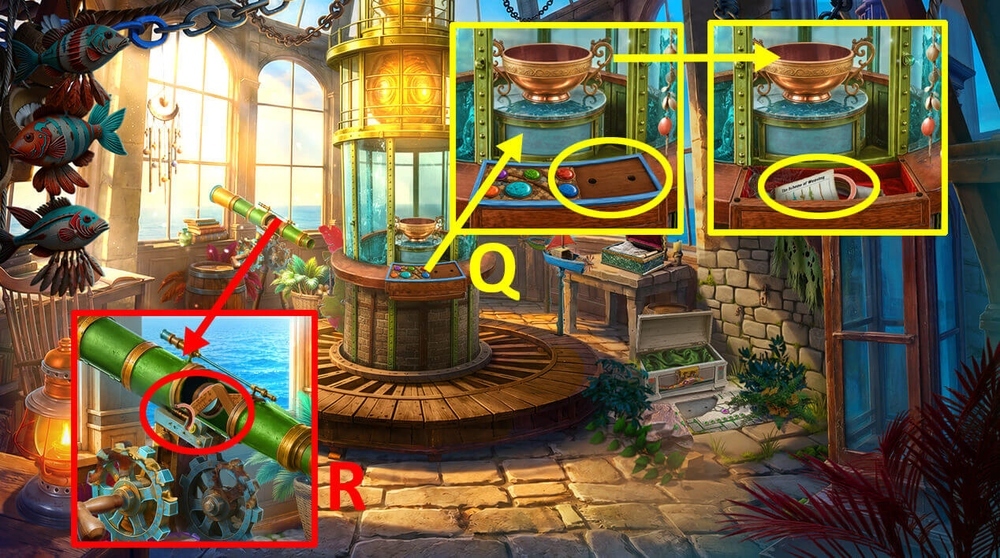
- Use MOSAIC FRAGMENT and GLASS WITH HOLES on the mosaic, take WEAVING PATTERN and ADJUSTMENT RING (Q).
- Use LENS and ADJUSTMENT RING on the spyglass (R).
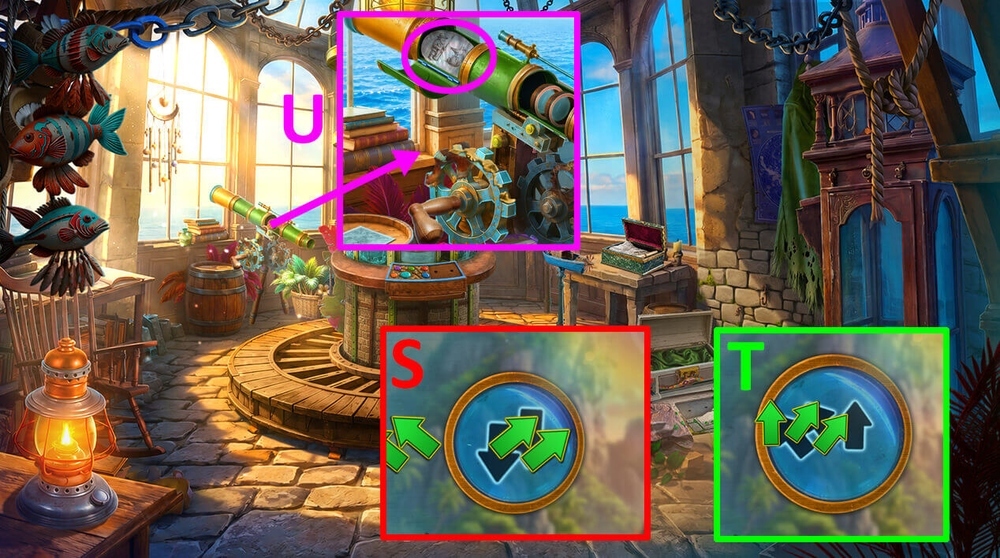
- Easy solution: Solution is random (S).
- Hard solution: Solution is random (T).
- Take LENS WITH DRAWINGS (U).
- Go to the Coastal Path.
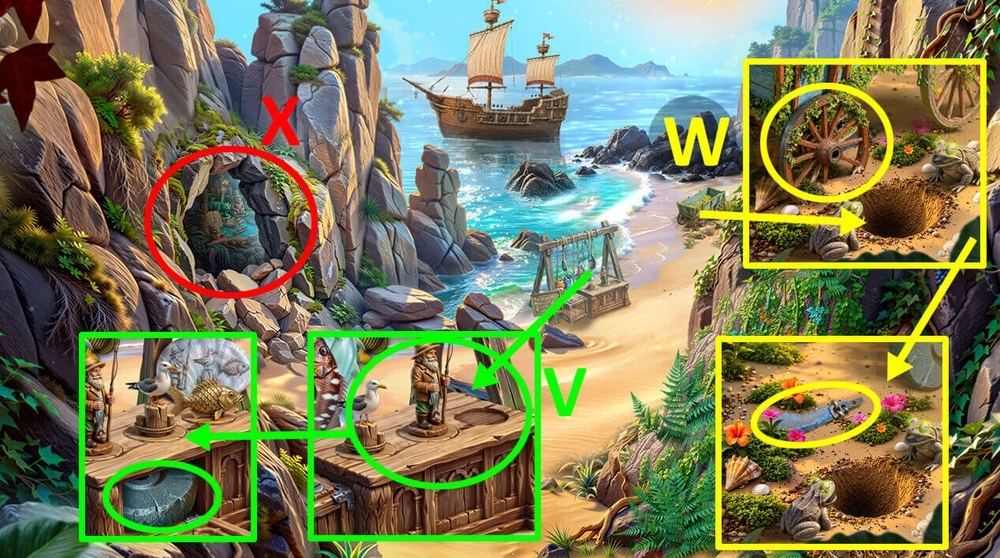
- Use FISH FIGURINE and LENS WITH DRAWINGS on the group of statuettes, take STONE DISC (V).
- Use STONE DISC on the cart with a broken wheel, take SABER FRAGMENT (W).
- Play puzzle, earn TUSK (X).
- Go to the Lighthouse Island.
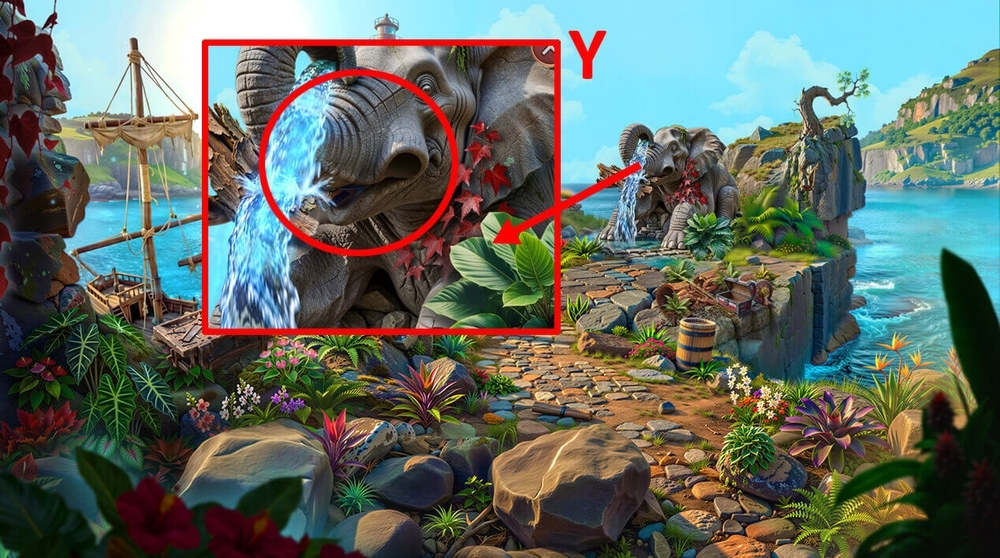
- Use TUSK on the elephant statue, earn BOOT (Y).
- Go back.
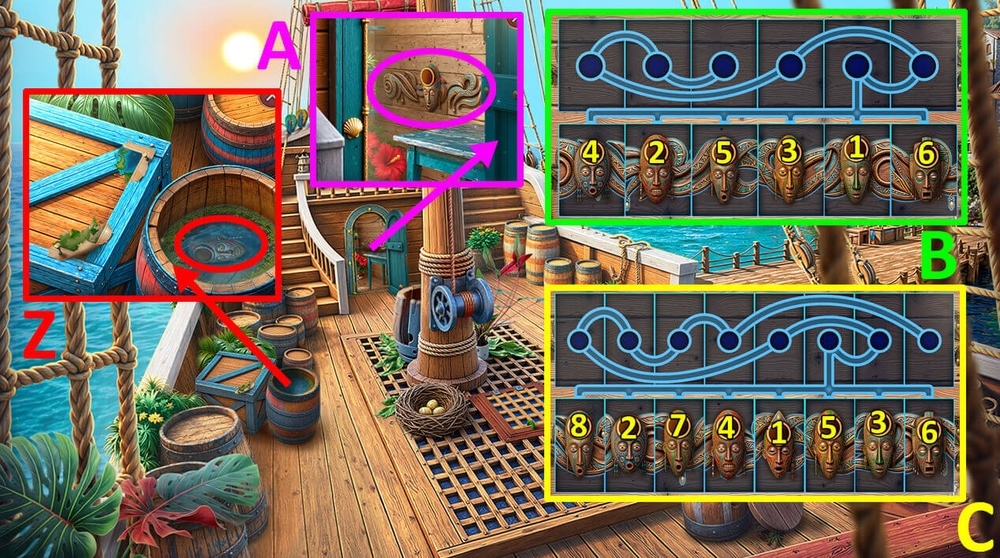
- Use BOOT on the barrel of water, earn MASKS 2/2 (Z).
- Use MASKS 2/2 on the wall with masks (A).
- Easy solution: Click: 1, 2, 3, 4, 5, 6, 7, 8 (B).
- Hard solution: Click: 1, 2, 3, 4, 5, 6 (C).
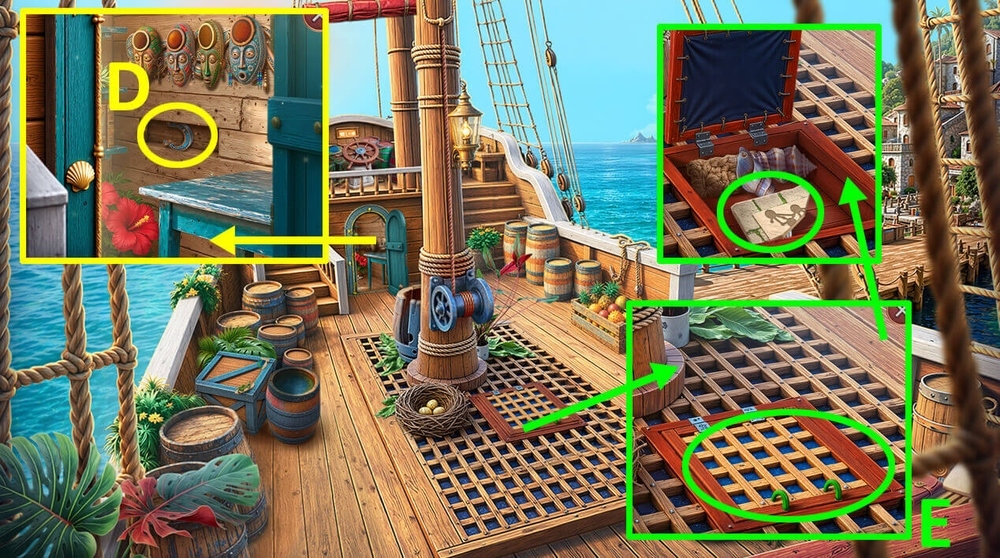
- Take HORSESHOE (D).
- Use HORSESHOE on the hatch in the ship’s floor, take TILE FRAGMENT (E).
- Go to the Lighthouse Top.
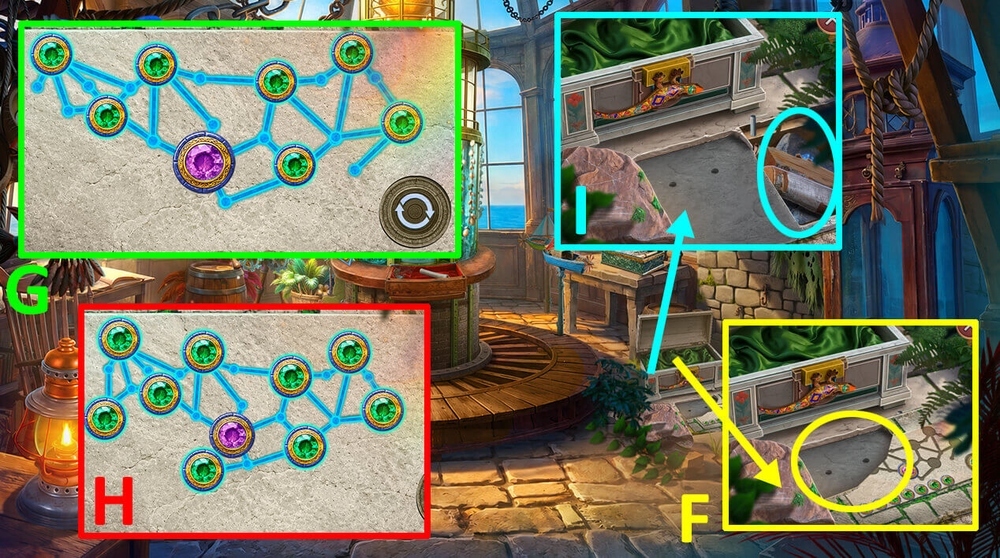
- Use TILE FRAGMENT on the stone tiles on the floor (F).
- Easy solution: Use the picture as a hint (G).
- Hard solution: Use the picture as a hint (H).
- Take FIREWOOD, read the note, examine tablet’s part (I).

- Select this option, earn TABLET FRAGMENTS 1/3 (J).
- Go to the Lighthouse Top.
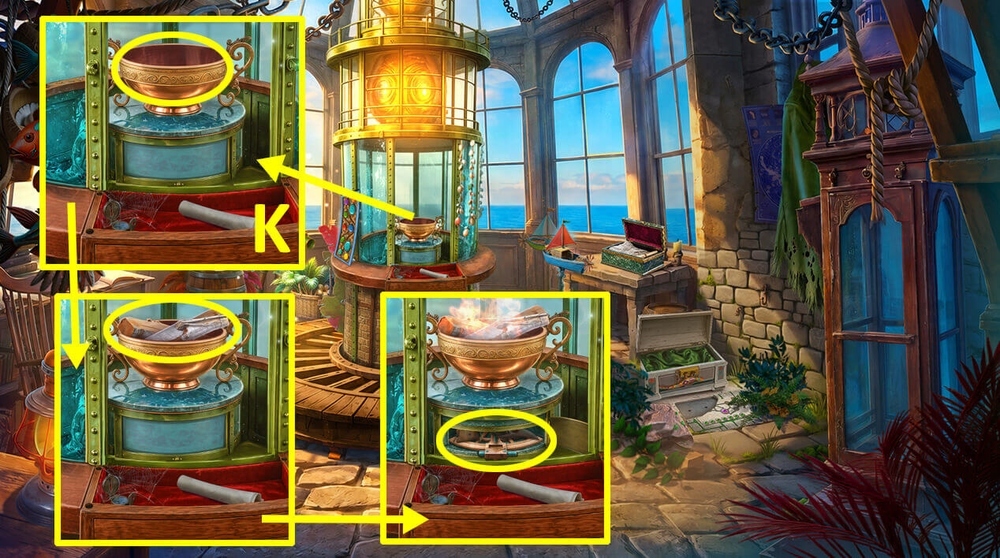
- Use FIREWOOD and LIGHTER on the bowl, take SEXTANT (K).
- Go to the Santa Marilla City Pier.

- Use SEXTANT on the stone pedestal, take OAR PIECE (L).
- Play puzzle, earn COIN (M).
- Go to the Coastal Path.
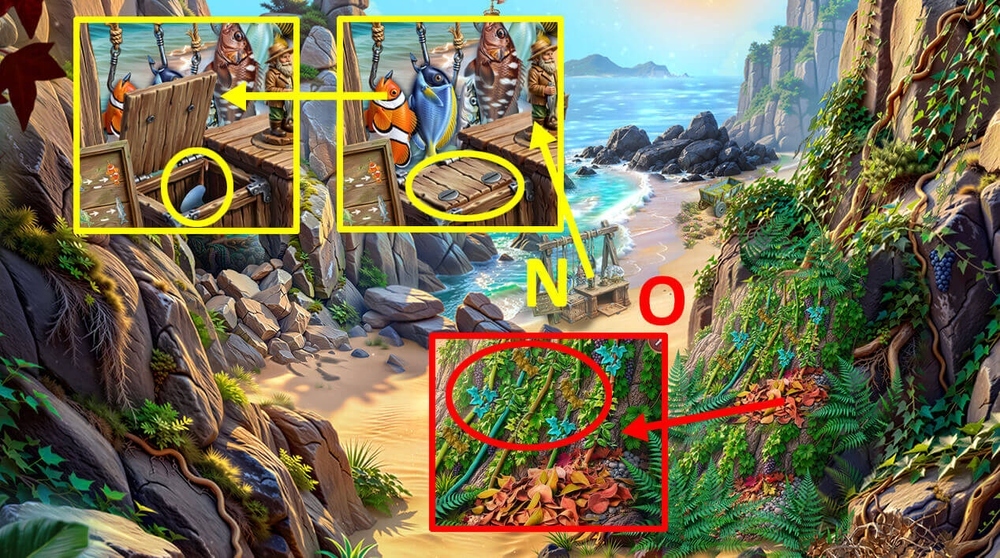
- Use COIN on the bolts on the box, take NUT KEY and CROCHET HOOK (N).
- Use WEAVING PATTERN and CROCHET HOOK on the plant’s vines (O).
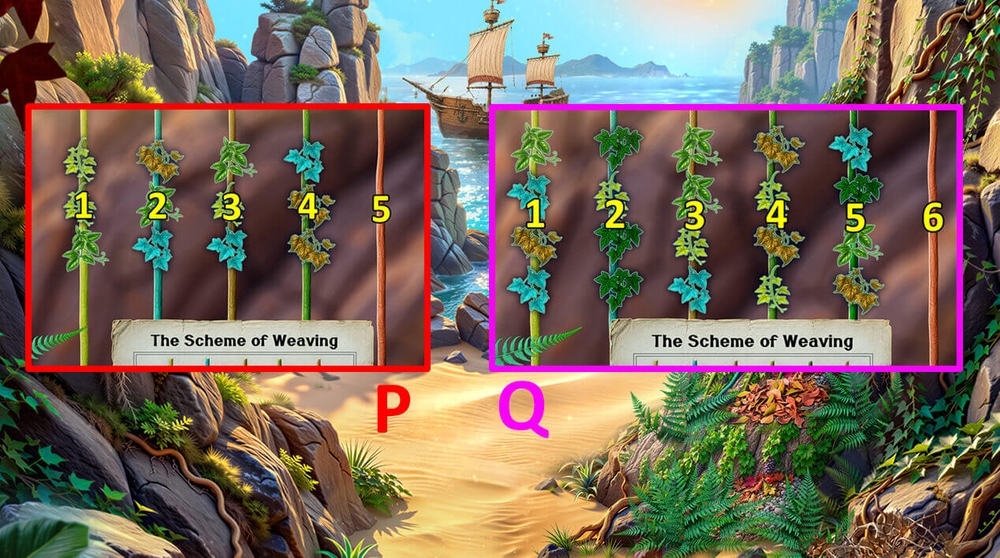
- Easy solution: Click: 2-5, 2-5, 4-2, 1-4, 1-5, 1-2, 4-1, 5-1, 2-4, 3-5, 4-1, 4-2, 4-3, 5-4, 5-4, 1-4, 3-5, 2-5, 3-1, 3-2, 5-3, 5-3, 5-3 (P).
- Hard solution: Click: 2-6, 2-6, 2-6, 2-6, 5-2, 4-2, 4-2, 4-2, 4-5, 3-4, 3-4, 1-4, 3-4, 3-1, 2-3, 2-3, 2-3, 1-2, 1-2, 3-1, 3-2, 1-3, 1-3, 1-3, 2-1, 4-1, 5-1, 3-2, 5-1, 5-4, 5-3, 6-5, 6-5, 1-5, 6-1, 6-5 (Q).
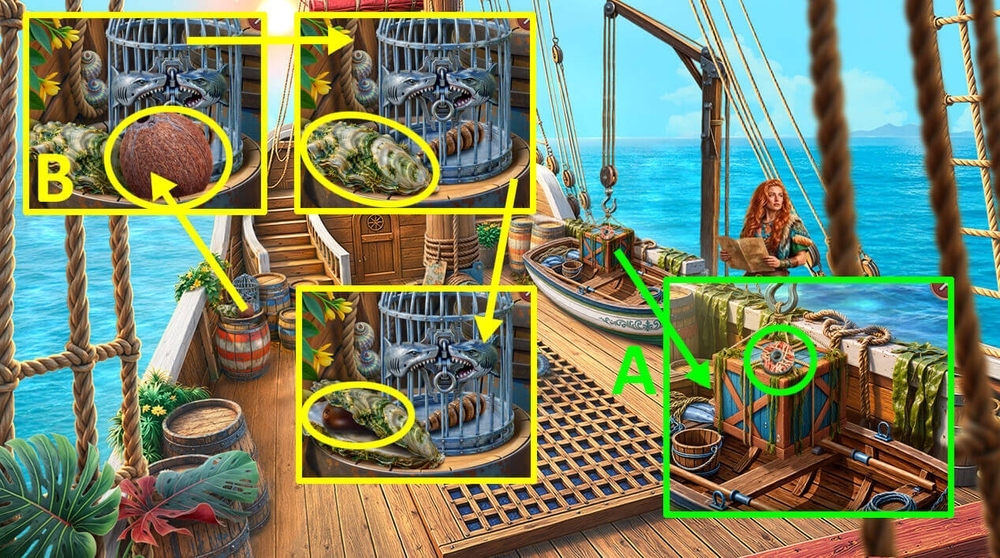
- Take CORAL DISCS 1/2 and COPPER RIVETS (A).
- Take COCONUT, use NUT KEY on oyster shell, take AWL (B).
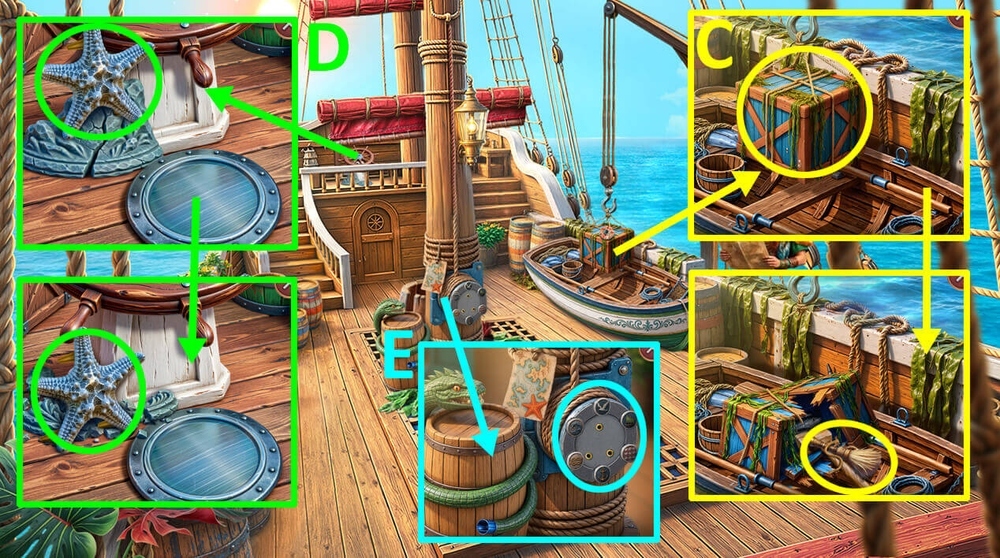
- Use HARPOON HANDLE, COPPER RIVETS and AWL on SABER FRAGMENT, earn MACHETE.
- Use MACHETE on the tied box, take ROPE, FEATHERED BRUSH and WOODEN MALLET (C).
- Use WOODEN MALLET on the stone starfish, take STARFISH (D).
- Use STARFISH on the mechanism (E).
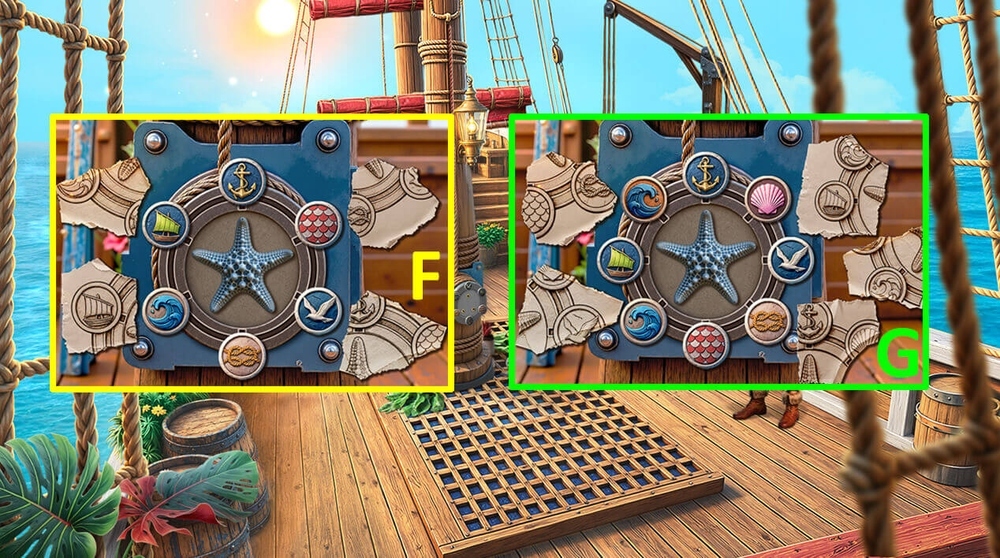
- Easy solution: Use the picture as a hint (F).
- Hard solution: Use the picture as a hint (G).

- Select this option (H).
- Take SULFUR and MATCH, use OAR PIECE on the large cobblestone, take CORAL DISCS 2/2 (I).
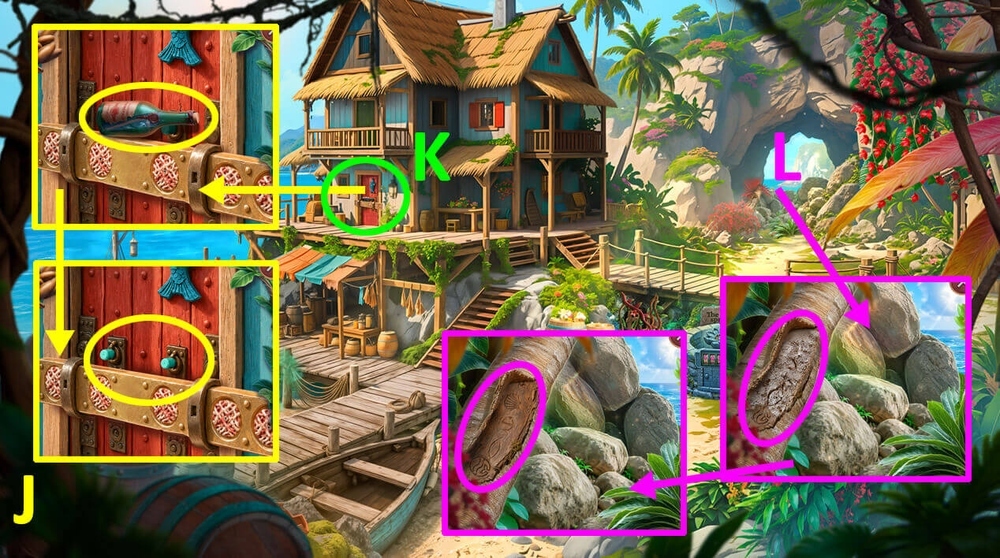
- Take SEALED BOTTLE, use CORAL DISCS 2/2 on the door (J).
- Play puzzle, earn SHELL SCRAPER (K).
- Use SHELL SCRAPER on the tree’s bark., take BARK WITH SYMBOLS (L).
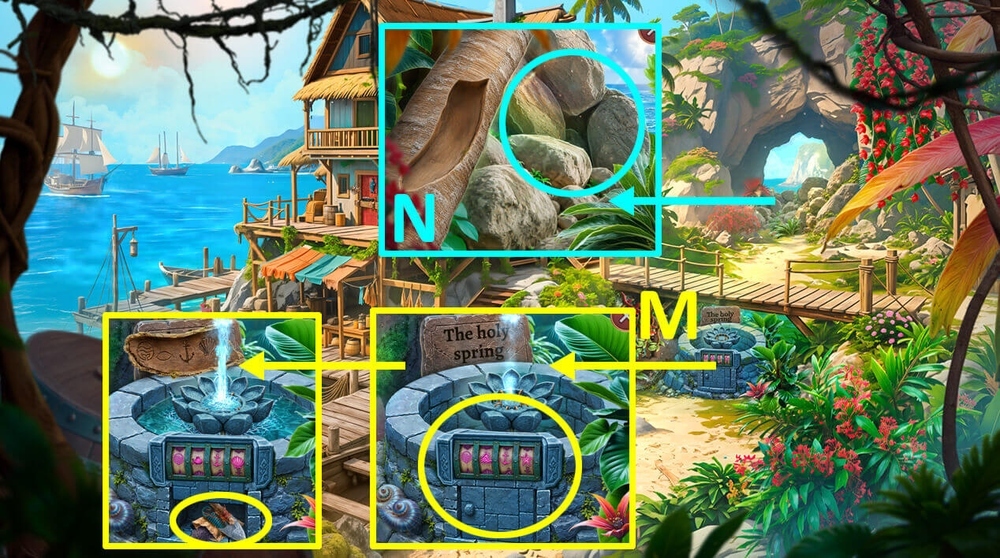
- Use BARK WITH SYMBOLS on the fountain, take HARPOON TIP, SMALL SPRINGS 1/2 and GUNPOWDER (M).
- Use ROPE, SULFUR and GUNPOWDER on COCONUT, earn COCONUT BOMB.
- Use MATCH and COCONUT BOMB on the pile of stones (N).
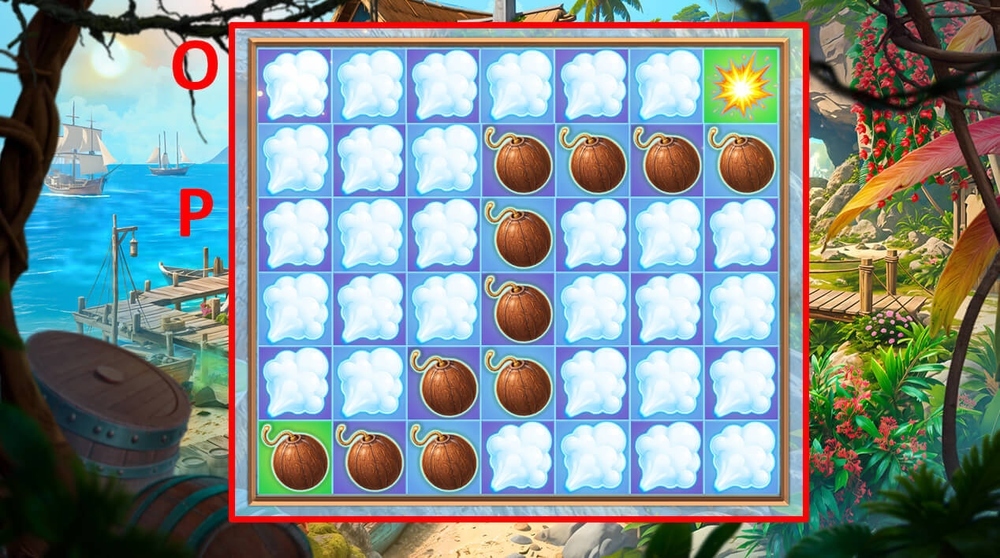
- Easy solution: Use the picture as a hint (O).
- Hard solution: Use the picture as a hint (P).
- Go forward.
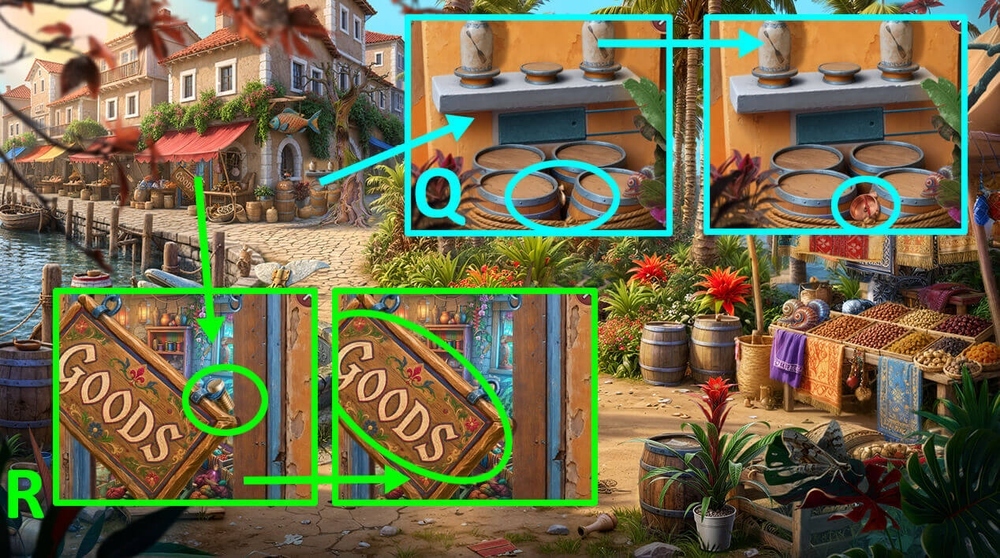
- Use HARPOON TIP on the objects stuck between the barrels, take BROKEN NAVIGATION DEVICE and CORKSCREW (Q).
- Use CORKSCREW on SEALED BOTTLE, earn SAILOR’S BANDANA.
- Take LITTLE SCREW, use SAILOR’S BANDANA on the hanging sign of the sales counter (R).
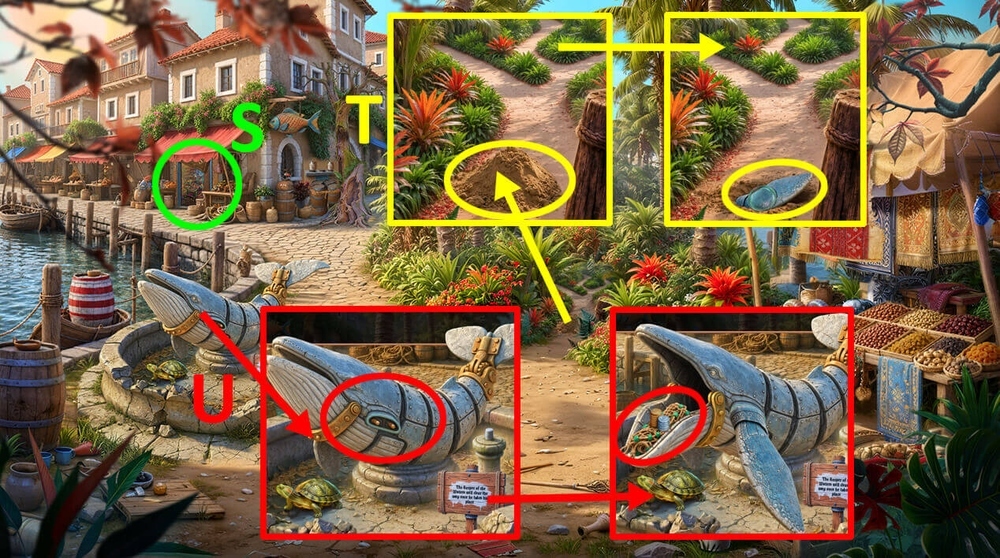
- Play puzzle, earn FISH TROWEL (S).
- Use FISH TROWEL on the mound of sand, take BOTTLE CAP and WHALE FIN (T).
- Use WHALE FIN on the whale statue, take COINS, FISH NET and BRASS PLATE (U).
- Use LITTLE SCREW, BOTTLE CAP and BRASS PLATE on BROKEN NAVIGATION DEVICE, earn COMPASS.
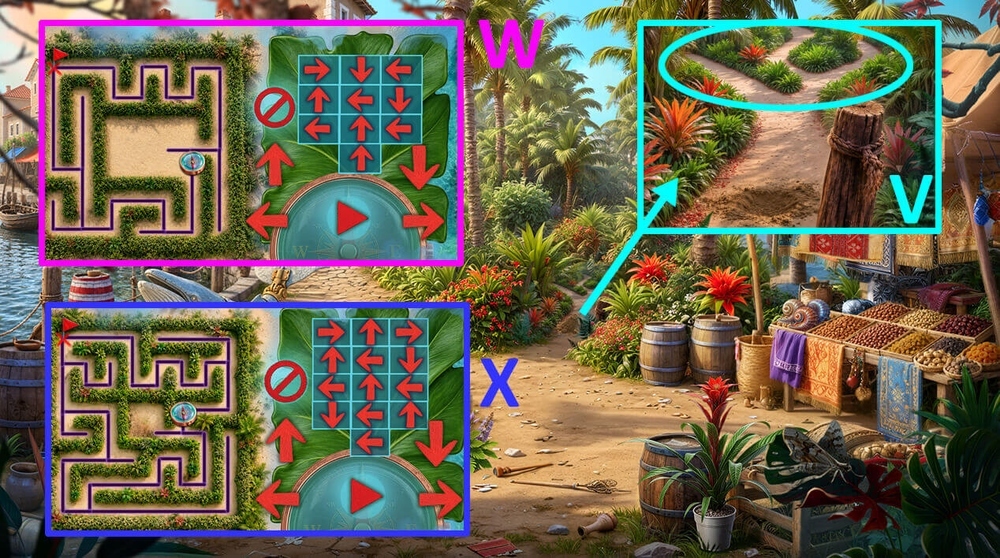
- Use COMPASS on the paths in the palm alley (V).
- Easy solution: Place the arrows as shown in the picture and tap the play button. (W).
- Hard solution: Place the arrows as shown in the picture and tap the play button. (X).
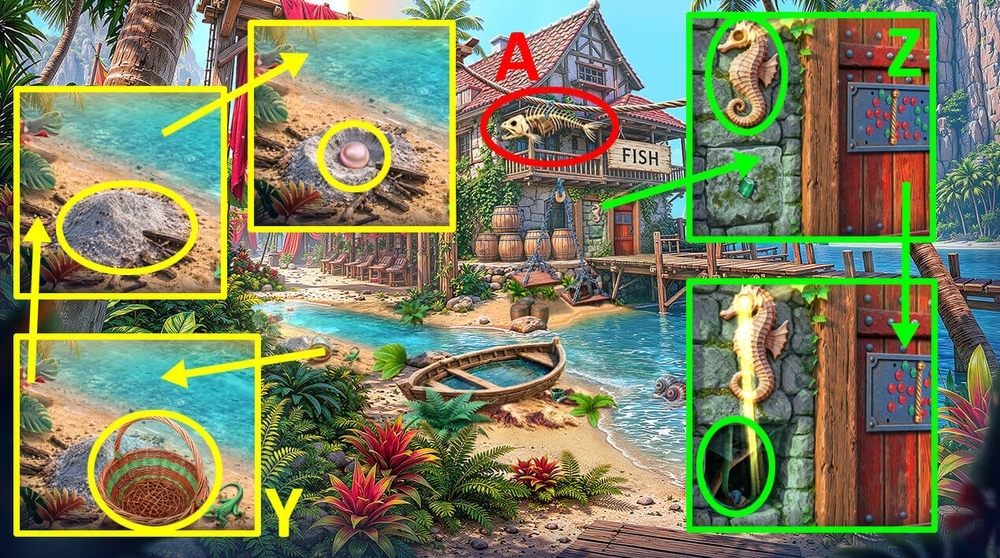
- Take WOVEN BASKET, use FEATHERED BRUSH on the pile of ashes, take PEARL (Y).
- Use PEARL on the seahorse figurine, take SLINGSHOT (Z).
- Use SLINGSHOT on the fish skeleton (A).
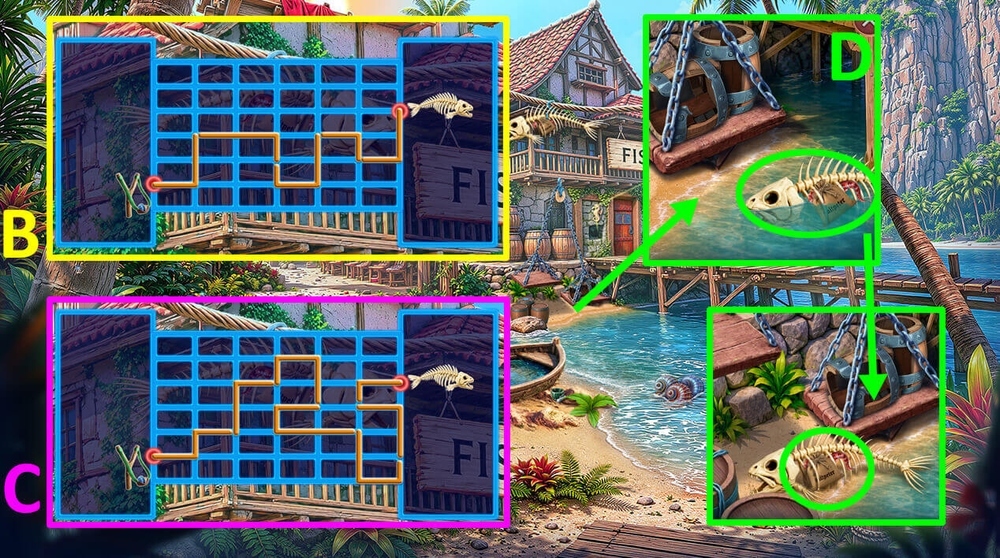
- Easy solution: Use the picture as a hint (B).
- Hard solution: Use the picture as a hint (C).
- Use FISH NET on the fish skeleton, take SALTPETER and OCTOPUS TENTACLE (D).
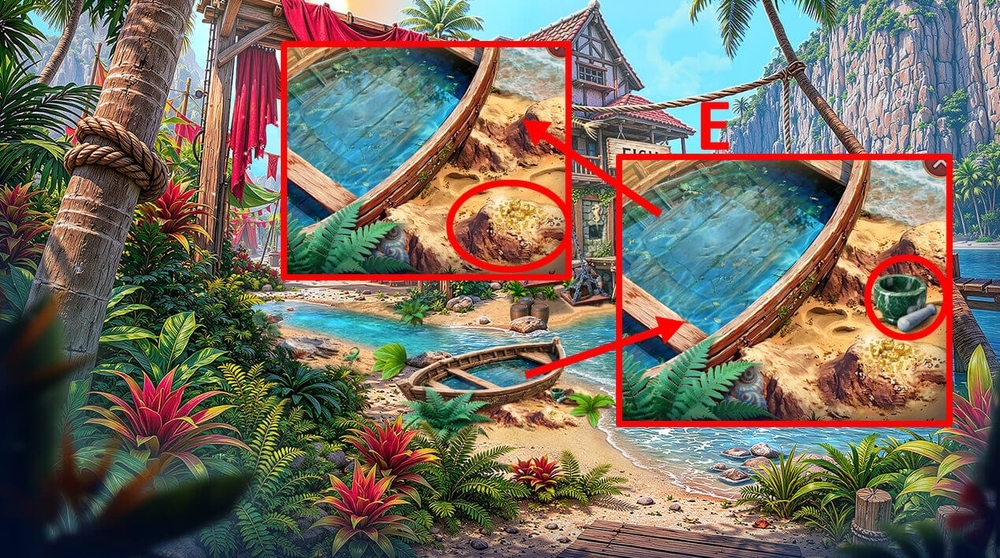
- Take MORTAR AND PESTLE, use WOVEN BASKET on sand, earn GOLD (E).
- Go to the My Ship’s Deck.
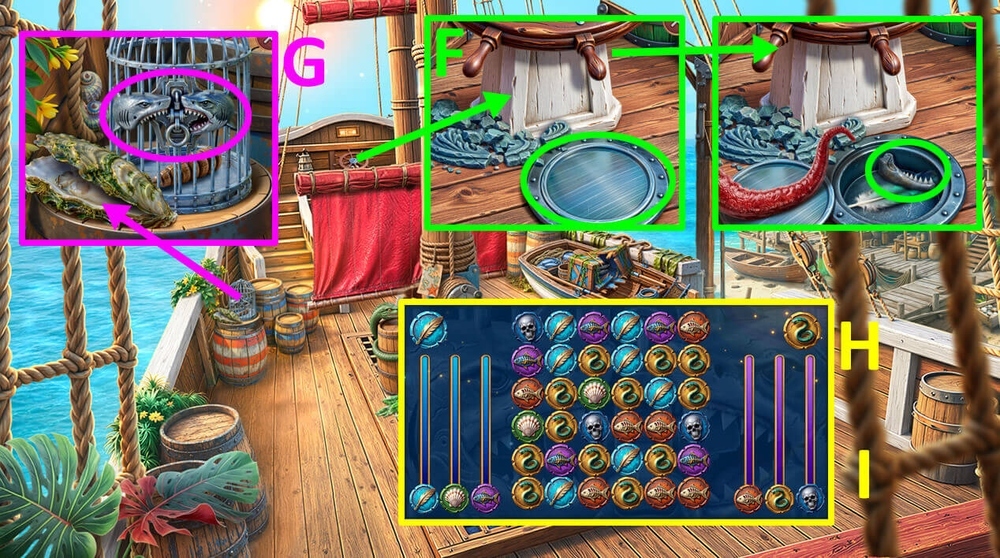
- Use OCTOPUS TENTACLE on the hatch in the floor, take SHARK TEETH (F).
- Use SHARK TEETH on the cage with shark figures (G).
- Easy solution: Solution is random (H).
- Hard solution: Solution is random (I).
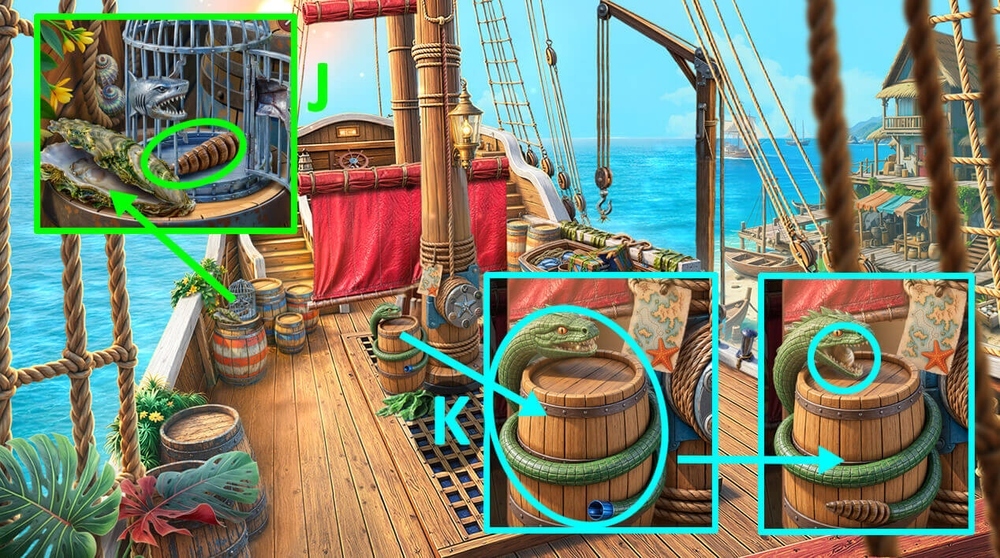
- Take RATTLE TAIL (J).
- Use RATTLE TAIL on the snake figurine, take EMPTY SHELL (K).
- Go forward.
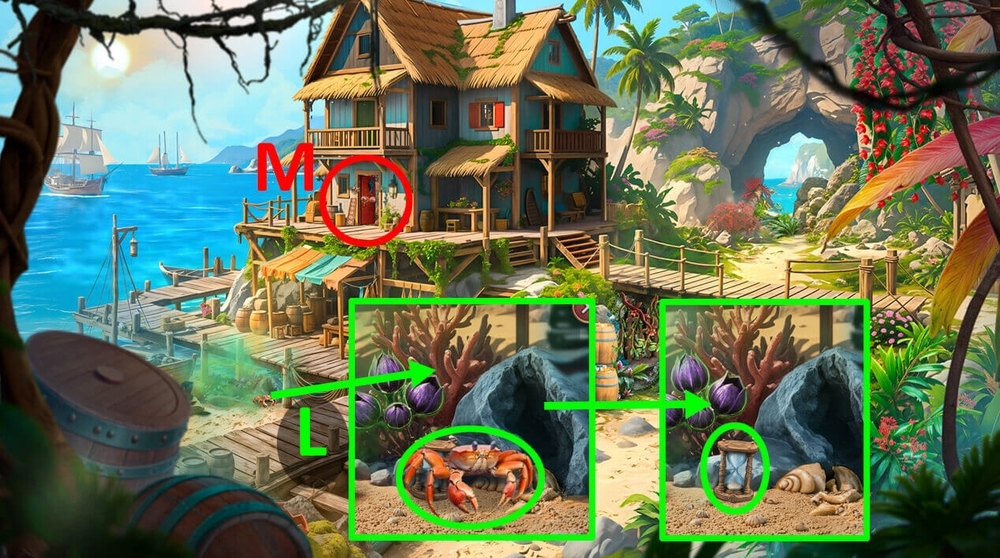
- Use EMPTY SHELL on the crab, take HOURGLASS (L).
- Play puzzle, earn RUM BARREL (M).
- Go to the San Esteban Pier.
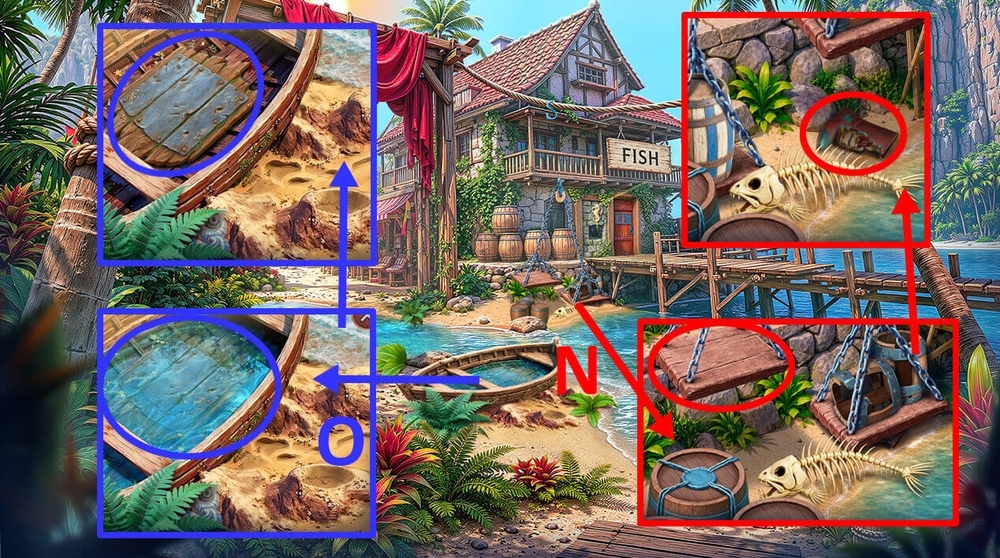
- Use RUM BARREL on the lift, take VINEGAR and BOOT (N).
- Use BOOT on the water in a boat, take WOODEN SHIELD (O).
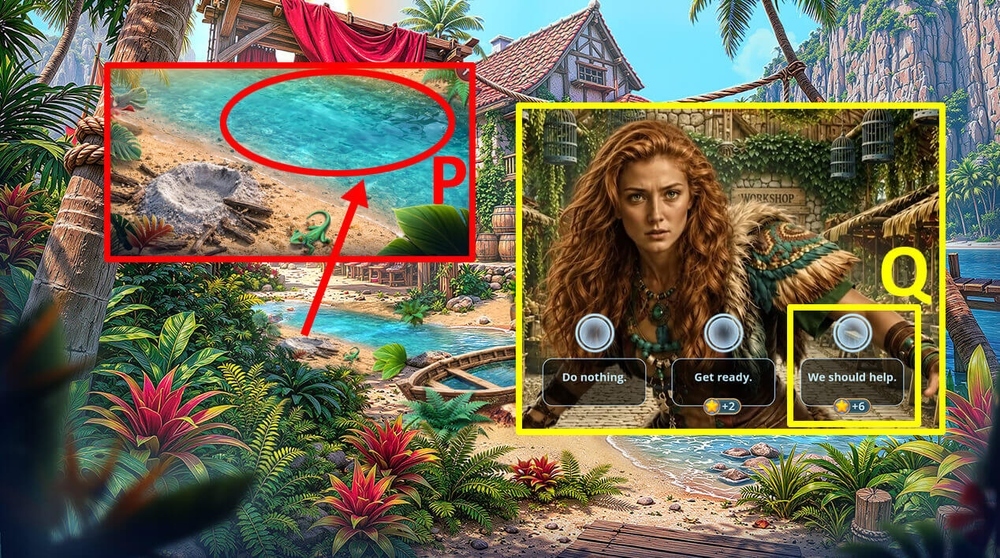
- Use WOODEN SHIELD on the stream of water (P).
- Go forward.
- Select this option (Q).
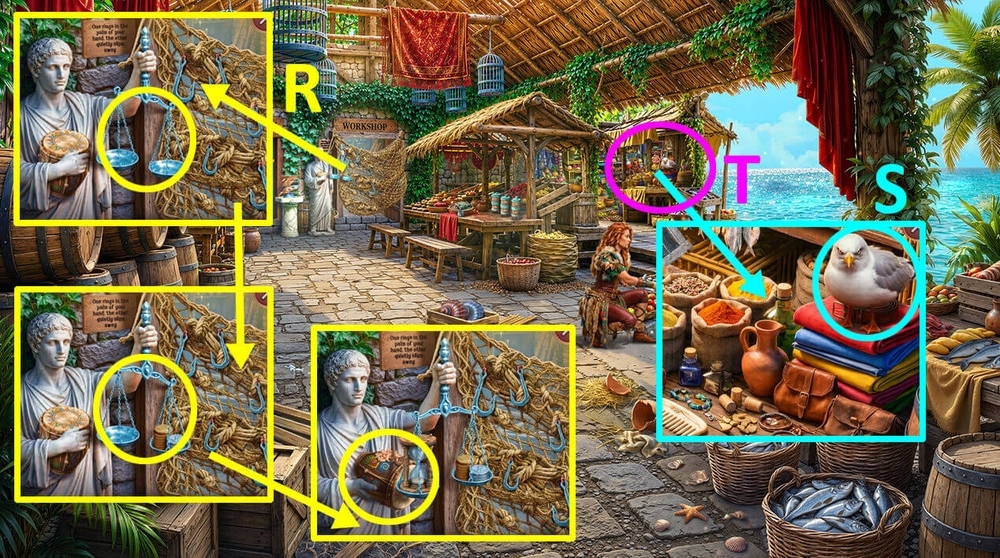
- Use COINS on the scales in the statue’s hand, use HOURGLASS on the scales in the statue’s hand, take LITTLE SHRIMP and TRIBAL DRUM (R).
- Use TRIBAL DRUM for seagull (S).
- Play puzzle, earn CRAB CLAWS (T).
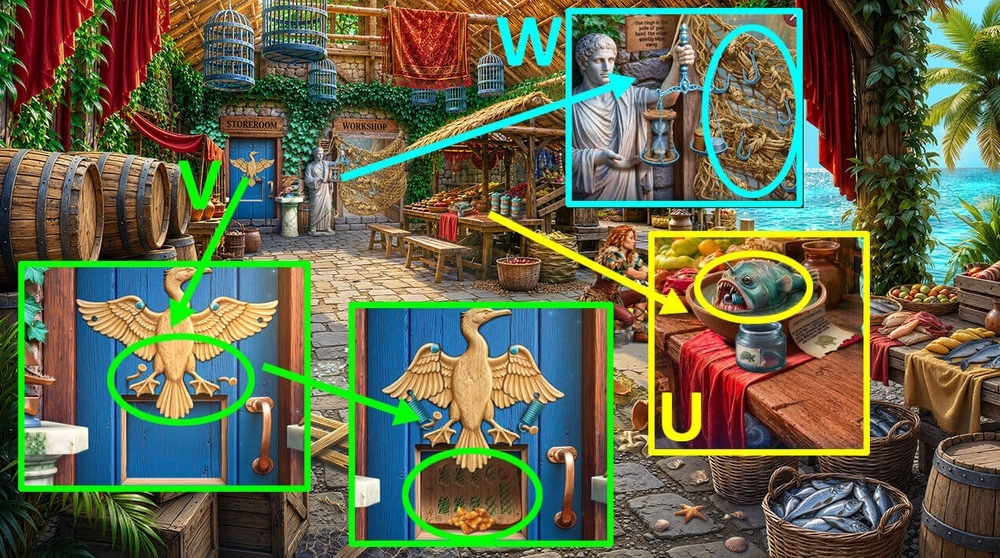
- Use CRAB CLAWS on an object in a fish’s mouth, earn SMALL SPRINGS 2/2 (U).
- Use SMALL SPRINGS 2/2 on the door, take MANGO and INSTRUCTION (V).
- Use INSTRUCTION on fishing nets (W).
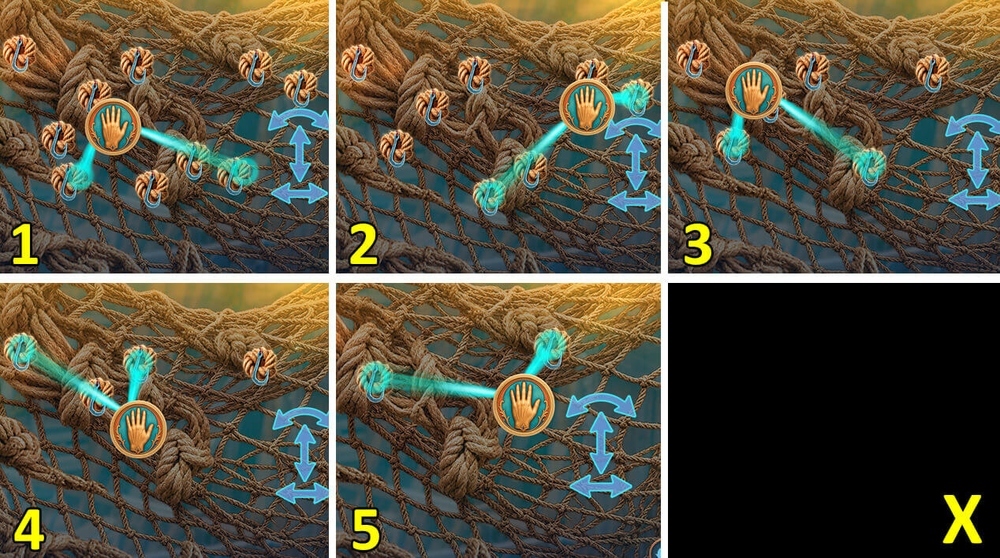
- Easy solution: Follow steps 1, 2, 3, 4, 5 (X).
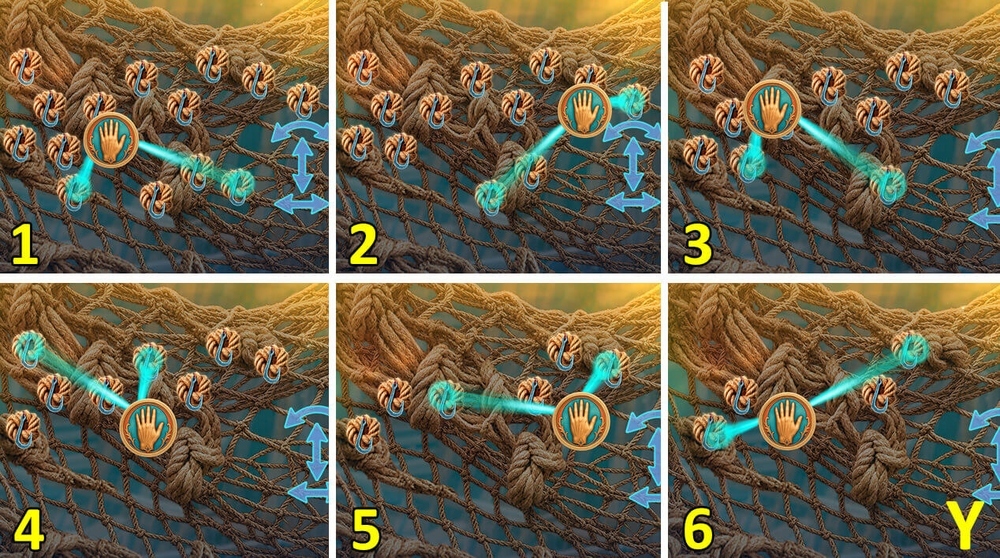
- Hard solution: Follow steps 1, 2, 3, 4, 5, 6 (Y).
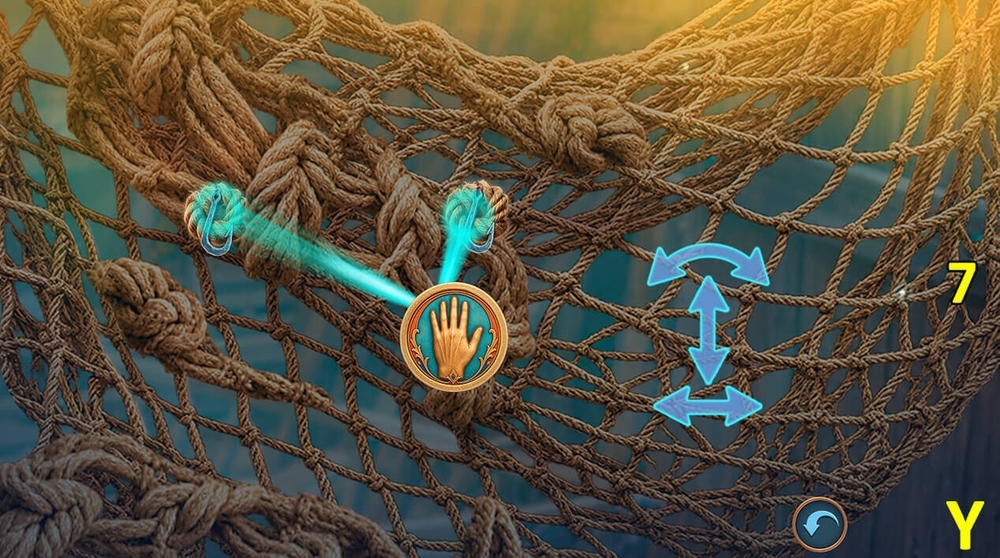
- Hard solution: 7 (Y).
- Go forward.
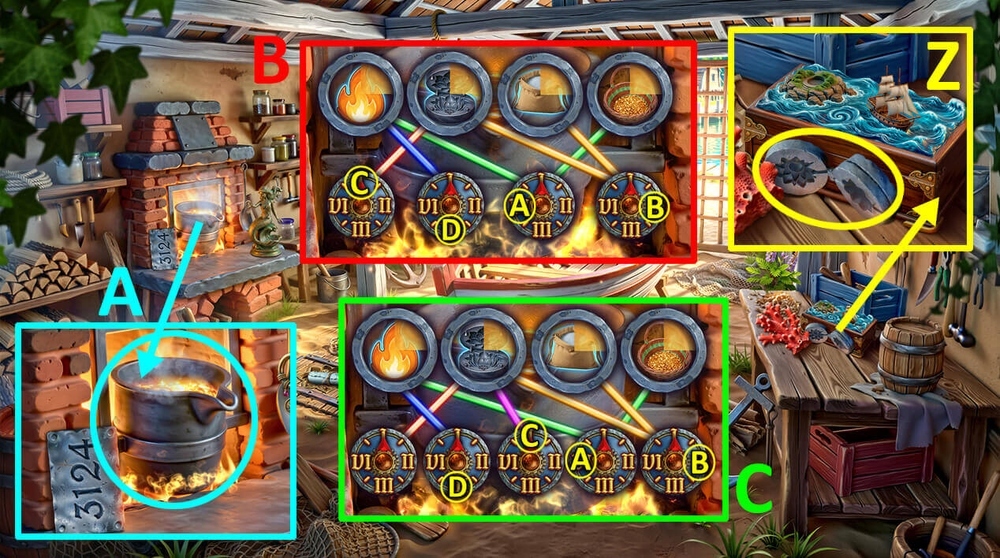
- Take LOTUS MOLD (Z).
- Use SALTPETER, GOLD and LOTUS MOLD to the forge furnace (A).
- Easy solution: Click: A, B, C, D (B).
- Hard solution: Click: A, B, C, D (C).
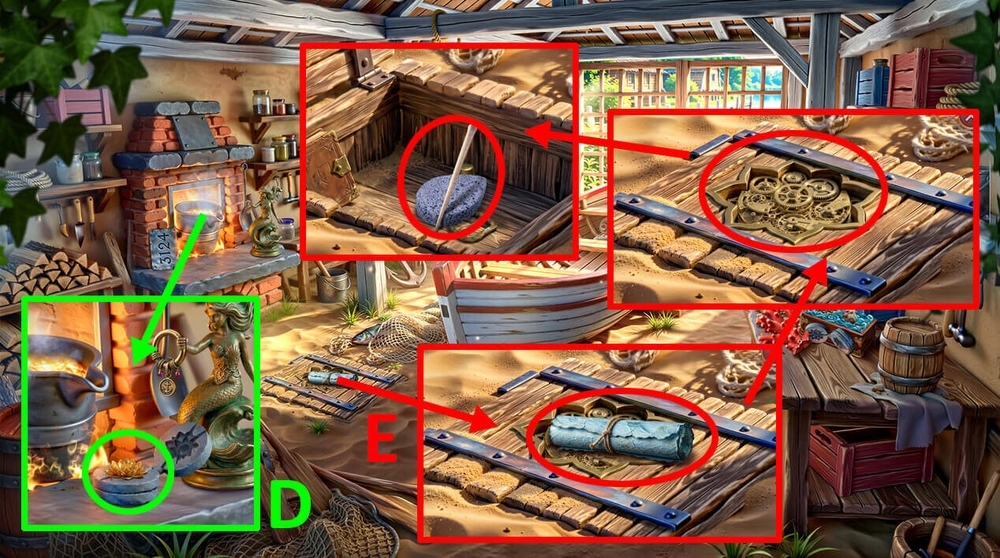
- Take GOLDEN LOTUS (D).
- Read the note, use GOLDEN LOTUS on the mechanism, take FISH BONE and PUMICE (E).
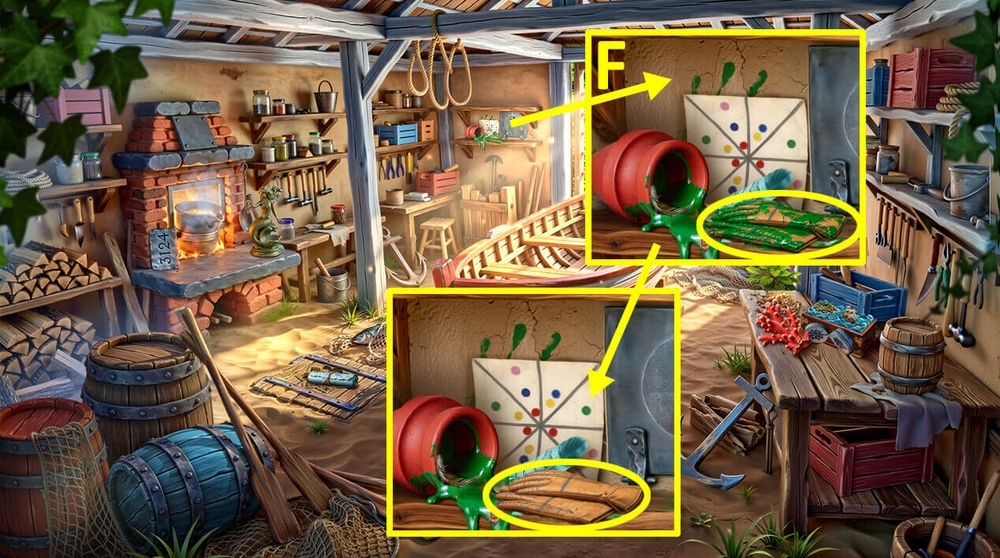
- Use VINEGAR on dried spilled paint, use PUMICE on dried spilled paint, take LEATHER GLOVES (F).
- Go to the San Esteban Streets.
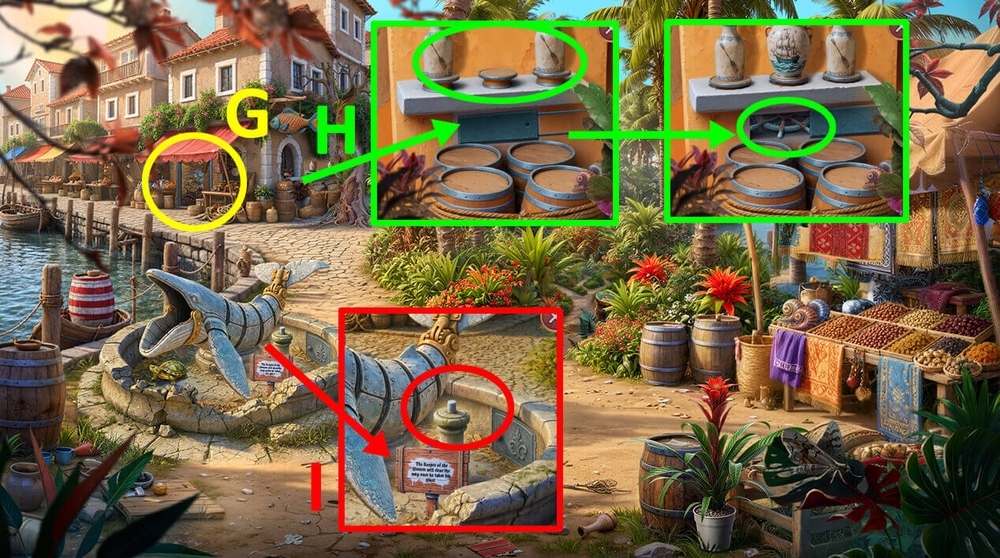
- Play puzzle, earn JUG (G).
- Use JUG on the pedestal for a jug, take STEERING WHEEL (H).
- Use STEERING WHEEL on the pin (I).
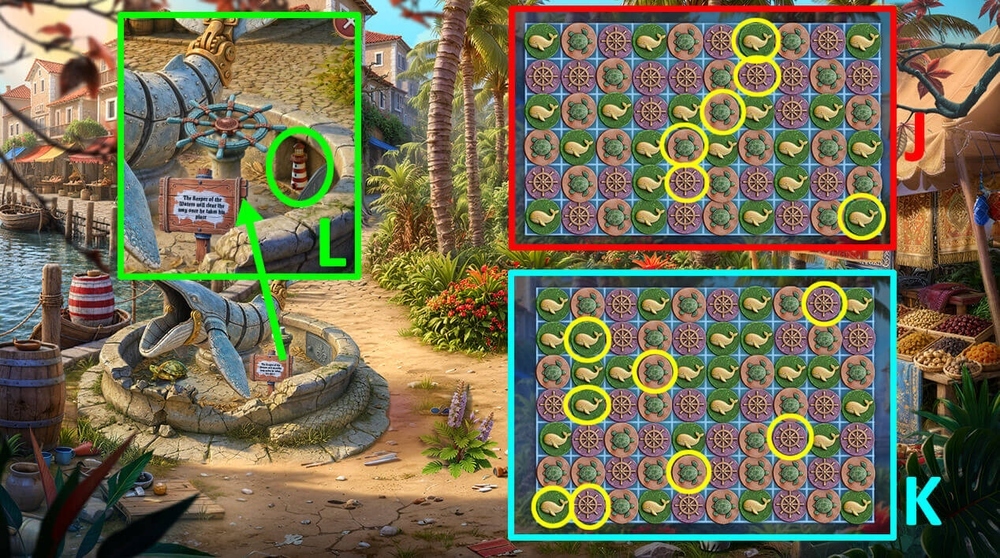
- Easy solution: Use the picture as a hint (J).
- Hard solution: Use the picture as a hint (K).
- Take LIGHTHOUSE FIGURINE (L).
- Go to the Boat Workshop.
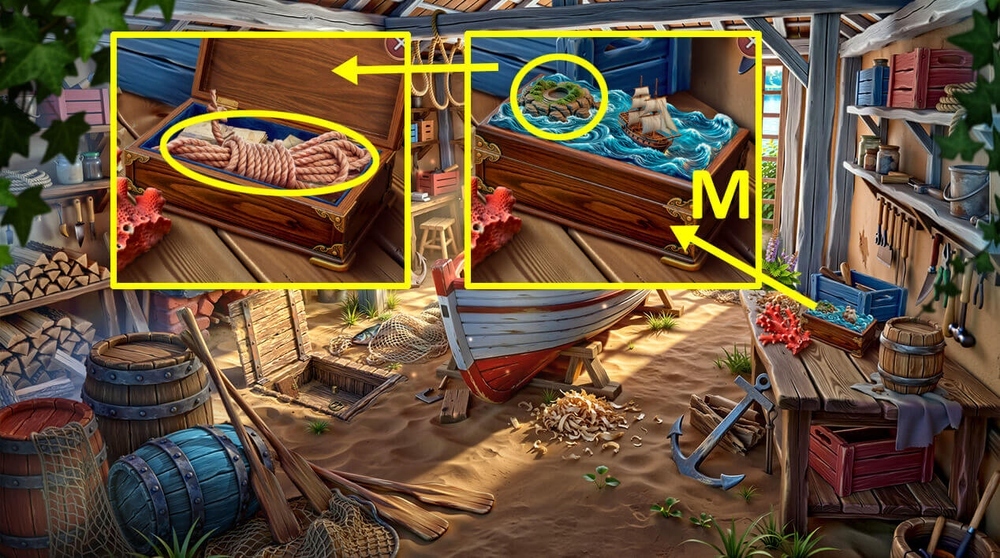
- Use LIGHTHOUSE FIGURINE on the box, take ROPE (M).
- Go back.
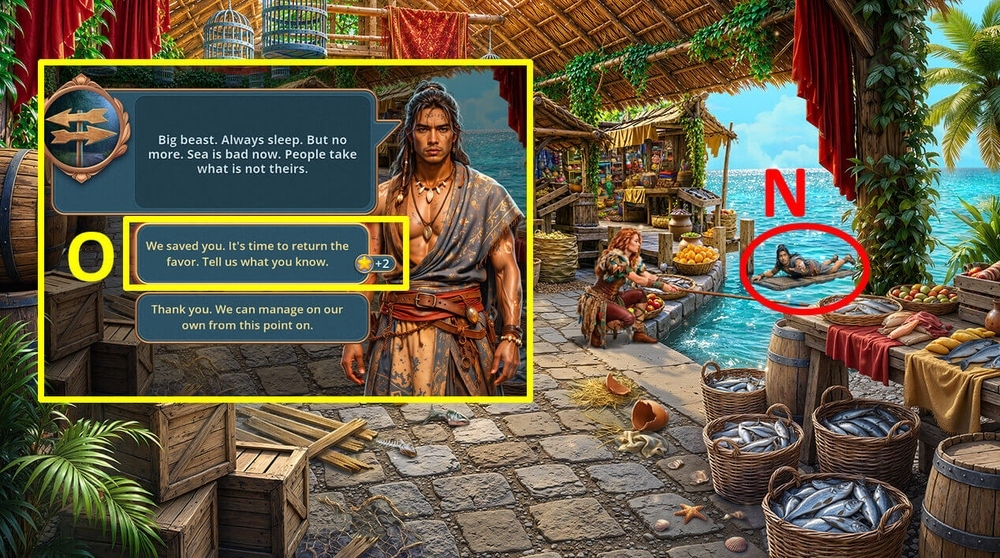
- Use ROPE at the drowning guy (N).
- Select this option, take the note (O).
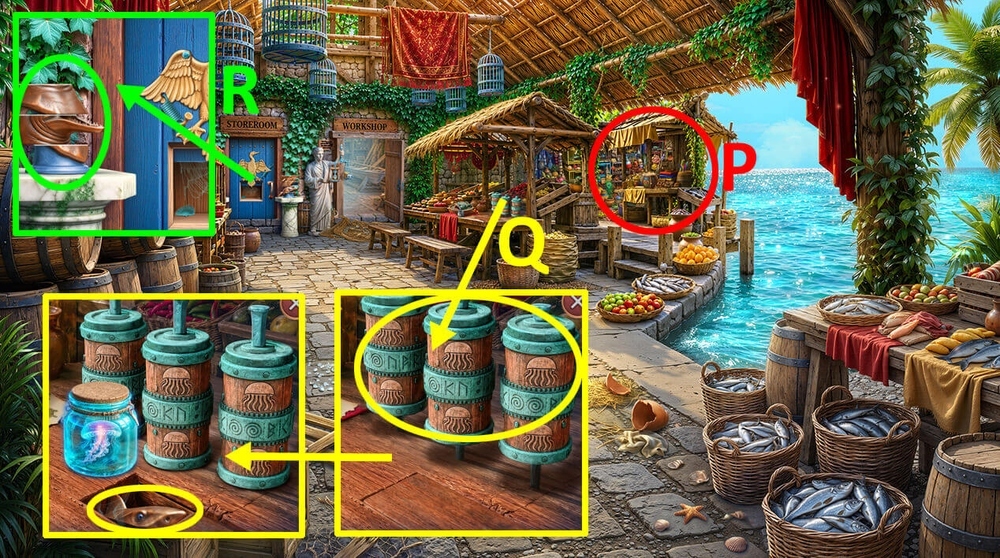
- Play puzzle, earn JAR WITH JELLYFISH (P).
- Use JAR WITH JELLYFISH on pillars with ancient symbols, take SHARK’S HEAD (Q).
- Use SHARK’S HEAD on the shark statue (R).
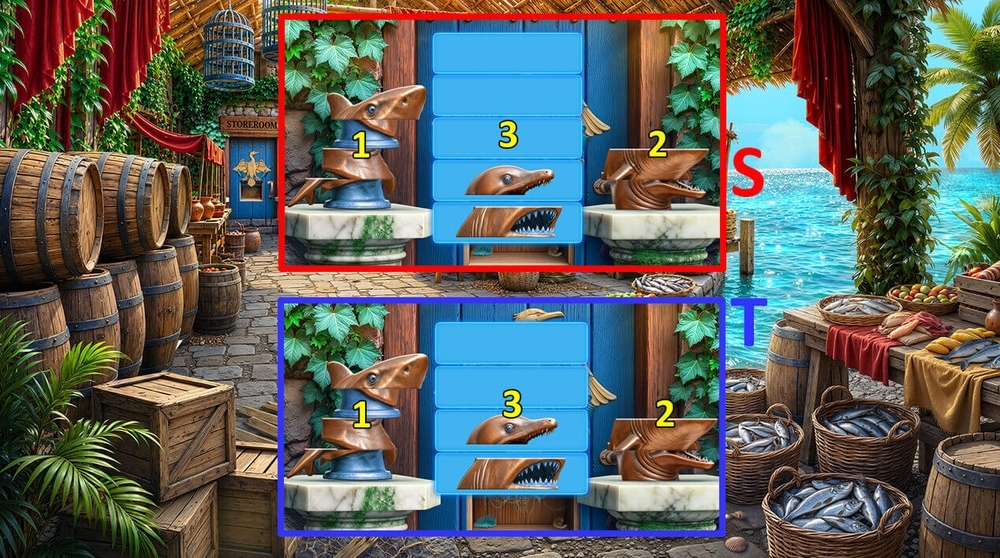
- Easy solution: Click: 2-3, 2-3, 1-3, 1-2, 1-2, 3-2, 3-2, 3-1, 3-2, 3-1, 2-3, 2-3, 2-1, 3-2, 3-2 (S).
- Hard solution: Click: 2-3, 1-3, 1-2, 3-1, 2-3, 2-1, 3-2, 1-2, 1-2, 1-3, 2-1, 2-1, 3-2, 1-2, 1-2, 3-1, 3-1, 2-1, 3-2, 1-3, 2-3, 1-2, 3-1, 3-1 (T).
- Go to the Flooded Warehouse.
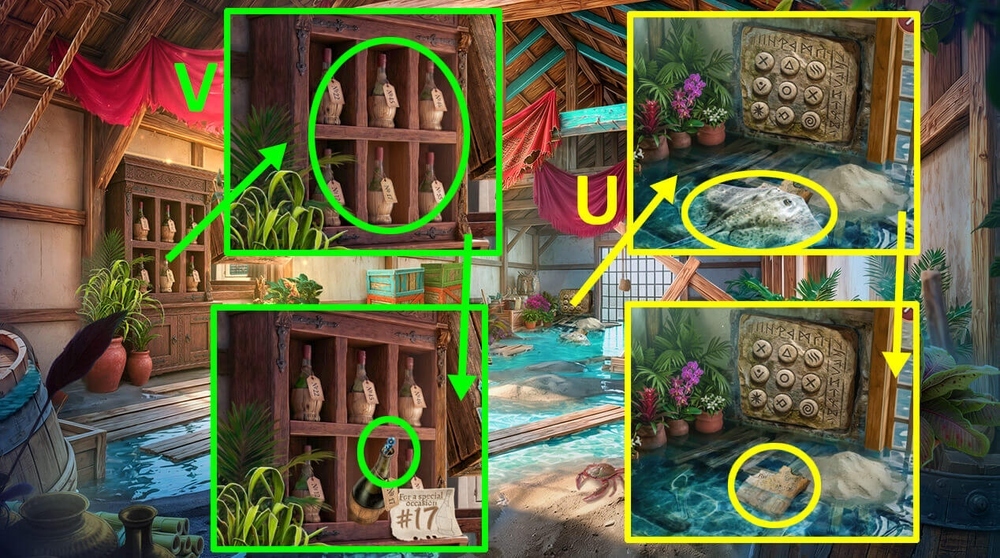
- Use LEATHER GLOVES on an electric ray, take MAP PIECE and WINE LIST (U).
- Use WINE LIST on the shelf with wine bottles, take HAIRPIN (V).
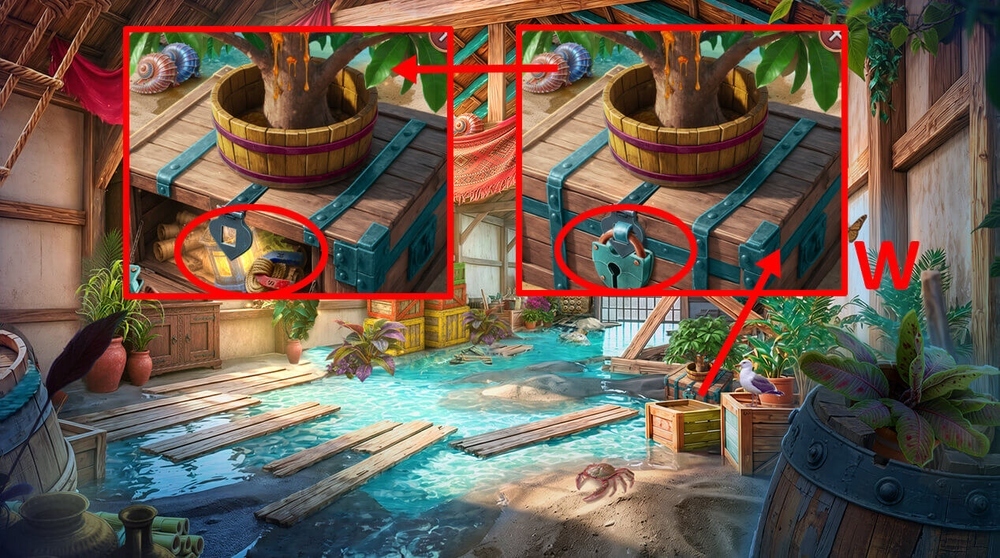
- Use FISH BONE and HAIRPIN with a padlock, take MAGNET ON ROPE, SHIP LANTERN and SEAWEED (W).
- Go back.
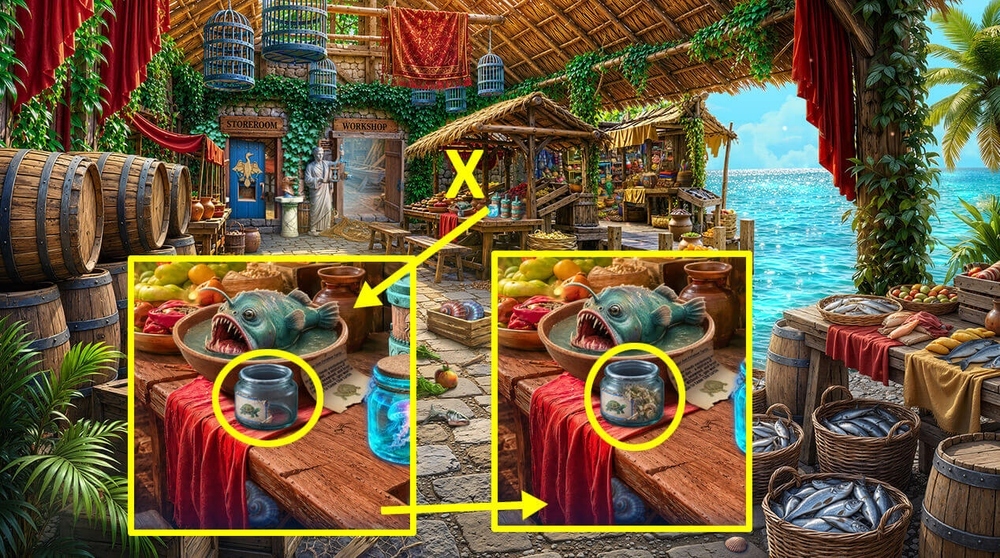
- Use LITTLE SHRIMP, MANGO and SEAWEED on an empty jar, take TURTLE FOOD (X).
- Go to the San Esteban Streets.
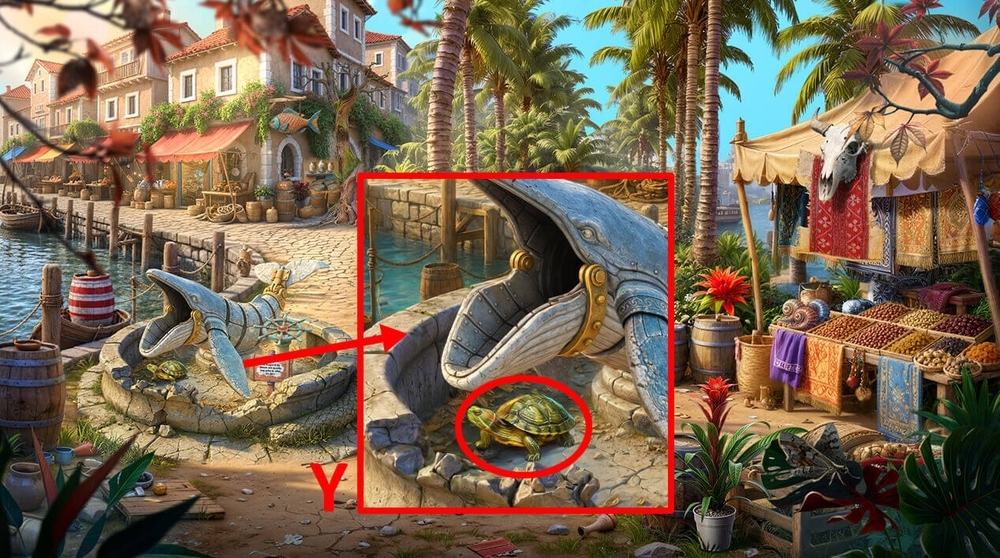
- Use TURTLE FOOD on the turtle, earn TURTLE (Y).
- Go to the Flooded Warehouse.
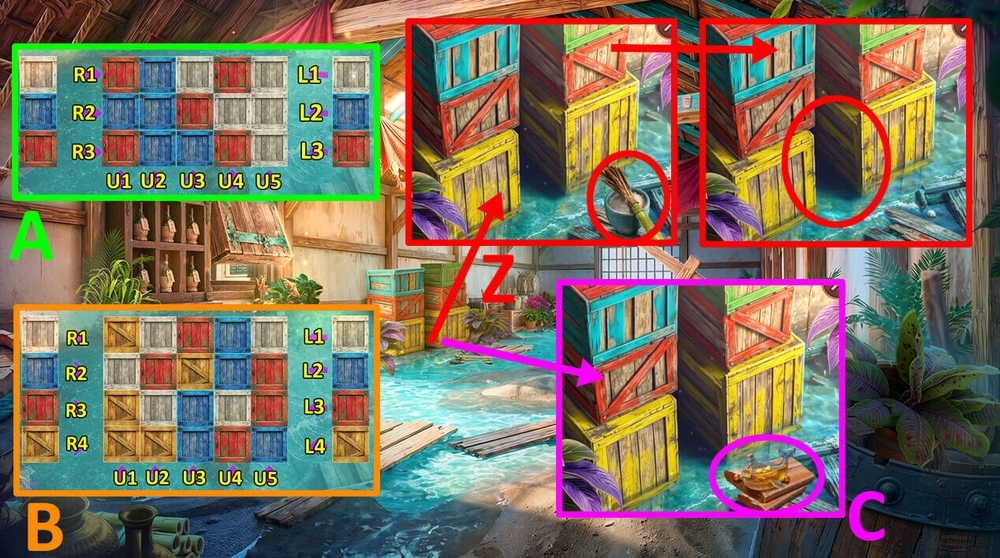
- Take PALM-FIBER BRUSH and POWDERED SUGAR, use TURTLE on the gap between the drawers (Z).
- Easy solution: Click: L1*3, U4, U5, R1*2, U4, R1, L2*4, U5, U4, L1*4, U4, U2, L2*4, U2, U3, U5, R2, U3, U5 (A).
- Hard solution: Click: R2, U2, R1, R2, U2, U4, L2, U4, U2, U3, L1*2, R3, R2, U2, U3, U4, L2, L3, U4, U5, L3, U5, U4, L2*2, U4 (B).
- Take WHALE OIL, PINS 1/2, WOODEN SUPPORT and BRUSH (C).

- Use POWDERED SUGAR and BRUSH on the door of the hiding place, take LEATHER CUFFS (D).
- Use WOODEN SUPPORT and LEATHER CUFFS on the window support (E).
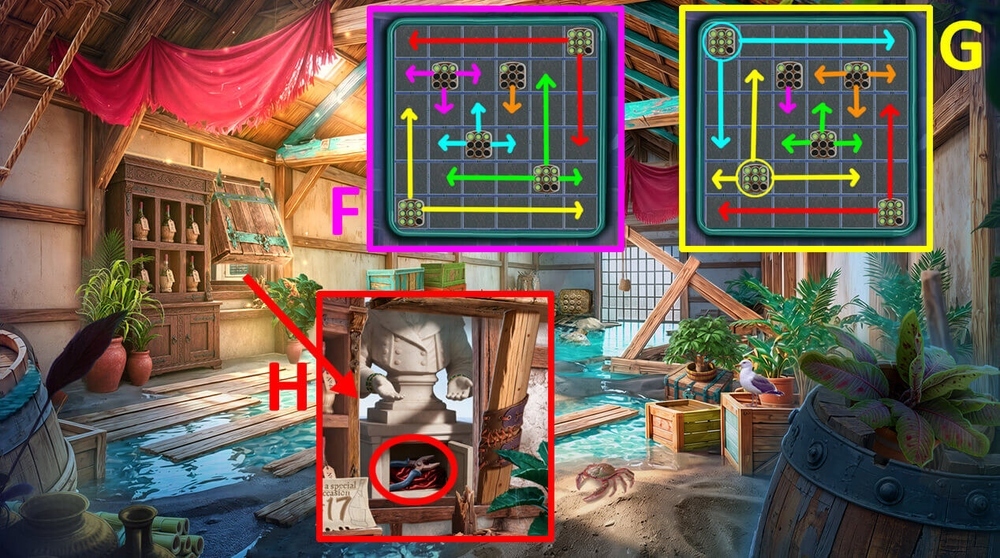
- Easy solution: Fill in the cells according to the arrows in the picture. (F).
- Hard solution: Fill in the cells according to the arrows in the picture. (G).
- Take CLIPPERS (H).
- Go to the San Esteban Pier.
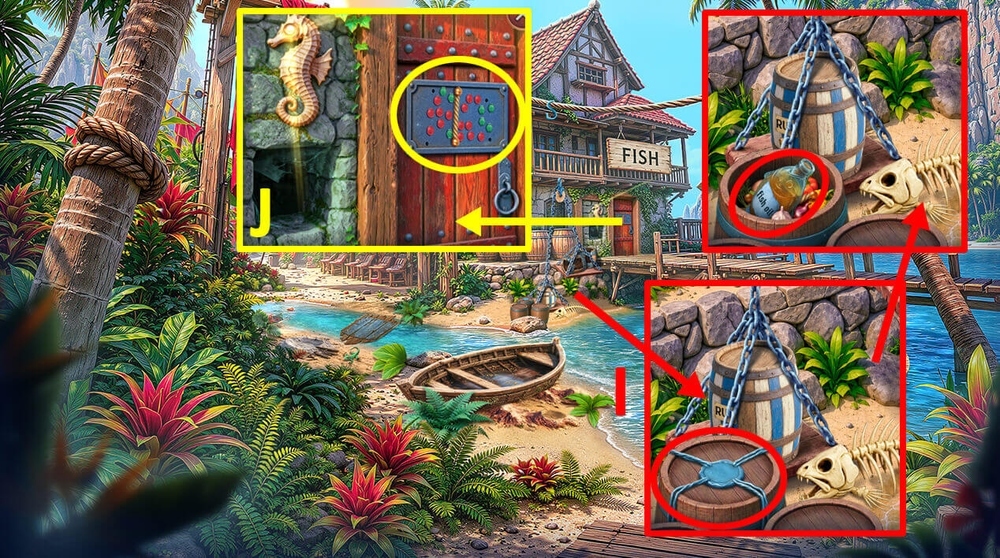
- Use CLIPPERS on the barrel with a metal seal, take SEALED FISH OIL and PINS 2/2 (I).
- Use PINS 2/2 on the door mechanism (J).
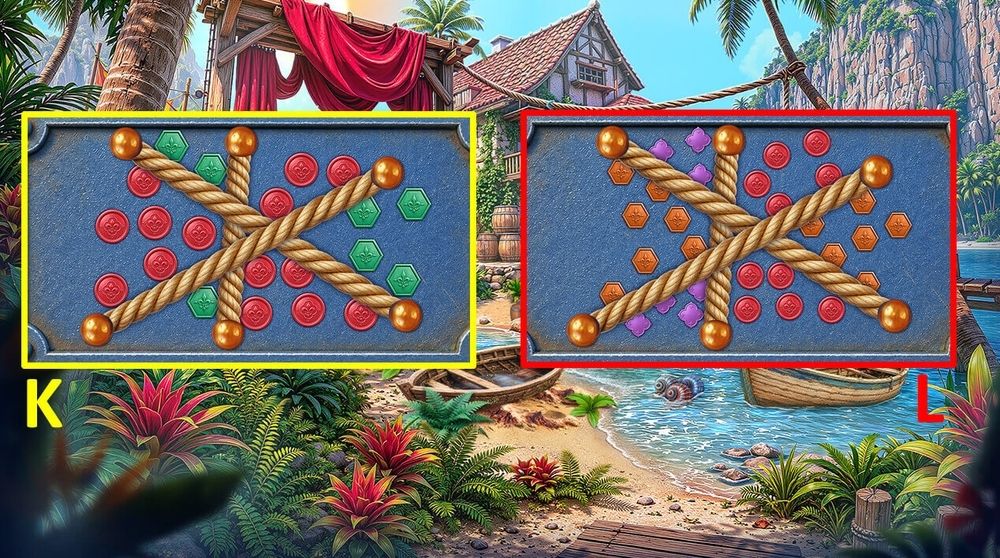
- Easy solution: Use the picture as a hint (K).
- Hard solution: Use the picture as a hint (L).
- Go to the Pier House.
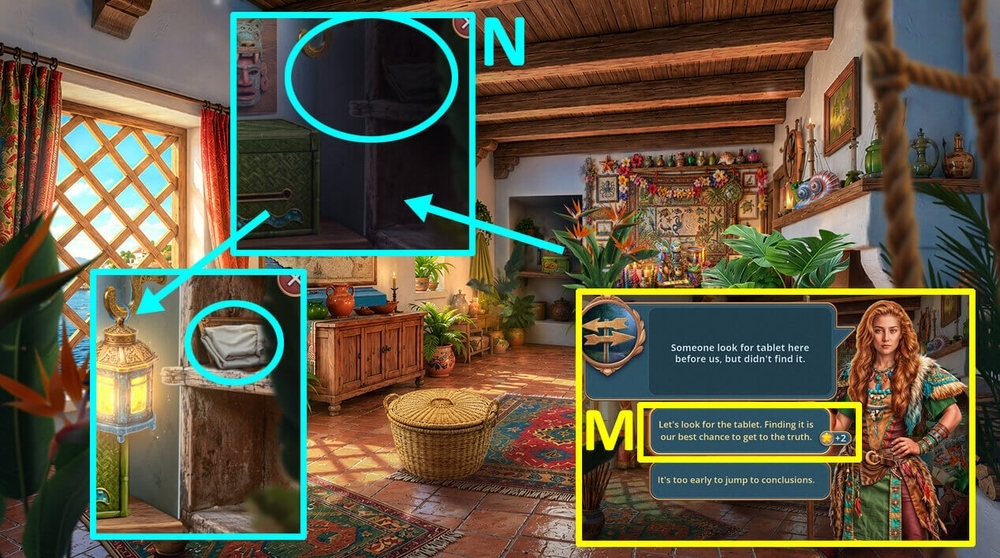
- Select this option (M).
- Use SHIP LANTERN on the dark corner, take SHIRT SLEEVE and MECHANISM PARTS 1/2 (N).
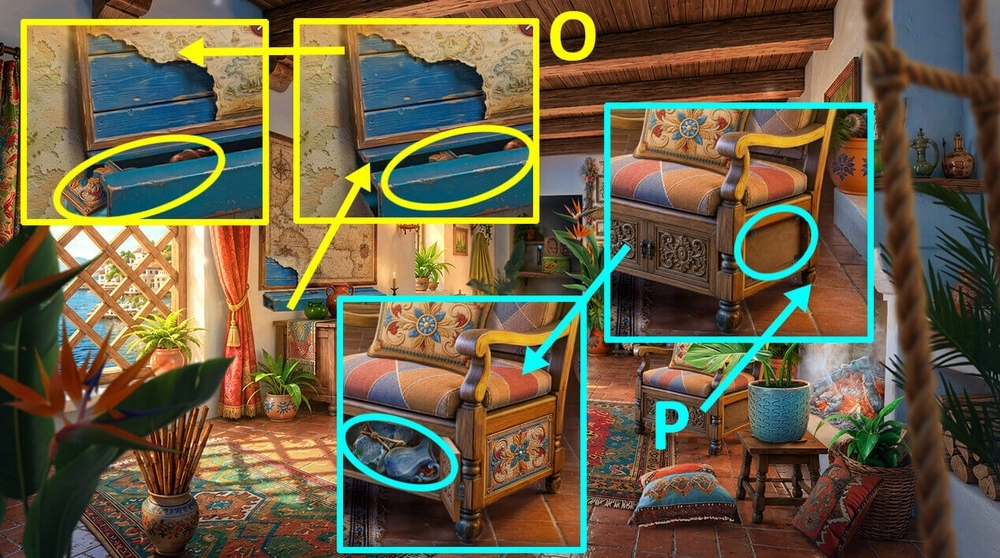
- Use MAGNET ON ROPE on the stuck objects, take MECHANISM PARTS 2/2, OLD OIL LAMP (O).
- Use MECHANISM PARTS 2/2 on the chair, take EMPTY DECANTER and STONE HAMMER (P).
- Go to the Boat Workshop.
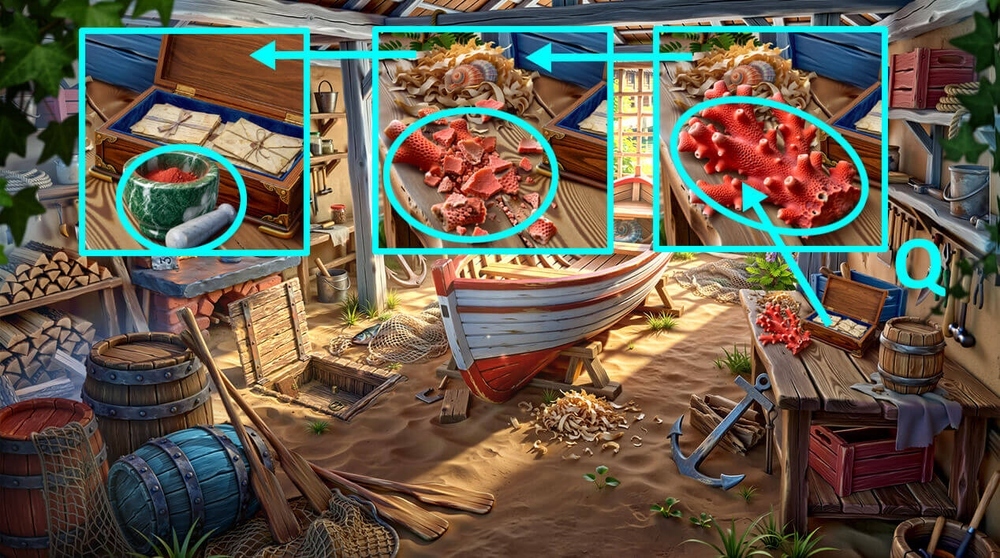
- Use STONE HAMMER on coral, use MORTAR AND PESTLE on coral fragments, take CORAL DUST (Q).
- Use WHALE OIL on CORAL DUST, earn PERMANENT DYE.
- Go to the Pier House.
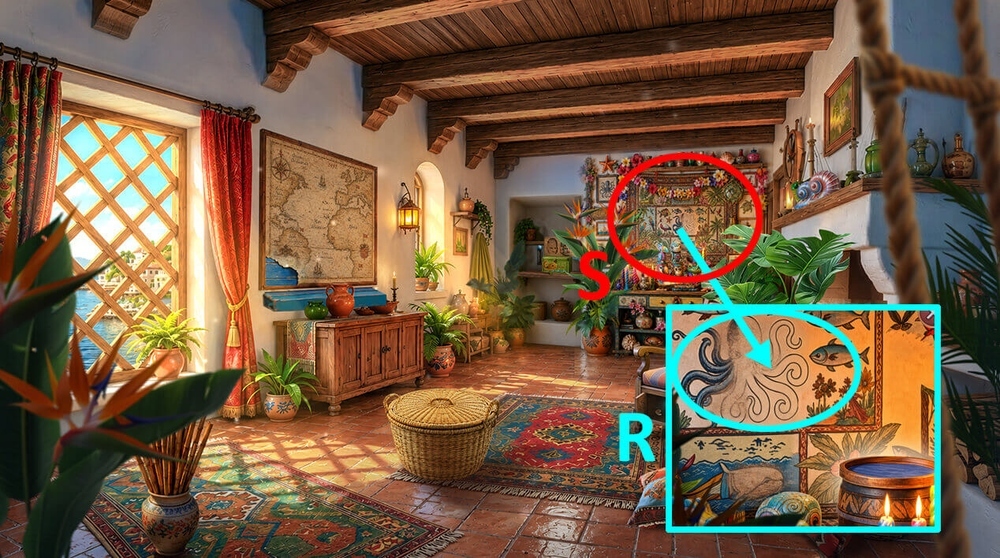
- Use PALM-FIBER BRUSH and PERMANENT DYE on the drawings on the wall (R).
- Play puzzle, earn CHAIN WITH HOOK (S).
- Go to the My Ship’s Deck.
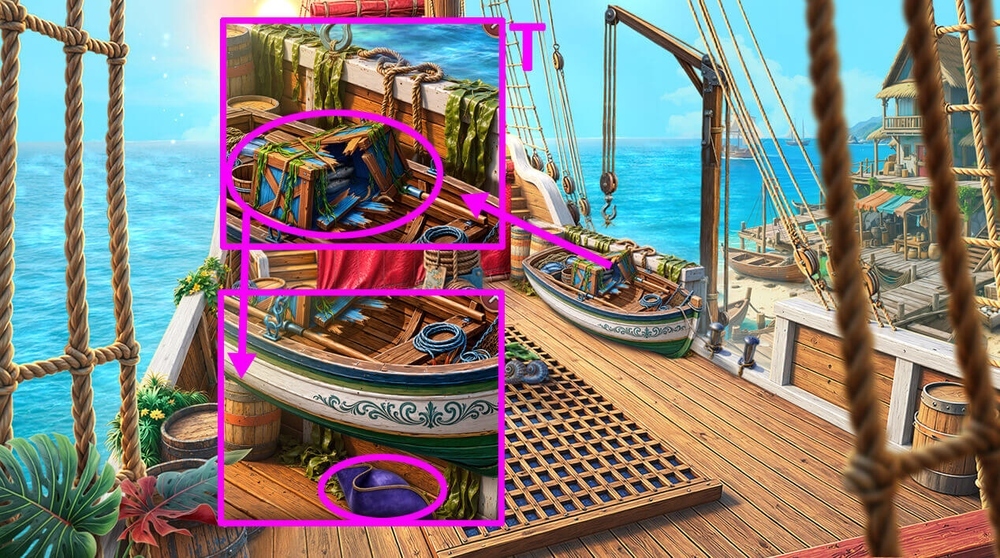
- Use CHAIN WITH HOOK on the boat, take TRICORN HAT (T).
- Go forward.
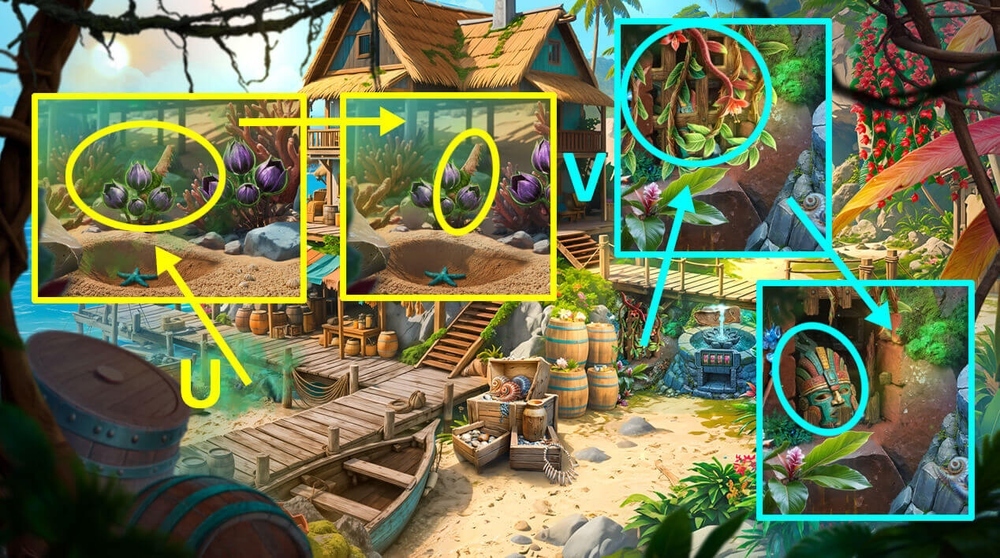
- Use TRICORN HAT on the smoke, take JAGGED CORAL (U).
- Use JAGGED CORAL on vines, take MASK and BLACKSMITH’S TONGS (V).
- Go to the Pier House.
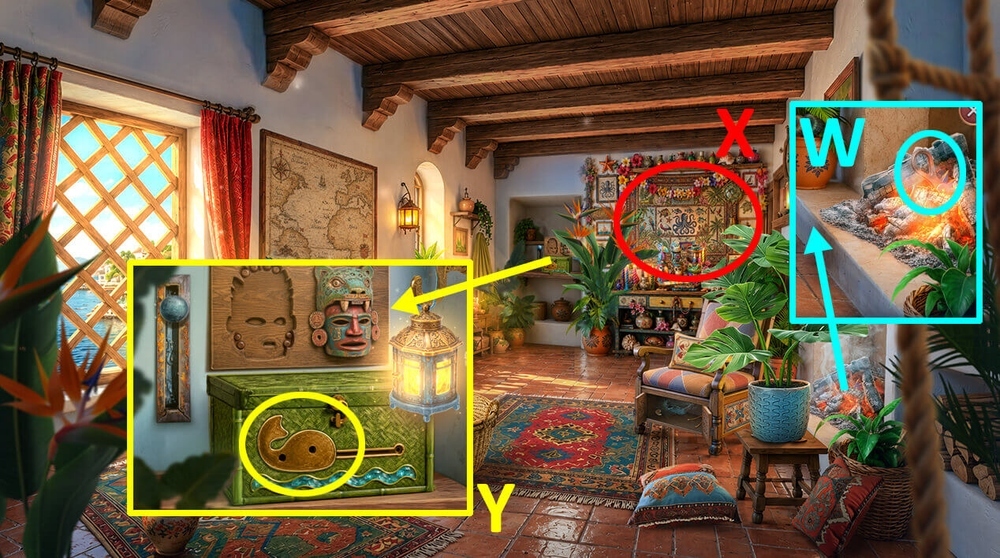
- Use BLACKSMITH’S TONGS on hot coals, earn SPUR (W).
- Play puzzle, earn WHALE FIGURINE (X).
- Use WHALE FIGURINE on the box (Y).
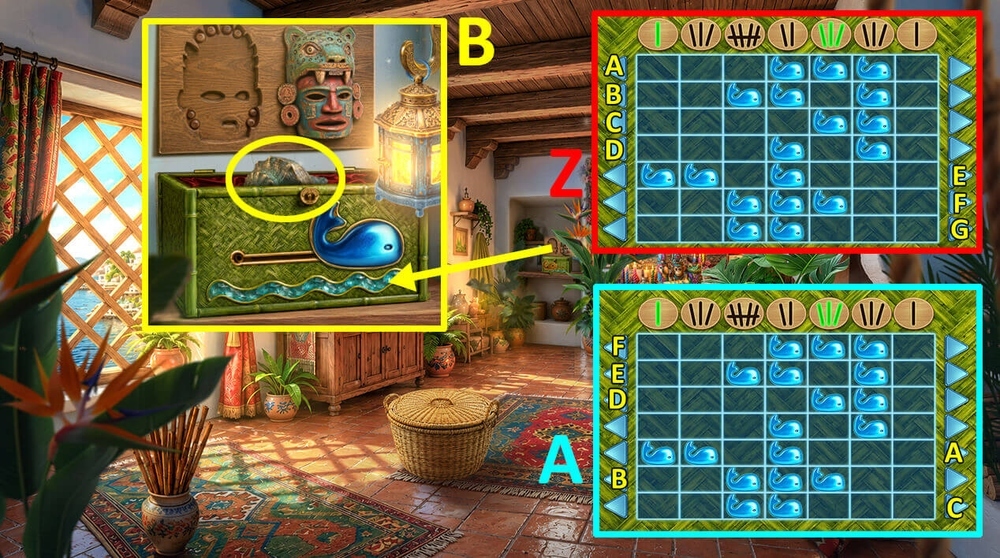
- Easy solution: Click: A*3, B, C*3, D, E*2, F, G*3 (Z).
- Hard solution: Click: A*2, B, C*3, D*2, E, F*3 (A).
- Take SHELL (B).
- Go to the Boat Workshop.
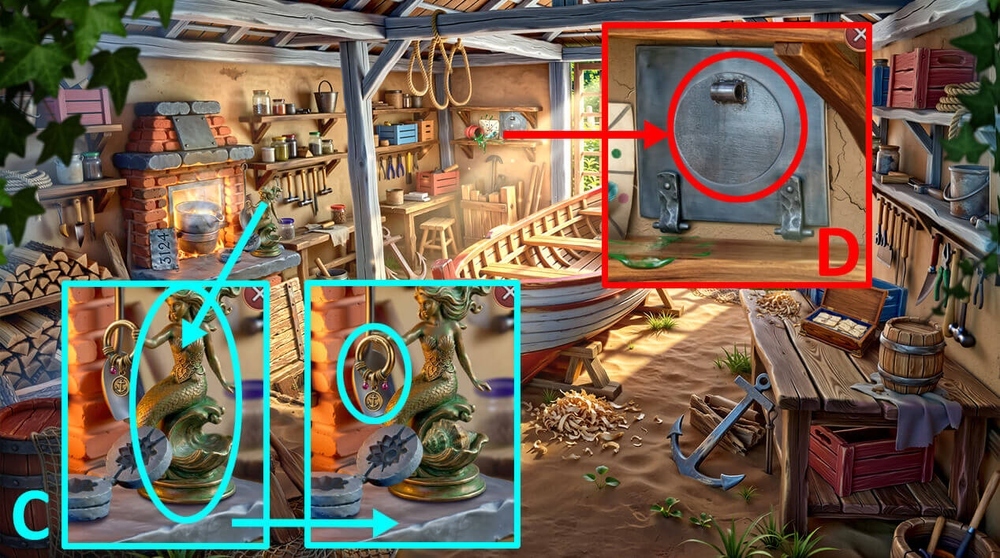
- Use SHELL on the mermaid figurine, take CAPTAIN EARRING (C).
- Use CAPTAIN EARRING on the door in the wall (D).
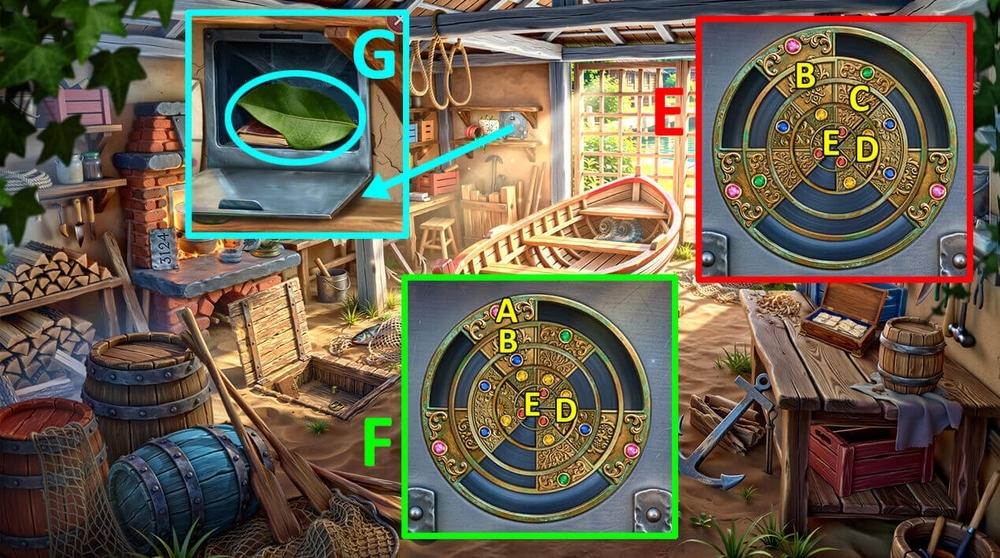
- Easy solution: Click: B, C*6, D*5, E*2 (E).
- Hard solution: Click: B, A*7, D*6, E*2 (F).
- Take BIG LEAF and SCREWDRIVER (G).
- Use SCREWDRIVER on OLD OIL LAMP, earn OIL.
- Go to the Pier House.
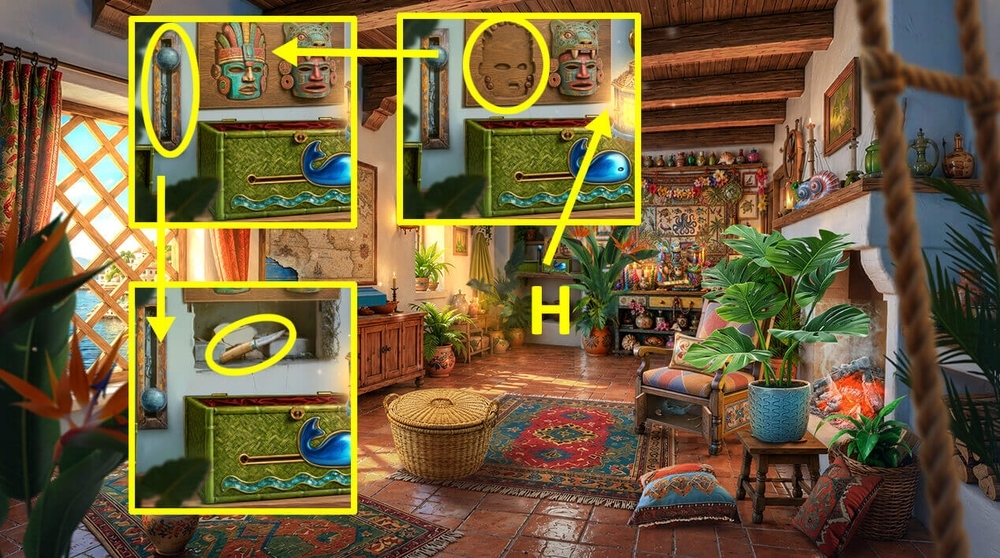
- Use MASK on the mask collection, use OIL on the rusty lever, take FISH KNIFE (H).
- Go to the Flooded Warehouse.
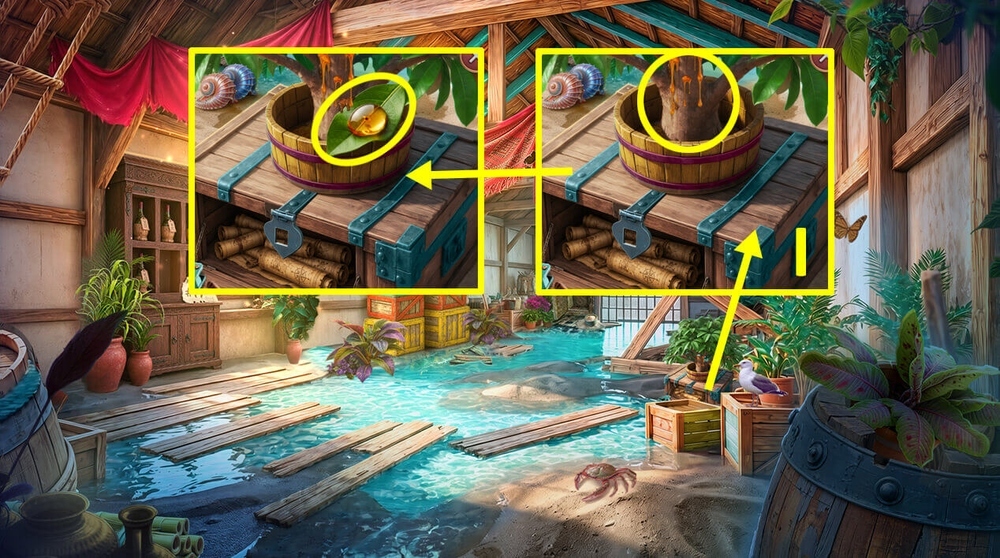
- Use BIG LEAF and FISH KNIFE on the tree, take RESIN (I).
- Go to the Pier House.
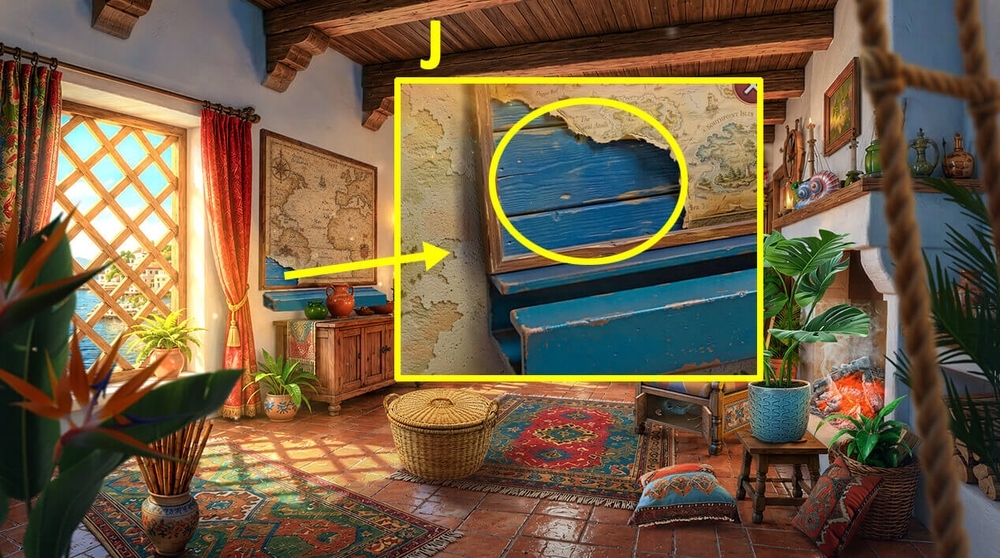
- Use MAP PIECE and RESIN on the scrap of map on the wall (J).

- Easy solution (K): Step 1: Click: A, B.
- Step 2: Click: A, B.
- Step 3: Click: A, B.
- Step 4: Click: A, B.
- Step 5: Click: A, B.
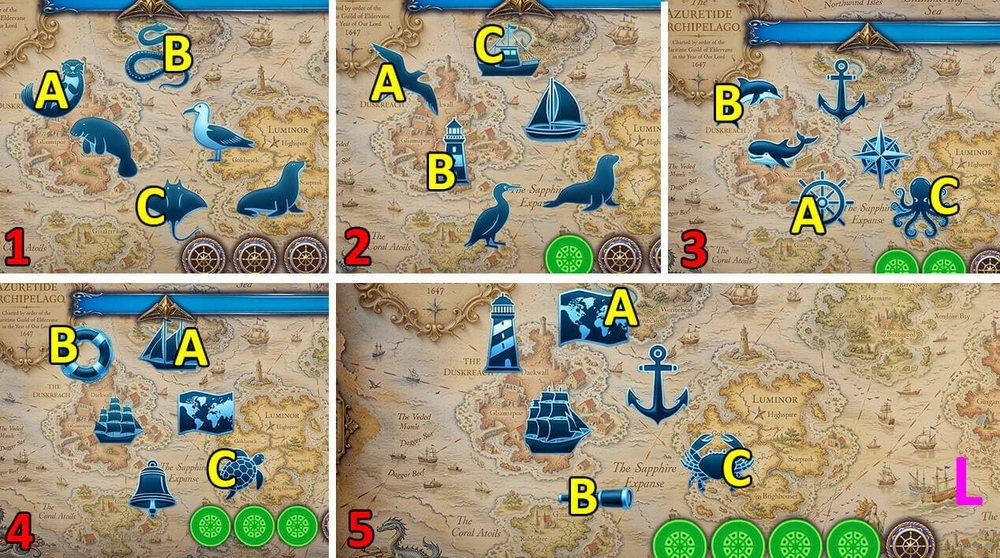
- Hard solution (L): Step 1: Click: A, B, C.
- Step 2: Click: A, B, C.
- Step 3: Click: A, B, C.
- Step 4: Click: A, B, C.
- Step 5: Click: A, B, C.
- Walkthrough Bonus Chapter, at the link below.