Detective Club 3: Carnival of Secrets (Bonus Chapter) – Continues the investigation into the hypnotic music and purple smoke that circus director Gregory uses to control people. Thomas and Emily return to familiar locations to find new evidence of the crimes and uncover the full extent of the carnival organizers’ influence. In the House of Horrors, the heroes discover hiding places, unusual mechanisms, and notes from a man who was forced to lure visitors into the darkness using music. From the evidence they find, it becomes clear that not all the performers participated voluntarily. To continue their search, Thomas must figure out how the devices work and locate the necessary items, including a mannequin’s hand and an unusual two-pronged key. Then Thomas and Emily head to music teacher Richard’s place. After reconstructing the interrupted composition, they gain important insights into hypnosis. Richard explains that certain combinations of sounds can influence the mind, but a powerful amplifier is required to simultaneously control a large crowd. The next part of the investigation leads the heroes to the mayor’s office, where they discover documents regarding a donation for municipal needs and a permit to build a circus arena without an official inspection. The latest lead takes Thomas to Flemus Timer’s tent. The fakir is under prolonged hypnosis and cannot free himself from the director’s influence on his own. In his notes, he describes how Gregory forced him to enter the arena; as soon as a certain melody began to play, Flemus would lose control of his own thoughts. Even attempts to resist were futile, as the purple smoke continued to intensify the effect. Thomas must restore the mechanisms, gather the necessary items, and find a way to bring the performer back to consciousness. Upon waking, Flemus recounts his ordeal and promises to help stop Gregory.
Bonus Chapter Walkthrough
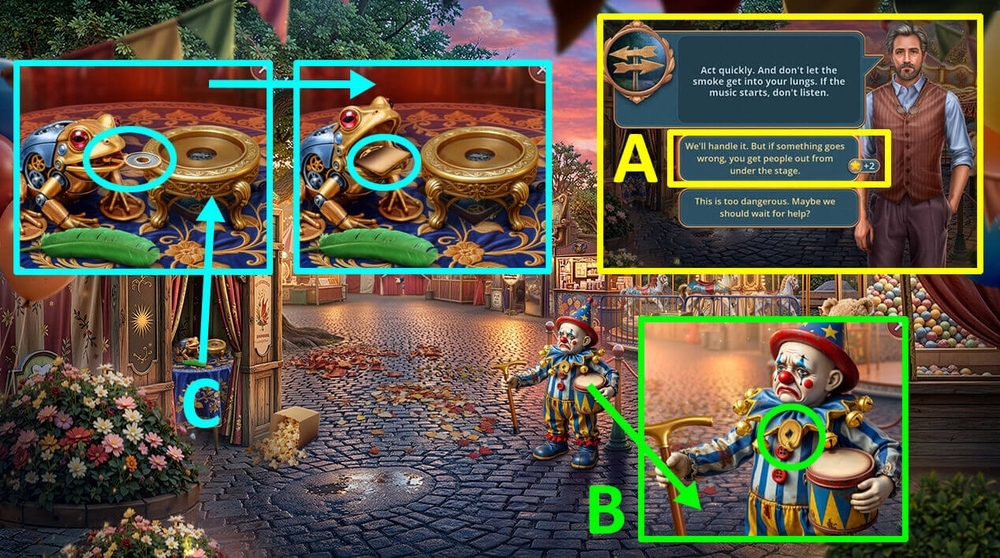
- Select this option, earn ANTIDOTE (A).
- Take ANCIENT COIN (B).
- Use ANCIENT COIN on the frog, read the note, take HORSESHOE (C).
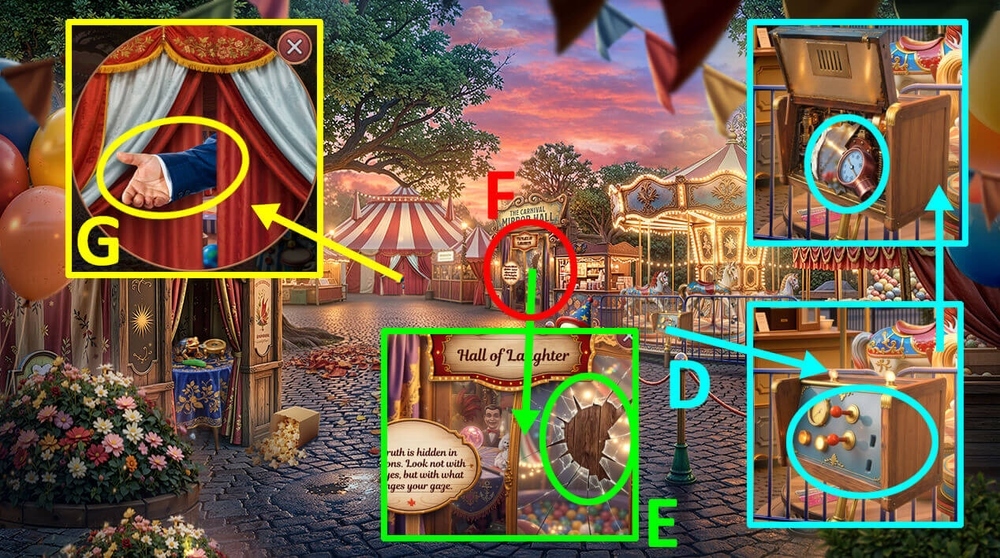
- Use HORSESHOE on the attraction control system, take MANOMETER and MIRROR SHARD (D).
- Use RESIN and MIRROR SHARD on the broken mirror (E).
- Play puzzle, earn CIRCUS EMPLOYEE PASS (F).
- Use CIRCUS EMPLOYEE PASS on the outstretched hand (G).
- Go forward.
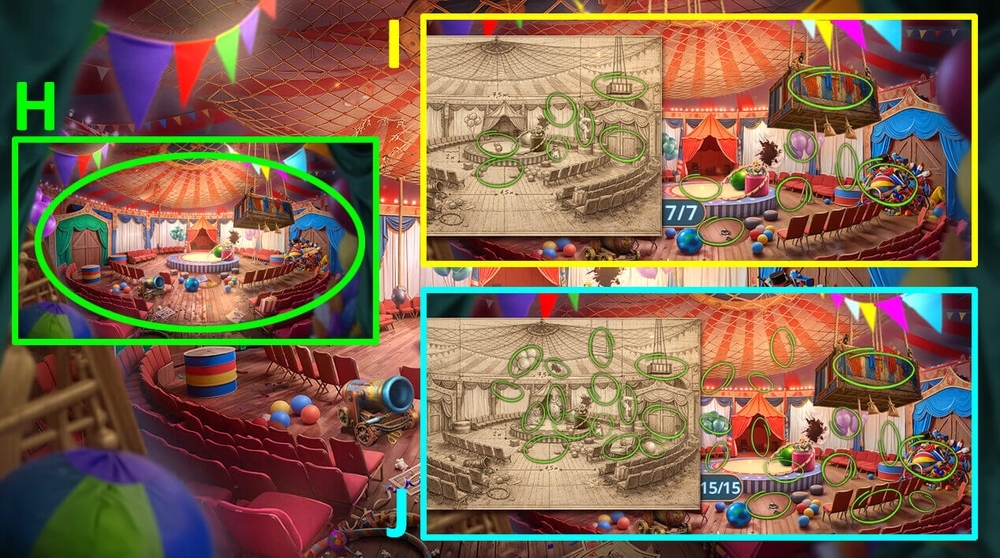
- Use CIRCUS STAGE PLANS on the background (H).
- Easy solution: Use the picture as a hint (I).
- Hard solution: Use the picture as a hint (J).
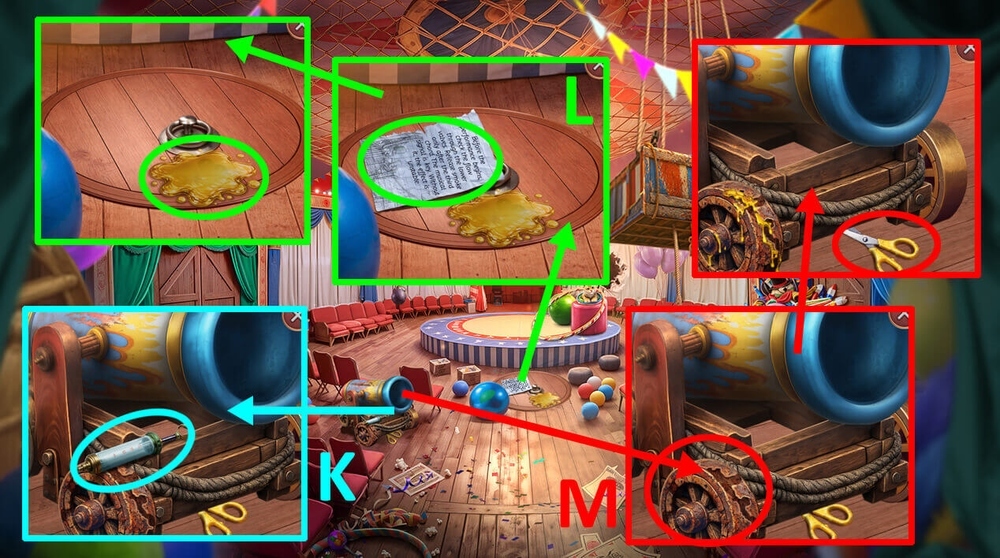
- Take SYRINGE WITHOUT NEEDLE (K).
- Read the note, use SYRINGE WITHOUT NEEDLE on the oil, earn SYRINGE WITH OIL (L).
- Use SYRINGE WITH OIL on the hinges of the circus cannon, take SCISSORS (M).
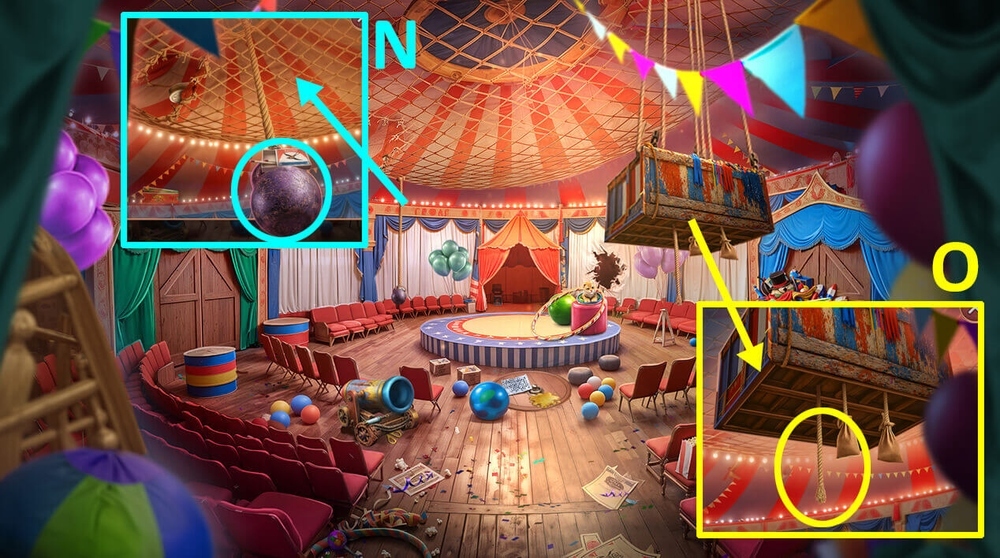
- Use SCISSORS on the rope, earn SCISSORS, MATCHES, and WEIGHT (N).
- Use WEIGHT on the rope on the lift (O).
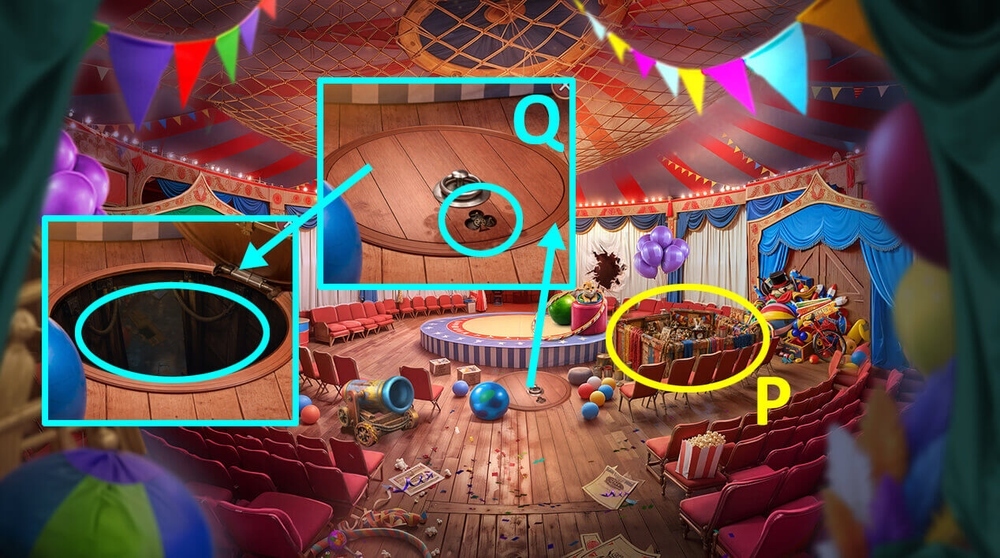
- Play puzzle, earn SIGNET RING (P).
- Use CANDLES and MATCHES on CANDELABRUM, earn MATCHES and CANDLESTICK.
- Use SIGNET RING on the slot in the floor hatch, use CANDLESTICK on the darkness (Q).
- Go forward.
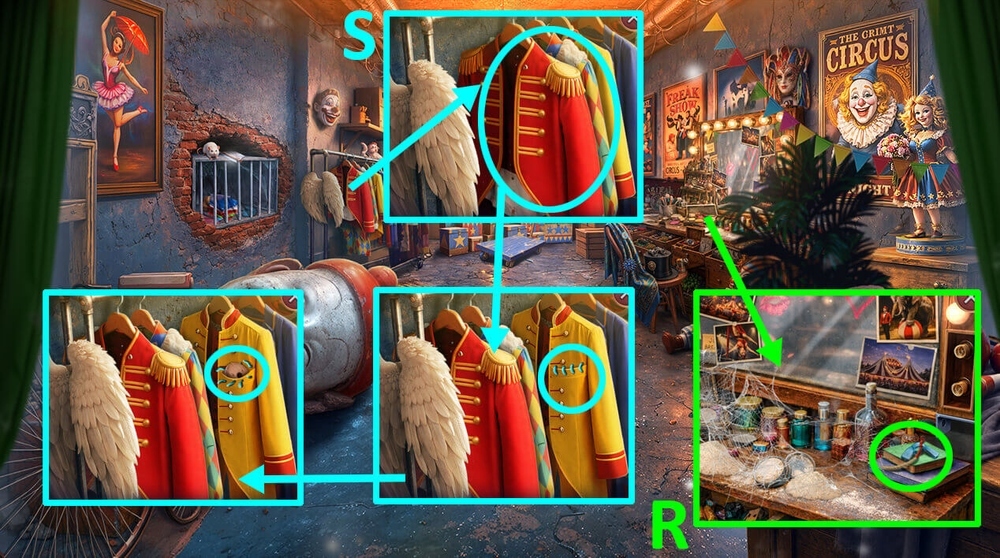
- Take WICK and SCREW (R).
- Click on the clothes, use SCISSORS on the pocket, take EMPTY COIL (S).
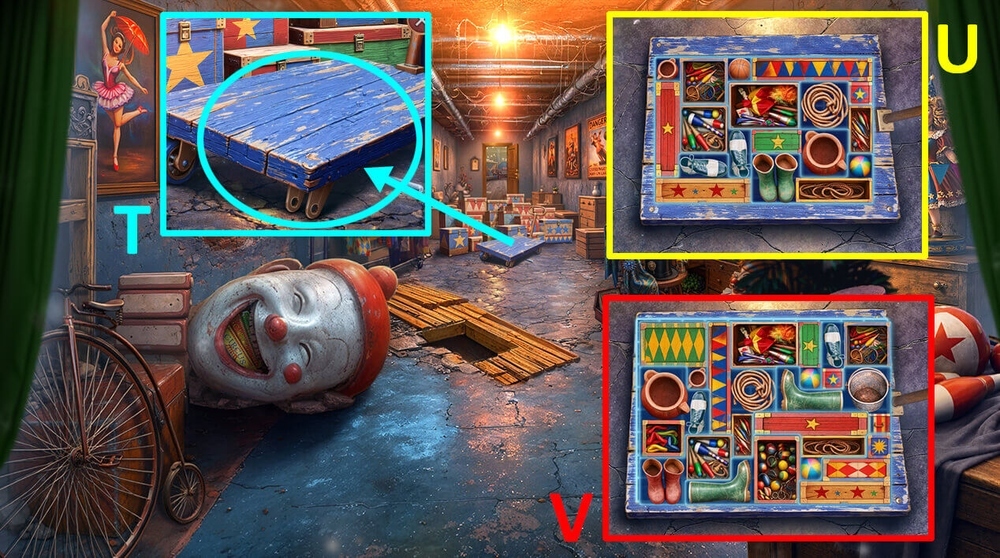
- Use SCREW and EMPTY COIL on the broken cart (T).
- Easy solution: Use the picture as a hint (U).
- Hard solution: Use the picture as a hint (V).
- Go forward.
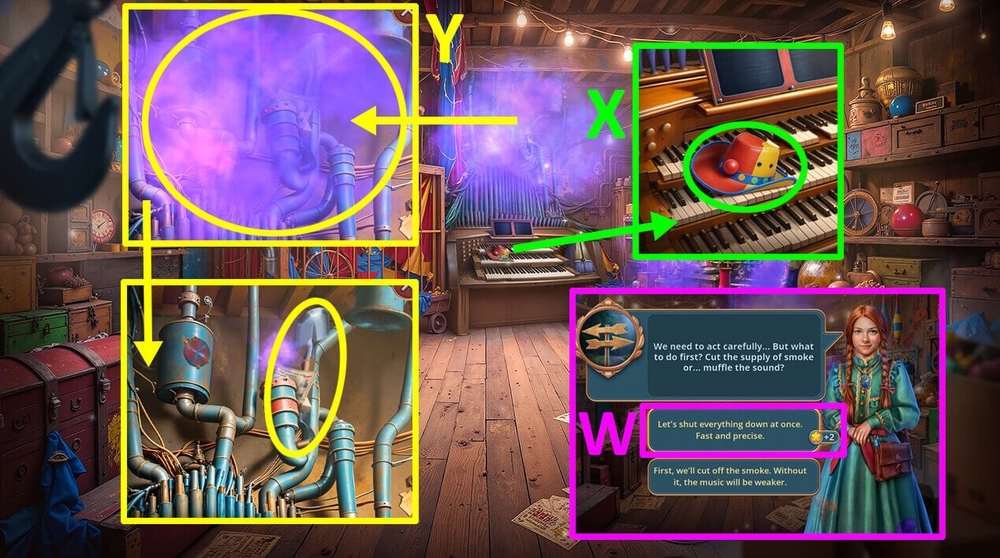
- Select this option (W).
- Take WIDE-BRIMMED HAT (X).
- Use WIDE-BRIMMED HAT on the smoke, read the note, take ORGAN KEYS 1/2 and SHOVEL (Y).
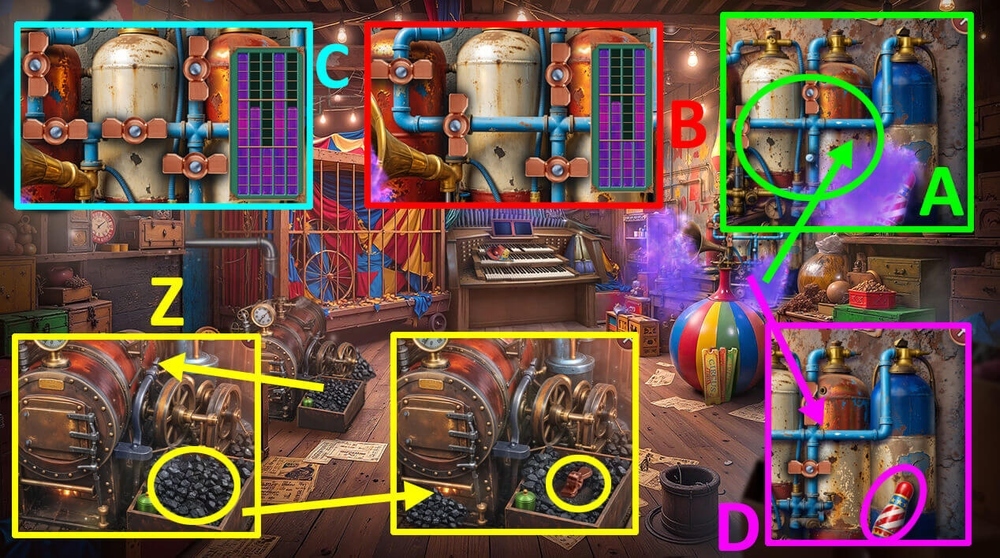
- Use SHOVEL on the coals, take VALVE (Z).
- Use VALVE on the gas canisters (A).
- Easy solution: Solution is random (B).
- Hard solution: Solution is random (C).
- Take BOWLING PIN (D).
- Go to Circus Tent.
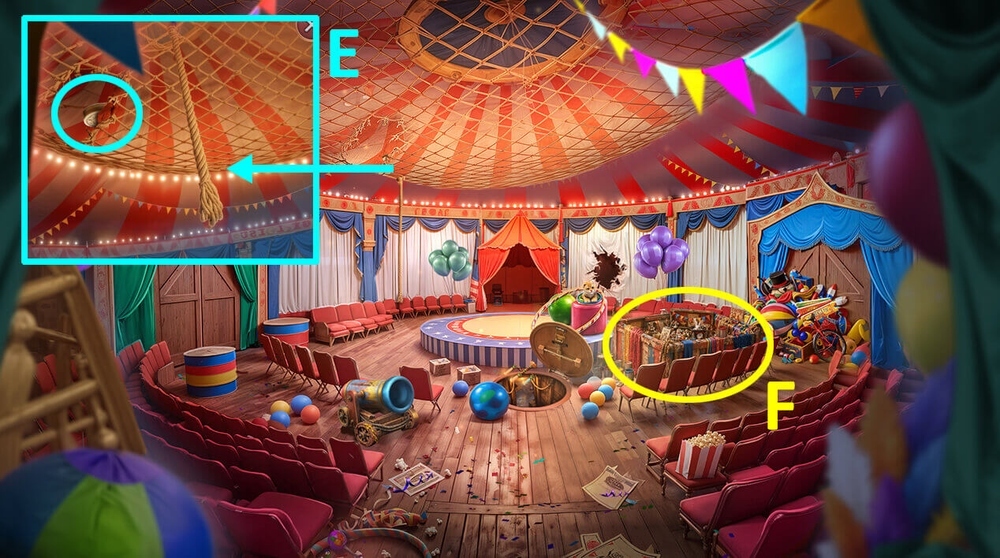
- Use BOWLING PIN on the item stuck in the net, earn GAME PIECES 1/2 (E).
- Play puzzle, earn BELL (F).
- Go back.
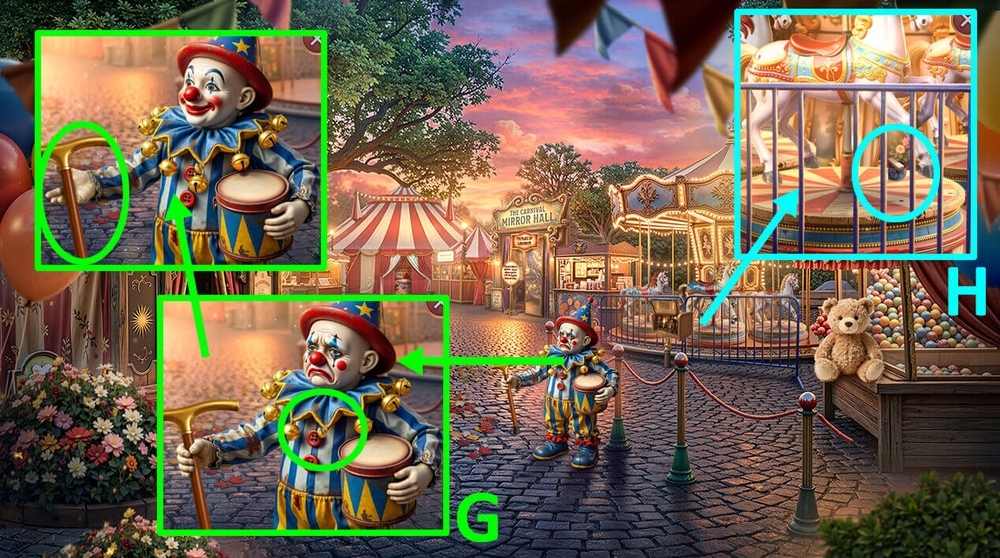
- Use BELL on the clown mannequin, take CLOWN’S CANE (G).
- Use CLOWN’S CANE on the items behind the attraction’s fence, earn ORGAN KEYS 2/2 and BRACELET (H).
- Go to Understage Room.
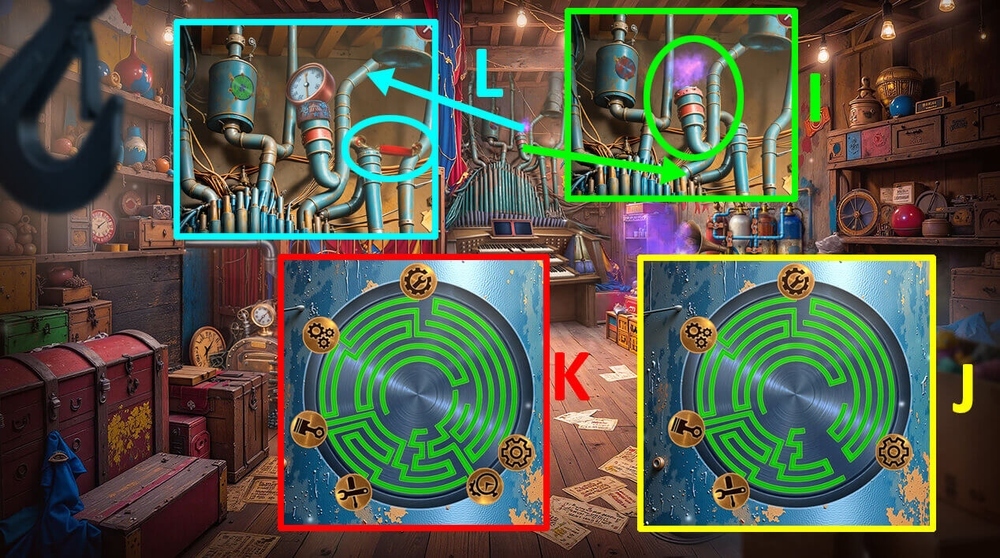
- Use MANOMETER and BRACELET on the mechanism (I).
- Easy solution: Use the picture as a hint (J).
- Hard solution: Use the picture as a hint (K).
- Take DOOR HANDLE (L).
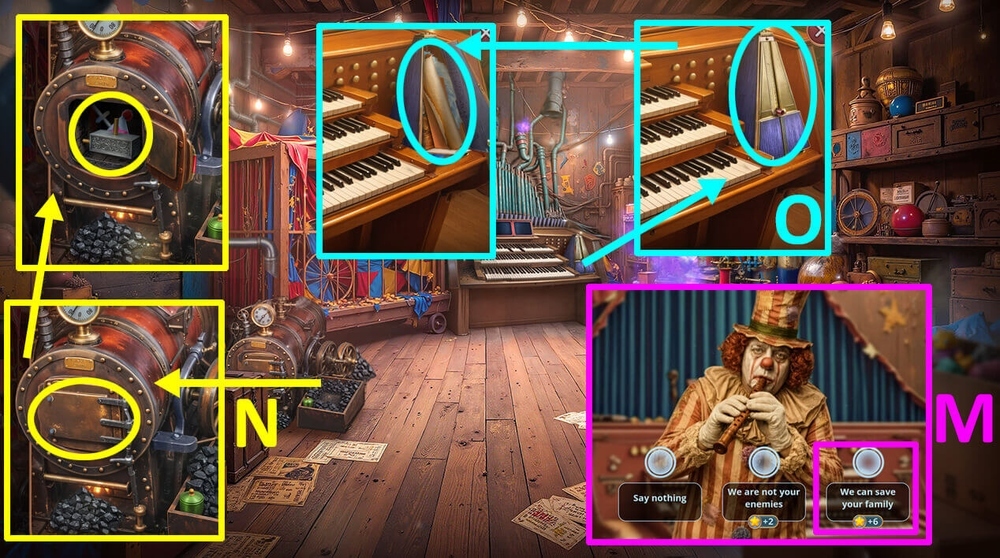
- Select this option (M).
- Use DOOR HANDLE on the door, take FRAME PARTS 1/3, MONKEY’S HAT and METRONOME POINTER (N).
- Use METRONOME POINTER on the metronome, take MECHANISM SCHEME, BOOKS 1/2 and FLUFFY BOA (O).
- Go back.
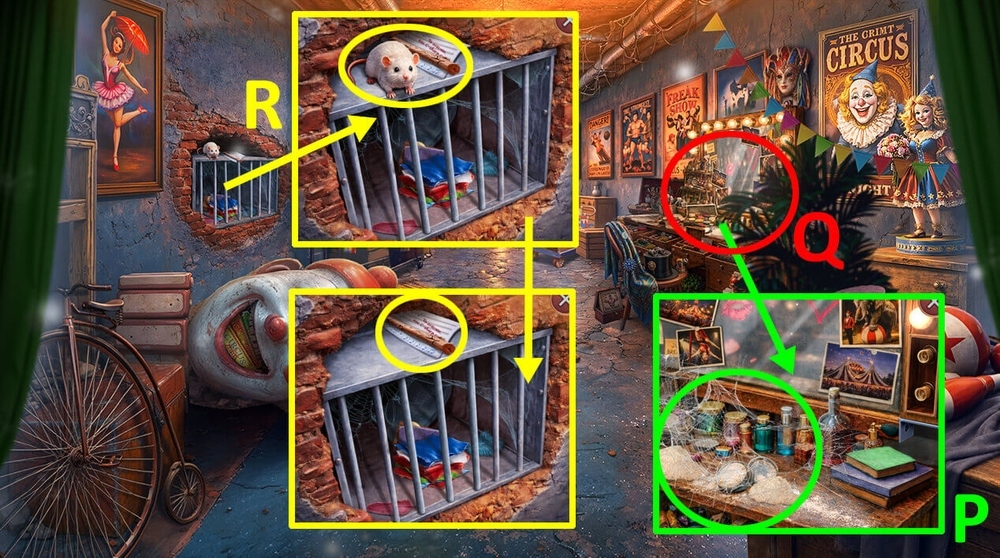
- Use FLUFFY BOA on the scattered powder and spider webs (P).
- Play puzzle, earn CHEESE (Q).
- Use CHEESE on the mouse, take LONG BRANCH and OLD MUSICAL SCORE (R).
- Go forward.
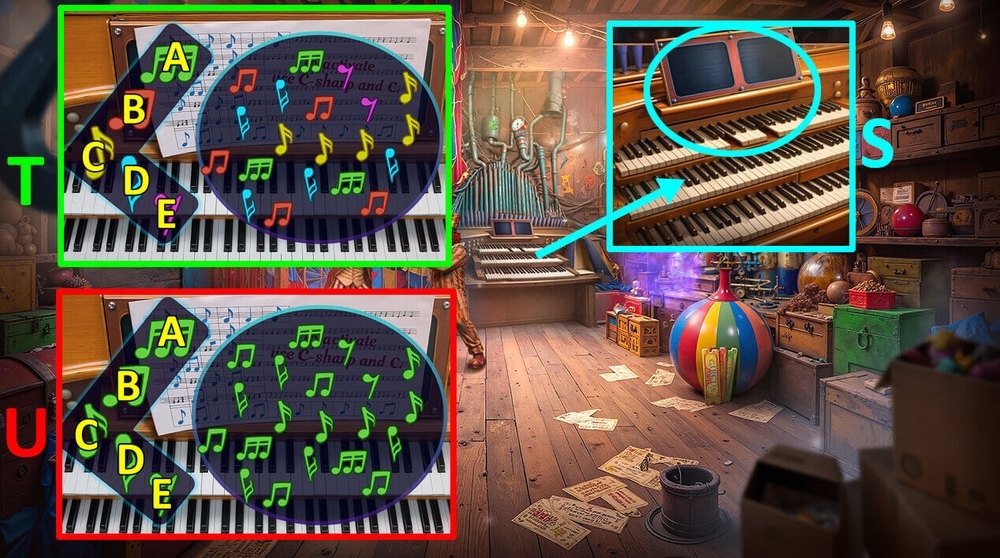
- Use ORGAN KEYS 2/2 and OLD MUSICAL SCORE on the organ (S).
- Easy solution: Click: D, B, E, C, D, A, B, D (T).
- Hard solution: Click: E, D, B, C, D, A, B, D (U).

- Take STRONGMAN’S BELT and ADAPTER CYLINDER (V).
- Use ANTIDOTE, MECHANISM SCHEME and ADAPTER CYLINDER on the smoke (W).
- Take CANNONBALL (X).
- Go to Circus Tent.
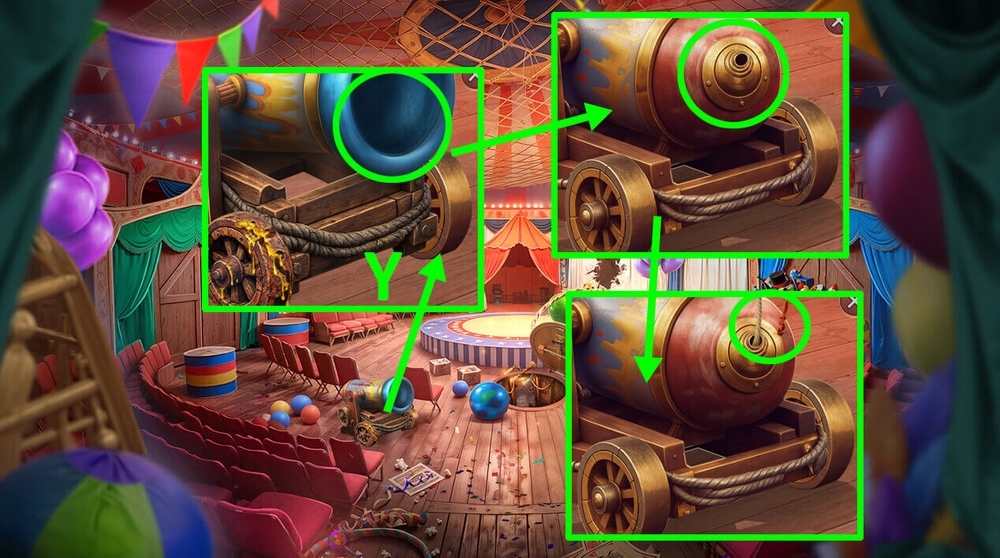
- Use CANNONBALL on the cannon, use WICK and MATCHES on the cannon (Y).
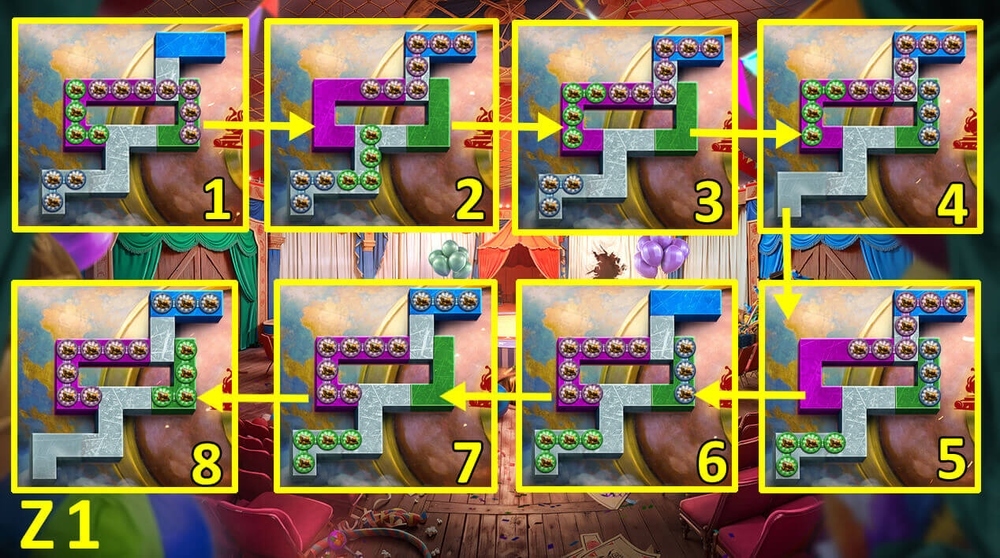
- Easy solution: Arrange the chains as described in the steps 1-8 (Z1).
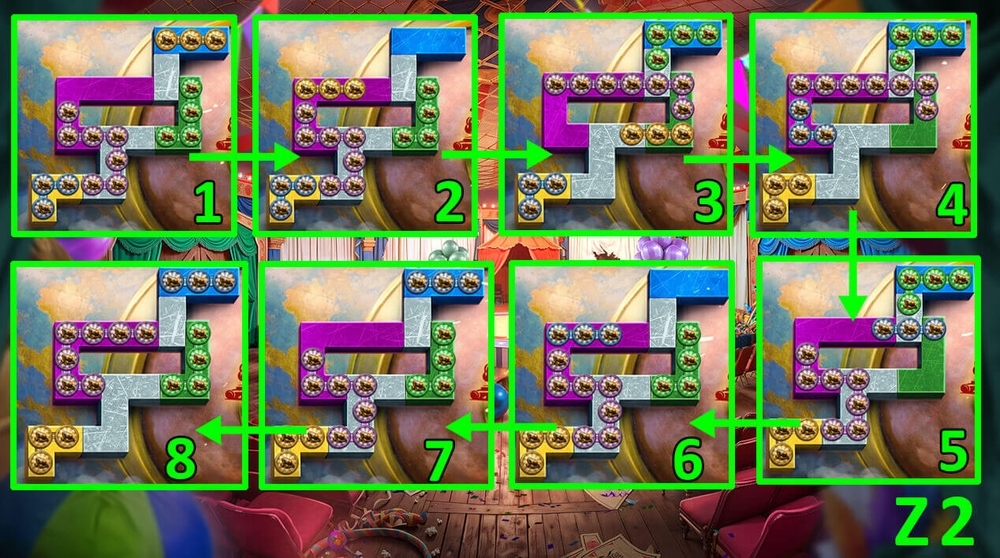
- Hard solution: Arrange the chains as described in the steps 1-10 (Z2).
- Go to Backstage.
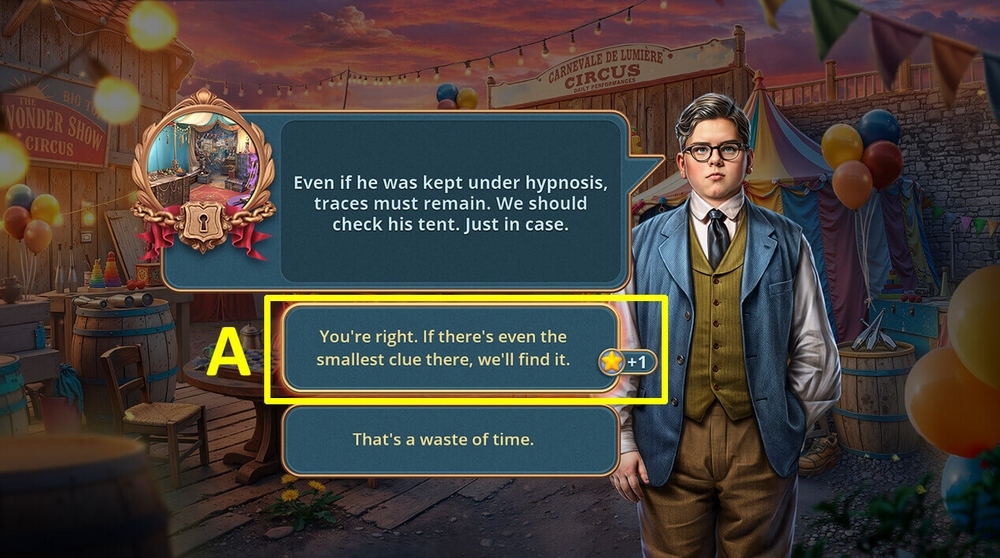
- Select this option (A).
- Go to Flemus’ Tent.
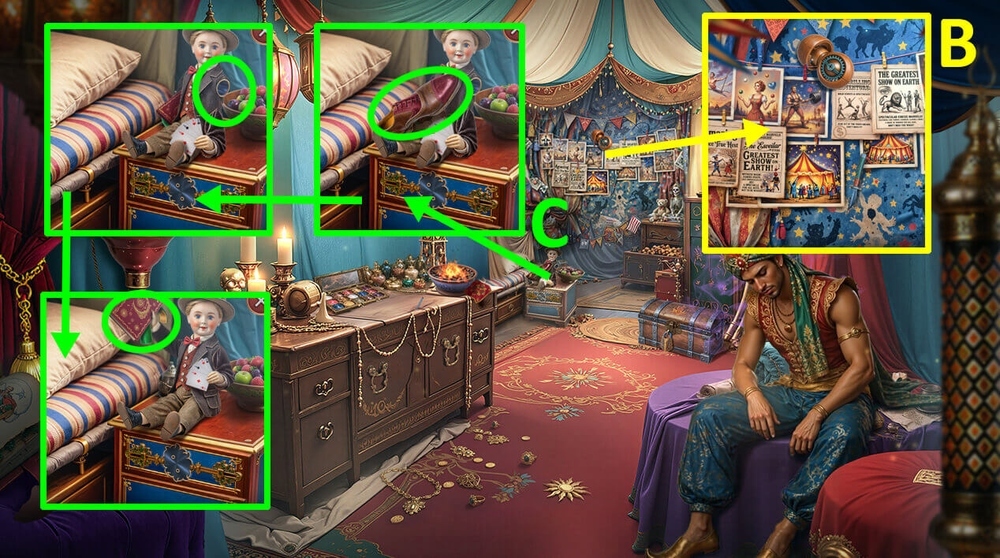
- Take HINGE WITH GEAR (B).
- Take FLEMUS’ SHOE, use HINGE WITH GEAR on the doll, read Flemus’ personal notes, take UMBRELLA HANDLE (C).
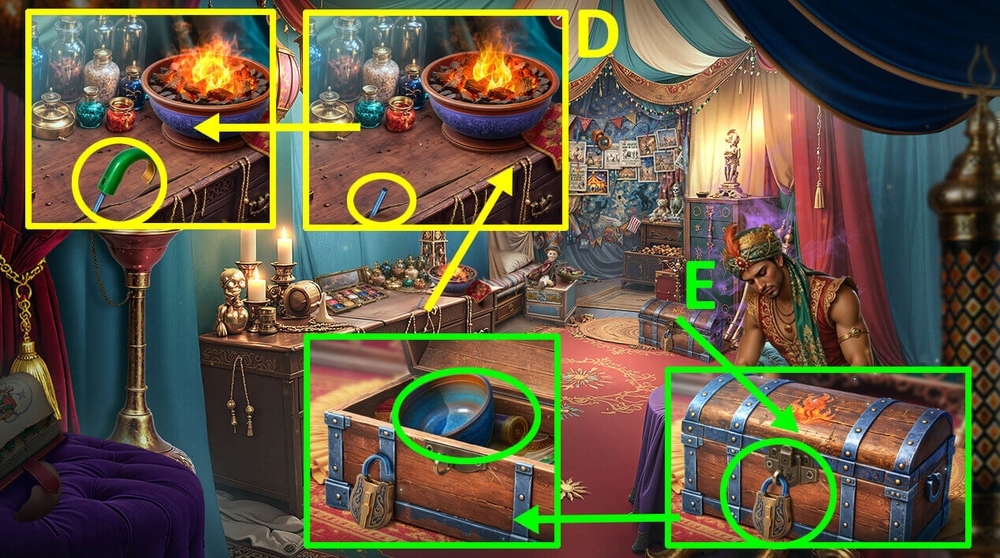
- Use UMBRELLA HANDLE on the spoke, take UMBRELLA SPOKE (D).
- Use FLEMUS’ SHOE and UMBRELLA SPOKE on the lock, take CRUCIBLE and PHONOGRAPH CYLINDER (E).
- Go back.
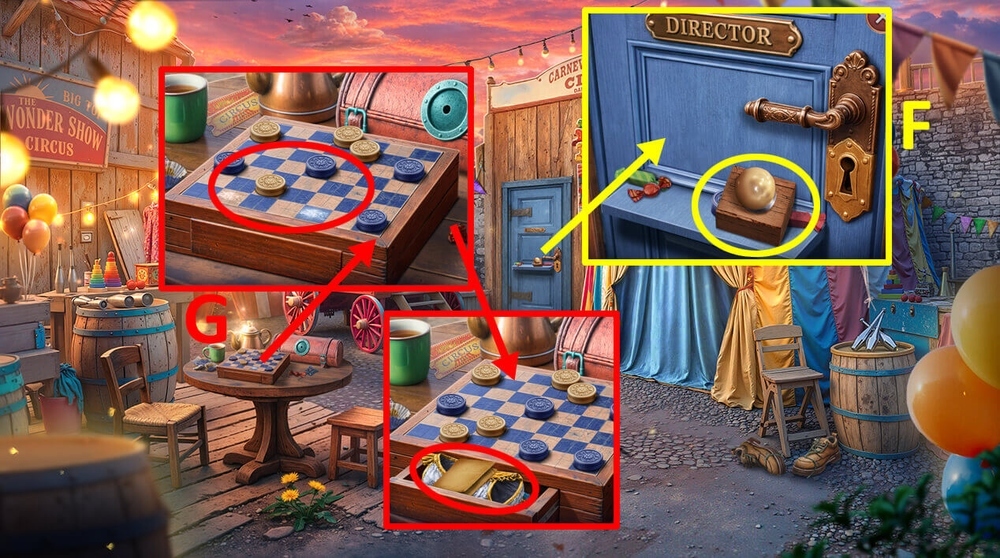
- Take FRAME PARTS 2/3 and GAME PIECES 2/2 (F).
- Use GAME PIECES 2/2 on the checkers board, read the note, take DOLLY DRESS (G).
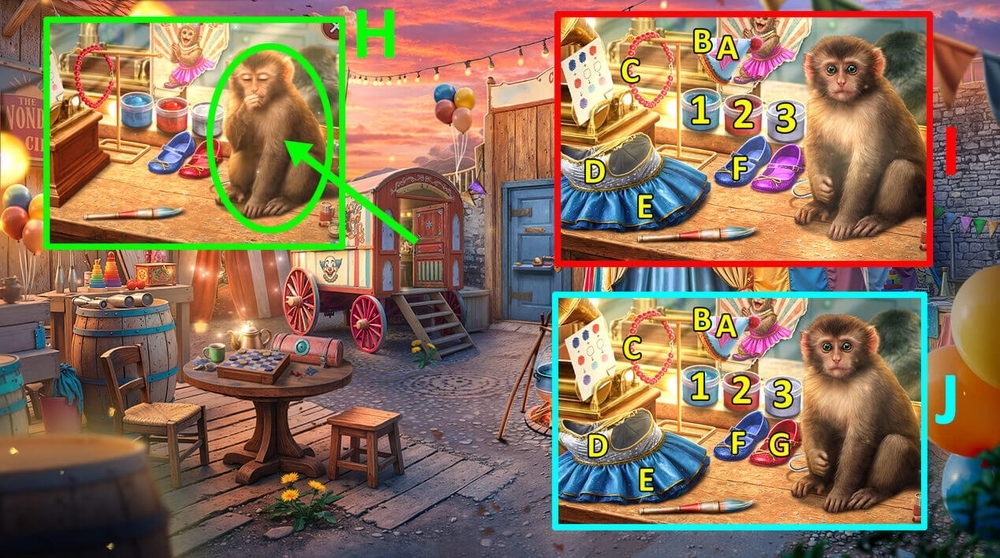
- Use MONKEY’S HAT and DOLLY DRESS on the monkey (H).
- Easy solution: Click: 3, C, 2, D, E, 1, A, 2, F, 2, B (I).
- Hard solution: Click: 1, A, 2, F, G, 2, B, 3, D, E, 3, C (J).
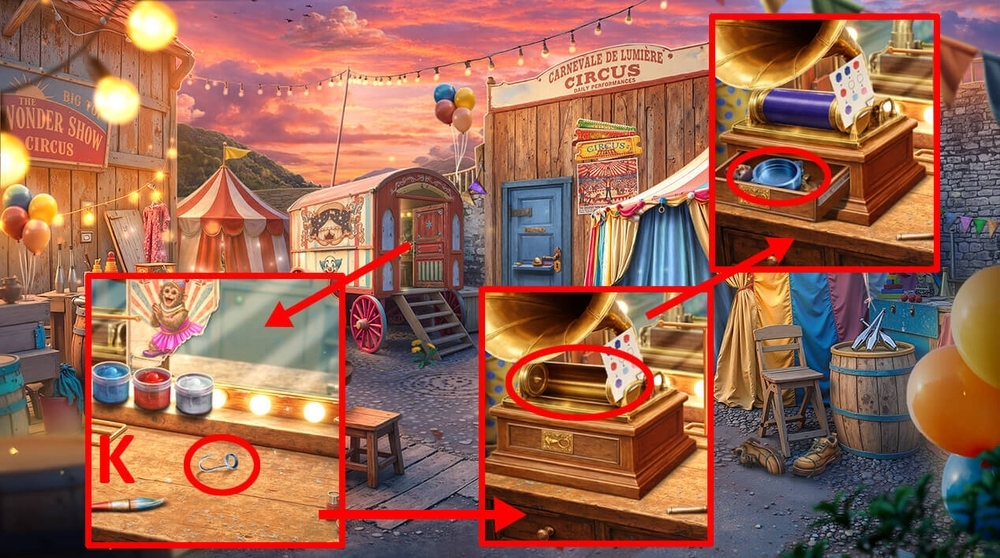
- Take HOOK, use PHONOGRAPH CYLINDER on the phonograph, take LENS MOLD and DRAWER AMULET (K).
- Go to Flemus’ Tent.
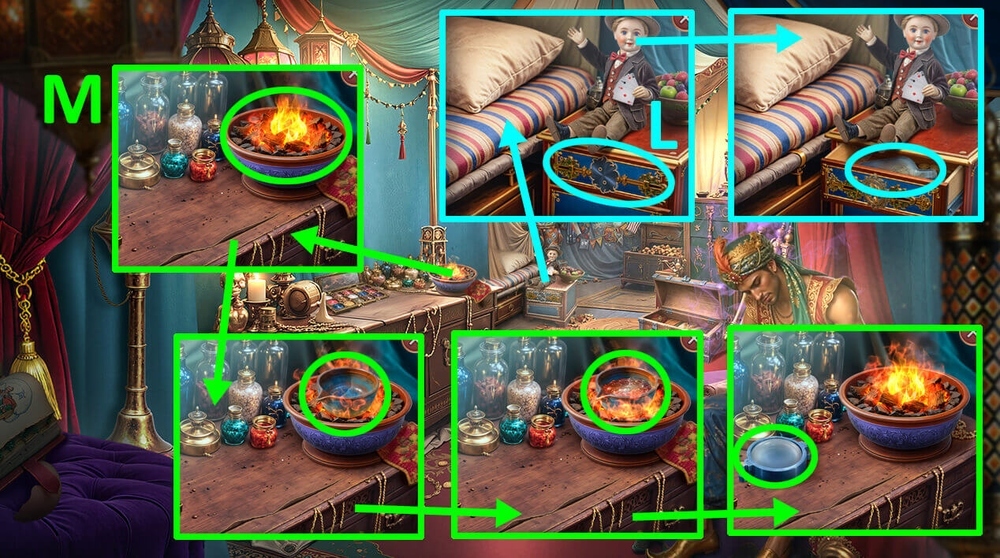
- Use DRAWER AMULET on the drawer, take BOTTLE (L).
- Use CRUCIBLE on the fire, use BOTTLE on the crucible, use LENS MOLD on the crucible, take LENS (M).
- Use HOOK on LONG BRANCH, earn BRANCH WITH HOOK.
- Go back.
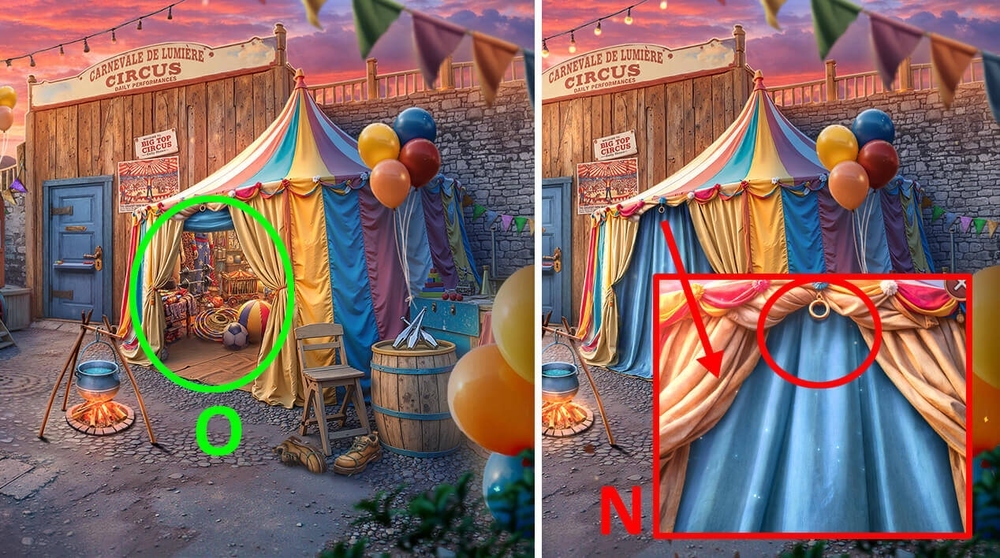
- Use BRANCH WITH HOOK on the ring (N).
- Play puzzle, earn MAGICIAN’S STAFF (O).
- Go to Understage Corridor.
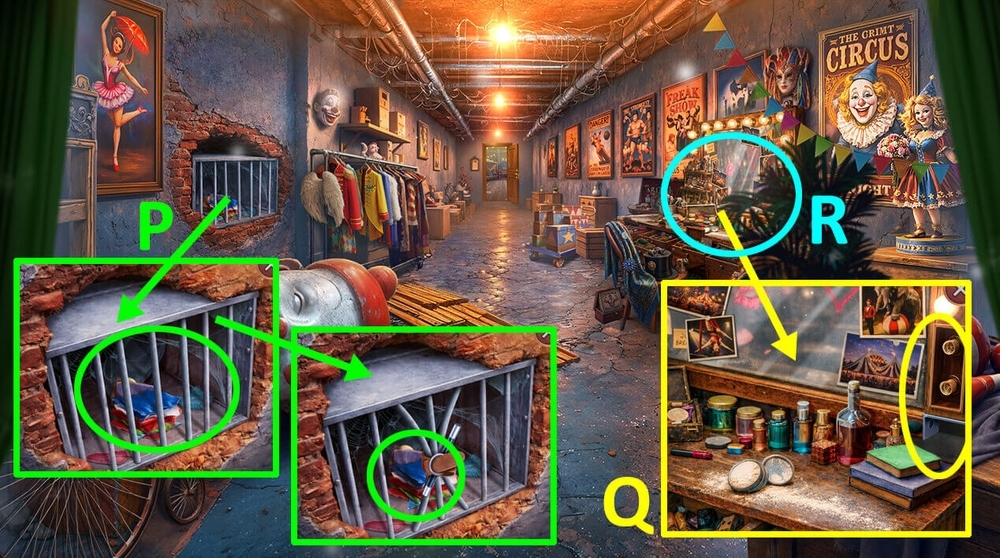
- Use STRONGMAN’S BELT and MAGICIAN’S STAFF on the bars, take TWEED FABRIC, CARBON PAPER and FRAME PARTS 3/3 (P).
- Use FRAME PARTS 3/3 on the frame (Q).
- Play puzzle, earn KEYS (R).
- Go to Backstage.
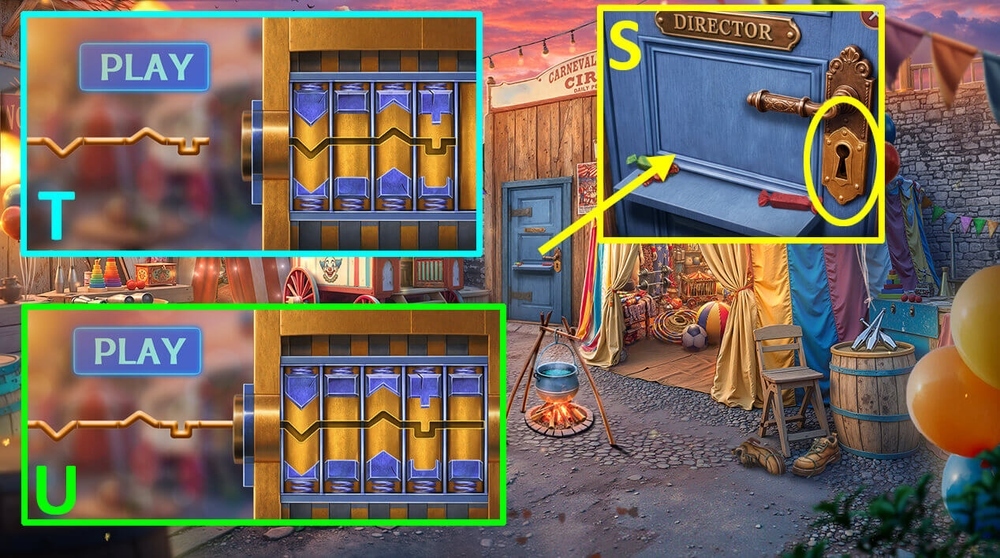
- Use KEYS on the door (S).
- Easy solution: Arrange the puzzle pieces as shown in the picture and click the “Play” button (T).
- Hard solution: Arrange the puzzle pieces as shown in the picture and click the “Play” button (U).
- Go to Circus Director’s Office.
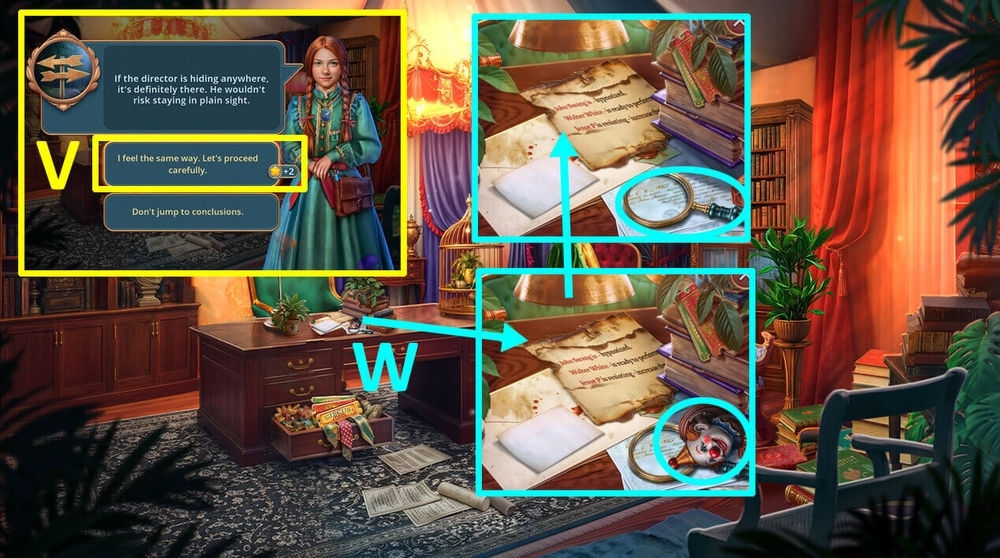
- Select this option (V).
- Take CLOWN HANDLE, use LENS on the magnifying glass without a lens, take MAGNIFYING GLASS (W).
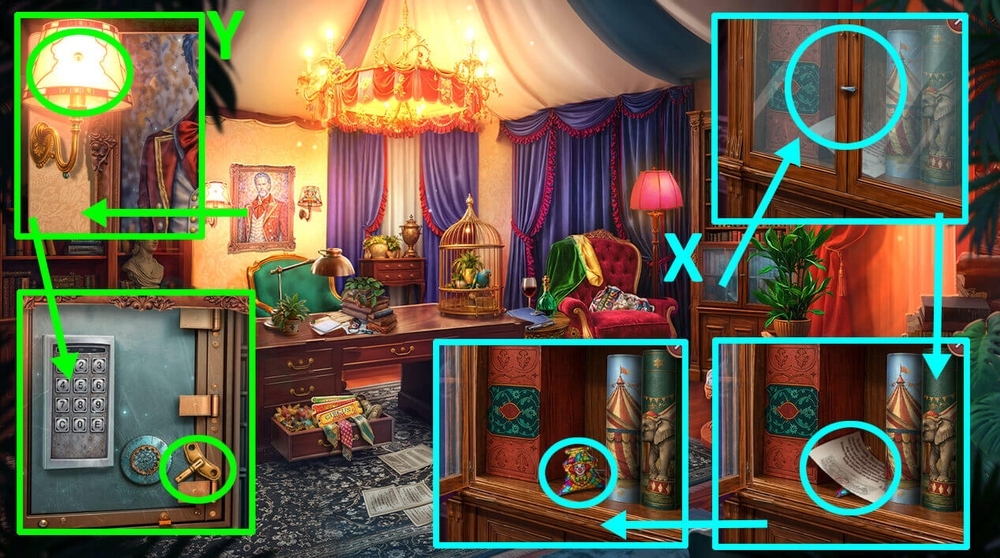
- Use CLOWN HANDLE on the door, read the note, take CLOWN PATTERN (X).
- Use CLOWN PATTERN on the lamp, take WINDING KEY (Y).
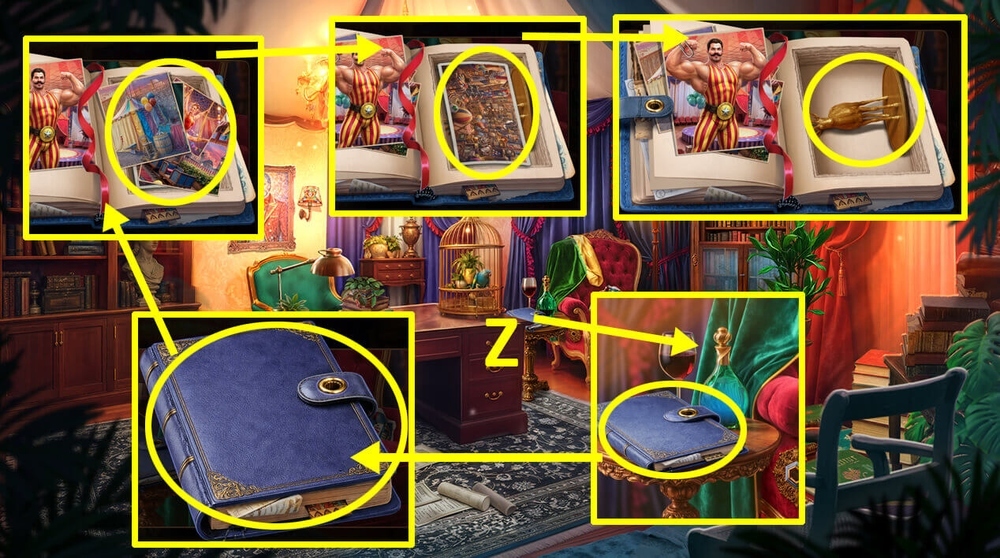
- Use WINDING KEY on the album, click on the photos, take TENT PHOTO and GAME PIECES 1/2 (Z).
- Go back.
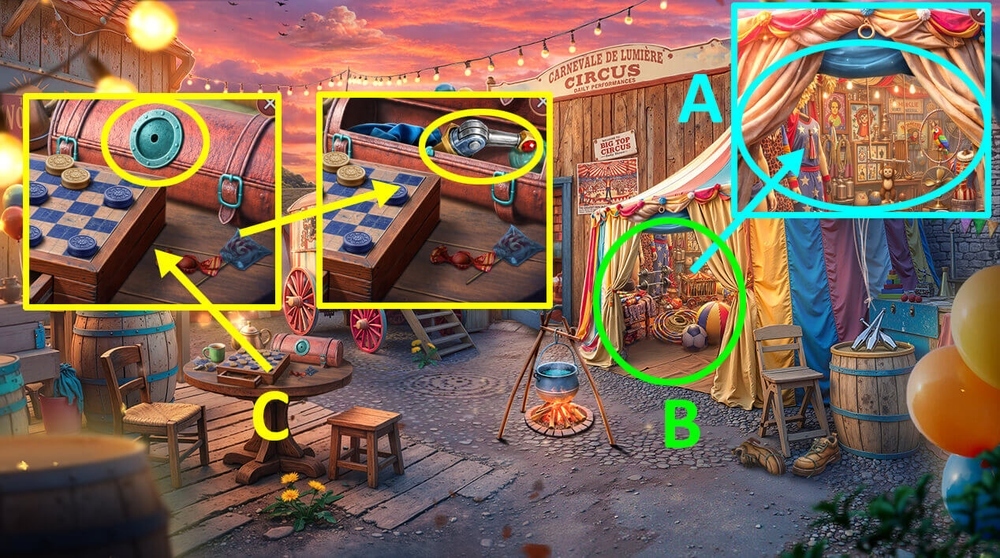
- Use TENT PHOTO on the tent (A).
- Play puzzle, earn GOLD EMBLEM (B).
- Use GOLD EMBLEM on the lock, take CHAIR LEVER (C).
- Go to Flemus’ Tent.
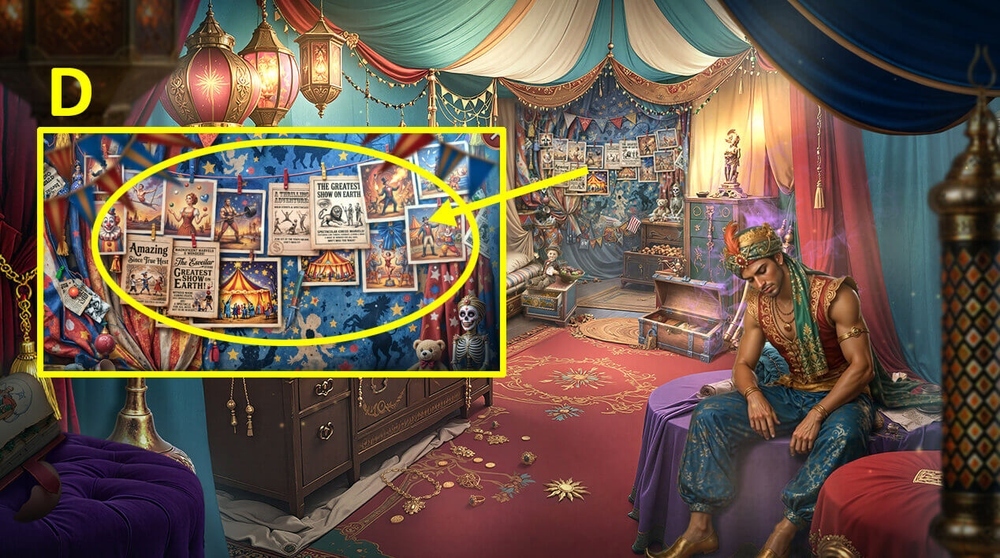
- Use MAGNIFYING GLASS on the posters on the wall (D).
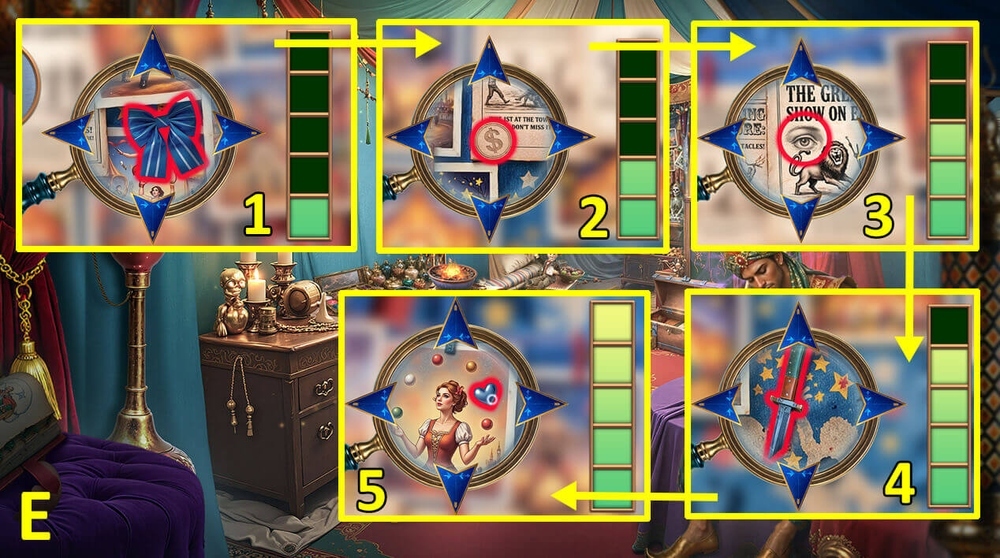
- Easy solution: Follow steps 1-5 (E).

- Hard solution: Follow steps 1-7 (F).
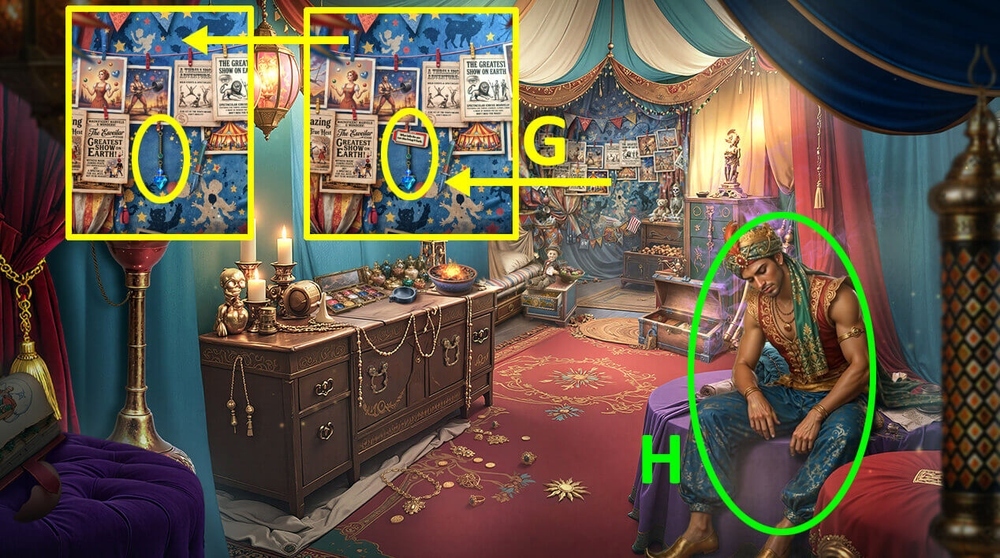
- Read the note, take ANTI-HYPNOSIS PENDULUM (G).
- Use ANTI-HYPNOSIS PENDULUM on Flemus, talk to Flemus (H).
- Go to Circus Director’s Office.
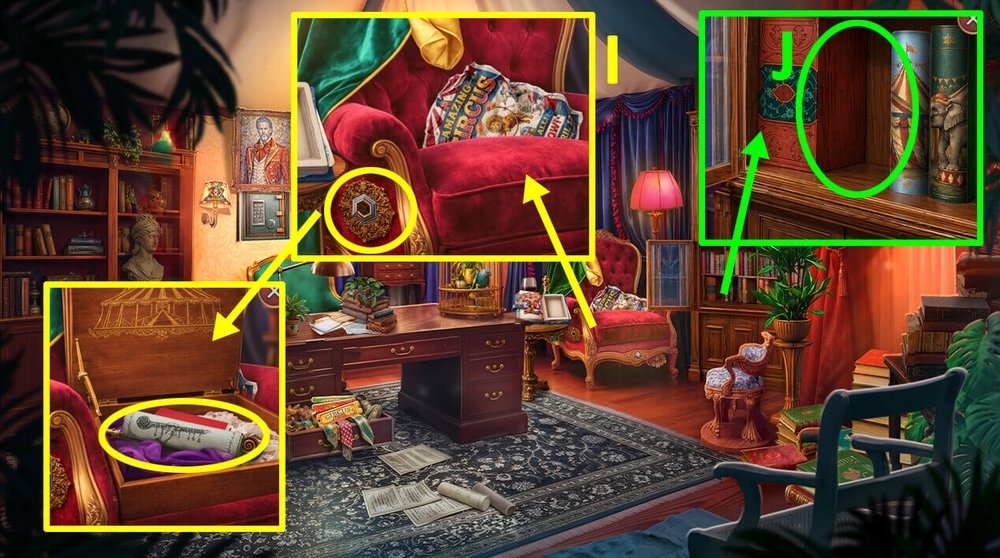
- Use CHAIR LEVER on the chair, read the note, take HYPNOSIS FLUTE and BOOKS 2/2 (I).
- Use BOOKS 2/2 on the bookcase (J).
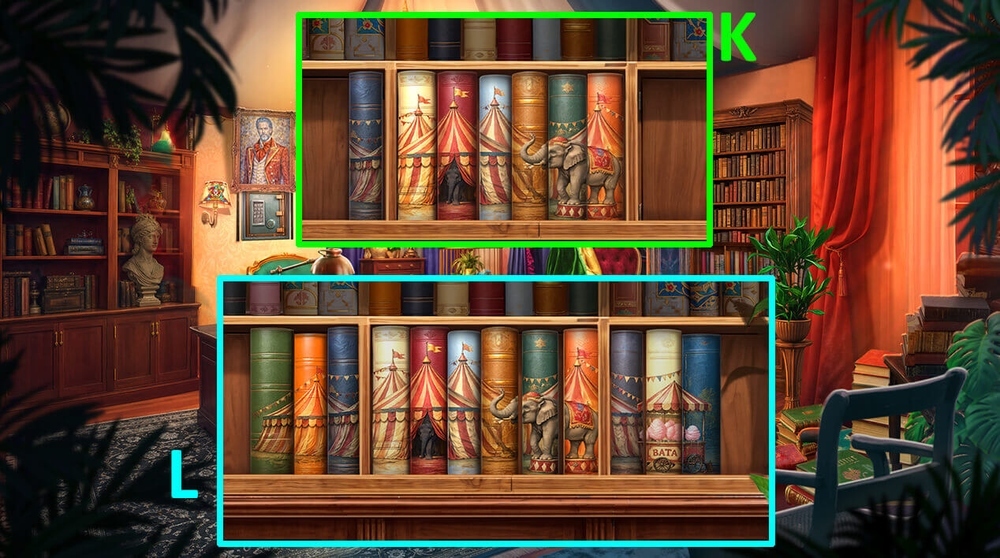
- Easy solution: Use the picture as a hint (K).
- Hard solution: Use the picture as a hint (L).
- Go forward.
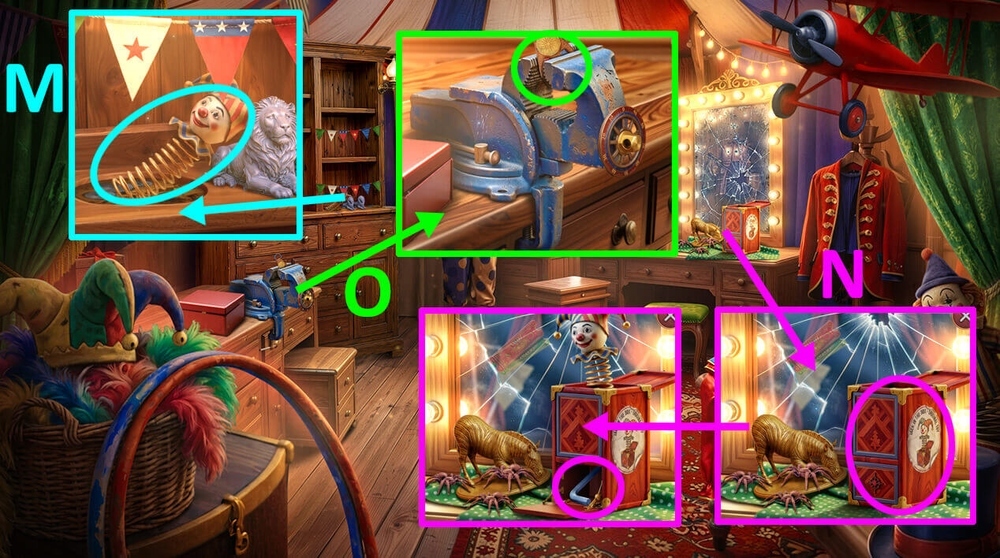
- Take CLOWN FIGURINE (M).
- Use CLOWN FIGURINE on the box, take HEX KEY (N).
- Use HEX KEY on the workbench (O).
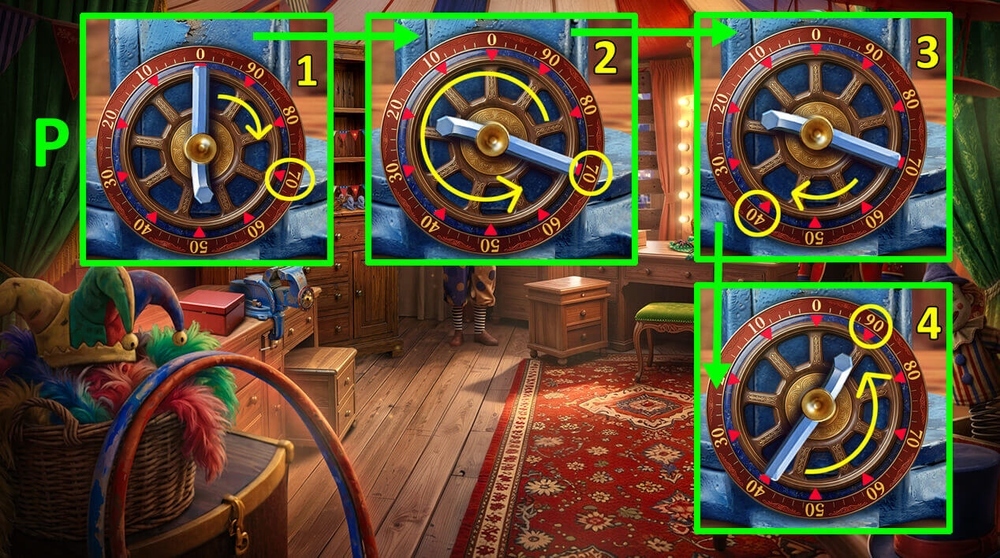
- Easy solution: Follow steps 1-4 (P).
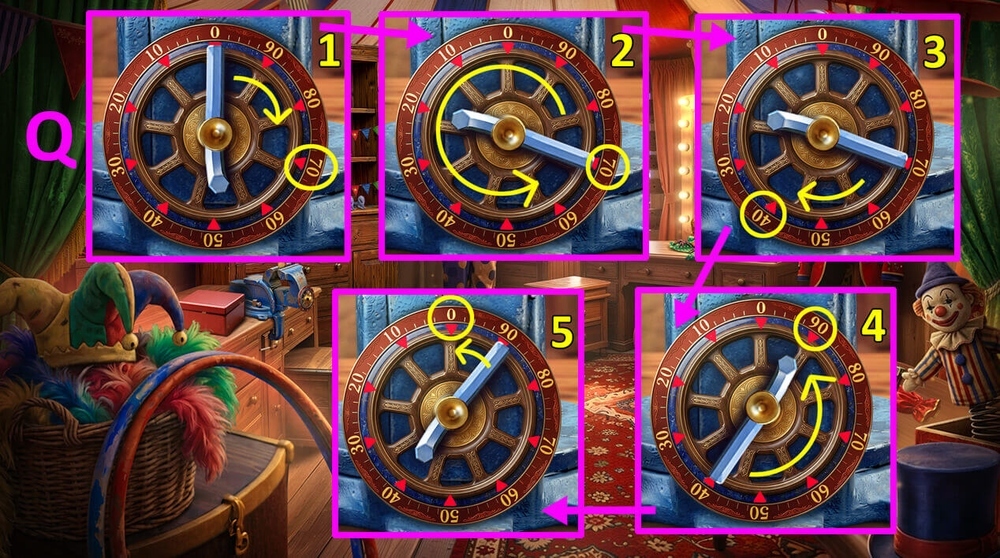
- Hard solution: Follow steps 1-5 (Q).
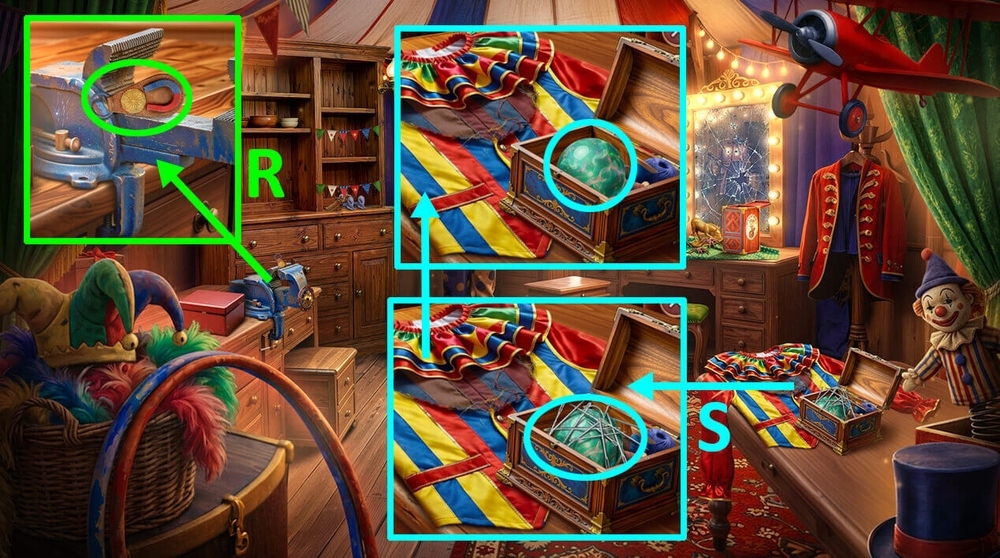
- Take KEYCHAIN WITH MAGNET (R).
- Use KEYCHAIN WITH MAGNET on the needles, take CRYSTAL BALL (S).
- Go to Circus Grounds.
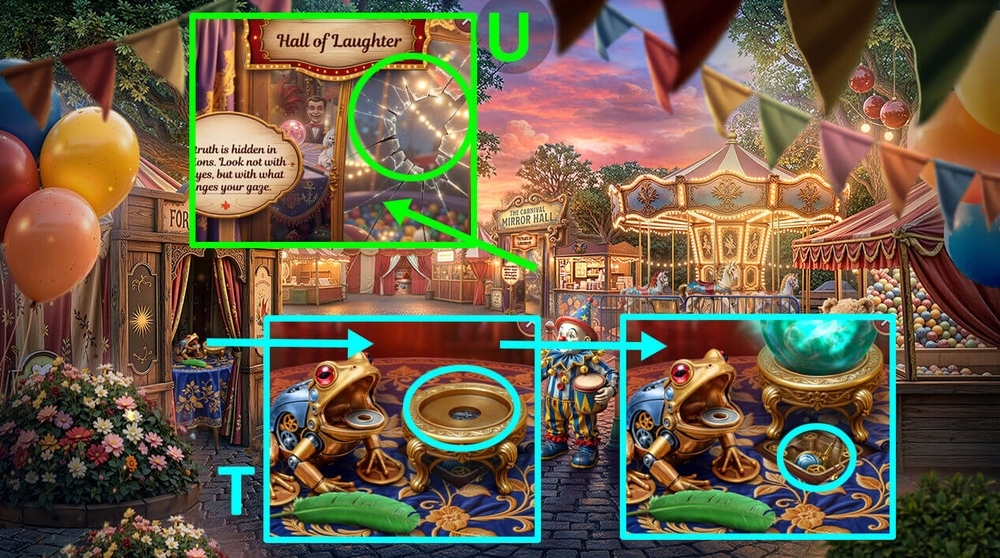
- Use CRYSTAL BALL on the stand, take COLORFUL GLASSES (T).
- Use COLORFUL GLASSES on the hall of mirrors (U).
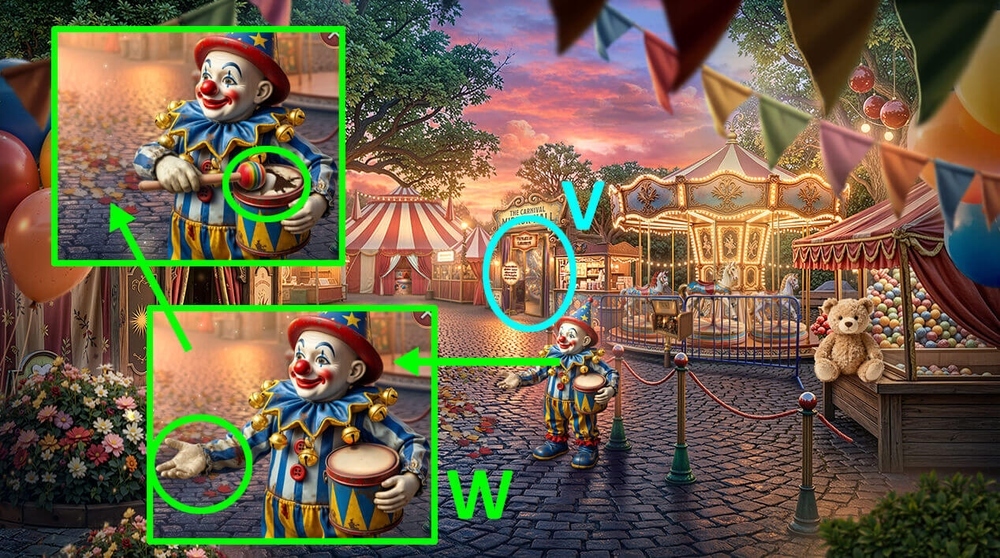
- Play puzzle, earn DRUMSTICK (V).
- Use DRUMSTICK on the clown mannequin, take COSTUME PATTERN (W).
- Go to Circus Workshop.
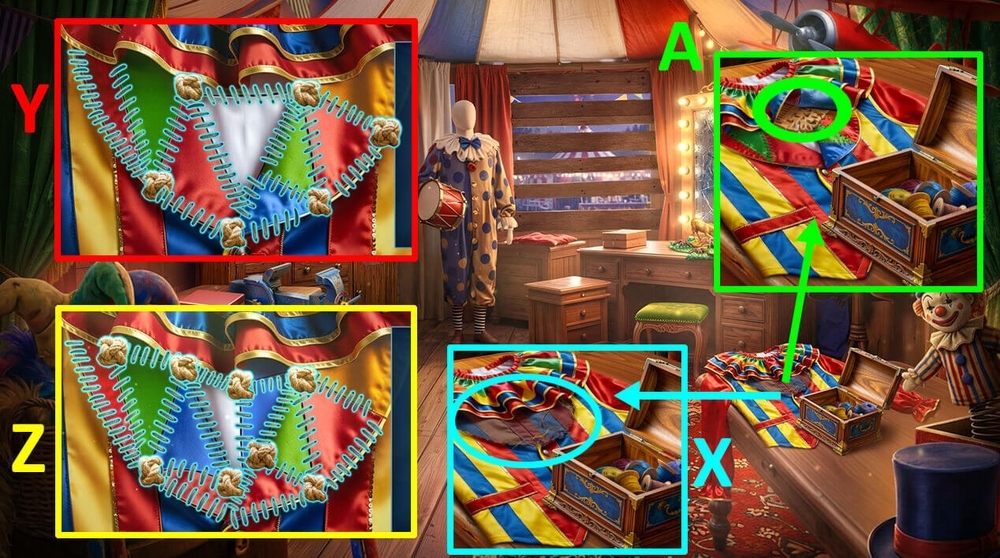
- Use TWEED FABRIC and COSTUME PATTERN on the unfinished clown costume (X).
- Easy solution: Use the picture as a hint (Y).
- Hard solution: Use the picture as a hint (Z).
- Take WOODEN COMB (A).
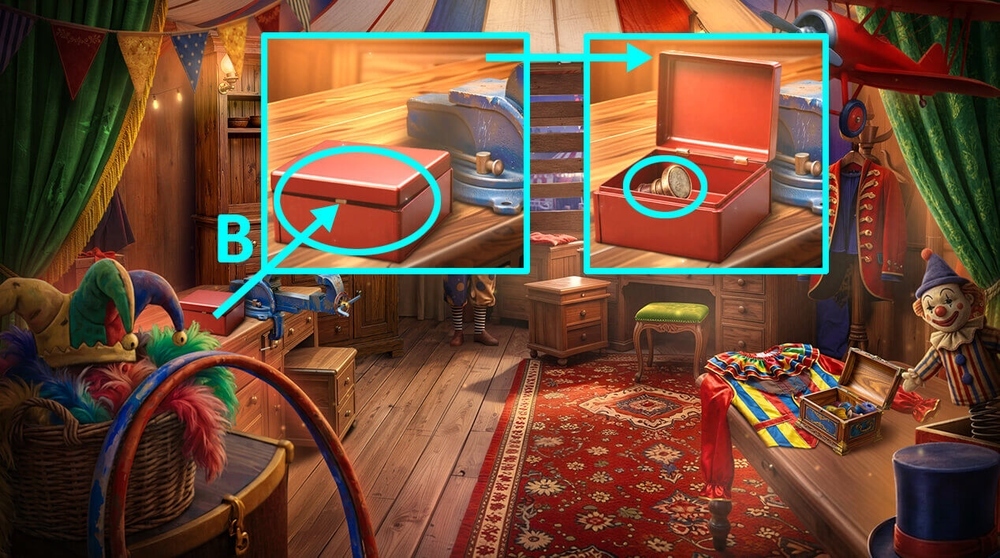
- Use WOODEN COMB on the closed box, take DRY STAMP (B).
- Go back.
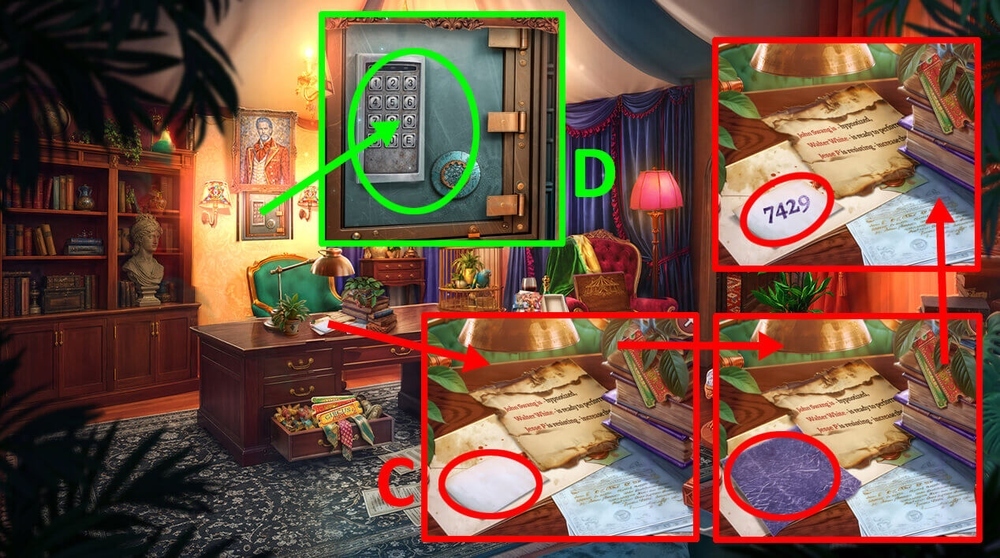
- Use CARBON PAPER and DRY STAMP on the blank sheet of paper, take SAFE CODE (C).
- Use SAFE CODE on the safe (D).
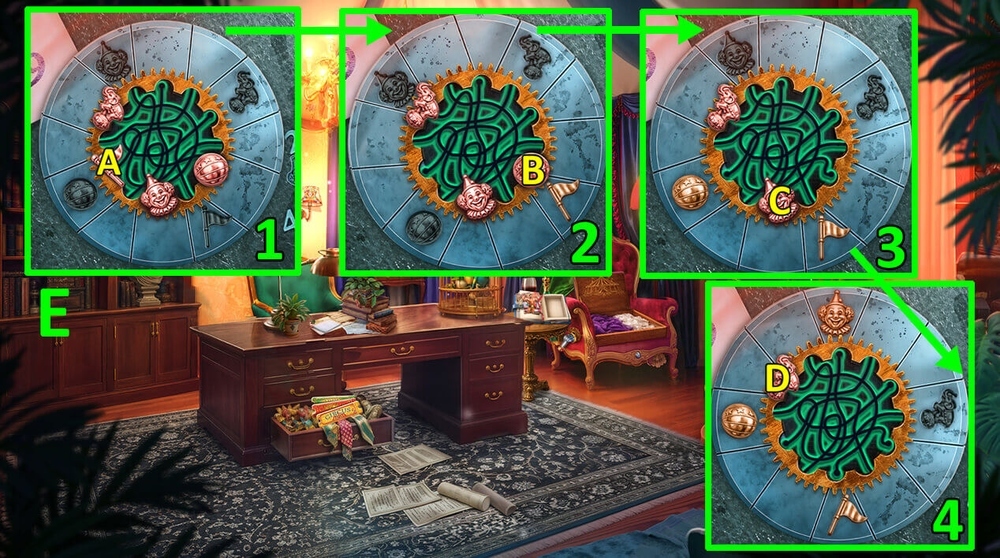
- Easy solution: To position the wheel as shown in image 1, click A, to position the wheel as shown in Image 2, click B, To place the wheel as shown in image 3, click C, To place the wheel as shown in image 4, click D (E).
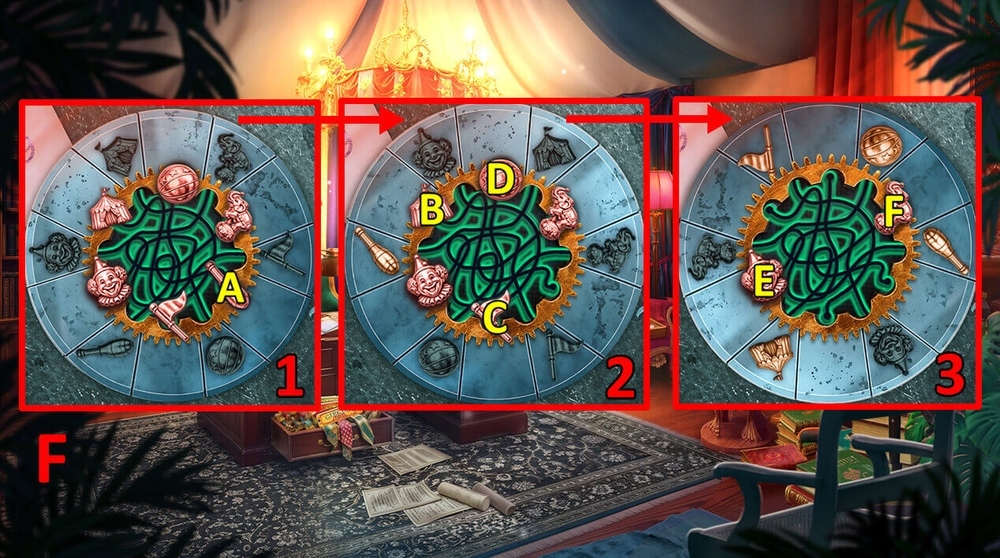
- Hard solution: To place the wheel as shown in image 1, click A, To place the wheel as shown in image 2, click B, C, D, To place the wheel as shown in Image 3, click E, F (F).
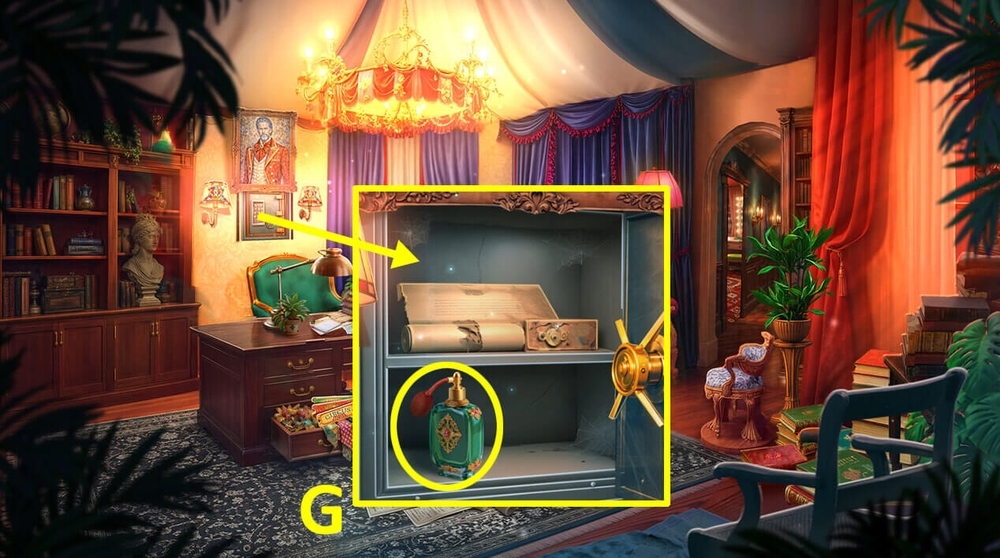
- Take EXPENSIVE PERFUME (G).
- Go forward.
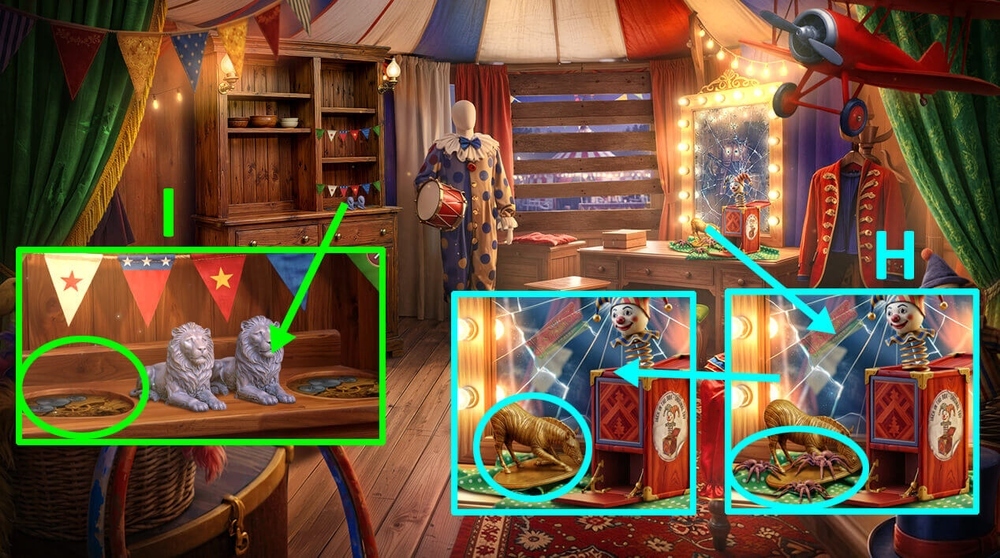
- Use EXPENSIVE PERFUME on the spiders, take GAME PIECES 2/2 (H).
- Use GAME PIECES 2/2 on the shelf with a mechanism (I).
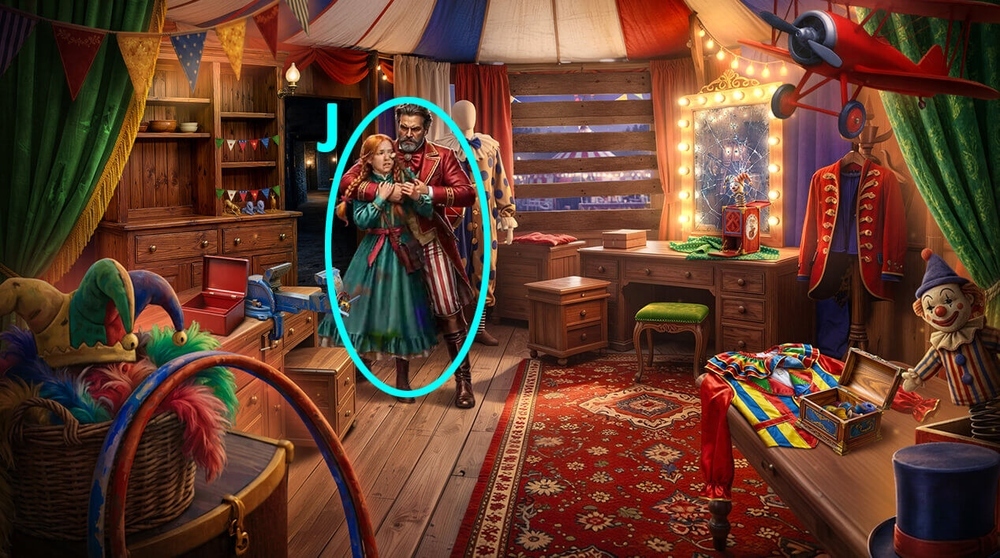
- Use HYPNOSIS FLUTE on the Circus Director (J).
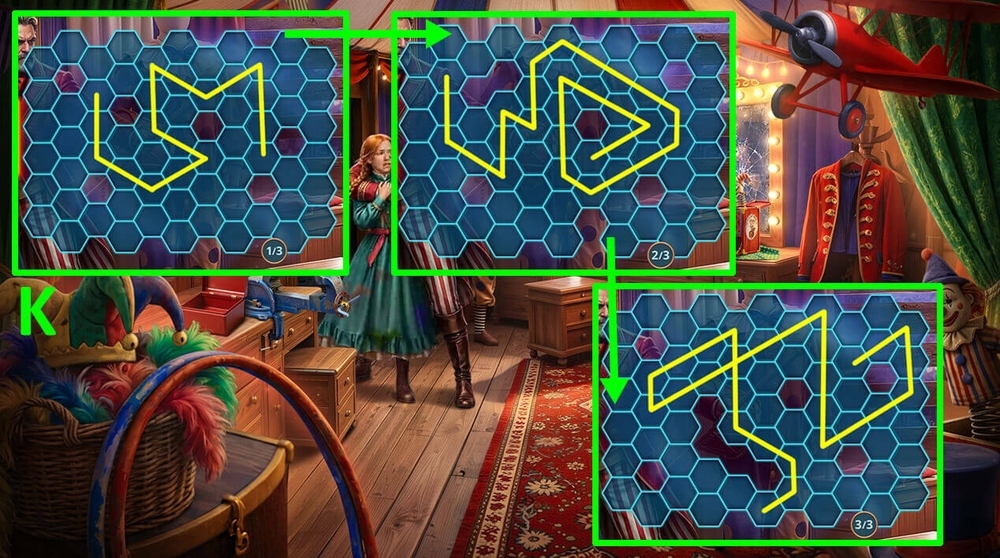
- Easy solution: Use the pictures as a hint (K).
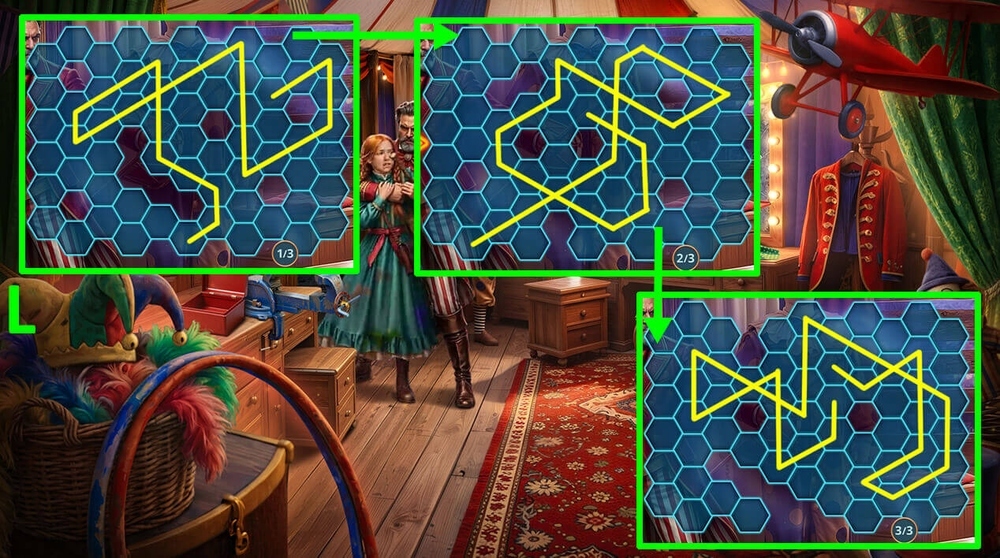
- Hard solution: Use the pictures as a hint (L).
Congratulations! You have completed the game Detective Club 3: Carnival of Secrets.