Connected Hearts 6: Vanished Beauty – The disappearance of a young woman leads to the uncovering of a secret cult. Jules arrives in the resort town of Seabridge Bay with her best friend Mallory. During a beach party, they meet Eli Gilbert, a talented guitarist in a local band. Jules and Eli are immediately drawn to each other, but their encounter is followed by a series of events: soon, Mallory disappears, leaving behind a note written in handwriting that seems unfamiliar to Jules. Eli can’t stay on the sidelines either. For several years now, he has been searching for his sister Emily, who disappeared under circumstances that remain unexplained to this day. Joining forces, the protagonists begin gathering evidence of other disappearances. The same symbol of the Sun is discovered in various corners of the city, and locals’ accounts of strange fires in the woods and suspicious visitors to an old chapel point to the existence of a secret society. By examining photographs, diaries, and notes left behind by someone, Jules and Eli gradually track down the Children of Dawn cult, founded by philosophy professor Caleb Morrow. Caleb lures people in with promises to change their lives and help them find new meaning. However, behind his flowery rhetoric lies a very different reality. Using hypnosis, incense, and special herbal mixtures, the professor suppresses the will of his followers and the abducted girls. As they investigate his activities, the protagonists visit the university, abandoned buildings, forest hideouts, and sites of secret rituals. At the same time, Caleb is well aware of their search and deliberately leaves clues, steering Jules and Elay down a path that serves his own interests. Gradually, the true reason behind the abductions is revealed. Caleb isn’t simply seeking to strengthen his cult’s influence; he is obsessed with bringing Olivia and Noah back from the dead. To achieve this, the professor is willing to sacrifice seven young women, hoping to exchange their souls for those of his deceased loved ones. Among those caught up in the events is Emily. Elay’s sister has fallen under the influence of the Children of Dawn and lost part of her memory, so the search for her proves much more difficult than her brother had anticipated. Not everyone the heroes meet turns out to be who they claim to be. If you can’t solve a puzzle or don’t know where to find items, you can check out the walkthrough for Connected Hearts 6: Vanished Beauty on our website and stop the ritual Caleb has prepared.
Connected Hearts 6: Vanished Beauty – Walkthrough
Here you can see the complete walkthrough for Connected Hearts 6: Vanished Beauty, namely all chapters, including the bonus chapter, in pictures.
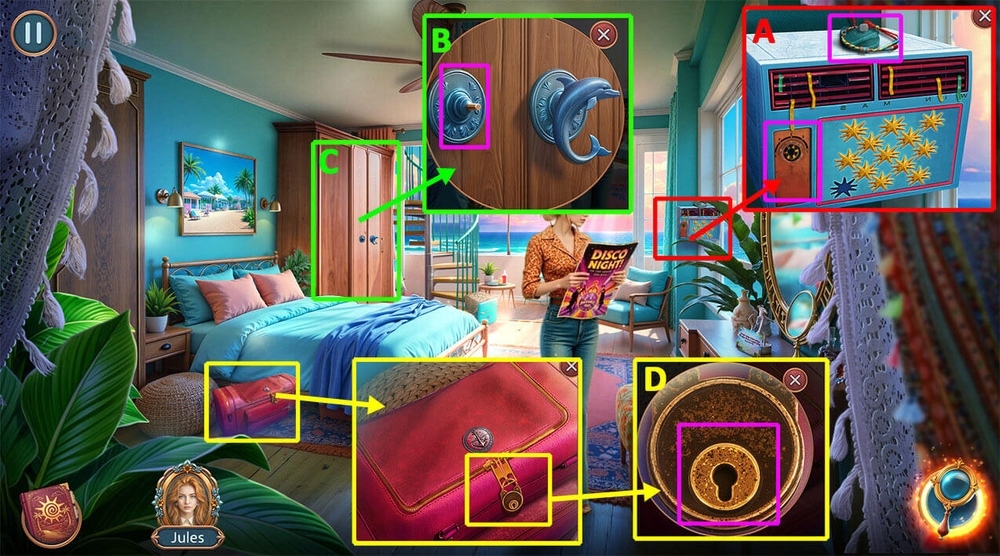
- Take BRACELET, AIR CONDITIONER SWITCH, use AIR CONDITIONER SWITCH on the switch slot, take DOLPHIN FIGURINE (A).
- Use DOLPHIN FIGURINE on the handle (B).
- Play puzzle, earn BADGE (C).
- Use BADGE on the lock, take FLOWER DECORATION, HAND PUMP, INSTANT CAMERA (D).

- Take FINS 1/2, use INSTANT CAMERA on the tablet (E).
- Easy Solution: Follow the instructions in the image (F-G).
- Hard Solution: Follow the instructions in the image (H-I).
- Take POORLY DEVELOPED PHOTO.
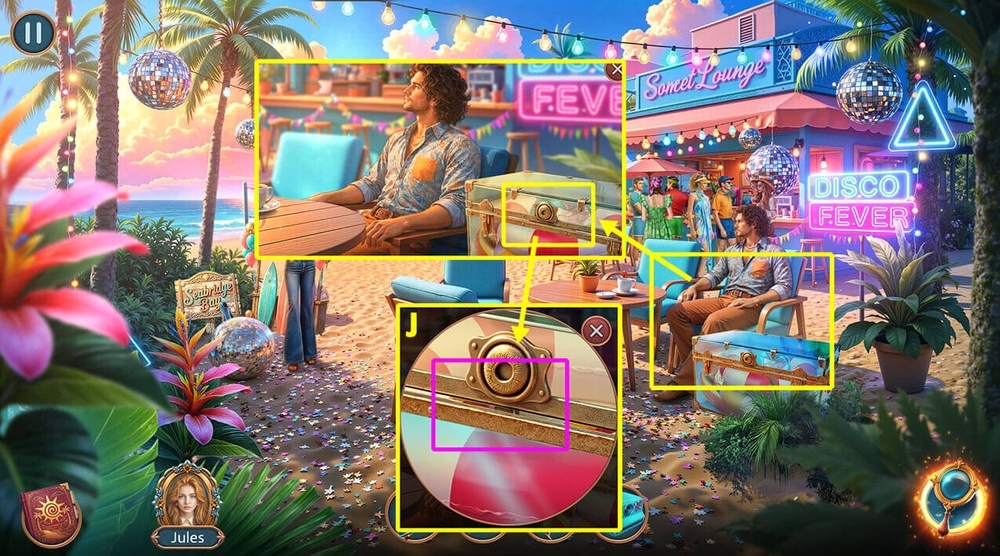
- Use POORLY DEVELOPED PHOTO on the gap, take DEFLATED VOLLEYBALL (J).

- Use HAND PUMP on DEFLATED VOLLEYBALL, earn VOLLEYBALL (K).
- Use VOLLEYBALL on the net (L).
- Read the note, take FINS 2/2, use BRACELET on the holes in the drawer, take WET WIPES (M).
- Go back.

- Play puzzle, earn HAIR DRYER (N).
- Click on the fridge door, use HAIR DRYER on the ice, take ICE CREAM, FROZEN BERRIES (O).
- Go forward (P).

- Use FROZEN BERRIES on the machine (Q).
- Easy solution: Click 3-4-2-1 (R).
- Hard solution: Click 3-5-2-1 (S).
- Take COCKTAIL.
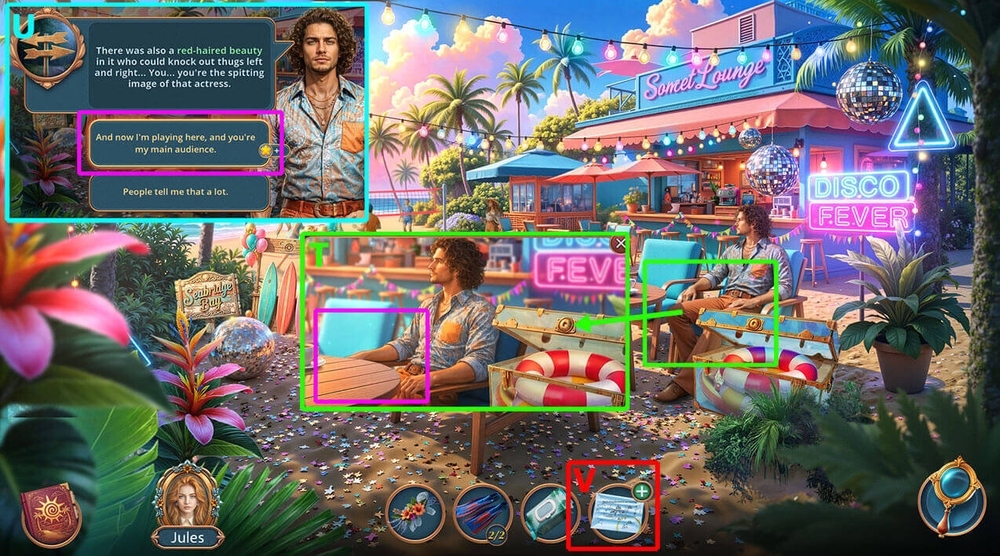
- Use COCKTAIL, ICE CREAM on the table (T).
- Select this option (U).
- Click on MEETING POINT (V).
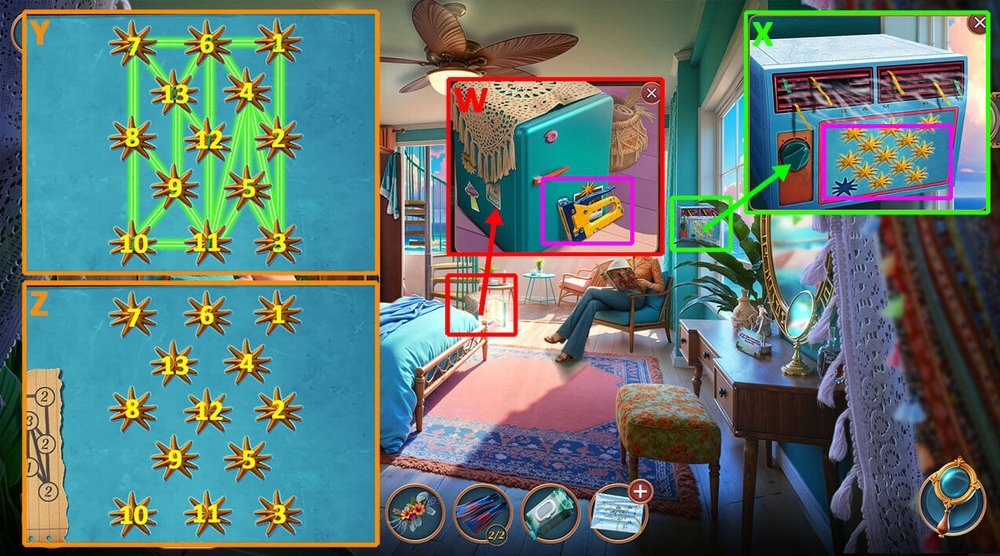
- Take STAPLER, click on the photo, earn STARFISH MAGNET, take DATE LOOK (W).
- Use STARFISH MAGNET on the empty slot (X).
- Easy solution: Click 1, 2, 3, 4, 5, 6, 7, 8, 9, 10, 11, 12 (Y).
- Hard solution: Click 1, 2, 3, 4, 5, 6, 7, 8, 9, 10, 11, 12 (Z).
- Take the map, take PAPER PLANE, SUNSCREEN.

- Use SUNSCREEN on the zipper, take MAKE-UP (A).
- Read the note, use MAKE-UP, DATE LOOK, FLOWER DECORATION on the mirror (B).
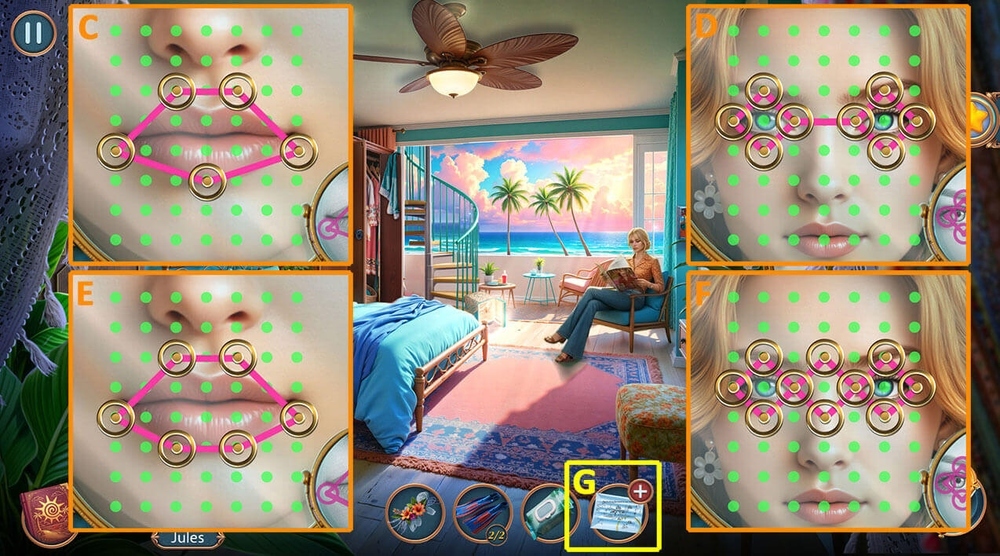
- Easy Solution: Follow the instructions in the image (C-D).
- Hard Solution: Follow the instructions in the image (E-F).
- Earn HOTEL MAP.
- Use HOTEL MAP on MEETING POINT (G).

- Select this option (H).
- Go forward (I).
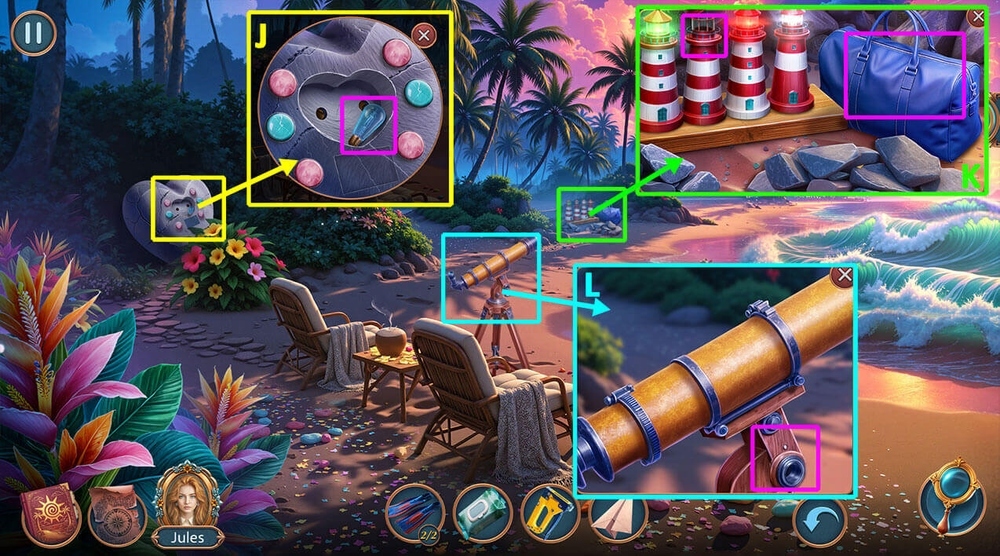
- Take LIGHTHOUSE LIGHT BULB (J).
- Click on the bag, read the note, take SURF SUIT, use LIGHTHOUSE LIGHT BULB on the lighthouse, take TELESCOPE HANDLE (K).
- Use TELESCOPE HANDLE on the stand, click on the telescope (L).
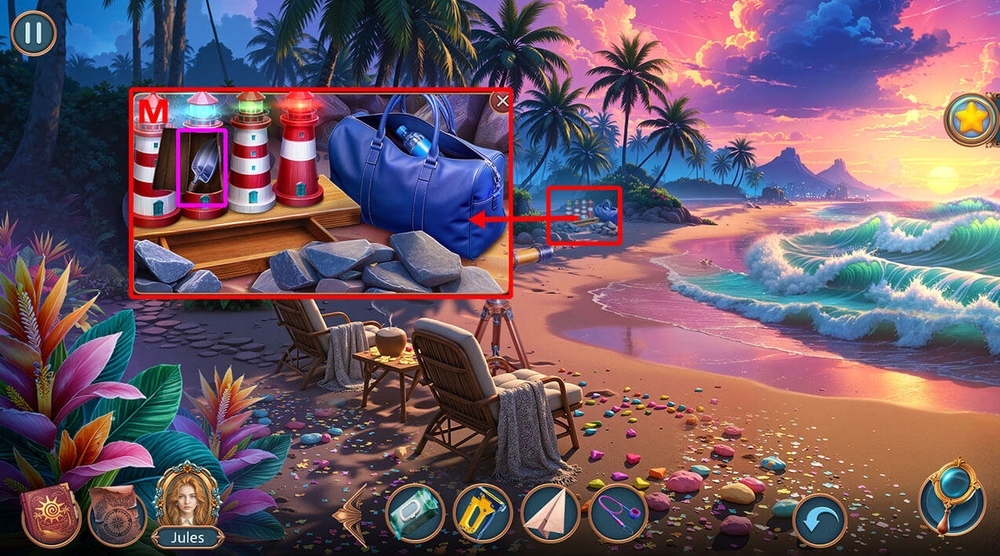
- Take SAND SCOOP (M).
- Go back.
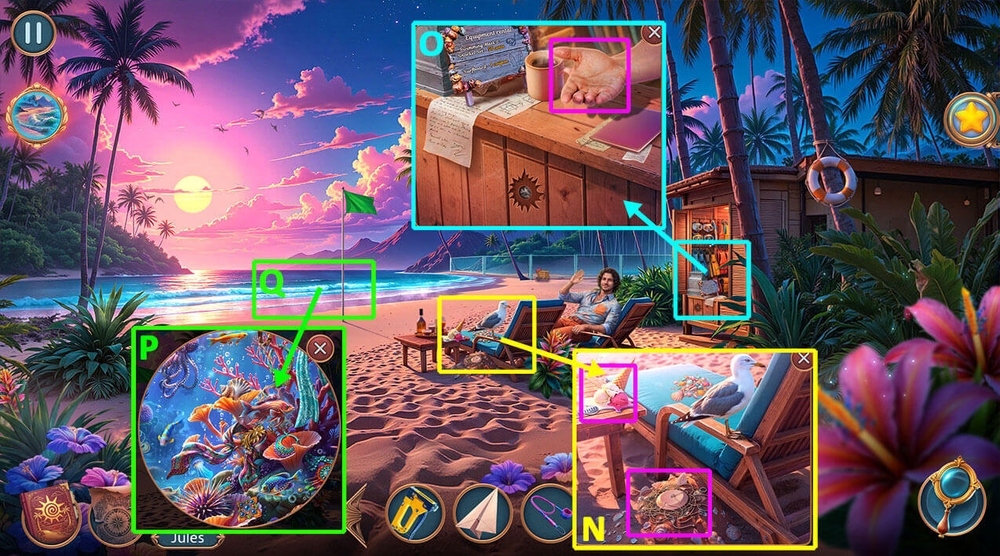
- Take WIND CHIMES, use SAND SCOOP on the pile of sand, take HEART STONE, use WET WIPES on the ice cream, take SPRING, 50 CENTS (N).
- Use 50 CENTS on the hand, take SNORKEL MASK (O).
- Use FINS 2/2, SNORKEL MASK on the corals (P).
- Play puzzle, earn BOTTLE WITH MESSAGE (Q).

- Click on BOTTLE WITH MESSAGE, click on the bottle, earn AMULET, read the note (R).
- Use AMULET on the place for the amulet, take RIBBON (S).
- Play puzzle, earn WHISTLE (T).
- Use WHISTLE on the seagull, take SHELLS (U).
- Use SHELLS, RIBBON on WIND CHIMES, earn RIBBON, earn WIND CHIME (V).
- Go forward (W).
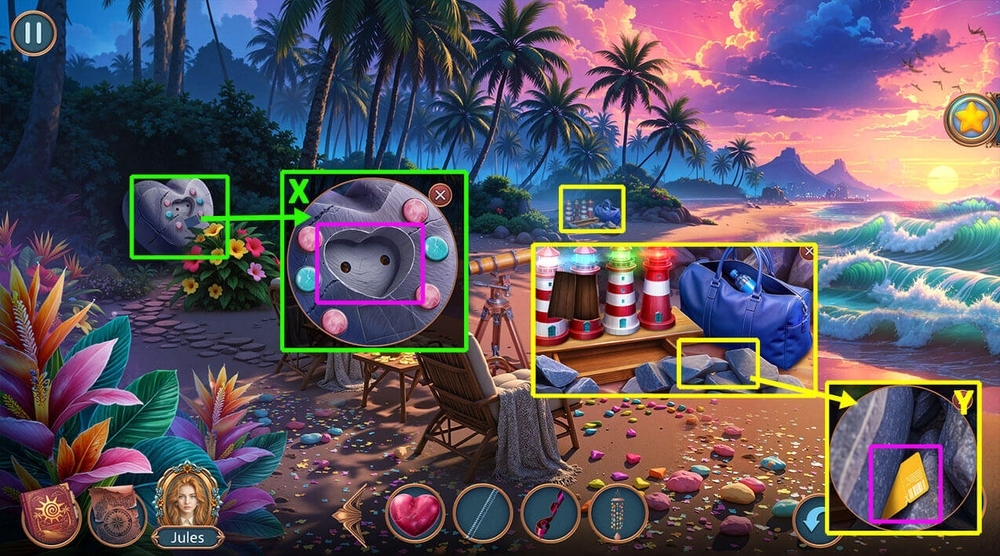
- Use HEART STONE on the place for the heart, take TIE CLIP, COUPONS 1/2 (X).
- Use TIE CLIP on the gap, earn COUPONS 2/2 (Y).
- Go back.
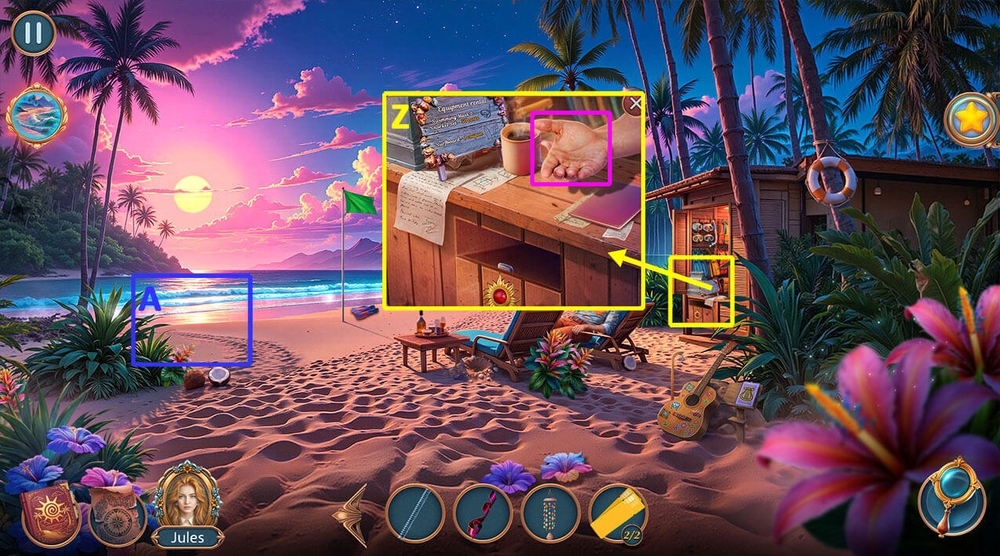
- Use COUPONS 2/2 on the hand, take SURFBOARDS (Z).
- Go forward (A).

- Use SURFBOARDS, SURF SUIT on the waves (B).
- Solution: Click R1, U (2 times), L2, U, R2, L1, U, L1, U, L2, D, L1, L2, D, L1, U, L2, U, L2, R1, U, L1, U (2 times), R1 (3 times), R2, D, R1, U (2 times) (C).
- Go back.
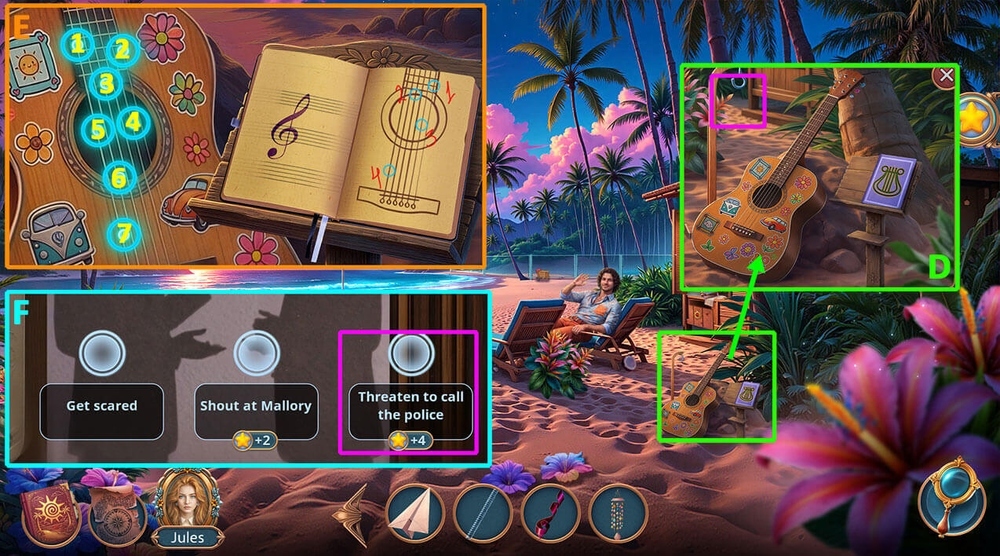
- Use WIND CHIME on the hook (D).
- Easy/Hard solution (E): Stage 1 – Click 2-3-4-7.
- Stage 2 – Click 4-3-5-6.
- Stage 3 – Click 4-3-6-1.
- Stage 4 – Click 2-4-6.
- Stage 5 – Click 6-4-3-2.
- Select this option (F).
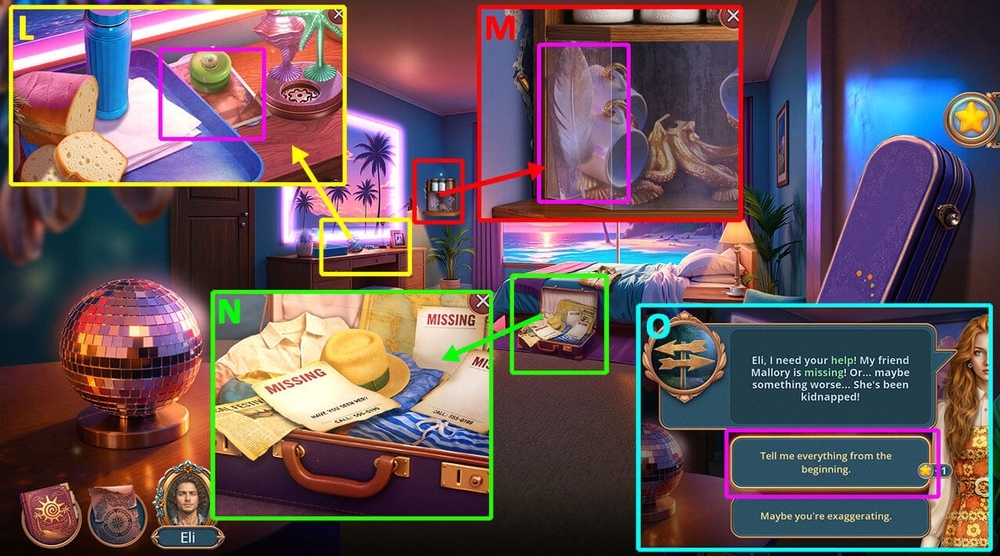
- Take YO-YOS 1/2, click on the photo, take MISSING GIRLS’ PHOTOS 1/2, SUCTION-CUP KEYCHAIN (L).
- Use SUCTION-CUP KEYCHAIN on the glass, take FEATHER, click on the photo, take MISSING GIRLS’ PHOTOS 2/2 (M).
- Use MISSING GIRLS’ PHOTOS 2/2 on the suitcase (N).
- Select this option (O).
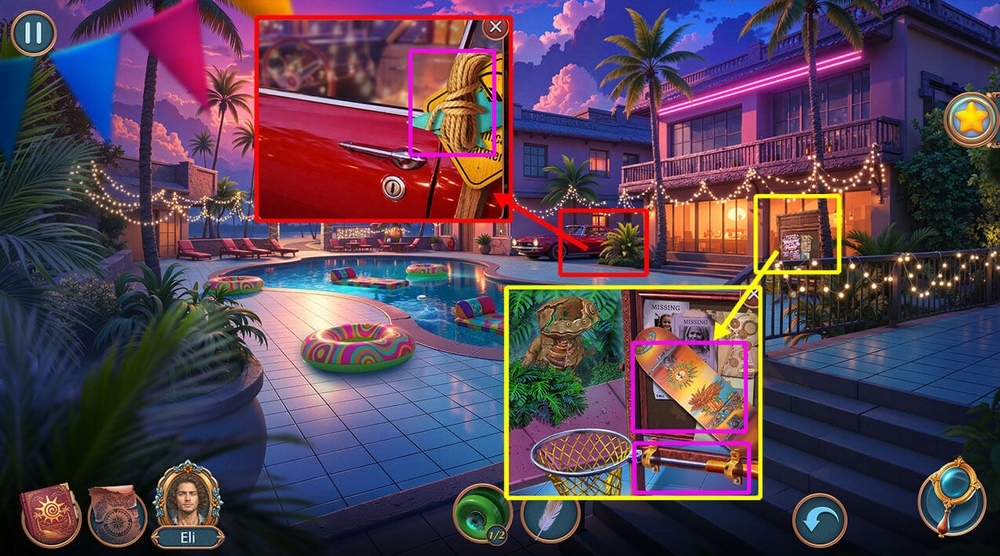
- Take ROPE, SHARK TABLET (P).
- Take SKATEBOARD WITHOUT WHEELS, use SHARK TABLET on the bolts, take SCOOP NET (Q).

- Use SCOOP NET on the band-aid under the water (R).
- Easy/Hard solution: Solution is random (S-T).
- Earn DUCT TAPE.
- Go forward (U).
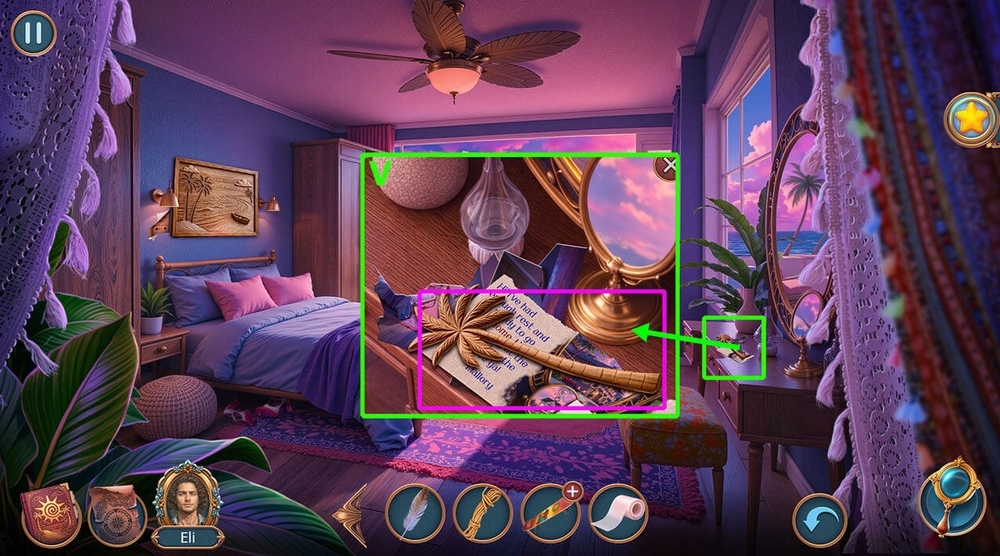
- Take PAINTING PARTS 1/2, click on the note, click on the hotel, click on the house, click on the note, use DUCT TAPE on the pieces, earn ROOM PHOTO (V).
- Play puzzle, earn CAR KEY.
- Go back.
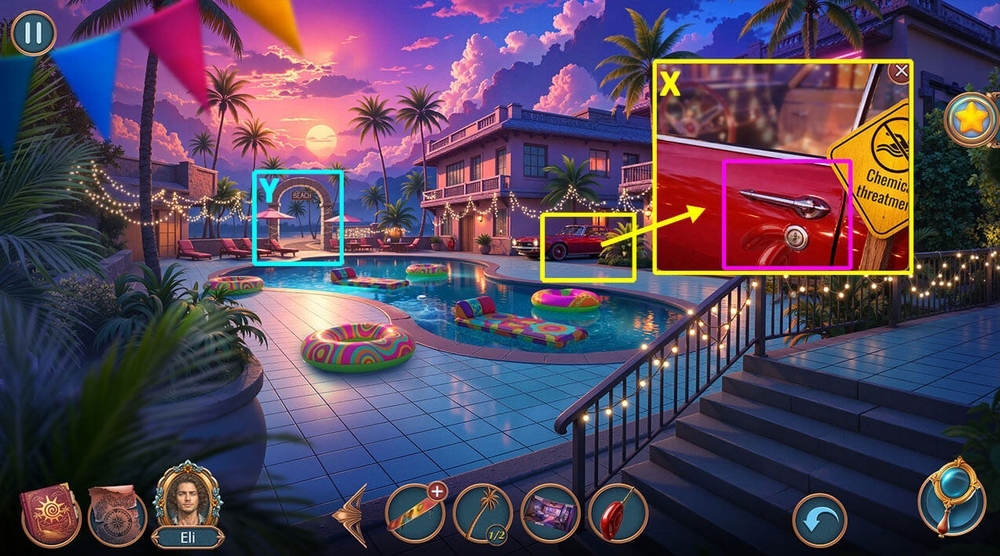
- Use CAR KEY on the car door, take YO-YOS 2/2 (W).
- Use YO-YOS 2/2 on SKATEBOARD WITHOUT WHEELS, earn SKATEBOARD (X).
- Go forward (Y).
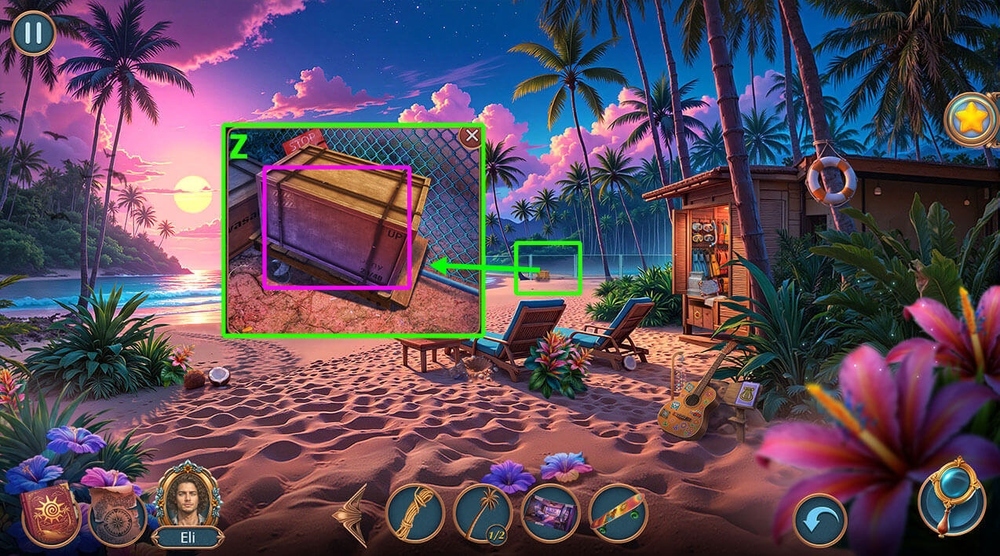
- Use SKATEBOARD on the drawer, take DEAD FLASHLIGHT (Z).
- Go to Jules and Mallory’s Room.
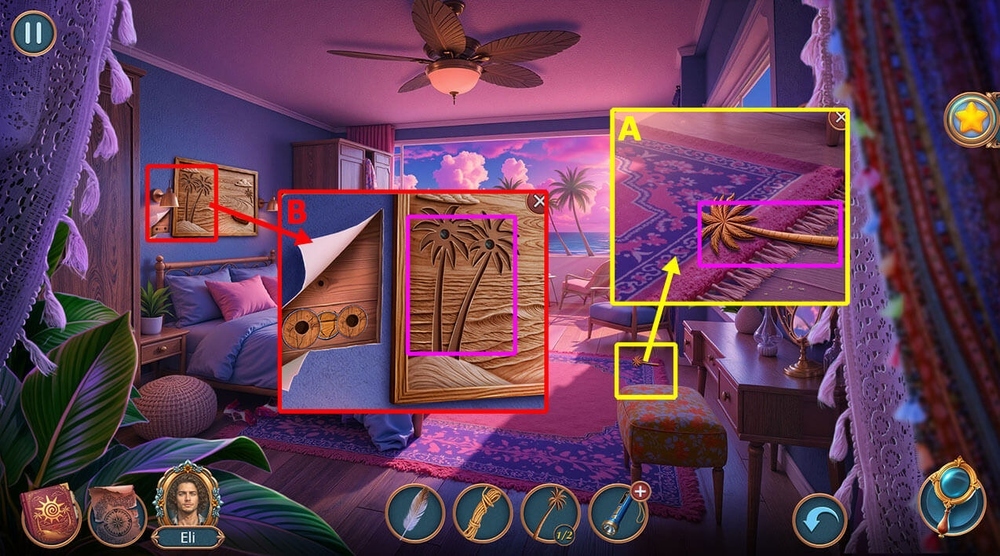
- Play puzzle.
- Take PAINTING PARTS 2/2 (A).
- Use PAINTING PARTS 2/2 on the painting, take BAS-RELIEF PARTS 1/3, click on the pamphlet, take HOTEL PAMPHLET (B).
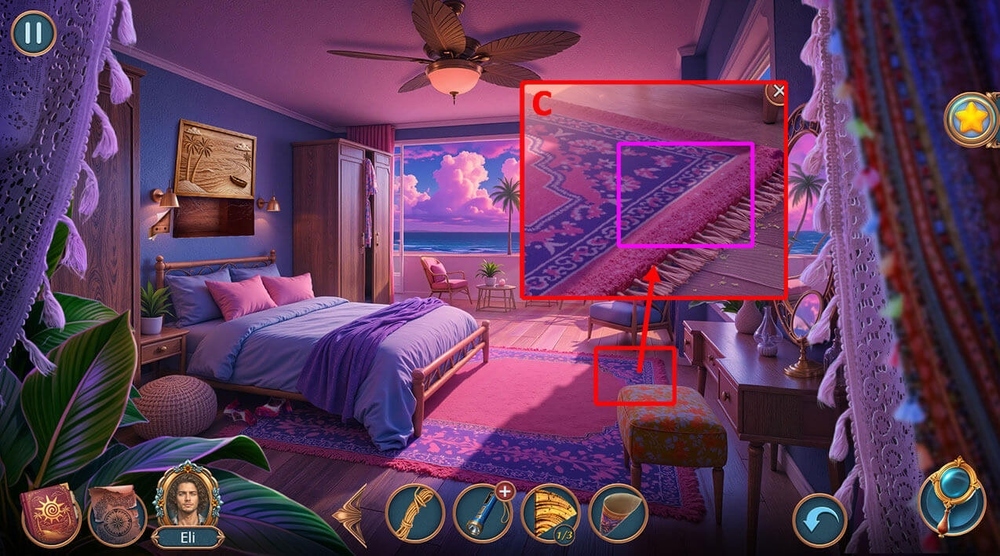
- Click on the carpet, use HOTEL PAMPHLET, FEATHER on the sand, earn SAND (C).
- Go back.

- Read the posters, click on the map, click on the sack, use SAND on the sack (C).
- Easy solution: Click 1, 2, 3, 4, 1, 2 (D).
- Hard solution: Click 3, 4, 5, 1, 2 (E).
- Take NIPPERS, BLANK BUSINESS CARD.
- Go forward (F).
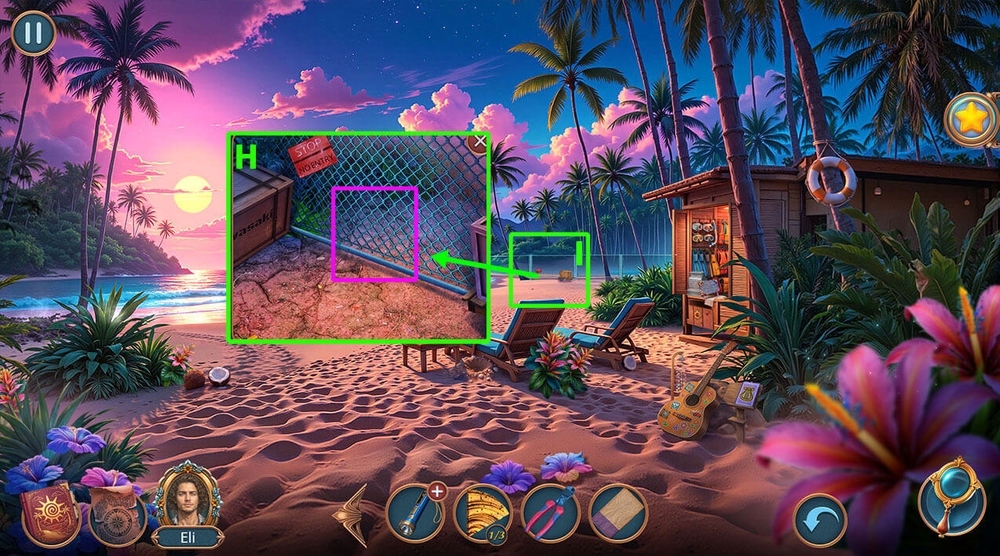
- Use NIPPERS on the net (H).
- Go forward (I).

- Click on the note, take PICTURE, take HOOK (J).
- Use HOOK, ROPE on the rock, take FAN (K).
- Use FAN on the shards, take PENCIL (L).
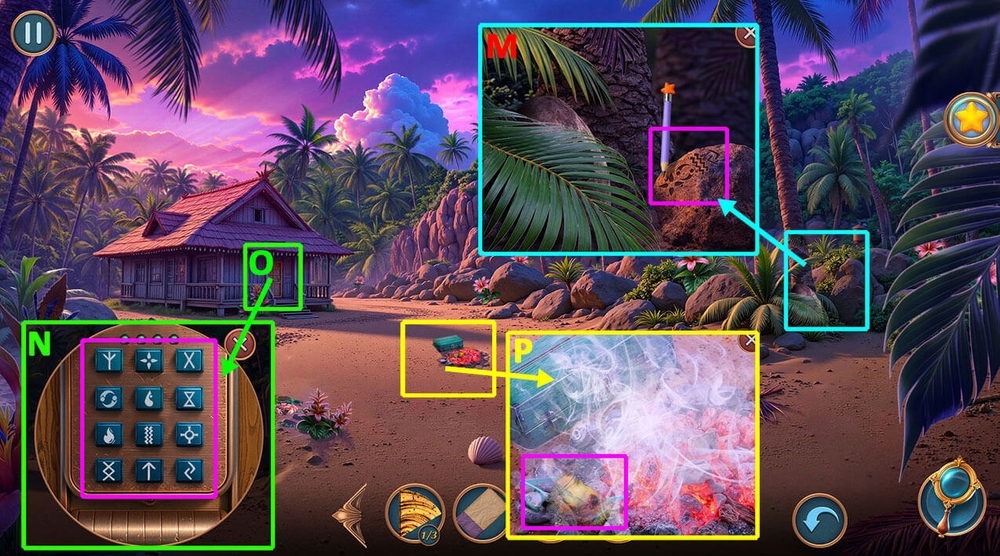
- Use BLANK BUSINESS CARD, PENCIL on the drawing on the rock, take CODE (M).
- Use CODE on the code lock (N).
- Play puzzle, earn WATER BOTTLE (O).
- Use WATER BOTTLE on the smoke, click on the photo twice, click on the hairpin, take BROKEN GLASSES (P).
- Go to Jules and Mallory’s Room.
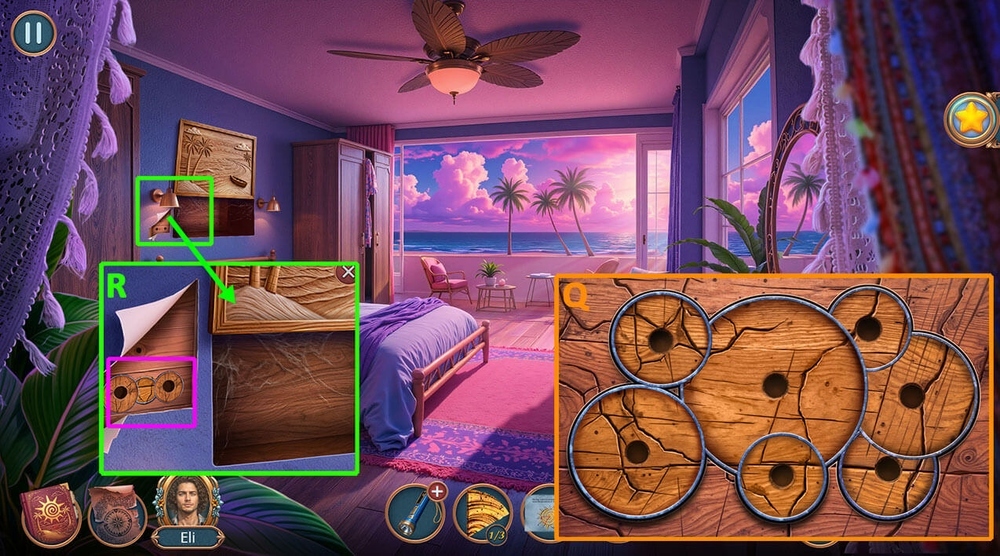
- Use BROKEN GLASSES on the holes (Q).
- Easy/Hard solution: Follow the instructions in the image (R).
- Take JAR OF JAM, ANIMAL FIGURINE.
- Go to Eli’s Room.
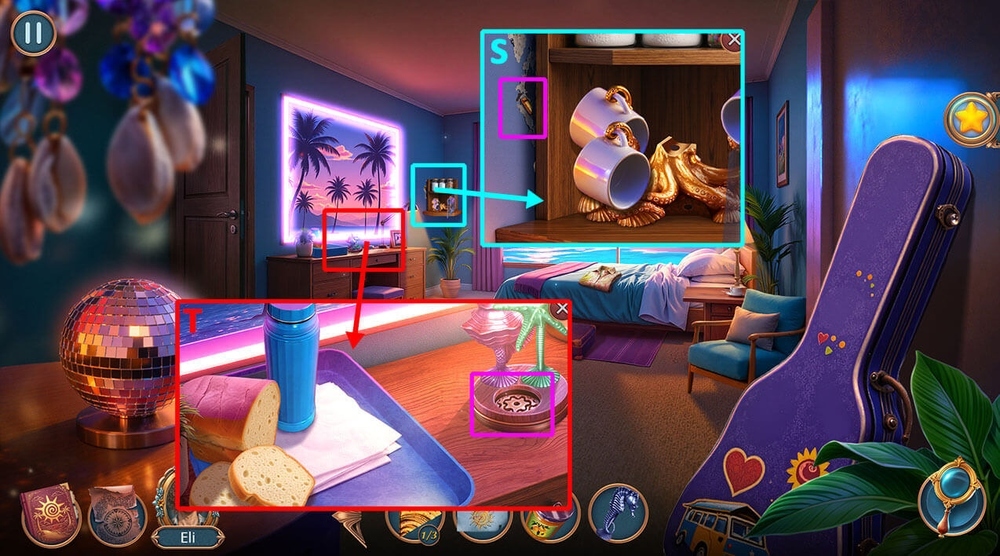
- Use ANIMAL FIGURINE on the place for the figurine, take FEATHER DUSTER, TWEEZERS, OCTOPUS PARTS 1/2 (S).
- Use TWEEZERS on the gap, earn BAS-RELIEF PARTS 2/3 (T).
- Go to Forest Edge.
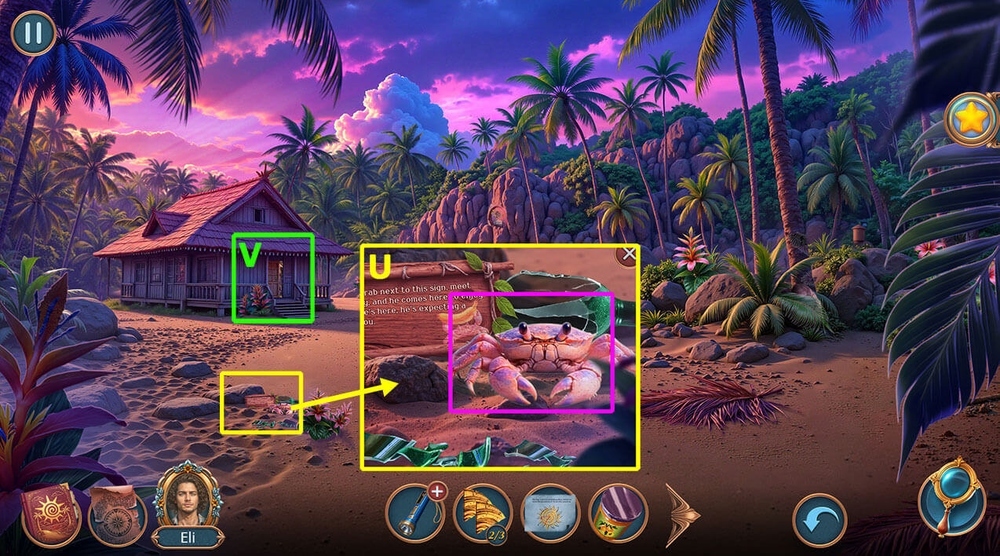
- Play puzzle, earn BANANA (U).
- Use BANANA on the crab, take SHARP BOTTLE (V).
- Go to Hotel Grounds.

- Use SHARP BOTTLE on the bag, read the note, take OPENER, STURDY FILE (W).
- Use STURDY FILE, PICTURE on the piece of sculpture, earn BAS-RELIEF PARTS 3/3 (X).
- Go to Forest Edge.
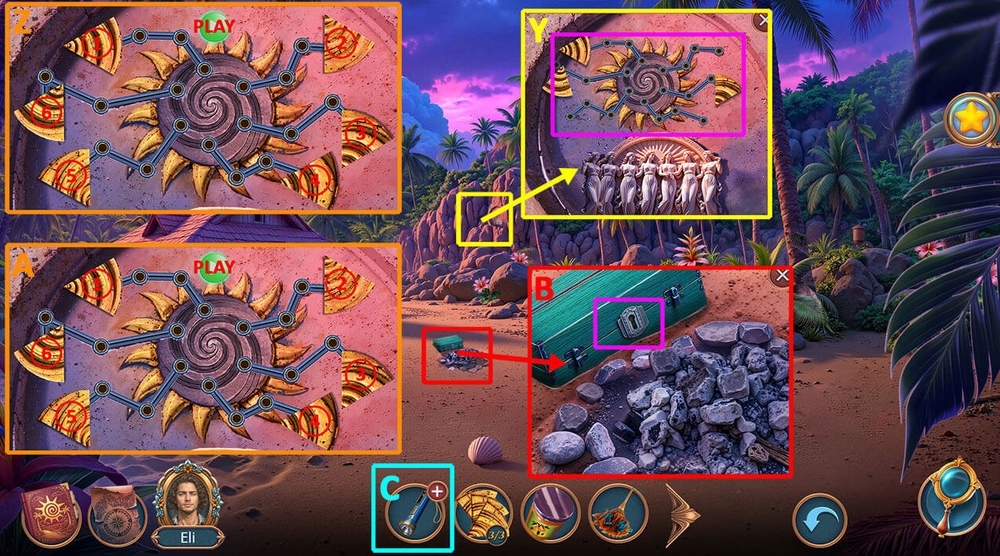
- Use BAS-RELIEF PARTS 3/3 on the bas-relief (Y).
- Easy solution: Click 1 (2 times), 2 (2 times), 4 (2 times), 5 (2 times), 6 (2 times), PLAY (Z).
- Hard solution: Click 1 (3 times), 2 (3 times), 3, 4, 5 (3 times), 6, PLAY (A).
- Read the note, take PIN.
- Use PIN on the lock, take VALVE, KNIFE, BATTERY (B).
- Use BATTERY on DEAD FLASHLIGHT, earn FLASHLIGHT (C).
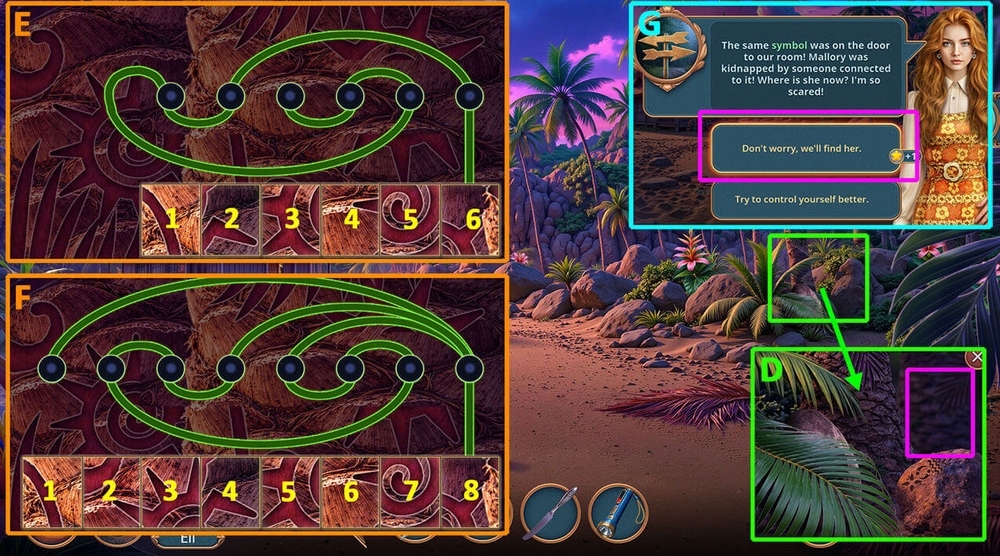
- Use FLASHLIGHT on the tree in the distance (D).
- Easy solution: Click 4, 3, 5, 6, 1, 2 (E).
- Hard solution: Click 2, 6, 5, 7, 3, 8, 1, 4 (F).
- Take MECHANISM PARTS 1/3, CANDLE, EARRING, OCTOPUS PARTS 2/2.
- Select this option (G).
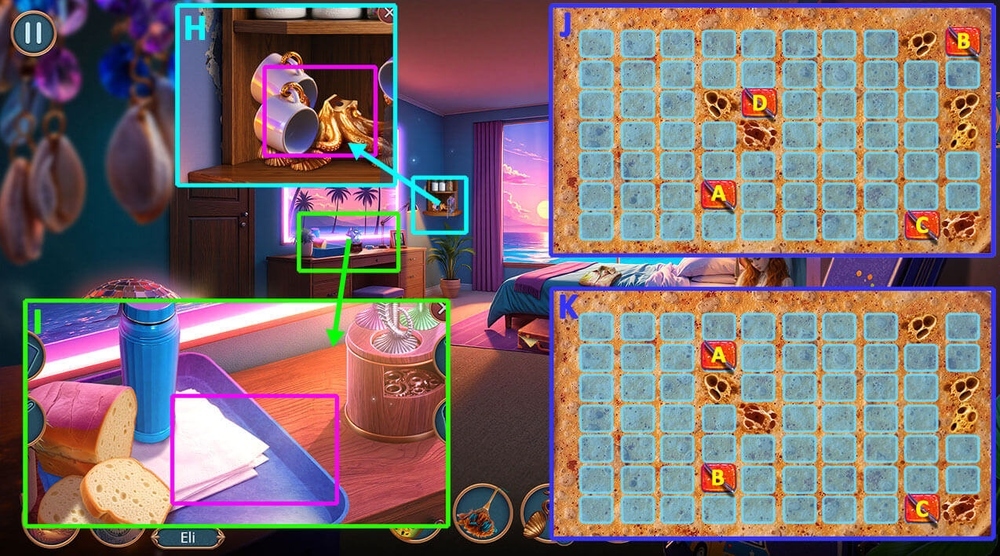
- Use OCTOPUS PARTS 2/2 on the octopus, take MUG (H).
- Use JAR OF JAM, KNIFE, OPENER, MUG on the tray (I).
- Easy solution: Click A – up, click C – left, up, right, down, left, up, click D – right, up, left, down, right, up, click C – right, up, left, click B – down, left, down, right, up (J).
- Hard solution: Click C – left, up, right, down, right, up, left, up, right, up, click B – left, up, right, down, click A – right, down, left, up, right, up, left, click B – right, up (K).
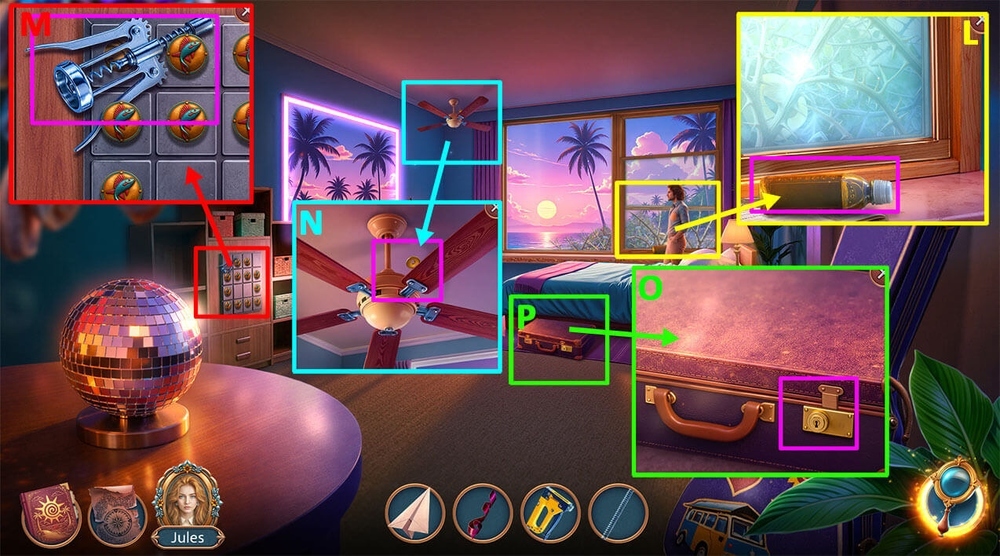
- Take OIL (L).
- Take BROKEN CORKSCREW (M).
- Use PAPER PLANE on the fan, take KEY (N).
- Use KEY on the suitcase (O).
- Play puzzle (P).

- Select this option, earn BAG (Q).
- Click on the bag twice, take OCCULT FIGURINE, MAP PART (R).
- Use OCCULT FIGURINE on the window, take CORKSCREW HANDLE (S).
- Use CORKSCREW HANDLE on BROKEN CORKSCREW, earn CORKSCREW (T).
- Use CORKSCREW on the closed drawer, take LOCK PICKS 1/2, FISH AMULET (U).

- Use FISH AMULET on the amulet slot (V).
- Easy solution: Drag 1 – 2 – 3 – 4 – 5 – 6 – 7 – 8 – 9 – 10 – 11 – 12 – 13 (W).
- Hard solution: Drag 1 – 2 – 3 – 4 – 5 – 6 – 7 – 8 – 9 – 10 – 11 – 12 – 13 – 14 – 15 – 16 – 17 – 18 – 19 – 20 – 21 (X).
- Examine Emily’s photo, take SHIRT.
- Use SHIRT on the vines, take TAPE (Y).
- Use TAPE, MAP PART on the suitcase (Z).
- Play puzzle (A).
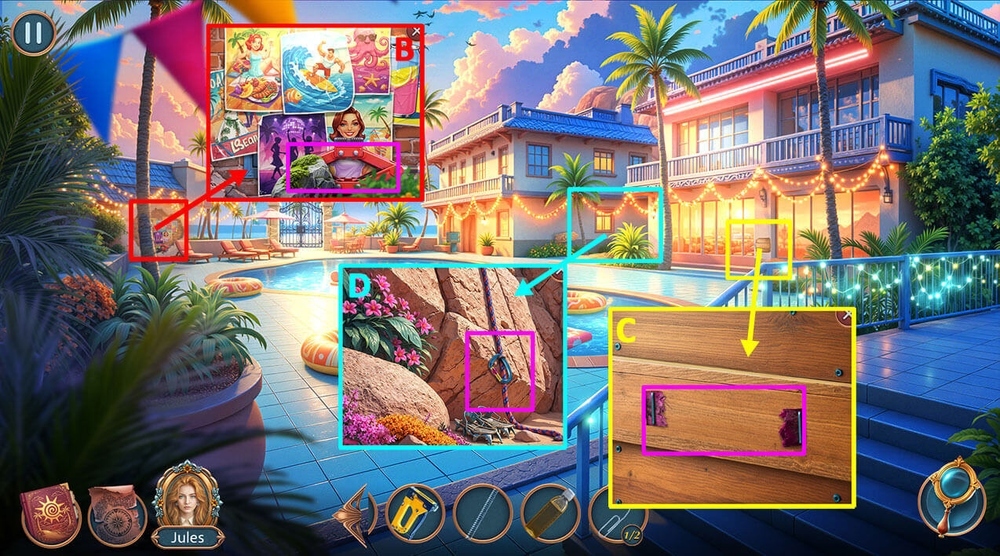
- Take ROCK, DISASSEMBLED JACK (B).
- Use RIBBON, STAPLER on the board, take CARABINER (C).
- Use CARABINER on the rope (D).
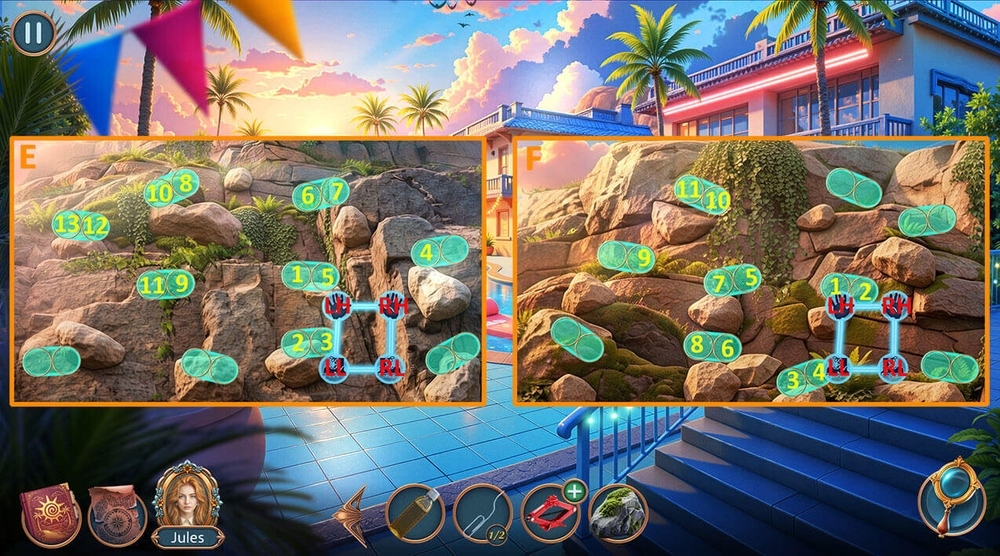
- Easy solution: Stage 1 – Drag LH-1, LL-2, RL-3, RH-4, LH-6, LL-1, RL-5, RH-7, LH-8, LL-9, RH-6, RL-1, LH-10, LL-11, RH-8, RL-9, LL-13, RL-12.
- Stage 2 – LH-1, RH-2, LL-3, RL-4, LH-5, LL-6, RH-1, RL-3, LH-7, LL-8, RH-5, RL-6, LH-9, RL-7, RH-10, RL-5, LL-7, LH-11 (E-F).

- Hard solution: Stage 1 – Drag LH-1, LL-2, RL-3, RH-4, LH-6, LL-1, RL-5, RH-7, LH-8, LL-9, RH-6, RL-1, LH-10, LL-11, RH-8, RL-9, LL-13, RL-12.
- Stage 2 – LL-1, RL-2, LH-3, RH-4, LH-5, LL-6, RH-3, RL-1, LH-7, LL-8, RH-5, RL-6, LH-9, LL-10, RH-7, RL-8, LH-11, LL-12, RH-9, RL-10, RH-13, LH-14, LL-11, RL-9, RH-15.
- Stage 3 – LH-1, RH-2, LL-3, RL-4, LH-5, LL-6, RH-1, RL-3, LH-7, LL-8, RH-5, RL-6, LH-9, RL-7, RH-10, RL-5, LL-7, LH-11 (G-H-I).

- Take GOBLET, COAL, LOCK PICKS 2/2 (J).
- Use LOCK PICKS 2/2 on the bag, take SPATULA, SMALL VALVE (K).
- Use SMALL VALVE, OIL on the oil lamp (L).
- Play puzzle, earn FLOWER GARLAND (M).
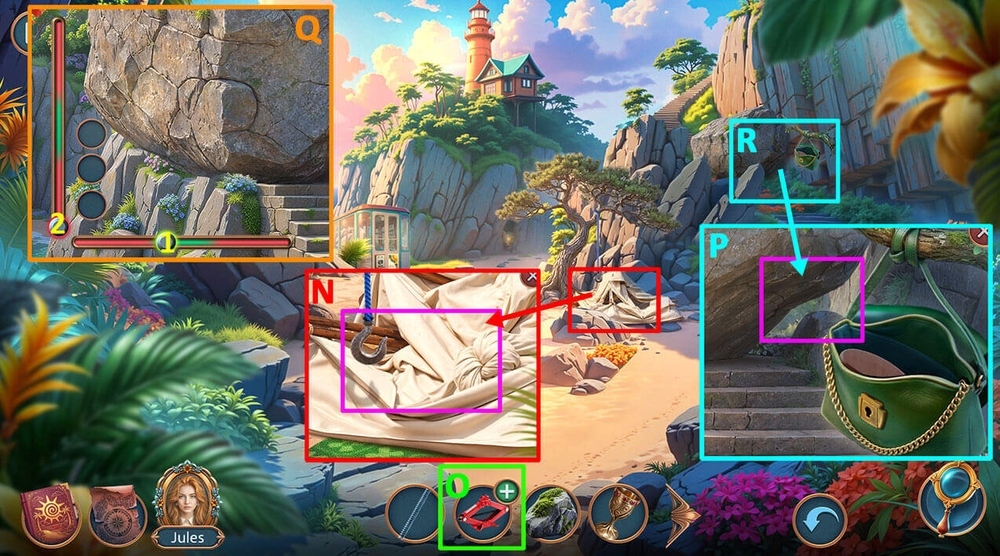
- Use FLOWER GARLAND on the tent, read the note, take LEAKY BAG, NUT (N).
- Use NUT, SPRING on DISASSEMBLED JACK, earn JACK (O).
- Use JACK on the big rock (P).
- Easy/Hard solution: Click on the screen when sliders 1 and 2 are in the necessary positions shown in the image (Q).
- Go forward (R).
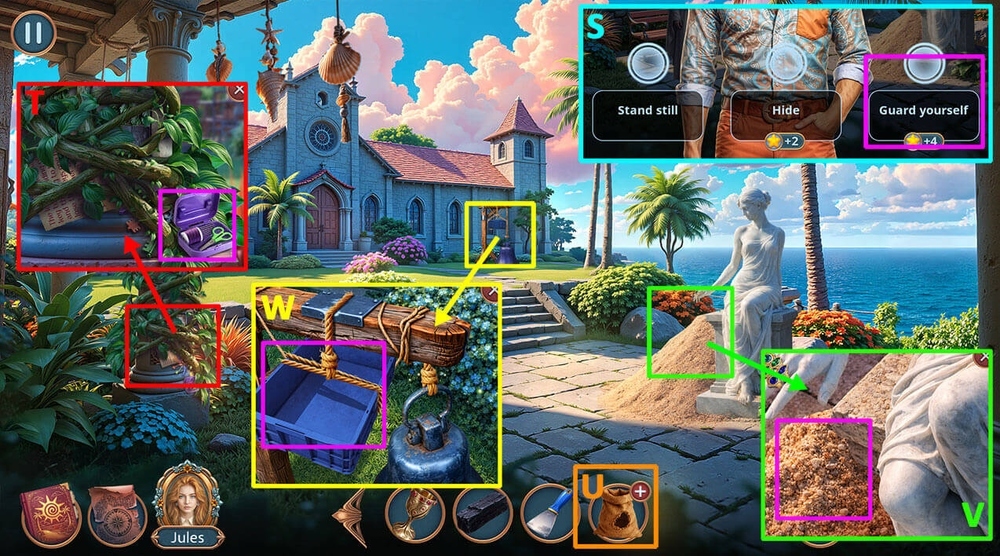
- Select this option (S).
- Take SEWING KIT (T).
- Use SEWING KIT on LEAKY BAG, earn BAG (U).
- Use GOBLET, BAG on the sand, take SAND BAG (V).
- Use SAND BAG, ROCK on the tray, take MAGNET, LEVER TOP, RINGS 1/2 (W).
- Go back.

- Play puzzle, earn DISCO FIGURINE (X).
- Use DISCO FIGURINE on the figurine slot, take TAPE, PERFUME (Y).
- Go back.
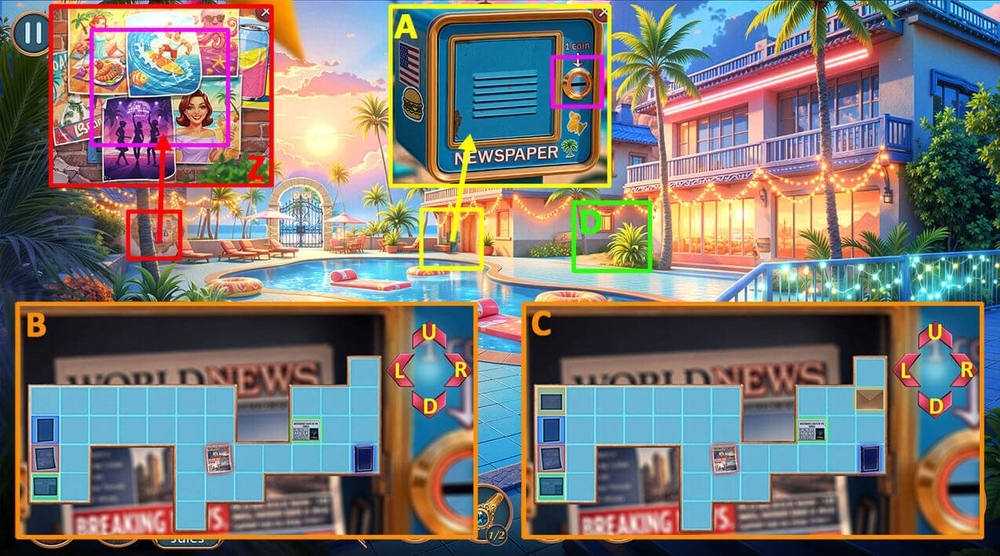
- Use PERFUME, SPATULA on the posters, take 50 CENTS (Z).
- Use 50 CENTS on the 50 CENTS receiver (A).
- Easy solution: Click L (3 times), D, L (2 times), U (2 times), L (2 times), U, L (5 times), D (2 times), U, L (B).
- Hard solution: Click L (3 times), D, L, D, L, U (3 times), L (2 times), U, L (5 times), D (2 times), L, U (3 times), L (C).
- Read the newspaper, take EMPTY PAPER.
- Go forward (D).

- Use EMPTY PAPER, COAL on the rock, take CODE (E).
- Go back.
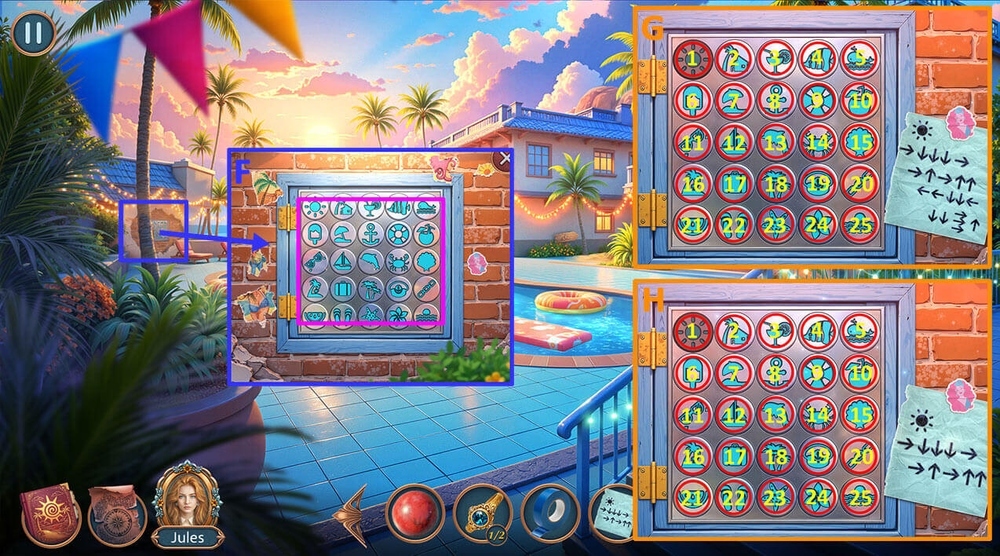
- Use CODE on the door with buttons (F).
- Easy solution: Click 2, 17, 19, 14, 15, 5 (G).
- Hard solution: Click 2, 17, 19, 14, 15, 5, 3, 13, 12, 22, 25, 20 (H).
- Take EAR TUBE, RINGS 2/2.
- Go to Near the Old Chapel.
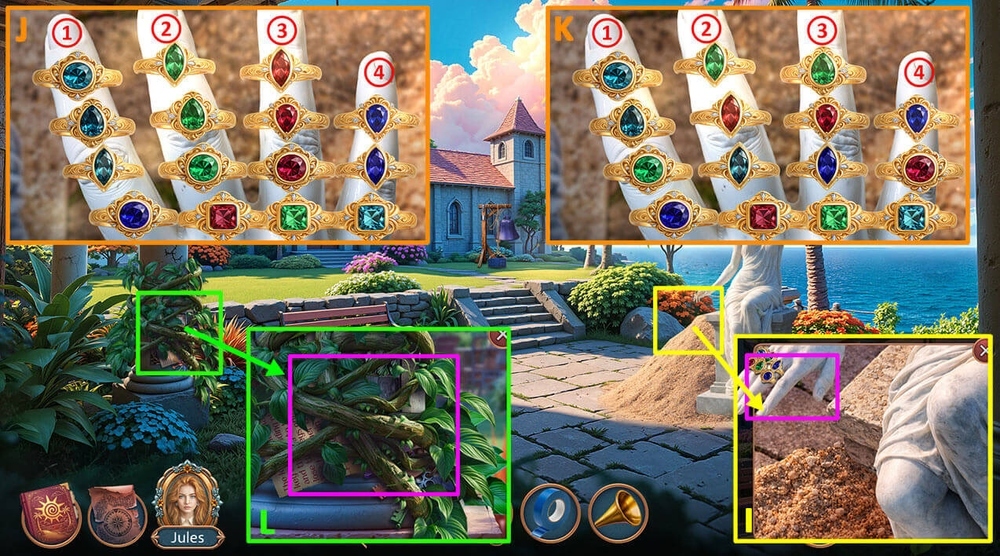
- Use RINGS 2/2 on the statue’s hand (I).
- Easy solution: Click 4-3, 4-2, 1-4, 1-4, 1-4, 2-1, 3-1, 2-1, 2-1, 2-4, 3-2, 3-2, 3-2, 4-3, 1-3, 1-3 (J).
- Hard solution: Click 2-3, 2-1, 2-4, 1-2, 3-4, 3-1, 3-2, 3-2, 4-3, 1-3, 1-2, 1-4, 1-3, 1-3, 4-1, 4-1, 2-1, 4-2, 4-1, 4-1, 3-4, 2-4, 2-4, 1-3, 1-2, 3-1 (K).
- Take SHEARS.
- Use SHEARS on the vine, read the note, take KEYS (L).

- Use KEYS on the door (M).
- Easy solution: Click 3-3-1-4-1-3, 3-3-1-5, 2, 1-2-1-4 (N).
- Hard solution: Click 3-3-1-4-1-3, 3-3-1-5, 2, 1-2-1-4, 1-1-1-5-3 (O).
- Select this option (P).

- Go forward (Q).
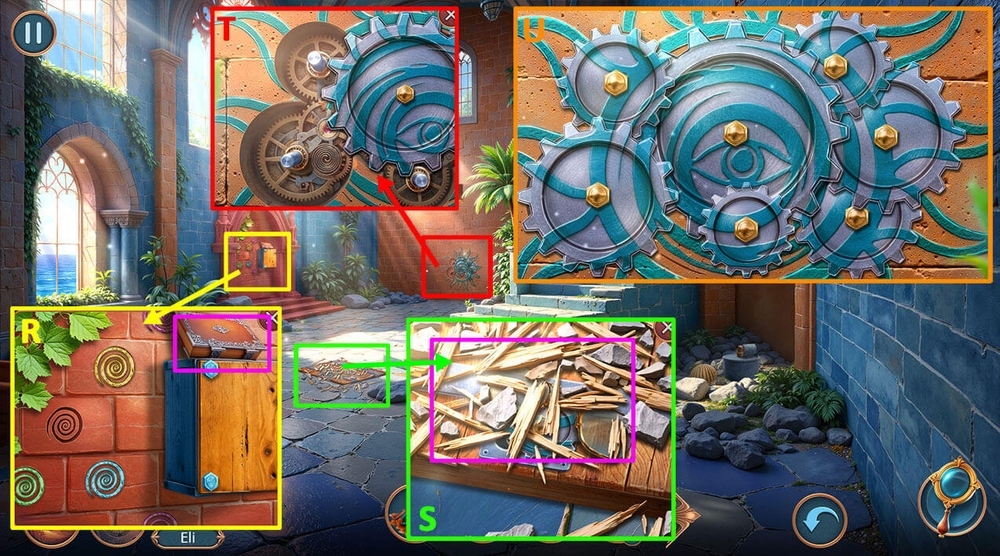
- Take HEAVY BOOK, MECHANISM PARTS 2/3 (R).
- Use FEATHER DUSTER on the wood chips, take GLASSES, MECHANISM PARTS 3/3 (S).
- Use MECHANISM PARTS 3/3 on the mechanism (T).
- Easy/Hard solution: Follow the instructions in the image (U).
- Take RITUAL PEG, read the journal.
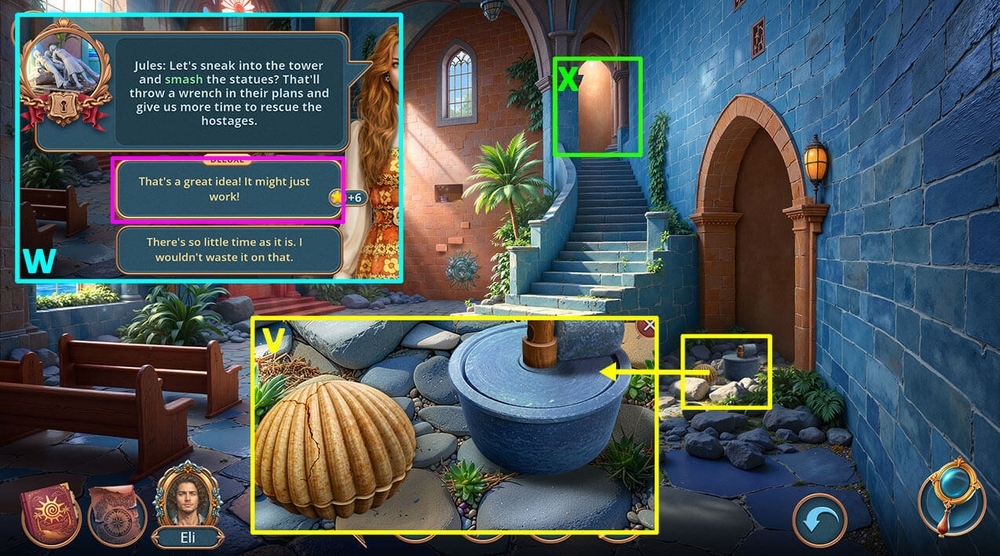
- Use RITUAL PEG, HEAVY BOOK on the shell, read the note, take BUTTON (V).
- Select this option (W).
- Go forward (X).

- Take SAW HANDLE (Y).
- Take FRAME PARTS 1/2, use SAW HANDLE on the saw without a handle, take SAW (Z).
- Use SAW on the rope, take NUTCRACKER (A).
- Go to Top of the Mountain.
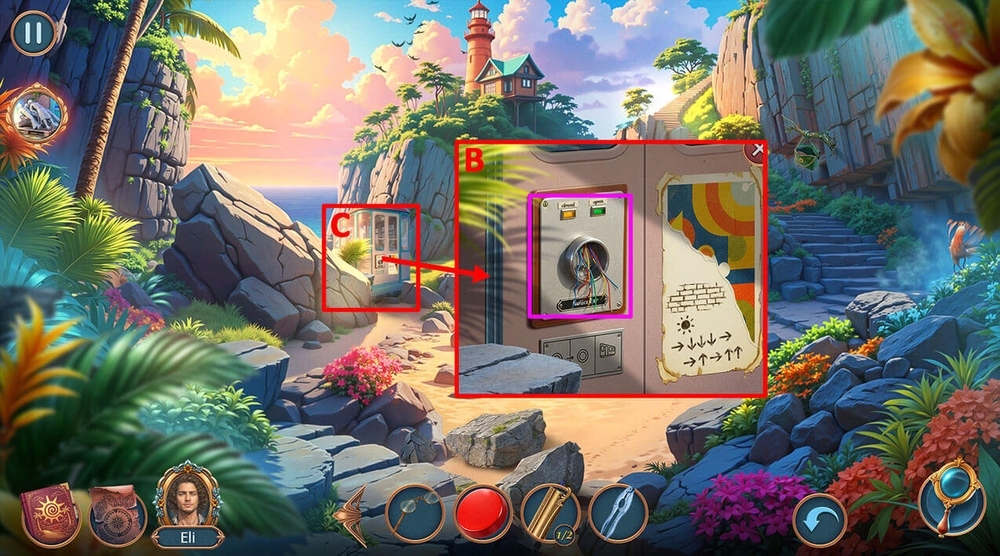
- Use BUTTON on the slot for a button (B).
- Go forward (C).
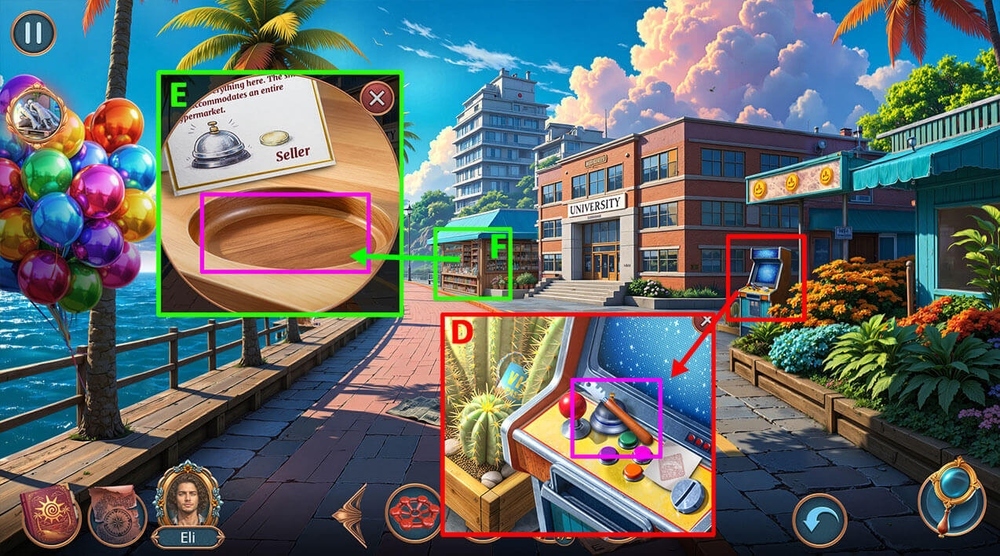
- Take GLASS CUTTER, DESK BELL (D).
- Read the tablet, use DESK BELL on the empty space (E).
- Play puzzle, earn MASQUERADE MUSTACHE (F).
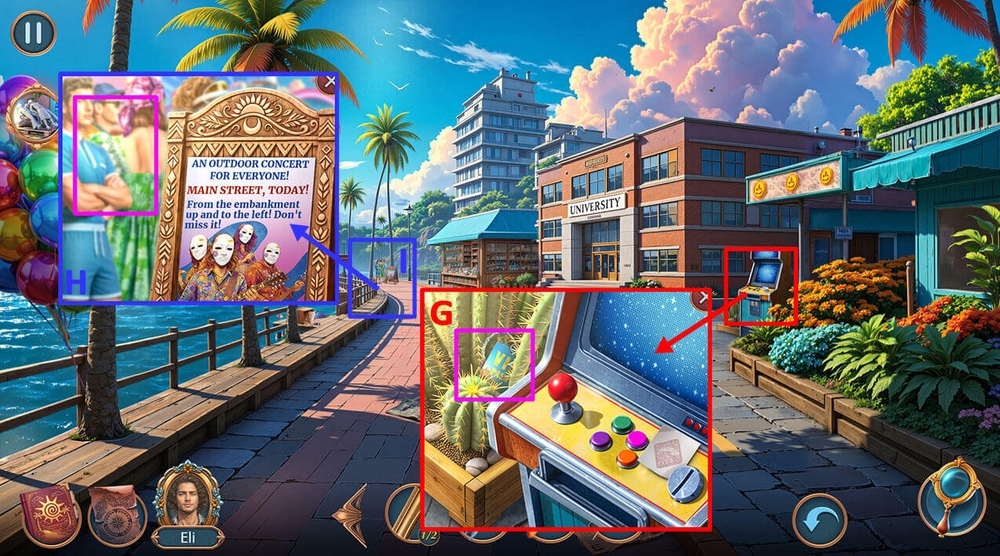
- Use MASQUERADE MUSTACHE on the cacti, earn VIP PASS (G).
- Read the poster, use VIP PASS on the crowd (H).
- Go forward (I).
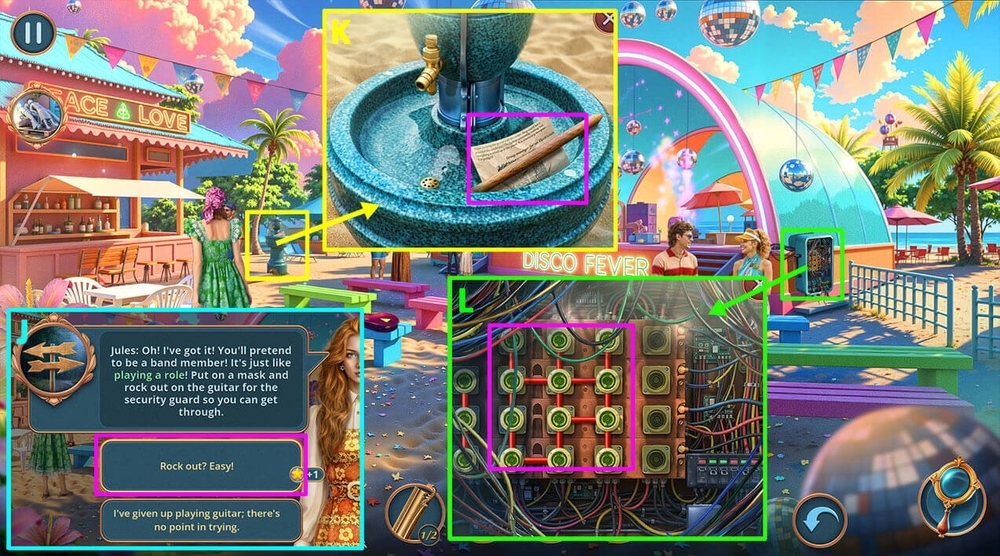
- Select this option, earn MASK (J).
- Take PRESS HANDLE, read the note, take WIRING DIAGRAM (K).
- Use WIRING DIAGRAM on the electrical panel (L).
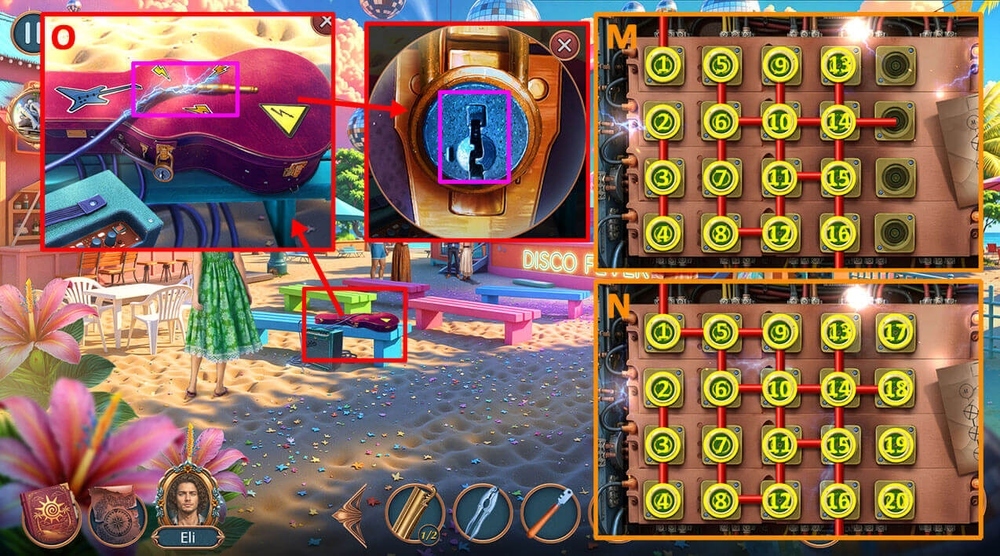
- Easy solution: Click 3, 1 (2 times), 2 (2 times), 3 (3 times), 13 (3 times), 14, 7 (3 times), 8 (2 times), 12, 15 (3 times), 16, 15 (M).
- Hard solution: Click 4 (3 times), 3 (2 times), 1 (3 times), 2 (2 times), 18, 13, 16, 9, 17, 13, 14 (3 times), 20 (3 times), 16 (2 times), 15 (2 times), 11, 12 (3 times), 16, 12, 16 (N).
- Take HEAT-SHRINK TUBING.
- Use HEAT-SHRINK TUBING, GLASSES on the damaged wire, click on the empty guitar case, use EARRING on the lock, take BROKEN GUITAR, BAS-RELIEF FRAGMENT (O).
- Go to Near the Old Chapel.

- Use BAS-RELIEF FRAGMENT on the place for a fragment (P).
- Easy solution: Click 1-R, 2-R, 3-R, 4-R-R-R, 5-R-R-R, PLAY (Q).
- Hard solution: Click 1-R-R-R, 2-R-R-R, 3-R, 4-R-R-R, 5-R-R, 6-R-R, PLAY (R).
- Take MERMAID FIGURINE.
- Go forward (S).
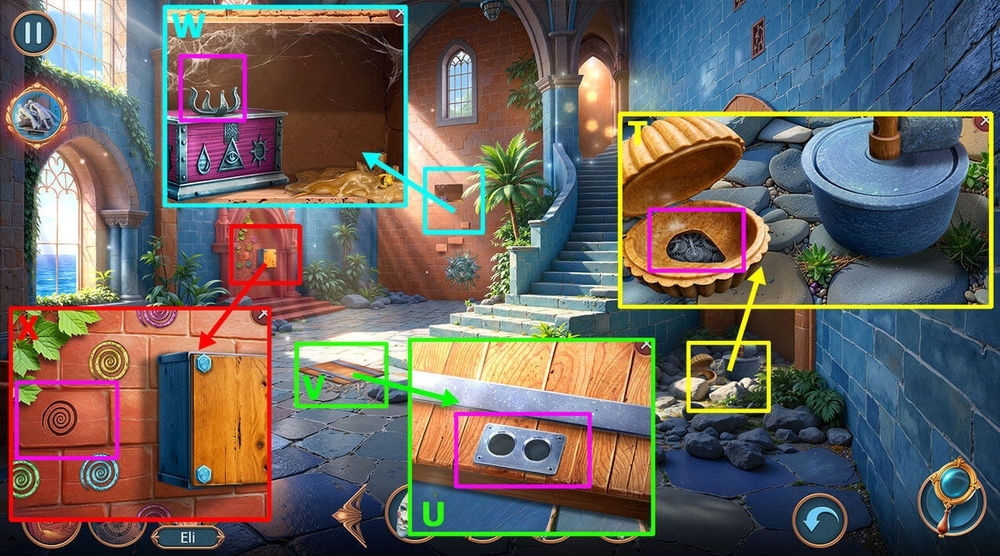
- Use MERMAID FIGURINE on the place inside a seashell, take HOOK (T).
- Use HOOK on the hatch (U).
- Play puzzle, earn RITUAL CRYSTAL (V).
- Use RITUAL CRYSTAL on the place for a crystal, take WIRE CUTTERS, TUNING PEGS, LIGHTER (W).
- Use CANDLE, LIGHTER on the spiral slot, take IMPRINT ON CANDLE (X).
- Go to Promenade.

- Use IMPRINT ON CANDLE, GLASS CUTTER on the glass (Y).
- Easy solution: Follow the instructions in the image (Z).
- Hard solution: Follow the instructions in the image (A).
- Take GLASS SPIRAL.
- Go to Old Chapel.
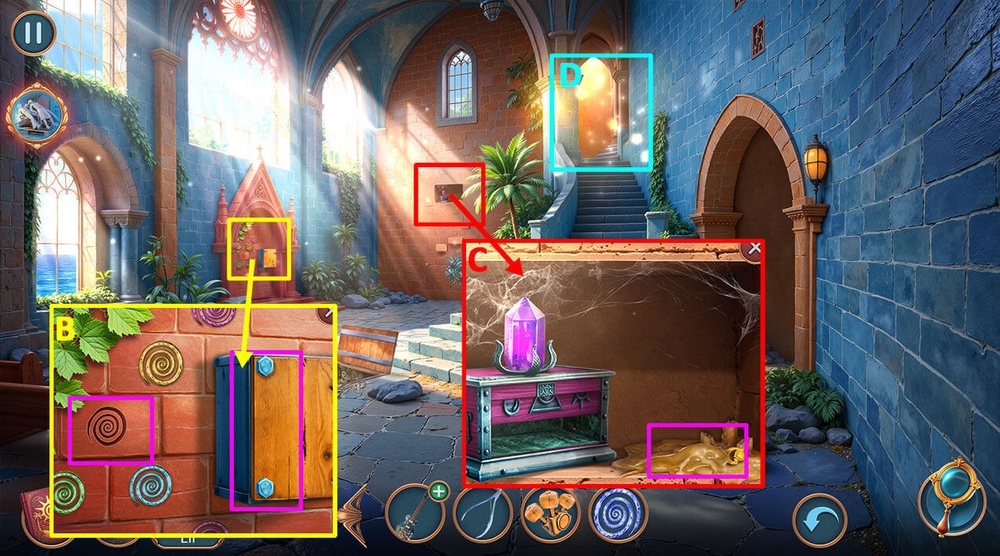
- Use GLASS SPIRAL on the spiral slot, take SEALED TUBE, COMB, use NUTCRACKER on the bolts, take FRAME PARTS 2/2 (B).
- Use COMB on the wax, take HAIR CLIPS 1/2 (C).
- Go forward (D).

- Use FRAME PARTS 2/2 on the painting, take HARMONICA (E).
- Use HARMONICA on the bat, take PAINT THINNER (F).
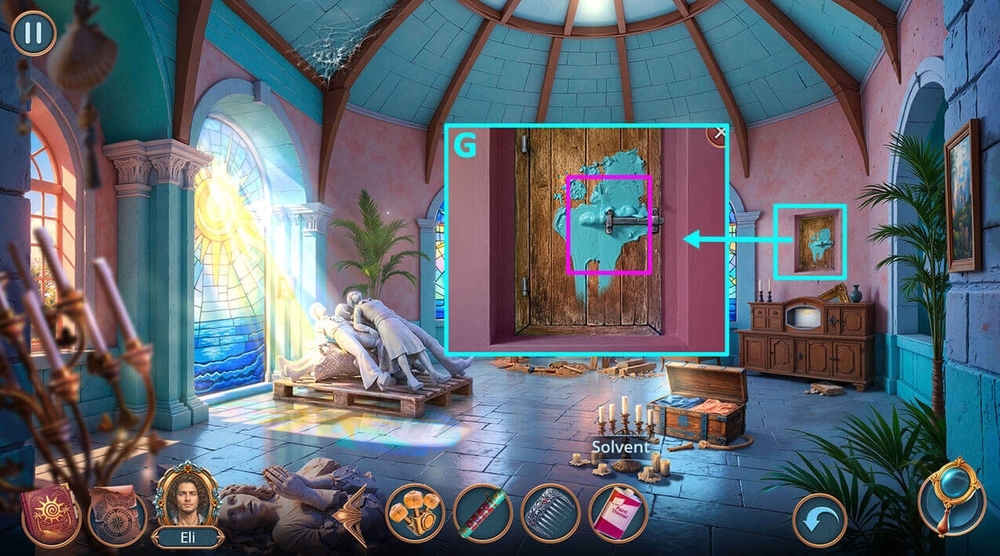
- Use PAINT THINNER on the paint, read the note, take BOW (G).
- Go to Promenade.
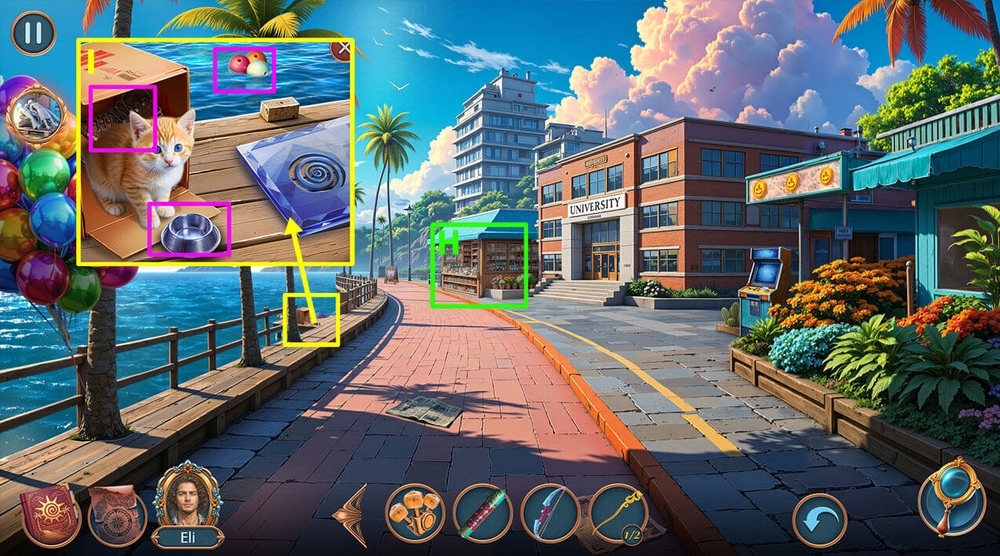
- Play puzzle, earn MILK (H).
- Use MILK on the bowl, take STUDDED BOOTS, SCREW, use BOW on the buoys in the distance, take ROUND BUOYS (I).
- Go to Chapel Tower.
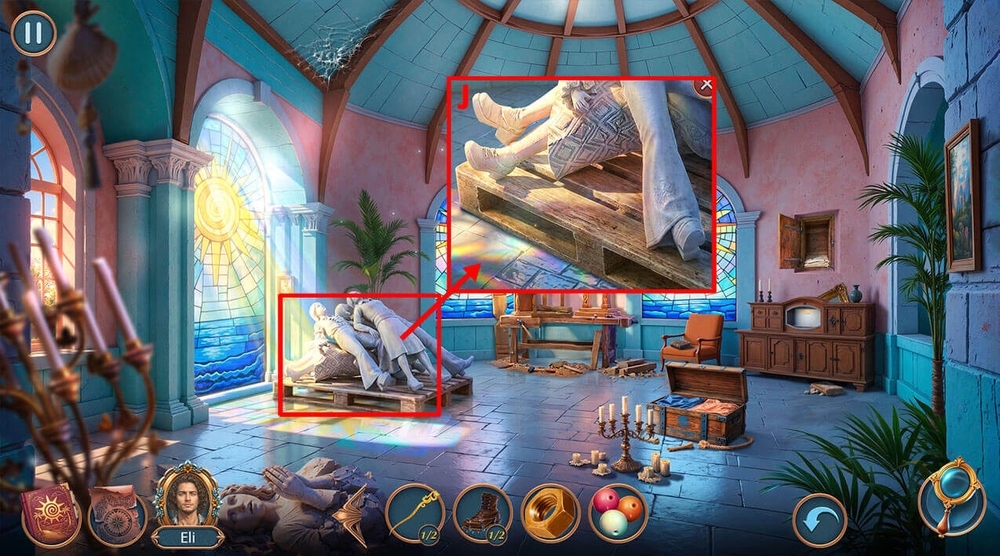
- Use ROUND BUOYS on the tray with sculptures (J).
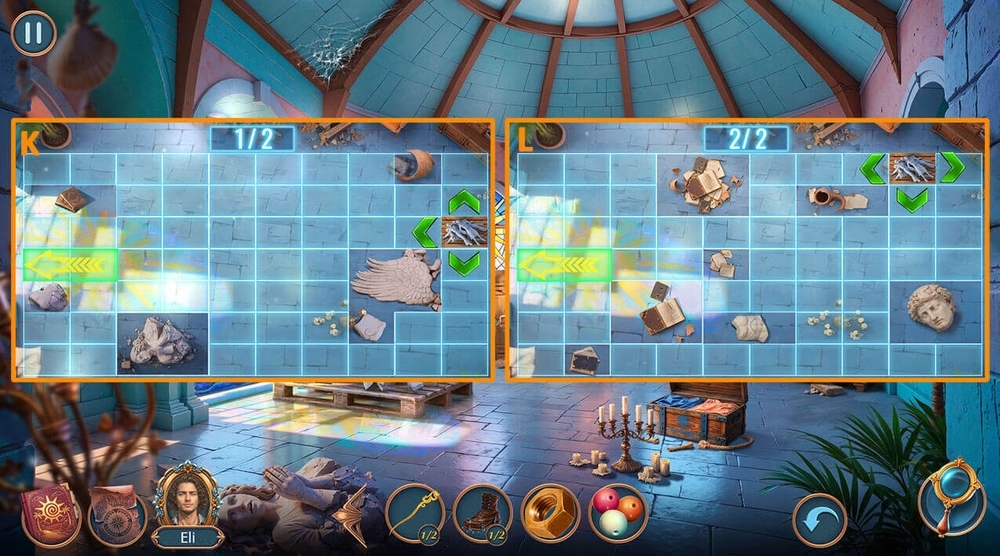
- Easy solution (K-L): Stage 1 – Click: arrow left, arrow down.
- Stage 2 – Click: arrow down, arrow left, arrow down, arrow right, arrow up, arrow left, arrow up, arrow right, arrow down, arrow left.

- Hard solution (M-N-O): Stage 1 – Click: arrow left, arrow down.
- Stage 2 – Click: arrow down, arrow left, arrow down, arrow right, arrow up, arrow left, arrow up, arrow right, arrow down, arrow left.
- Stage 3 – Click: arrow down, arrow left, arrow up, arrow right, arrow down, arrow left.
- Go to Concert Venue.
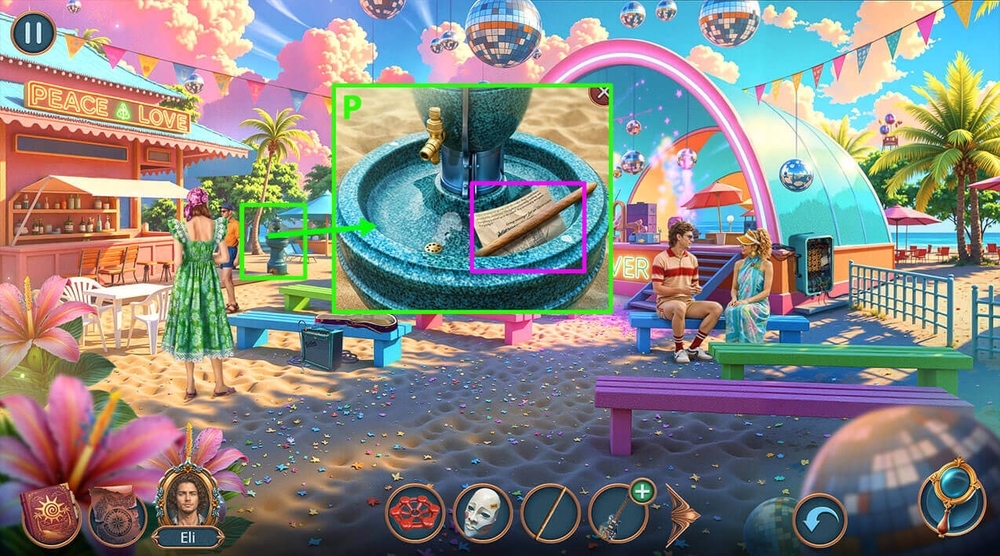
- Use VALVE, SCREW on the tap, take CLOTHESPIN (P).
- Go to Old Chapel.

- Play puzzle, earn BENT TOKEN (Q).
- Use PRESS HANDLE, BENT TOKEN on the press, take SLOT MACHINE TOKEN (R).
- Go to Promenade.
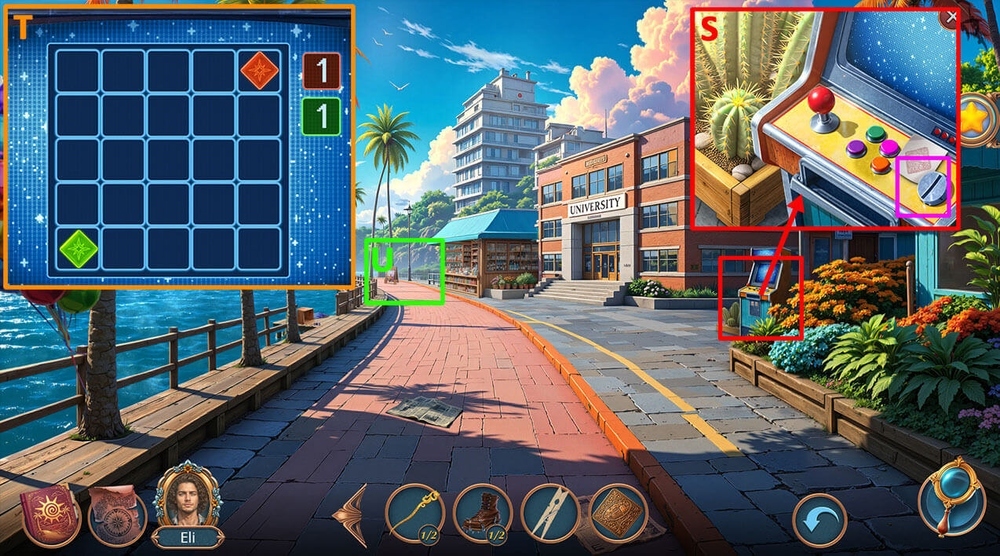
- Use SLOT MACHINE TOKEN on the machine’s 50 CENTS receiver (S).
- Solution: Solution is random (T).
- Take BRUSH, HAIR CLIPS 2/2.
- Go forward (U).

- Use HAIR CLIP on the lock, take THICK PIPE, use WIRE CUTTERS on the line, earn LINE (V).
- Use LINE, TUNING PEGS on BROKEN GUITAR, earn GUITAR (W).
- Use GUITAR, MASK on James (X).
- Easy/Hard solution: Tap the moving token until James appears on the screen (Y).

- Use LEVER TOP on the joystick, take LEVER (Z).
- Take BROKEN MAGICIAN’S CANE, use LEVER on the joystick slot (A).
- Play puzzle, earn FRISBEE (B).
- Use FRISBEE on the dog (C).
- Go forward (D).
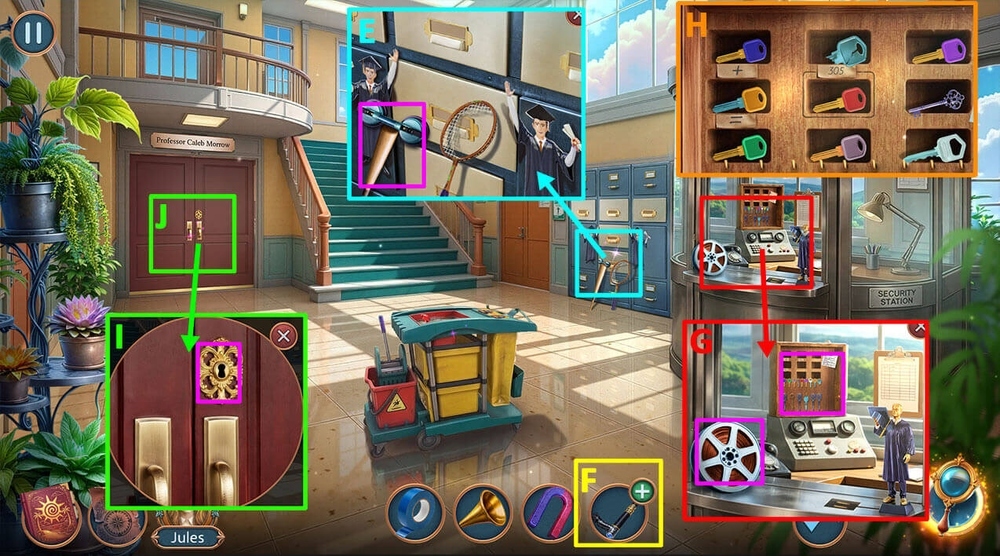
- Take INDUSTRIAL SUCTION CUP and BASEBALL BAT (E).
- Use BASEBALL BAT, TAPE on BROKEN MAGICIAN’S CANE, earn LONG CANE (F).
- Take REELS 1/2, use LONG CANE on the key holder (G).
- Easy/Hard solution: Follow the instructions in the image (H).
- Earn OFFICE KEY.
- Use OFFICE KEY on the door (I).
- Go forward (J).

- Take SAFE HANDLE (K).
- Use EAR TUBE, SAFE HANDLE on the safe (L).
- Easy solution: Follow the instructions in the images (M-N).
- Hard solution: Follow the instructions in the images (O-P-Q).
- Examine the photo, take SUN EARRING.
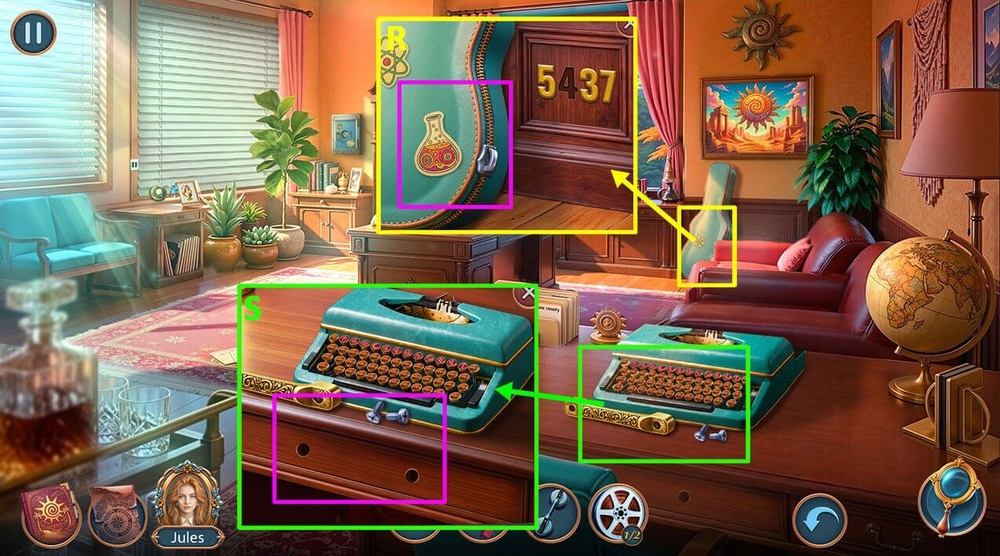
- Use SUN EARRING on the guitar case, take GUITAR PICK (R).
- Use GUITAR PICK on the box, read the note, examine the key with a number, take LECTURE HALL NUMBER (S).
- Go back.
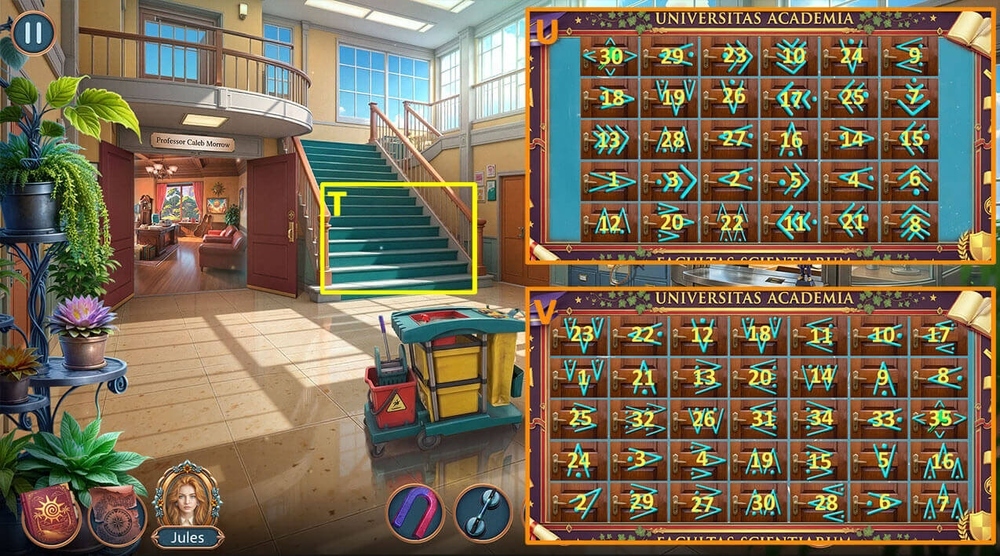
- Use LECTURE HALL NUMBER on the hallway (T).
- Easy solution: Click from 1 to 30 in ascending order (U).
- Hard solution: Click from 1 to 35 in ascending order (V).
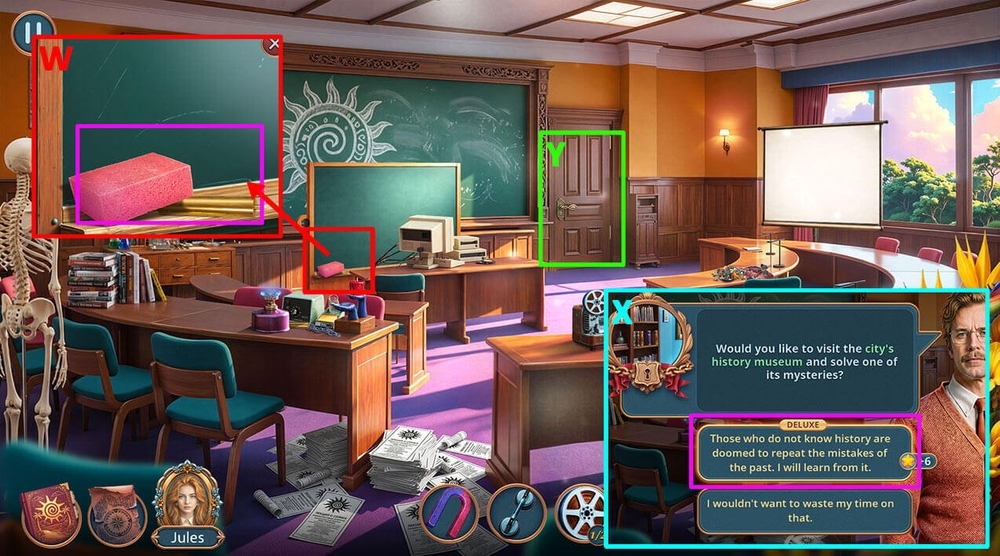
- Take SPONGE, CLOCK WEIGHTS 1/2, use INDUSTRIAL SUCTION CUP on the board (W).
- Select this option (X).
- Go forward (Y).

- Take SHARPENER, STOOL (Z).
- Use STOOL on the bookcases, take FAN (A).
- Use FAN on the smoke, take NUMBER (B).
- Go back.

- Take BROKEN PENDANT, use MAGNET on the pins, take MOLECULES 1/2, REELS 2/2 (C).
- Use REELS 2/2 on the projector (D).
- Play puzzle, earn BURNER HANDLE (E).
- Use BURNER HANDLE on the burner, take LINE-TIGHTENING MACHINE (F).
- Go back.

- Use LINE-TIGHTENING MACHINE on the torn rocket, take BADMINTON RACKET (G).
- Use BADMINTON RACKET on the water, take WINDOW CLEANER (H).
- Go back.

- Use WINDOW CLEANER, SPONGE on the map of the area (I).
- Easy solution: Follow the instructions in the images (J-K-L).

- Hard solution: Follow the instructions in the images (M-N-O-P).
- Earn CODE.
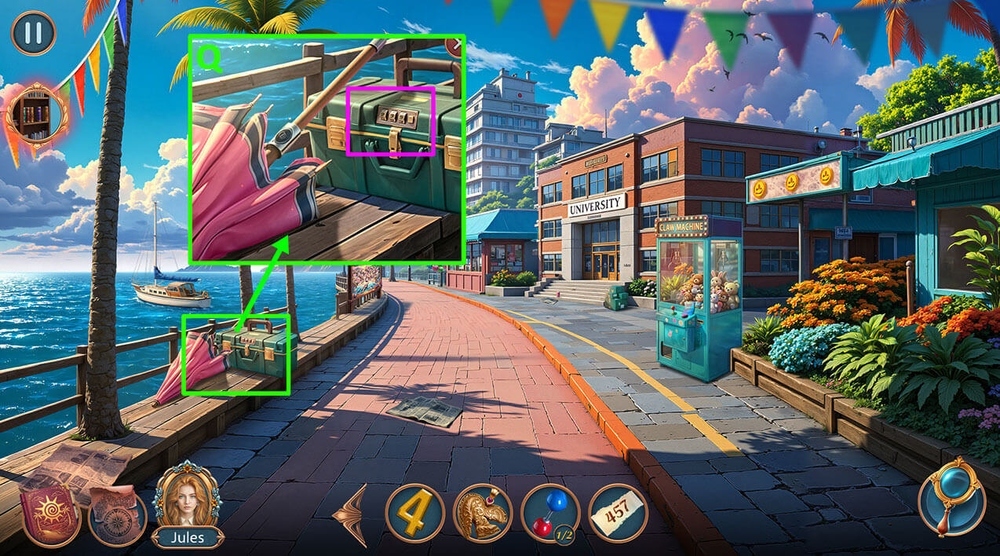
- Use CODE on the toolbox, take SEPTUM RING (Q).
- Go to Lecture Hall.

- Use SEPTUM RING on the box, take BLINDS BUTTONS 1/2 (R).
- Play puzzle, earn OCCULT CANDLE (S).
- Select this option, earn SYMBOL SCHEME (T).
- Use OCCULT CANDLE on the hand, take MOLECULES 2/2 (U).
- Go to Caleb Morrow’s Office.

- Use MOLECULES 2/2 on the molecule (V).
- Easy solution: Follow the instructions in the image (W).
- Hard solution: Follow the instructions in the image (X).
- Take JAR STICKERS.
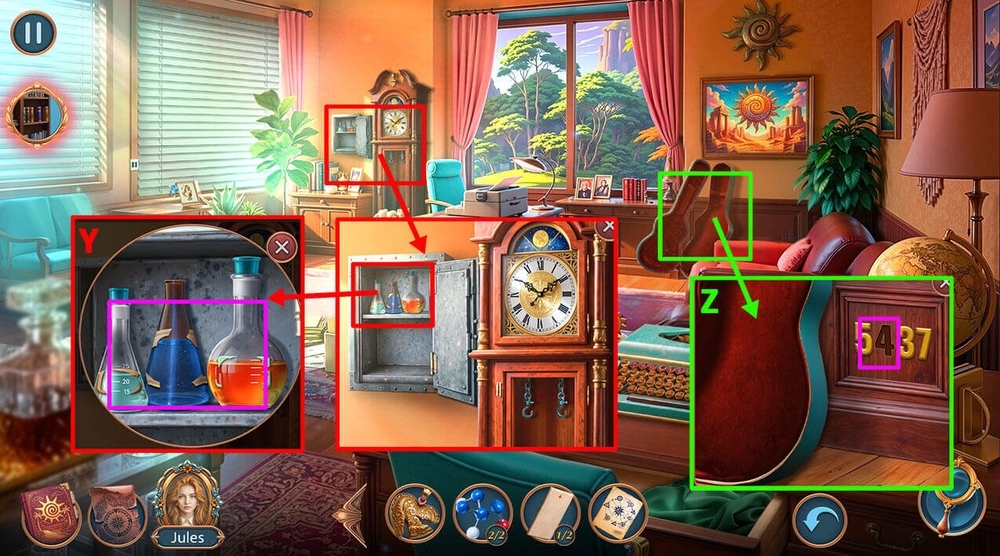
- Use JAR STICKERS on the jars, take REAGENT, INK TAPES, and UMBRELLA BUTTON (Y).
- Use NUMBER on the slot for the number, take WATER PARK PART (Z).
- Go to Seabridge Bay History Museum.

- Use WATER PARK PART on the water park slide, take WINDING KEY (A).
- Use WINDING KEY on the robot, take BOOKS 1/2, HAND CREAM (B).
- Go to City Waterfront.
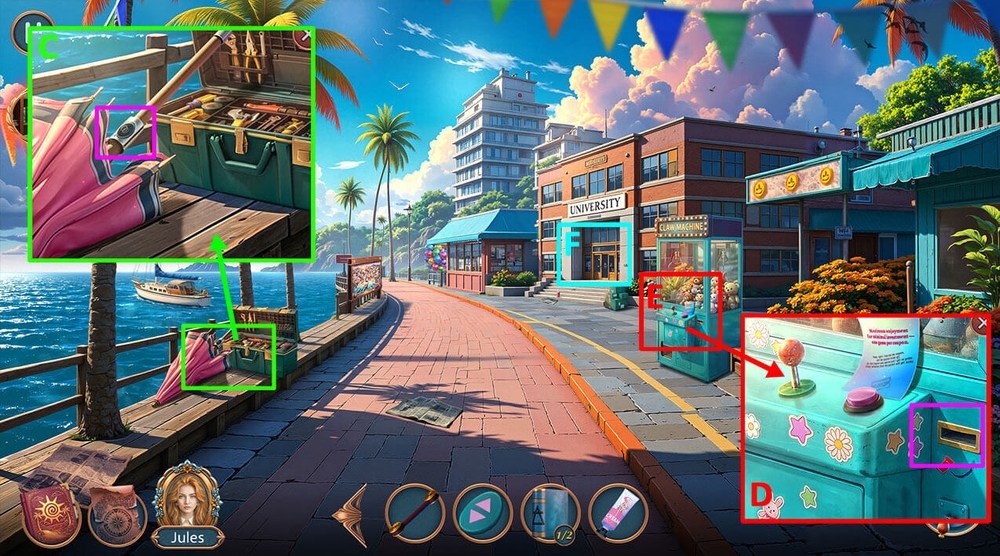
- Use UMBRELLA BUTTON on the umbrella, read the note, take PLUG, ONE-GAME COUPON (C).
- Use ONE-GAME COUPON on the machine (D).
- Play puzzle, earn DEAN WITH DIPLOMA (E).
- Go forward (F).
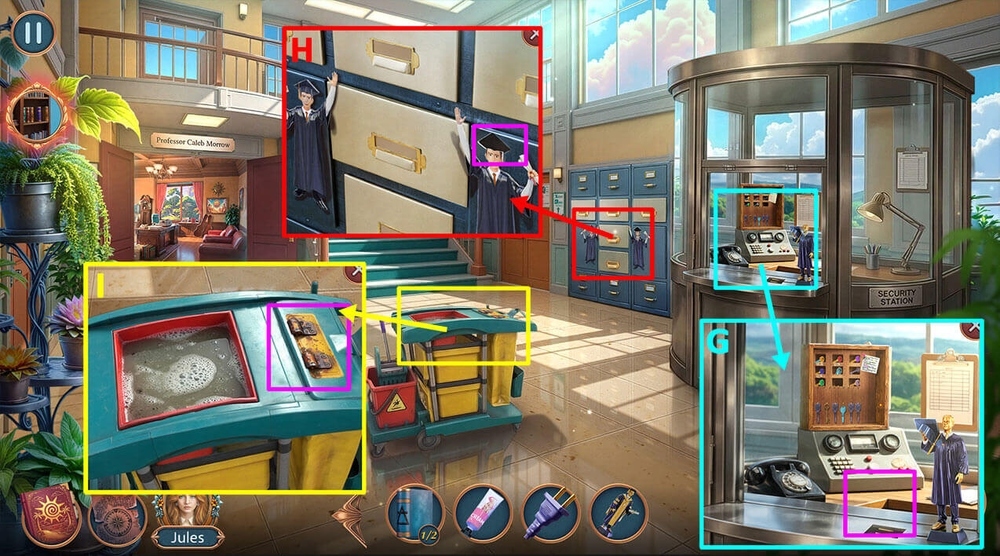
- Use DEAN WITH DIPLOMA on the place for the figurine, take ACADEMIC HAT AMULET (G).
- Use ACADEMIC HAT AMULET on the amulet slot, read the note, take GRABBER, BLADES, CHEMISTRY TEXTBOOK (H).
- Use HAND CREAM on the rusty hinges, take PAPER CLIP (I).
- Go to Seabridge Bay History Museum.

- Use PAPER CLIP on SHARPENER, earn BLADE (J).
- Use BLADE on the ribbon, take BOOKS 2/2 (K).
- Use BOOKS 2/2 on the bookcase (L).
- Easy solution: Follow the instructions in the image (M).
- Hard solution: Follow the instructions in the image (N).
- Read the note.
- Go back.
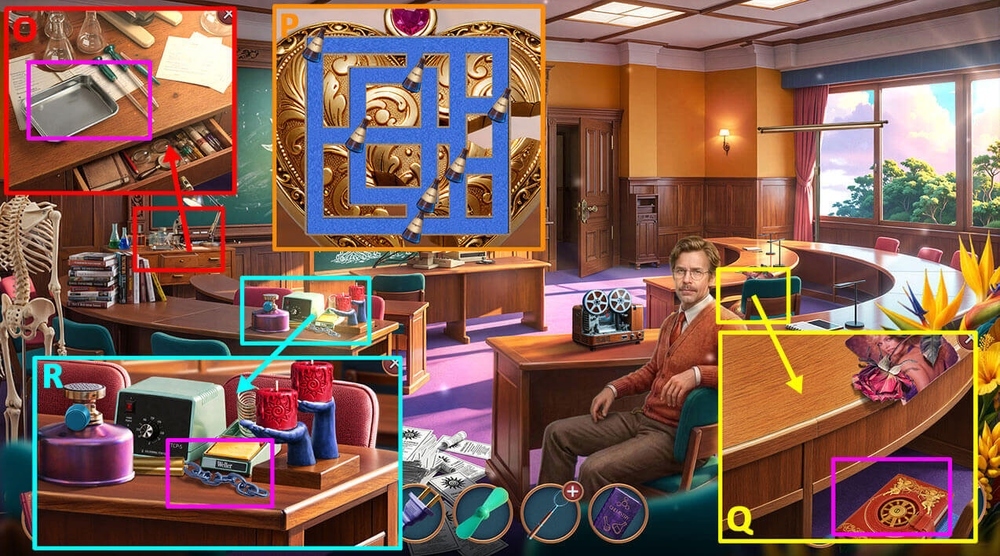
- Use BROKEN PENDANT, REAGENT, CHEMISTRY TEXTBOOK on the table (O).
- Solution: Follow the instructions in the image (P).
- Take RESTORED PENDANT.
- Click on the journal, use RESTORED PENDANT on the journal, click on Caleb Morrow, click on the spiral sun, click on the question mark, click on the journal, take SOLDERING IRON (Q).
- Use SOLDERING IRON on the chain, take CLOCK WEIGHTS 2/2 (R).
- Go to Caleb Morrow’s Office.
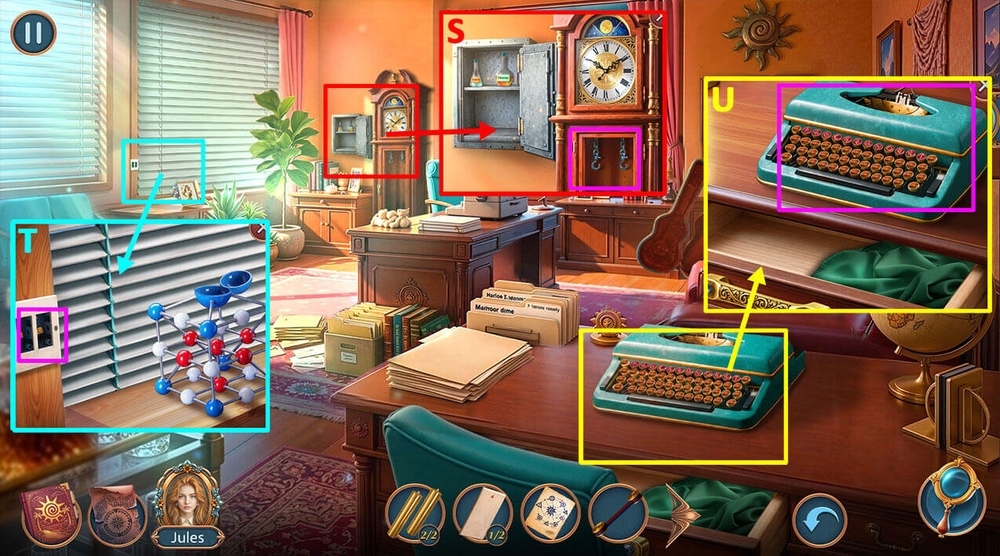
- Use CLOCK WEIGHTS 2/2 on the clock, take THREADS, BLINDS BUTTONS 2/2 (S).
- Use BLINDS BUTTONS 2/2 on the blinds, read the journal, take BOTTLE OF FRESH WATER, STICKY TAPE, CARRIAGE (T).
- Use CARRIAGE, SYMBOL SCHEME, INK TAPES on the typewriter (U).

- Easy solution: Click 1-1, 2-2, 3-3, 4-4, 5-5, 6-6, 7-7, 8-8, 9-9 (V).
- Hard solution: Click 1-1, 2-2, 3-3, 4-4, 5-5, 6-6, 7-7, 8-8, 9-9, 10-10, 11-11, 12-12 (W).
- Read the note.
- Select this option (X).

- Take ROPE, CHISEL (Y).
- Use CHISEL on the board, read the note, earn FOREST PATHS MAP (Z).
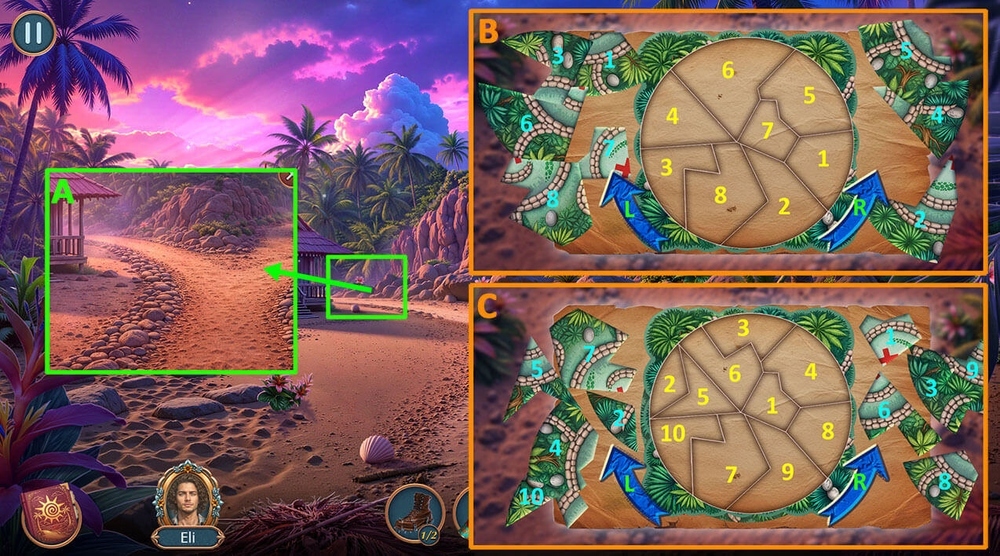
- Use FOREST PATHS MAP on the path (A).
- Easy solution: Click L, drag 1-1, 2-2, click L, drag 3-3, click L, drag 4-4, 5-5, click L, drag 6-6, 7-7, click L, drag 8-8 (B).
- Hard solution: Click R, drag 1-1, 2-2, click R, drag 3-3, 4-4, 5-5, click R, drag 6-6, click R, drag 7-7, 8-8, click R, drag 9-9, 10-10 (C).
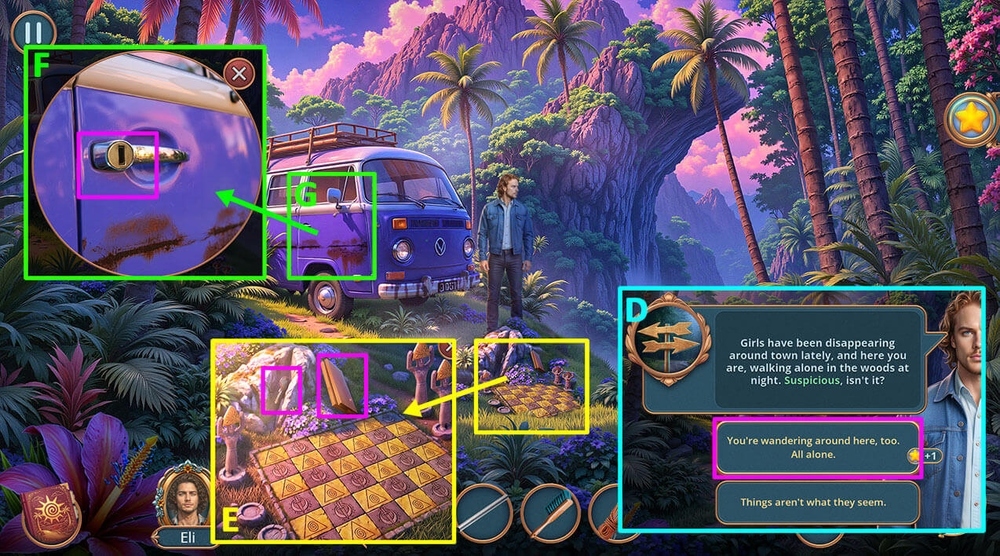
- Select this option (D).
- Take BOARDS, use CLOTHESPIN on the stuck key, earn KEY (E).
- Use KEY on the van’s door (F).
- Play puzzle, earn GRASS TRIMMER (G).
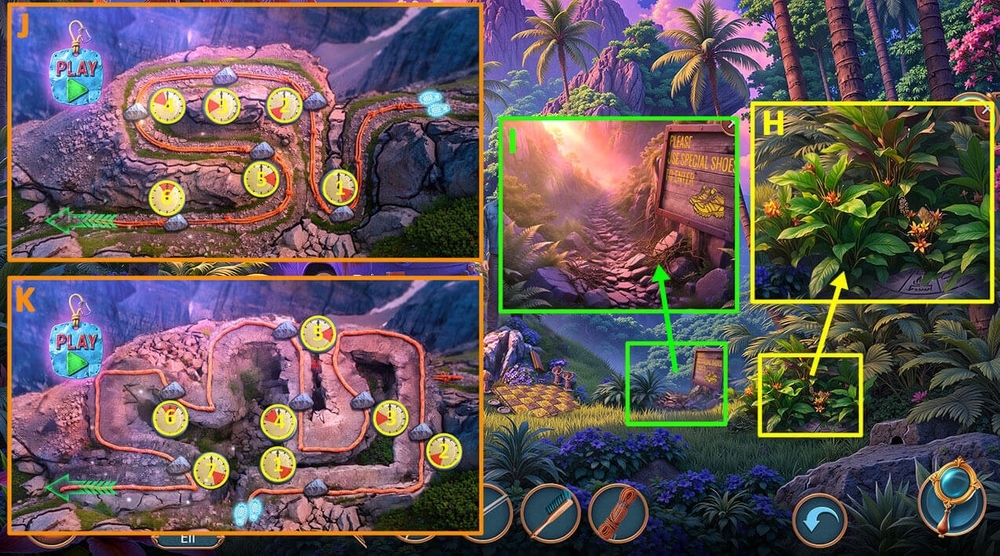
- Use GRASS TRIMMER on the grass, take CULT FIGURINES 1/2, STUDDED BOOTS 2/2 (H).
- Use STUDDED BOOTS 2/2, ROPE on the path down (I).
- Easy solution: Click 1 (6 times), 2 (5 times), 3 (4 times), 4 (4 times), 5 (2 times), 6 (5 times) (J).
- Hard solution: Click 1 (5 times), 2 (4 times), 3 (4 times), 4 (4 times), 5, 6 (4 times), 7 (2 times) (K).
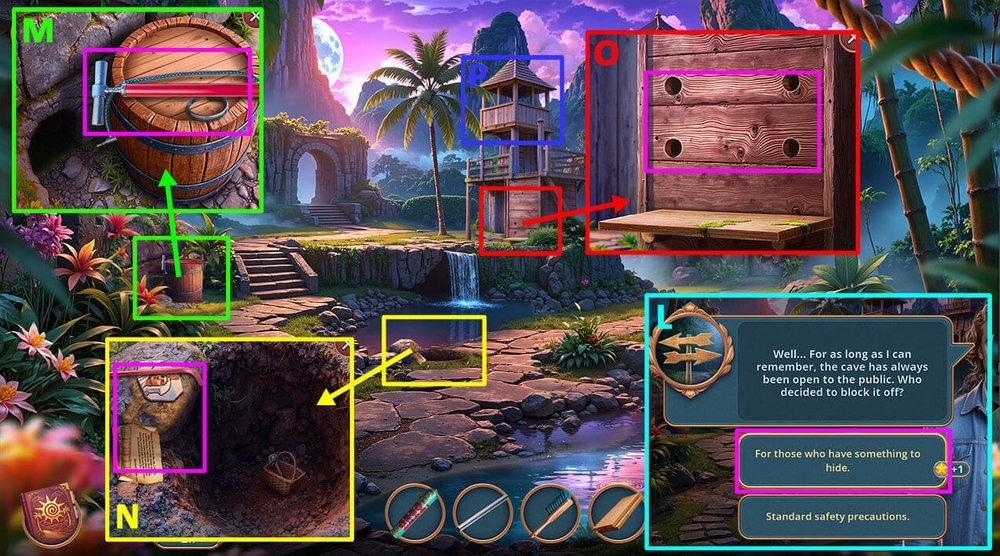
- Select this option (L).
- Take HAND PUMP, CHAIN LINK (M).
- Take HEX KEY, FRESCO FRAGMENTS 1/2, read the note, use BRUSH on the mud, use SEALED TUBE on the symbols on the stone, take CORKS (N).
- Use CORKS, THICK PIPE, BOARDS on the structure (O).
- Play puzzle, earn GLOW STICK (P).
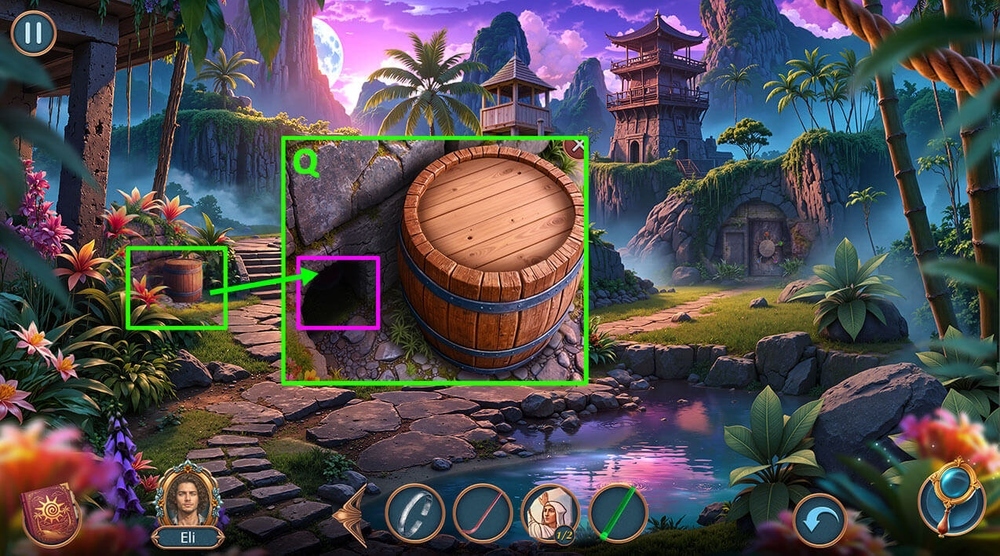
- Use GLOW STICK on the burrow, take SYMBOL BUTTON (Q).
- Go to Forest Clearing.
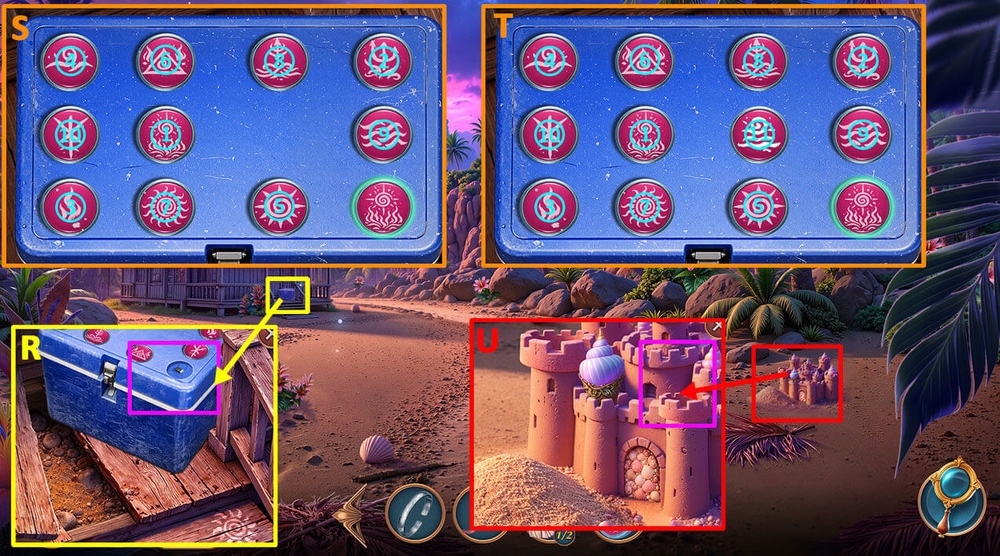
- Use SYMBOL BUTTON on the secret stash (R).
- Easy solution: Click 1 – 2 – 3 – 4 – 5 – 6 – 7 – 8 – 9 – 10 (S).
- Hard solution: Click 1 – 2 – 3 – 4 – 5 – 6 – 7 – 8 – 9 – 10 – 11 (T).
- Take SAND CASTLE PART.
- Use SAND CASTLE PART on the sand castle, take DRILL (U).
- Go to Near the Cave’s Entrance.
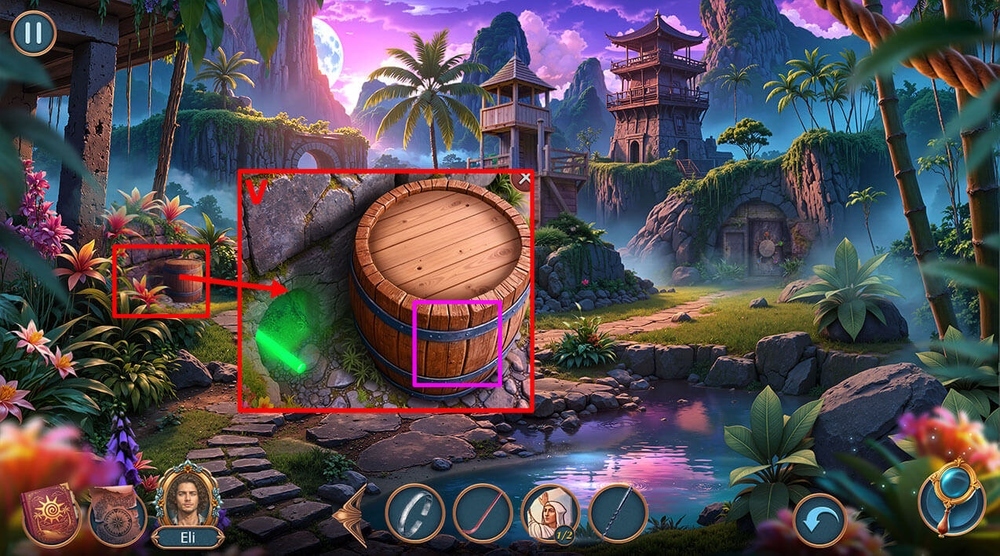
- Use DRILL on the barrel, take HOOK (V).
- Go back.

- Play puzzle, earn INSECT REPELLENT (W).
- Use INSECT REPELLENT on the wasps, take RUBBER, CULT FIGURINES 2/2 (X).
- Use CULT FIGURINES 2/2 on the figurine slots (Y).
- Easy solution: Follow the instructions in the image (Z).
- Hard solution: Follow the instructions in the image (A).
- Take COCONUT.
- Go back.
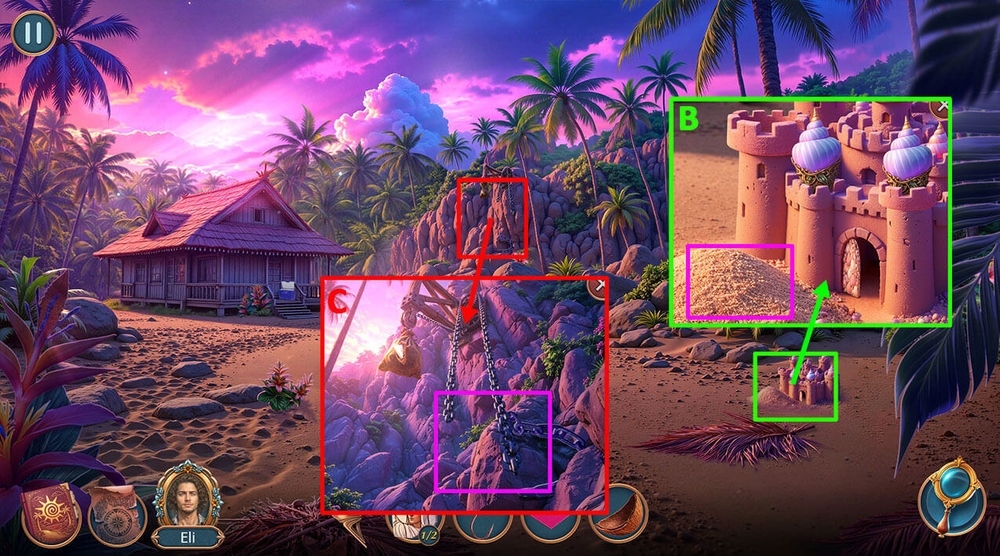
- Use COCONUT on the pile of sand, take CARABINER (B).
- Use CARABINER, CHAIN LINK on the chain, take FOIL (C).
- Go to Near the Cave’s Entrance.
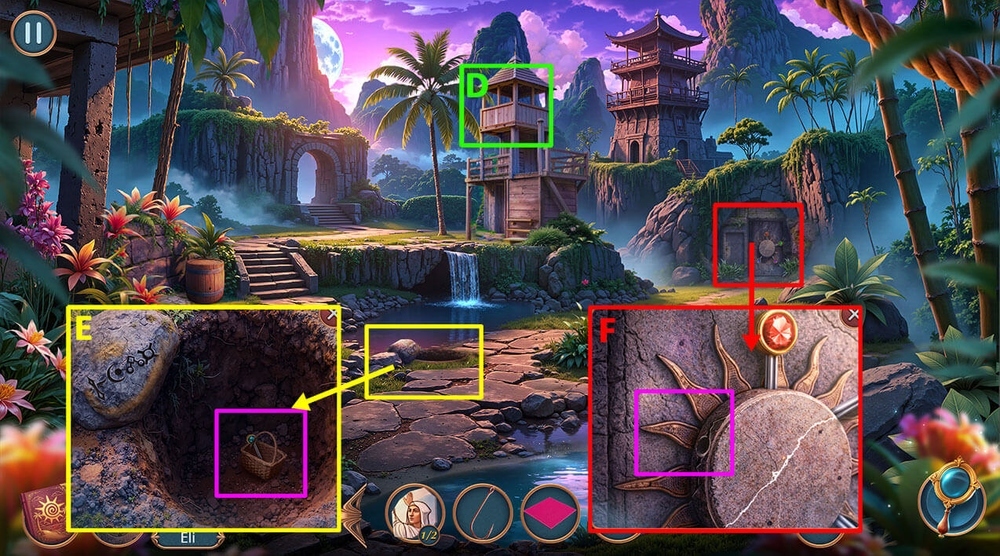
- Play puzzle, earn GRABBER HAND (D).
- Use GRABBER HAND on the basket, take DOOR LEVER (E).
- Use DOOR LEVER on the door (F).
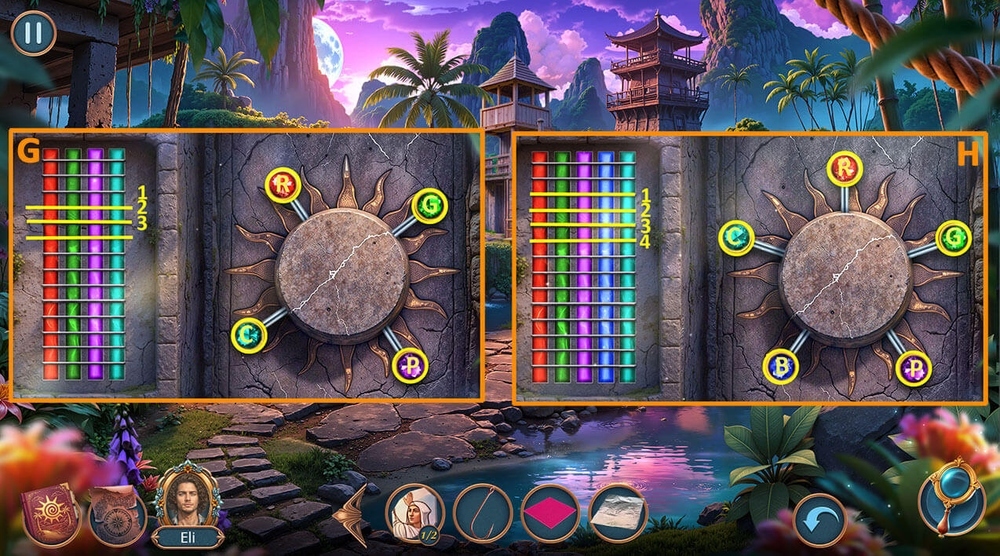
- Easy solution: Press R, when the red bar reaches 1, press G, when the green bar reaches 2, press P, when the purple bar reaches 3, press B, when the blue bar reaches 4, press C (G).
- Hard solution: Press R, when the red bar reaches 1, press G, when the green bar reaches 2, press P, when the purple bar reaches 3, press C (H).
- Walkthrough Bonus Chapter, at the link below.