
Unsolved Case 6: Ash and Secrets – You’ll go on an investigation into the dangerous Great Green reservation where truck driver Harry Wright is mysteriously killed. A mysterious amulet is discovered at the scene, leading to a web of corruption linked to a highway project and the traditions of an ancient community. In the course of the investigation you will have to face dangerous enemies, sort out personal conflicts and betrayals, and uncover the secrets of a village on the brink of destruction. Together with your faithful partner Paul you will explore crime scenes, find clues and unravel tangled traces. Solve the mystery of the murder, unraveling who is behind the crimes, and survive all the horrors that await you at every turn. If you can not pass any of the puzzles or do not know where the items are, on our site you can watch the walkthrough of the game Unsolved Case 6: Ash and Secrets, and learn the terrible truth.
Unsolved Case 6: Ash and Secrets – Walkthrough
Here you can see the full walkthrough of Unsolved Case 6: Ash and Secrets game, namely for all chapters, including bonus chapter, in pictures.

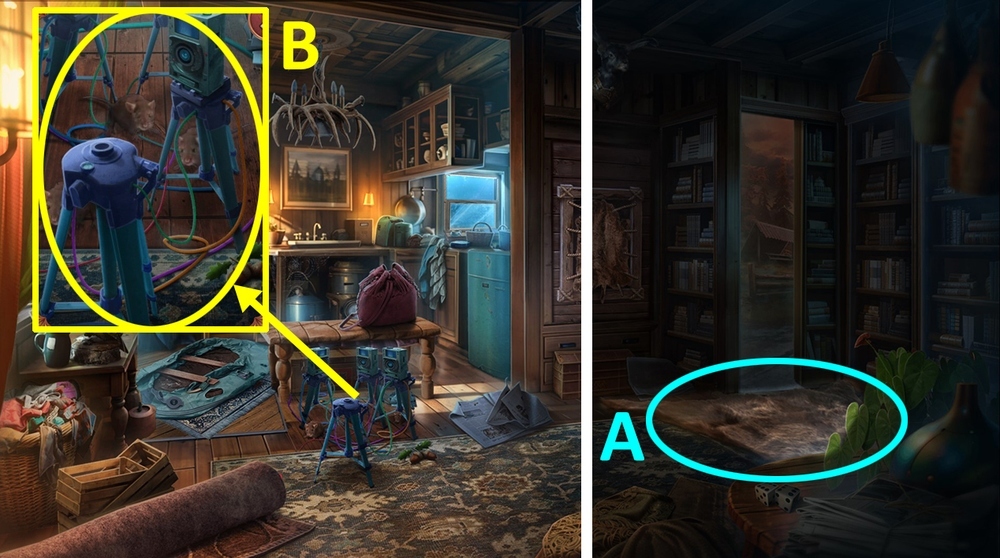
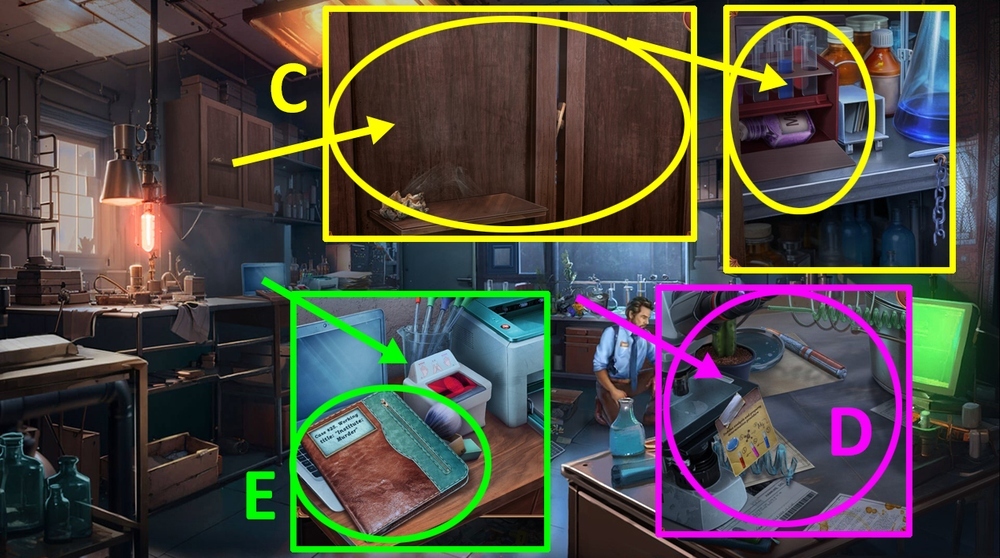
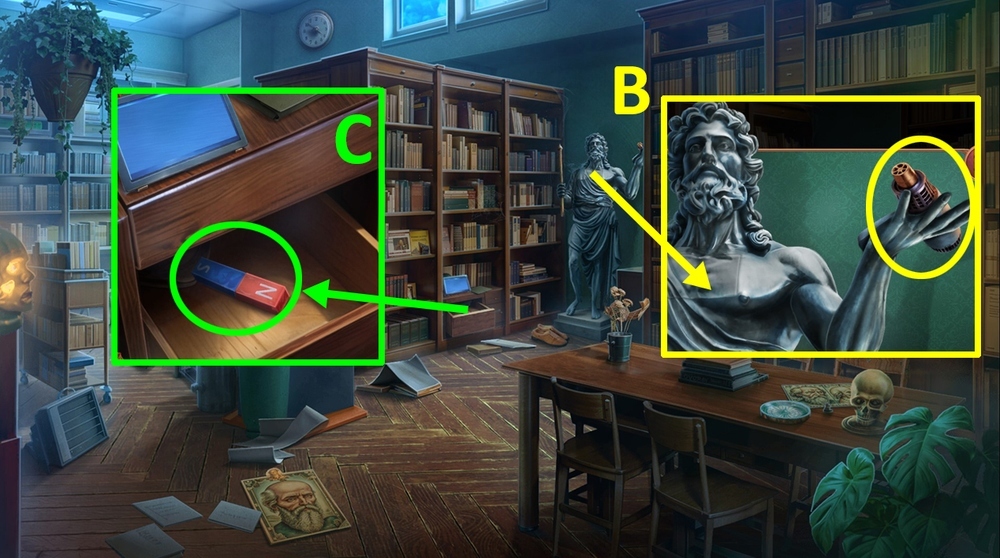
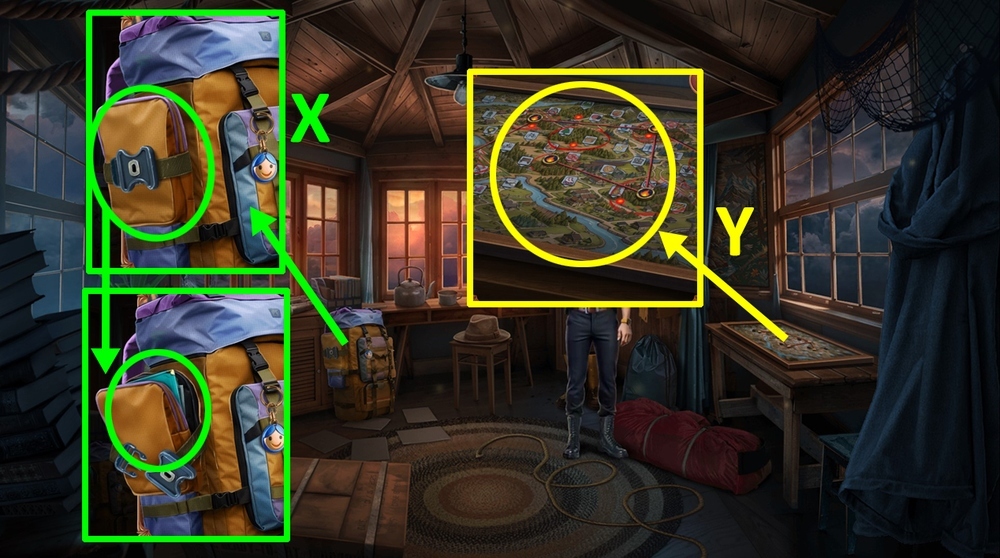
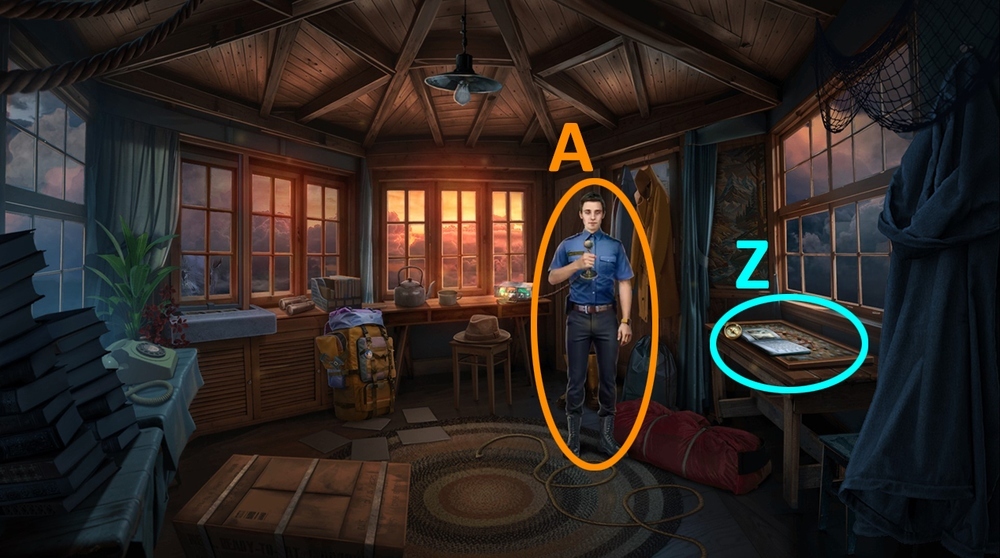
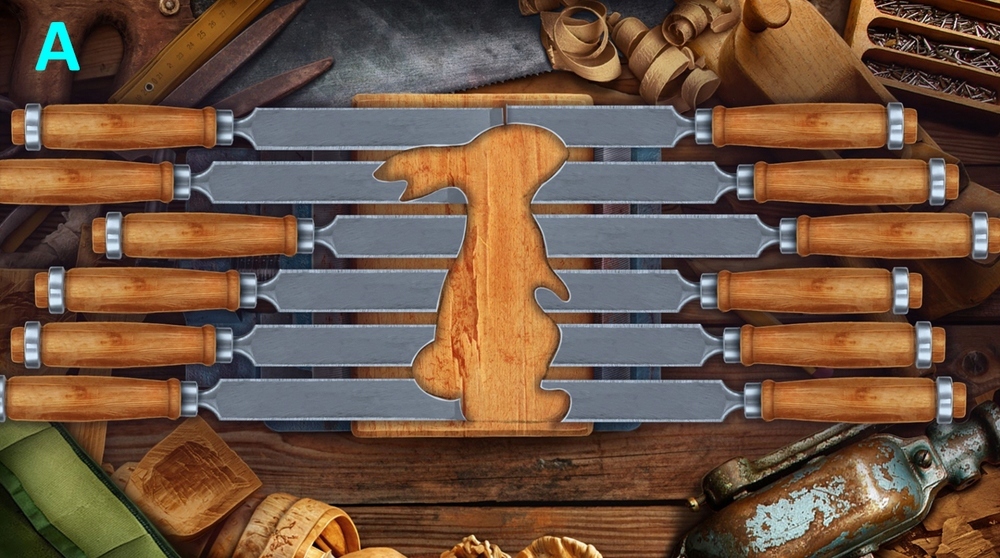
- Take the journal, take CLIMBING HARNESS, open the drawer (A).
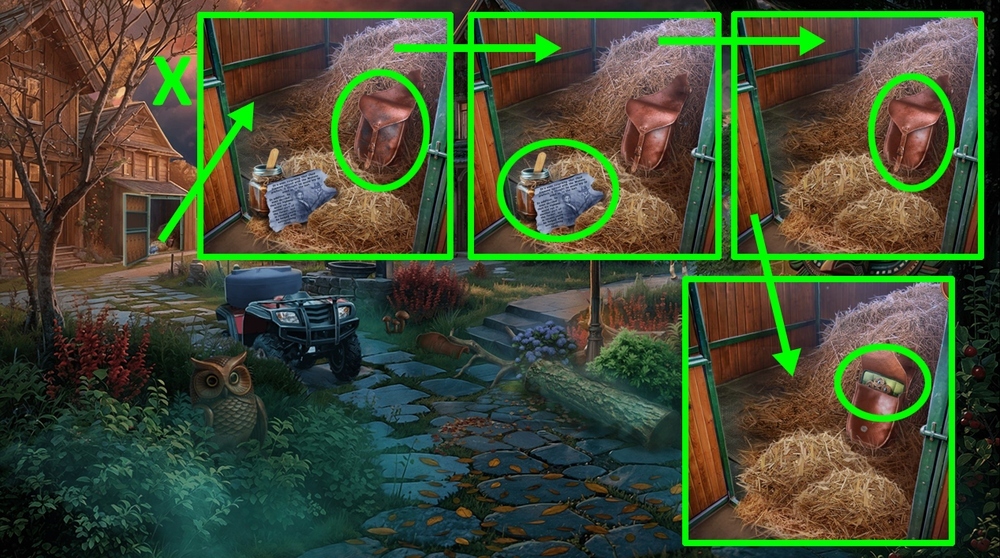
- Use CLIMBING HARNESS on the torn belt.
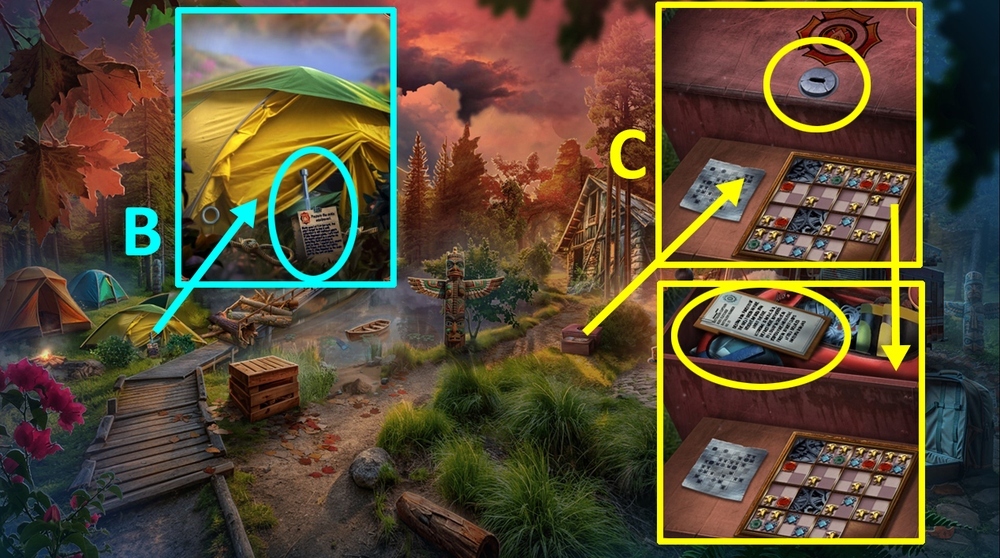
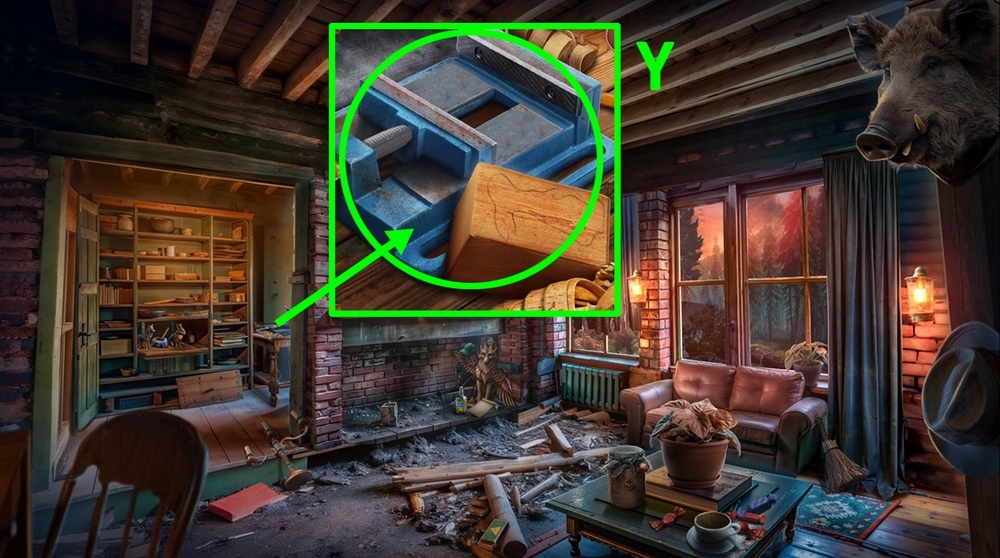
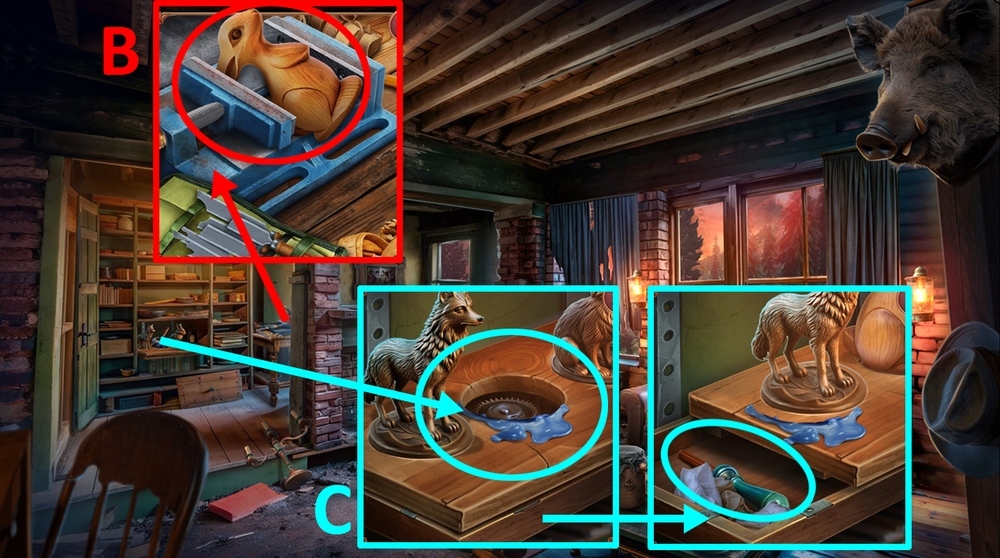
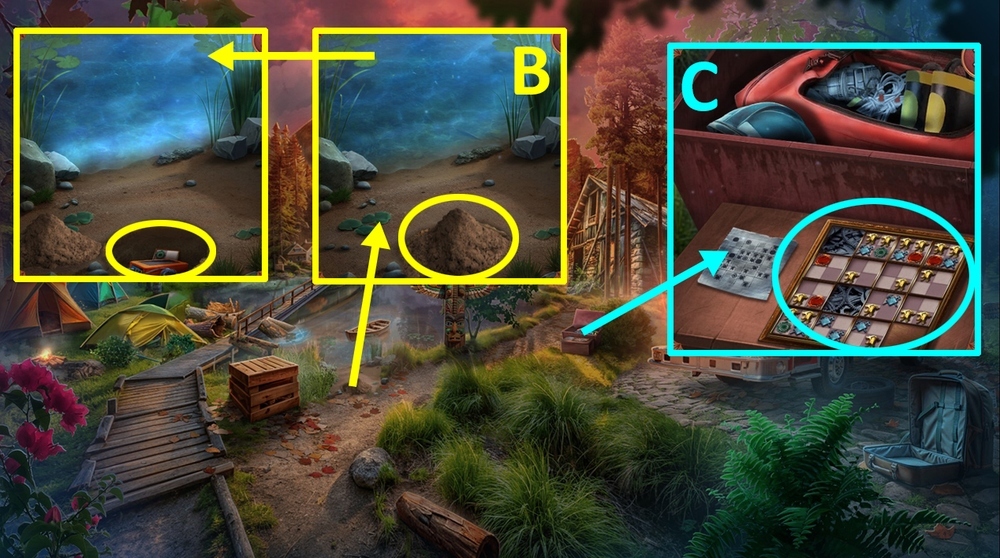
- Take FLAXSEED OIL and MAP SCRAPS (B).
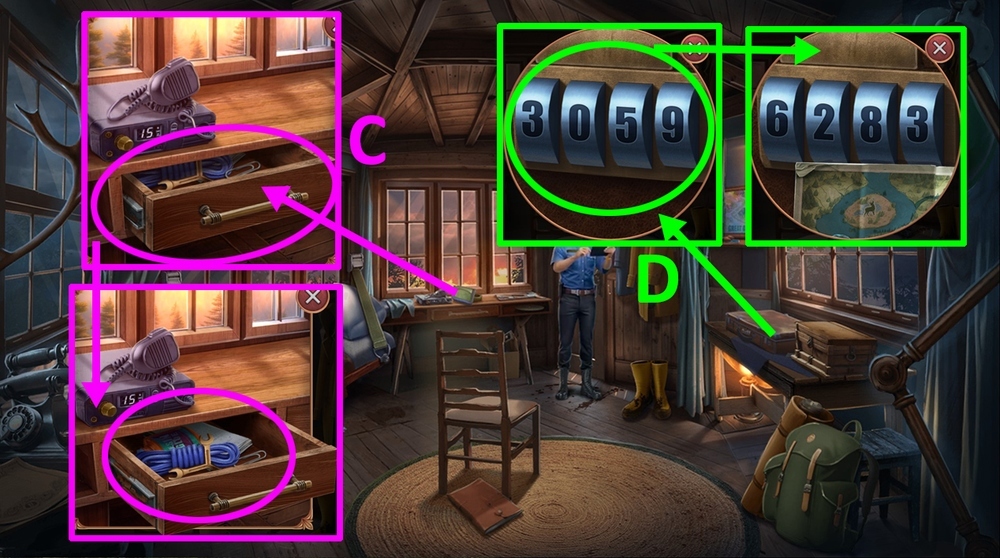
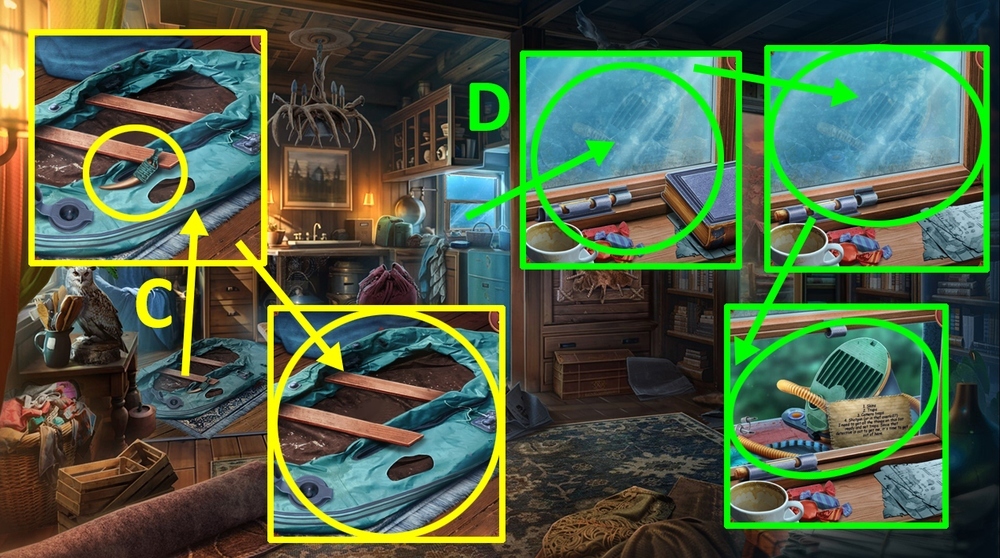
- Use FLAXSEED OIL on the drawer mechanism, take LOCK PARTS 1/2, ROPE, and RESIN GLUE (C).
- Use RESIN GLUE on MAP SCRAPS, earn CODE.
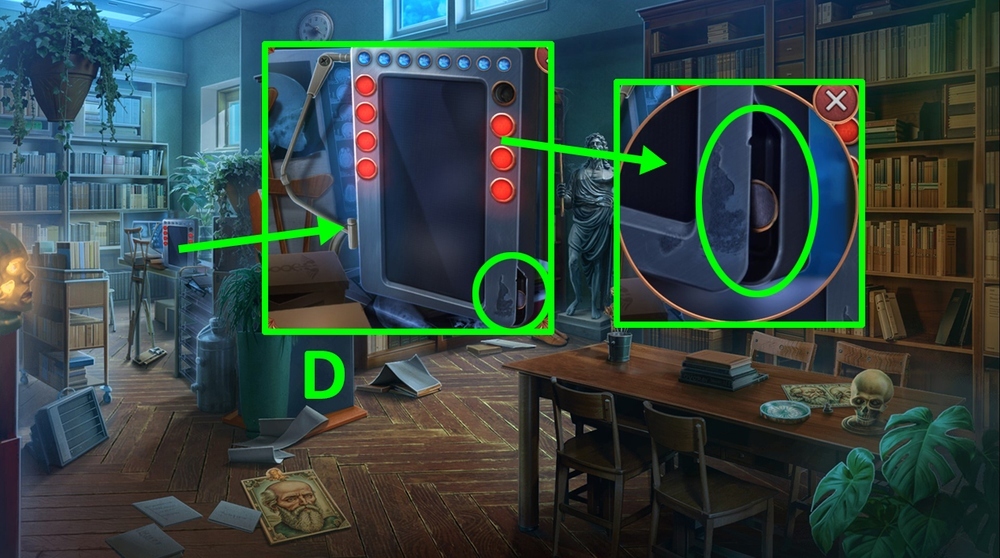
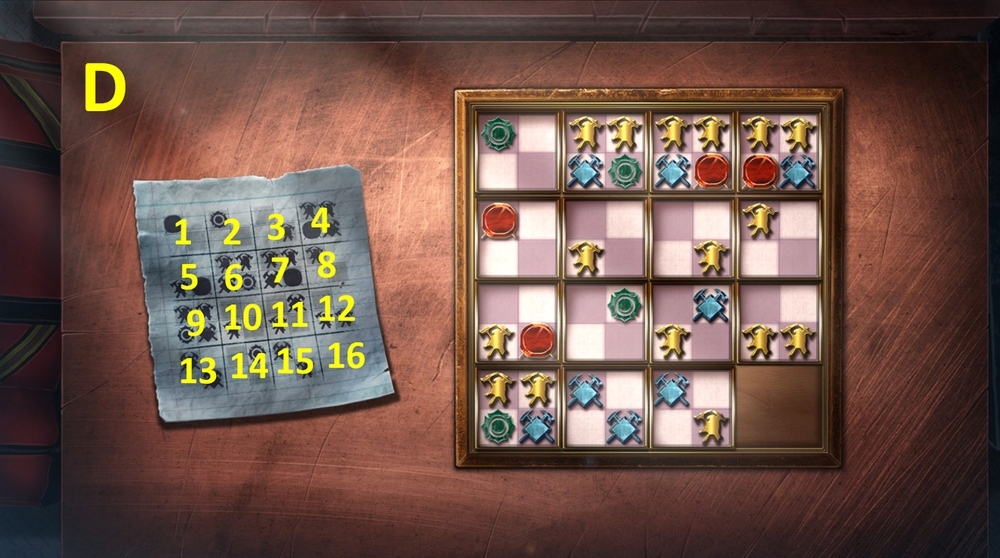
- Use CODE on the lock, enter 6283 by clicking on numbers (D).
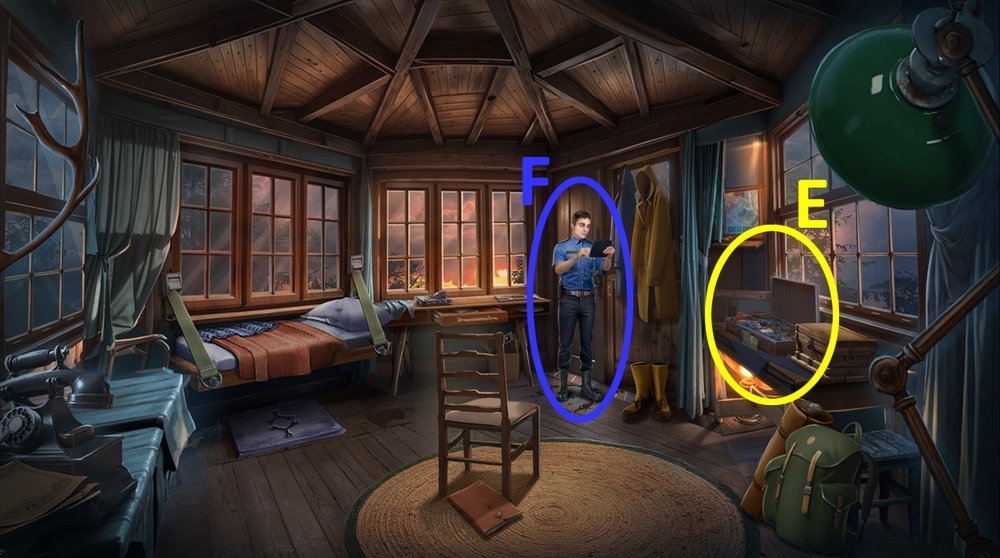
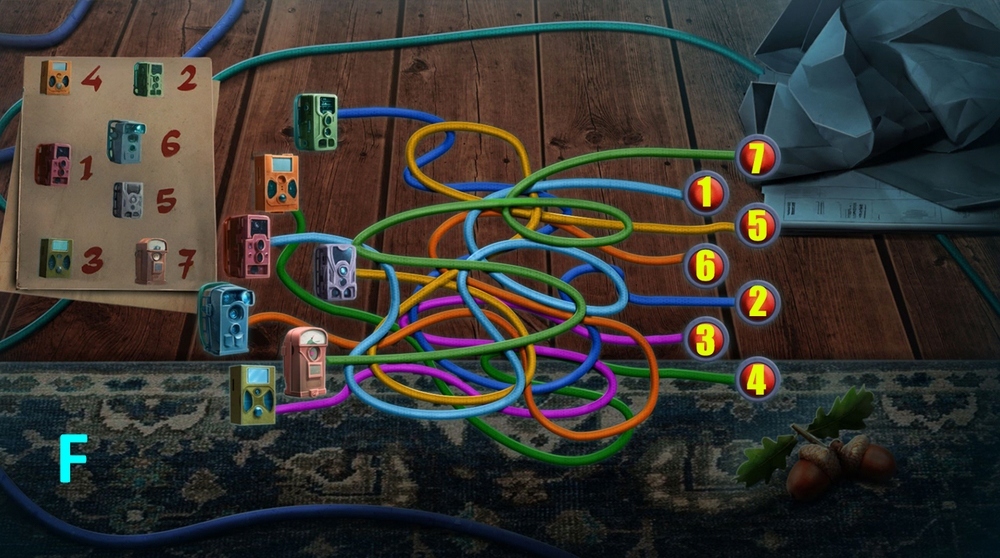
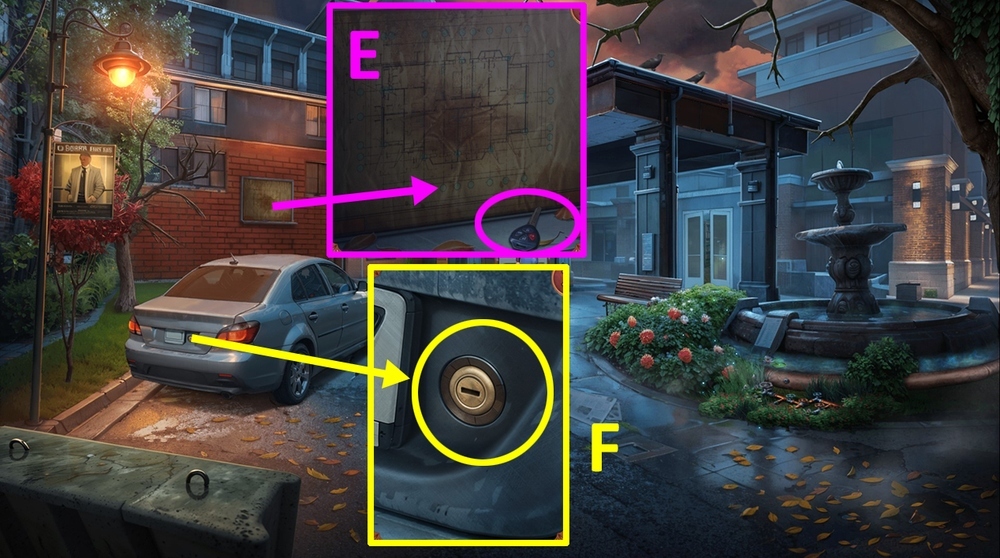
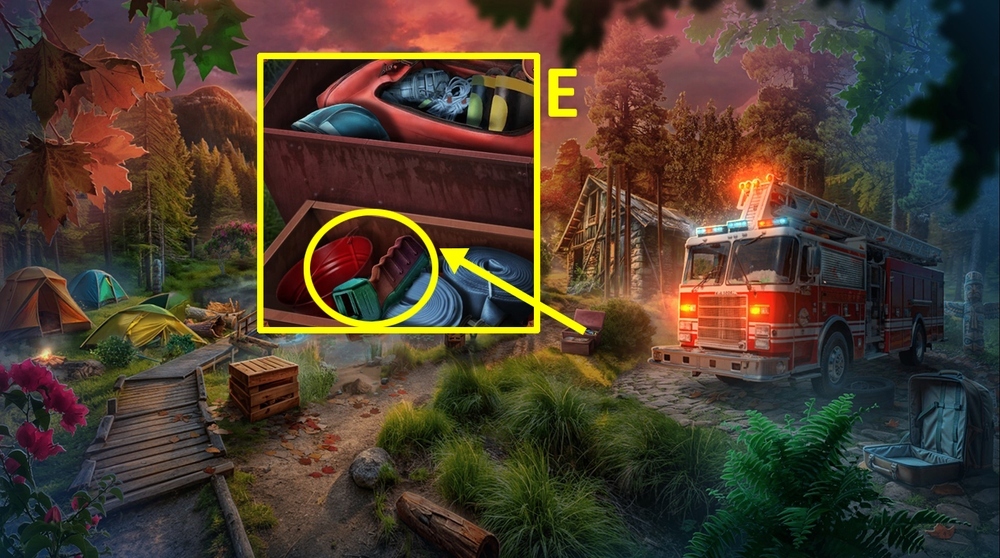
- Play puzzle, earn VICTIM’S ID (E).
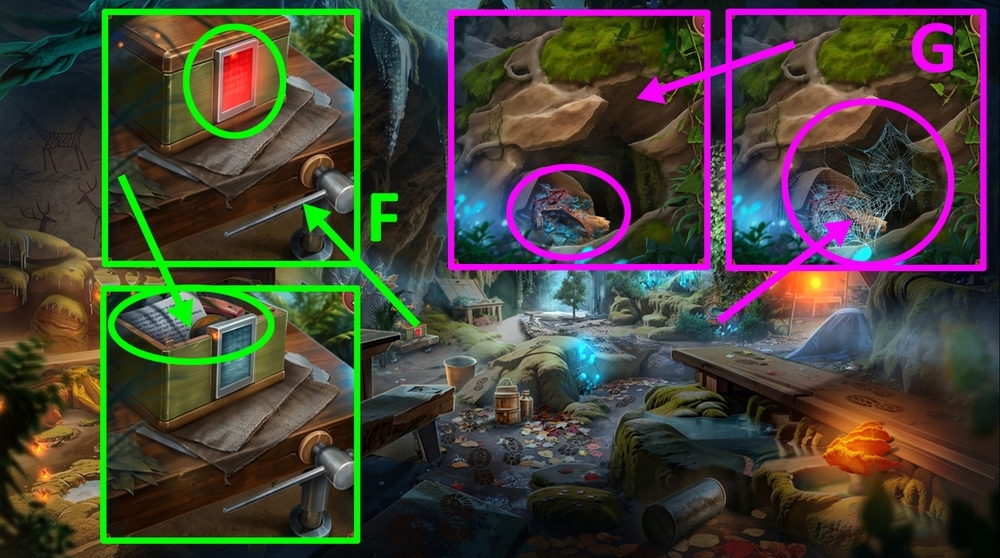
- Give VICTIM’S ID to Paul (F).
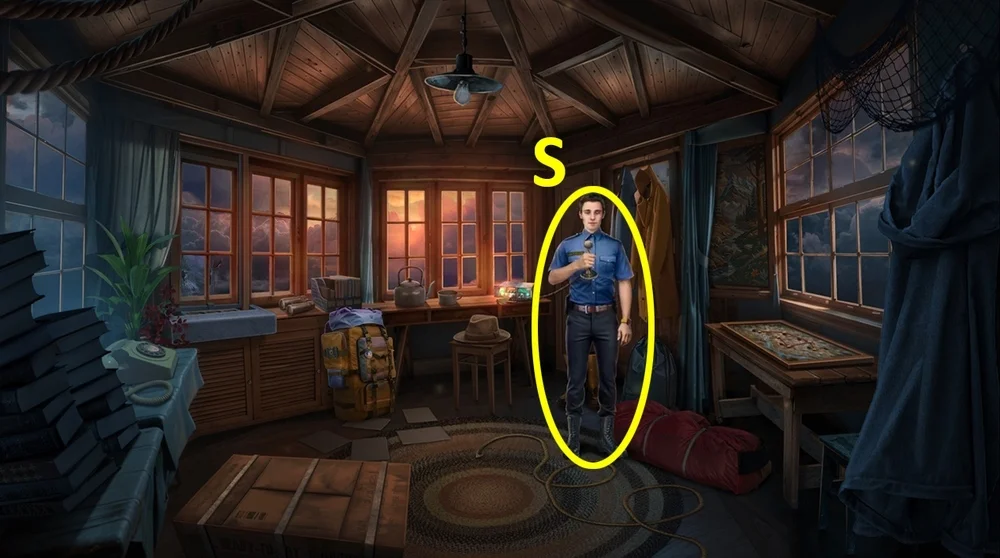
- Go forward.

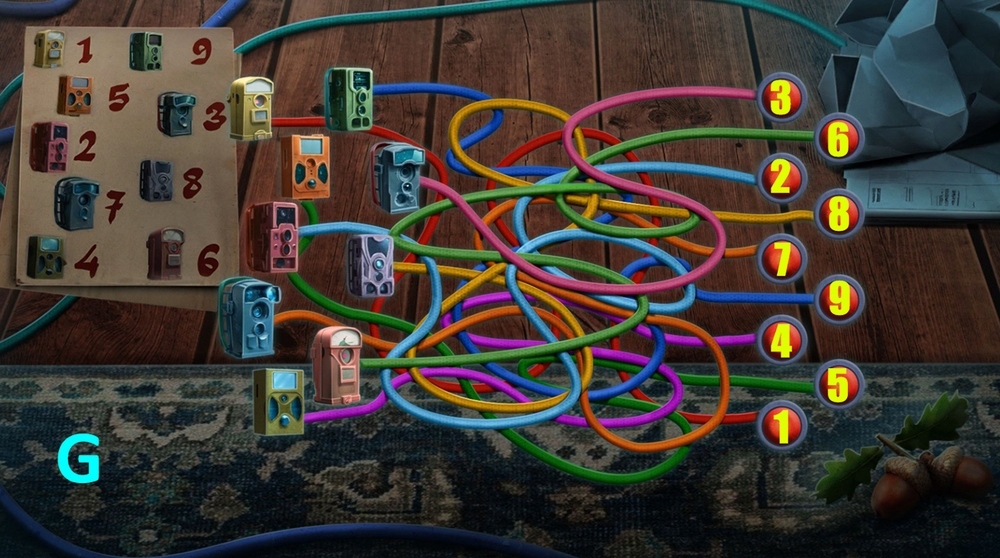
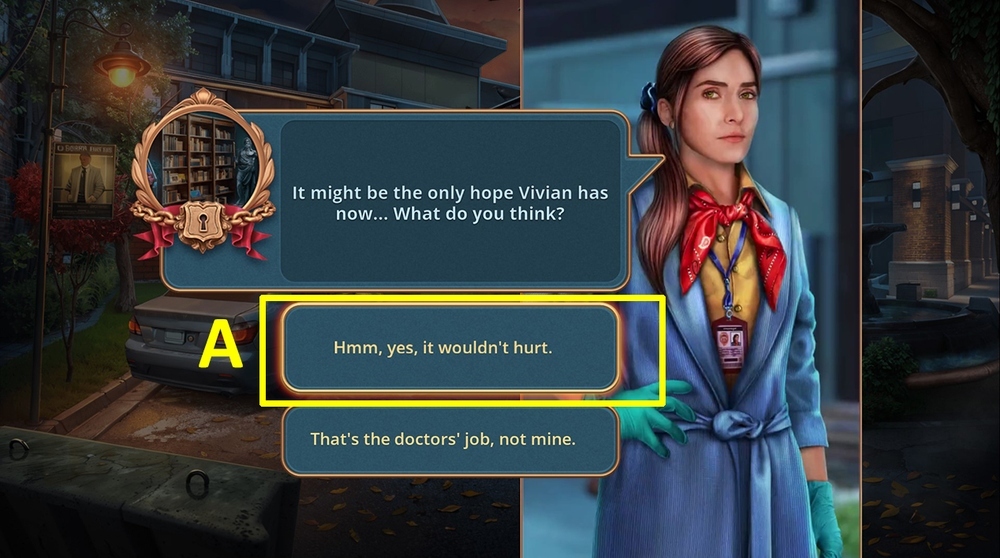
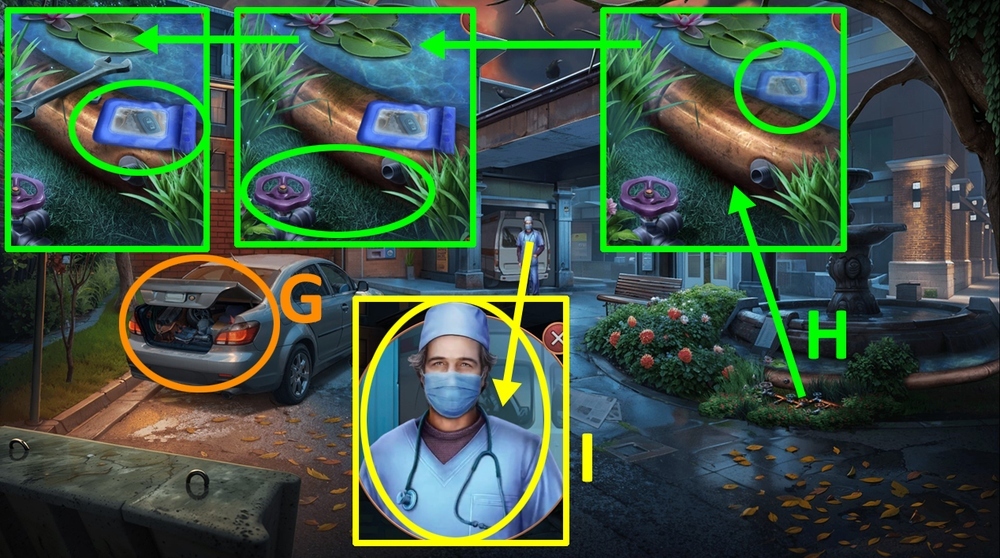
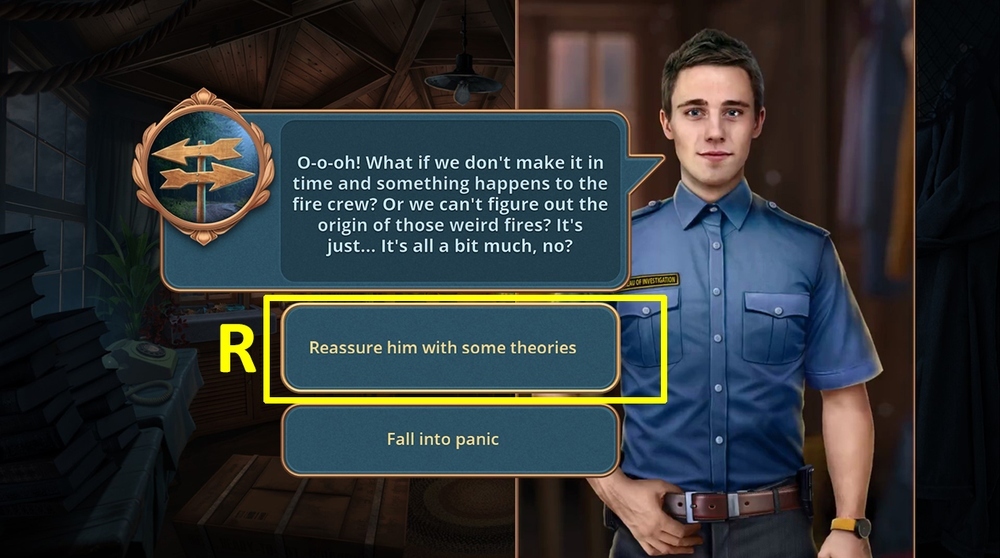
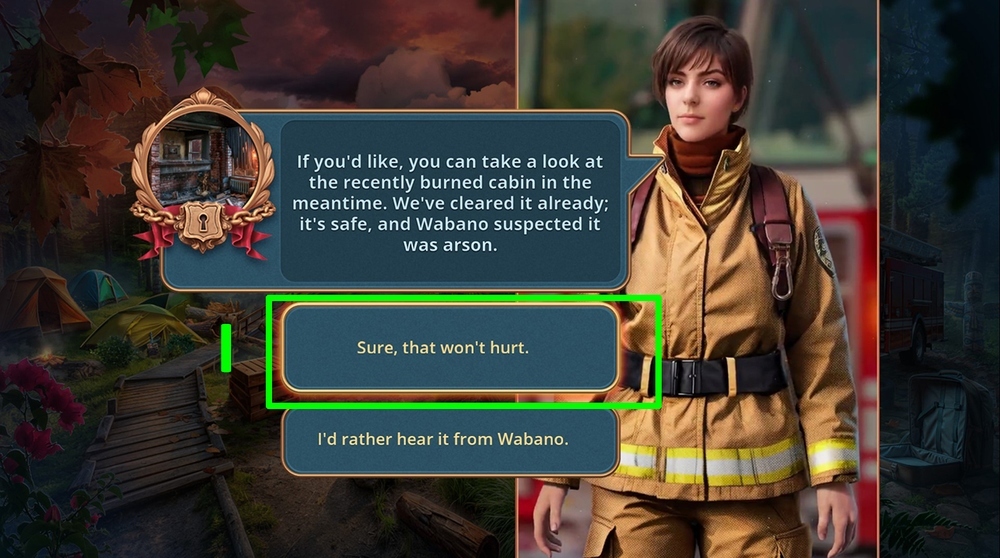
- Talk to Paul, select this option (G).
- Go to Truck Cabin.
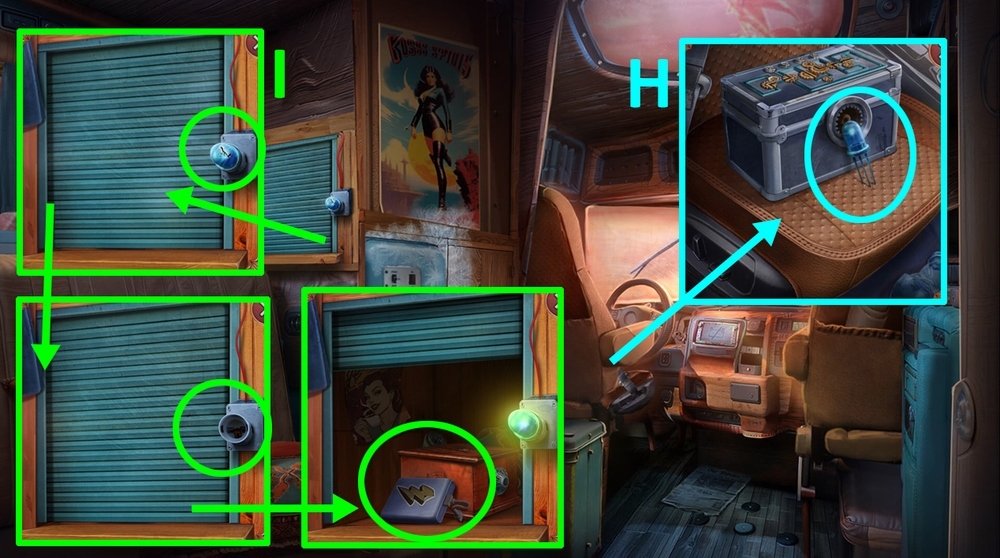
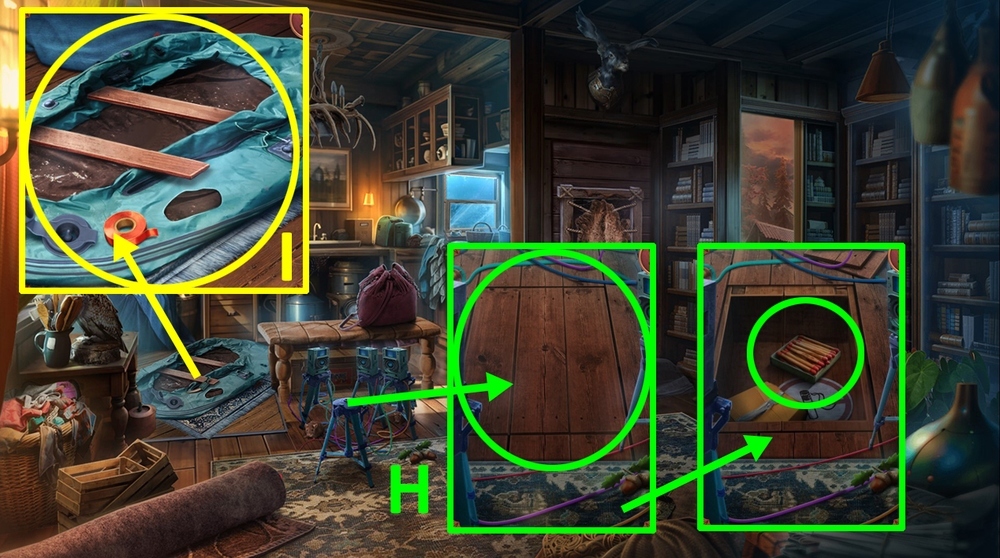
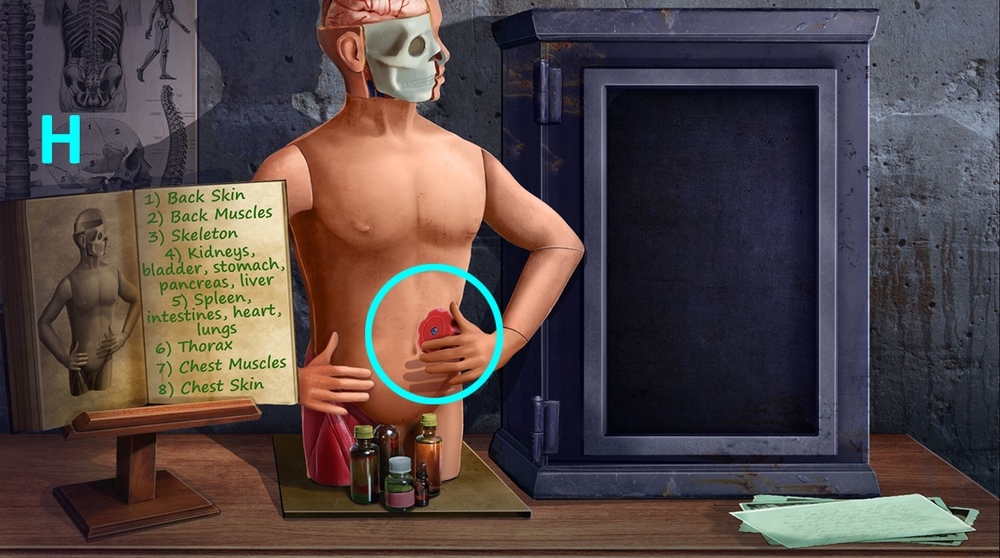
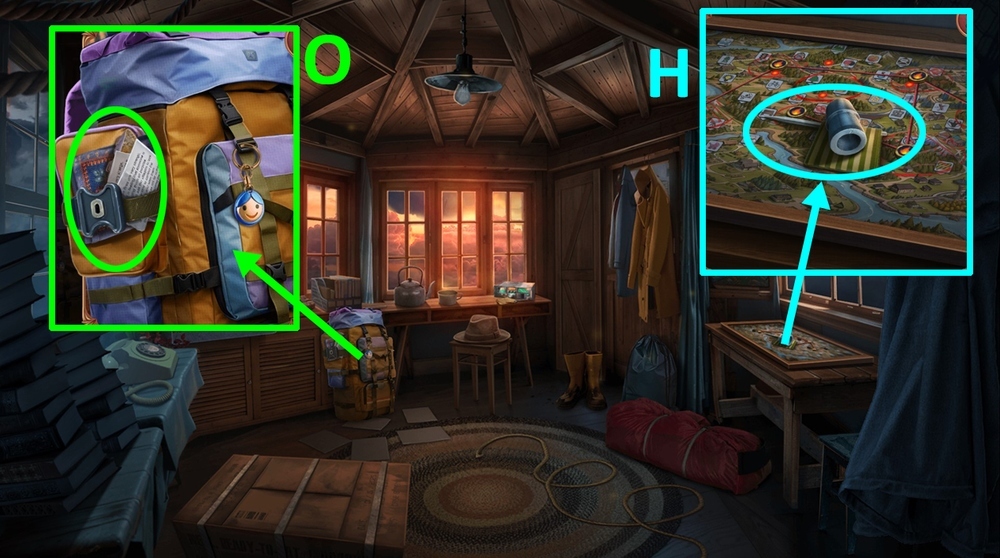
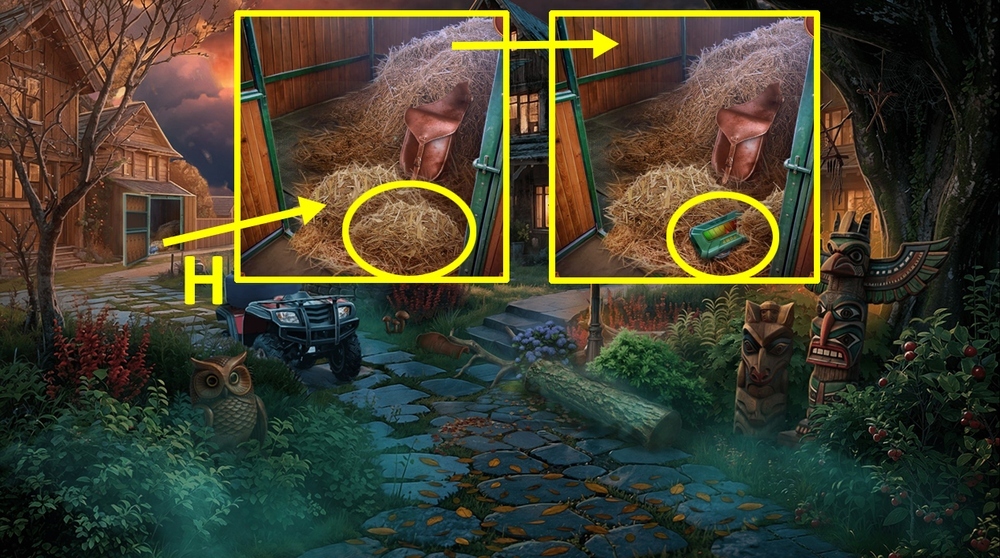
- Take LED LIGHT (H).
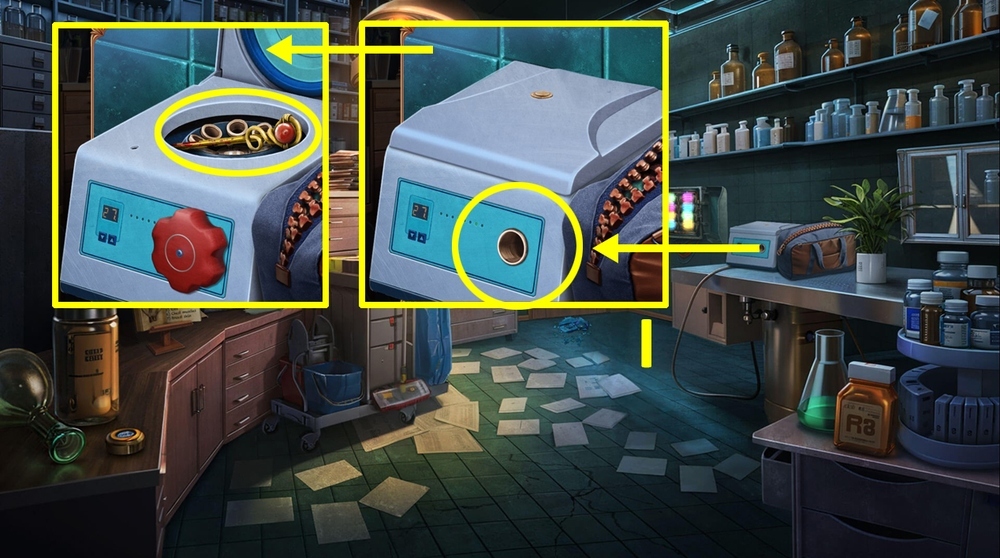
- Click on the broken light bulb, use LED LIGHT on the empty socket, take POWER BANK (I).
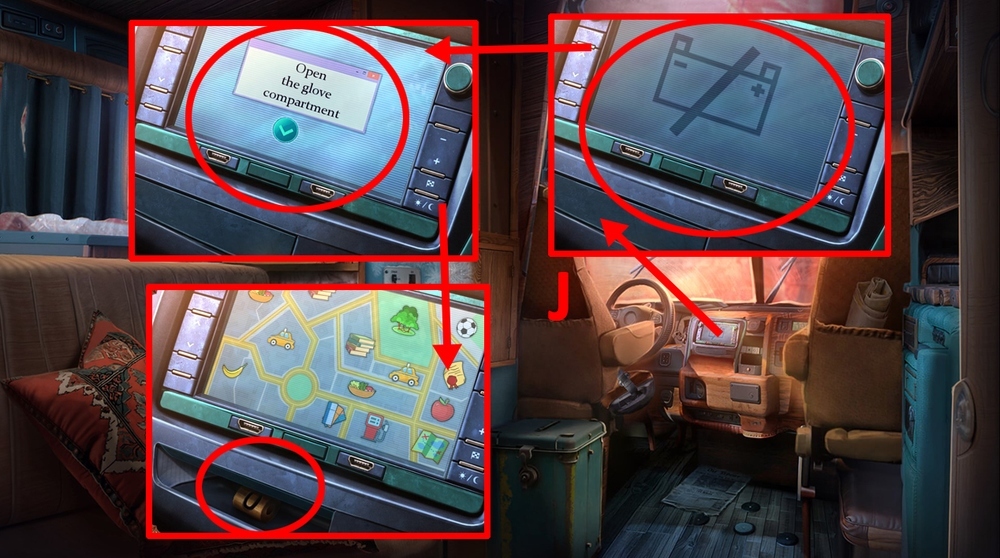
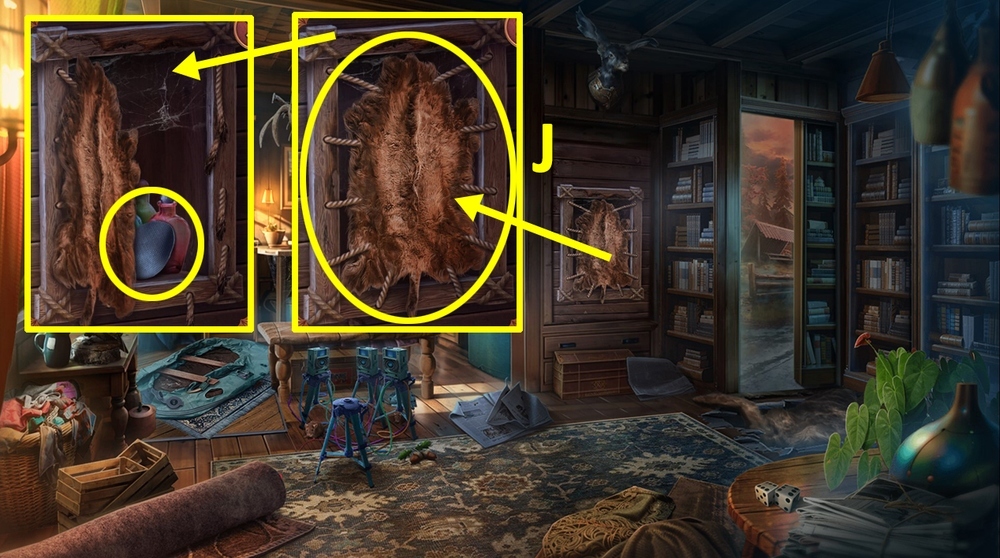
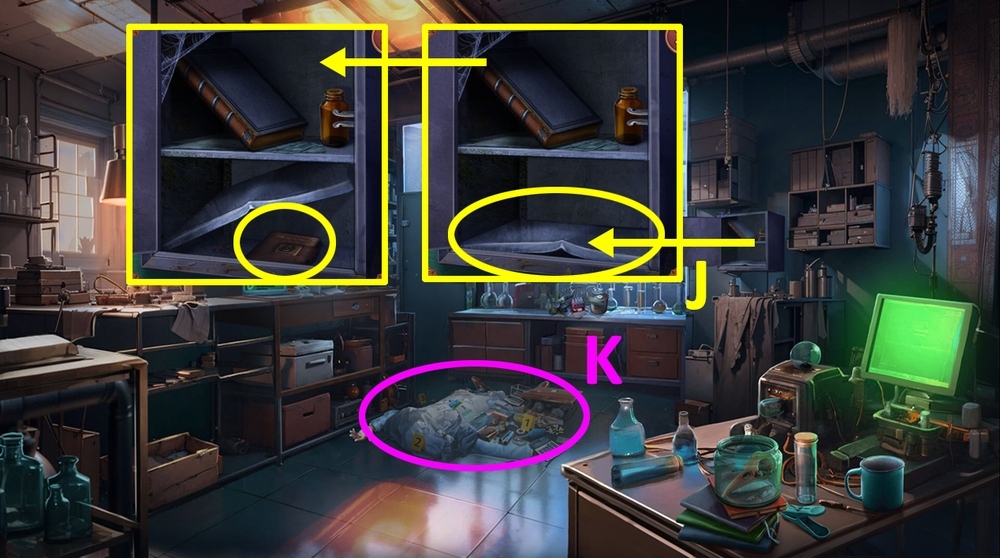
- Use POWER BANK on the panel, click on the panel, take LOCK CYLINDER (J).
- Go back.
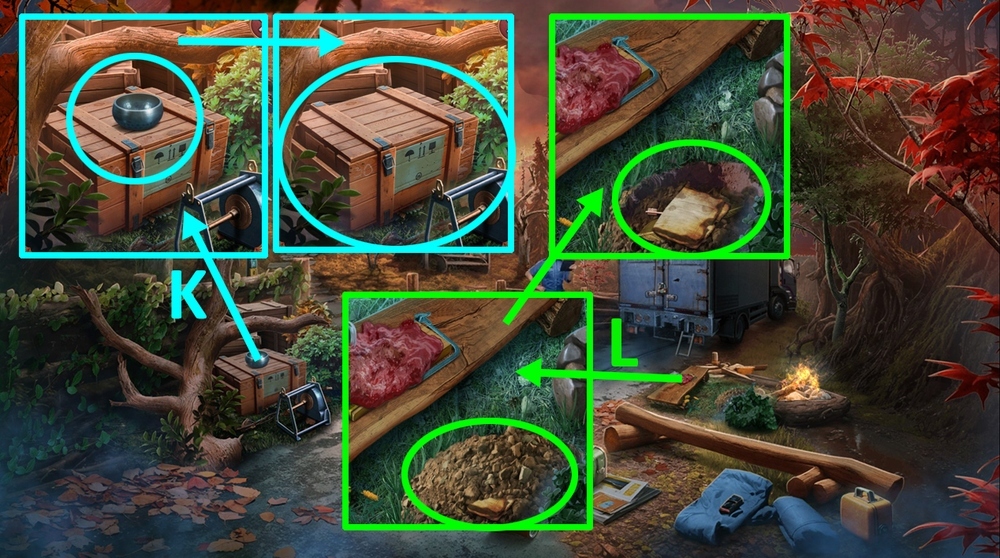
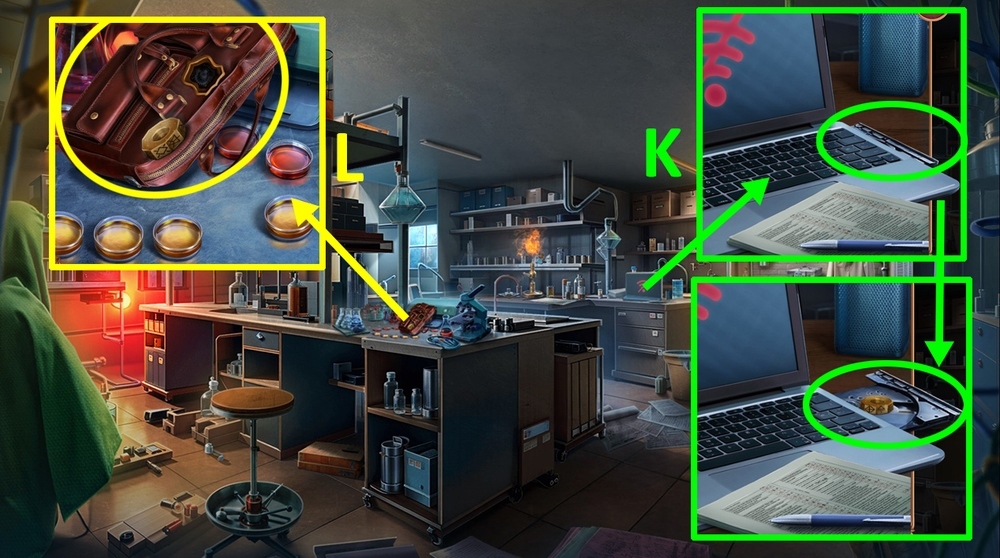
- Take MUSIC BOWL, use ROPE on the box (K).
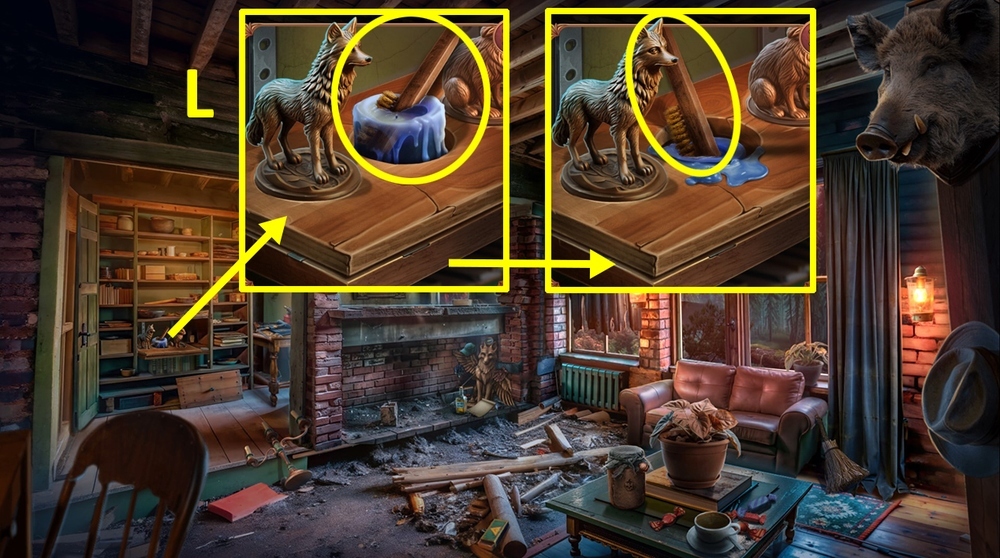
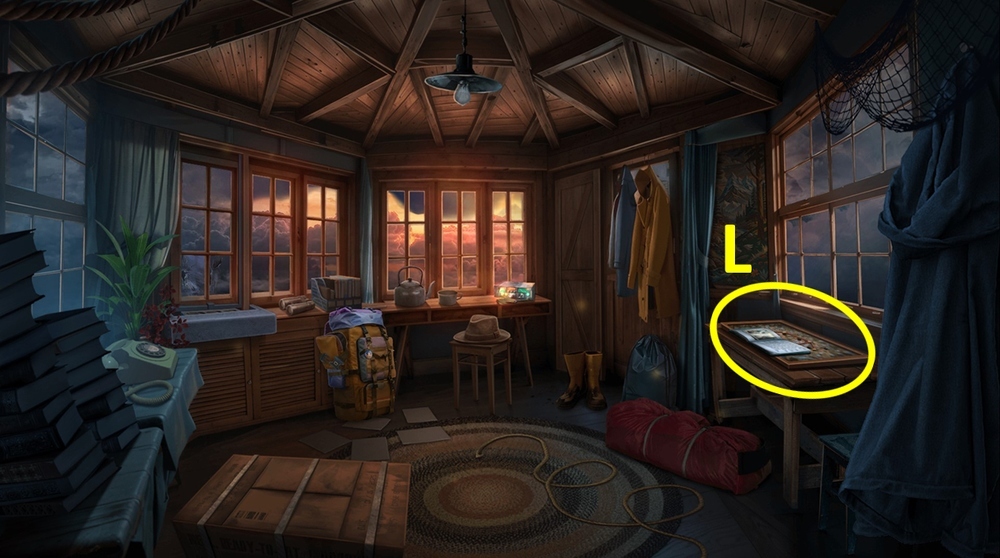
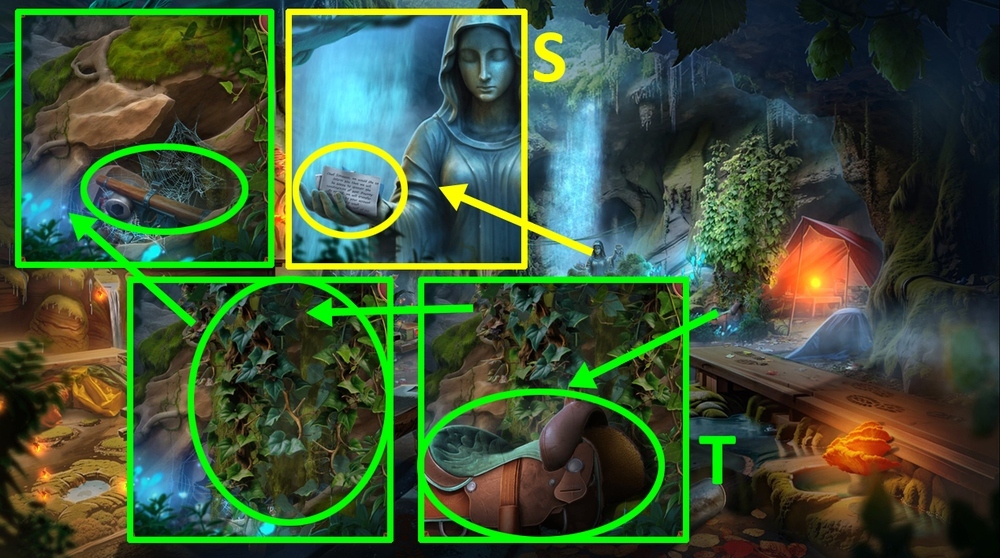
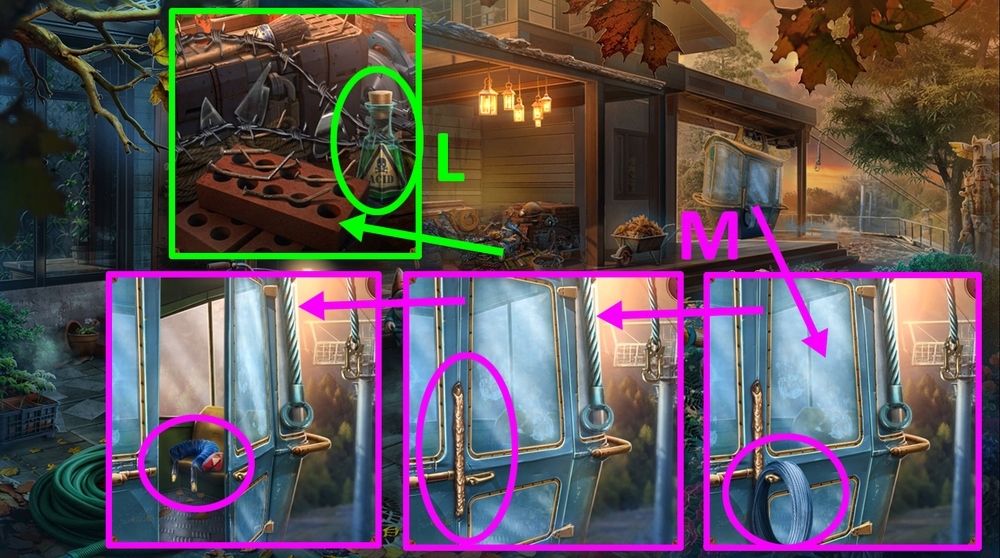
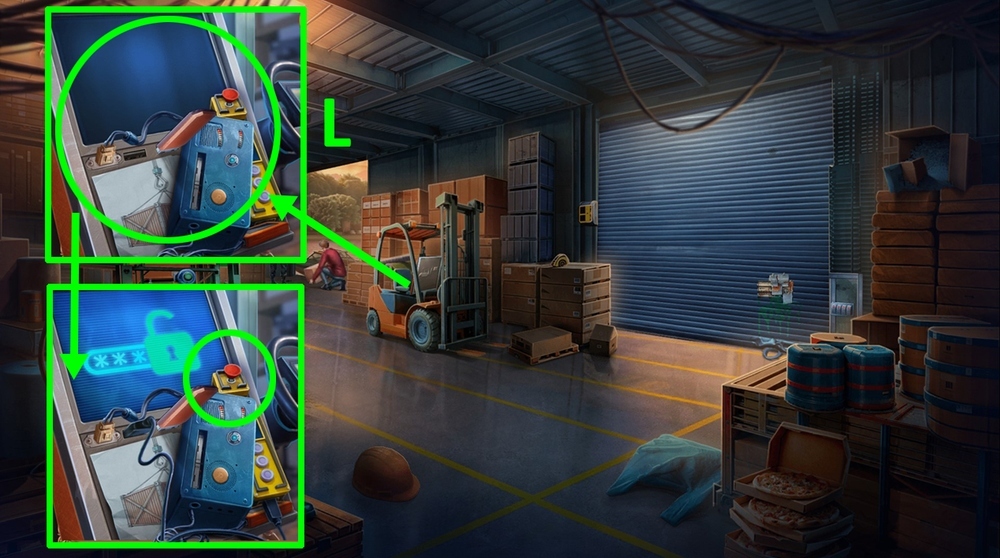
- Use MUSIC BOWL on the pile of dirt, take and read the note, take TOTEM FEATHER 1/3 and LOCK PICK (L).
- Use LOCK PICK on the lock, take the tablet.
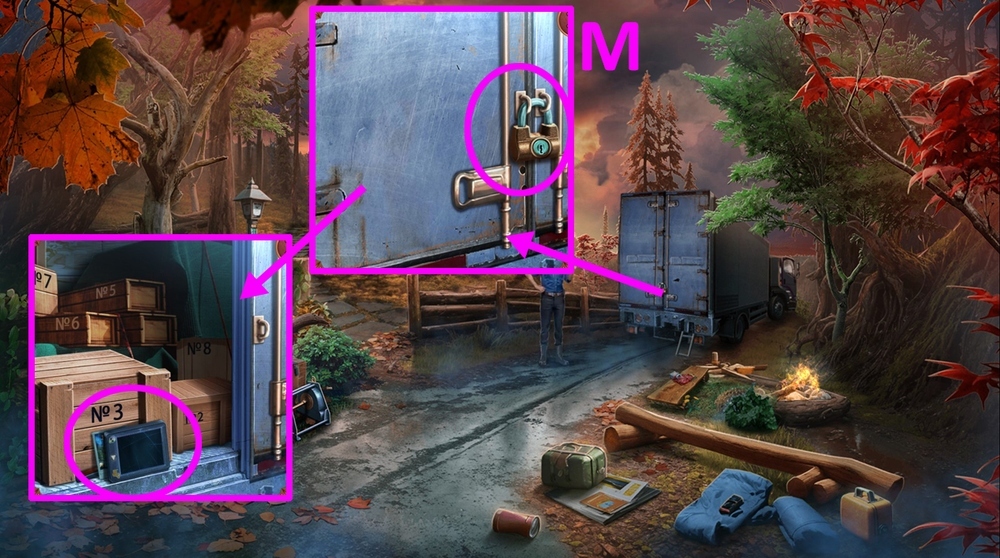
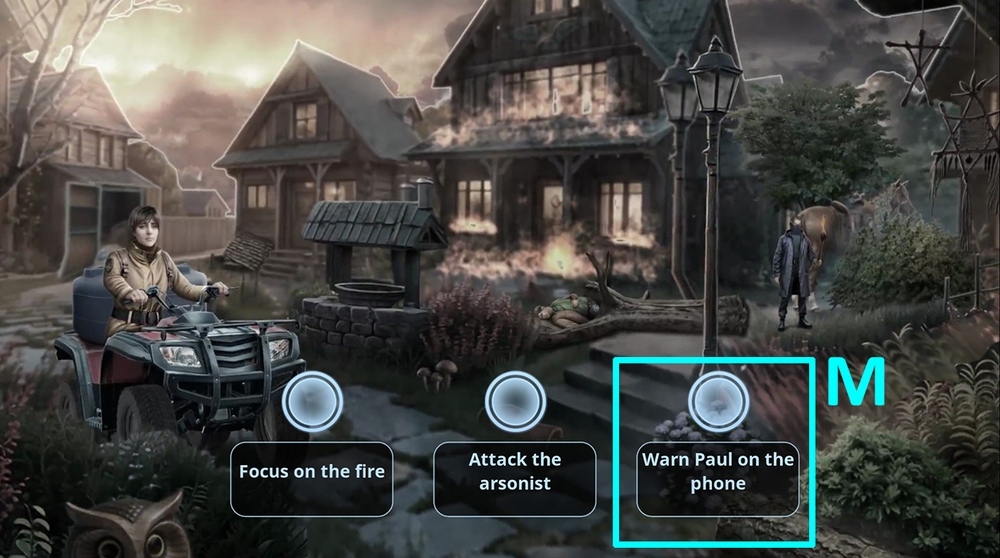
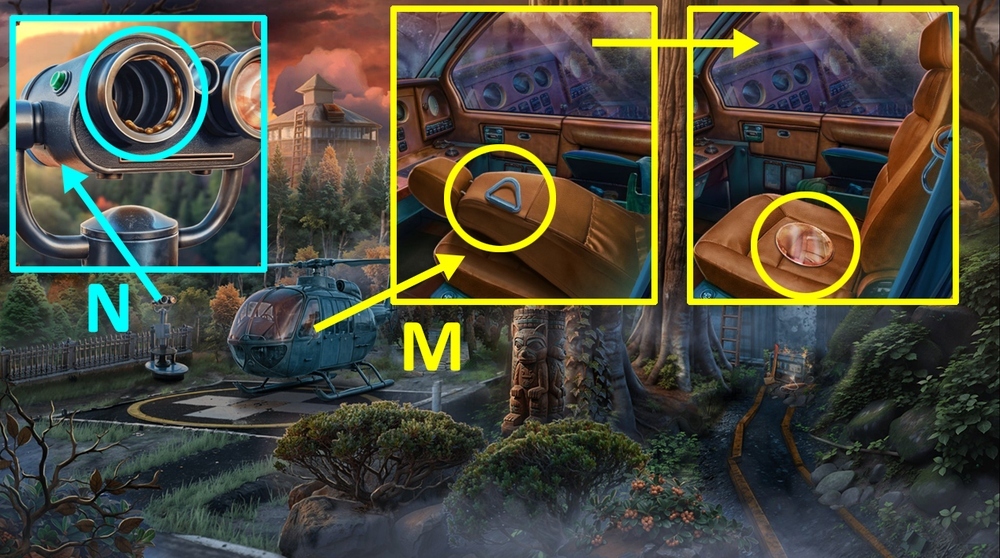
- Take VICTIM’S PHOTO and SHARP RAZOR (M).
- Go back.
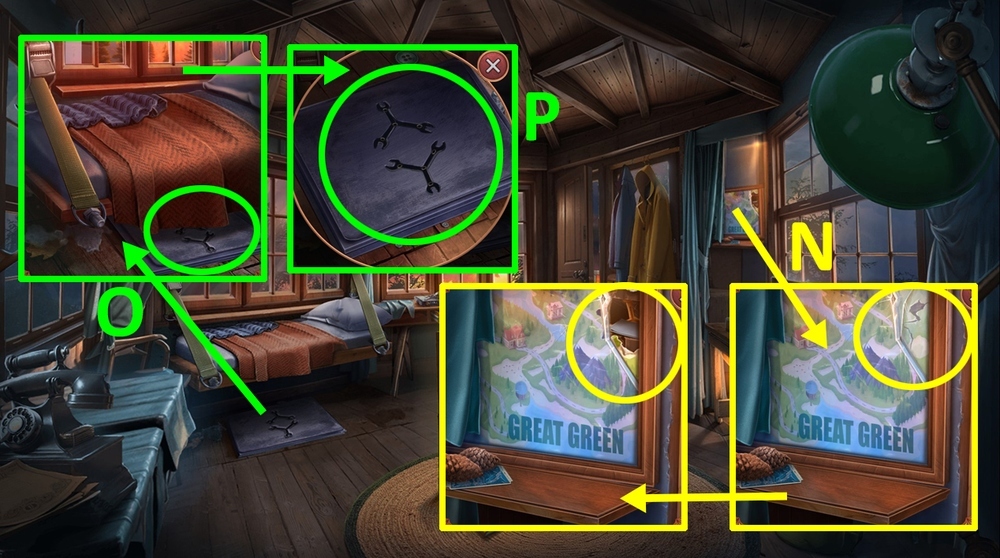
- Use SHARP RAZOR on the crack in the poster glass, take and read the note, take LOCK PARTS 2/2 (N).
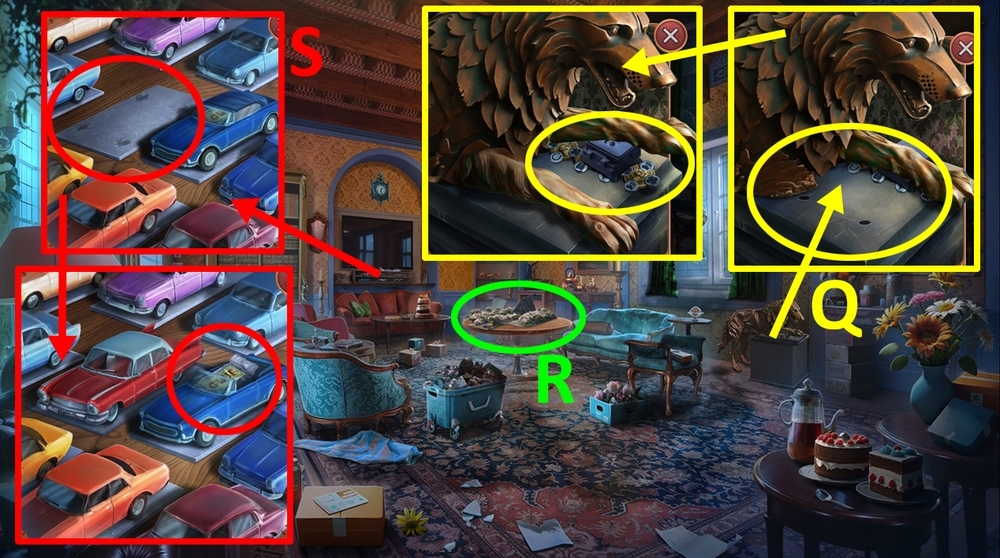
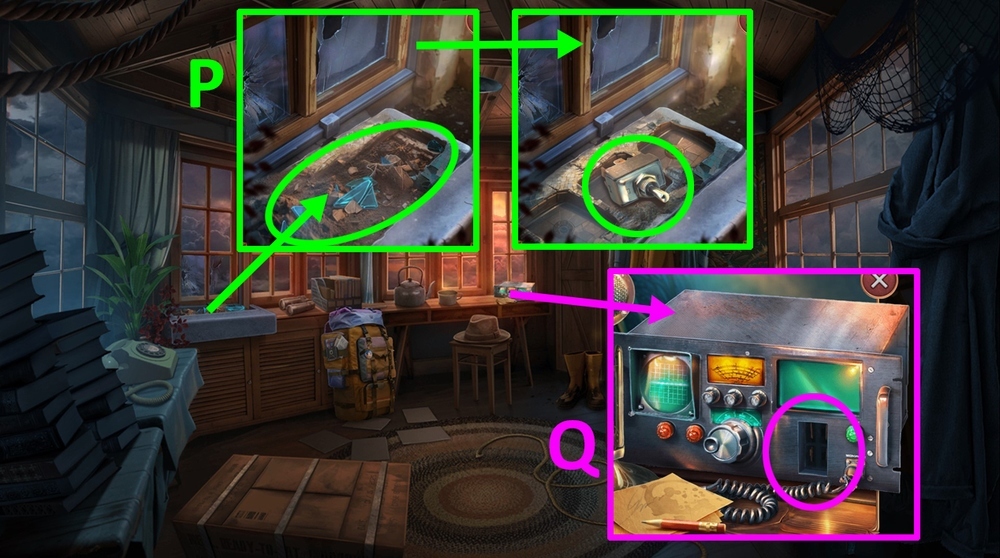
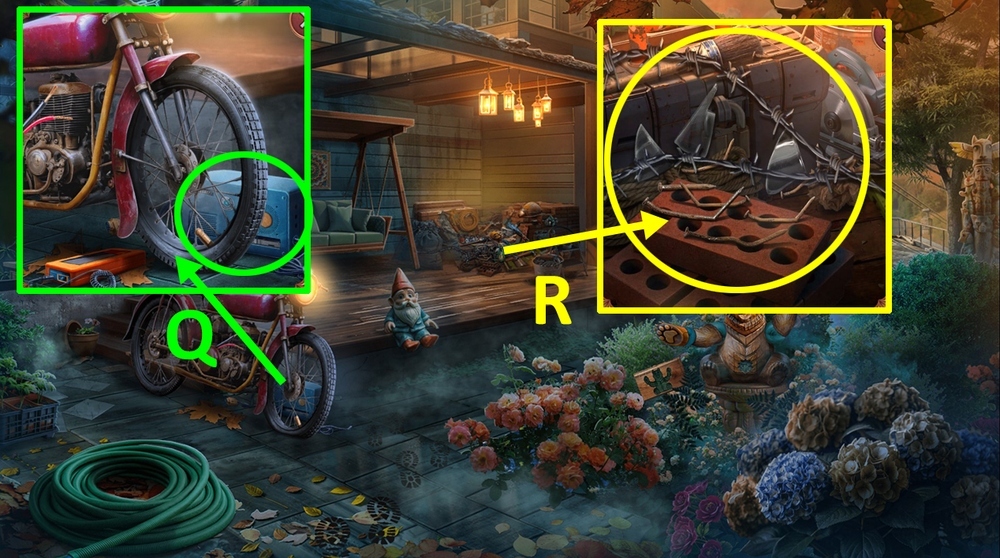
- Click under the bed, use LOCK PARTS on the hatch (O-P).
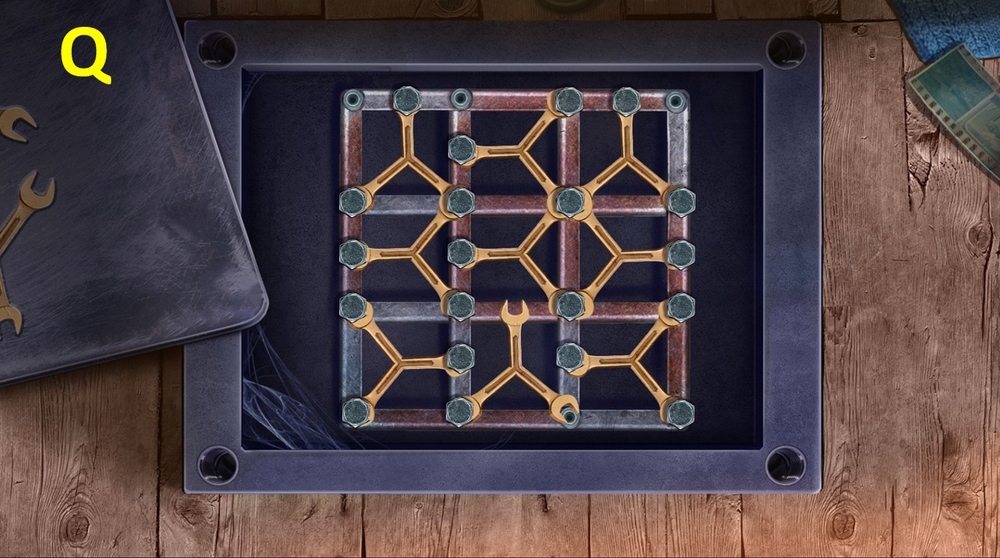
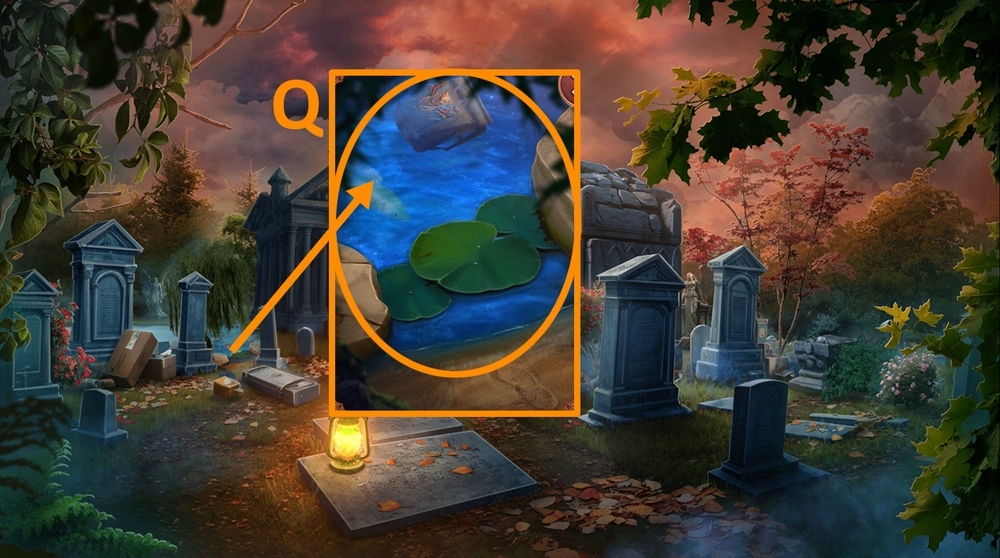
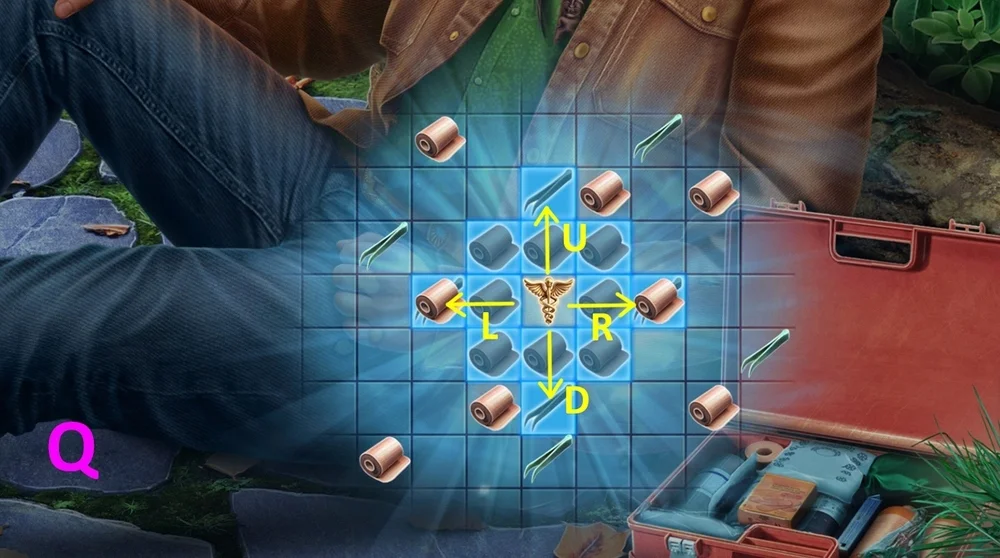
- Easy solution: arrange the lock parts as shown in the picture (Q).
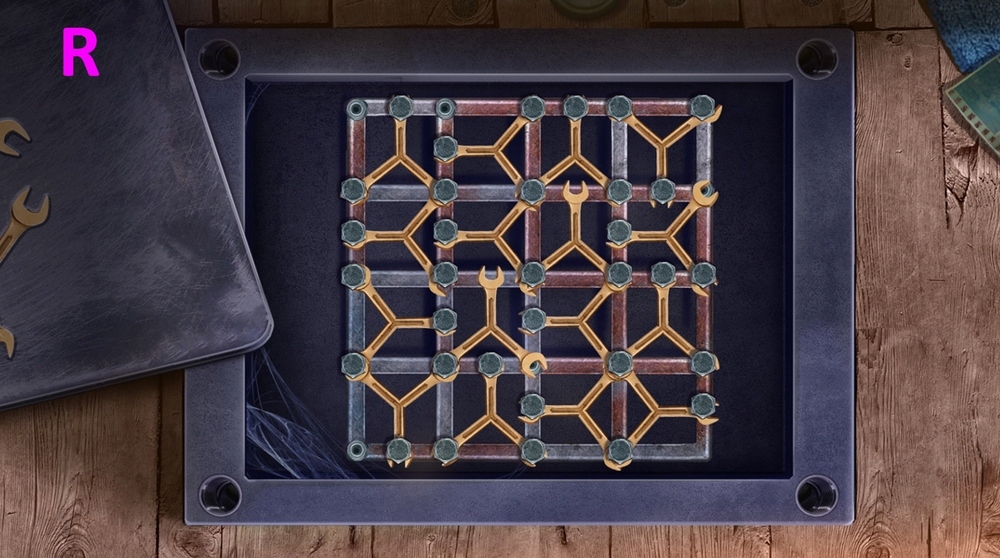
- Hard solution: arrange the lock parts as shown in the picture (R).
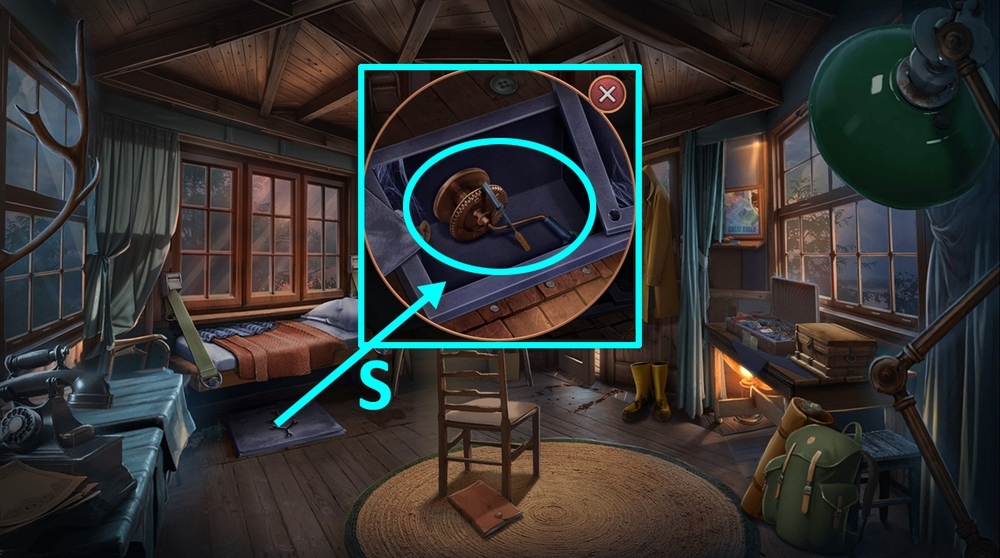
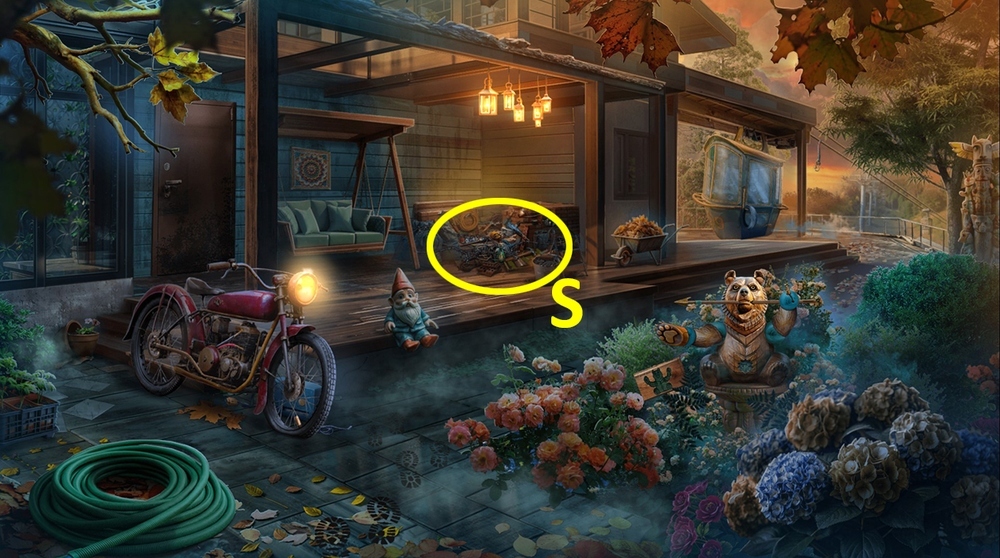
- Take RAMROD and WINCH (S).
- Go forward.
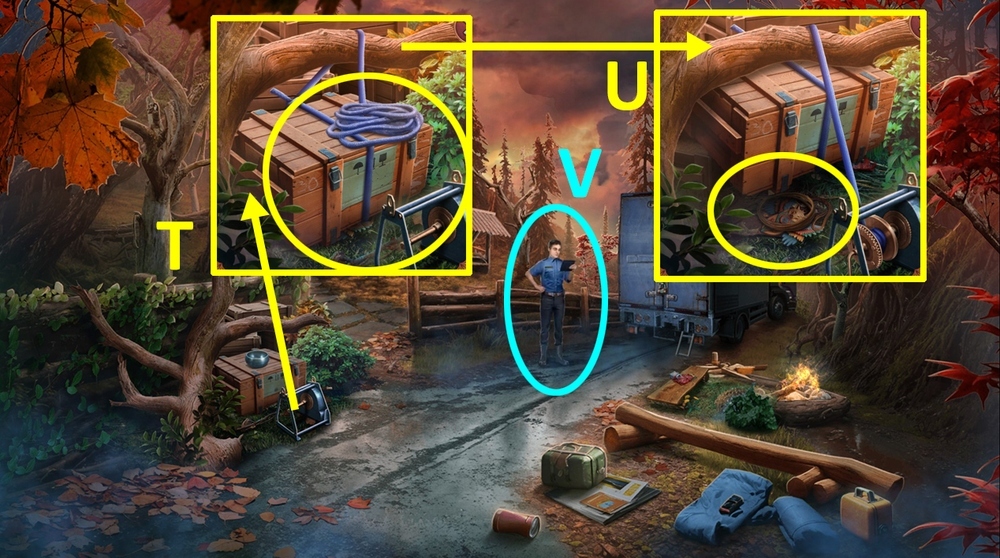
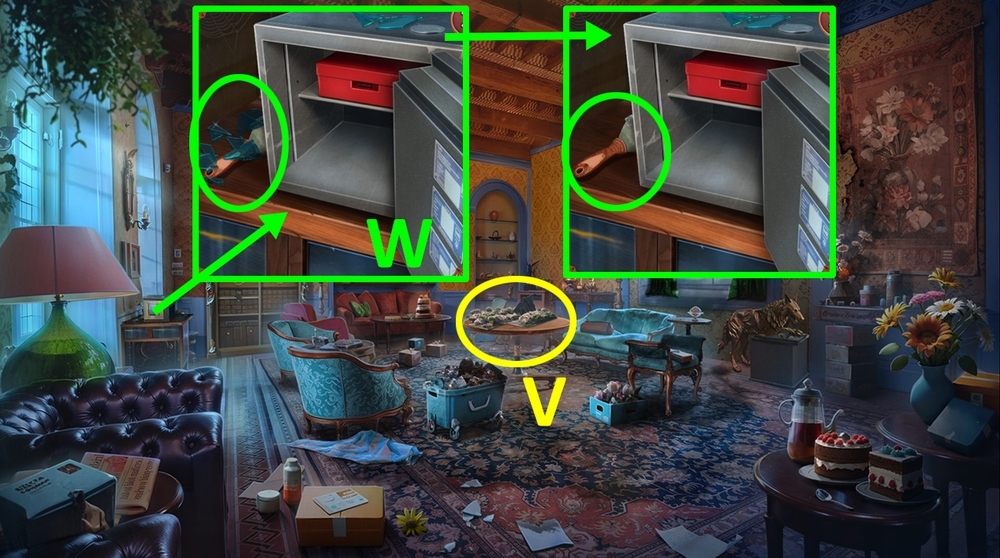
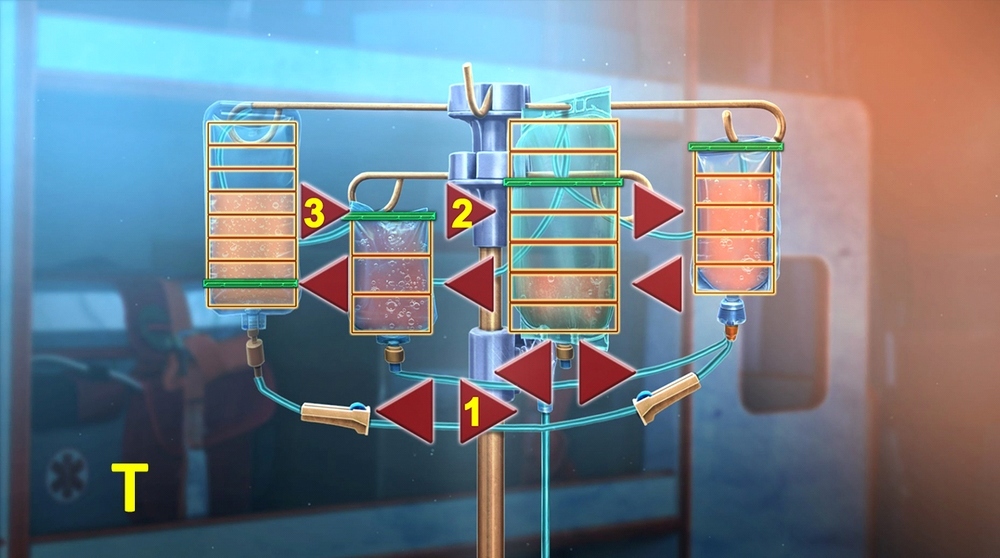
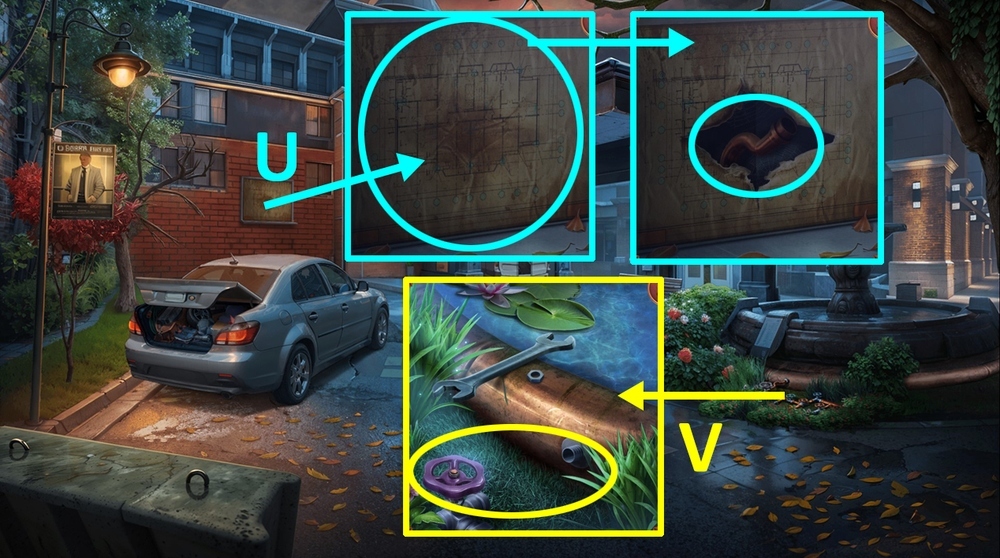
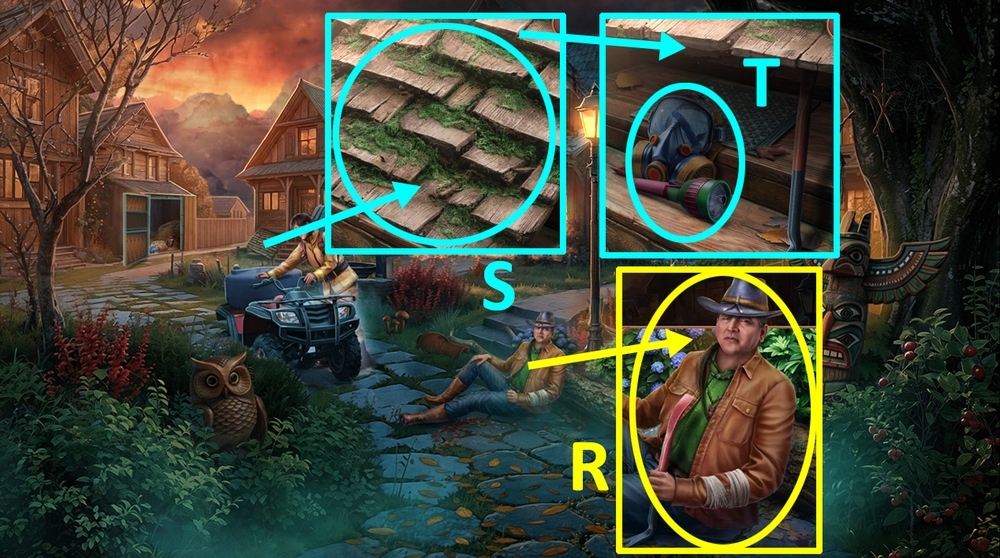
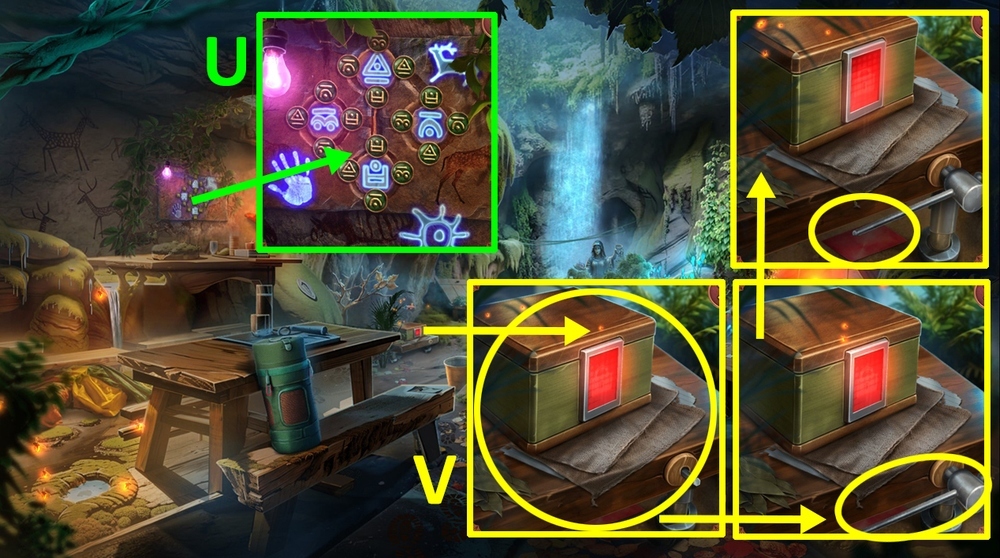
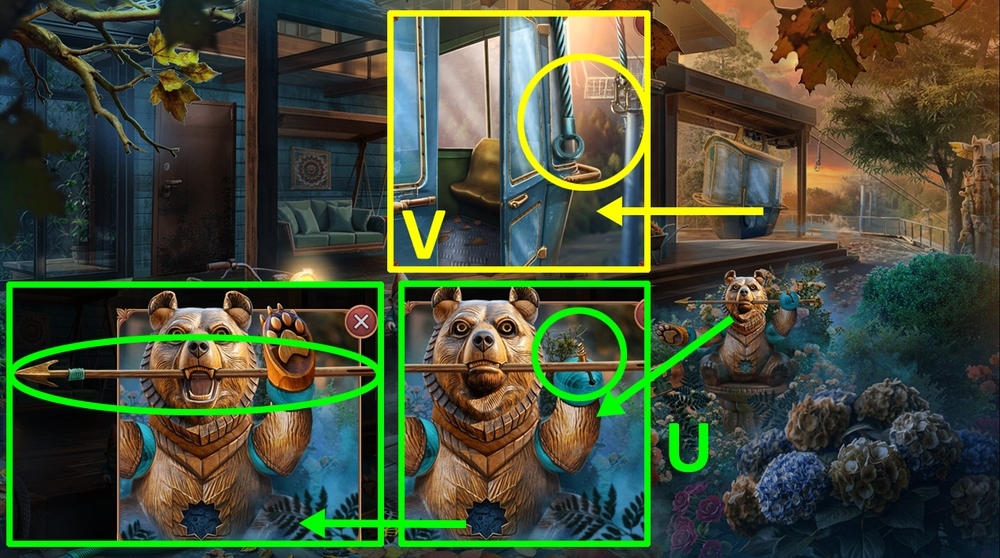
- Use WINCH on the box, take STRINGS and STRANGE AMULET (T-U).
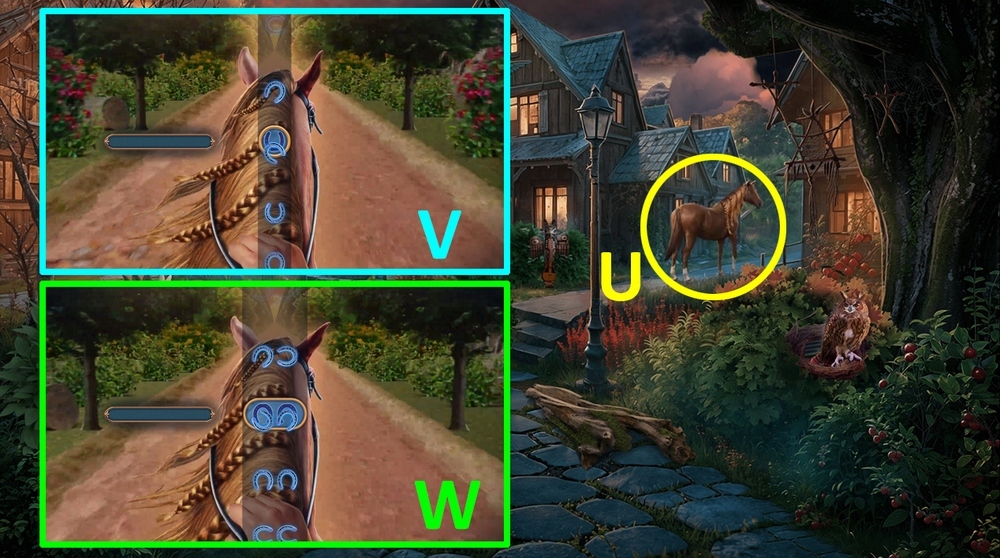
- Give STRANGE AMULET to Paul (V).
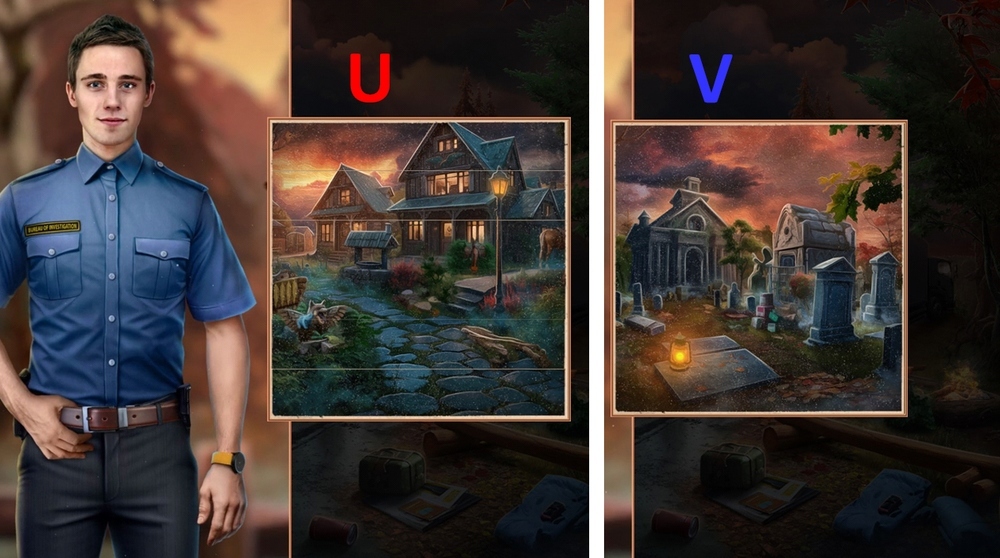
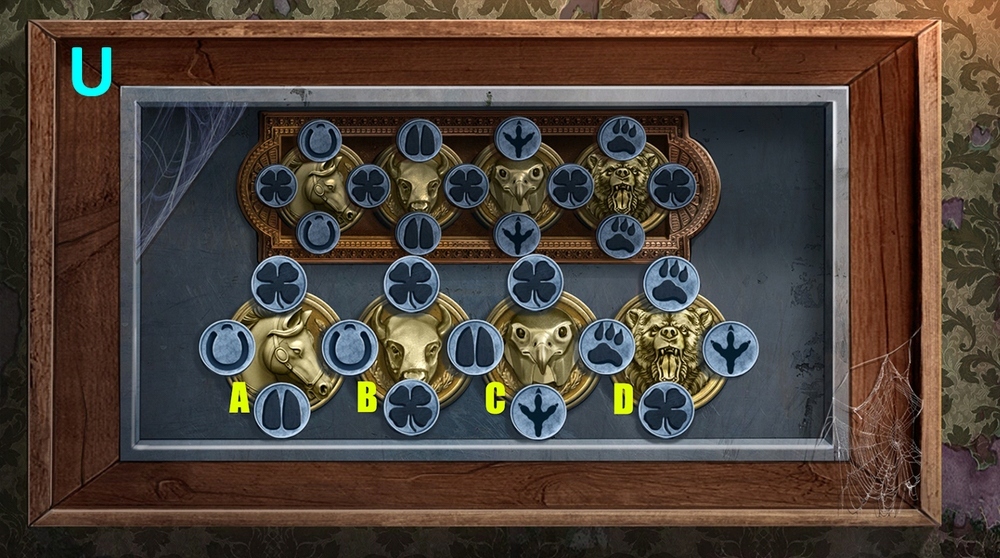
- Solution: arrange the fragments as shown in the picture (U).
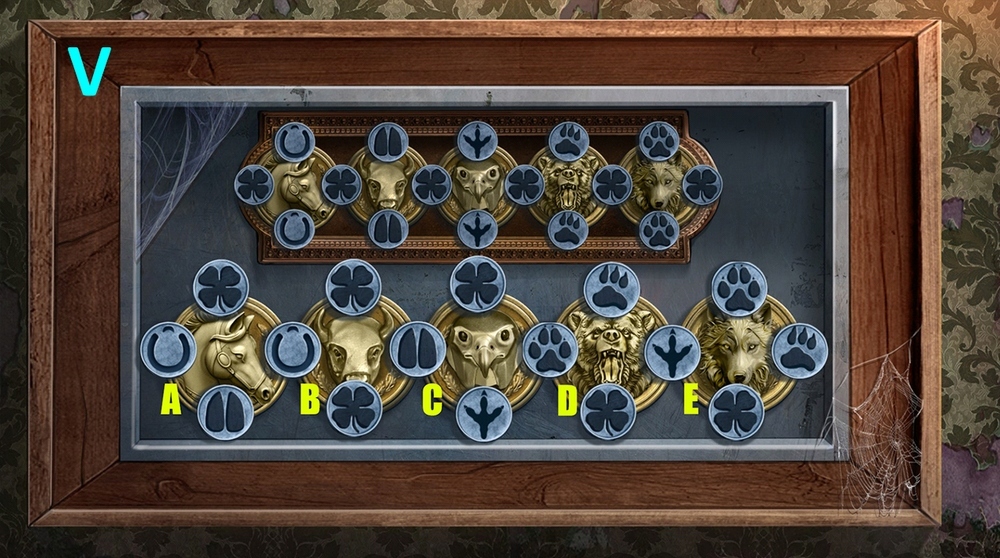
- Solution: arrange the fragments as shown in the picture (V).
- Earn GPS.
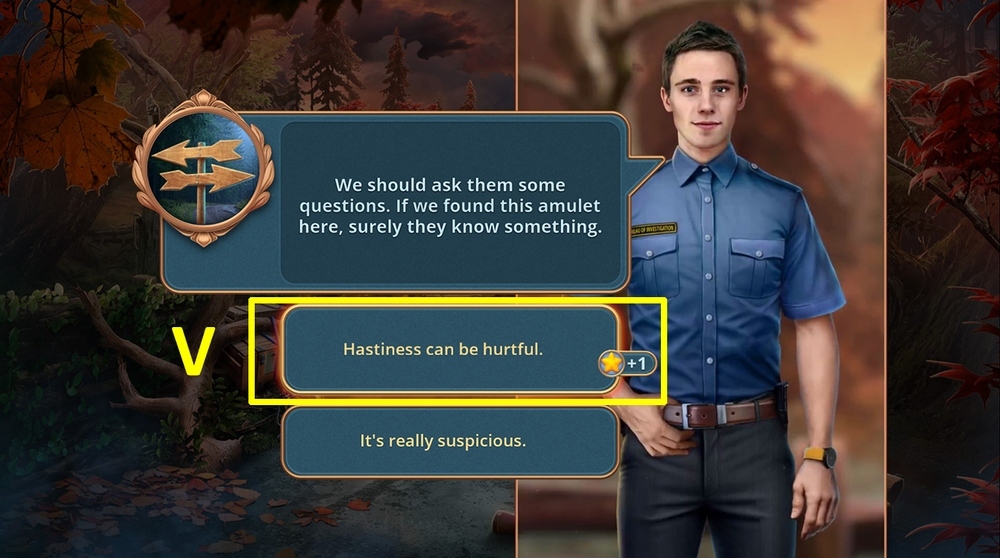
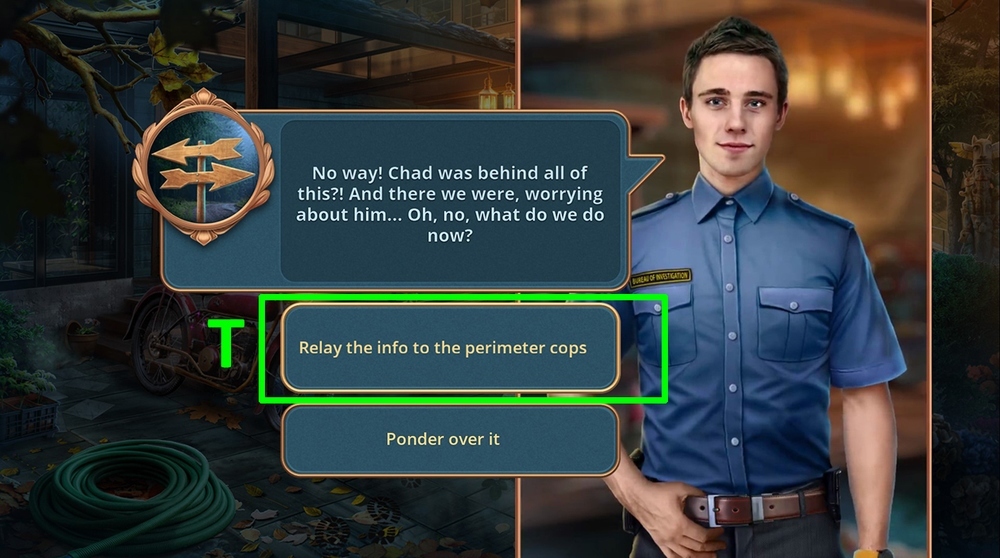
- Select this option (V).

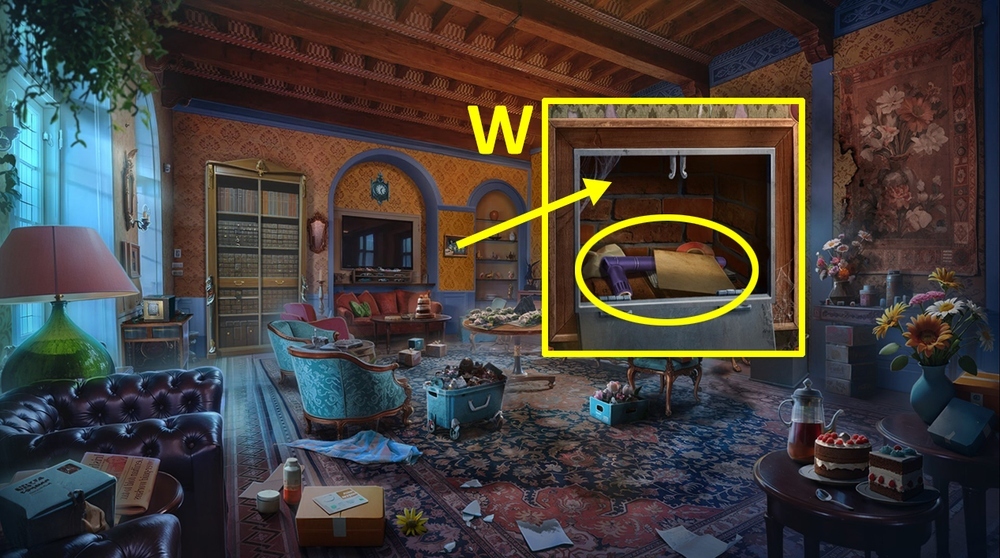
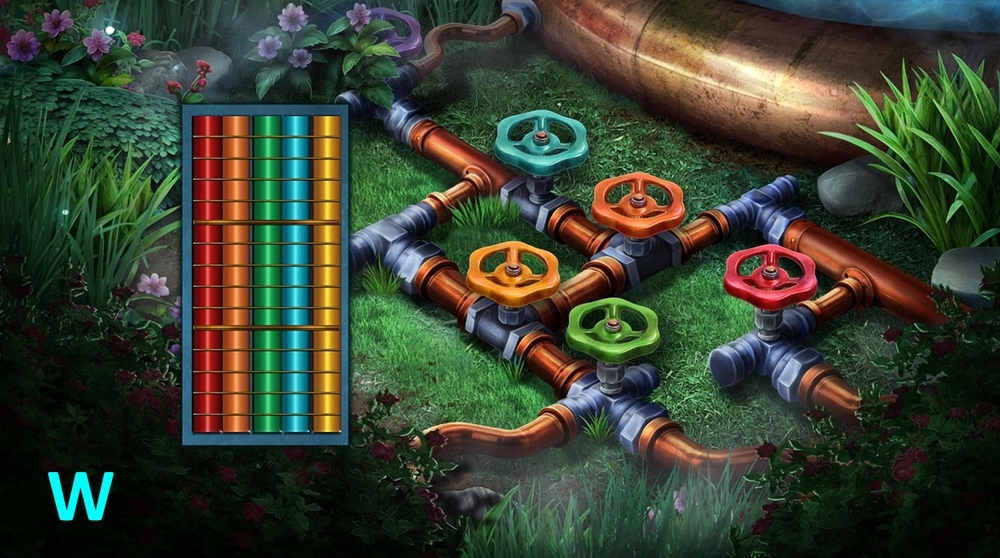
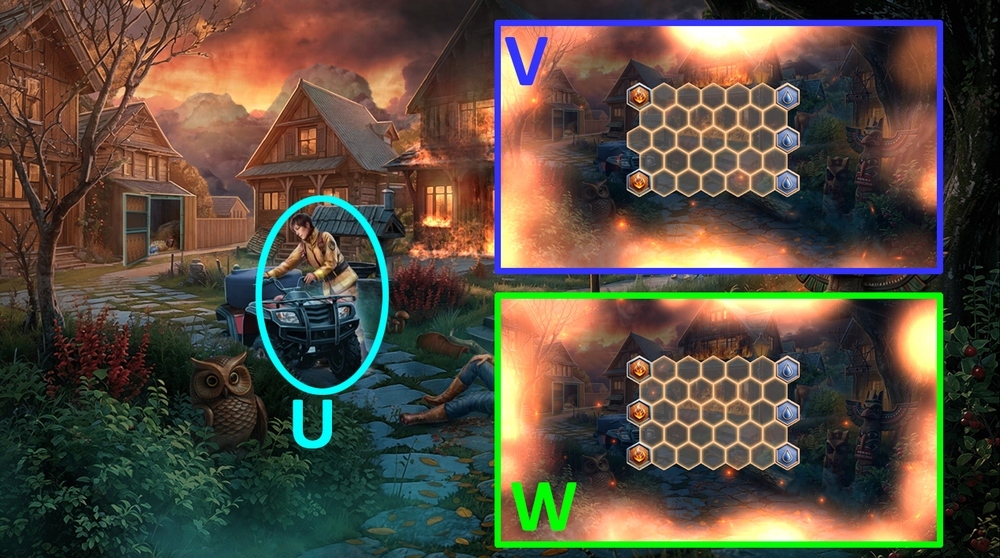
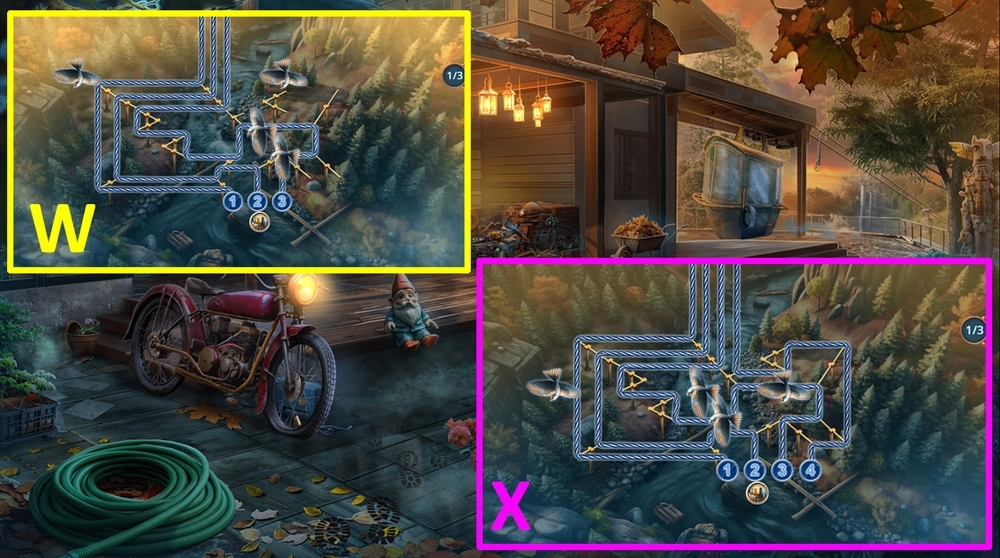
- Use GPS on the path in the background (W).
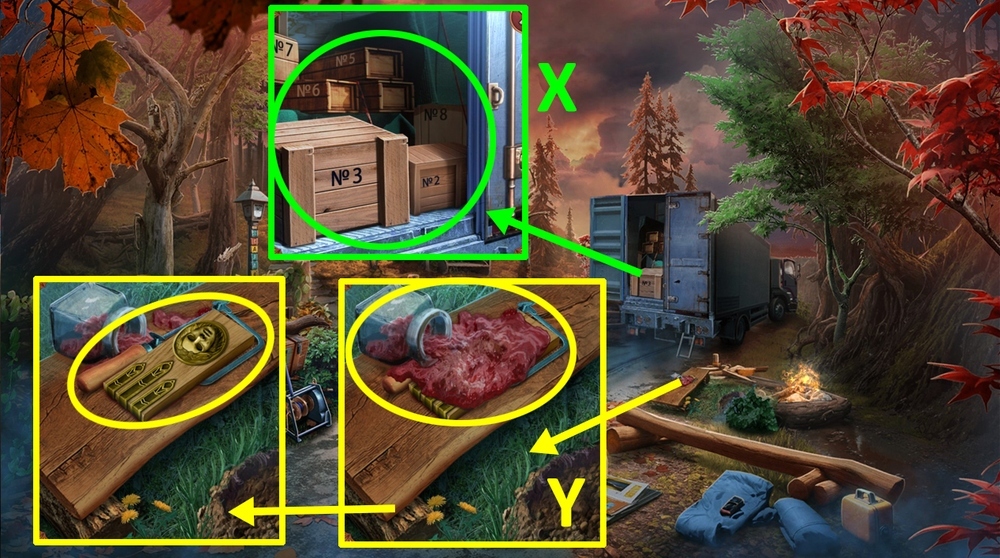
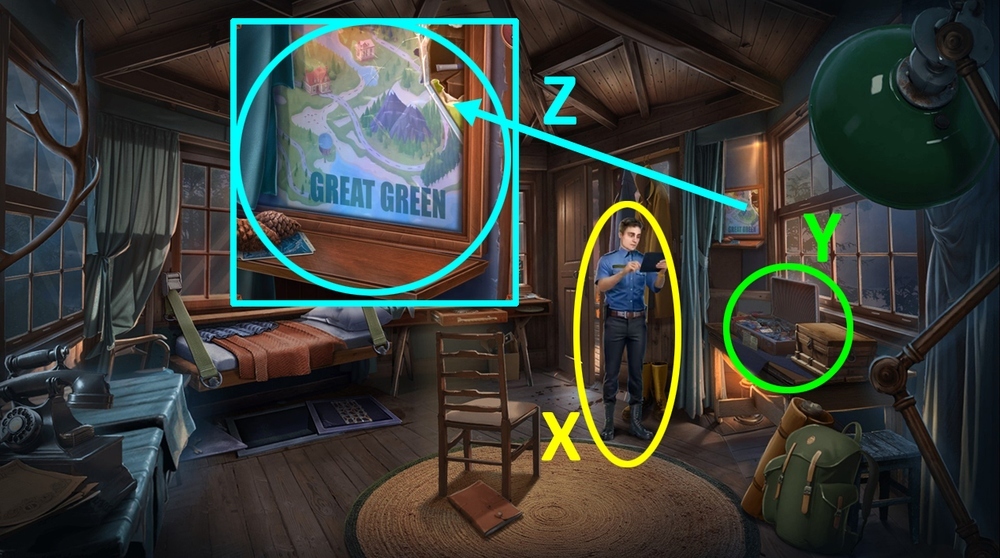
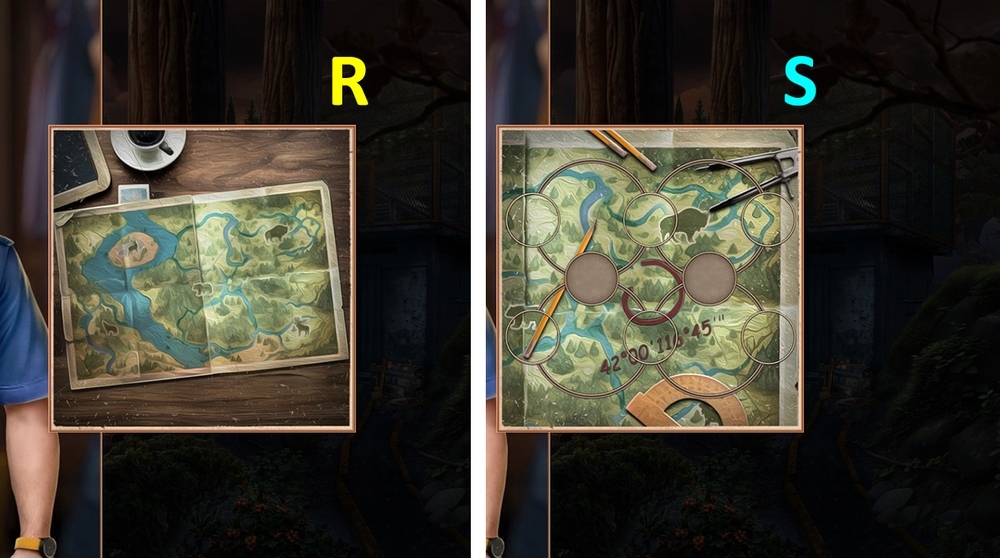
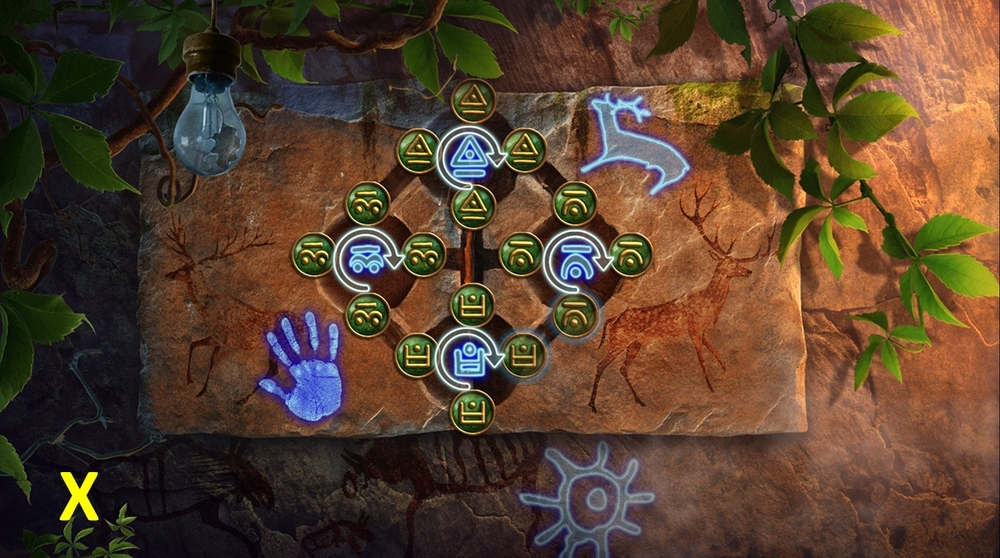
- Easy solution: connect the signs as shown in the picture (X).
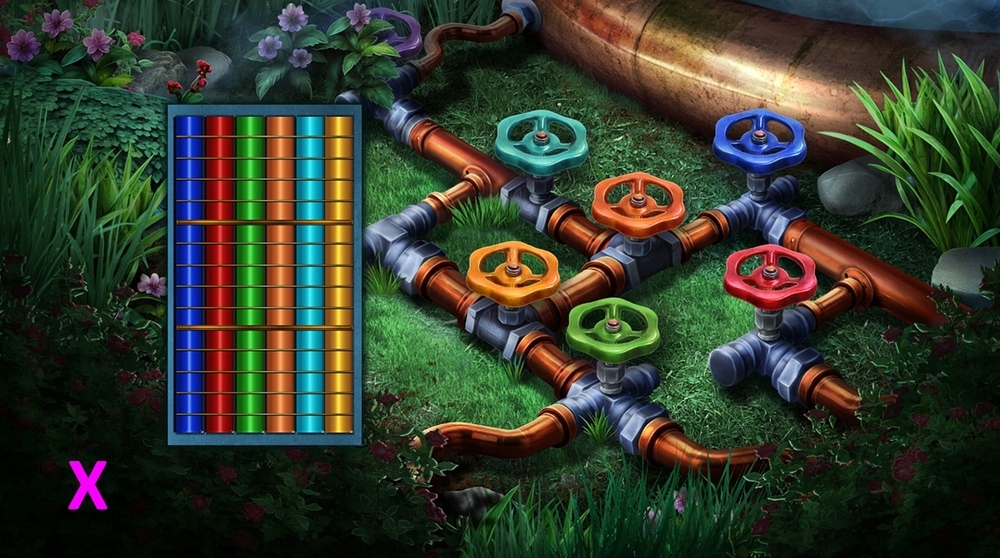
- Hard solution: connect the signs as shown in the picture (Y).
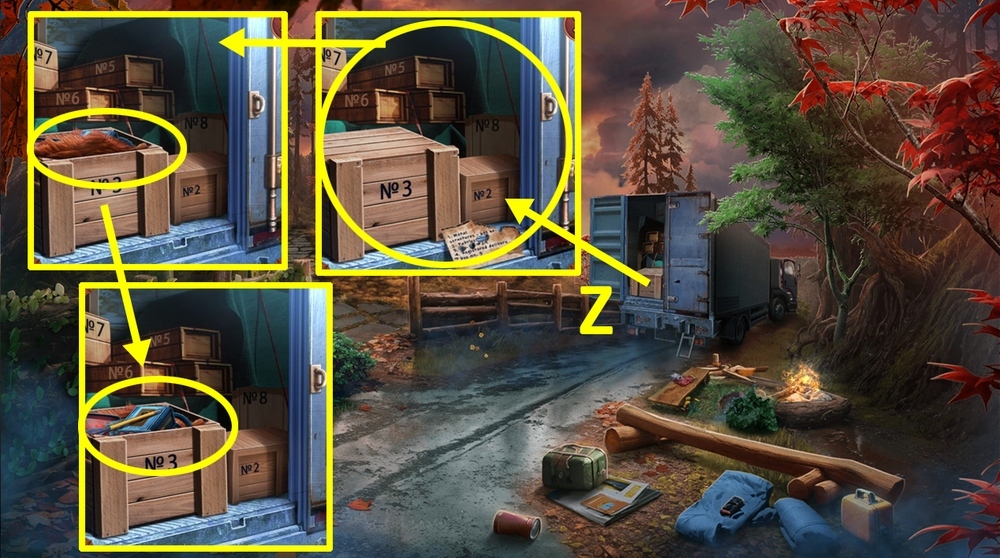
- Go to the Secluded Village.
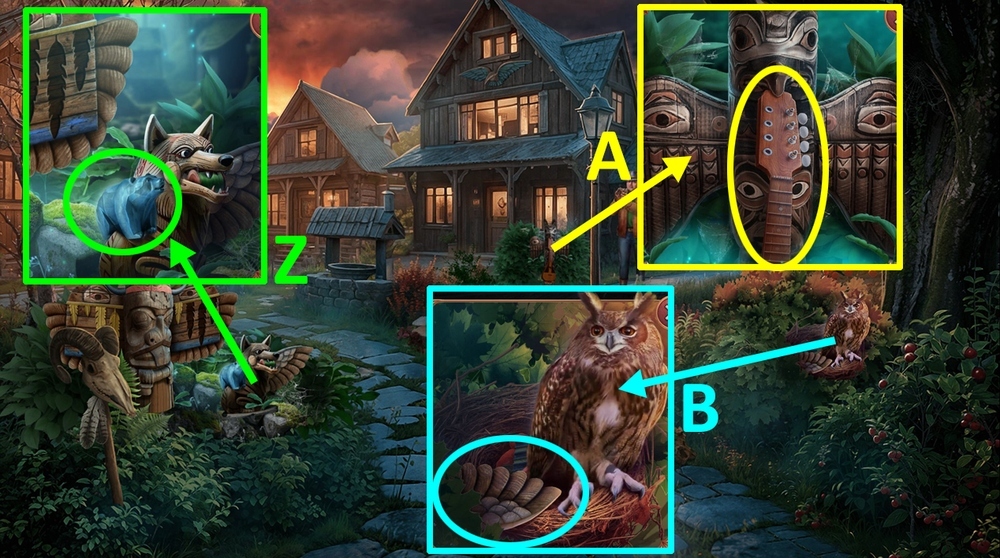
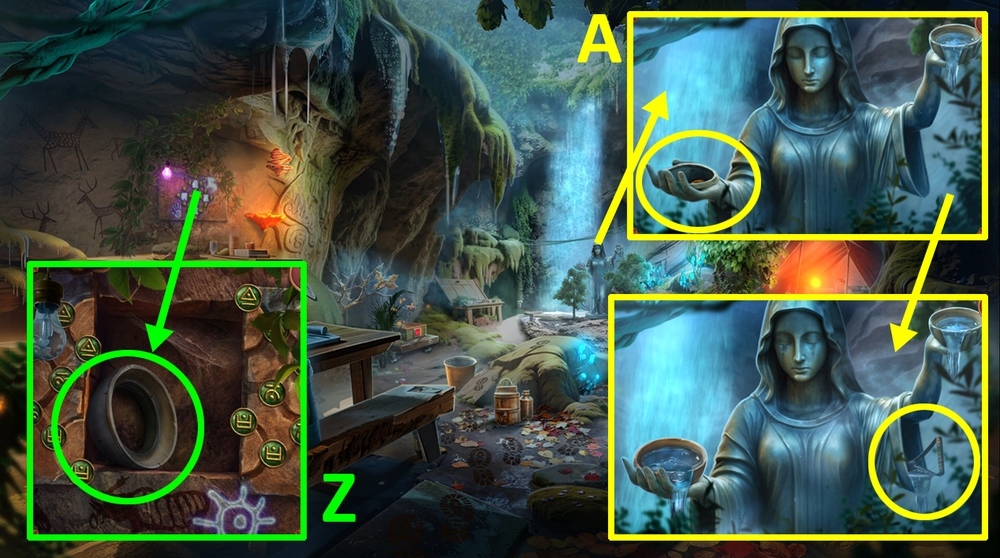
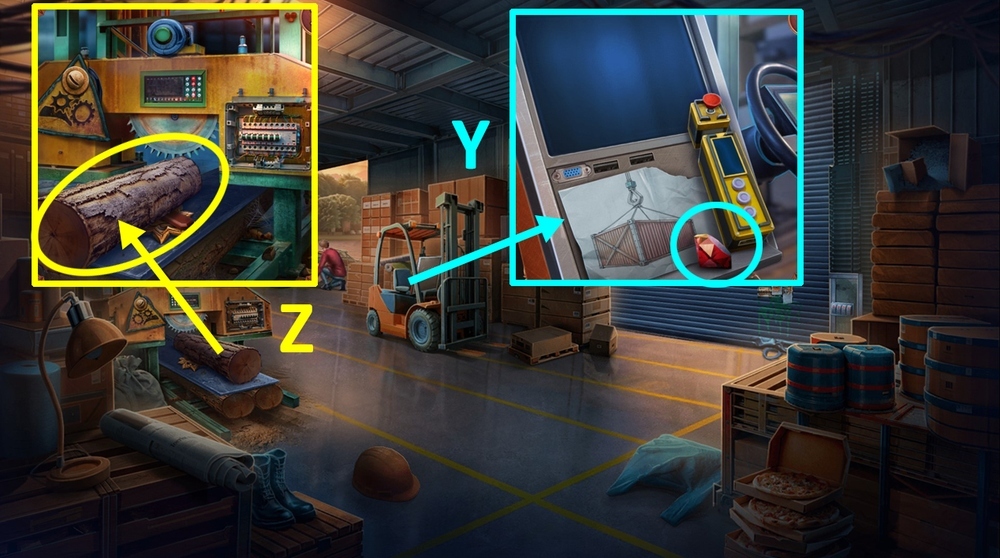
- Take STONE BEAR (Z).
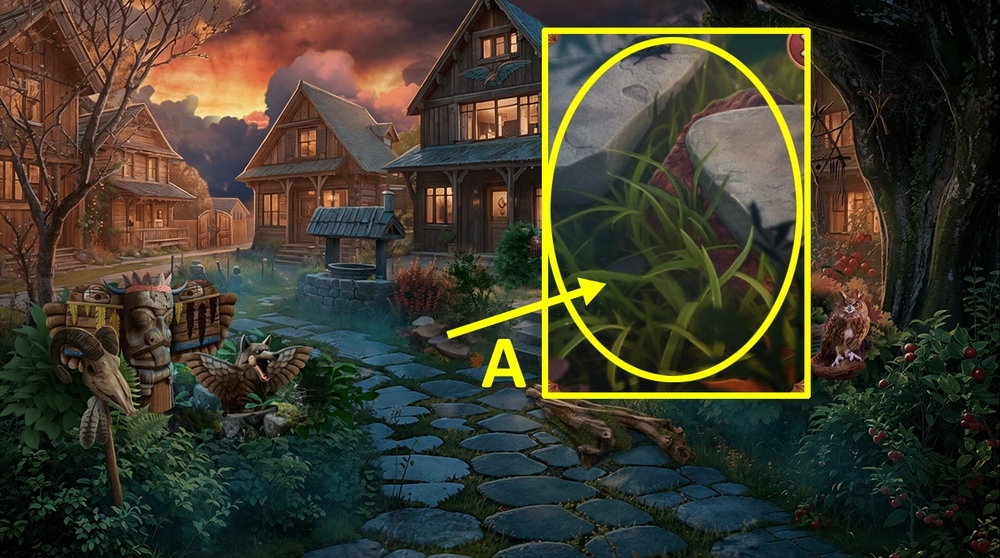
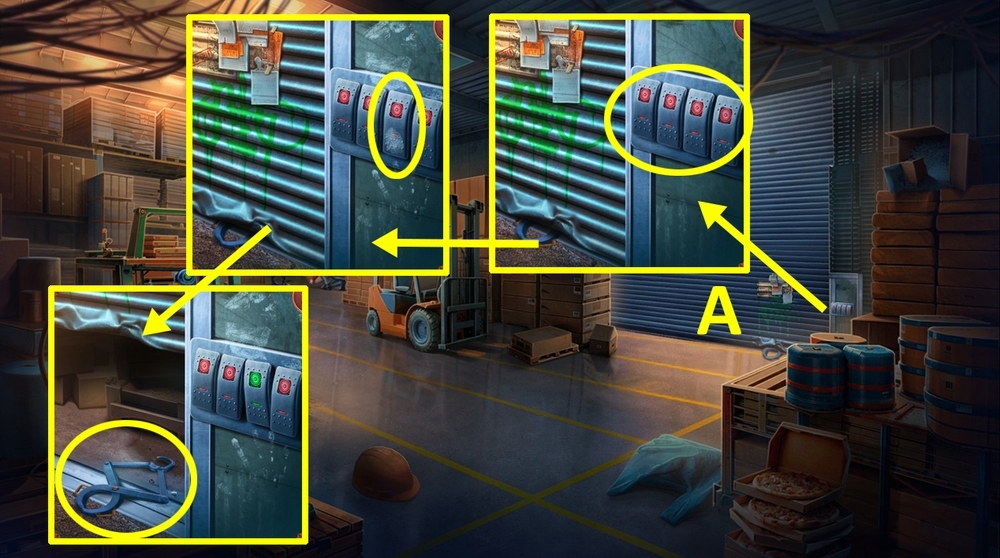
- Use STRINGS on the headstock (A).
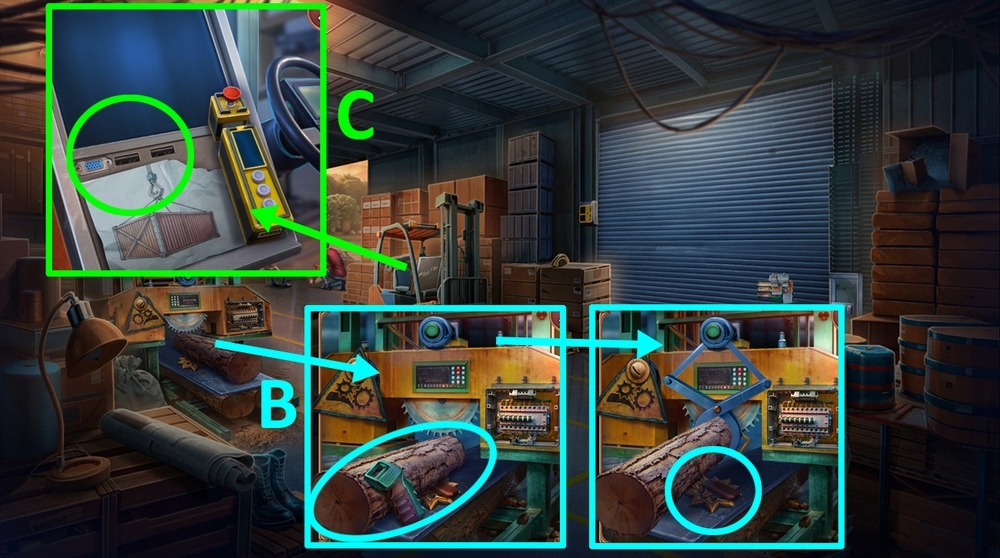
- Take WING (B).
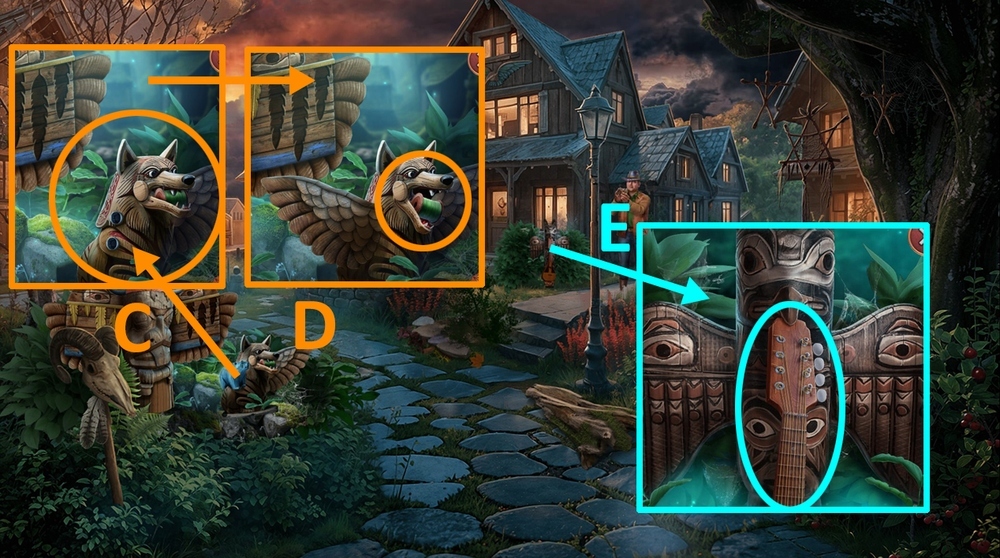
- Use WING on the wolf totem, take LINE and STRING WINDER (C-D).
- Use STRING WINDER on the headstock (E).
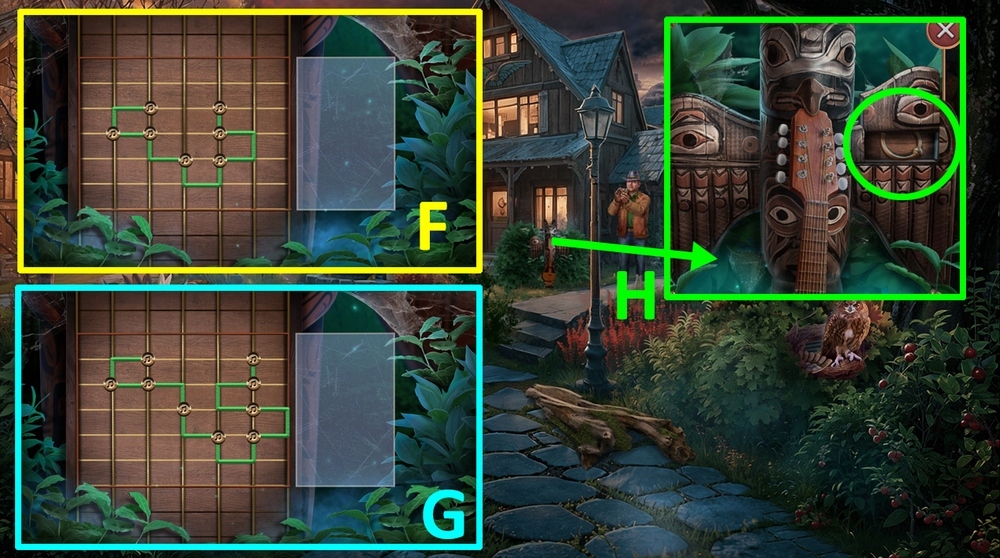
- Easy solution: Arrange the fragments as shown in the picture (F).
- Hard solution: Arrange the fragments as shown in the picture (G).
- Take KNOCKER (H).
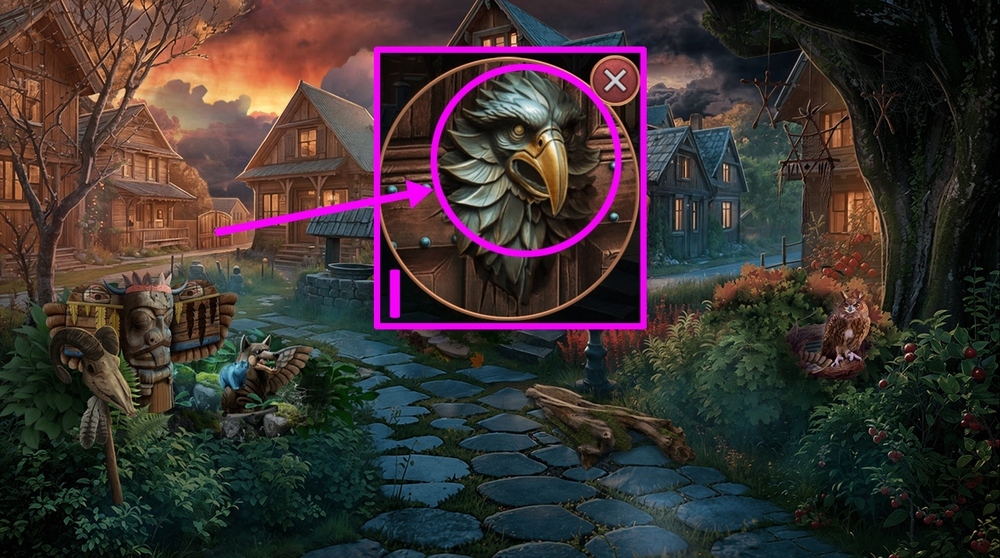
- Use KNOCKER on the eagle’s beak (I).
- Go forward.
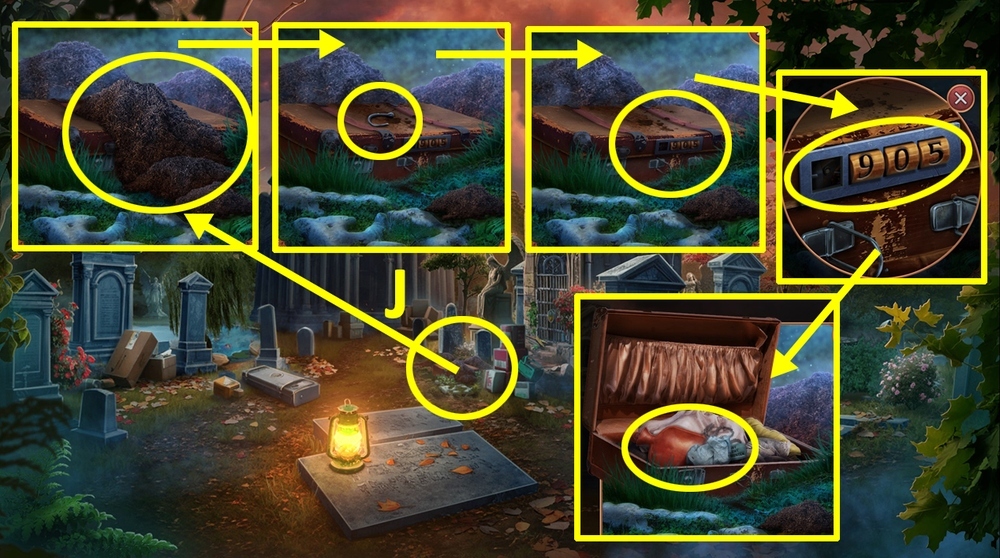
- Use VICTIM’S PHOTO on the pile of dirt in the background, use MUSIC BOWL on the pile of dirt.
- Take FISHHOOK, click on the suitcase and use LOCK CYLINDER on the lock, take and read the note.
- Take HARRY WRIGHT’S DOG TAG and HAND WARMER (J).
- Go to Truck Cabin.
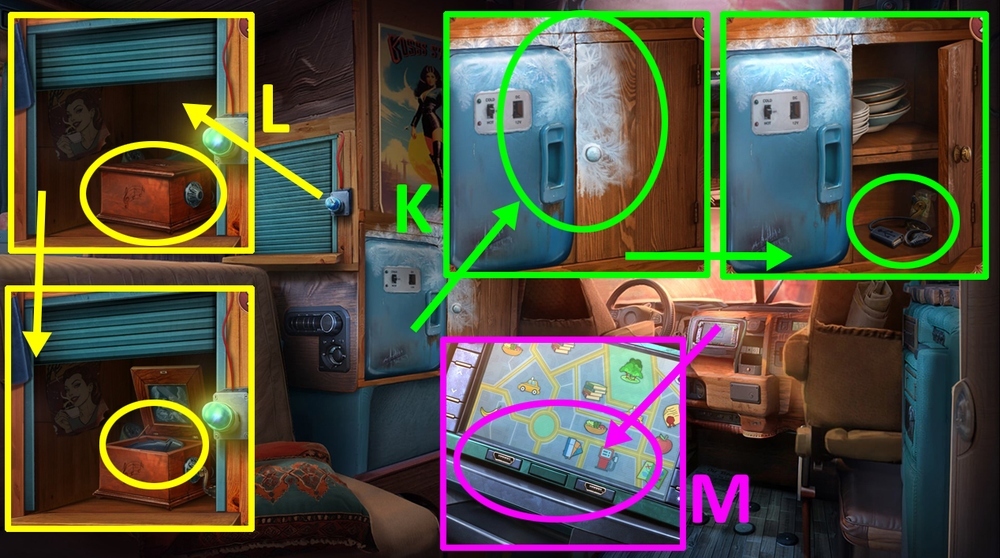
- Use HAND WARMER on the ice, take FLASH DRIVE ADAPTER and LEVER (K).
- Use LEVER on the music box, take TASER (L).
- Use FLASH DRIVE ADAPTER on the panel (M).
- Go to Tribal Cemetery.
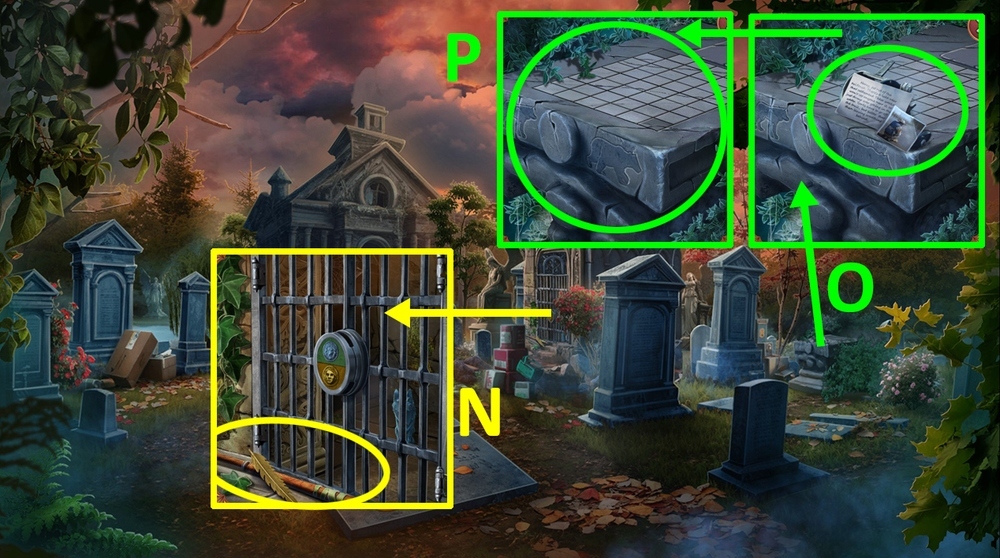
- Take TOTEM FEATHERS 2/3 and BROKEN FISHING ROD (N).
- Use LINE and FISHHOOK on BROKEN FISHING ROD.
- Take and read the note, take COIL, use STONE BEAR on the stone table (O-P).
- Use COIL on BROKEN FISHING ROD, earn FISHING ROD.
- Use FISHING ROD on the pond (Q).
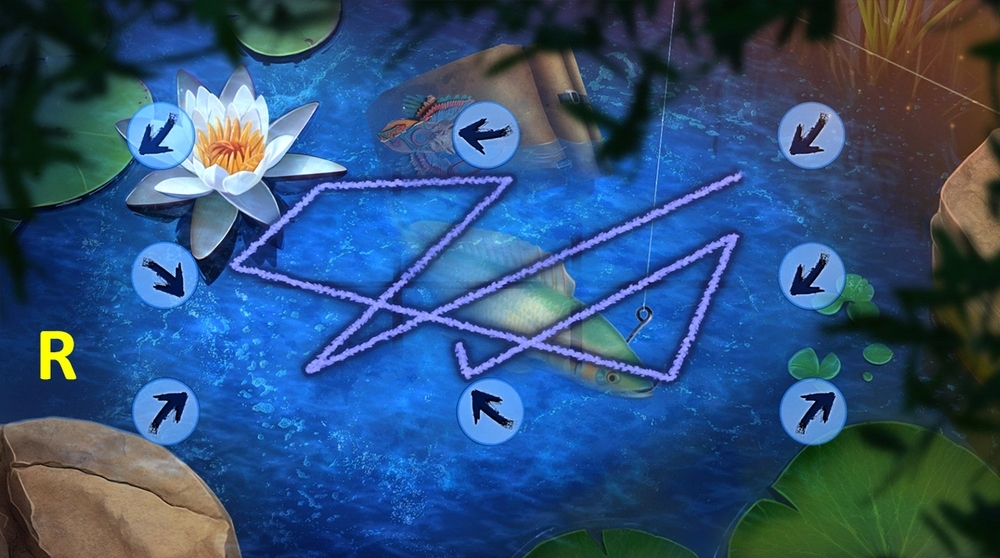
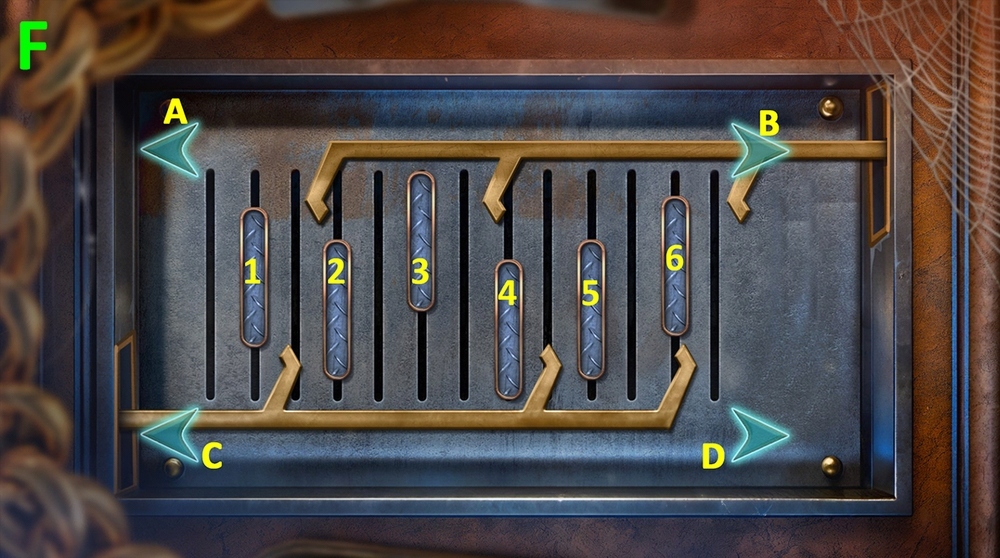
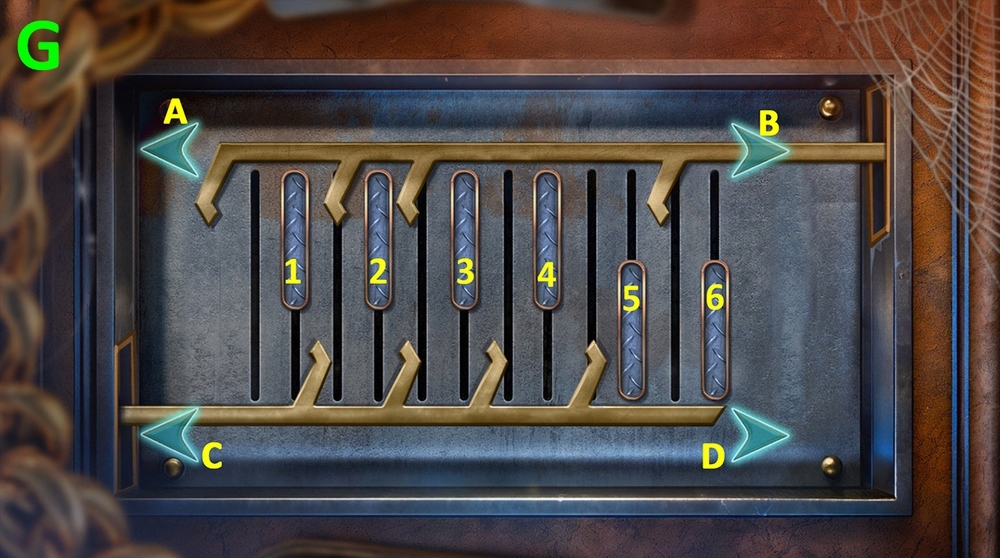
- Solution: arrange the arrows as shown in the picture (R).
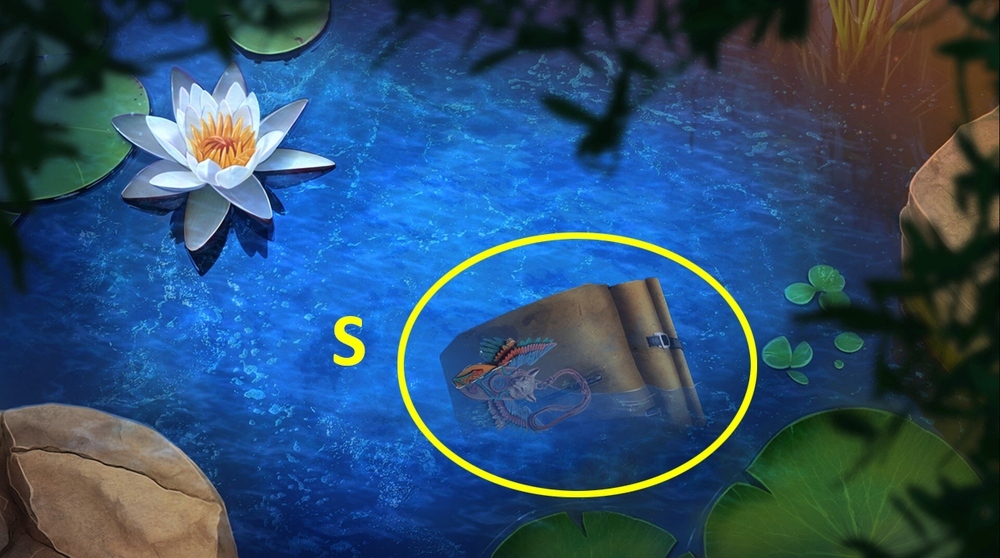
- Take OLD RUCKSACK (S).
- Click on the rucksack buckle, read and take DIARY.
- Go back.
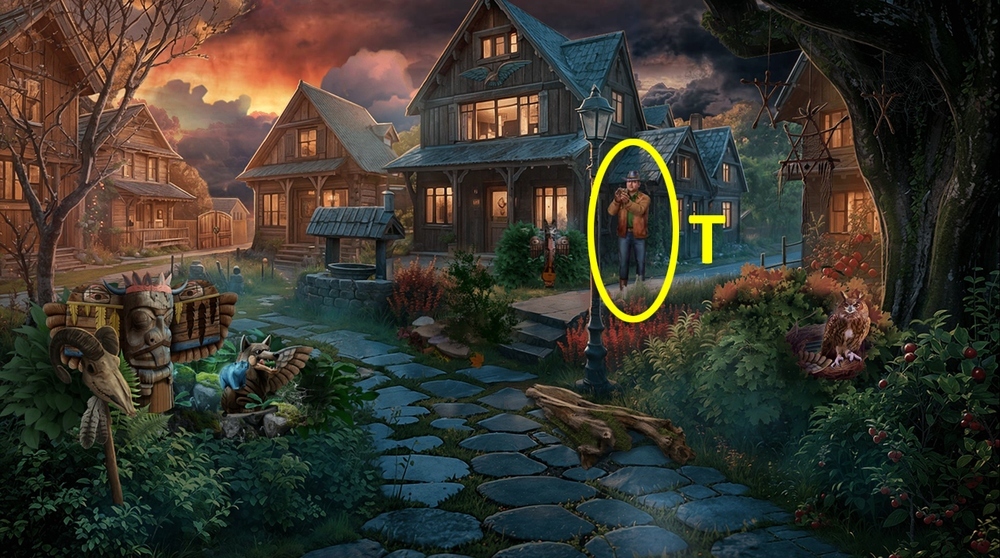
- Give DIARY to the man (T).
- Earn SADDLE.

- Select this option (T).
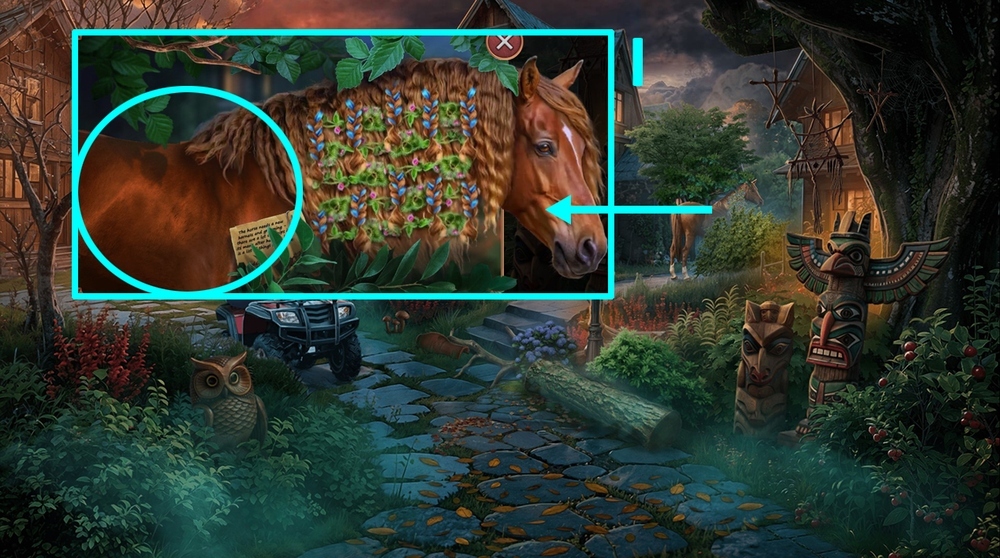
- Use SADDLE on the horse (U).
- Easy solution: solution is random (V).
- Hard solution: solution is random (W).
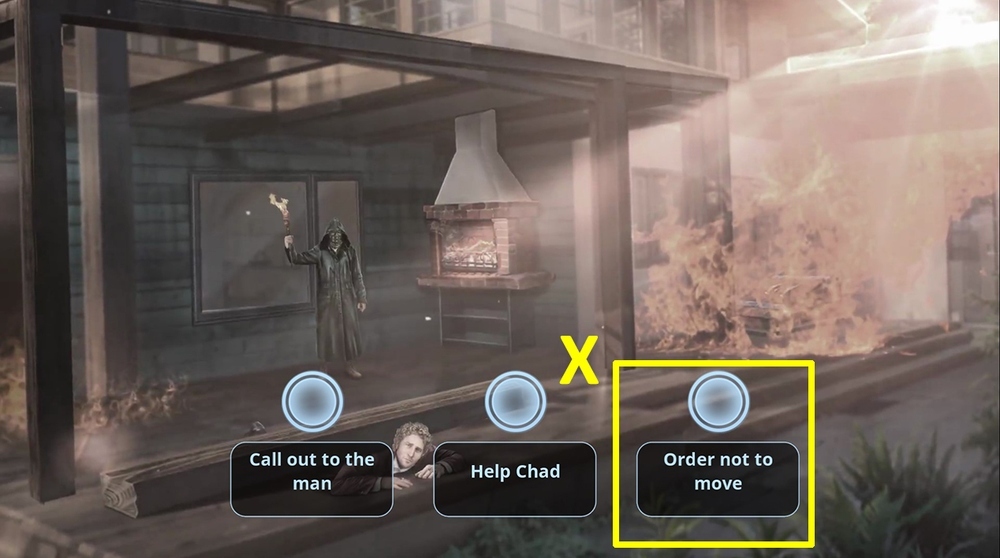
- Select this option (X).

- Take FIRE TONGS, HOSE, and BROKEN JACK (Y).
- Take EMPTY PANEL, use FIRE TONGS on the fire, take JACK’S HANDLE (Z).
- Use JACK’S HANDLE on BROKEN JACK, earn JACK.
- Use JACK on Chad (A).
- Earn VALVE.
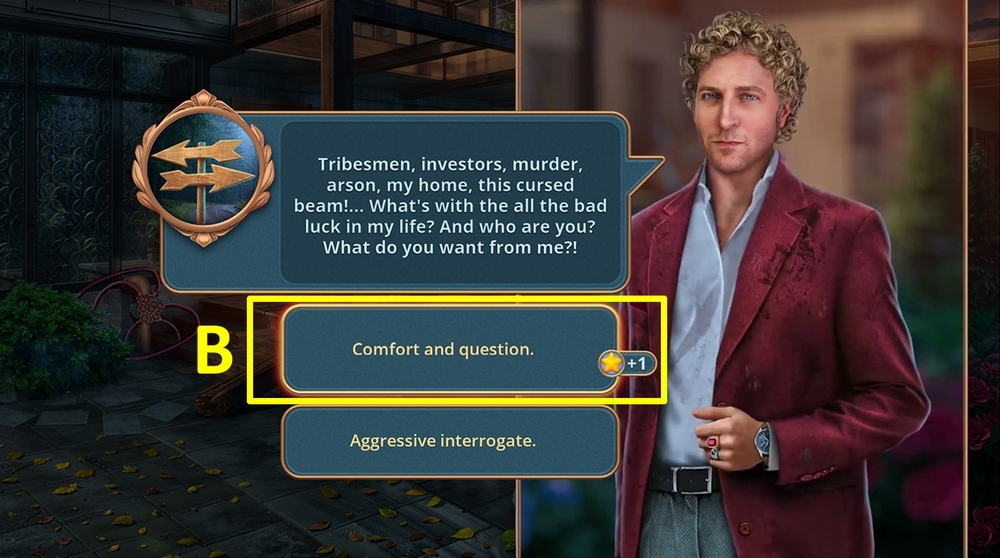
- Select this option (B).
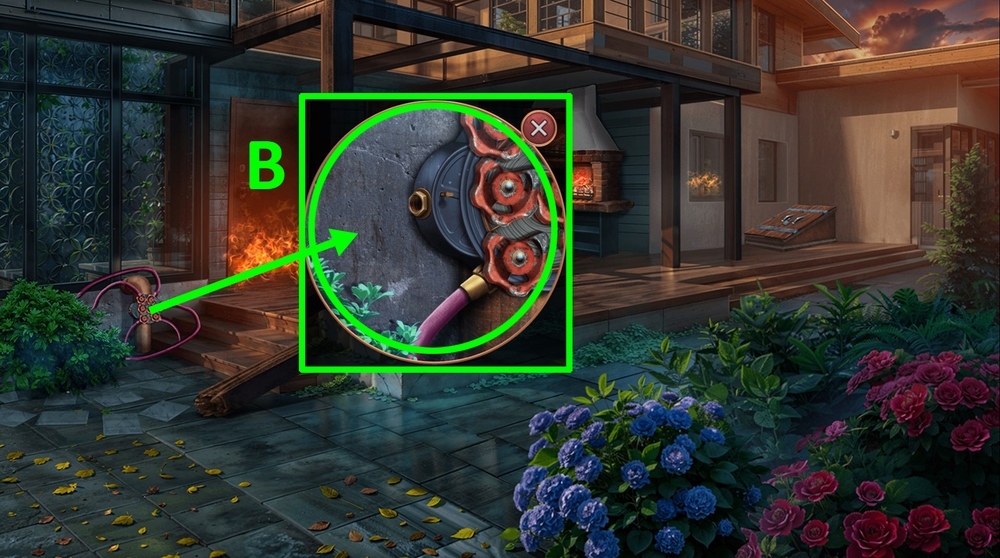
- Use HOSE and VALVE on the pipe (B).
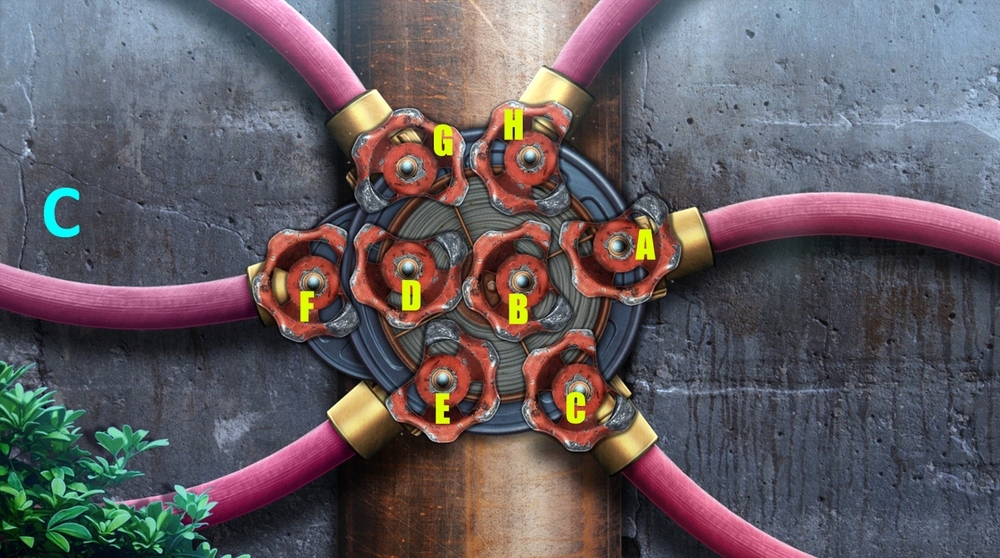
- Easy solution: click A (x3), B, C, B, D (x2), E (x3), D, F (x4), D, B, H (x6), G (x2) (C).
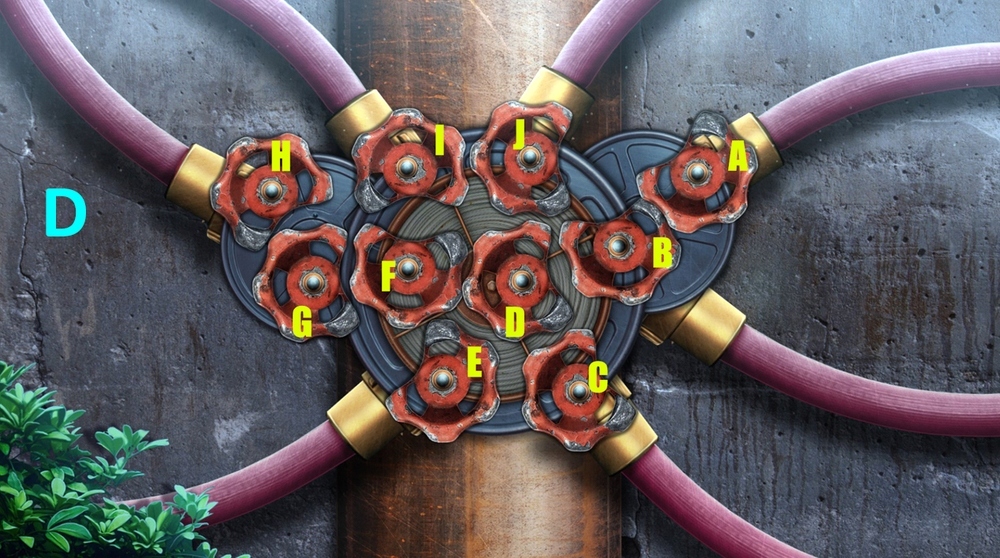
- Hard solution: click I (x4), J (x3), E, F, C (x3), D (x2), B (x2), A (x4), B (x2), D (x2), F (x2), G (x3), H (x2), E (x2) (D).
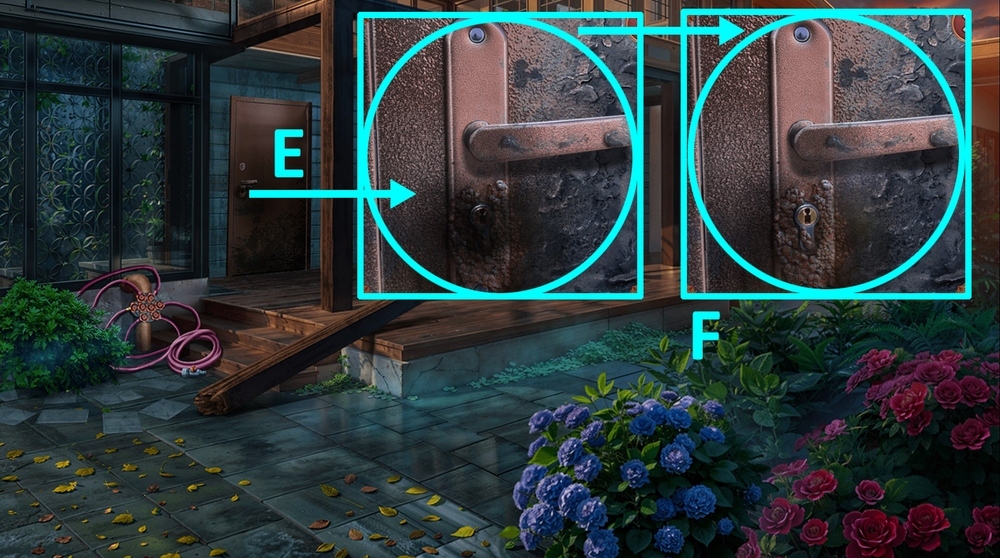
- Use RAMROD on the keyhole, use LOCK PICK on the keyhole (E-F).
- Go forward.
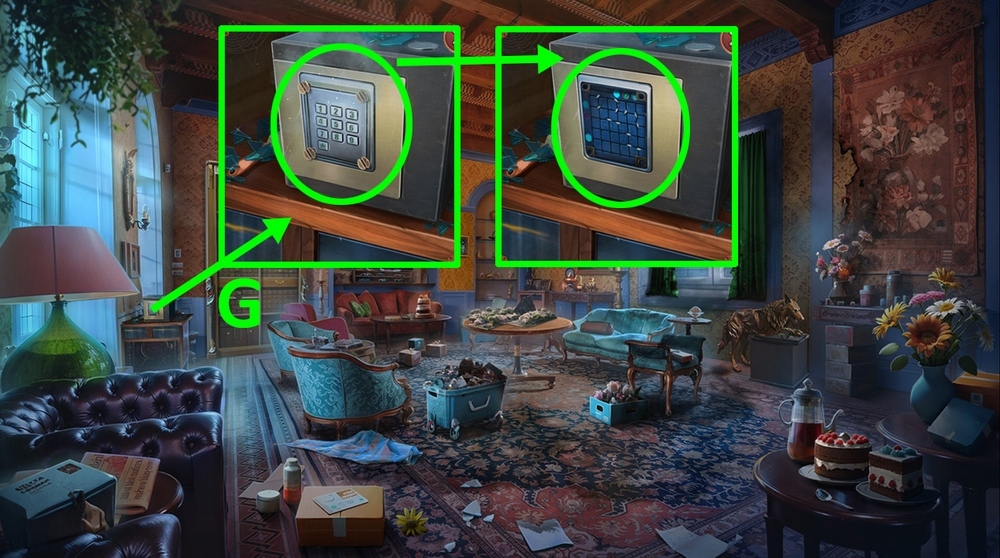
- Use HARRY WRIGHT’S DOG TAG on the screws, use TASER on the panel (G).
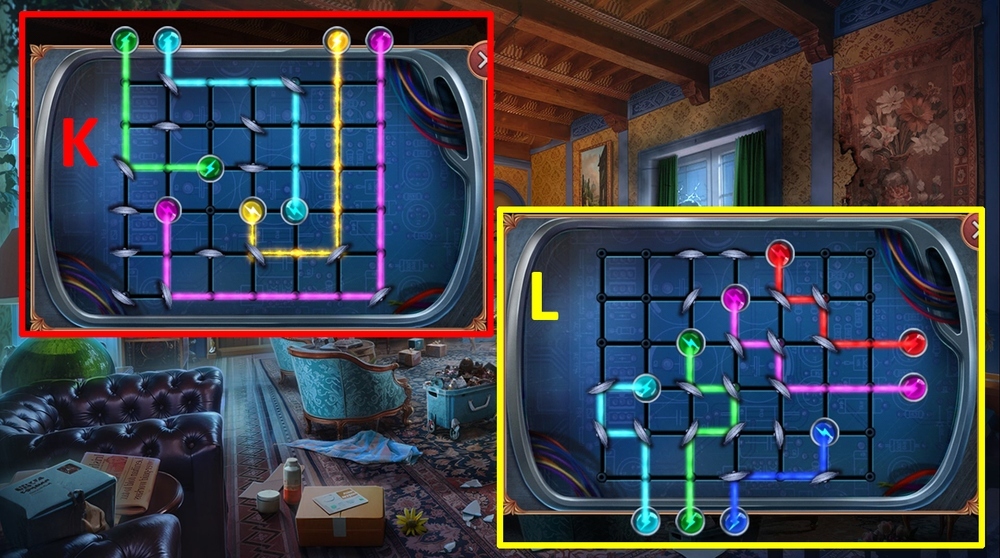
- Easy solution: arrange the pieces as shown in the picture (K).
- Hard solution: arrange the pieces as shown in the picture (L).
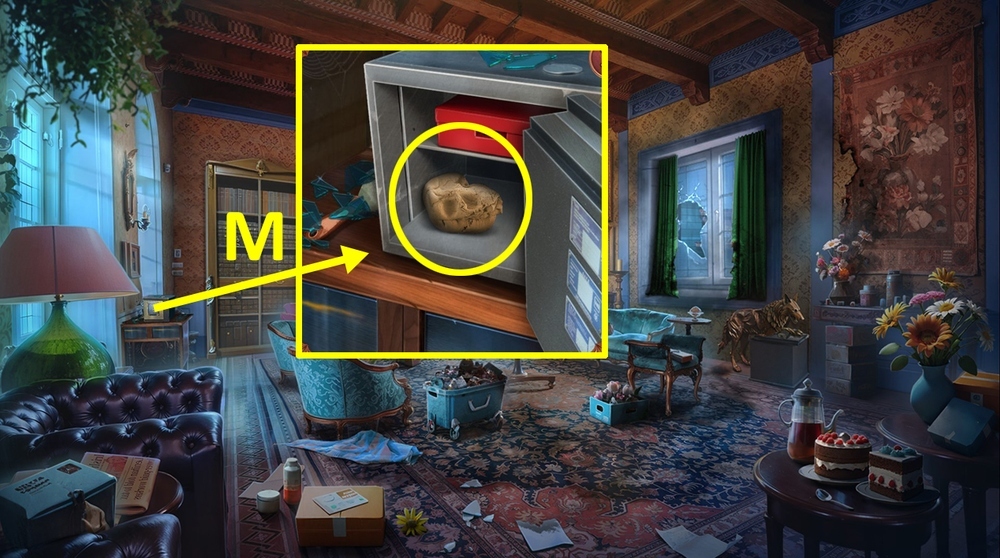
- Take SCULPTING CLAY (M).
- Go to Truck Cabin.
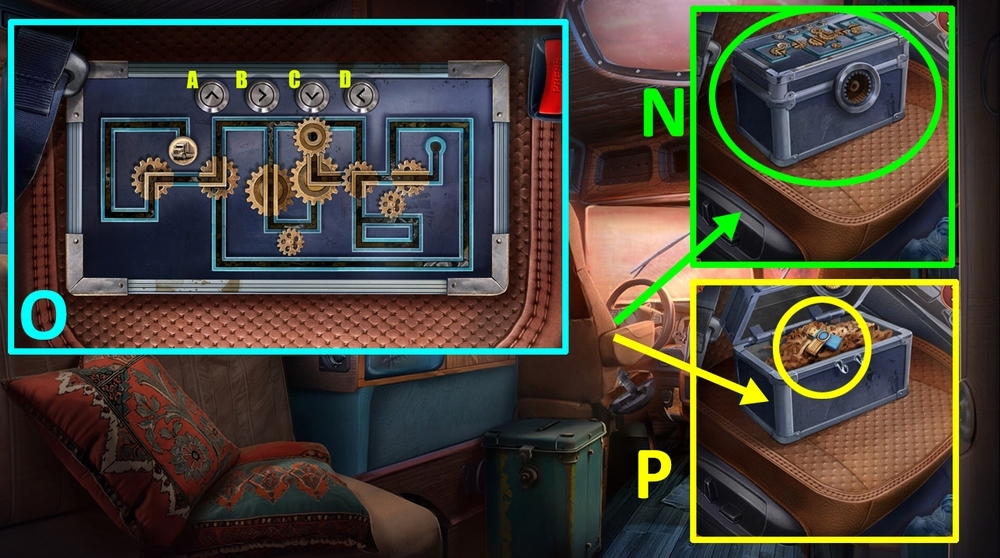
- Use SCULPTING CLAY on the box (N).
- Solution: click A, D, C, B, A, B, A, B, C, B, A, B, C, B, C, D, A, B, C, D, A, B, C, D, A, A, B, B, A (O).
- Take FLASH DRIVE (P).

- Use FLASH DRIVE on the panel (Q).
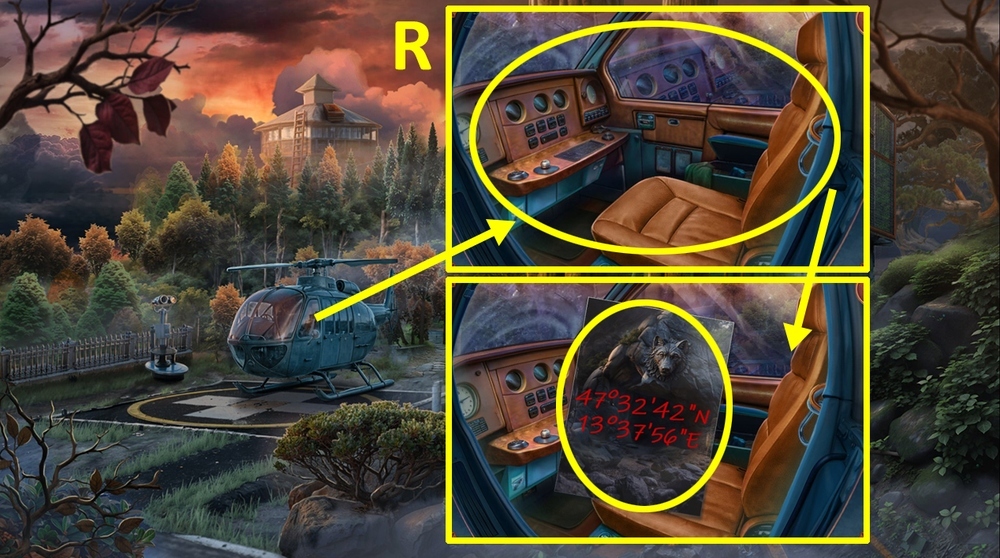
- Play puzzle (R).
- Go to Simmons Manor.
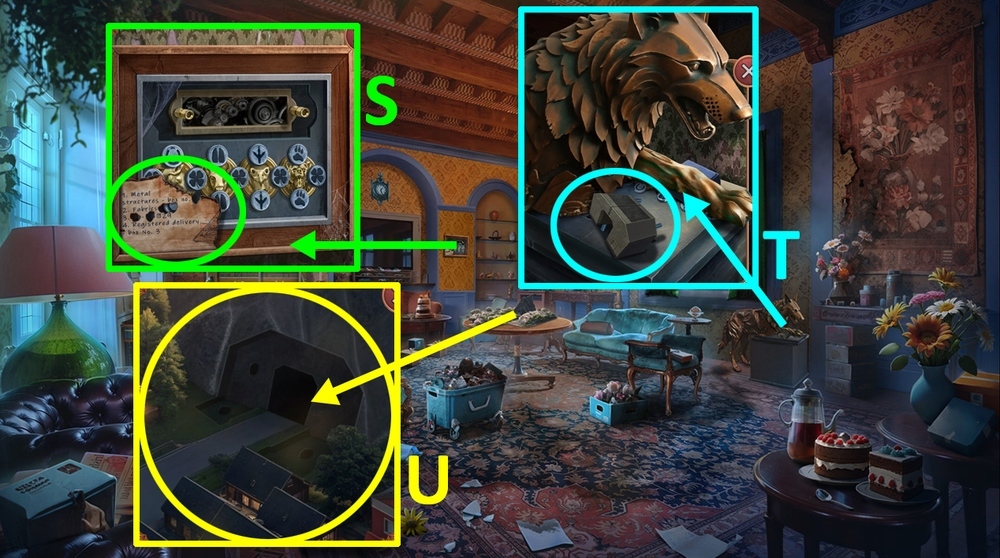
- Read and take BILL OF LADING (S).
- Take LAYOUT PIECE (T).
- Use LAYOUT PIECE on the tunnel (U).
- Play puzzle, earn CHAD’S GLOVE (V).
- Use CHAD’S GLOVE on the shards and take SCRAPER (W).
- Go to Crime Scene.
- Use BILL OF LADING on the box (X).
- Use SCRAPER on the jam, take HUMAN SIGN and HAND SAW (Y).
- Use HAND SAW on the box, remove the fabric, take BOLT and TRANSMITTER, take and read the note, take METAL DETECTOR (Z).
- Go forward.
- Use METAL DETECTOR on the ground (A).
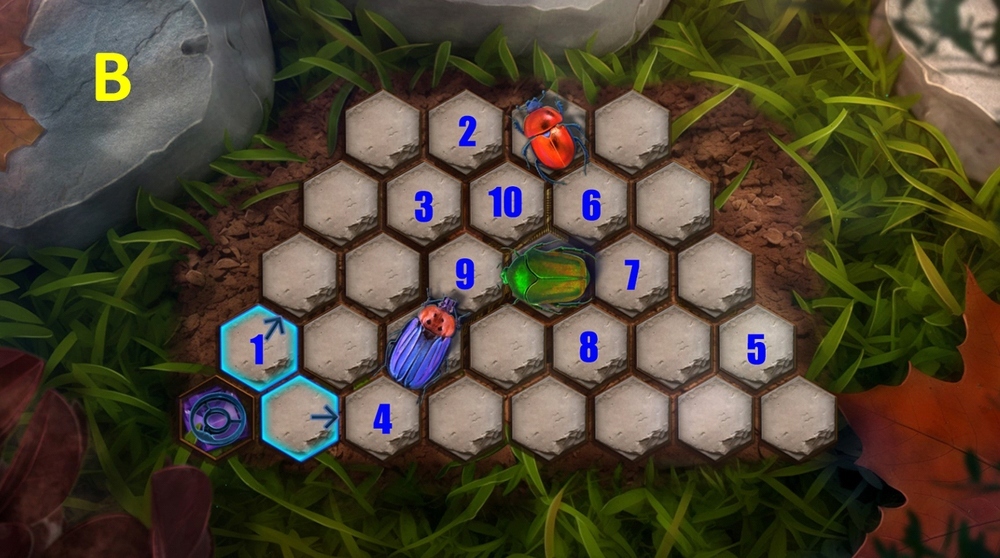
- Easy solution: click 1, 2, 3, 4, 5, 6, 7, 8, 9, 10 (B).
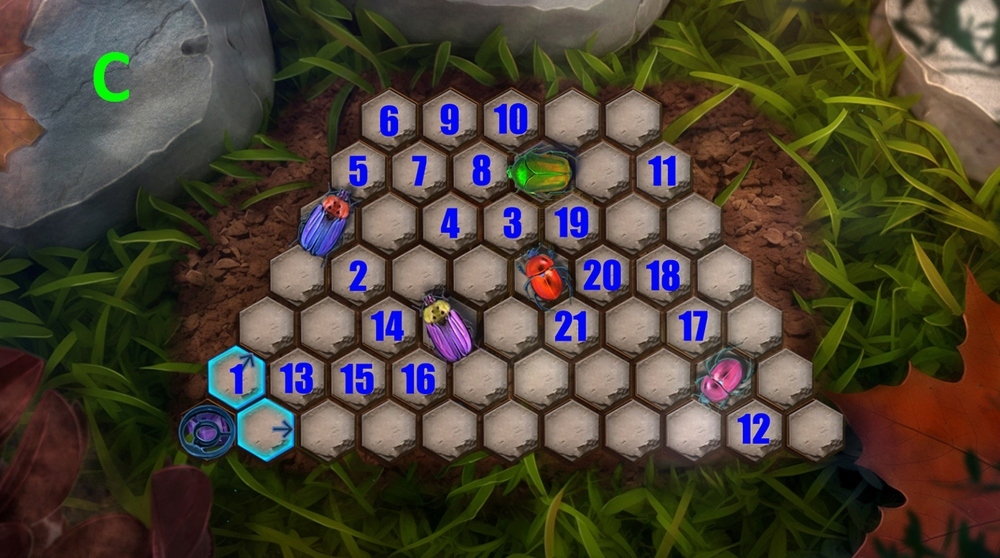
- Hard solution: click 1, 2, 3, 4, 5, 6, 7, 8, 9, 10, 11, 12, 13, 14, 15, 16, 17, 18, 19, 20, 21 (C).
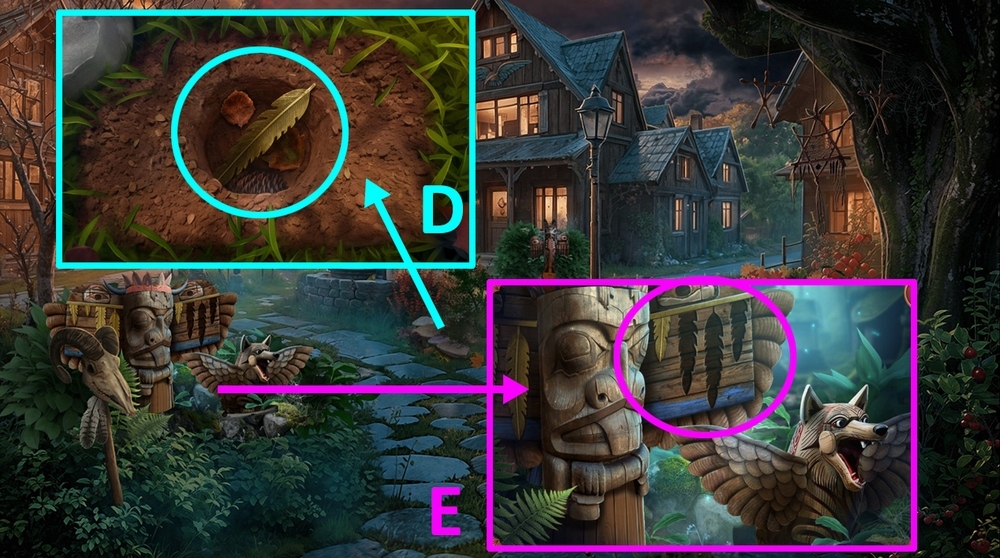
- Take TOTEM FEATHERS 3/3 (D).
- Use TOTEM FEATHERS on the totem (E).
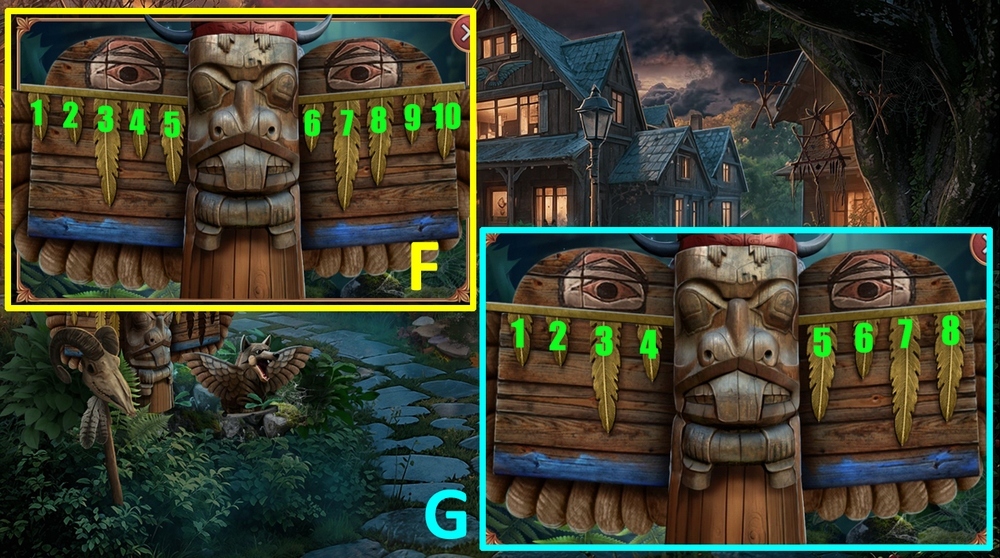
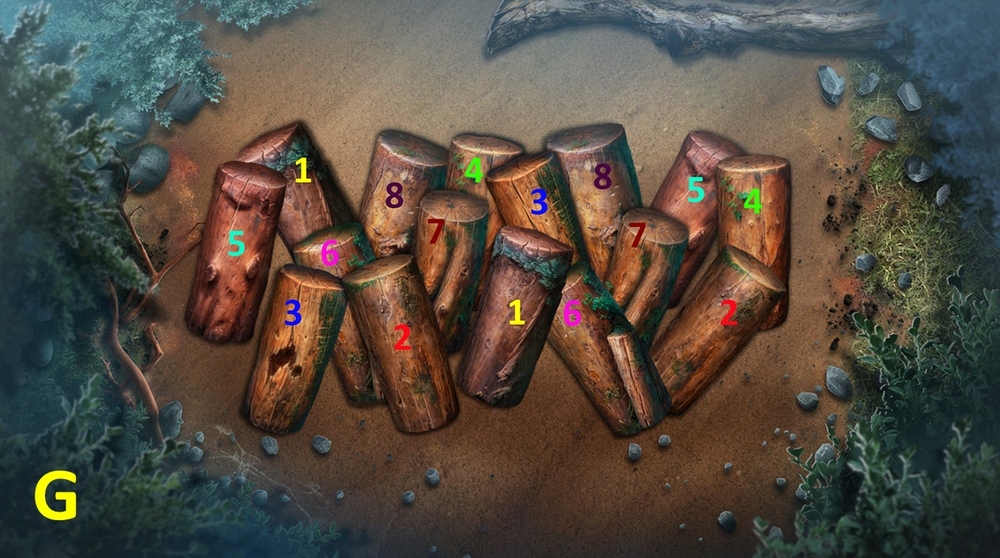
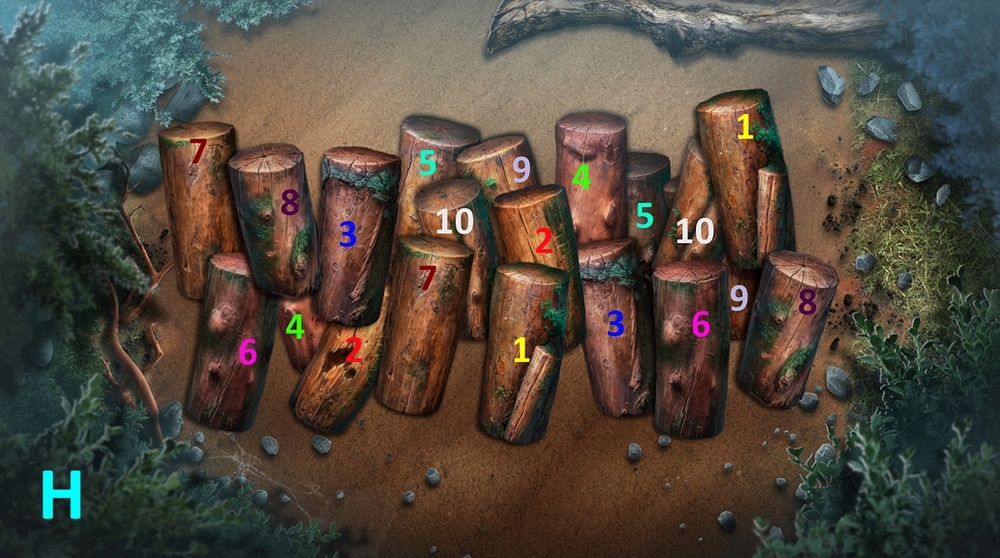
- Easy solution: click 8, 8, 6, 6, 6, 6, 5, 5, 7, 7, 7, 4, 4, 4, 2, 2, 2, 3, 3, 1, 1, 1, 1 (F).
- Hard solution: click 9, 9, 9, 9, 10, 10, 8, 8, 8, 8, 6, 6, 6, 6, 5, 5, 4, 4, 4, 7, 7, 7, 1, 2, 2, 2 (G).

- Take ANIMAL WHISTLE (H).
- Use ANIMAL WHISTLE on the owl, take WRENCHES 1/2 and ANIMAL SIGN (I).
- Go to Tribal Cemetery.
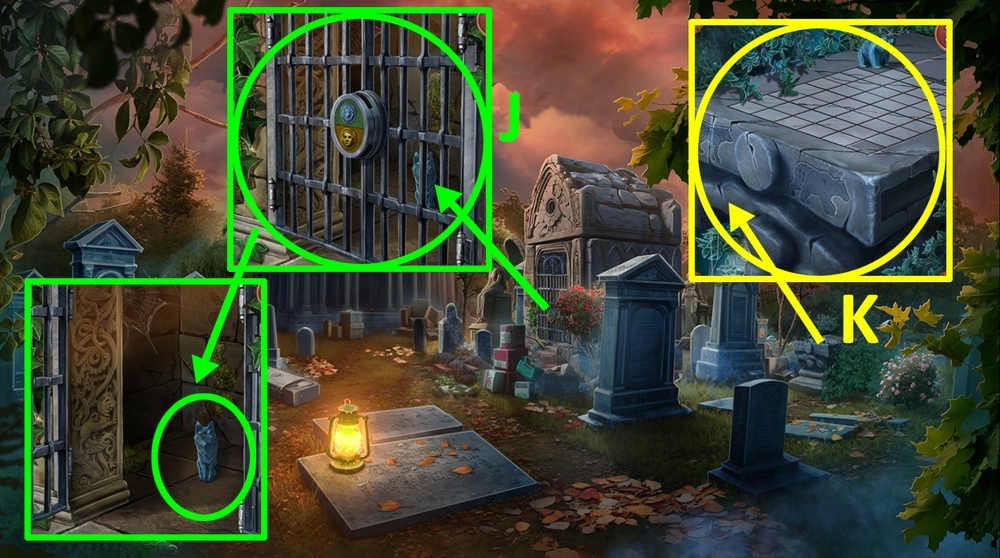
- Use HUMAN SIGN and ANIMAL SIGN on the lock, take STONE WOLF (J).
- Use STONE WOLF on the stone table (K).
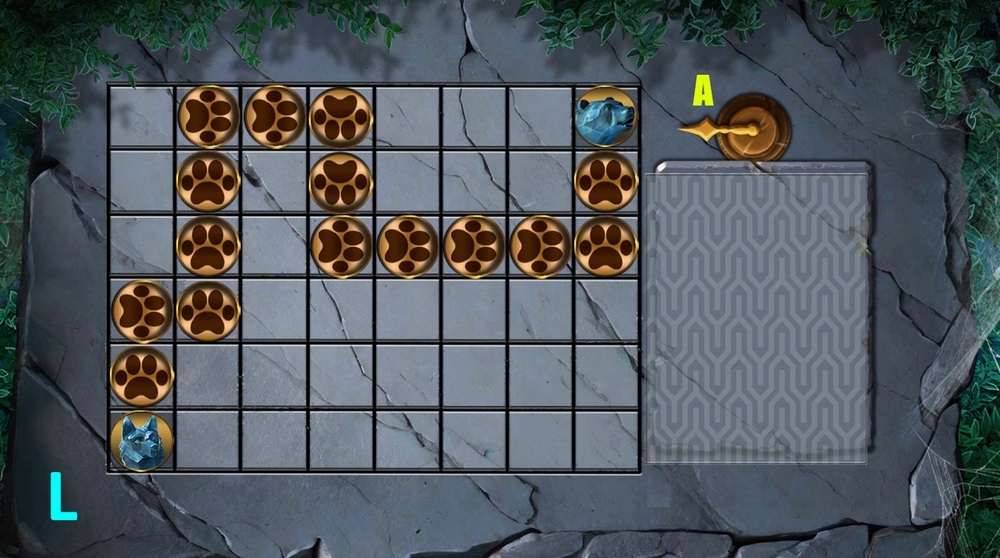
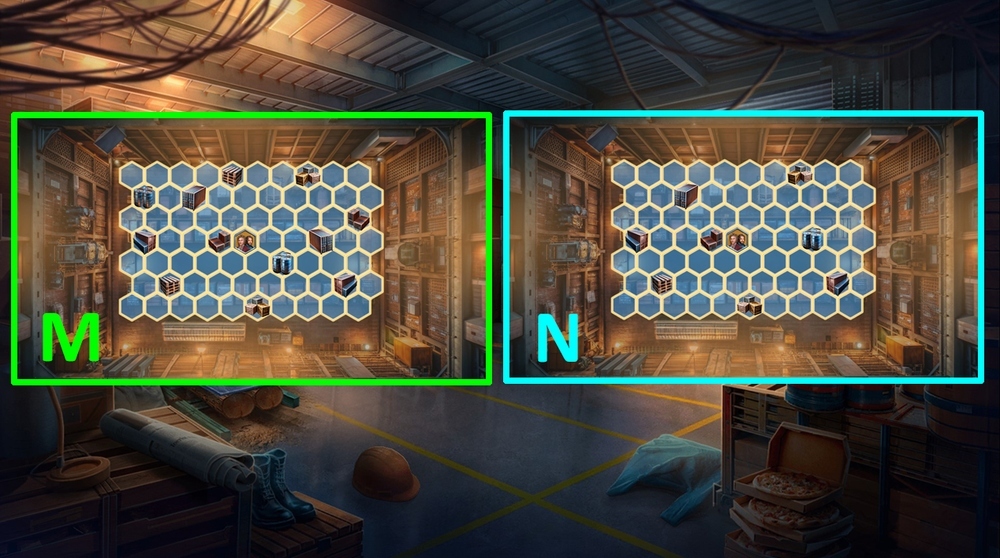
- Easy solution: place the chips as shown in the picture, then press A (L).
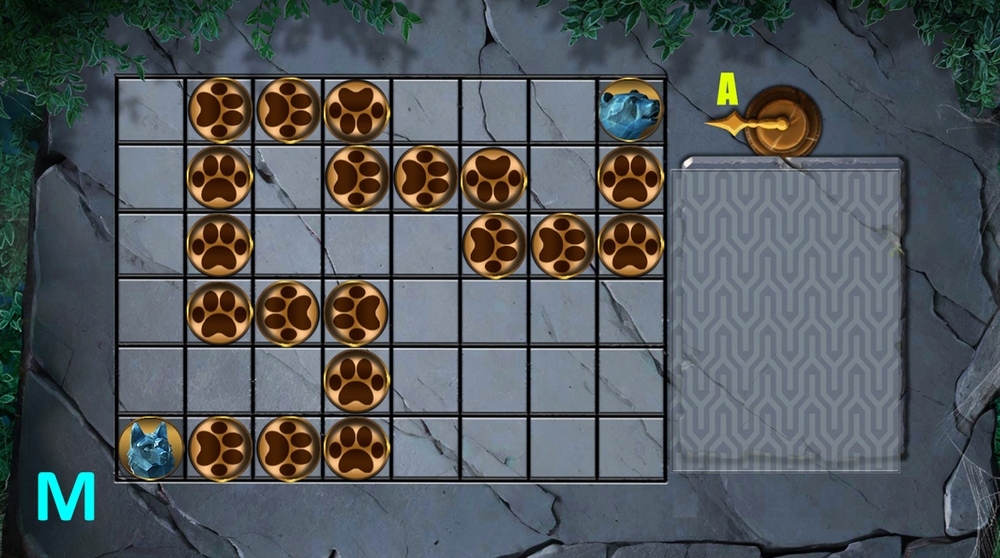
- Hard solution: place the chips as shown in the picture, then press A (M).
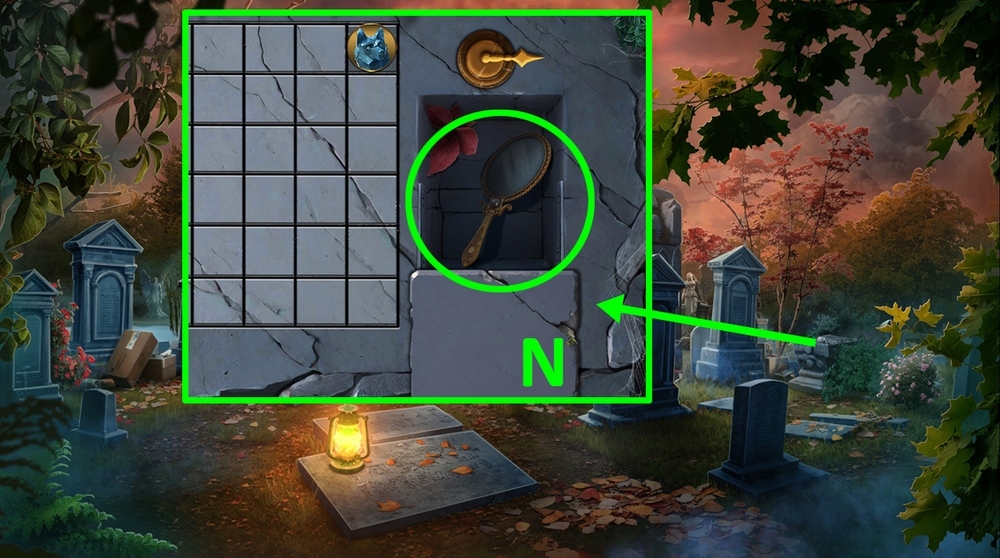
- Take HAND MIRROR (N).
- Go to Manor Terrace.
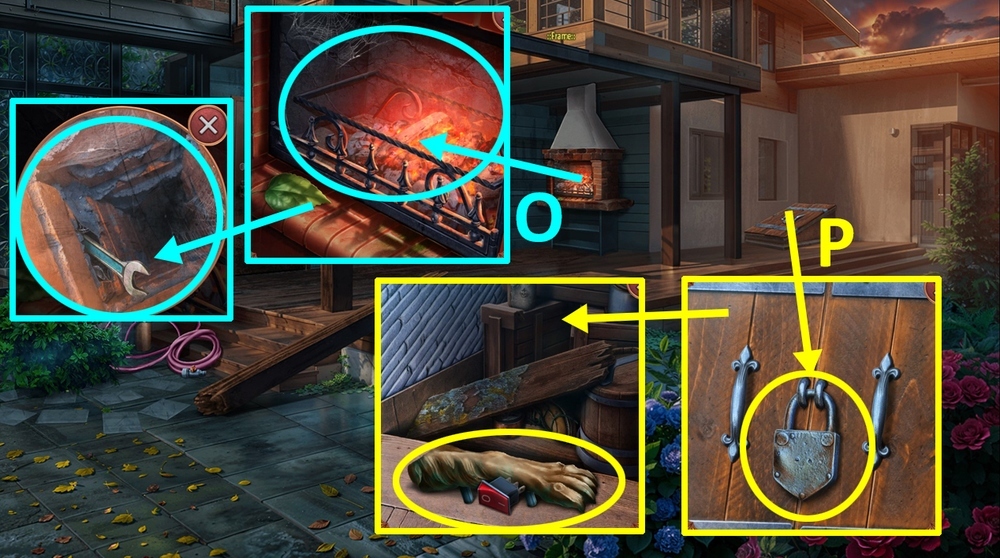
- Use HAND MIRROR on the fireplace, use BOLT on the stuck wrench, earn WRENCHES 2/2 (O).
- Use WRENCHES on the lock, take BUTTON and WOLF PAW (P).
- Use BUTTON on TRANSMITTER.
- Go forward.
- Use WOLF PAW on the stone pedestal, take CAMERA MOUNT and PANEL PART (Q).
- Play puzzle, earn CAR MODEL (R).
- Use CAR MODEL on the empty spot, take GLUE (S).

- Use PANEL PART and GLUE on EMPTY PANEL, earn DECORATIVE PANEL.
- Use DECORATIVE PANEL on the empty slot (T).
- Easy solution: click A (x3), B, C, D (x2), C, D (x3), C (x2), D (U).
- Hard solution: click A (x3), B, C, D (x2), C (x3), E (x2), D (x3), E (x2), D (x3), E (x2), D, E, D (x2), E (x3), D (x2), E (V).
- Take and read the note, take DUCT TAPE and ANTENNA (W).
- Use ANTENNA on TRANSMITTER, earn SIGNAL AMPLIFIER.
- Go to Security Tower.
- Give SIGNAL AMPLIFIER to Paul (X).
- Play puzzle, earn CABIN’S LOCATION (Y).
- Use CABIN’S LOCATION on the poster (Z).
- Click on the bear skin (A).
- Use CAMERA MOUNT and CAMERA on the tripod (B).
- Take BOAR TUSK, use DUCT TAPE on the boat (C).
- Use BOAR TUSK on the window latch, take the book and use it on the latch, open the window, take and read the note, take PUMP and CAMERA TRAP REMOTE (D).

- Use CAMERA TRAP REMOTE on the tripod (E).
- Easy solution: click 1, 2, 3, 4, 5, 6, 7 (F).
- Hard solution: click 1, 2, 3, 4, 5, 6, 7, 8, 9 (G).
- Open the hatch, take MATCHES (H).
- Use PUMP on the boat (I).
- Use MATCHES on the hide, take RUBBER PATCH (J).
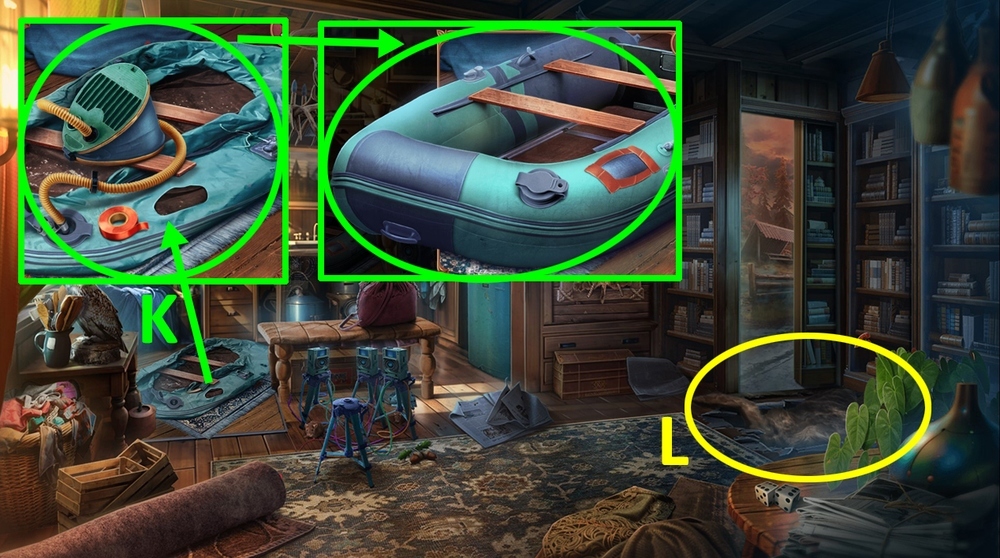
- Use RUBBER PATCH on the boat, take INFLATABLE BOAT (K).
- Use INFLATABLE BOAT on the trap (L).
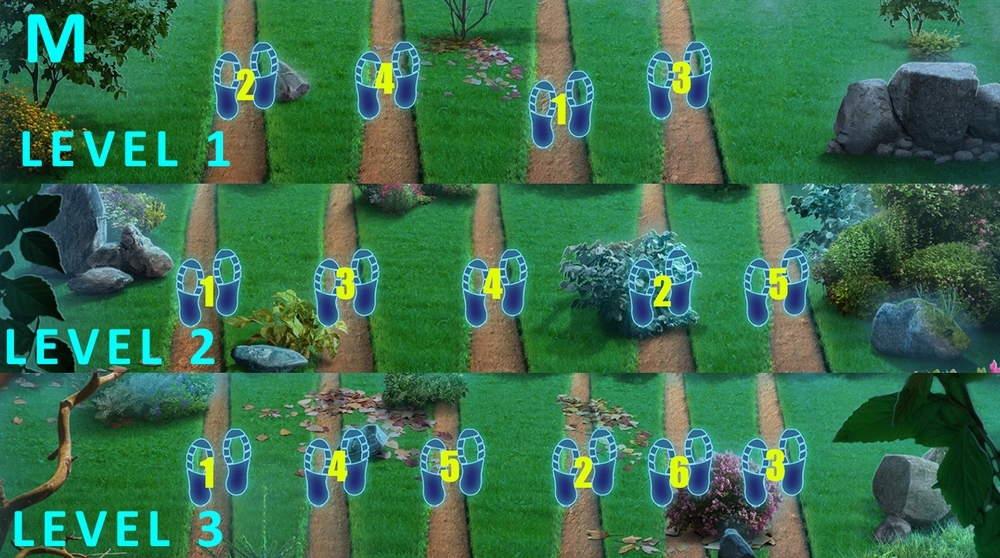
- Easy solution: click on the footprints in the order shown in the picture from step 1 to step 3 (M).
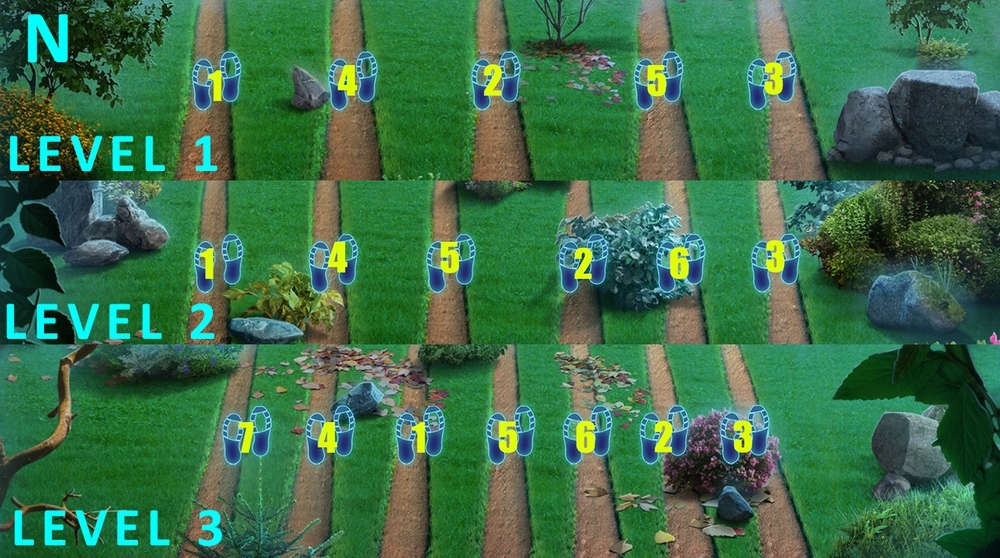
- Hard solution: click on the footprints in the order shown in the picture from step 1 to step 3 (N).
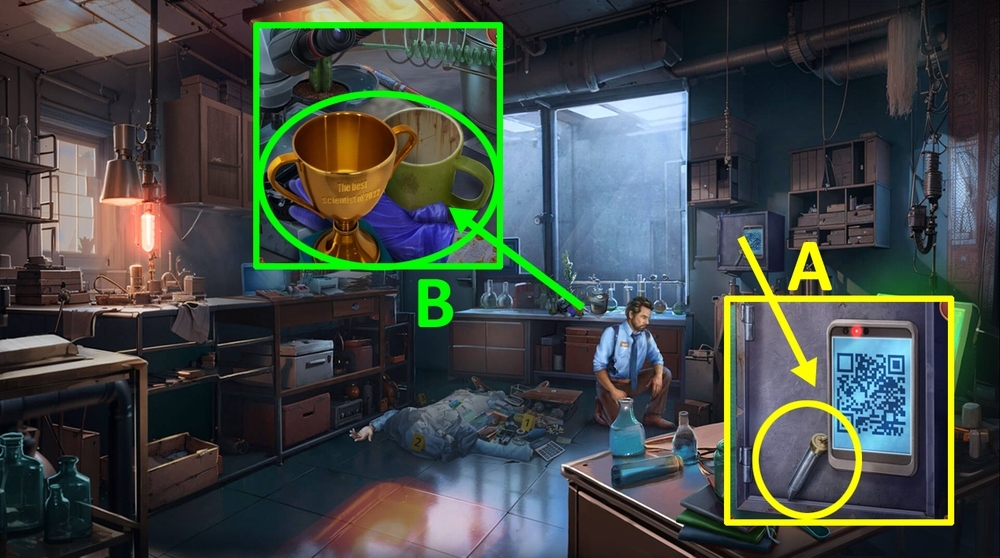
- Take FLASK PENDANT (A).
- Take BEST SCIENTIST AWARD, RUBBER GLOVES, and MUG WITH FINGERPRINT (B).
- Use FLASK PENDANT and BEST SCIENTIST AWARD on the object stuck in the gap, take REAGENT SET (C).
- Use REAGENT SET on the table (D).
- Take CASE FILE and FINGERPRINT KIT (E).
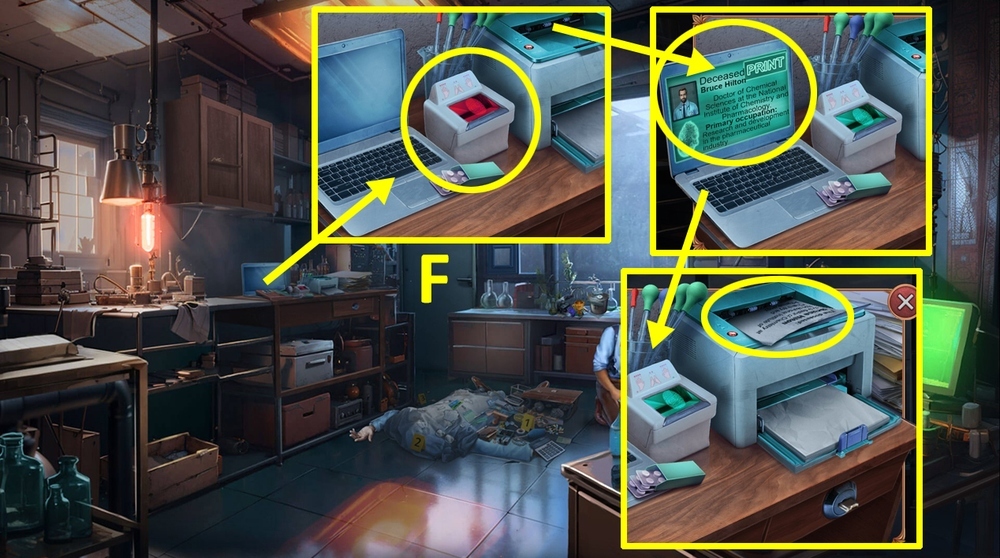
- Use FINGERPRINT KIT on MUG WITH FINGERPRINT, earn MUG WITH FINGERPRINT and VICTIM’S FINGERPRINTS.
- Use VICTIM’S FINGERPRINTS on the fingerprint scanner, press “PRINT” on the laptop screen, read and take VICTIM PROFILE (F).
- Open CASE FILE, use VICTIM PROFILE on CASE FILE.
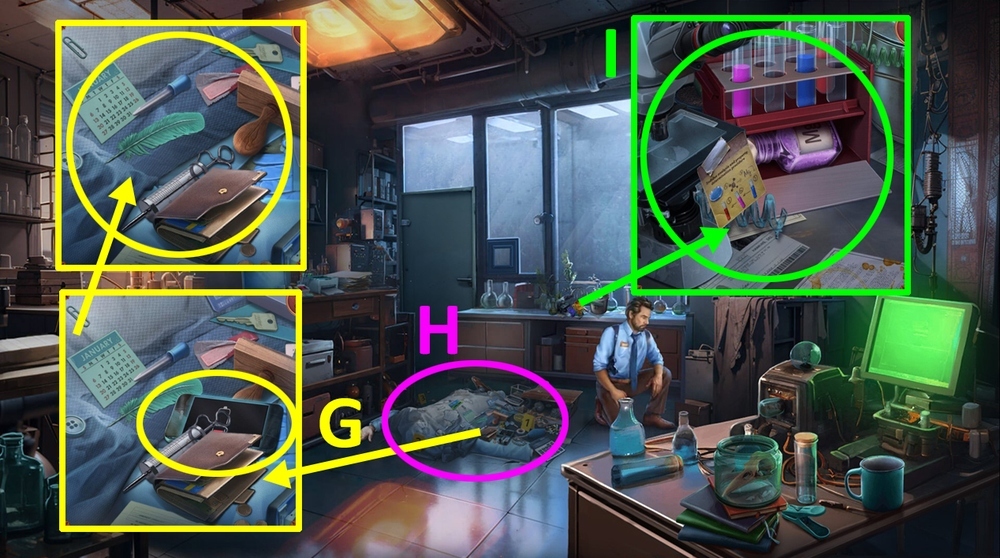
- Take DEAD PHONE, use RUBBER GLOVES on the body (G).
- Play puzzle, earn LIQUID SAMPLE (H).
- Use LIQUID SAMPLE on the table (I).
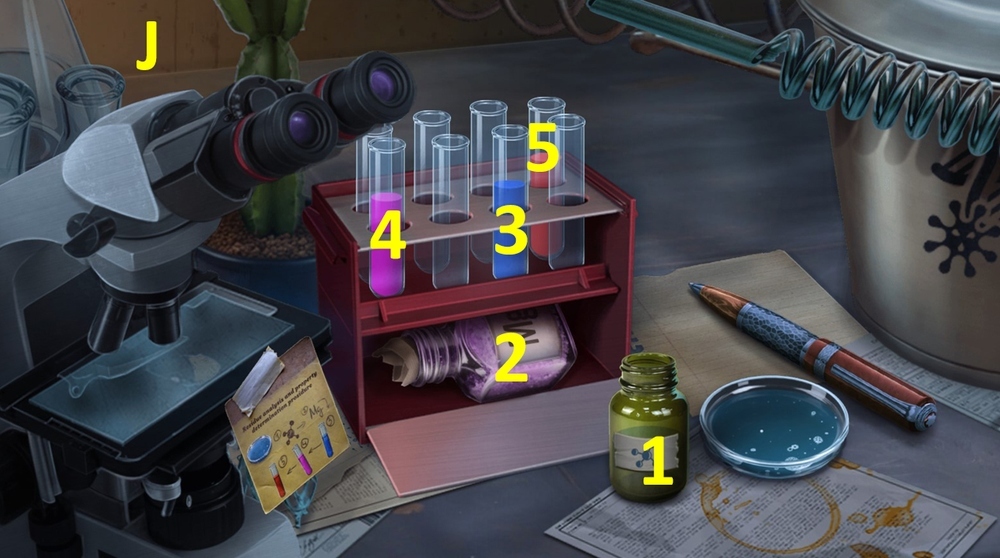
- Solution: Click 1-2-3-4-5 (J).
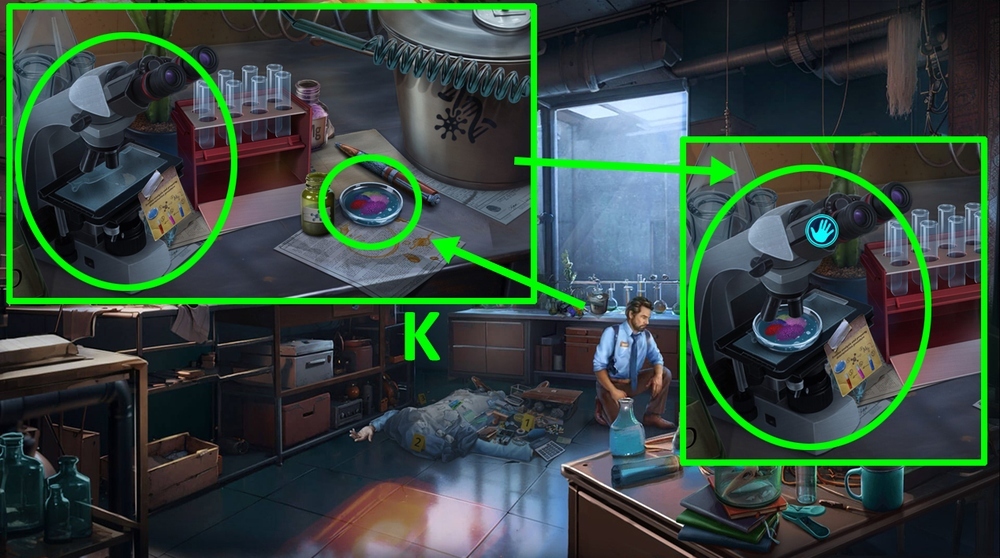
- Take the Petri dish and use it on the microscope, click on the microscope (K).
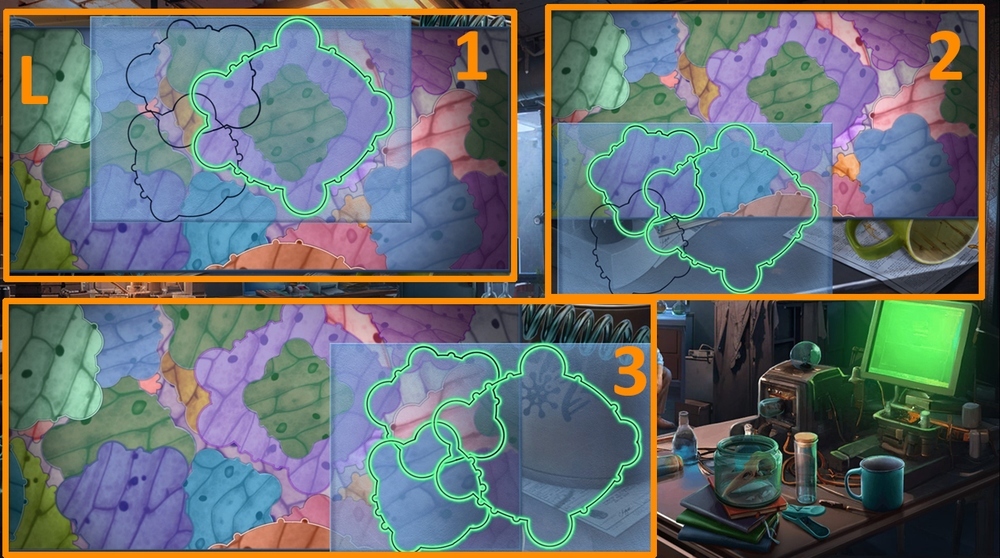
- Easy solution: Place the template as shown in stages 1-3 (L).
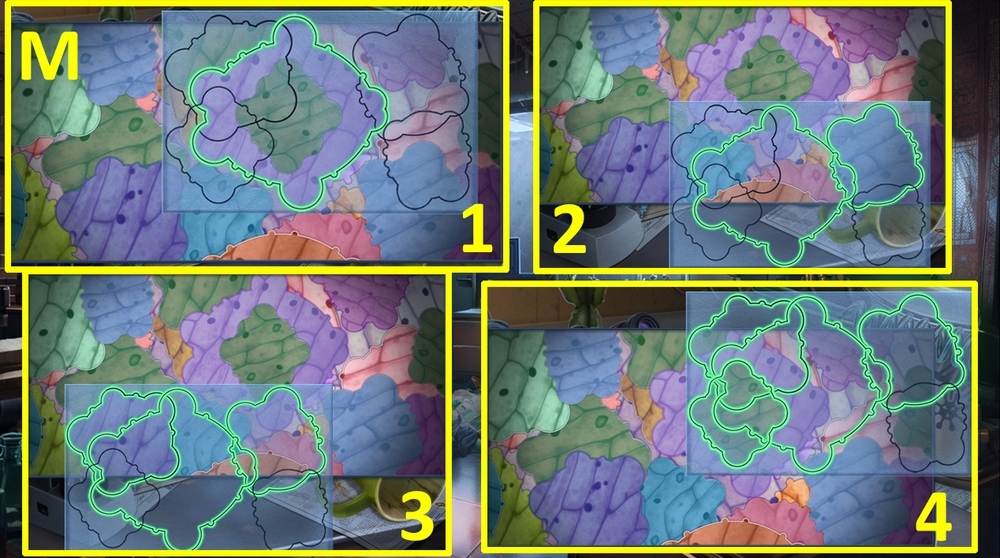
- Hard solution: Place the template as shown in stages 1-4 (M).

- Hard solution: Place the template as shown in stages 5 (M).
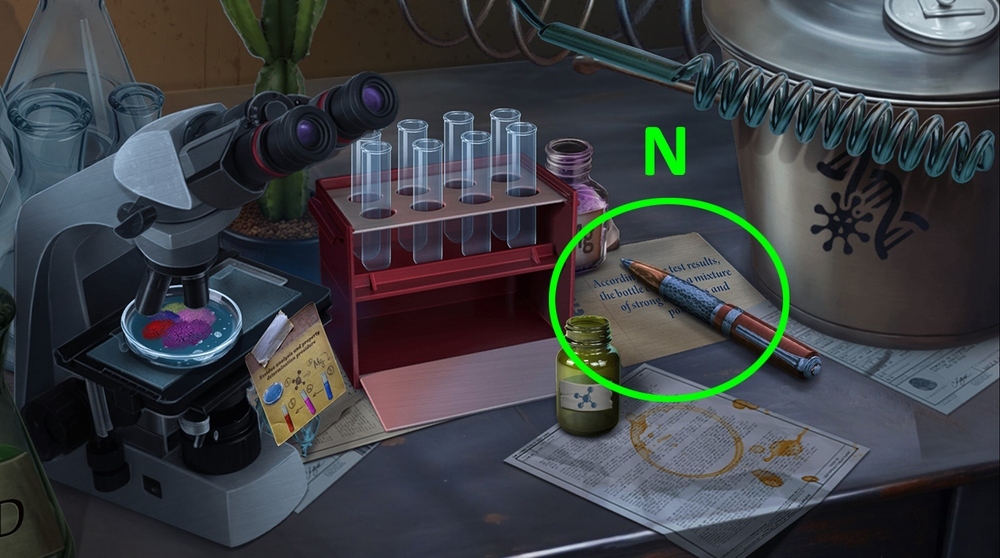
- Take and read the note, earn POISON (N).
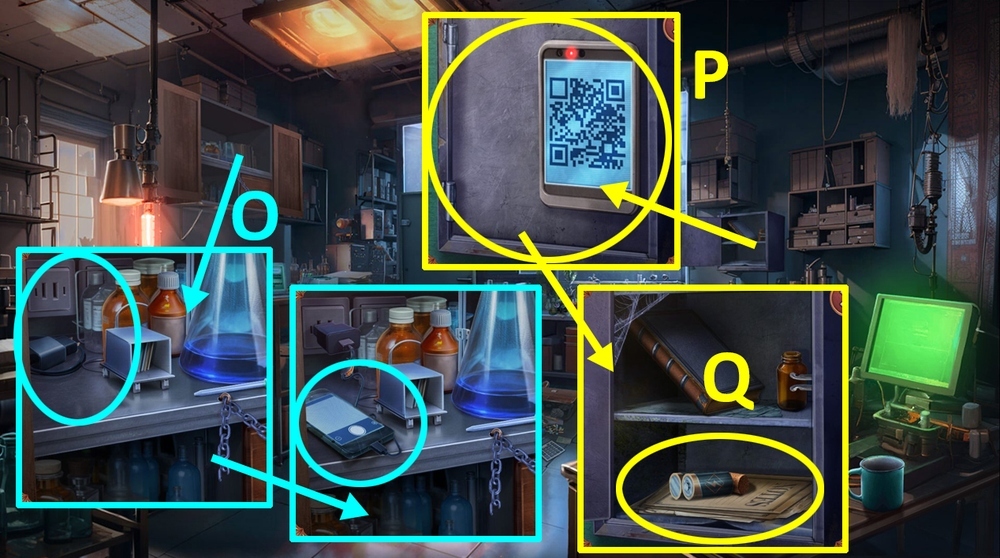
- Use DEAD PHONE on the charger, wait for the phone to charge, take PHONE WITH SCANNER (O).
- Use POISON on CASE FILE.
- Use PHONE WITH SCANNER on the QR code, take BATTERIES and CORK, read and take PAPERS ON SCIENTIST (P-Q).
- Use PAPERS ON SCIENTIST on CASE FILE, take FILLED REPORT.
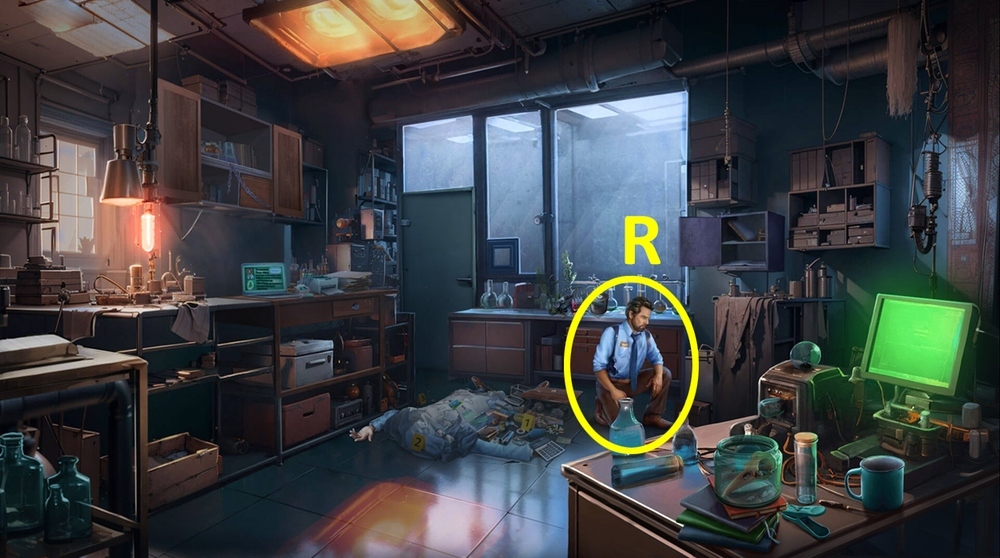
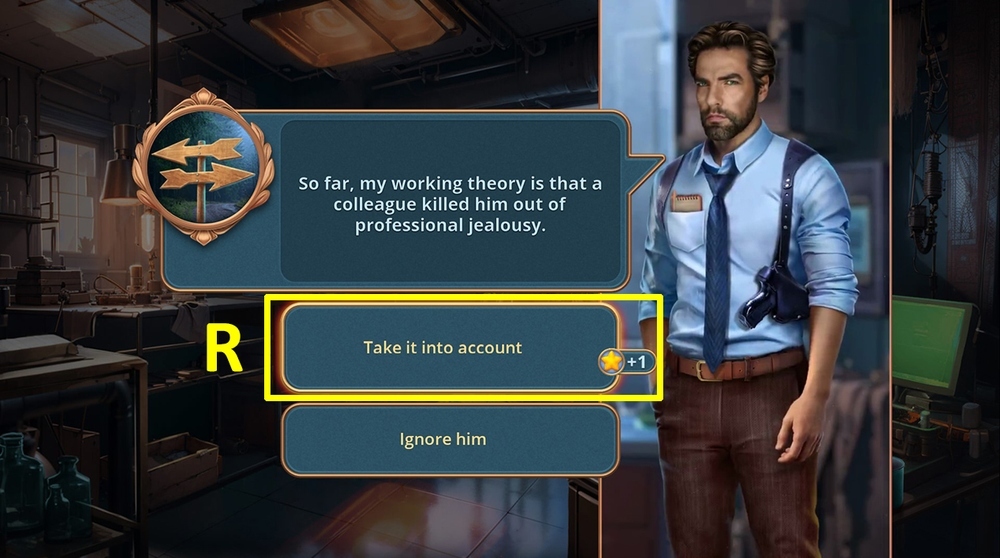
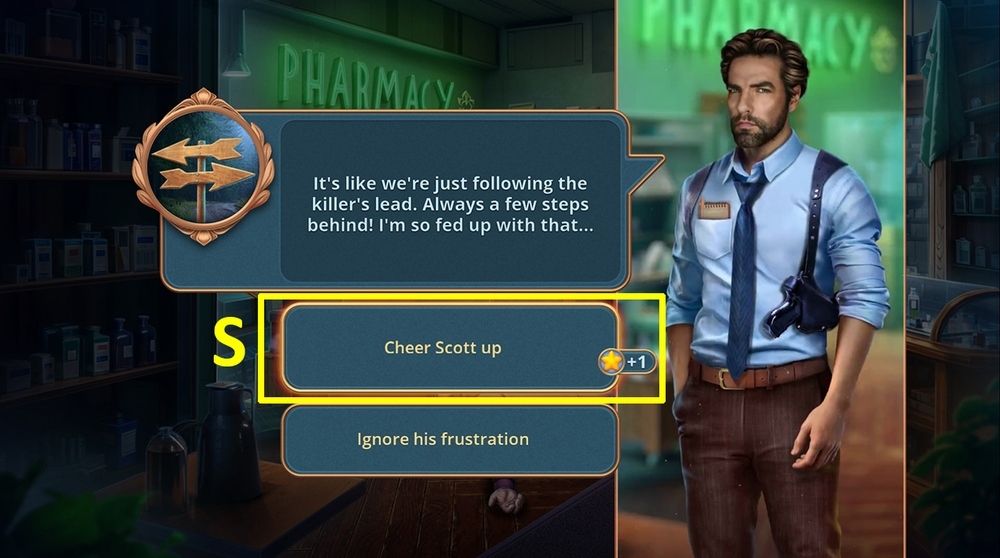
- Use FILLED REPORT on Scott (R).
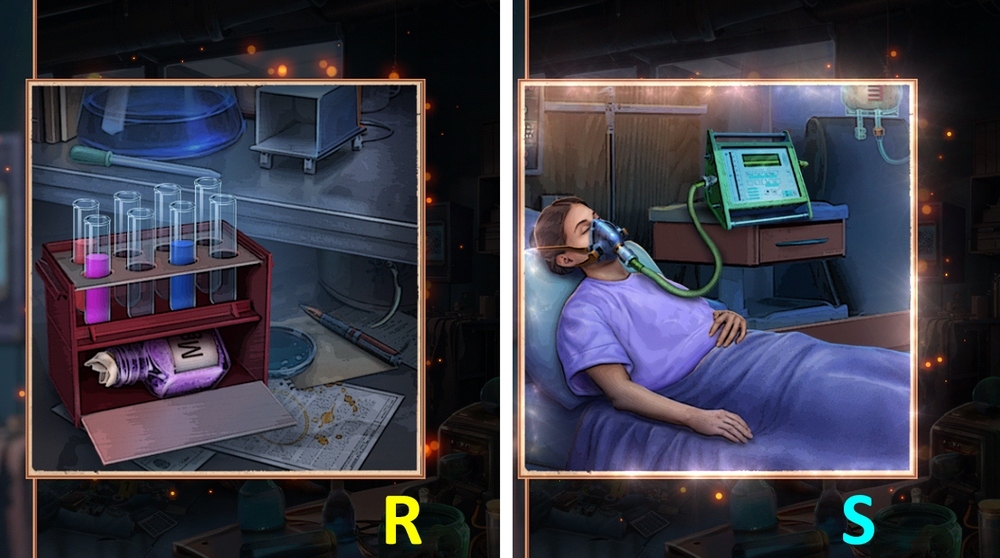
- Solution: Assemble the picture using the clue (R).
- Solution: Assemble the picture using the clue (S).
- Earn FUSE.
- Go forward.
- Select this option (R).

- Use RUBBER GLOVES on the switchboard, then use FUSE on it (S-T).
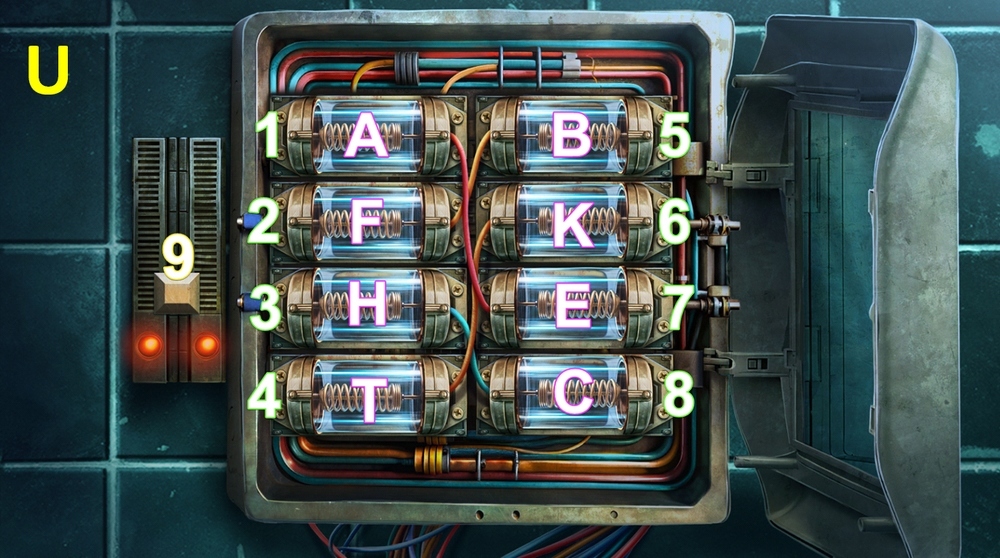
- Easy solution: Place the fuses in the following order: F-1, T-2, H-4, B-7, K-8, B-8, click 9 (U).
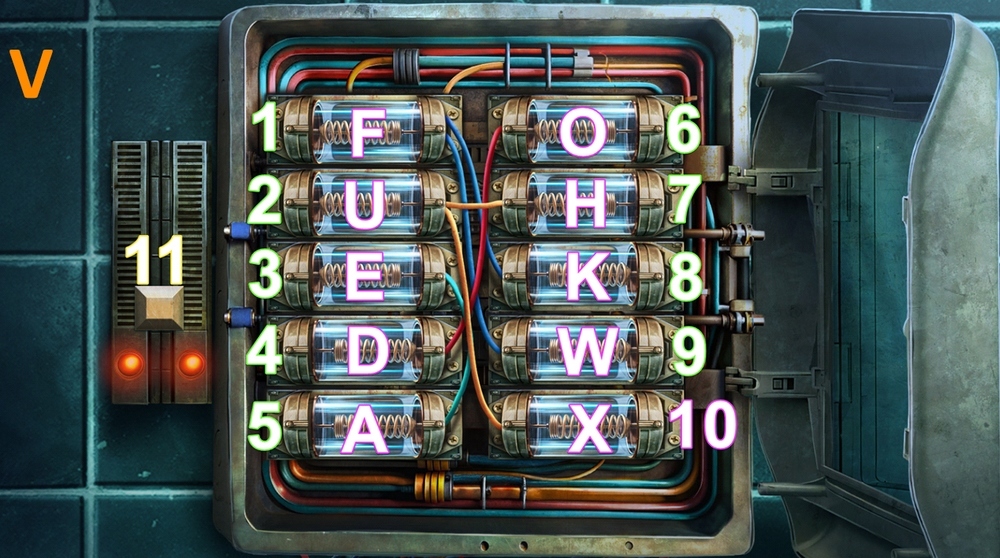
- Hard solution: Place the fuses in the following order: F-1, E-1, D-3, O-3, H-5, F-10, W-10, click 11 (V).

- Click on the anatomical model (W).
- Use BATTERIES on the soap dispenser, earn SOAPED TOOTHBRUSH, take MODEL PARTS 1/3 (X-Y).

- Use SOAPED TOOTHBRUSH on the bag, take and read the note, take VACUUM CLEANER (Z).
- Use VACUUM CLEANER on the shards, take MODEL PARTS 2/3 and CLOTHESPIN (A).
- Go back.
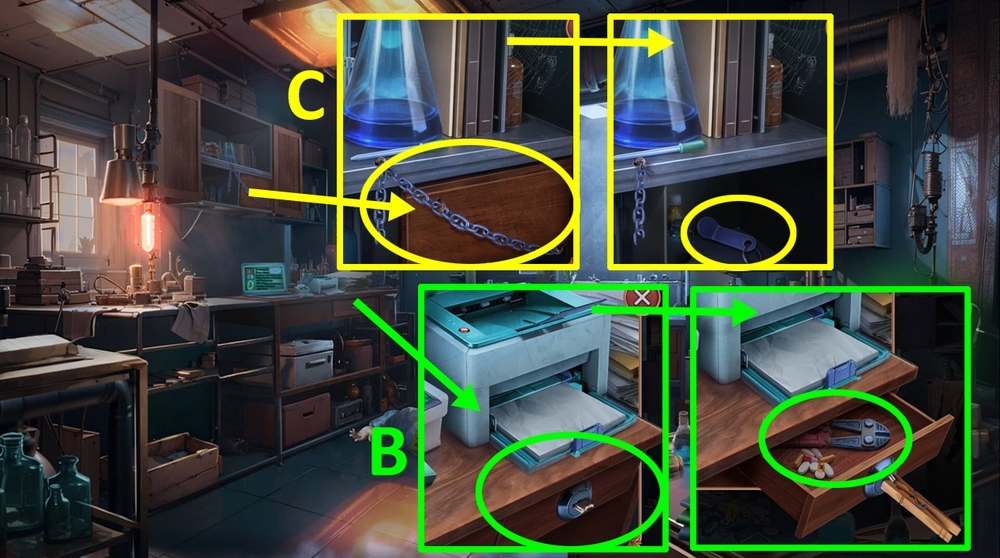
- Use CLOTHESPIN on the broken key in the keyhole of the drawer, take BOLT CUTTER (B).
- Use BOLT CUTTER on the chain, take MAGNETIC KEY (C).
- Go forward.
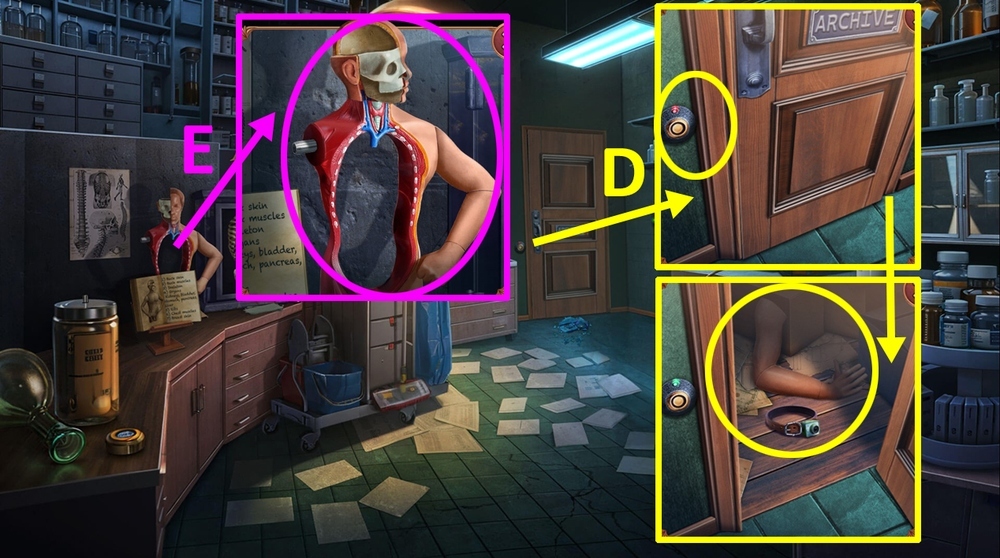
- Use MAGNETIC KEY on the magnetic lock, take COLLAR CAMERA and MODEL PARTS 3/3 (D).
- Use MODEL PARTS on the anatomical model (E).
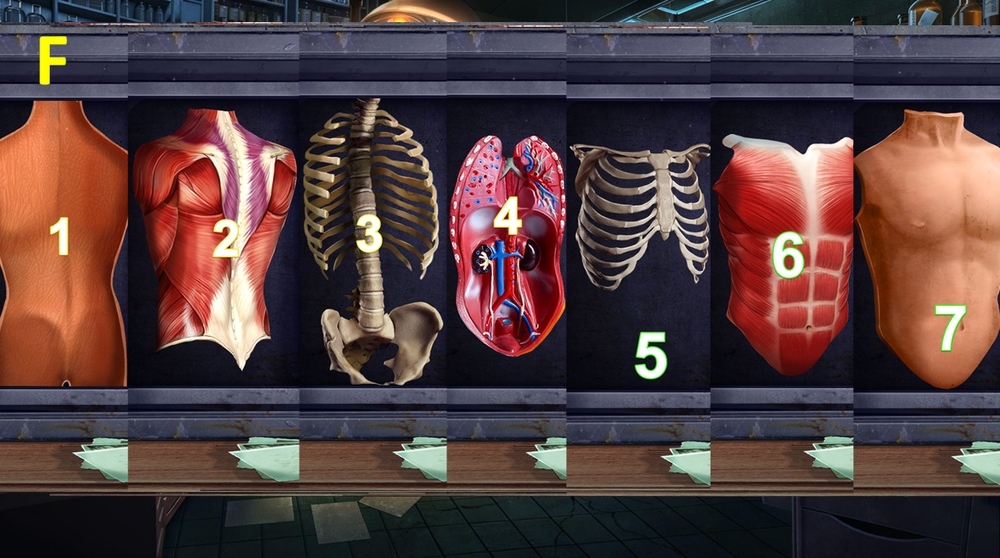
- Easy solution: Click in the right order 1-2-3-4-5-6-7 (F).
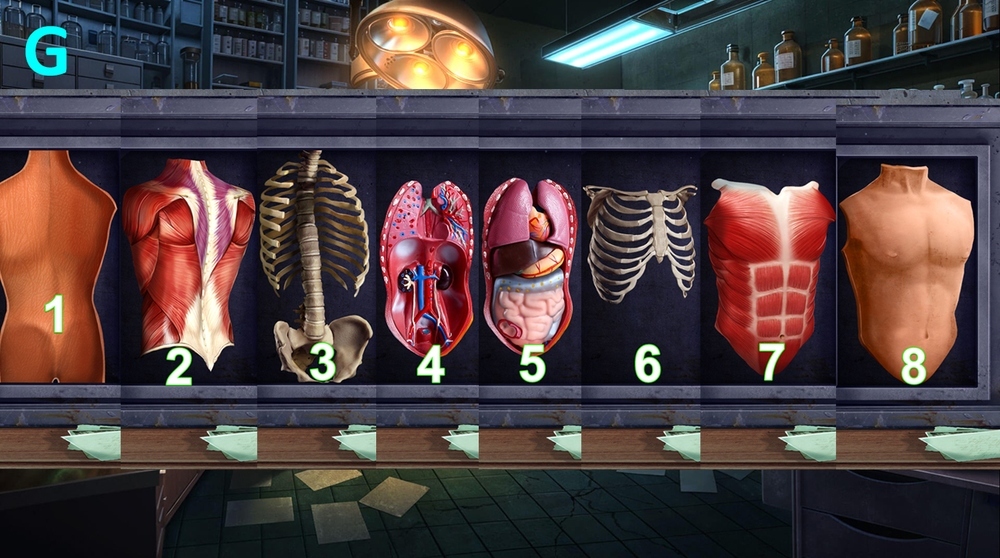
- Hard solution: Click in the right order 1-2-3-4-5-6-7-8 (G).
- Take KNOB (H).
- Use KNOB on the machine, take PIN (I).
- Go back.
- Use PIN on the bottom of the safe, take SCIENTIST’S WALLET (J).
- Play puzzle, earn CREDIT CARD (K).
- Go forward.
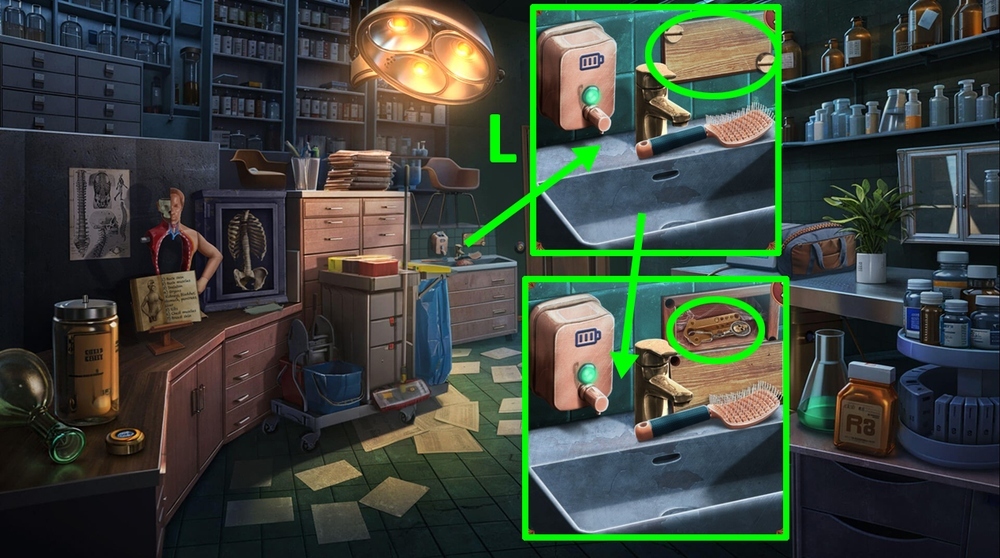
- Use CREDIT CARD on screws, earn CREDIT CARD, take WALLET KEY (L).
- Use WALLET KEY on SCIENTIST’S WALLET, take BARCODE, take and read the pharmacy’s business card.
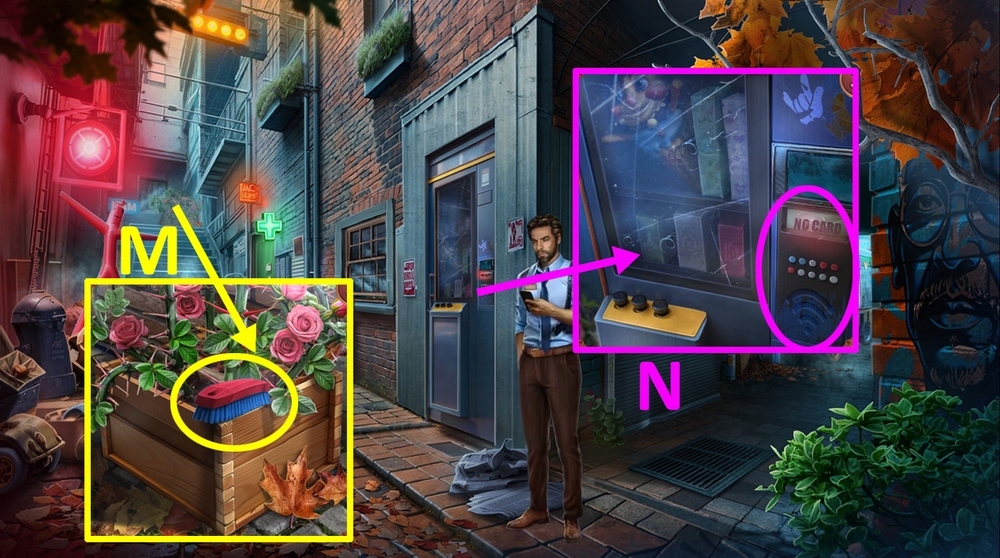
- Take BRUSH (M).
- Use CREDIT CARD on the vending machine terminal (N).

- Solution: Select the correct item: stage 1 – click 1 (O).
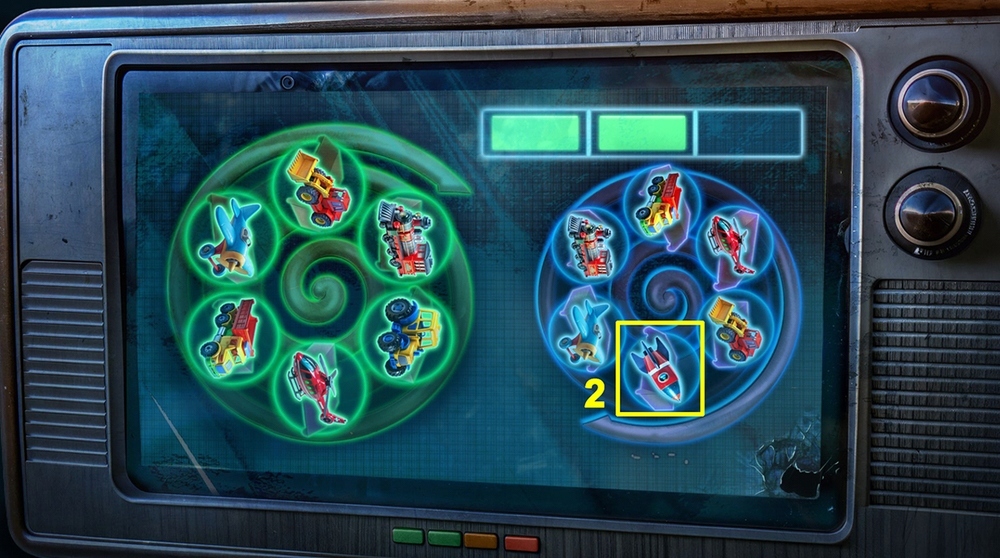
- Stage 2 – click 2.

- Stage 3 – click 3.
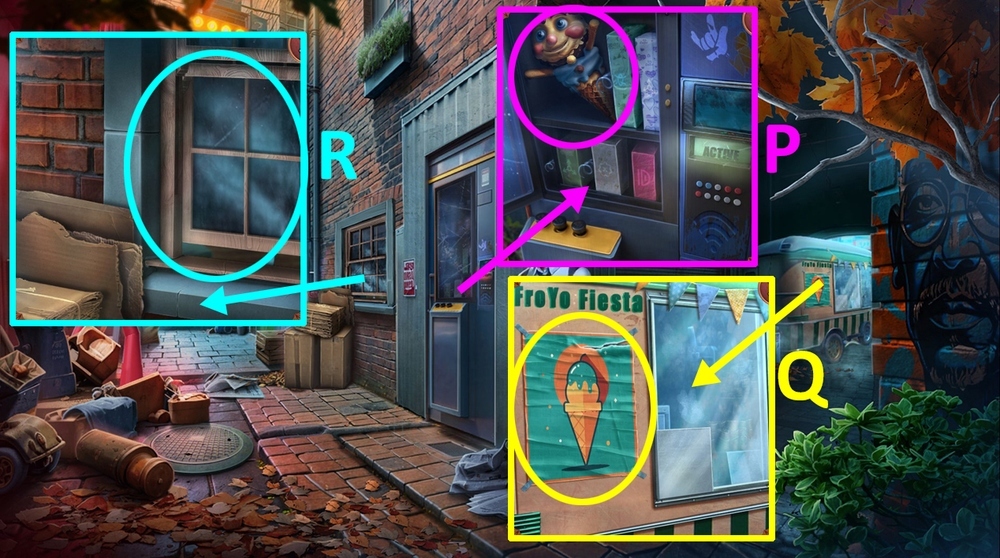
- Earn CREDIT CARD, take MASCOT (P).
- Click on the poster to remove it (Q).
- Use MASCOT on the window (R).
- Go forward.
- Select this option (S).
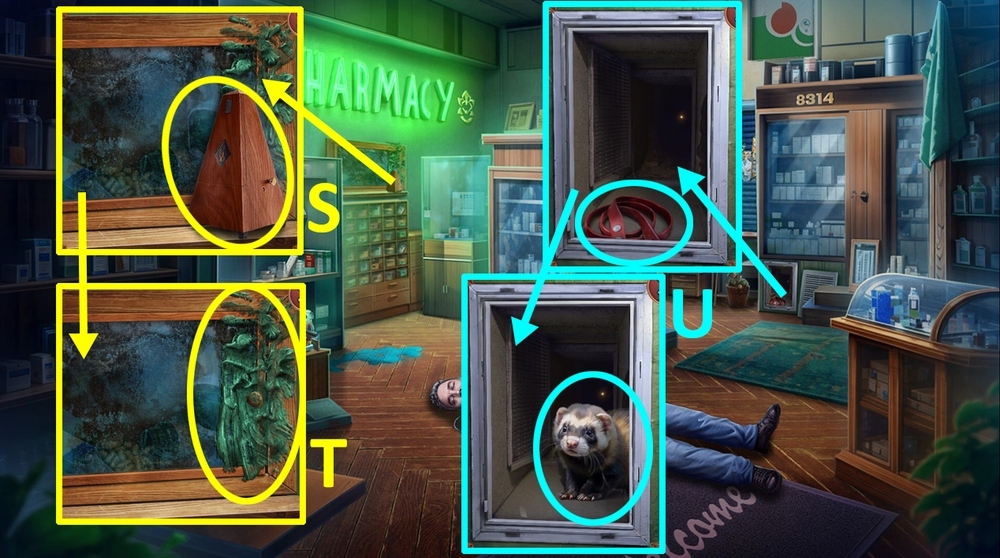
- Take METRONOME, use BRUSH on the dried paint (S-T).
- Take LONG TOURNIQUET, use COLLAR CAMERA on the ferret (U).
- Use LONG TOURNIQUET on the broken chain, take RUBBER NOZZLE (V).
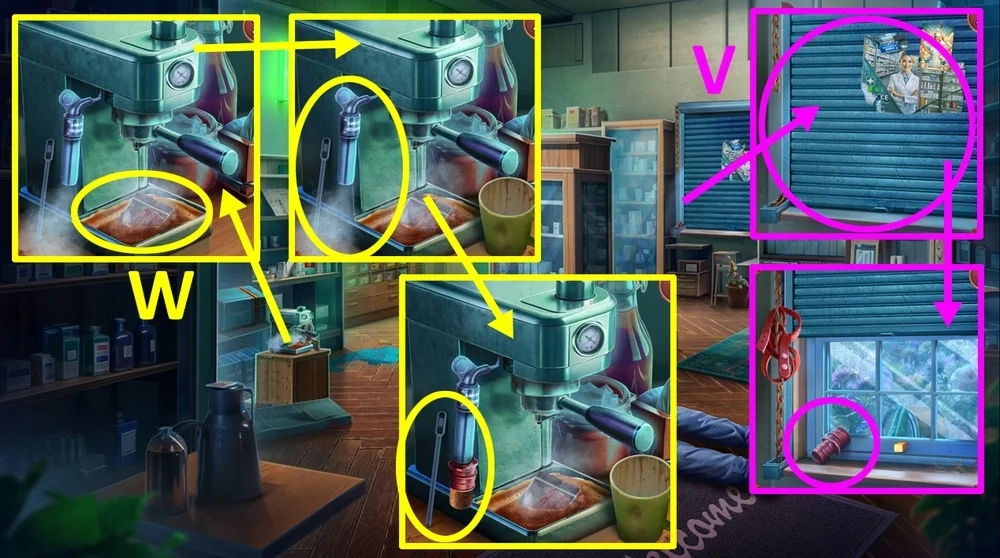
- Use MUG WITH FINGERPRINT, CORK, and RUBBER NOZZLE on the coffee machine, take COFFEE STICK (W).
- Go back.
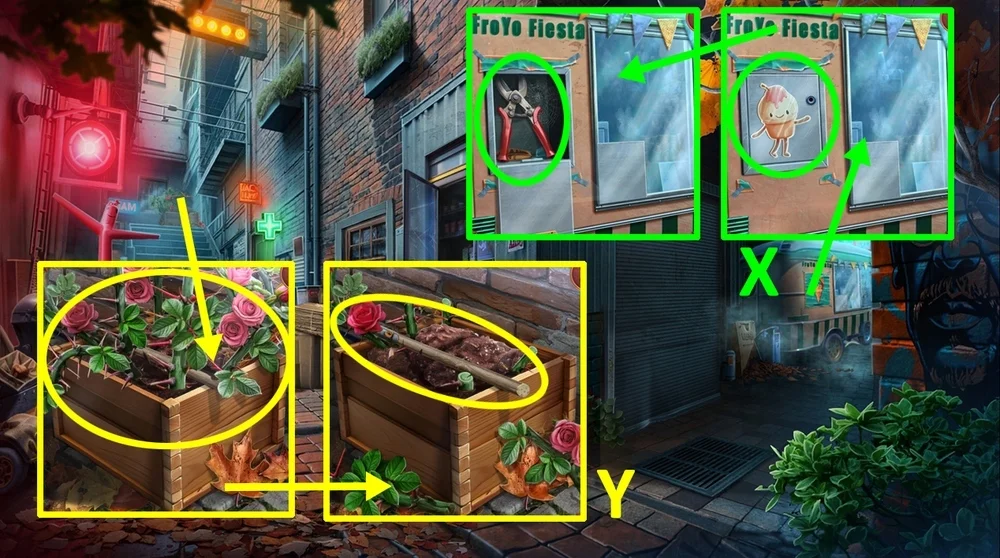
- Use COFFEE STICK on the panel with the ice cream picture, take PRUNER (X).
- Use PRUNER on the roses, take SHOVEL HANDLE (Y).
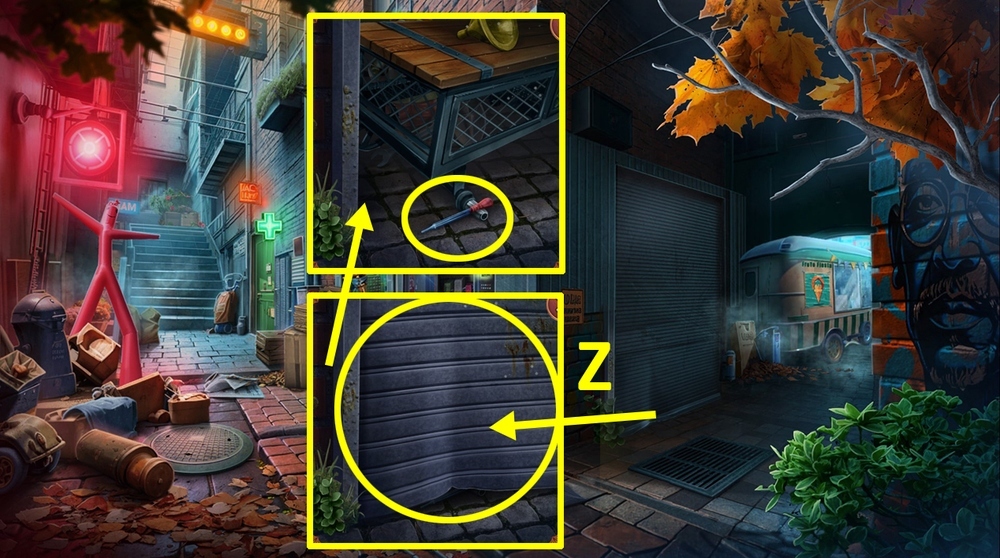
- Use SHOVEL HANDLE on METRONOME, earn DIY JACK.
- Use DIY JACK on the garage door, take PIPETTE (Z).
- Go forward.
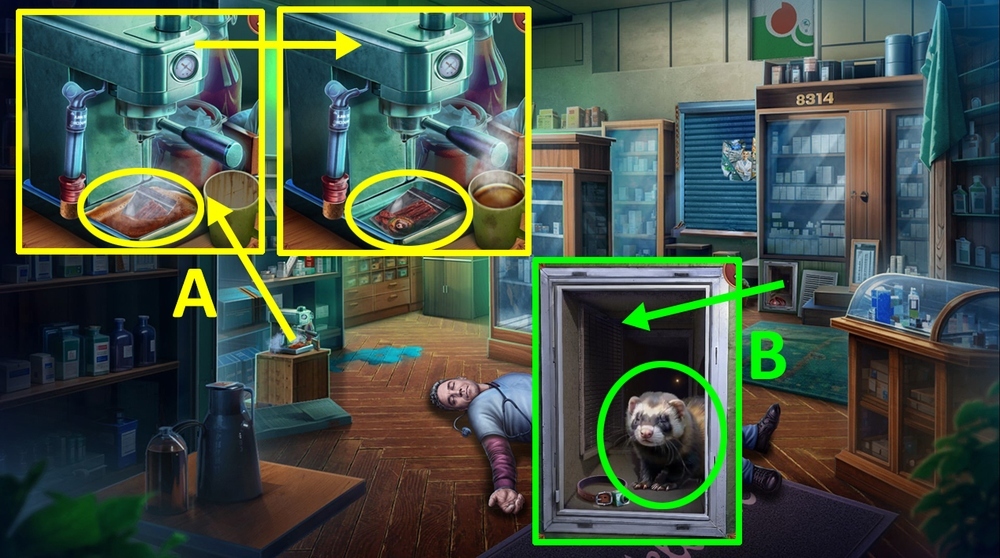
- Use PIPETTE on the coffee machine, take CURED MEAT (A).
- Use CURED MEAT on the ferret (B).
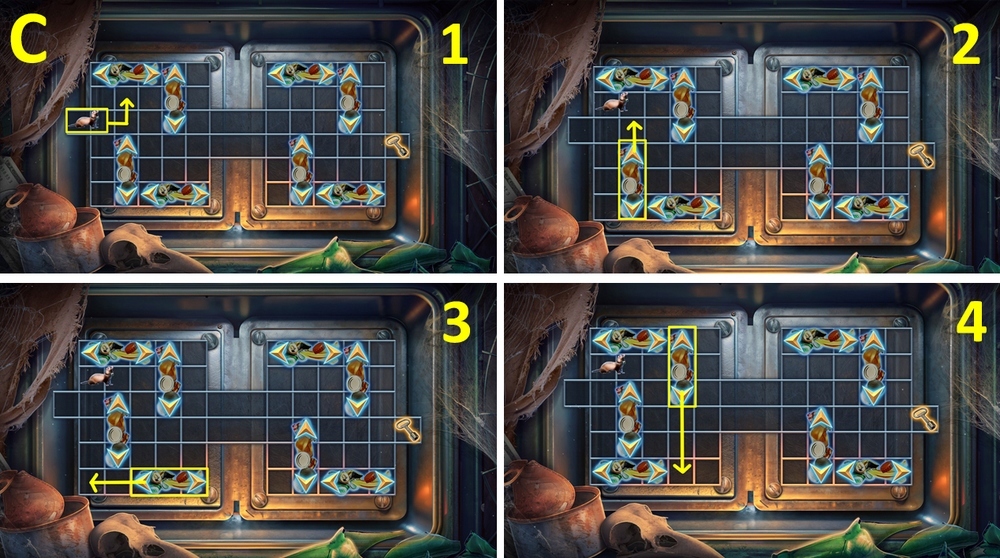
- Easy solution: Move the ferret and obstacles as shown in the clues from step 1 to step 13 (C).
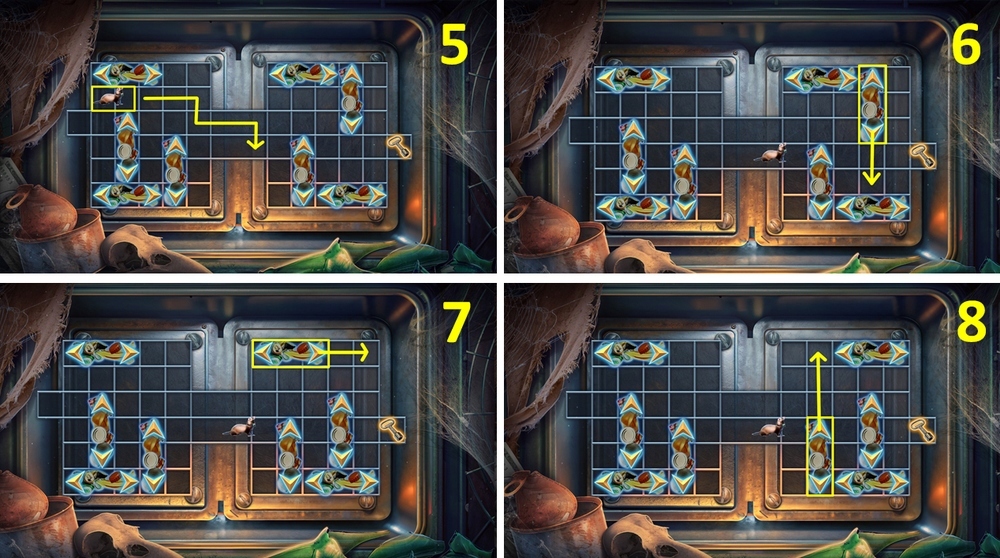
- Easy solution: 5-8.
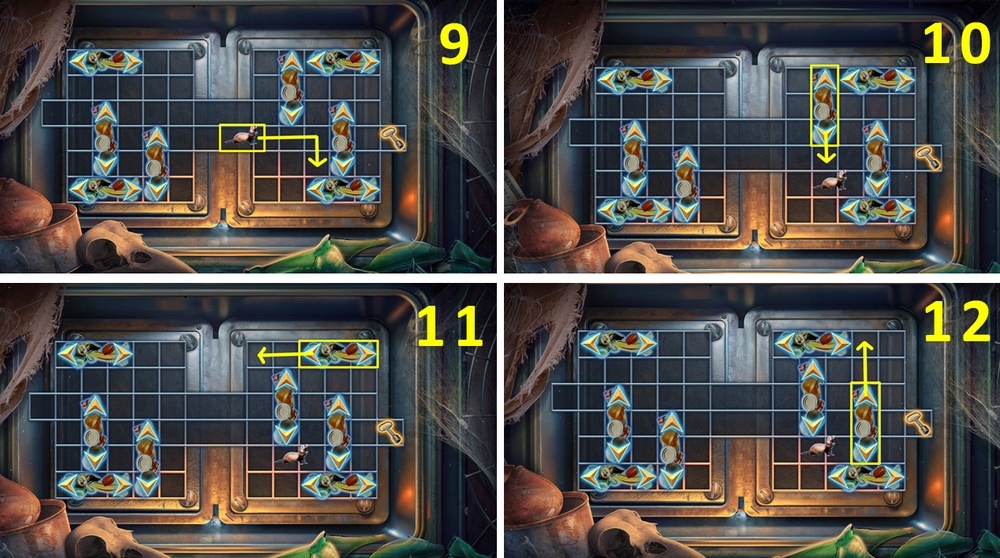
- Easy solution: 9-12.

- Easy solution: 13.
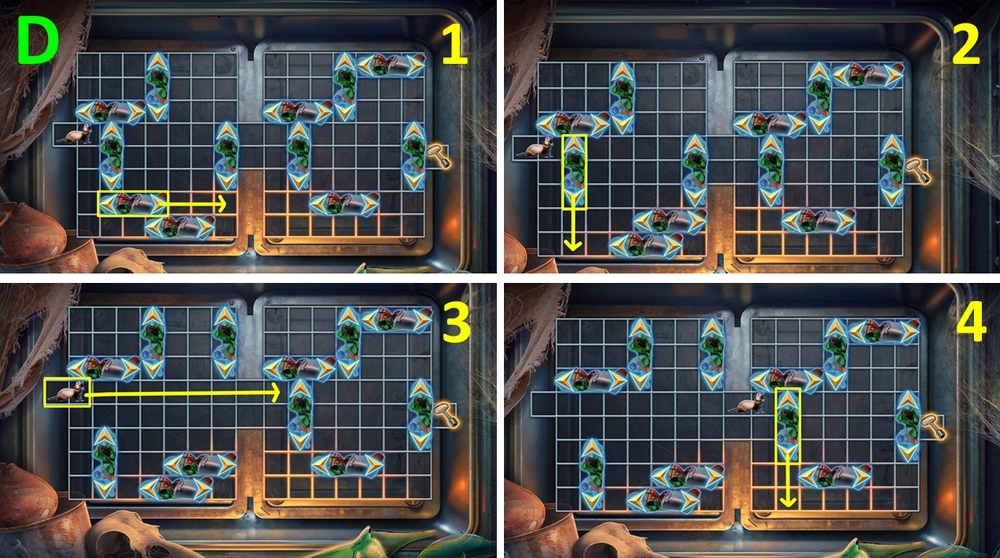
- Hard solution: Move the ferret and obstacles as shown in the clues from step 1 to step 6 (D).
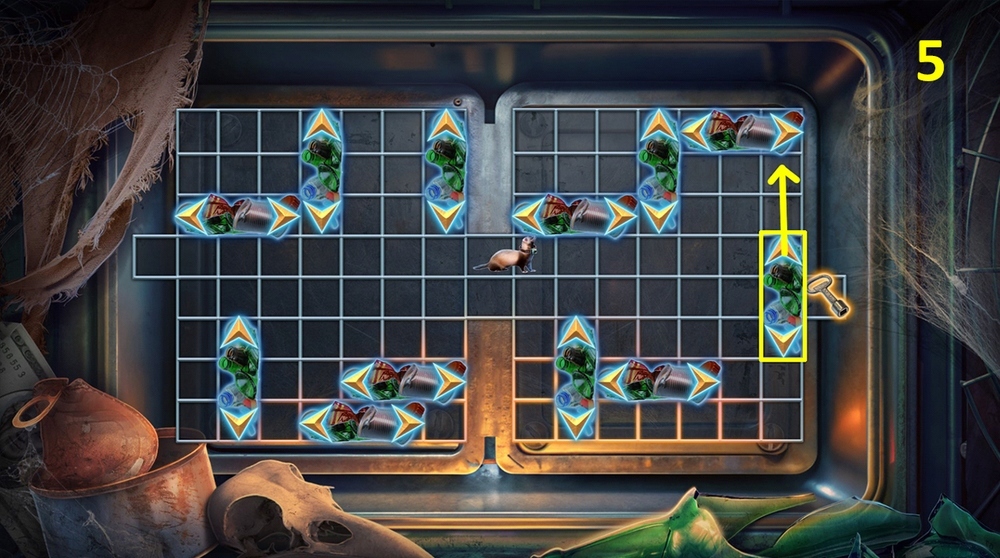
- Hard solution: 5.
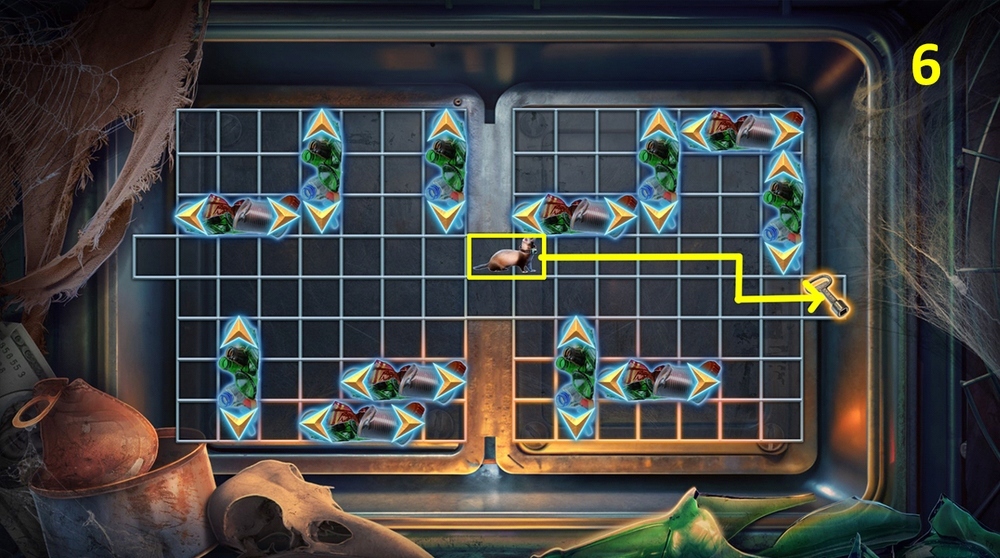
- Hard solution: 6.
- Earn KEY.

- Use KEY on the pin in the window frame, take RAZORLESS BOX CUTTER and PAINT CAN (E).
- Go back.

- Use PAINT CAN on the cart, take WRENCH and GARDEN GNOME (F).
- Use GARDEN GNOME on the dirt, take ALCOHOL (G).
- Go forward.
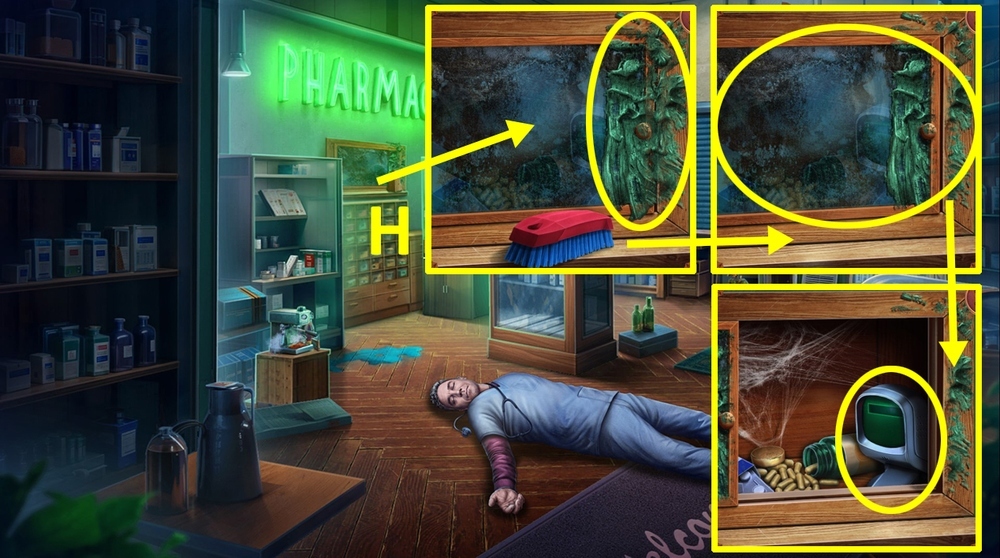
- Use ALCOHOL on the dried paint, click on the door to open it, use BARCODE on the scanner (H).
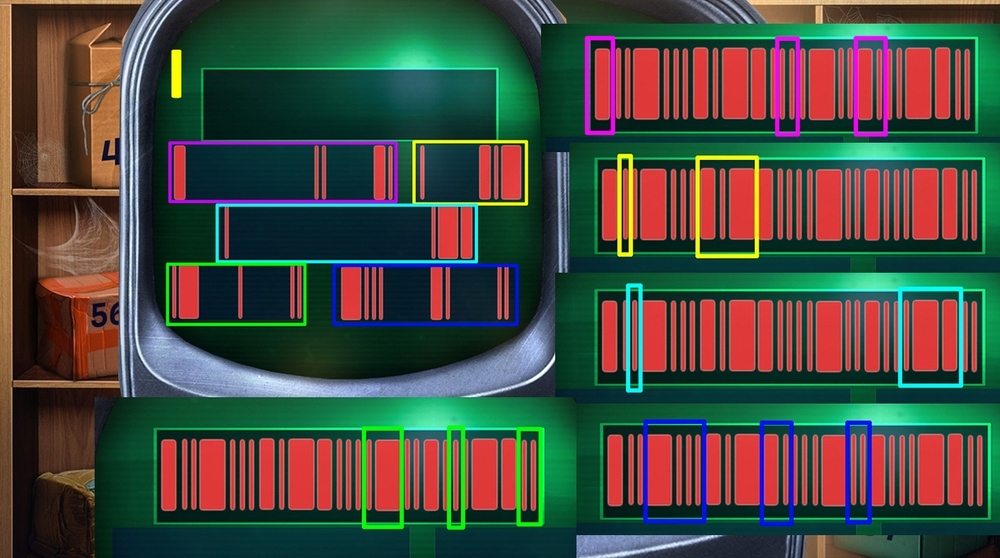
- Solution: Arrange the parts of the barcode as shown in the clues (I).
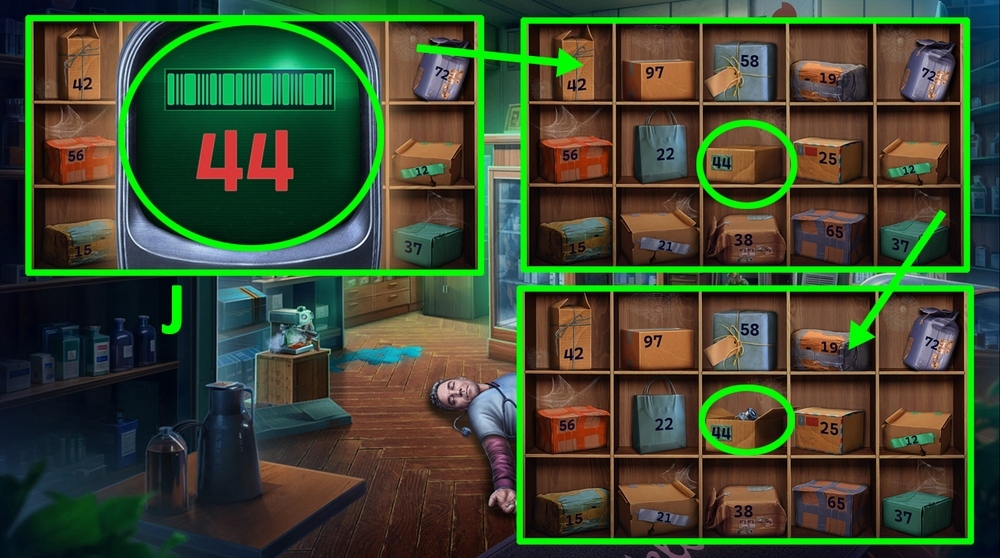
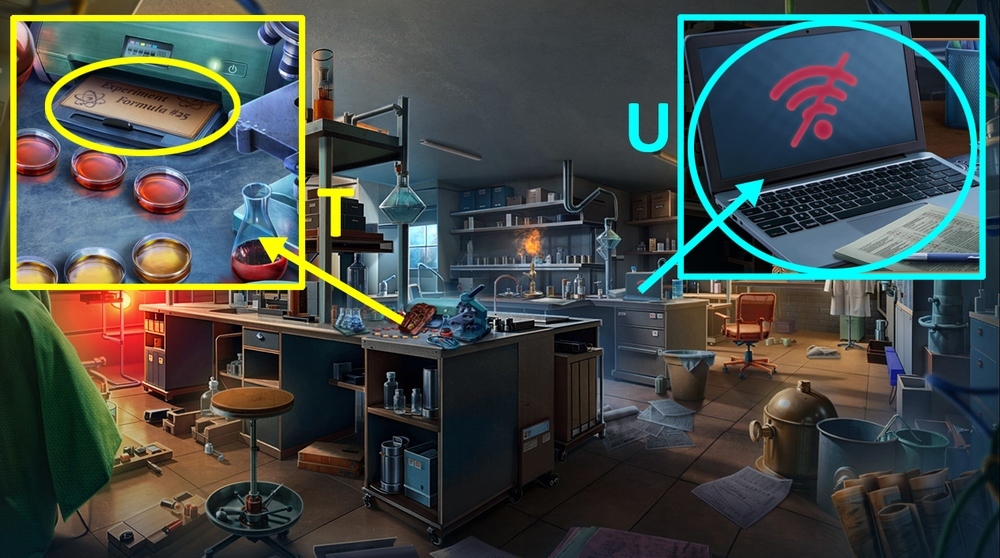
- Click on the screen, click on box #44, take EXPERIMENTAL FORMULA (J).
- Use CREDIT CARD on the CD drive, take LOCK CYLINDERS 1/2 (K).
- Take LOCK CYLINDERS 2/2 and BAG (L).
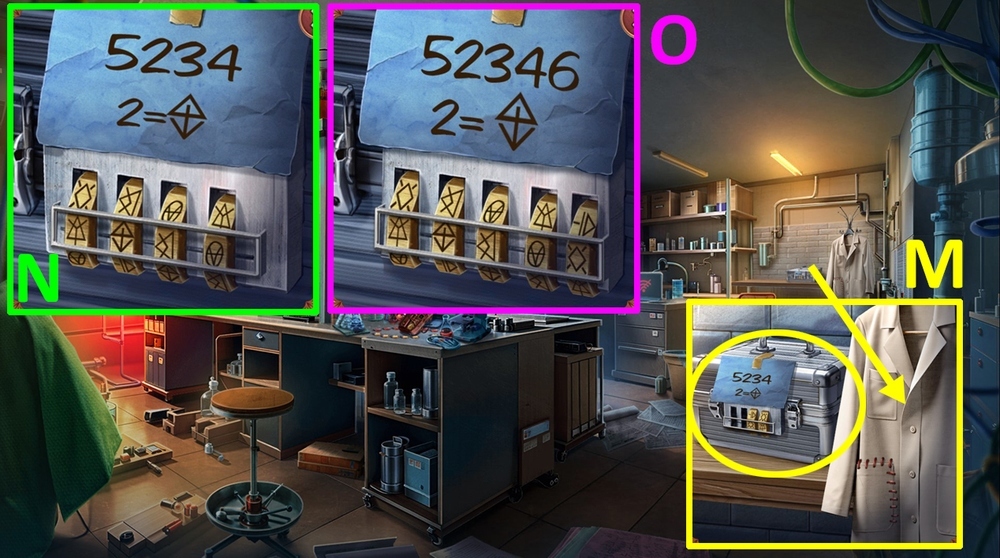
- Use LOCK CYLINDERS on the lock (M).
- Easy solution: Select characters using the clue (N).
- Hard solution: Select characters using the clue (O).
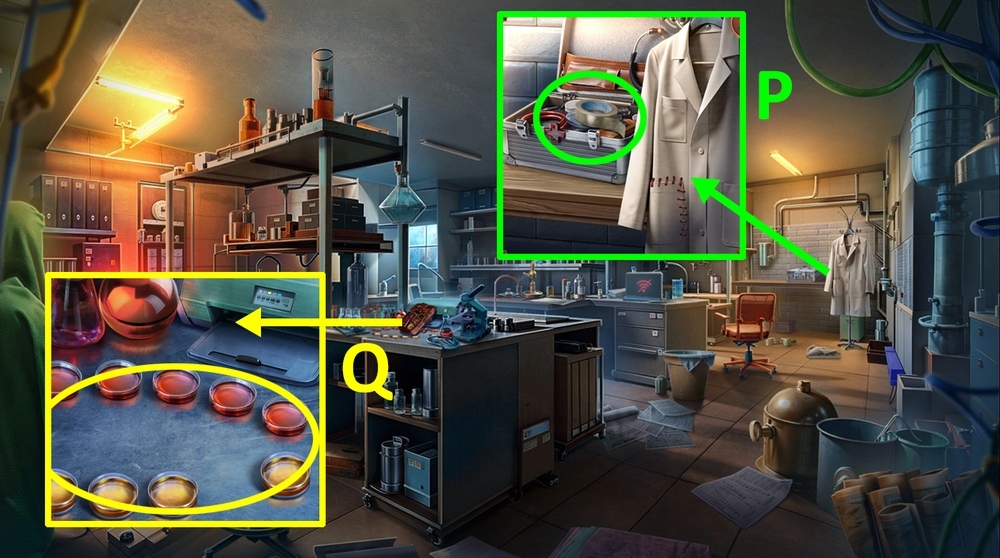
- Take DUCT TAPE and PETRI DISH (P).
- Use PETRI DISH and EXPERIMENTAL FORMULA on the table (Q).
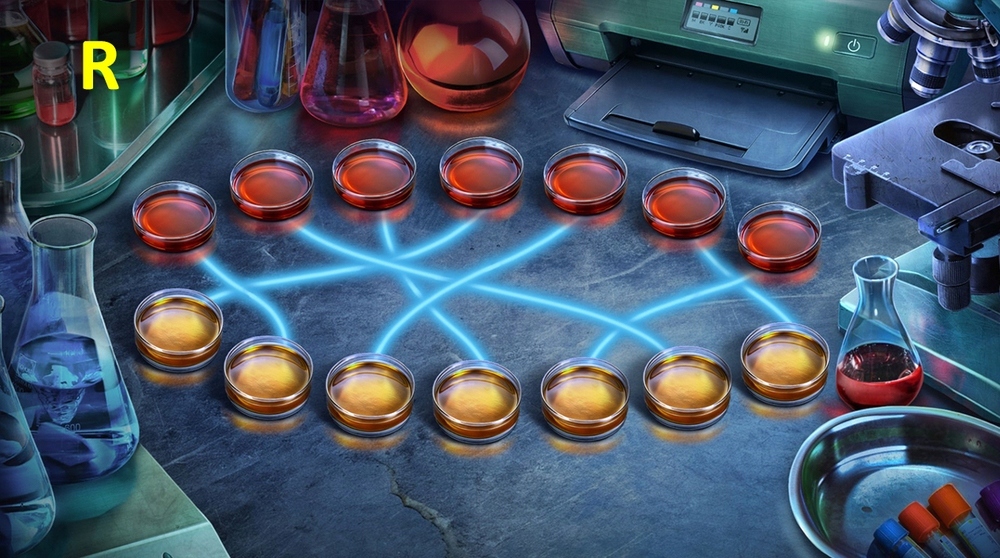
- Easy solution: Connect the Petri dishes in pairs using the clue (R).
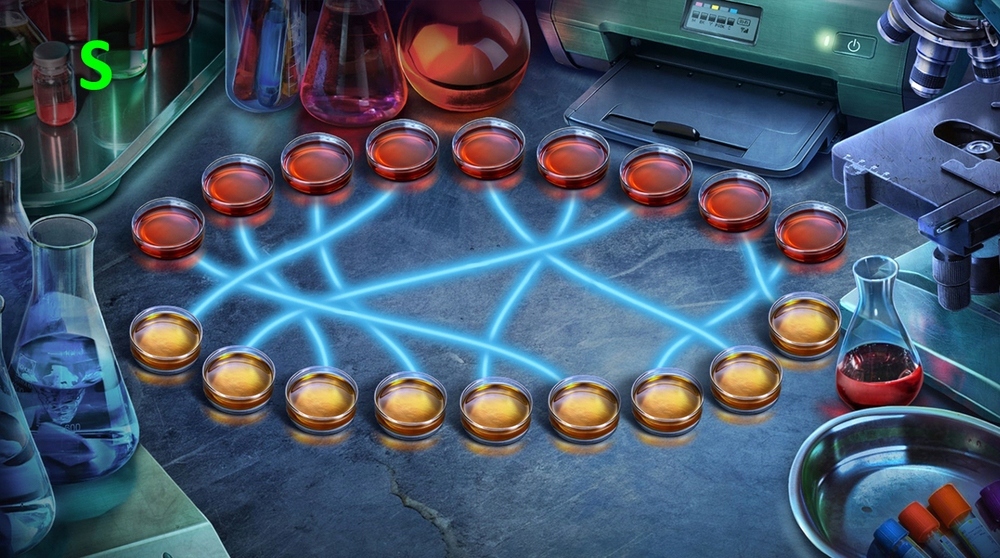
- Hard solution: Connect the Petri dishes in pairs using the clue (S).
- Take DRUG TITLE and RAZOR (T).
- Use DRUG TITLE on the laptop (U).

- Use RAZOR on RAZORLESS BOX CUTTER, earn BOX CUTTER.
- Use BOX CUTTER on the stitches on the pocket, take BURNER LID (V).
- Use BURNER LID on the burner, take NUT and ROUTER (W).
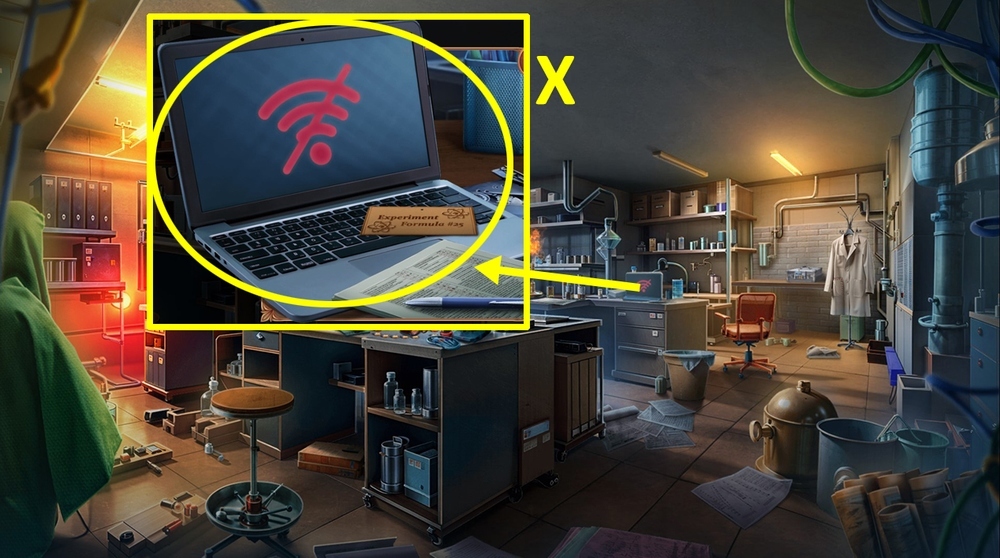
- Use ROUTER on the laptop (X).
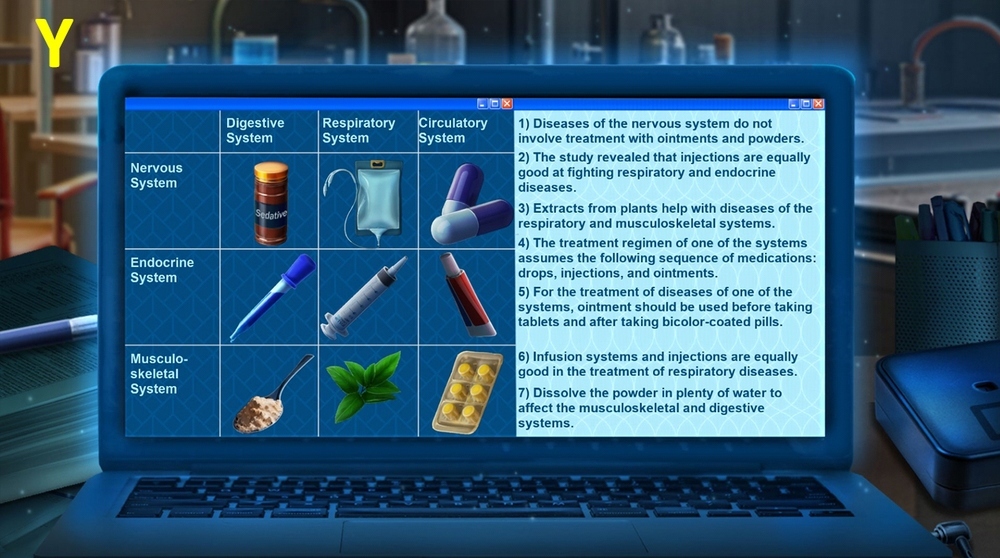
- Solution: Place the items in the cells of the table as shown in the clue (Y).
- Read the article and click on the screen (Z).
- Select this option (A).
- Go forward.
- Take INDUSTRIAL DRYER (B).
- Take MAGNET (C).
- Take a closer look at the lower right corner of the panel, use MAGNET on the stuck object, earn CUFFLINK (D).
- Go back.
- Take CAR KEYS (E).
- Use CAR KEYS on the keyhole (F).
- Play puzzle, earn FISHING ROD (G).
- Use FISHING ROD on the water, use WRENCH and NUT on the side of the fountain, click on the package to open it, take LOCK FOB and CLAY (H).
- Use CLAY on BAG, take HANDCUFFS and BADGE.
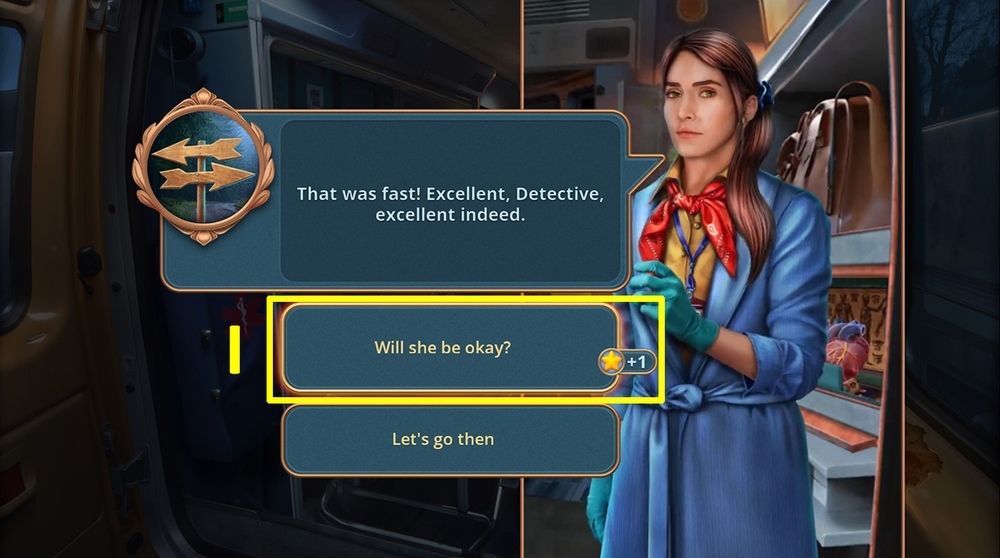
- Show BADGE to the nurse (I).
- Go to the Ambulance.
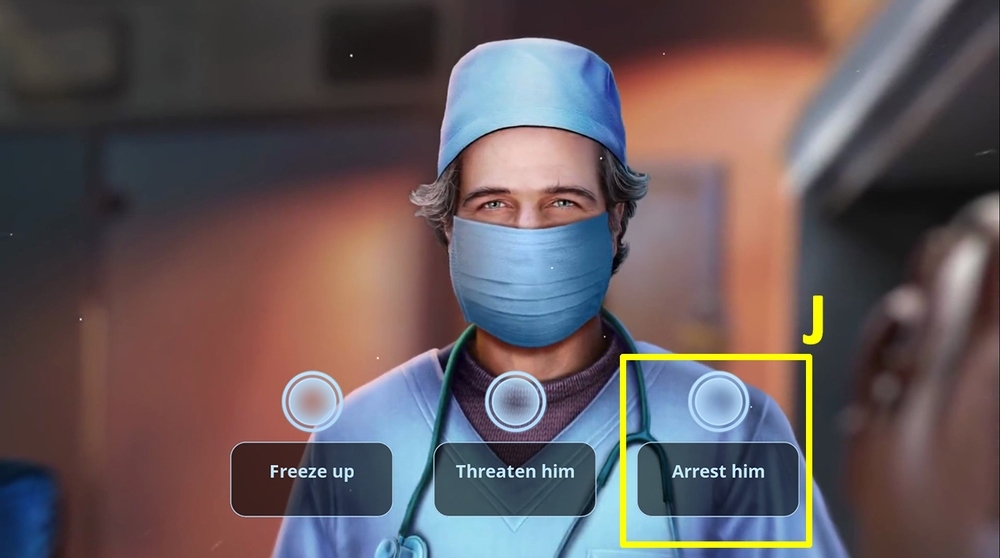
- Select this option (J).
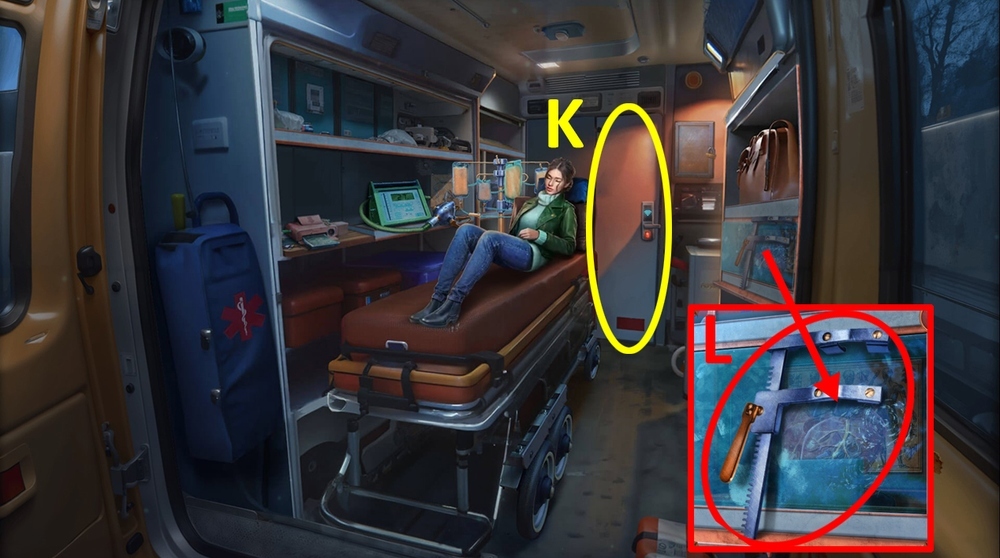
- Use LOCK FOB on the door, click on the “unlock” button (K).
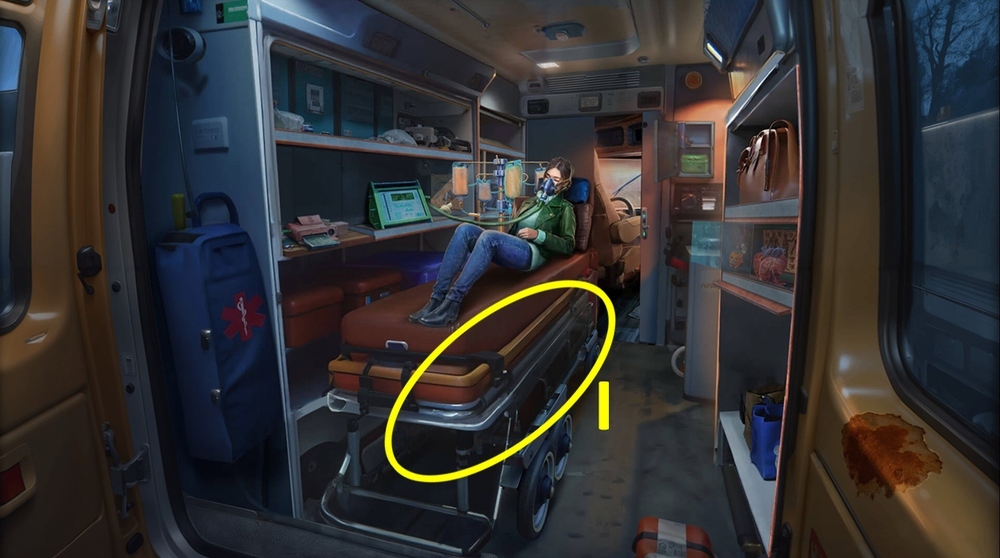
- Take RIB SPREADER (L).

- Use RIB SPREADER on the lock, use CUFFLINK on the safe, take BOWL and IV TUBE (M).
- Go to the Hospital Archive.
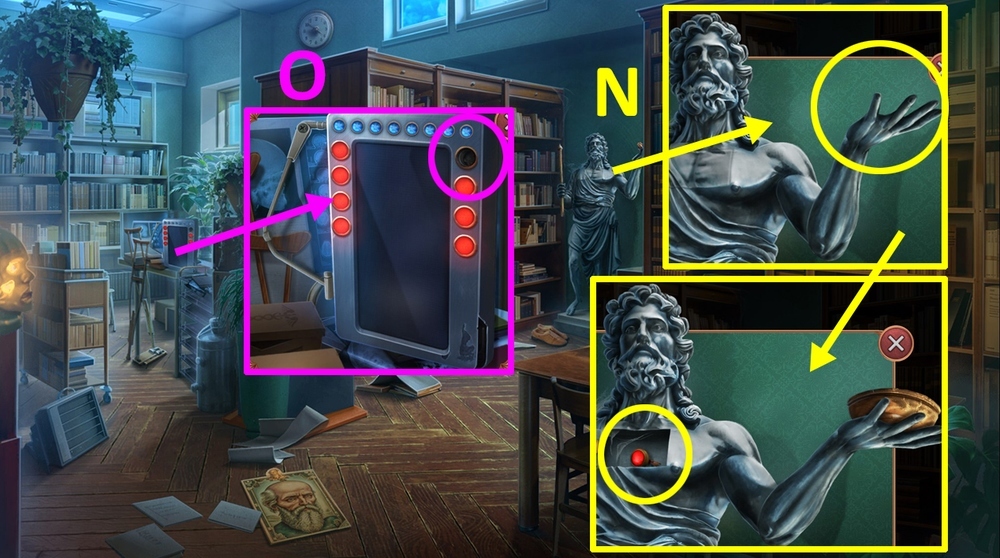
- Use BOWL on the statue’s hand, take INDICATOR LIGHT (N).
- Use INDICATOR LIGHT on the empty socket (O).
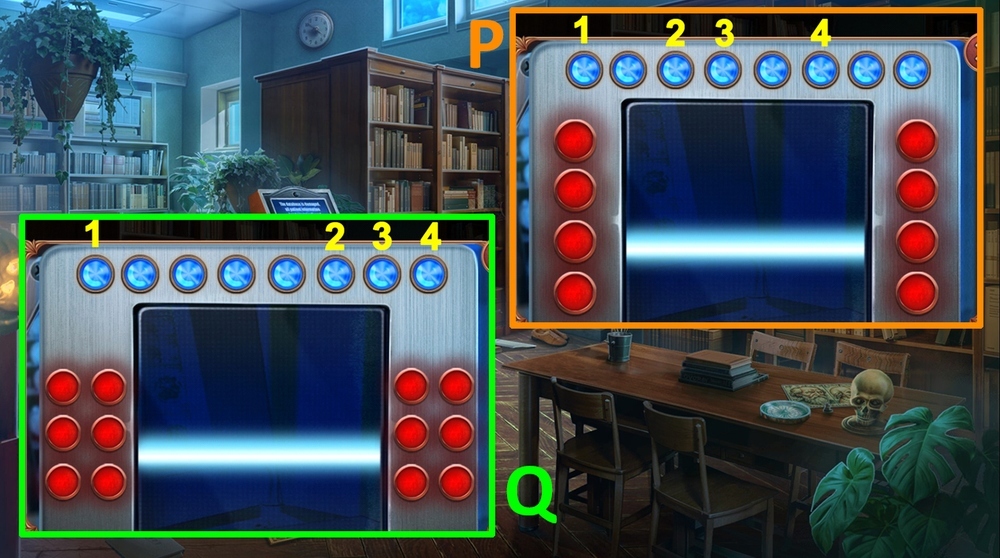
- Easy solution: Click 1-2-3-4 (P).
- Hard solution: Click 1-2-3-4 (Q).
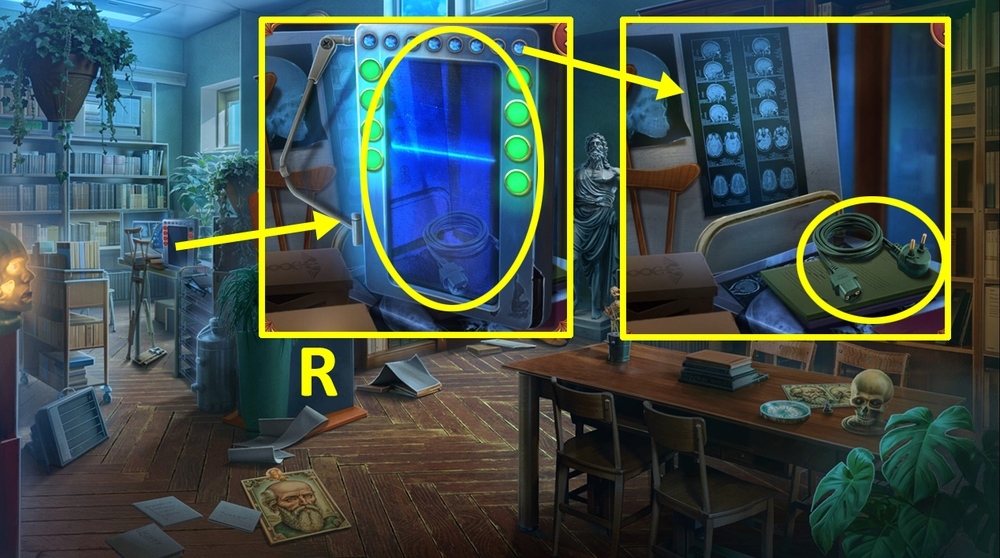
- Click on the screen, take UNIVERSAL WIRE (R).
- Go to the Ambulance.
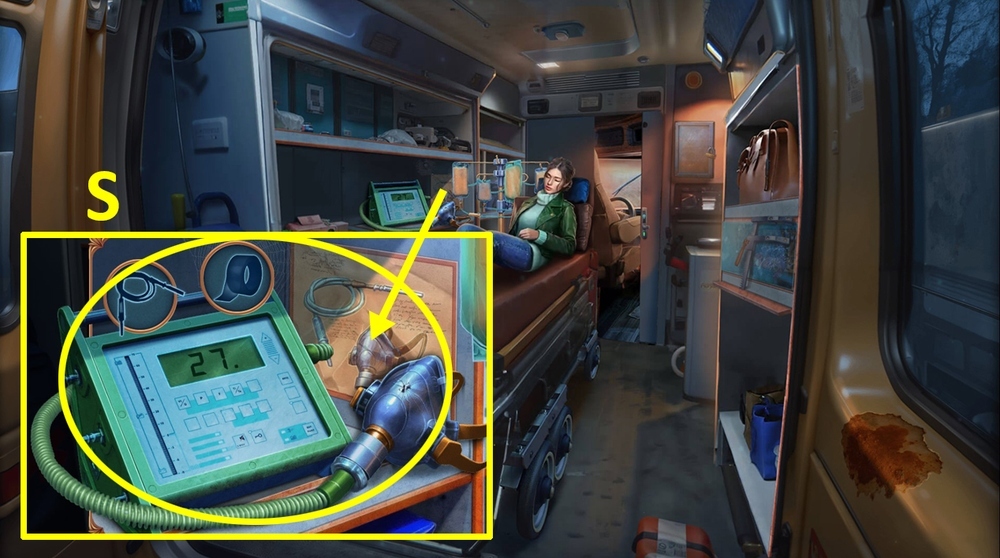
- Use DUCT TAPE and IV TUBE on the machine (S).
- Solution: Click 1-2-3 (T).
- Talk to Sandra, earn FLASHLIGHT.
- Go back.
- Use FLASHLIGHT on the evacuation plan, take PIPE PART (U).
- Use PIPE PART on the side of the fountain (V).
- Easy solution: Solution is random (W).
- Hard solution: Solution is random (X).
- Take SUCTION CUP (Y).
- Go to the Ambulance.
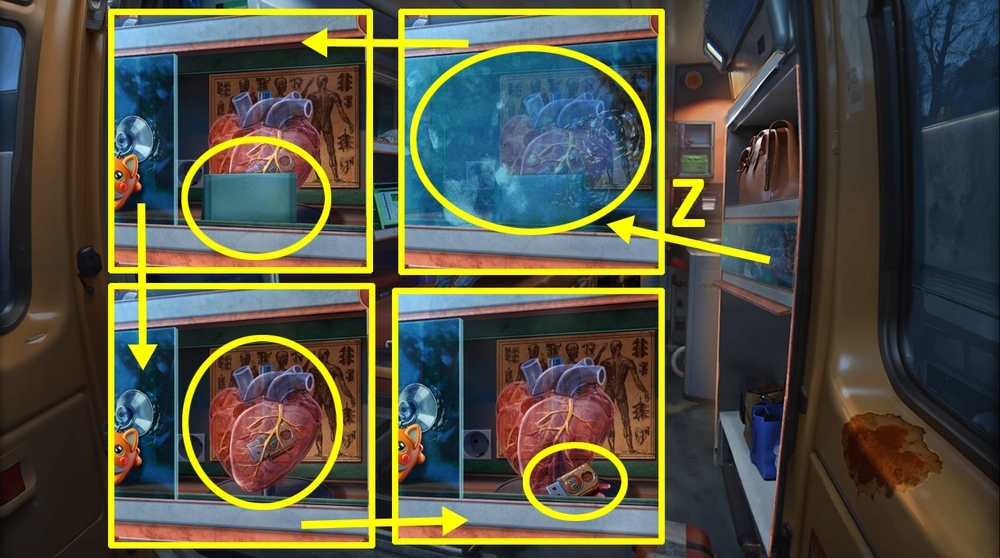
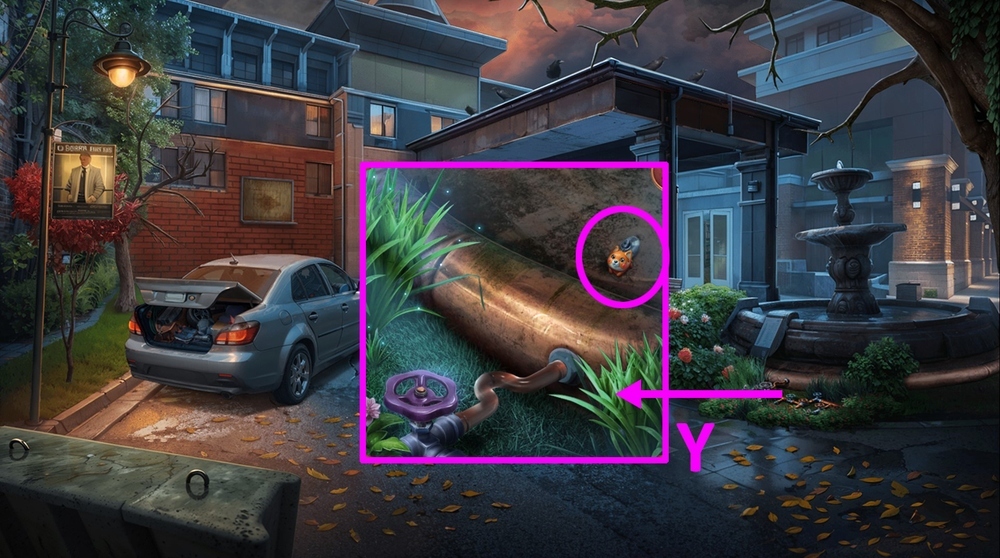
- Use SUCTION CUP on the glass, take and read the note, take TOKEN, use INDUSTRIAL DRYER and UNIVERSAL WIRE on the heart model, take FLASH DRIVE (Z).
- Go to the Hospital Archive.
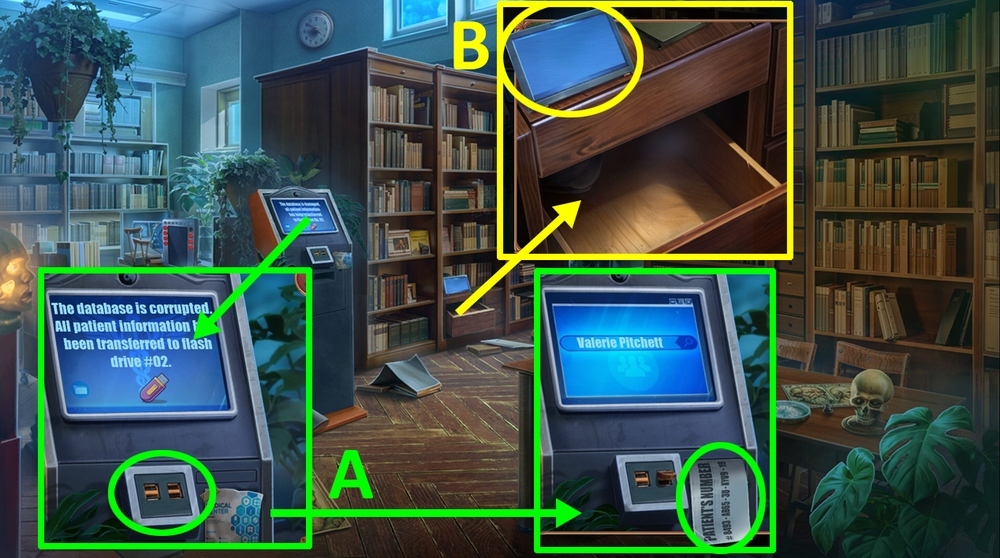
- Use FLASH DRIVE on the USB port, take PATIENT’S CHART NUMBER (A).
- Use PATIENT’S CHART NUMBER on the tablet (B).
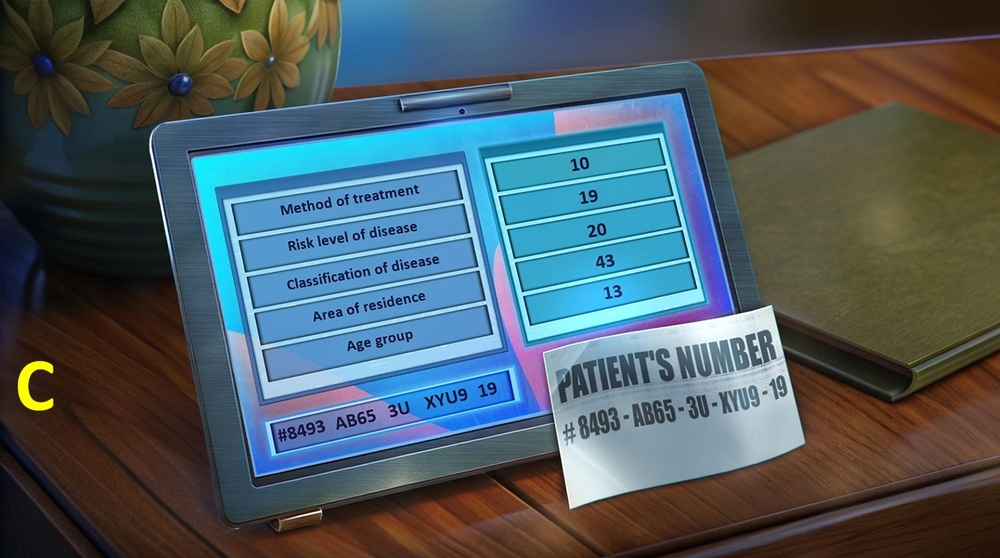
- Easy solution: Find the correct combination of characters and numbers from each category using the clue (C).
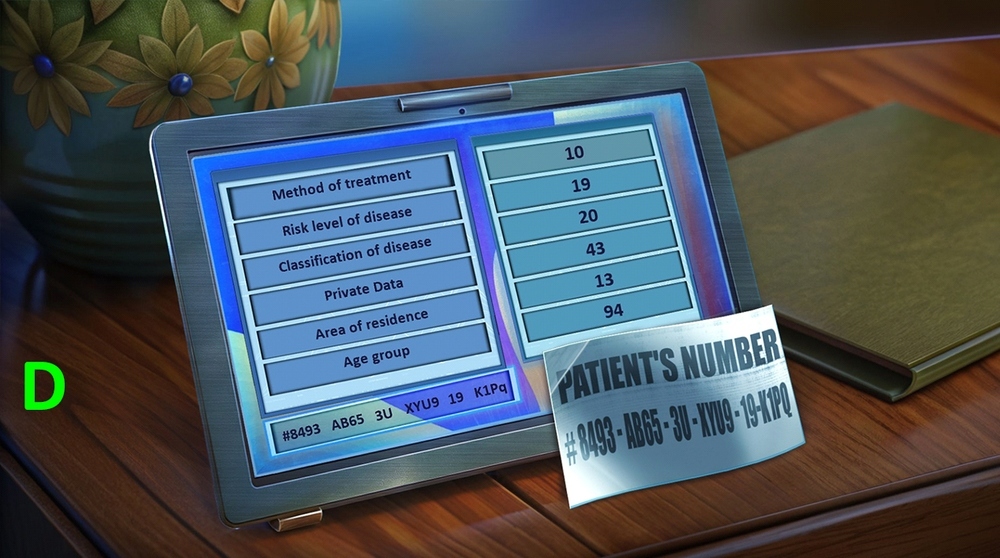
- Hard solution: Find the correct combination of characters and numbers from each category using the clue (D).

- Click on the folder in the drawer on the right, read notes (E).
- Go back.

- Use TOKEN on the coin acceptor, take GURNEY STRAPS (F-G).
- Play puzzle, earn SAFETY BELTS (H).
- Go to the Ambulance.
- Use GURNEY STRAPS and SAFETY BELTS on the gurney (I).
- Earn NAVIGATOR.
- Select this option (I).
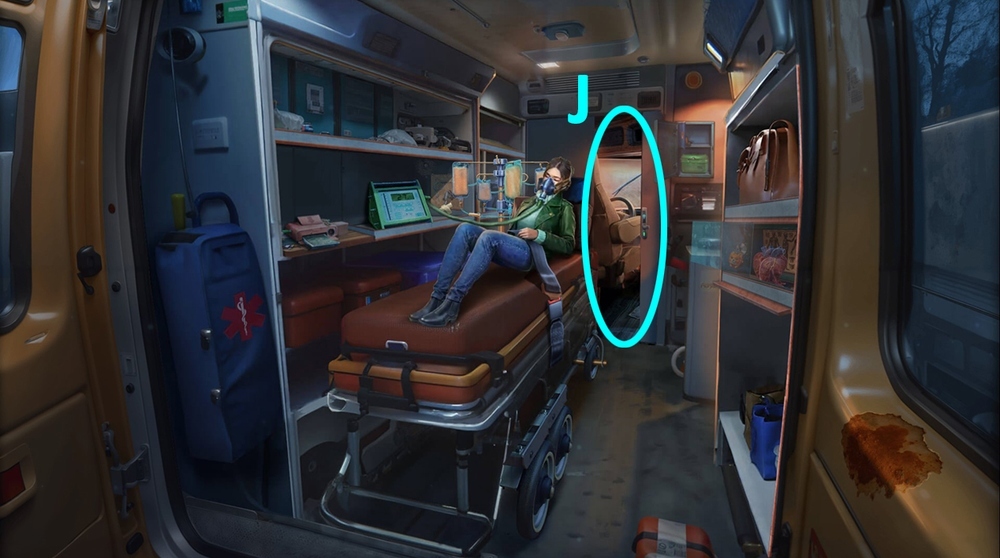
- Use NAVIGATOR on the driver’s seat (J).
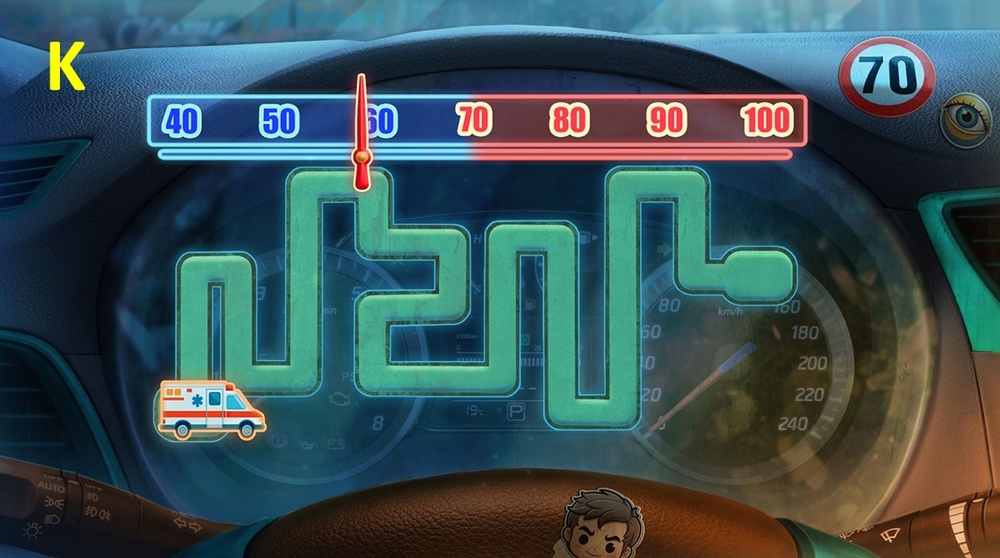
- Easy solution: Solution is random (K).
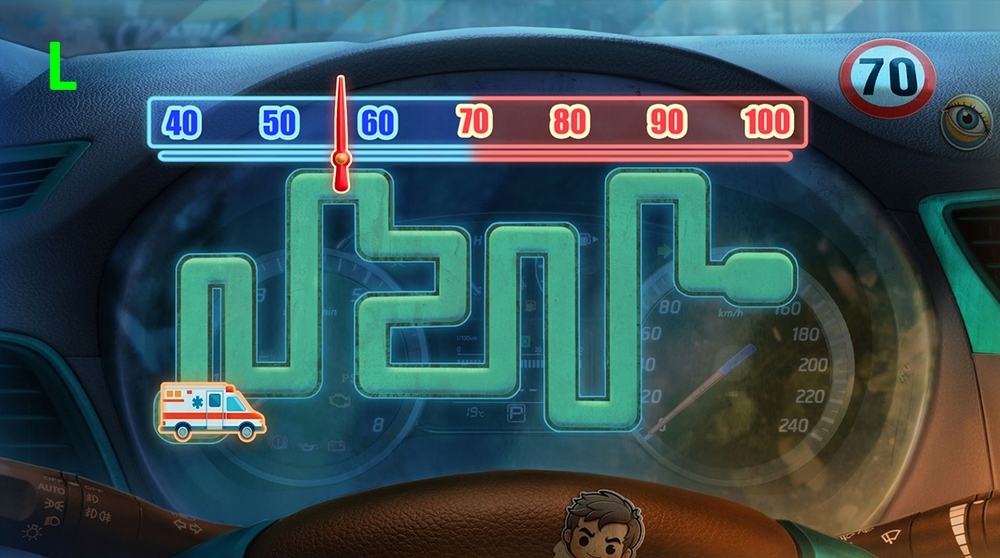
- Hard solution: Solution is random (L).
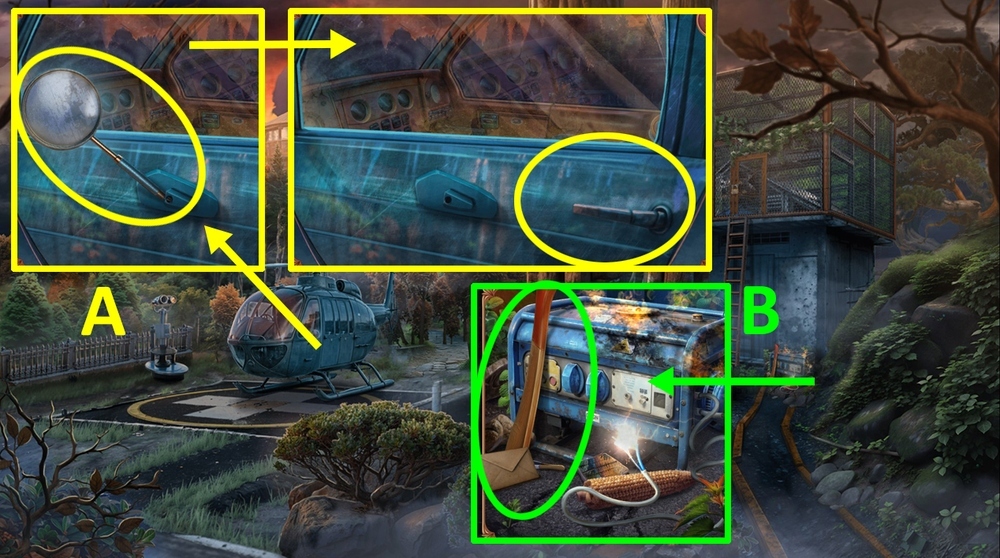
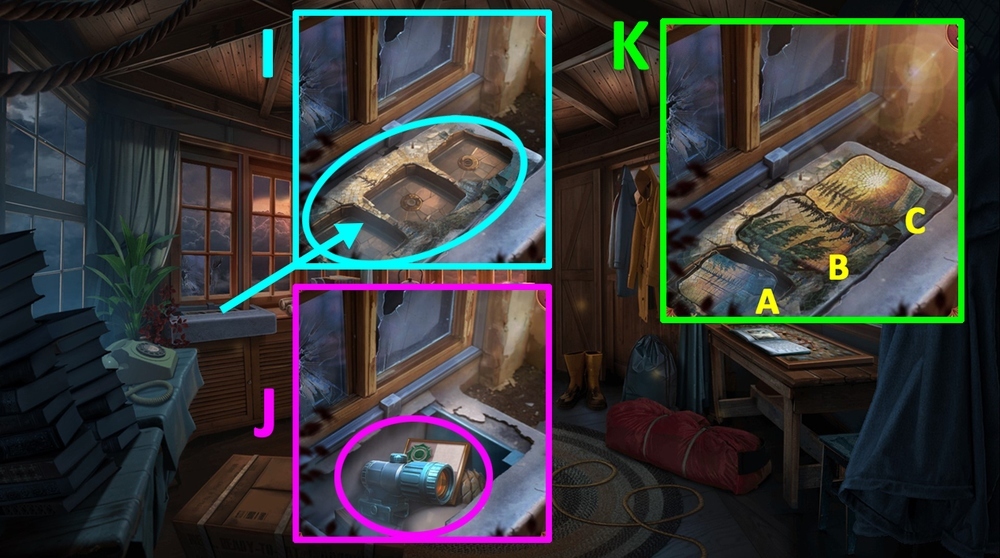
- Take SIDE-VIEW MIRROR, click on the door to open it (A).
- Take and read the note, take SHAFT and TWEEZERS (B).
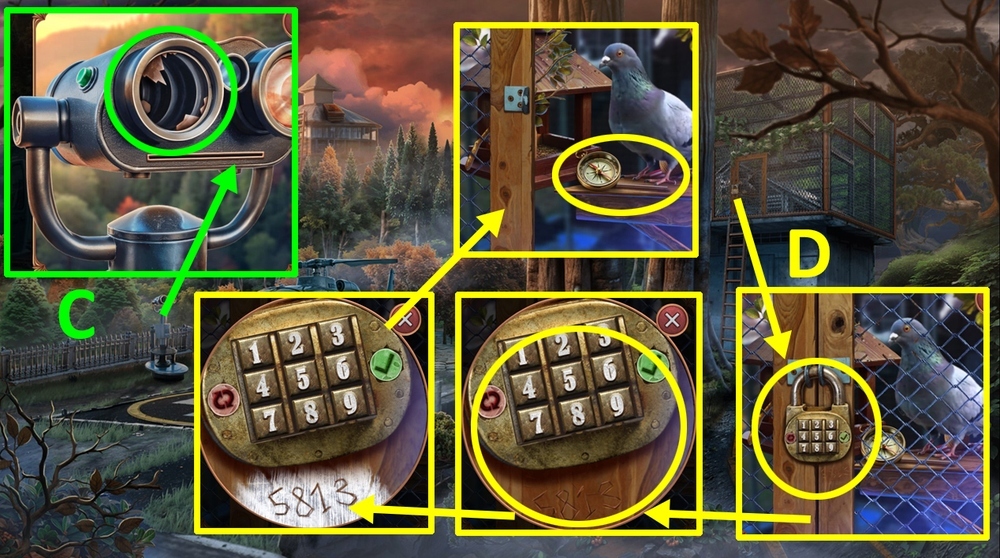
- Use TWEEZERS on the broken lens of the tower viewer, take CHALK (C).
- Take a closer look at the keypad, use CHALK on the scratches under the keypad, enter 5813 and press on the check mark button, take COMPASS and THIN METAL BAR (D).

- Click on the window, use SIDE-VIEW MIRROR and THIN METAL BAR on the window (E).
- Easy solution: Click B, 2, 4, 4, 5, 1, 1, C (x6), 3, 4, 5, 6, 6, B (x4) (F).
- Hard solution: Click C (x5), 1, 2, 3, 4, B (x7) (G).
- Go forward.
- Take WEDGE and MAP MARKS 1/2 (H).
- Use WEDGE on SHAFT.
- Take and read the note, take MOSAIC PIECES 1/3 and HANDKERCHIEF (O).
- Use HANDKERCHIEF on shards, take SWITCH (P).
- Use SWITCH on the radio (Q).
- Solution: Arrange the pieces according to the clue (R).
- Solution: Arrange the pieces according to the clue (S).
- Select this option, earn FIRE EXTINGUISHER (R).
- Give COMPASS to Paul (S).
- Go back.

- Use FIRE EXTINGUISHER on the burning wire, take MOSAIC PIECES 2/3 and POPCORN (T-U).
- Give POPCORN to the pigeon, take TWINE and MAP MARKS 2/2 (V-W).
- Go forward.
- Use MAP MARKS on the lock, read and take WABANO’S NOTES (X).
- Use WABANO’S NOTES on the map (Y).
- Play puzzle, earn FIREFIGHTERS’ LOCATION (Z).
- Give FIREFIGHTERS’ LOCATION to Paul (A).
- Take and read the note, take PIN (B).
- Use PIN on the lock, take and read the notes, take MAGNET (C).
- Use MAGNET on TWINE, earn TWINE WITH MAGNET.
- Use TWINE WITH MAGNET on the water (D).
- Easy solution: Solution is random (E).
- Hard solution: Solution is random (F).
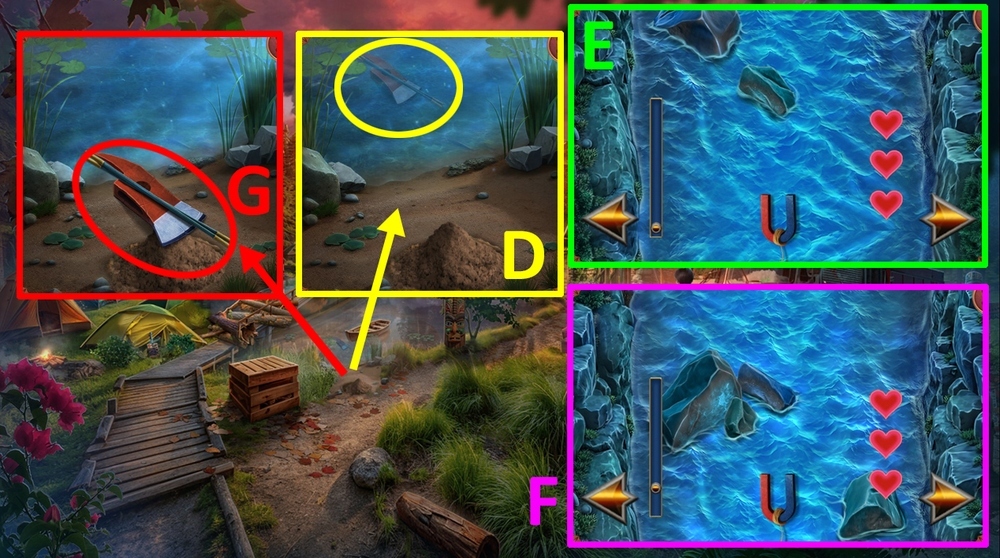
- Take TENT POLE and AXE BLADE (G).
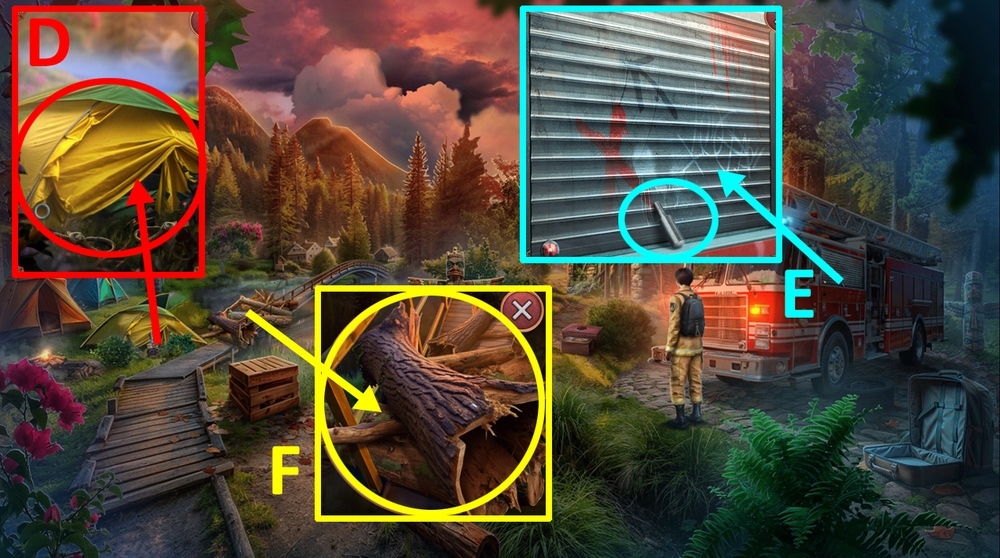
- Use TENT POLE on the tent (D).
- Use AXE BLADE on SHAFT, earn FIRE AXE.
- Take CLAMPING (E).
- Use FIRE AXE on the log (F).
- Easy solution: Click 1-1, 2-2, 3-3, 4-4, 5-5, 6-6, 7-7, 8-8 (G).
- Hard solution: Click 1-1, 2-2, 3-3, 4-4, 5-5, 6-6, 7-7, 8-8, 10-10, 9-9 (H).
- Select this option, earn FIRST AID KIT (I).
- Go forward.
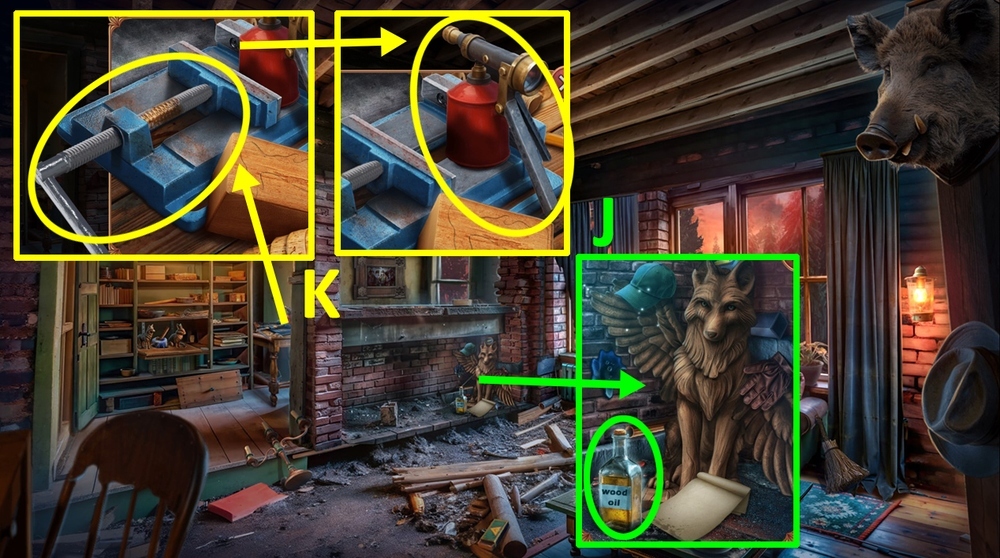
- Take WOOD OIL (J).
- Use WOOD OIL on the clamp, take BURNER (K).
- Use BURNER on wax, earn SAWDUST BRUSH (L).
- Go to the Firefighters’ Camp.
- Go to the Secluded Village.
- Select this option (M).
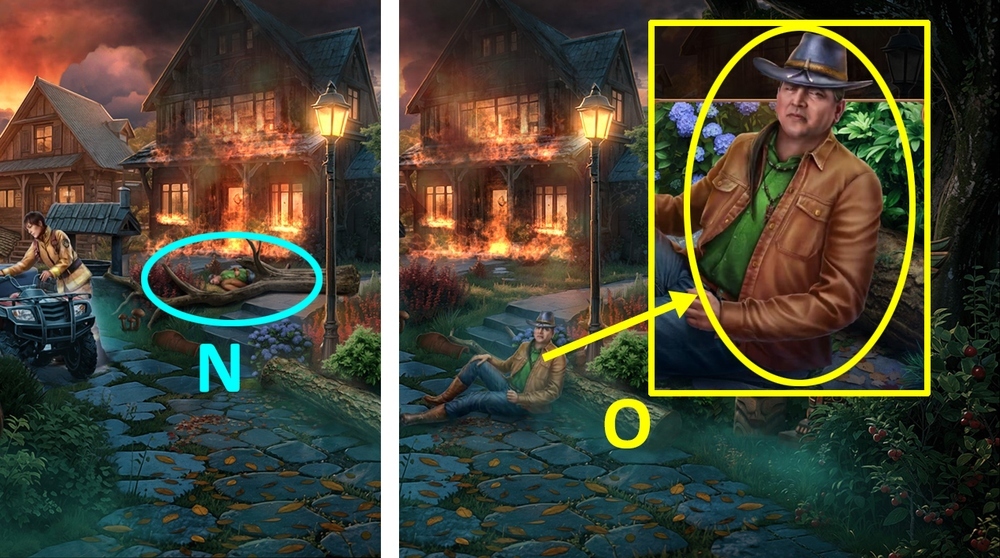
- Use FIRE AXE on the fallen tree (N).
- Use FIRST AID KIT on Wabano (O).
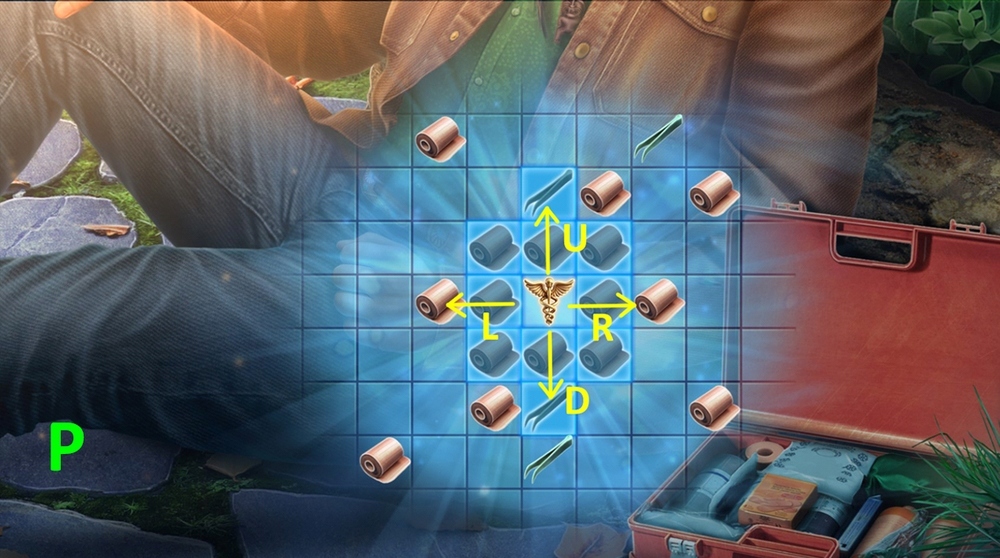
- Easy solution: L – swipe left, R – swipe right, U – swipe up, D – swipe down, swipe: L, D, L, D, U, U, U, R, U, D, D, R, R, U, R, D, D, U, L, L, D, U (P).
- Hard solution: L – swipe left, R – swipe right, U – swipe up, D – swipe down, swipe: L, D, L, D, U, R, U, U, U, D, D, R, R, U, R, D, D, U, L, L, D, U (Q).
- Take CROWBAR (R).
- Use CROWBAR on the roof, take DAMAGED FLASHLIGHT and RESPIRATOR MASK (S-T).
- Give RESPIRATOR MASK to Roxie (U).
- Easy solution: Solution is random (V).
- Hard solution: Solution is random (W).
- Earn CAR KEY.
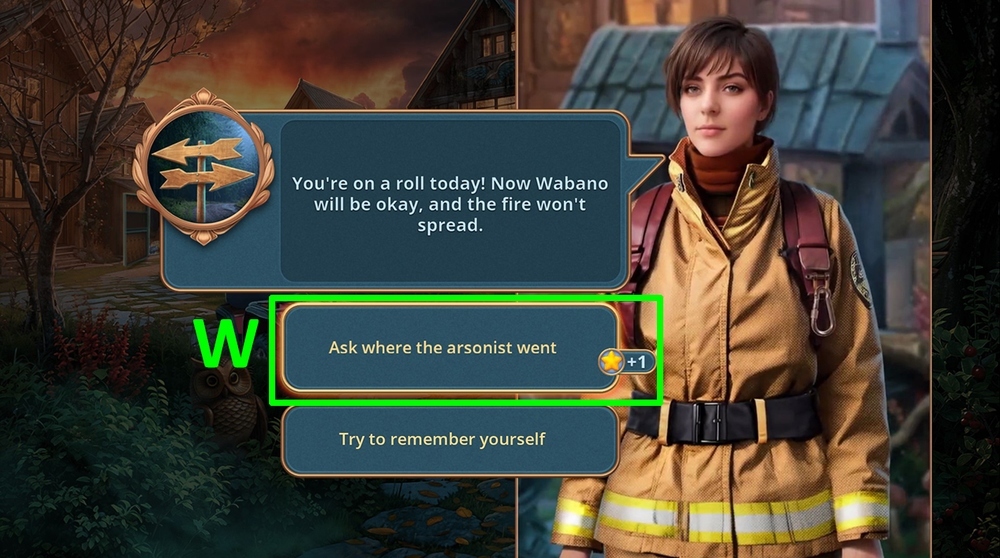
- Select this option (W).
- Use SAWDUST BRUSH on the bag, take and read the note, take JAR OF RESIN, click on the bag to open it, take FRAME PARTS 1/2 and CARVING KIT (X).
- Go to the Burned Cabin.
- Use CARVING KIT on the table (Y).

- Easy solution: Position the cutters according to the clue (Z).
- Hard solution: Position the cutters according to the clue (A).
- Take RABBIT FIGURINE (B).
- Use RABBIT FIGURINE on the empty slot, take LEVER (C).
- Go back.
- Use CAR KEY on the door, take TENT PEGS (D).
- Use TENT PEGS and FIRE AXE on the tent, take HAIR TIE and MOSAIC PIECES 3/3, use LEVER on the safe, take FRAME PARTS 2/2 (E).
- Go to the Burned Cabin.
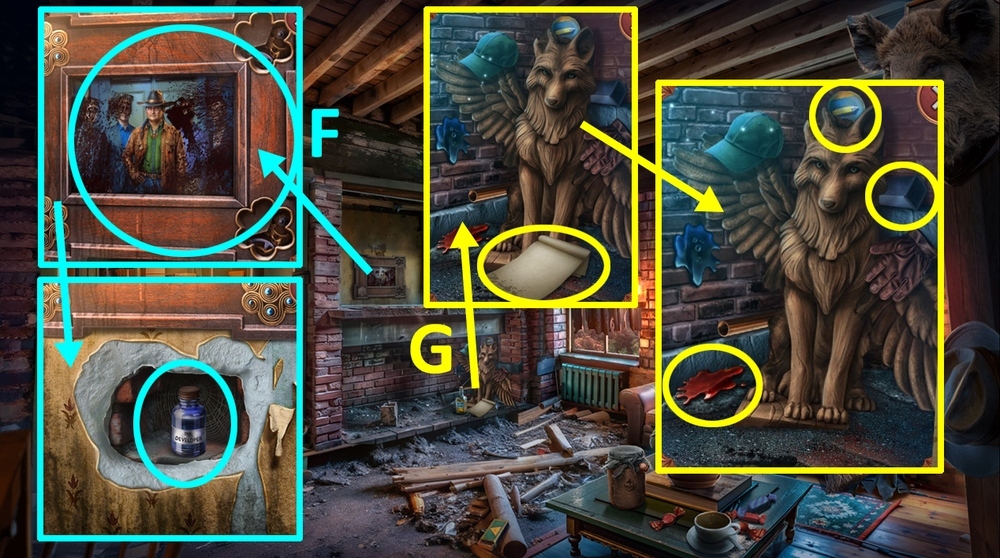
- Use FRAME PARTS on the frame, take INK DEVELOPER (F).
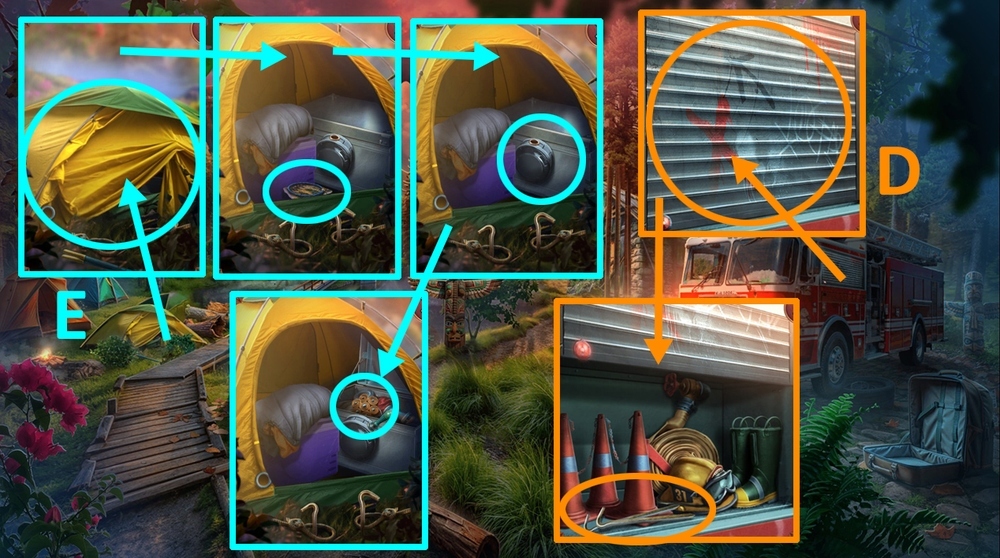
- Use INK DEVELOPER on the blank page, click on the metal piece behind the wolf, the round patch on the wolf’s head, and the red spot at the wolf’s feet on the left (G).
- Use HAIR TIE on DAMAGED FLASHLIGHT.
- Go to the Helipad.
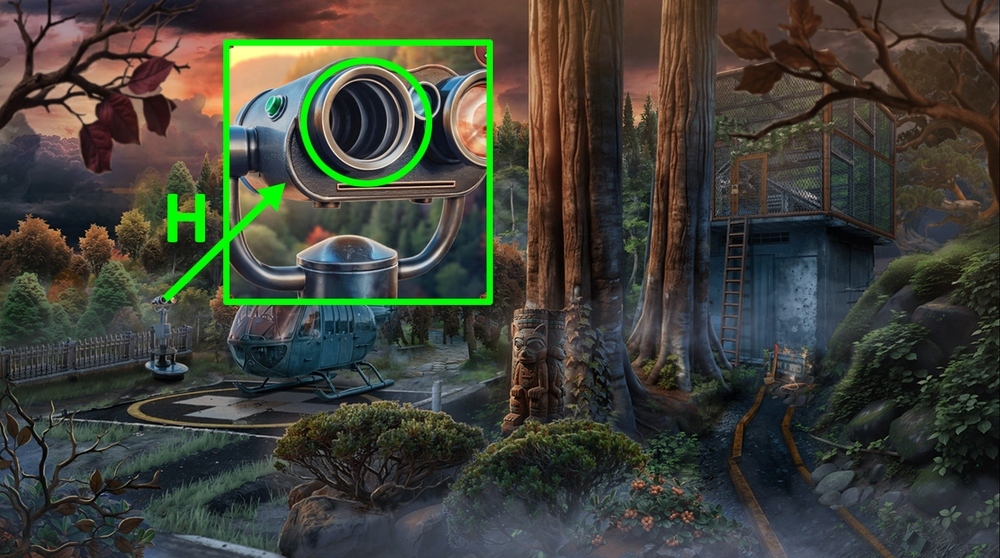
- Use JAR OF RESIN on the broken lens of the tower viewer (H).
- Go to the Watch Tower.
- Use MOSAIC PIECES on the damaged mosaic (I).
- Solution: Click A, B, B, C (J).
- Take RIFLE SCOPE and FIREFIGHTER EMBLEMS 1/2 (K).
- Play puzzle, earn CARABINER (L).
- Go back.
- Use CARABINER on the seat, take LENS (M).
- Use LENS on the tower viewer (N).
- Easy solution: Solution is random (O).
- Hard solution: Solution is random (P).
- Take CAVE PHOTO (Q).
- Use CAVE PHOTO on the seat (R).
- Take and read the note, take BLUE TAPE (S).
- Use BLUE TAPE on DAMAGED FLASHLIGHT.
- Take SADDLE, use FIRE AXE on vines, take HARPOON GUN and WORKBENCH PEDAL (T).
- Use RIFLE SCOPE on the HARPOON GUN.
- Take a look at the strange imprints (U).
- Use CLAMPING and WORKBENCH PEDAL on the workbench, click on the pedal 2 times, take RED FOIL (V).

- Use RED FOIL on DAMAGED FLASHLIGHT, earn UV FLASHLIGHT.
- Use UV FLASHLIGHT on the wall (W).
- Easy solution: Arrange the chips according to the clue (X).

- Hard solution: Arrange the chips according to the clue (Y).
- Take RITUAL BOWL (Z).
- Use RITUAL BOWL on the statue, take CAMPING SHOVEL (A).
- Go to the Firefighters’ Camp.
- Use CAMPING SHOVEL on the pile of sand, take DEAD BATTERY and FIREFIGHTER EMBLEMS 2/2 (B).
- Use FIREFIGHTER EMBLEMS on the board (C).
- Solution: Click on the tiles 15, 11, 7, 3, 2, 1, 5, 9, 13, 14, 10, 11, 7, 3, 4, 8, 12, 11, 10, 6, 7, 8, 12, 11, 7, 8, 4, 3, 7, 8, 12, 16, 15, 11, 12, 8, 7, 3, 4, 8, 12, 16, 15, 11, 7, 8, 4, 3, 7, 11, 12, 16 (D).
- Take TASER (E).
- Go to the Tribal Cave.
- Use TASER on the box, take and read the note, take POCKET VACUUM (F).
- Use POCKET VACUUM on the spider web, take BRIDLE and SHORT PITCHFORK (G).
- Go to the Secluded Village.
- Use SHORT PITCHFORK on the hay, take PUMP and STIRRUP (H).
- Use SADDLE, BRIDLE, and STIRRUP on the horse (I).

- Easy solution: Solution is random (J).

- Hard solution: Solution is random (K).
- Take ACID (L).
- Take IRON CABLE, use ACID on the door, take RUBY EYES 1/2 and PUMP NOZZLE (M).
- Use IRON CABLE on HARPOON GUN.
- Use PUMP NOZZLE on PUMP, earn MOTORCYCLE PUMP.
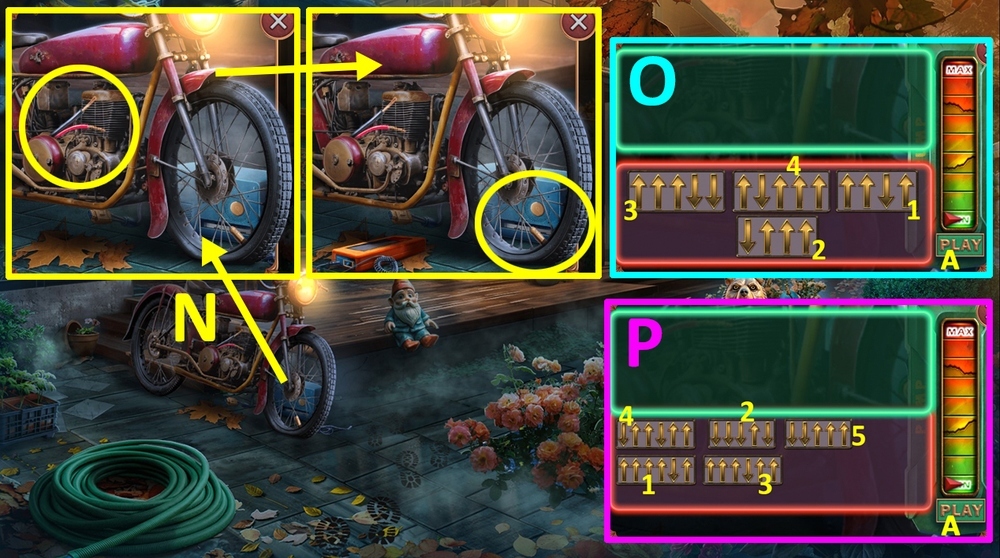
- Use DEAD BATTERY and MOTORCYCLE PUMP on the motorcycle (N).
- Easy solution: Click 1, 2, 3, 4, A (O).
- Hard solution: Click 1, 2, 3, 4, 5, A (P).
- Take SYSTEM UNIT and CHAINMAIL GLOVES (Q).
- Use CHAINMAIL GLOVES on the barbed wire (R).
- Play puzzle, earn BEAR’S PAW (S).
- Select this option (T).
- Use BEAR’S PAW on the bear, take HARPOON (U).
- Use HARPOON on HARPOON GUN, earn LOADED HARPOON GUN.
- Use LOADED HARPOON GUN on the cable (V).
- Easy solution: Solution is random (W).
- Hard solution: Solution is random (X).
- Take RUBY EYES 2/2 (Y).
- Use TASER on the log (Z).
- Use UV FLASHLIGHT on the buttons, press the button with the fingerprint on it, take LUMBER CLAWS (A).
- Use LUMBER CLAWS on the log, take ACCESS THUMB DRIVE and STATUE PART (B).
- Use ACCESS THUMB DRIVE on the USB port (C).
- Go back.
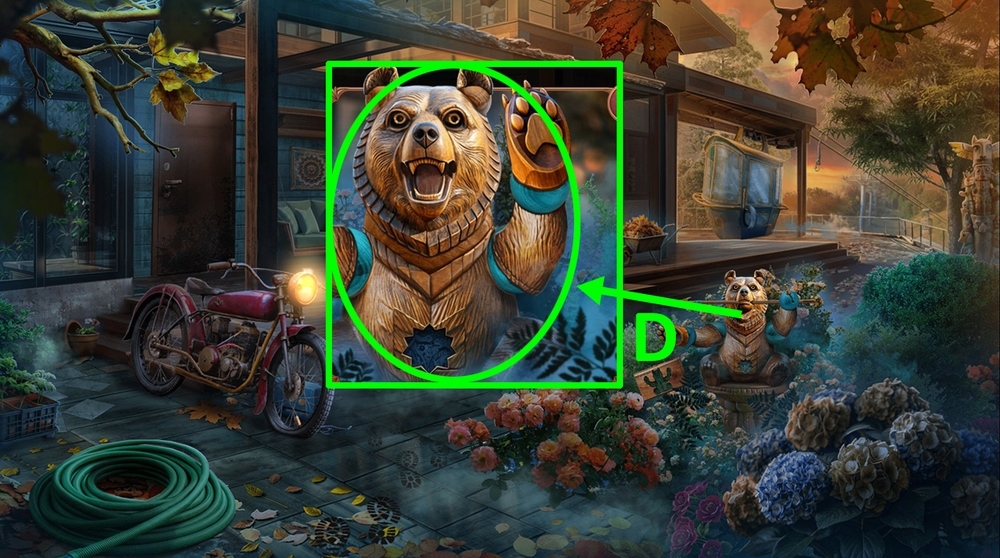
- Use RUBY EYES and STATUE PART on the bear (D).
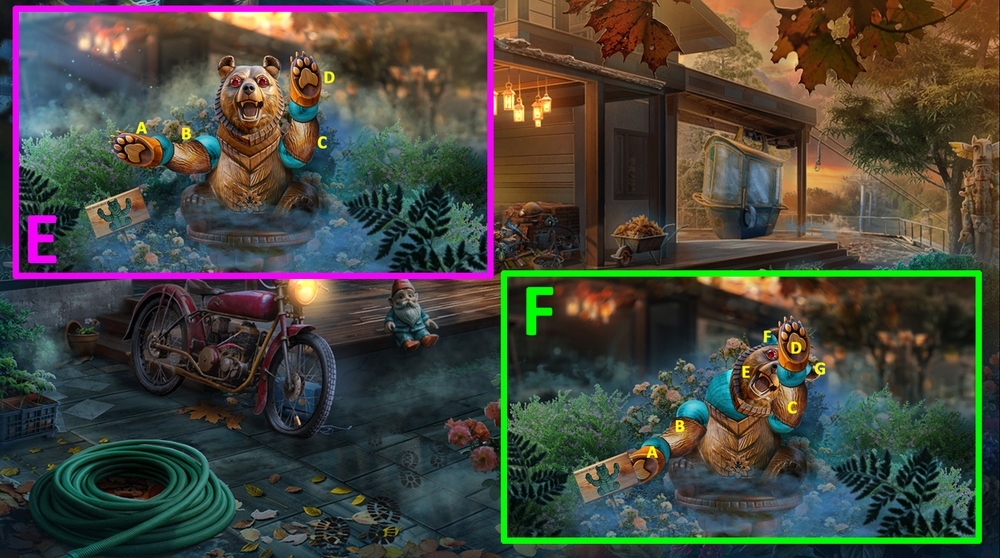
- Easy solution: Click A, B (x3), C (x2), D (x2) (E).
- Hard solution: Click B (x3), C (x2), E, D (x3), F, G, A (x3) (F).

- Take CAR LIGHTER (G).
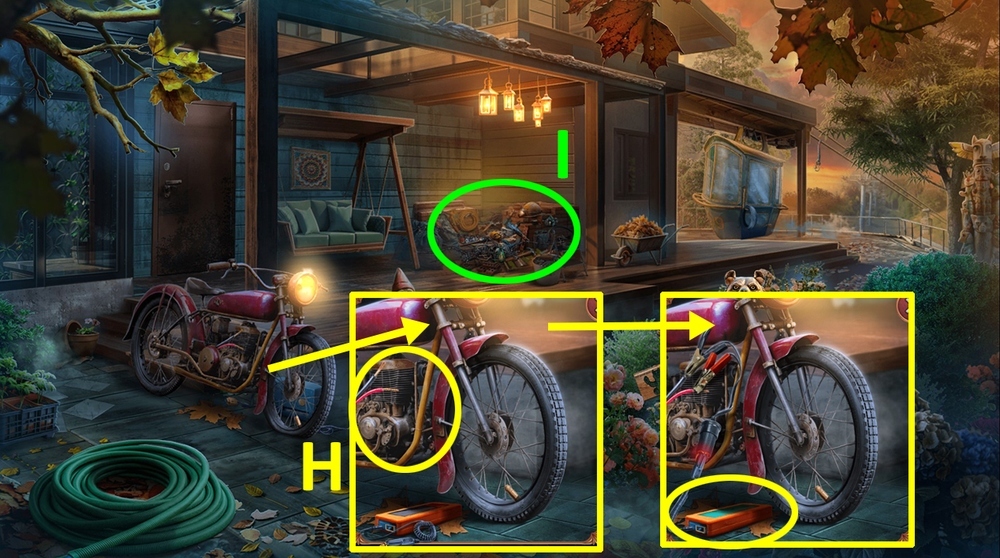
- Use CAR LIGHTER on the motorcycle, take CHARGED BATTERY (H).
- Use CHARGED BATTERY on the SYSTEM UNIT, earn CHARGED UNIT.
- Play puzzle, earn MULTITOOL CARD (I).
- Go forward.
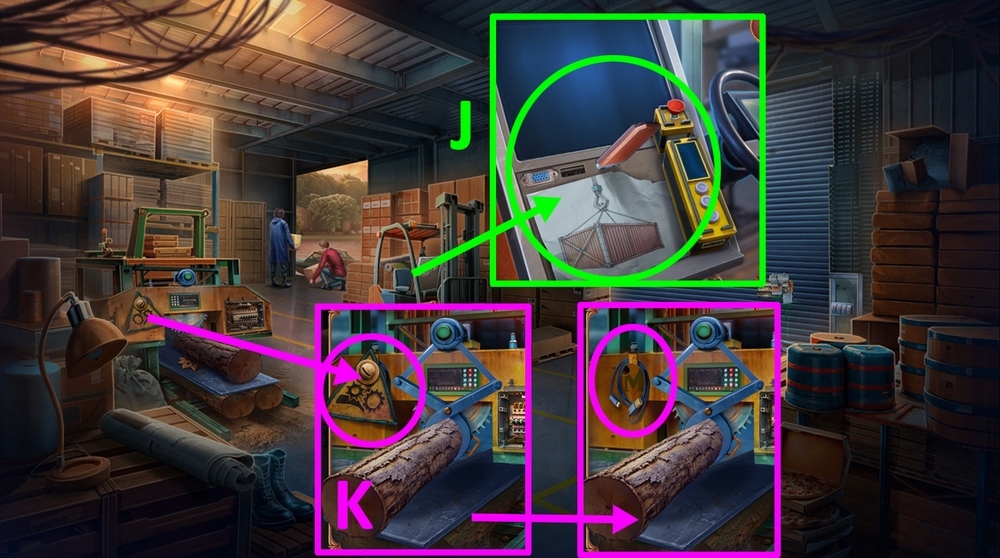
- Use CHARGED UNIT on the panel (J).
- Use MULTITOOL CARD on the screw, take USB CABLE (K).
- Use USB CABLE on the USB port, press the red button (L).
- Easy solution: Solution is random (M).
- Hard solution: Solution is random (N).
- Walkthrough Bonus Chapter, at the link below.


