Detective Club 3: Carnival of Secrets – A festive circus performance kicks off an investigation into a series of disappearances. Thomas goes to the carnival with Emily and George to see the famous show by the fakir Flemus Timer, who manipulates fire as if it were ribbons. However, just before the show begins, the wind blows their tickets away, and Thomas has to find them to get into the circus. Shortly after the show starts, he notices a strange clown named Grimas, who steals Emily’s favorite pendant. At the same time, purple smoke spreads throughout the big top, and a hypnotic melody robs the girl and George of their ability to control their actions. To restore his friends’ memories, Thomas must find their personal belongings and then set out in search of the clown. Grimas’s trail leads the heroes to the House of Horrors and the performers’ crew trailers, where they discover clues, stolen items, and a suspicious safe under a circus wagon. It gradually becomes clear that the clown himself is not acting of his own free will; an unknown man is threatening his family and forcing him to obey orders. Meanwhile, Thomas, Emily, and George begin to notice a connection between the circus performances and the disappearances of London residents. Even the police appear to be under a hypnotic spell; a constable is acting suspiciously, and attempts to report the crimes yield no results. In the Scotland Yard archives, the friends find documents and newspaper articles confirming that people went missing after attending the performances. The investigation leads the heroes to an abandoned warehouse, in the basement of which they discover traces of a purple substance. Emily’s music teacher helps them understand the effect of the melody on the human mind and explains why a powerful sound amplifier is necessary for mass hypnosis. Later, the girl’s father, Charles Banks, conducts a chemical analysis of the sample and determines that the smoke settles on the skin and clothing, affecting the nervous system. He promises to develop an antidote capable of freeing the victims from outside influence. New clues compel Thomas to investigate the city administration. In the mayor’s office, documents are discovered regarding a large donation from the circus and a building permit issued without an official inspection. It becomes clear that the circus management may not be the only party behind this criminal scheme. If you’re stuck on a puzzle or don’t know where to find items, you can check out the walkthrough for Detective Club 3: Carnival of Secrets on our website to complete the investigation.
Detective Club 3: Carnival of Secrets – Walkthrough
Here you can see the complete walkthrough for Detective Club 3: Carnival of Secrets, namely all chapters, including the bonus chapter, in pictures.
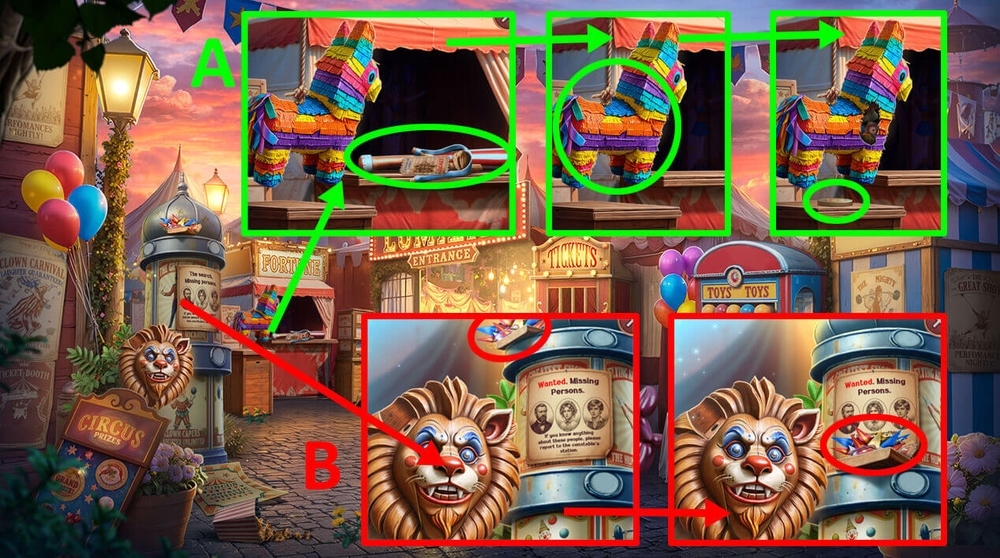
- Take TICKETS 1/3, SLINGSHOT and PINATA BAT, use PINATA BAT on the pinata, take GAME TOKEN (A).
- Use SLINGSHOT on the box with items, take PAPER CLIP, GARLAND WITH FLAGS and TICKETS 2/3 (B).
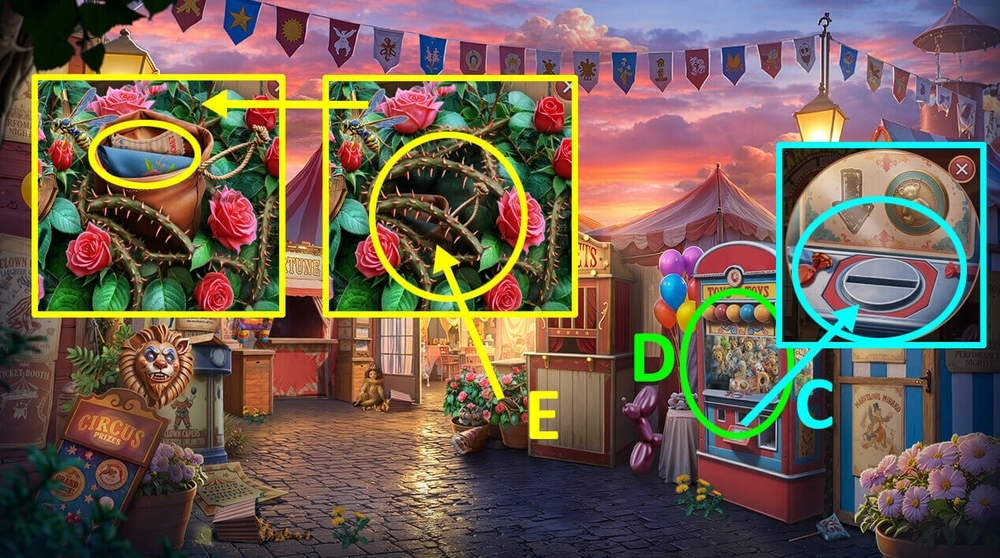
- Use GAME TOKEN on the toy machine (C).
- Play puzzle, earn FISHING ROD (D).
- Use FISHING ROD on the sack, take HANDKERCHIEF and TICKETS 3/3 (E).
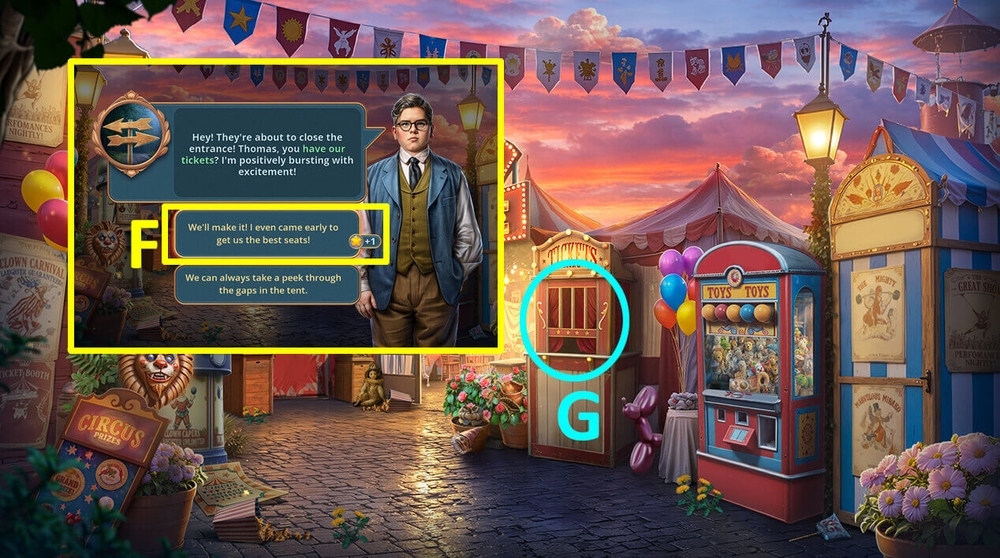
- Select this option (F).
- Use TICKETS 3/3 on the ticket booth window (G).
- Go forward.
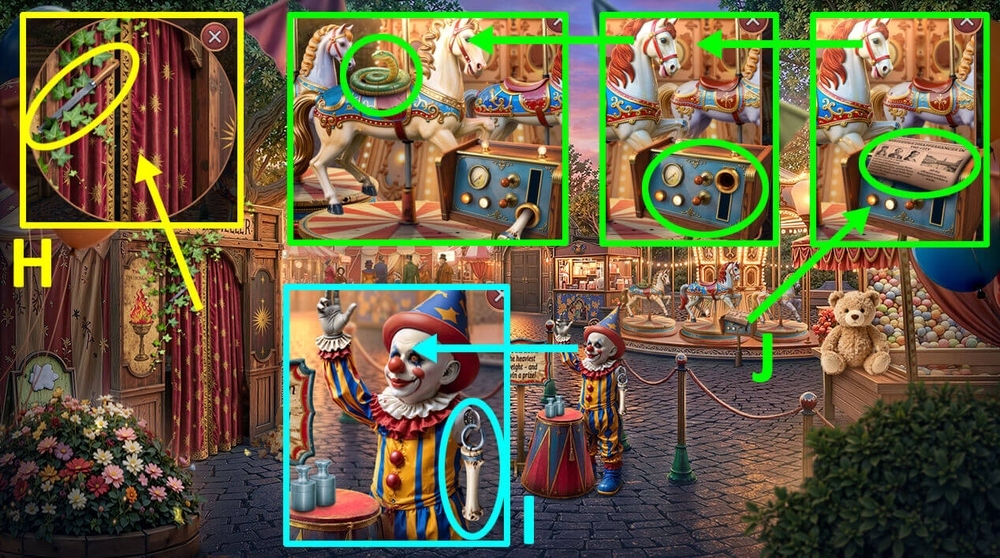
- Take FILE (H).
- Use FILE on the mannequin arm fastener, earn PROP BONE (I).
- Read the newspaper, use PROP BONE on the carousel control panel, take PROP SNAKE (J).
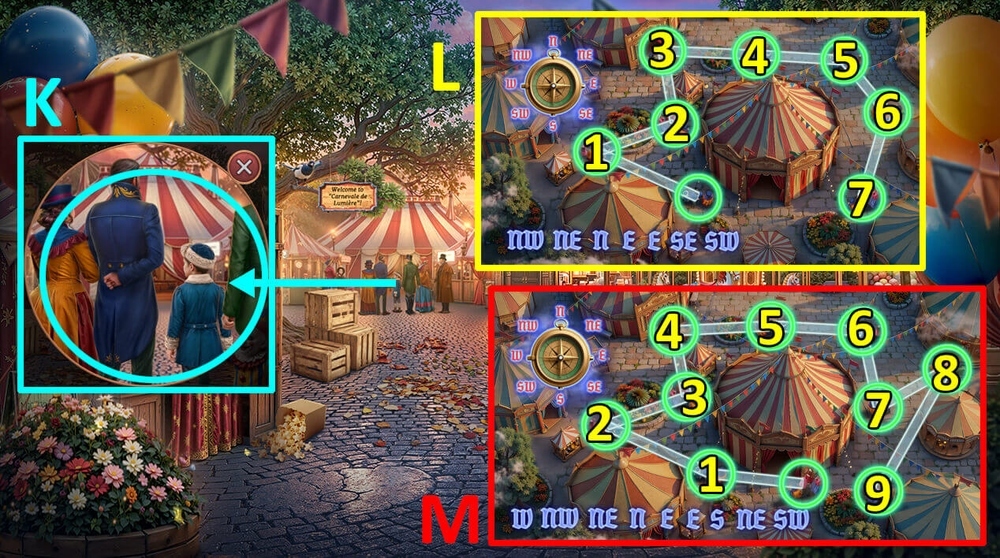
- Use PROP SNAKE on the crowd of people (K).
- Easy solution: Click: 1-2-3-4-5-6-7 (L).
- Hard solution: Click: 1-2-3-4-5-6-7-8-9 (M).
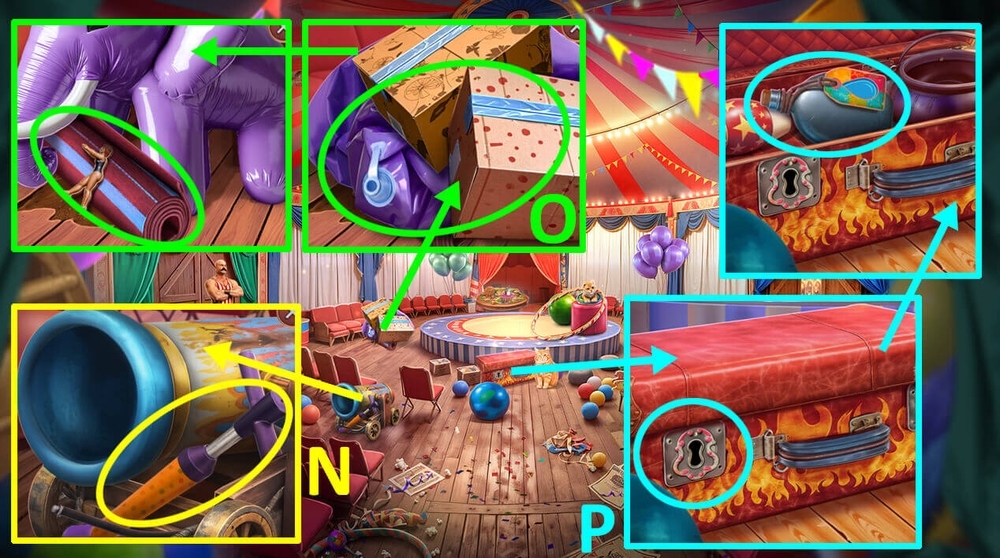
- Take HAND PUMP (N).
- Use HAND PUMP on the inflatable figure, take ASSISTANT FIGURINE and RUG (O).
- Use PAPER CLIP on the suitcase lock, take FLASK WITH WATER (P).
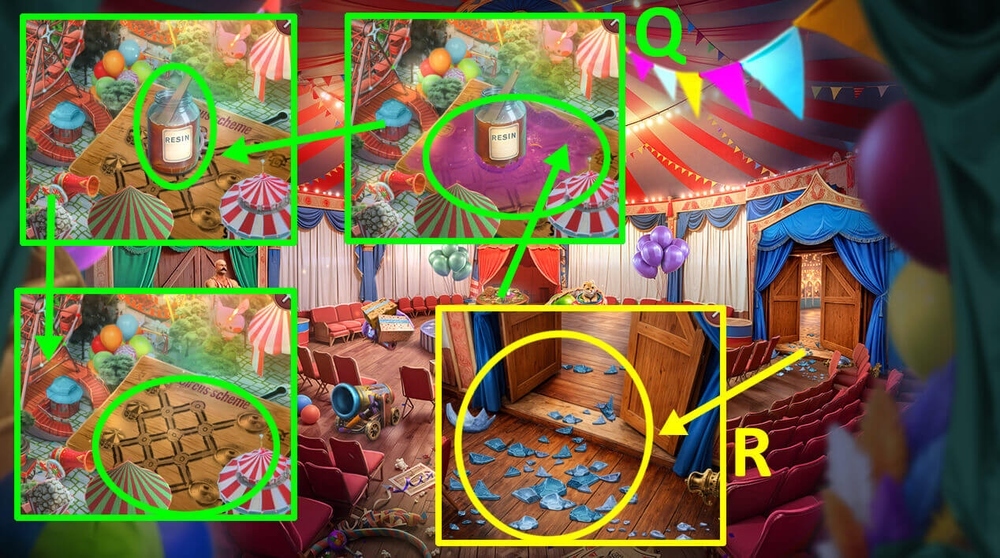
- Use HANDKERCHIEF and FLASK WITH WATER on the spilled liquid, take ADHESIVE RESIN and GEARS 1/2, take and read a sign with a circus diagram (Q).
- Use RUG on the shards (R).
- Go forward.
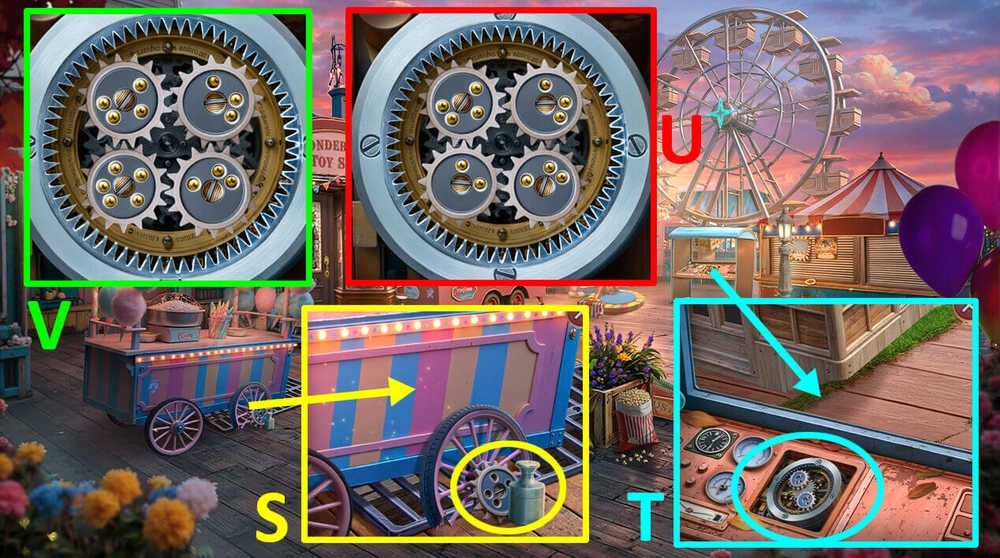
- Take SMALL WEIGHT and GEARS 2/2 (S).
- Use GEARS 2/2 on the control stand of an old fairground wheel (T).
- Easy solution: Use the picture as a hint (U).
- Hard solution: Use the picture as a hint (V).
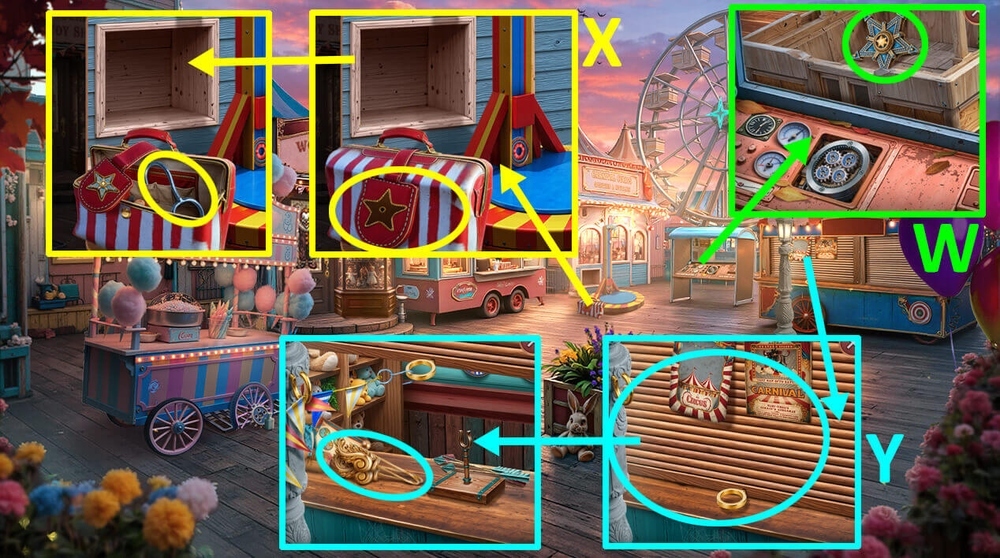
- Take STAR EMBLEM (W).
- Use STAR EMBLEM on the bag, take HOOK (X).
- Use GARLAND WITH FLAGS on HOOK, earn GARLAND WITH HOOK.
- Use GARLAND WITH HOOK on the shutters, take CURTAIN HOLDER (Y).
- Go to Circus Grounds.
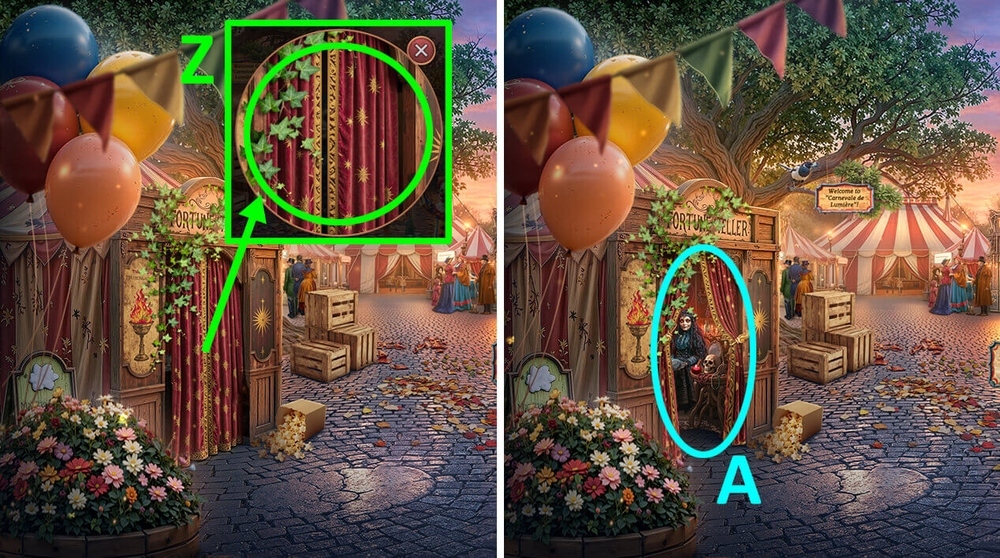
- Use CURTAIN HOLDER on the curtain (Z).
- Play puzzle, earn ROULETTE WHEEL (A).
- Go to Shooting Gallery Square.
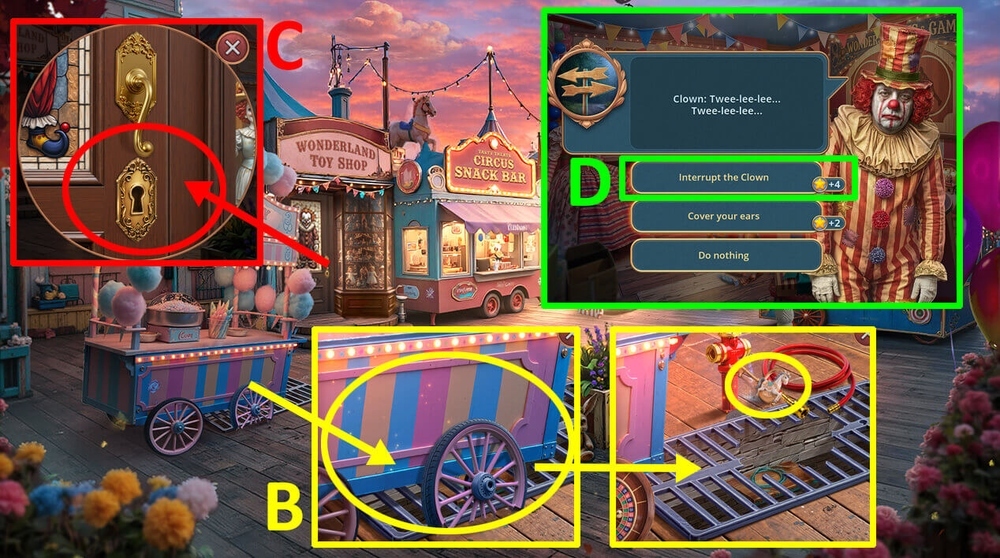
- Use ROULETTE WHEEL on the cotton candy cart, take KEY (B).
- Use KEY on the door (C).
- Go forward.
- Select this option (D).
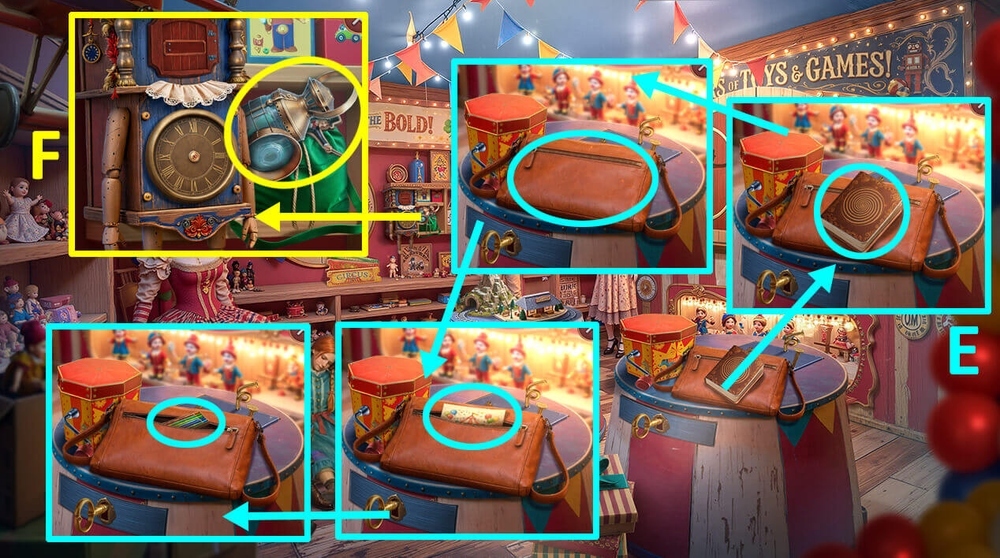
- Take and read the circus book, click on the bag, take the note and FRIENDS’ BELONGINGS 1/2 (E).
- Take UNLIT LANTERN and MAGICIAN FIGURINE (F).
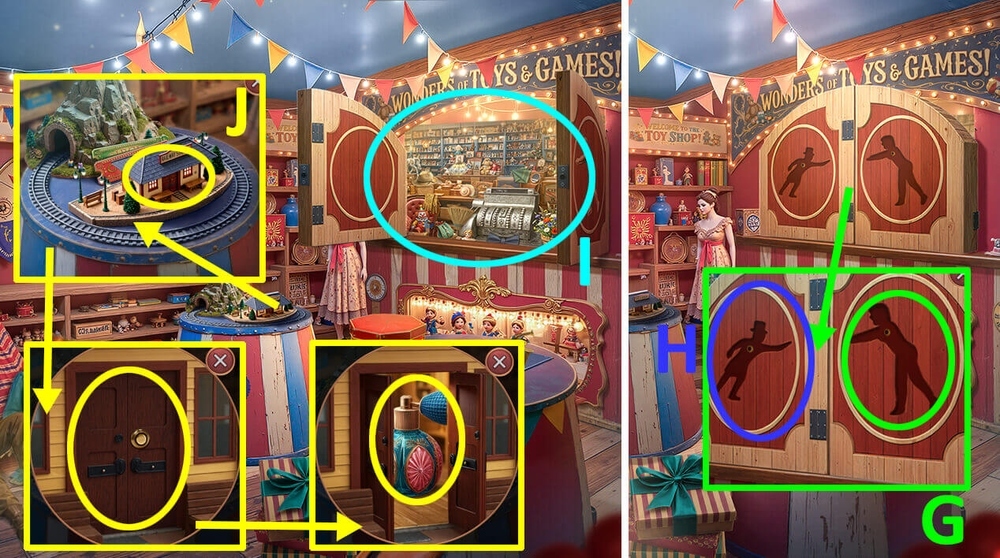
- Use the ASSISTANT FIGURINE on the right cabinet door (G).
- Use MAGICIAN FIGURINE on the left cabinet door (H).
- Play puzzle, earn STUD EARRING (I).
- Use STUD EARRING on the toy train station, take PERFUME (J).
- Go to In Front of the Circus.
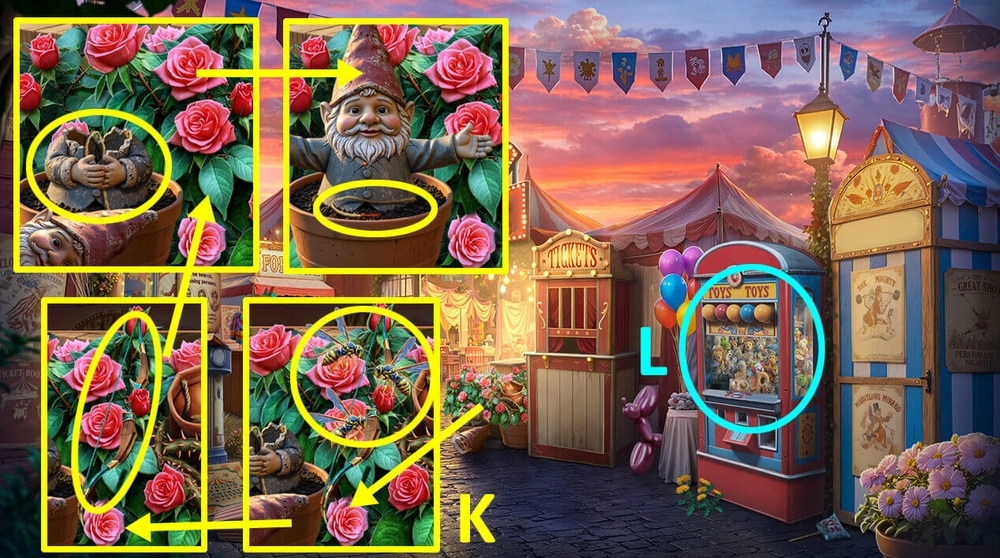
- Use PERFUME on the wasps, take BOW, use ADHESIVE RESIN on the broken garden gnome, take WICK (K).
- Play puzzle, earn CRESCENT PIN (L).
- Go to Toy Shop.
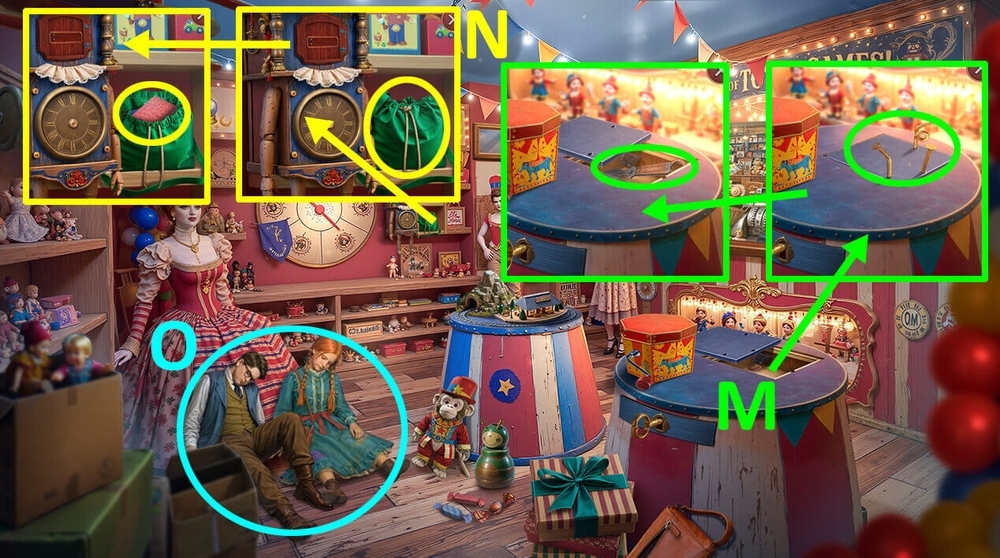
- Use CRESCENT PIN on the nails, take THROWING KNIFE (M).
- Use THROWING KNIFE on Emily’s bag, take FRIENDS’ BELONGINGS 2/2 (N).
- Use FRIENDS’ BELONGINGS 2/2 on friends (O).
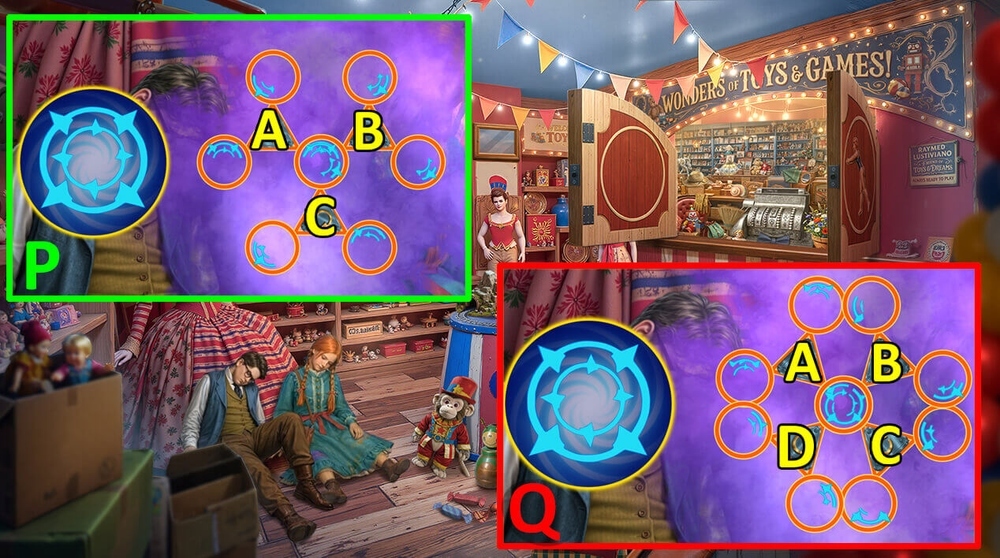
- Easy solution: A*2, B*2, C (P).
- Hard solution: D*2, B, C*2 (Q).
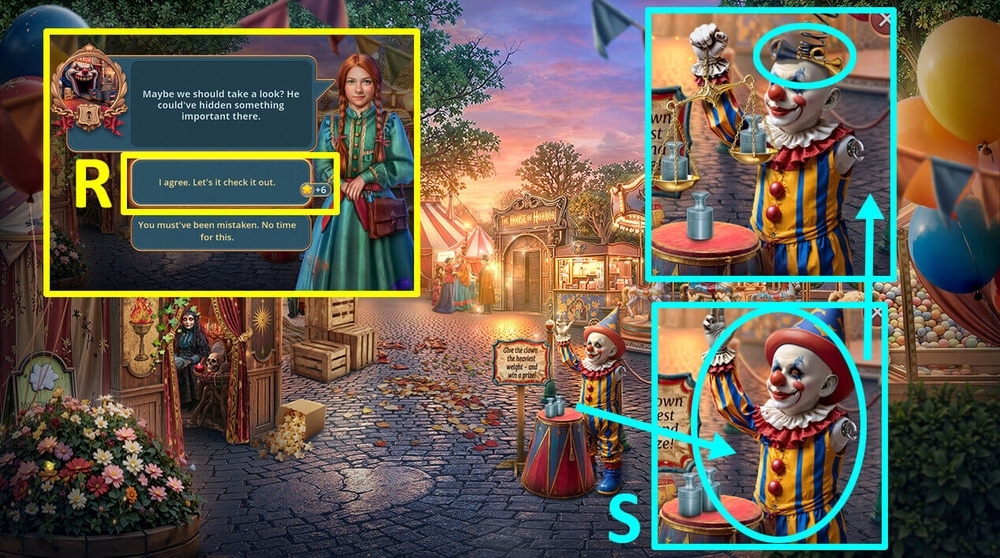
- Select this option, earn CLOWN SCALES (R).
- Use SMALL WEIGHT and CLOWN SCALES on the clown mannequin, take HORN (S).
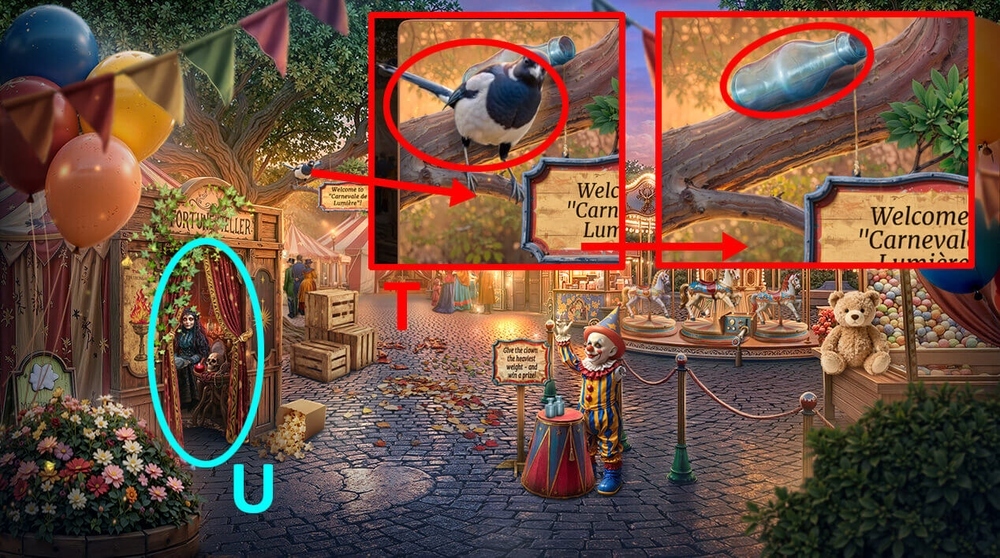
- Use HORN on the bird, take BOTTLE (T).
- Play puzzle, earn LION EAR (U).
- Go to Horror Room.
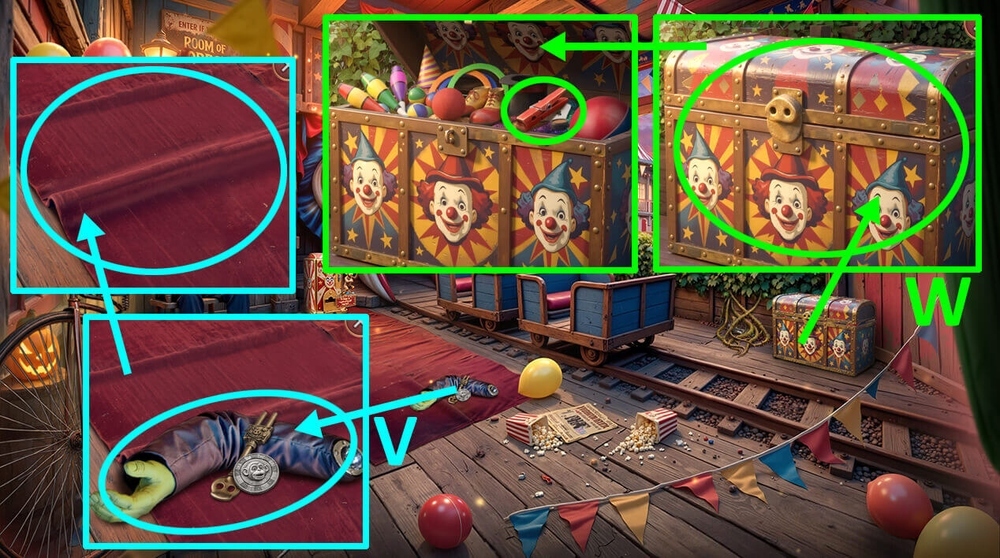
- Take MONKEY TOKENS 1/3, BIDENT and MANNEQUIN HAND, click on the carpet (V).
- Use BIDENT on the chest, take CLOTHESPIN (W).
- Go to In Front of the Circus.

- Use LION EAR on the fake lion head, take OIL WITH WICK (X).
- Use OIL WITH WICK on UNLIT LANTERN, earn LANTERN.
- Use LANTERN on the darkness (Y).
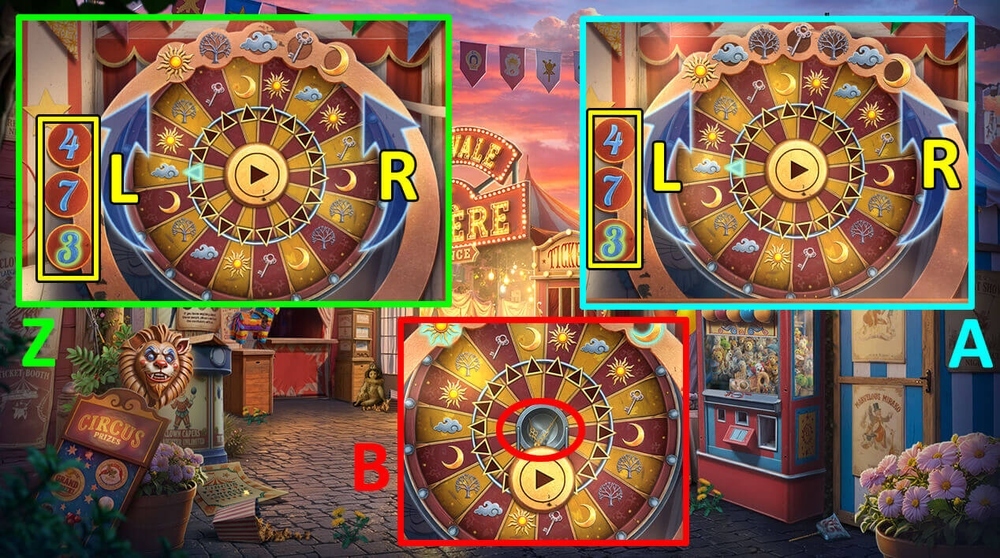
- Easy solution: 4-R, 4-R, 4-R, 3-R, 4-R (Z).
- Hard solution: 4-R, 4-L, 7-R, 3-R, 3-L, 4-L, 7-L (A).
- Take CLOCK HANDS (B).
- Go to Toy Shop.
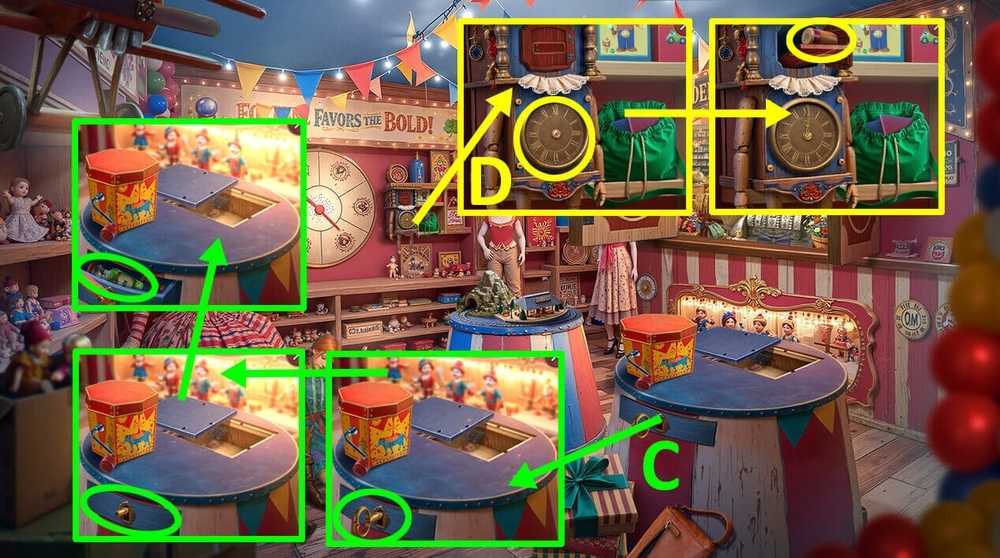
- Click on the key, use CLOTHESPIN on the key fragment in the drawer, take TOXIN (C).
- Use CLOCK HANDS on the clock face, take CORK (D).
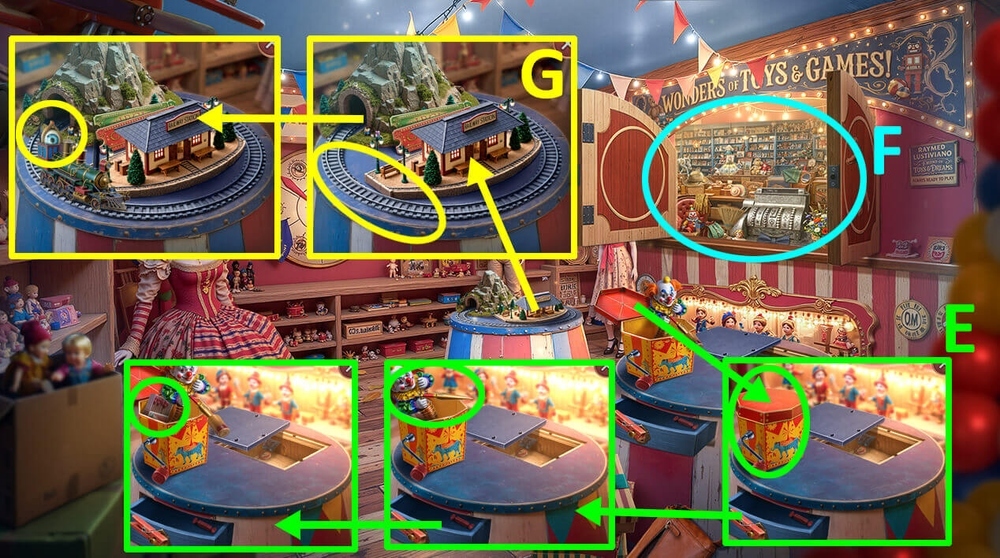
- Click on the Jack-in-the-Box wind-up toy, use CORK on the awl, take MATCHES (E).
- Play puzzle, earn TOY TRAIN (F).
- Use TOY TRAIN on the toy railway, take EYES 1/2 and WIND-UP MOUSE (G).
- Go to Horror Room.
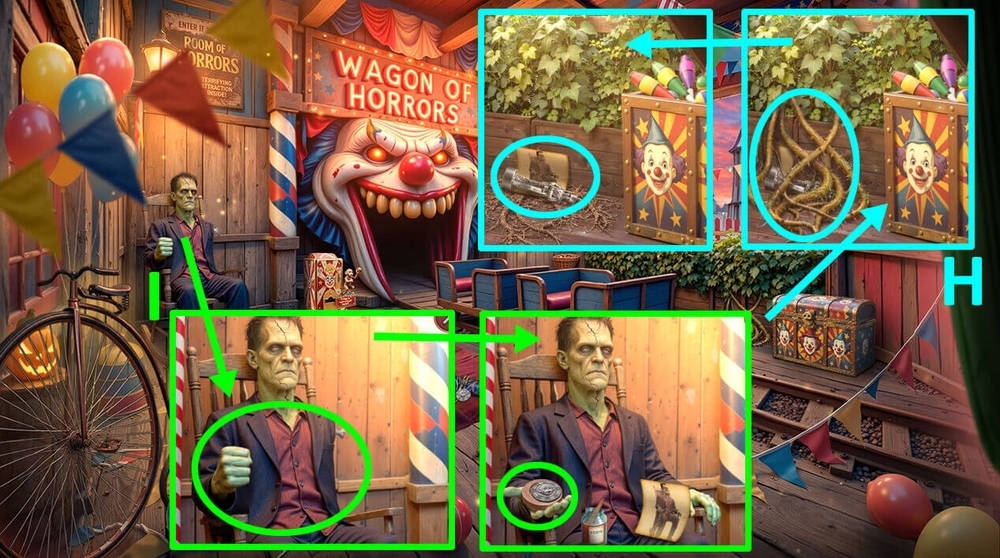
- Use TOXIN on the thorny vines, take SILVER TOY SOLDIER and MANNEQUIN SKETCH (H).
- Use MANNEQUIN SKETCH on the Frankenstein mannequin, use ADHESIVE RESIN and MANNEQUIN HAND on the Frankenstein mannequin, take MONKEY TOKENS 2/3 and TOKEN MOLD (I).
- Go to Inside the Tent.
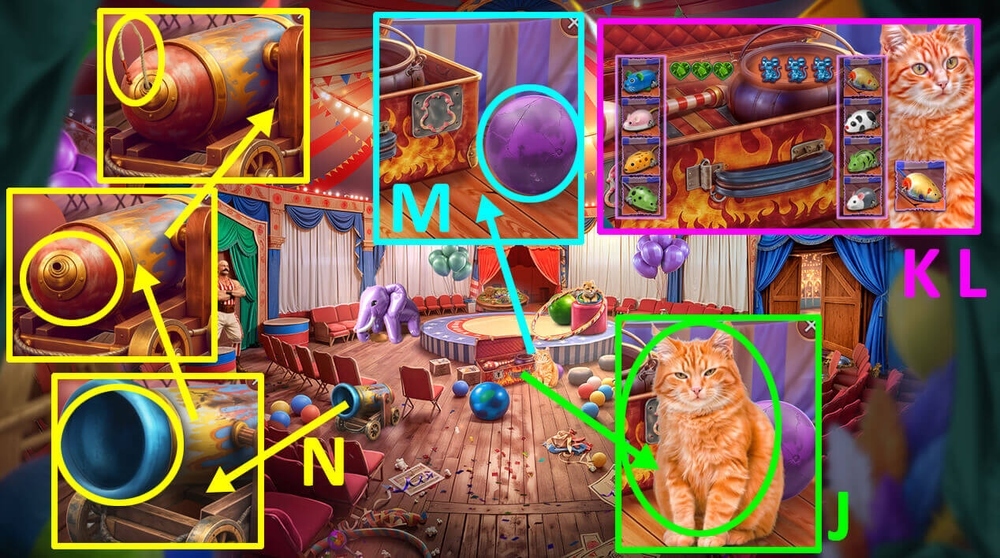
- Use WIND-UP MOUSE on the cat (J).
- Easy solution: Solution is random (K).
- Hard solution: Solution is random (L).
- Take CANNONBALL (M).
- Use CANNONBALL on the circus cannon, use WICK on the circus cannon, use MATCHES on the wick (N).
- Go to Circus Backstage.
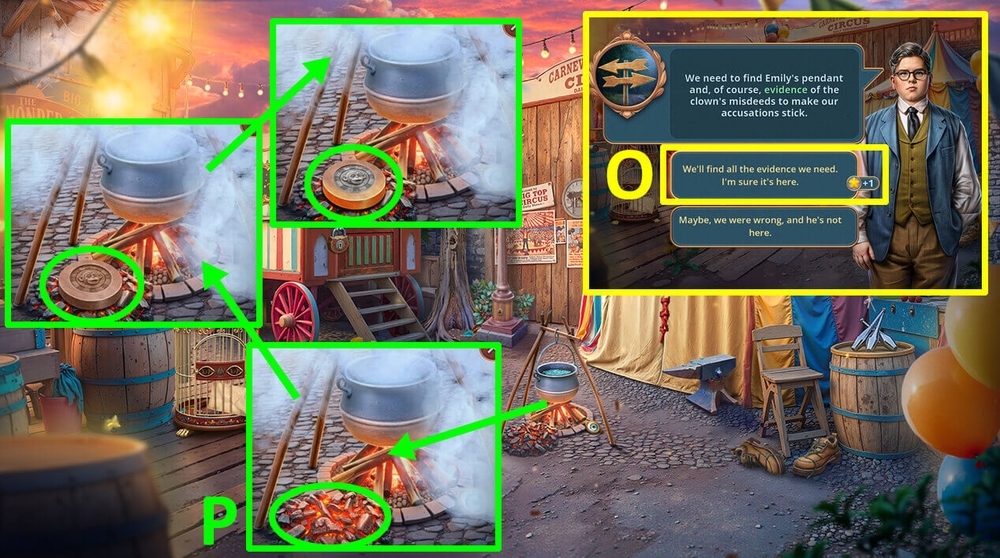
- Select this option, earn PENCIL (O).
- Use TOKEN MOLD on the burning coal, use SILVER TOY SOLDIER on the mold, use HANDKERCHIEF on the token, earn MONKEY TOKENS 3/3 (P).
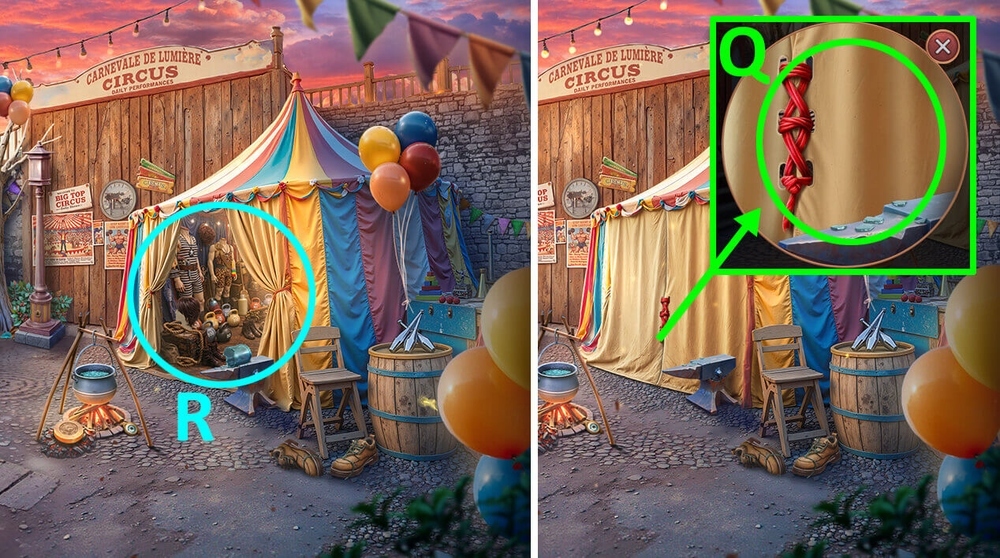
- Use BOTTLE on the tied knot (Q).
- Play puzzle, earn DRAWKNIFE (R).
- Go to Horror Room.
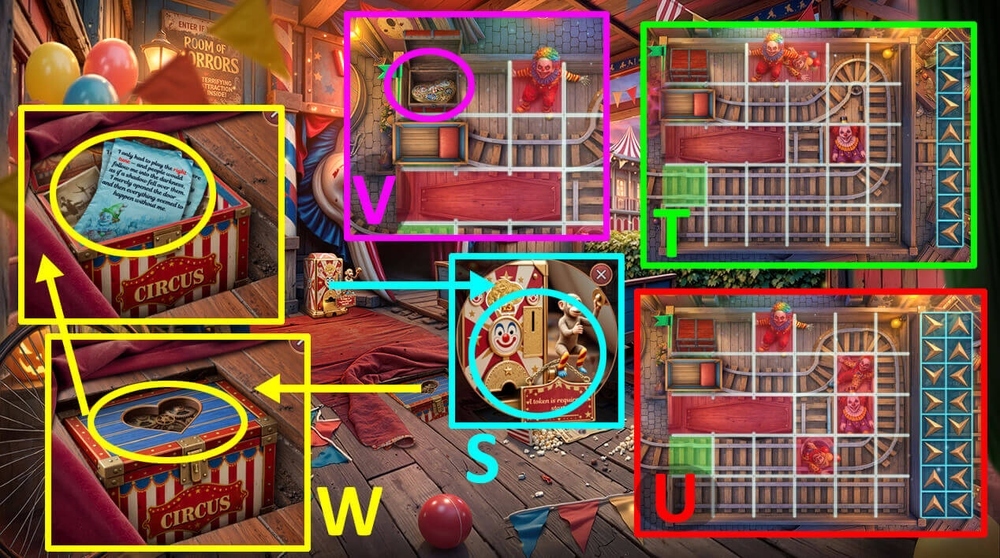
- Use MONKEY TOKENS 3/3 on the coin slot at the terror cart ride (S).
- Easy solution: Use the picture as a hint (T).
- Hard solution: Use the picture as a hint (U).
- Take HEART AMULET (V).
- Use the HEART AMULET on the heart-shaped slot on the box, take and read the notes (W).
- Go to Circus Backstage.
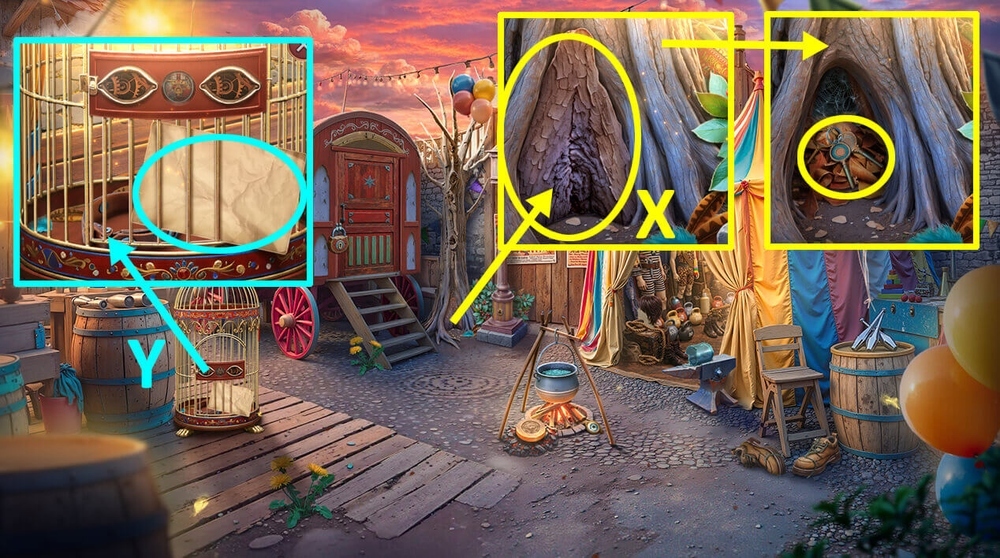
- Use DRAWKNIFE on the bark, take BUNCH OF KEYS (X).
- Take PAPER (Y).
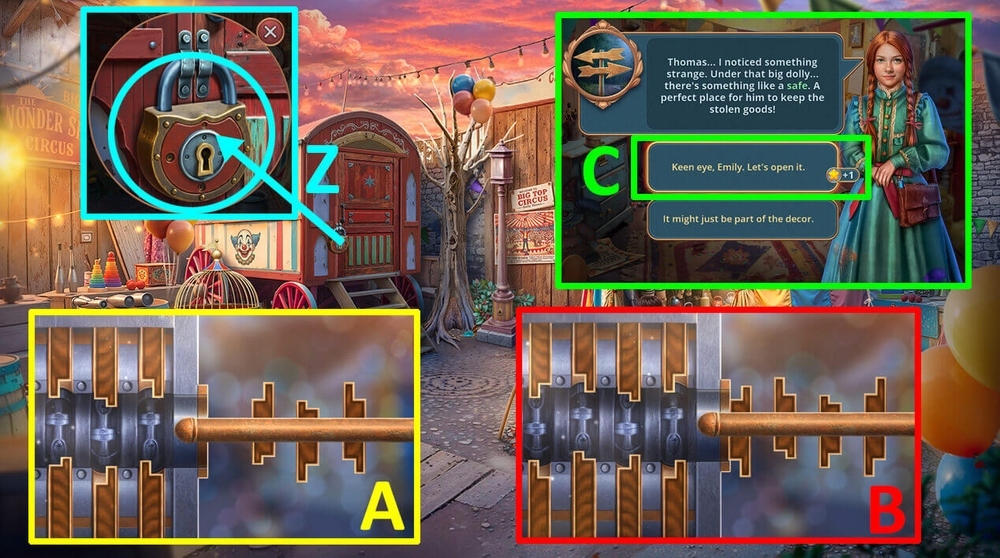
- Use BUNCH OF KEYS on the door lock (Z).
- Easy solution: Use the picture as a hint (A).
- Hard solution: Use the picture as a hint (B).
- Go forward.
- Select this option (C).
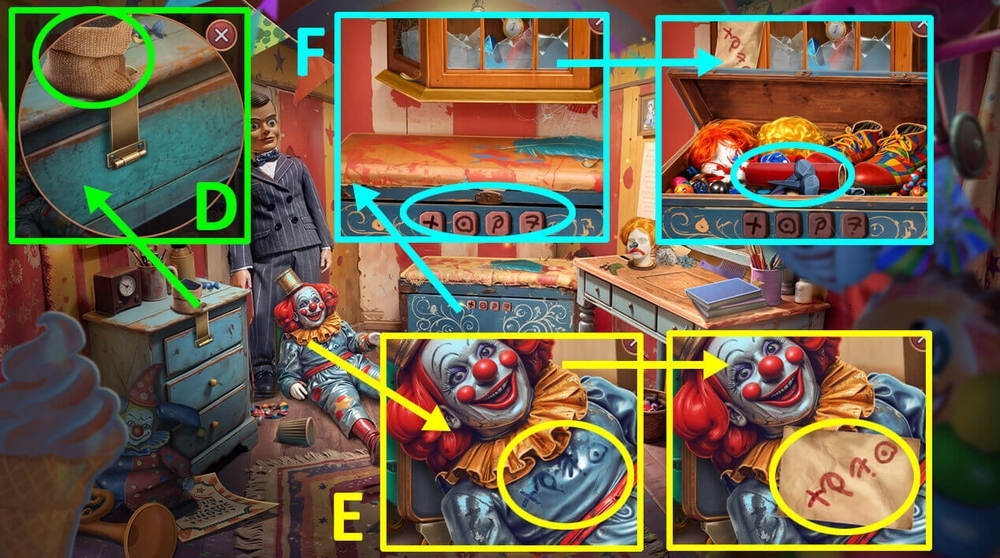
- Take GUNPOWDER (D).
- Use PENCIL and PAPER on the broken clown doll, take PAPER WITH SYMBOLS (E).
- Use PAPER WITH SYMBOLS on the chest with buttons, take NAILS and FIRECRACKER (F).
- Go back.
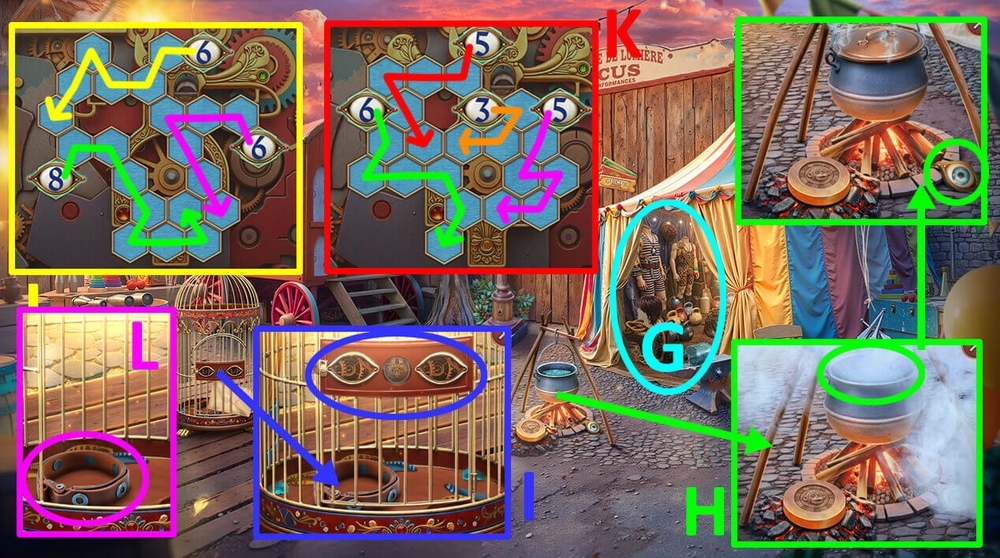
- Play puzzle, earn LID (G).
- Use LID on the boiler, take EYES 2/2 (H).
- Use EYES 2/2 on the birdcage (I).
- Easy solution: Use the picture as a hint (J).
- Hard solution: Use the picture as a hint (K).
- Take BRACELET (L).
- Go to Shooting Gallery Square.
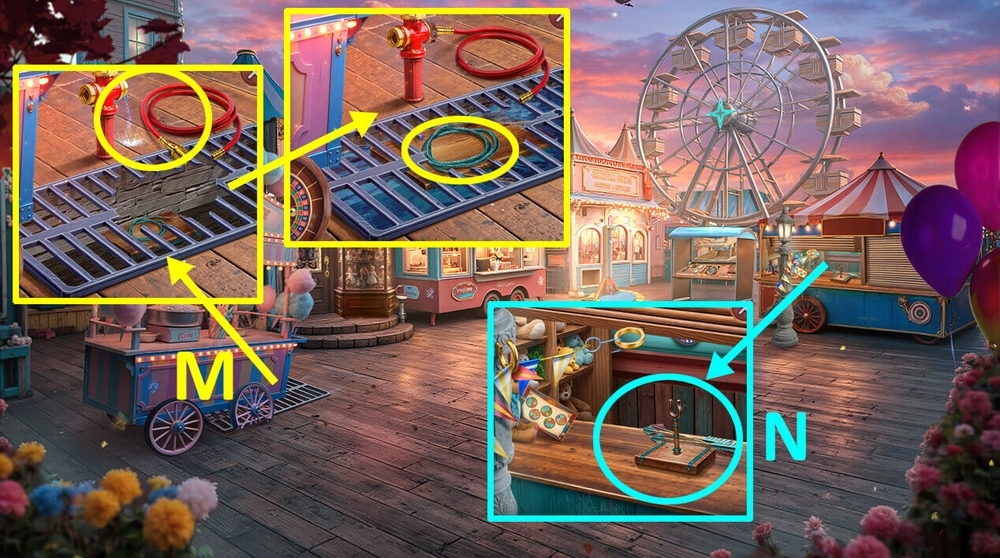
- Use BRACELET on the hose, take BOWSTRING (M).
- Use BOWSTRING on BOW, earn BOW.
- Use BOW on the rack in the shooting range (N).
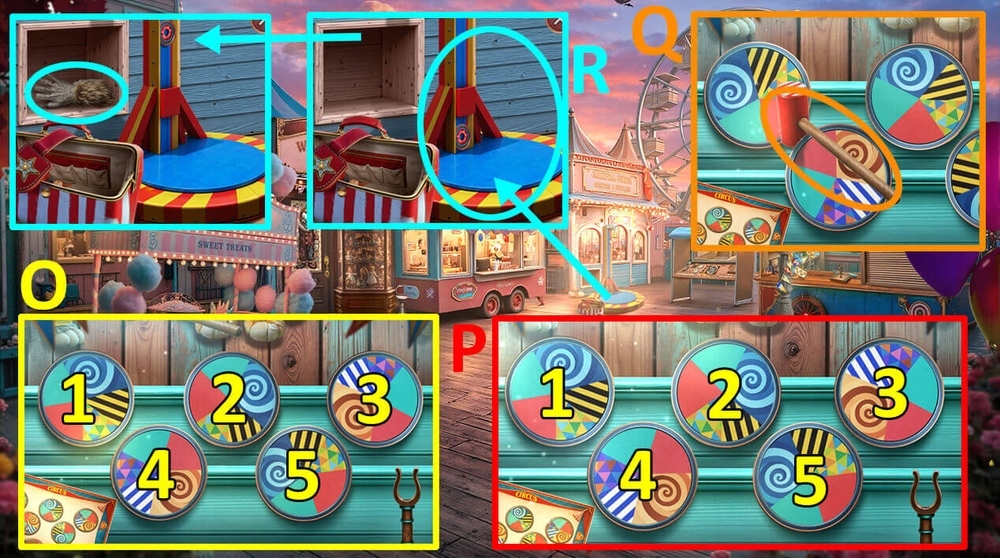
- Easy solution: Click: 1, 1, 1, 2, 2, 2, 3, 3, 4, 4, 4, 5, 5, 5 (O).
- Hard solution: Click: 1, 1, 1, 3, 3, 3, 2, 2, 2, 5, 5 (P).
- Take SLEDGEHAMMER (Q).
- Use SLEDGEHAMMER on the power meter toy, take MONSTER PAW GLOVE (R).
- Go to Clown’s Trailer.
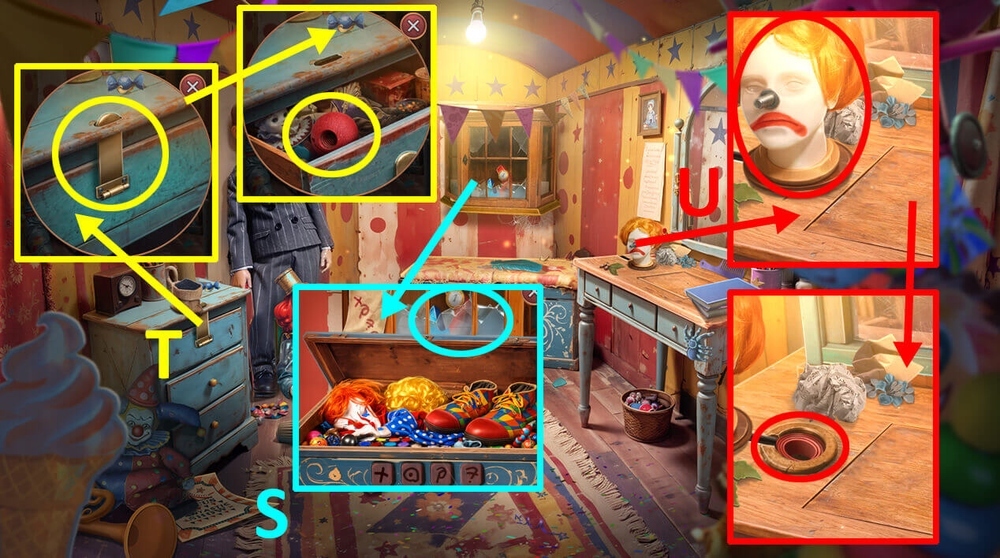
- Use MONSTER PAW GLOVE on the shards, take COIN and MAGNET (S).
- Use MAGNET on the metal valve, take CLOWN NOSE (T).
- Use CLOWN NOSE on the clown mannequin head, take BELT and KEY (U).
- Go back.
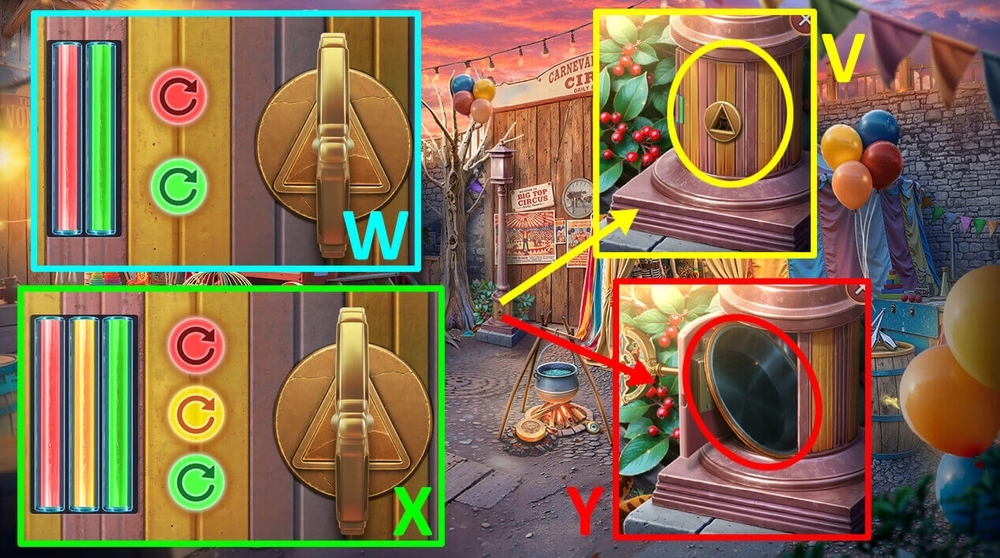
- Use KEY on the lantern (V).
- Easy solution: Solution is random (W).
- Hard solution: Solution is random (X).
- Take LANTERN LID (Y).
- Go to Inside the Tent.
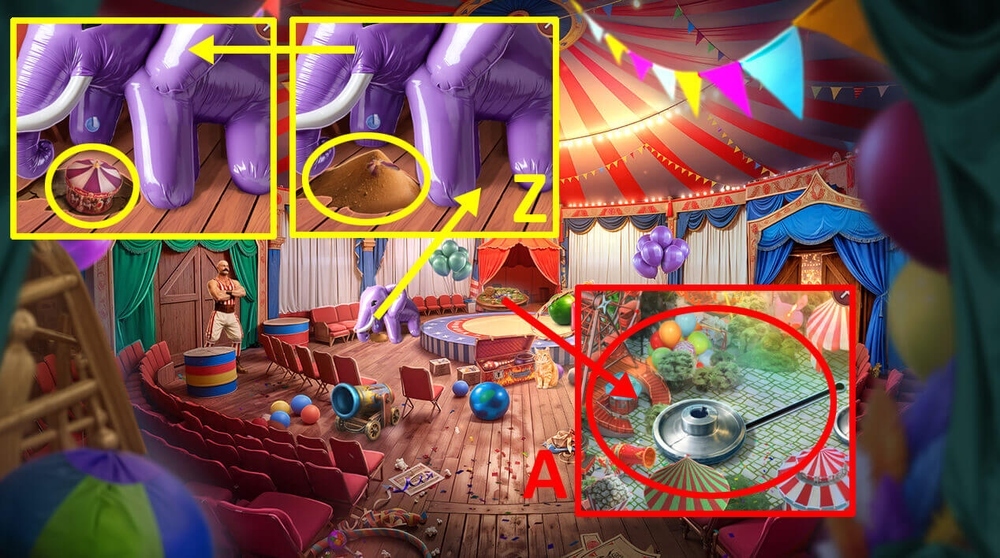
- Use LANTERN LID on the sand, take TENT FIGURINE (Z).
- Use the TENT FIGURINE on the festival layout (A).
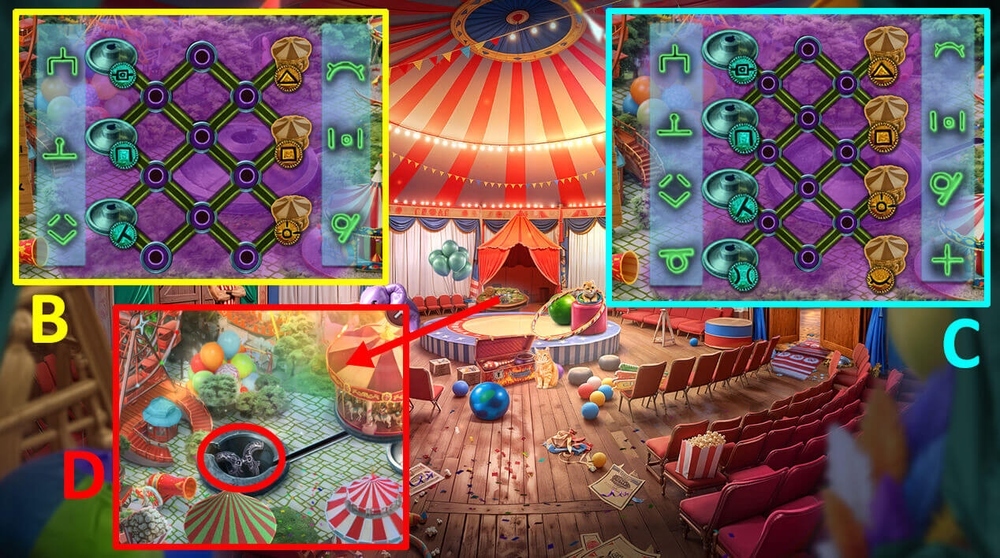
- Easy solution: Solution is random (B).
- Hard solution: Solution is random (C).
- Take CORKSCREW (D).
- Go to Clown’s Trailer.
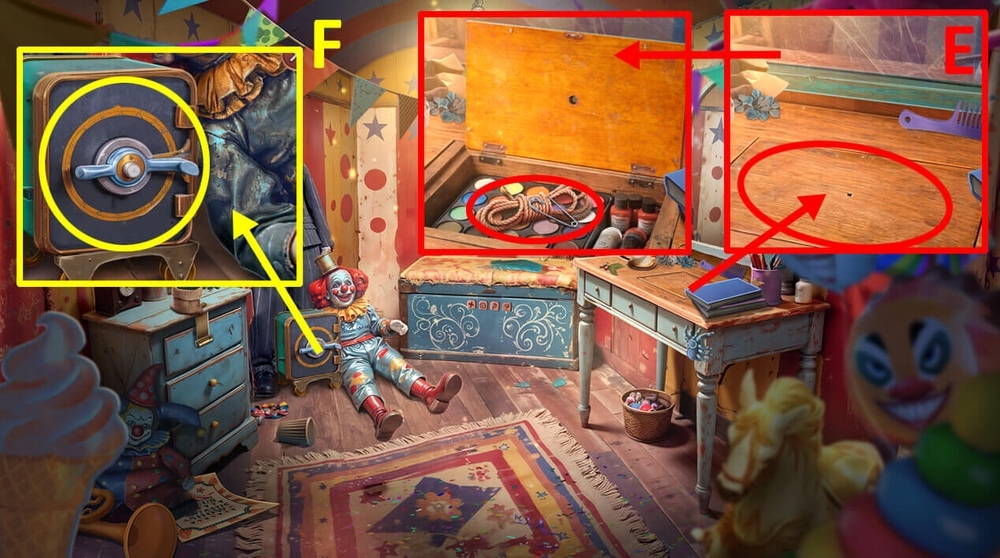
- Use CORKSCREW on the hole in the table, take PIN and THREAD (E).
- Use GUNPOWDER and THREAD on FIRECRACKER, earn FIRECRACKER.
- Use FIRECRACKER on the safe, use MATCHES on the firecracker (F).
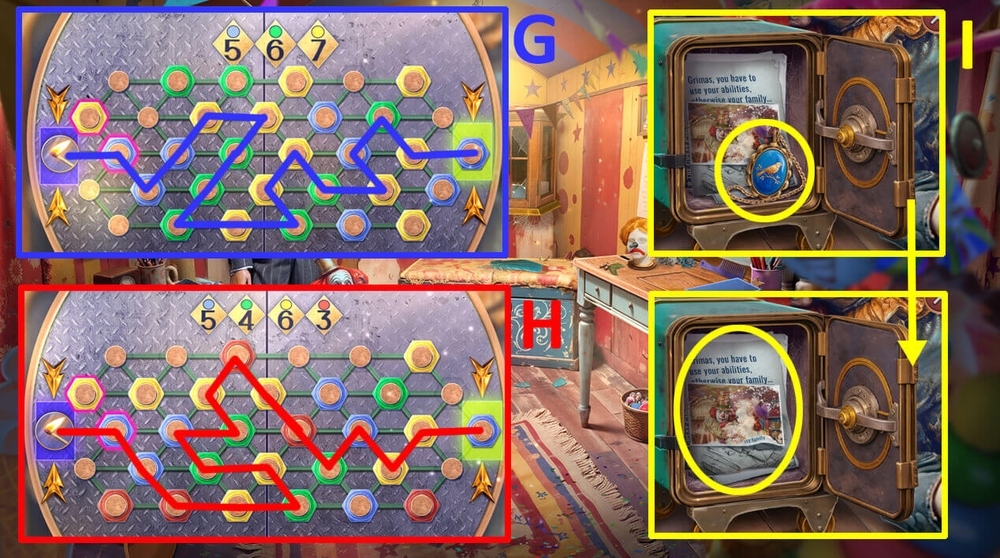
- Easy solution: Use the picture as a hint (G).
- Hard solution: Use the picture as a hint (H).
- Take EMILY’S PENDANT, read the notes (I).
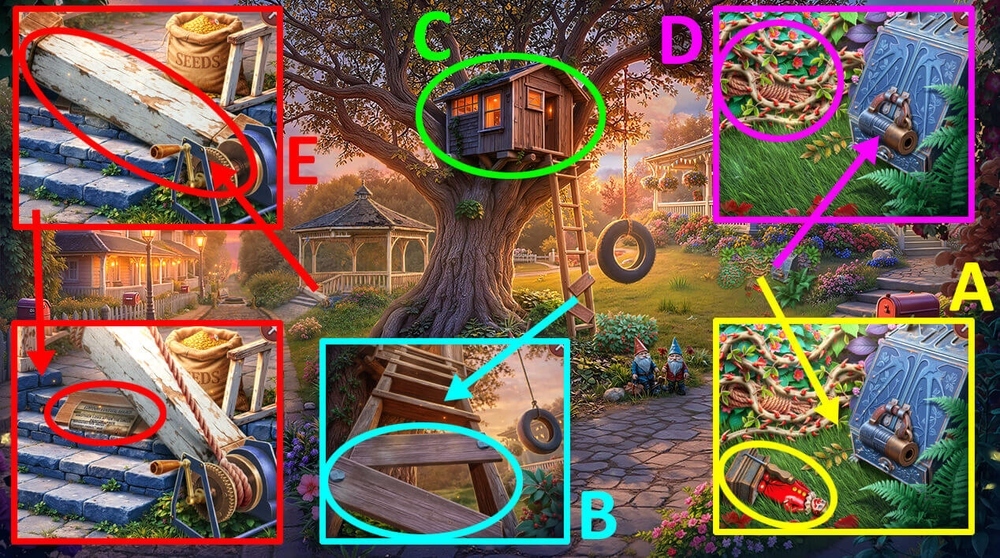
- Take LOCK PICKS 1/2 and HEAVY FIGURINE (A).
- Use NAILS and HEAVY FIGURINE on the boards (B).
- Play puzzle, earn HANDKERCHIEF (C).
- Use HANDKERCHIEF on the prickly stems, earn ROPE and HANDKERCHIEF (D).
- Use ROPE on the column, read the newspaper, take BOARD (E).
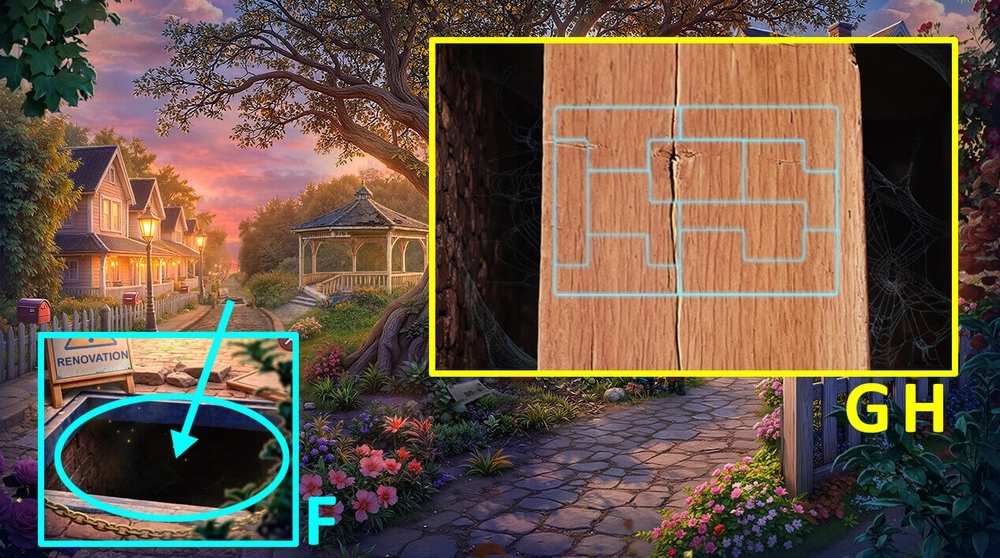
- Use BOARD on the hatch (F).
- Easy solution: Use the picture as a hint (G).
- Hard solution: Use the picture as a hint (H).
- Go forward.
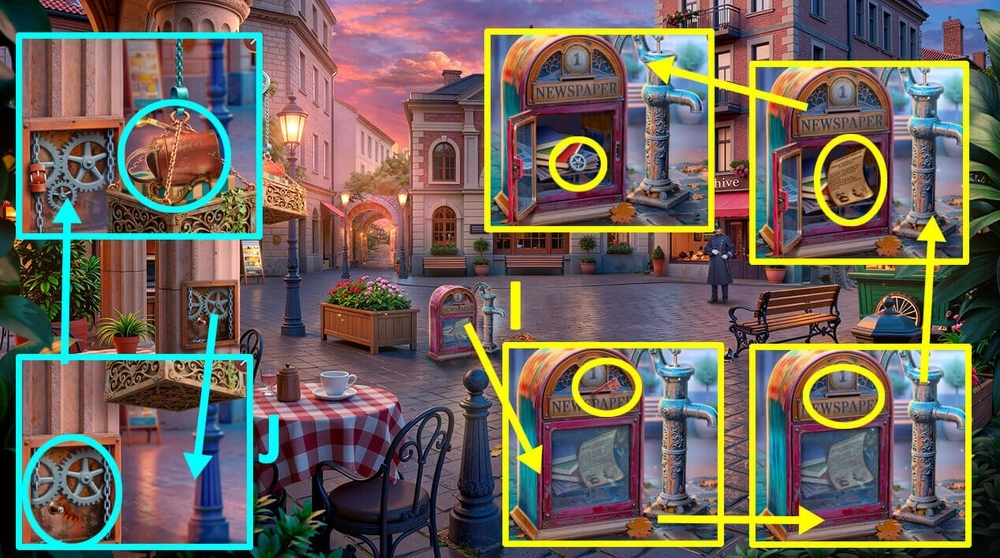
- Take FLAGS 1/2, use COIN on the book vending machine, read the note, take GEAR (I).
- Use BELT and GEAR on the mechanism, take WATERING CAN (J).
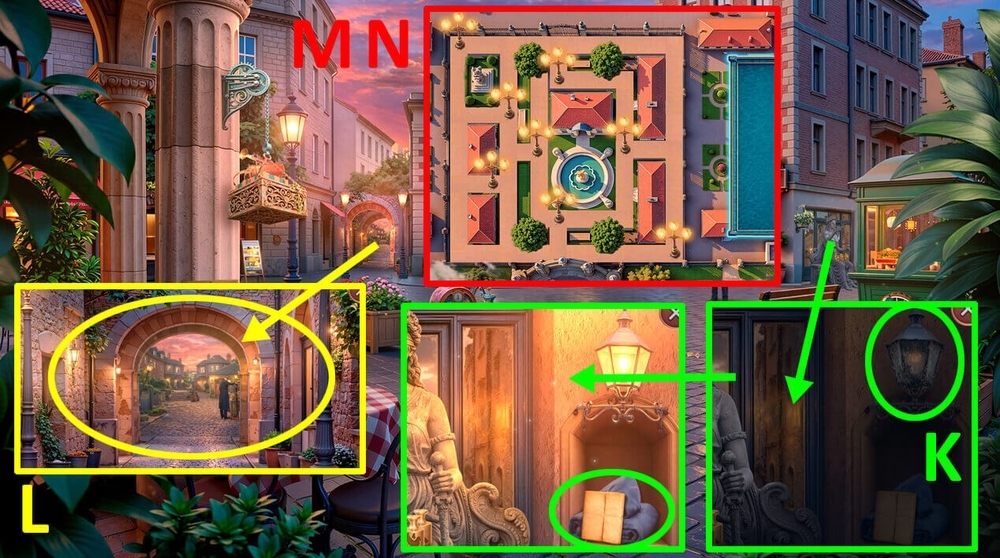
- Use HANDKERCHIEF and WATERING CAN on the lantern, read the note, take LEVERS 1/2 and CLOAK (K).
- Use CLOAK on the passage between the houses (L).
- Easy solution: Use the picture as a hint (M).
- Hard solution: Use the picture as a hint (N).
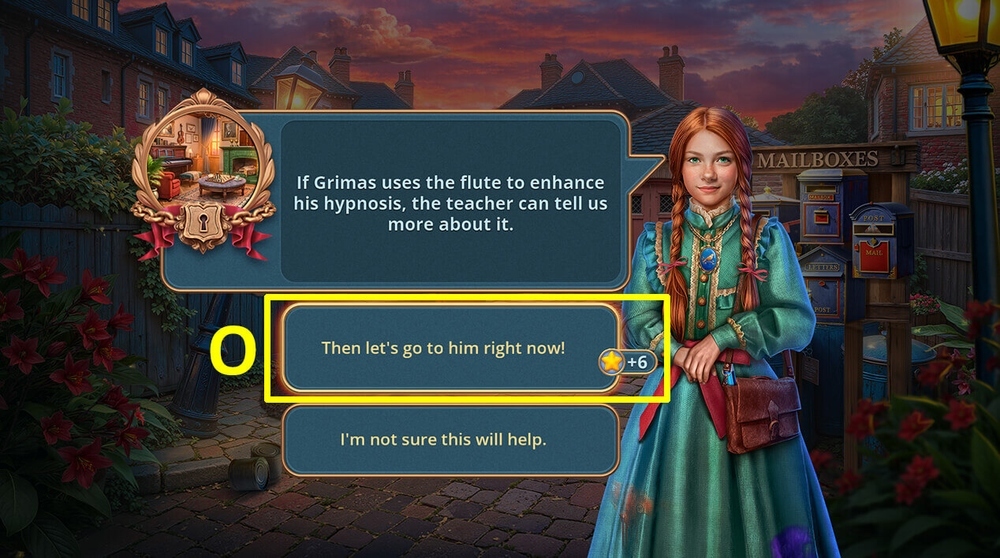
- Select this option (O).
- Go forward.
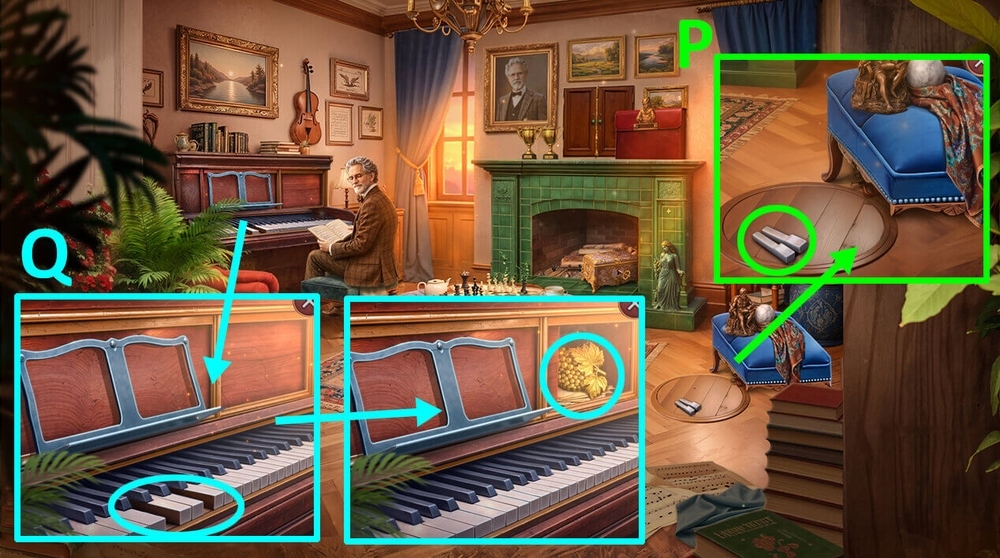
- Take PIANO KEYS (P).
- Use PIANO KEYS on the piano, take FIGURINE PART (Q).
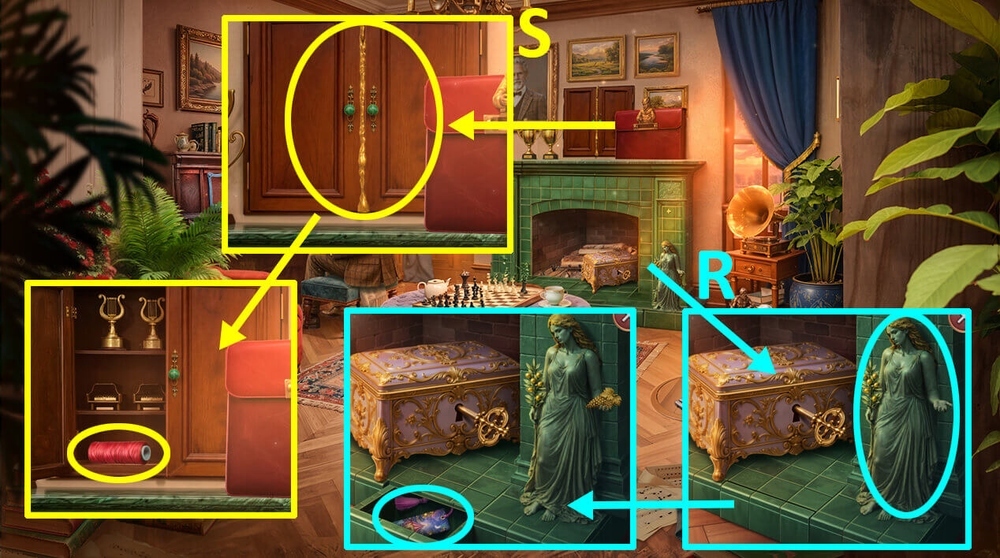
- Use FIGURINE PART on the figurine, take BOOKMARK (R).
- Use BOOKMARK on the cupboard doors, take THREADS (S).
- Go back.
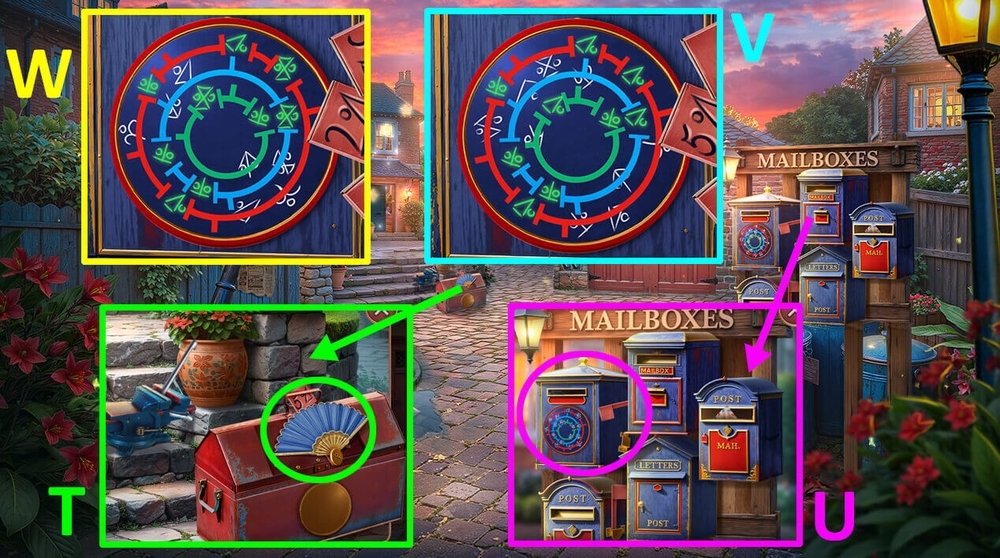
- Take FAN and FLAGS 2/2 (T).
- Use FLAGS 2/2 on the mailbox (U).
- Easy solution: Use the picture as a hint (V).
- Hard solution: Use the picture as a hint (W).
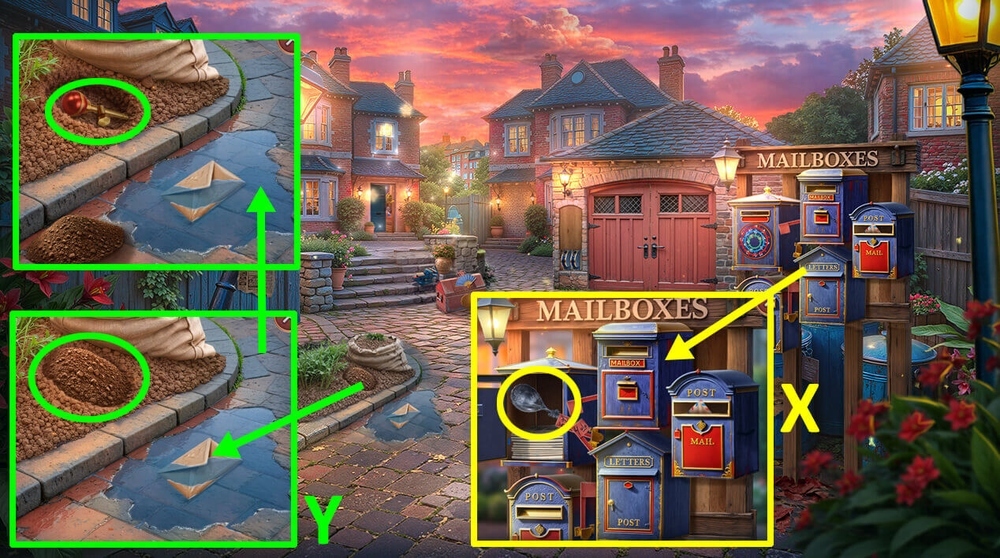
- Take SPOON (X).
- Use SPOON on the pile of dirt, take BOLT and LEVERS 2/2 (Y).
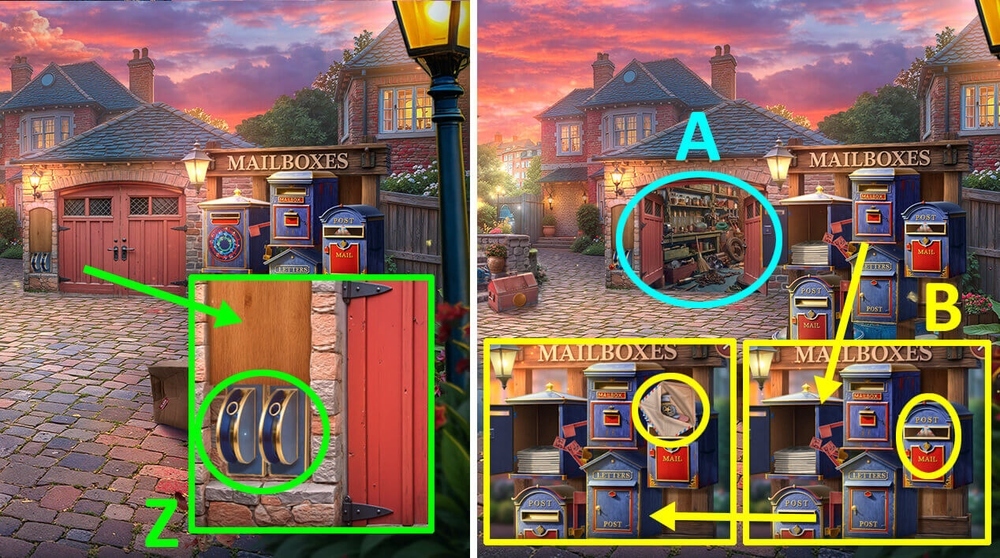
- Use LEVERS 2/2 on the garage door opening mechanism (Z).
- Play puzzle, earn HOOK (A).
- Use HOOK on the stuck letter, take BROKEN AMULET and LOCK PICKS 2/2 (B).
- Go to Near Emily’s House.
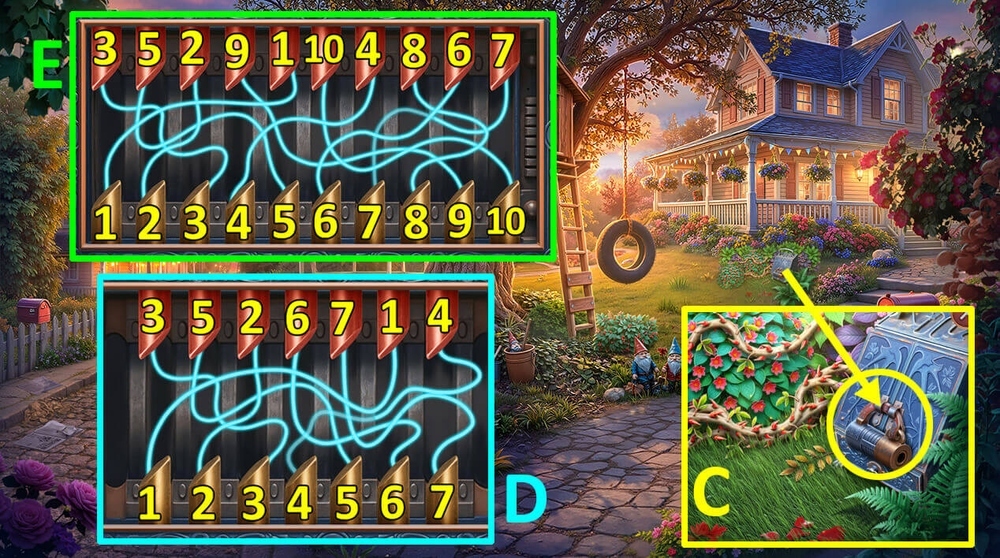
- Use LOCK PICKS 2/2 on the lock (C).
- Easy solution: Click: 1-1, 2-2, 3-3, 4-4, 5-5, 6-6, 7-7 (D).
- Hard solution: Click: 1-1, 2-2, 3-3, 4-4, 5-5, 6-6, 7-7, 8-8, 9-9, 10-10 (E).
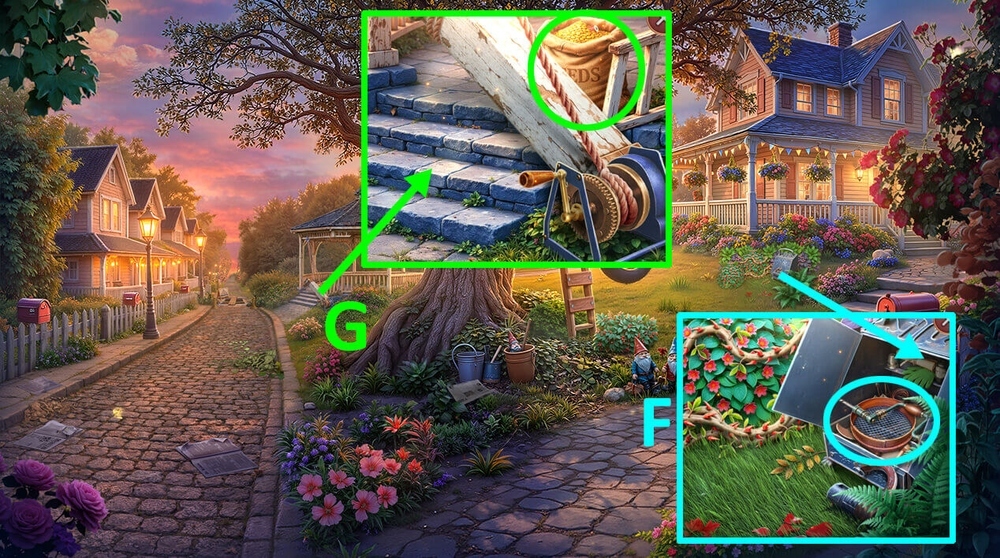
- Take HAND DRILL and SIEVE (F).
- Use SIEVE on the pouch of seeds, earn PENCIL (G).
- Go forward.
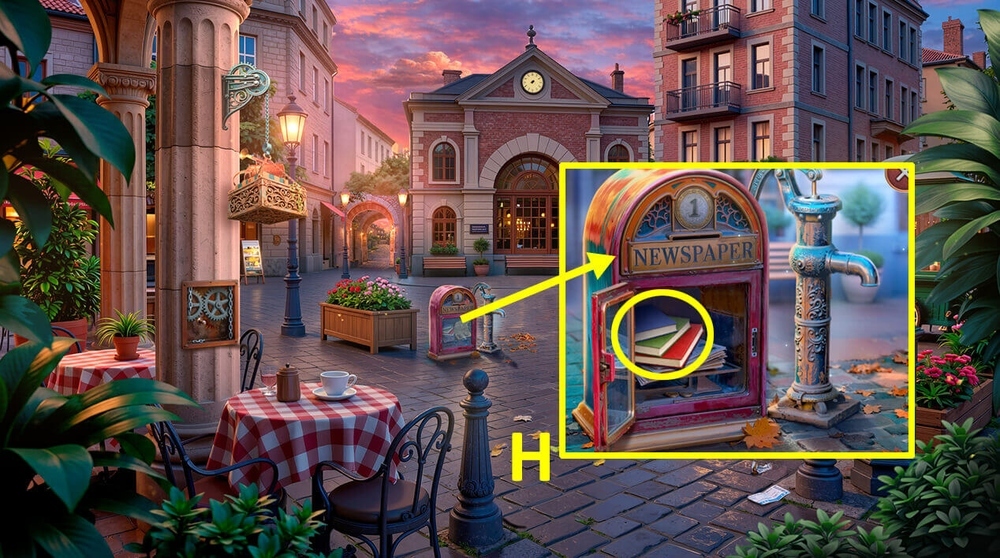
- Use THREADS on the books, earn BOOKS (H).
- Go to Music Teacher’s House.
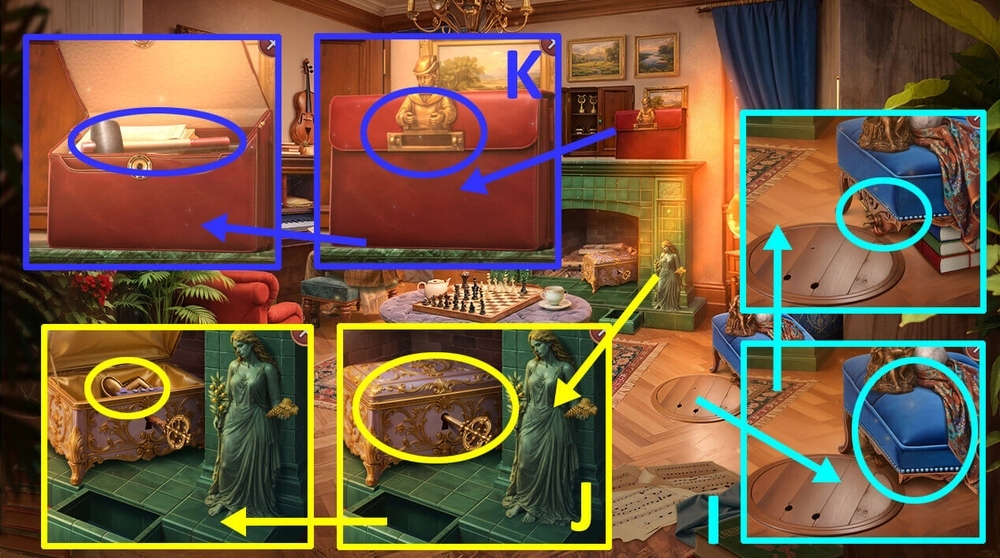
- Use BOOKS on the sofa, take OILER (I).
- Use OILER on the key, take NOTE AMULET (J).
- Use NOTE AMULET on the bag, take HAMMER (K).
- Go back.
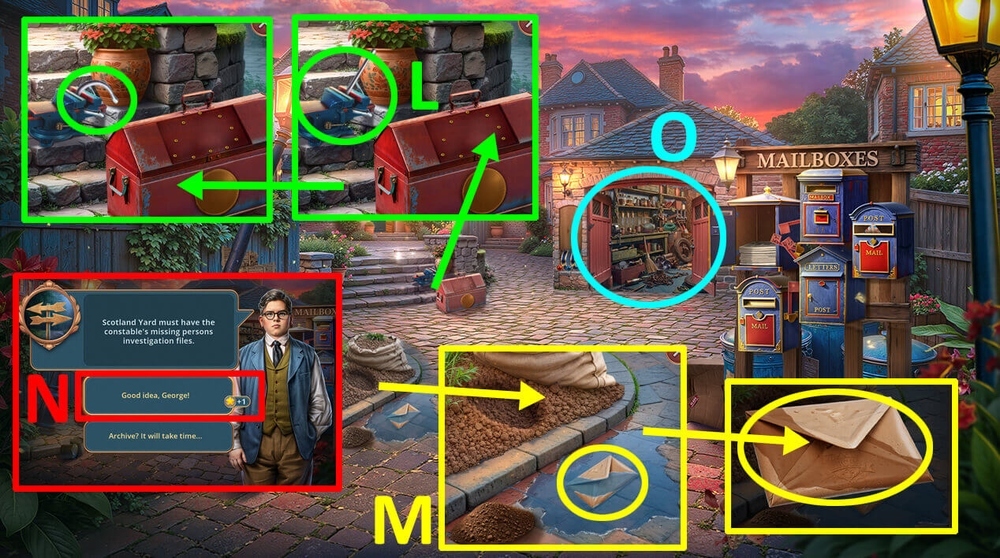
- Use HAMMER on the pin, take RING (L).
- Use FAN and PENCIL on the letter (M).
- Select this option (N).
- Play puzzle, earn PLIERS (O).
- Go forward.
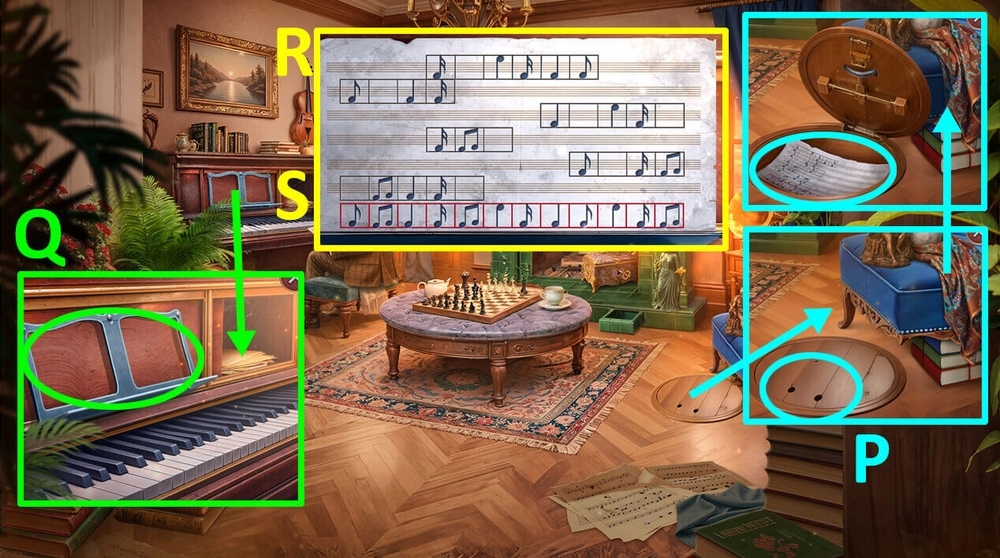
- Use RING on the trapdoor, take MUSIC SHEETS (P).
- Use MUSIC SHEETS on the music stand (Q).
- Easy solution: Use the picture as a hint (R).
- Hard solution: Use the picture as a hint (S).
- Talk to the music teacher.
- Go to City Square.
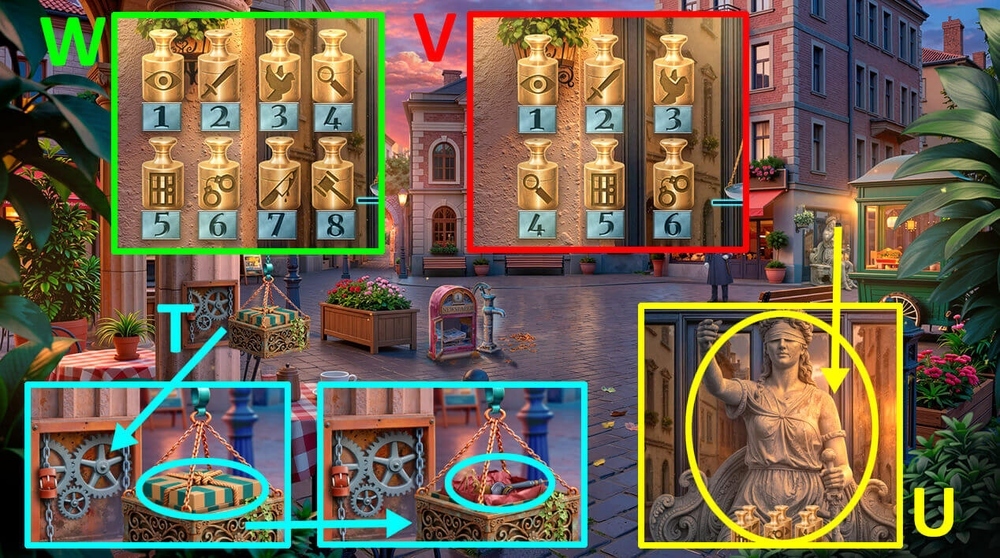
- Use PLIERS on the ropes, take AMULET PART and SCALES OF JUSTICE (T).
- Use SCALES OF JUSTICE on the statue of Themis (U).
- Easy solution: Use the picture as a hint (V).
- Hard solution: Use the picture as a hint (W).
- Go to Scotland Yard Archive.
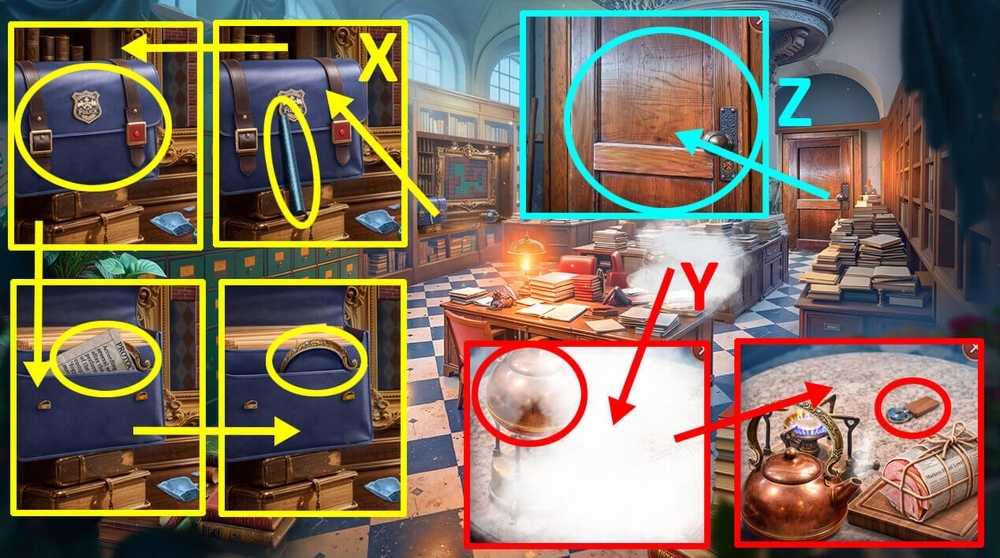
- Take ROD, use PIN on the button on the bag, read the note, take HEADBAND (X).
- Use HEADBAND on the kettle, take KEY (Y).
- Use KEY on the door (Z).
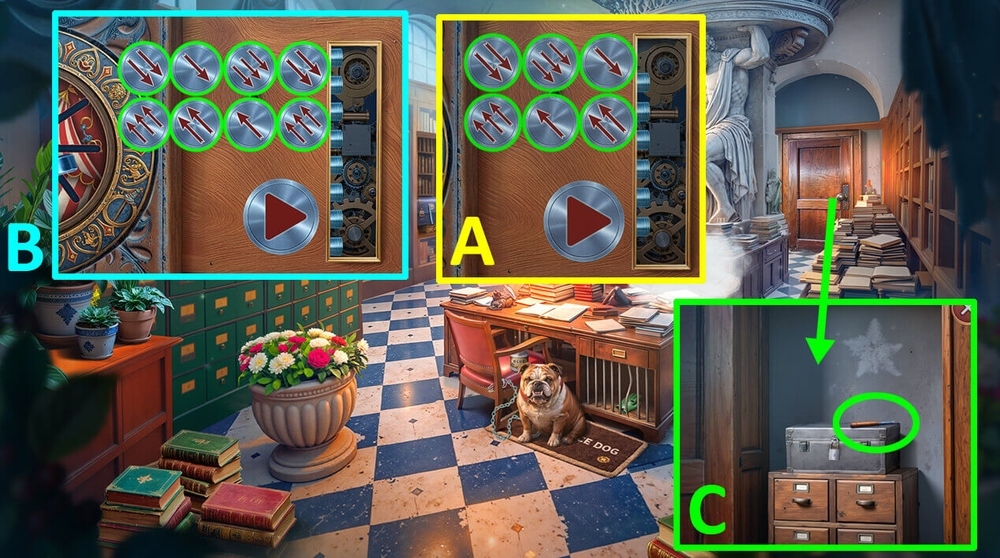
- Easy solution: Use the picture as a hint (A).
- Hard solution: Use the picture as a hint (B).
- Take RIPPER (C).
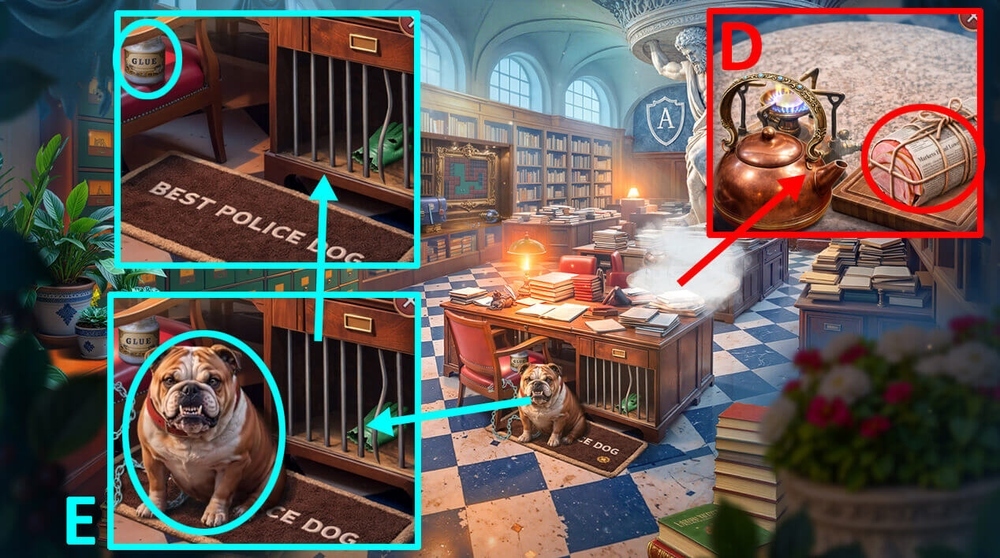
- Use RIPPER on the rope, earn HAM (D).
- Use HAM on the dog, take GLUE (E).
- Go to Near Emily’s House.
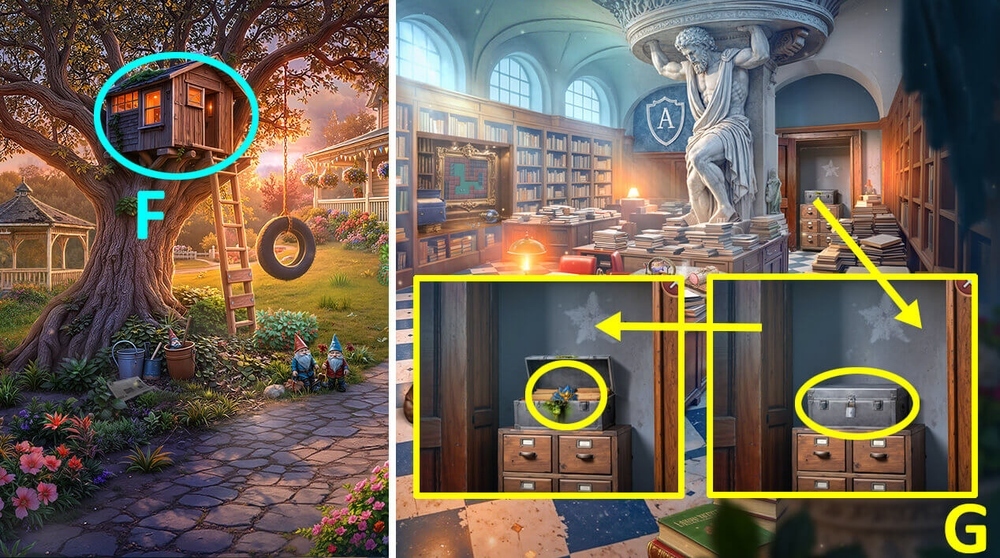
- Play puzzle, earn ACID (F).
- Go to Scotland Yard Archive.
- Use ACID on the lock, take FLOWER AMULET (G).
- Go to Constable’s Street.
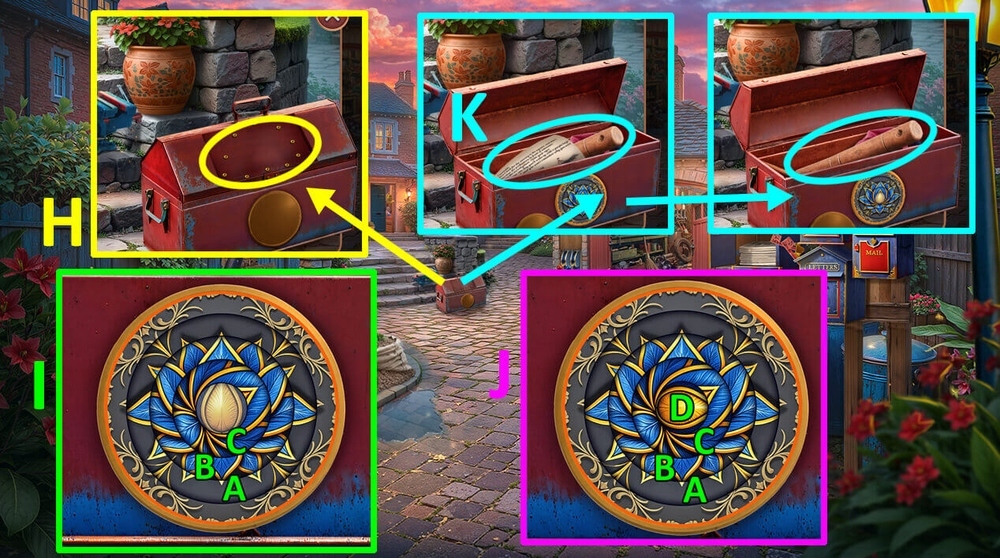
- Use FLOWER AMULET on the box of gardening tools (H).
- Easy solution: A*3, C*2, B (I).
- Hard solution: A*3, C*2, B, D*5 (J).
- Read the note, take STICK and SCARF (K).
- Go to Scotland Yard Archive.
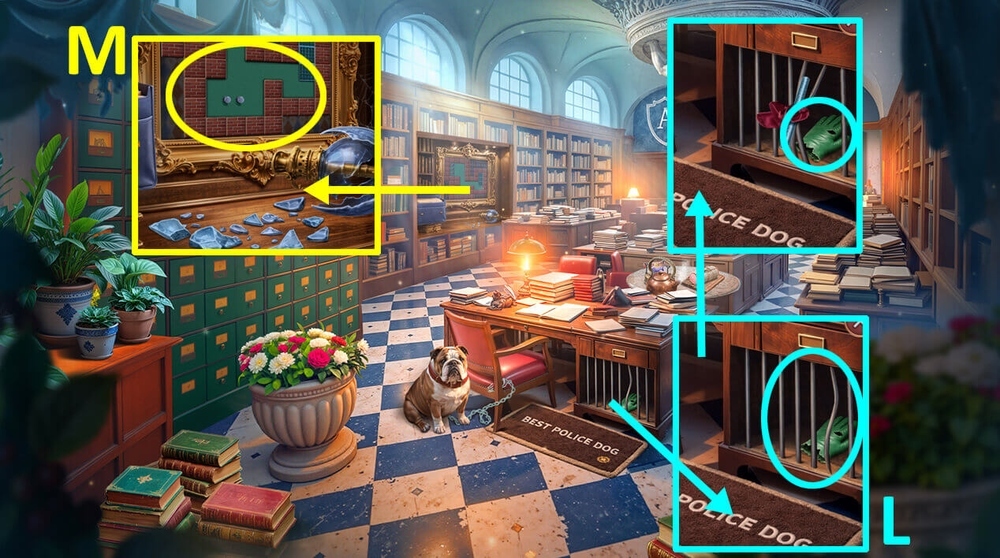
- Use ROD and SCARF on the grates, take TORN GLOVE and AMULET PIECE (L).
- Use AMULET PART, AMULET PIECE and GLUE on BROKEN AMULET, earn POLICEMAN’S HAT AMULET.
- Use POLICEMAN’S HAT AMULET on the painting on the wall (M).
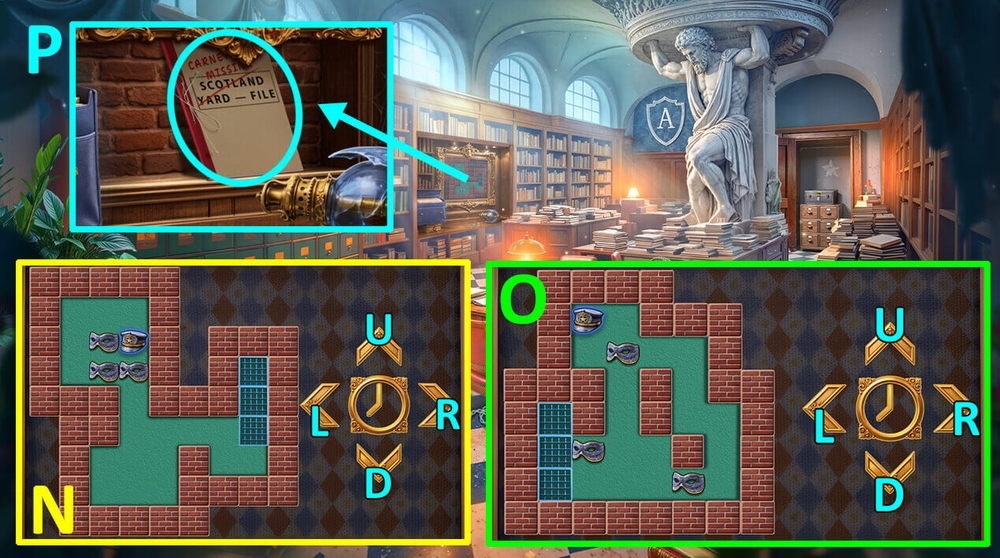
- Easy solution: D*3, R, D*2, L*2, U, R, D, R, U, L, U, R*3, D, R, U*2, D, L*4, U*4, L*2, D, R, U, R, D*4, R, D*2, L*2, U, R, D, R, U, L, U, R*3, D, R, U, L*4, U*3, L*2, D, R, U, R, D*3, R, D*2, L*2, U, R, D, R, U, L, U, R*3 (N).
- Hard solution: R, D, R*2, D*2, R, D*2, L*2, U, L*2, D, L, U, R*3, D, L*2, R*4, U*2, L, U*2, L*2, D*2, U*2, R*2, D*2, R, D*2, L*2, U, L*2 (O).
- Read the folder of documents from the cache (P).

- Select this option (Q).
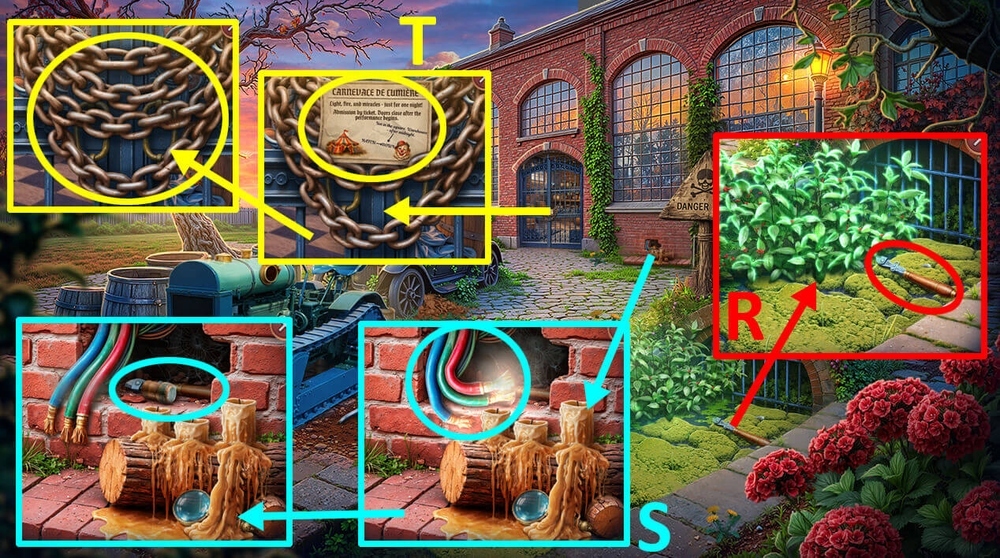
- Take BROKEN BOLT CUTTER (R).
- Use TORN GLOVE on the exposed wires, take CORK and BOLT CUTTER PART (S).
- Use BOLT and BOLT CUTTER PART on BROKEN BOLT CUTTER, earn BOLT CUTTER.
- Read the note, take CIRCUS EMBLEMS 1/4, use BOLT CUTTER on the chain (T).
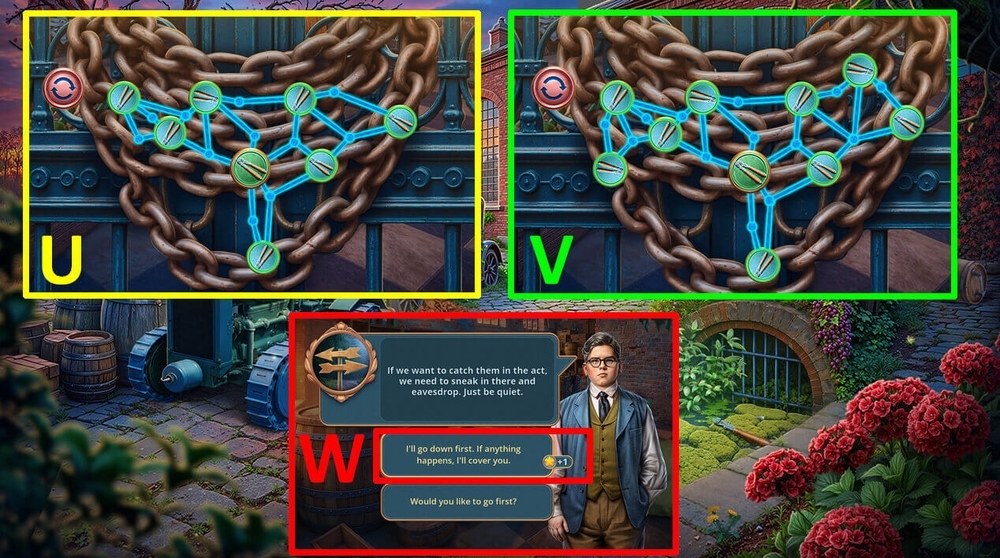
- Easy solution: Use the picture as a hint (U).
- Hard solution: Use the picture as a hint (V).
- Go forward.
- Select this option (W).
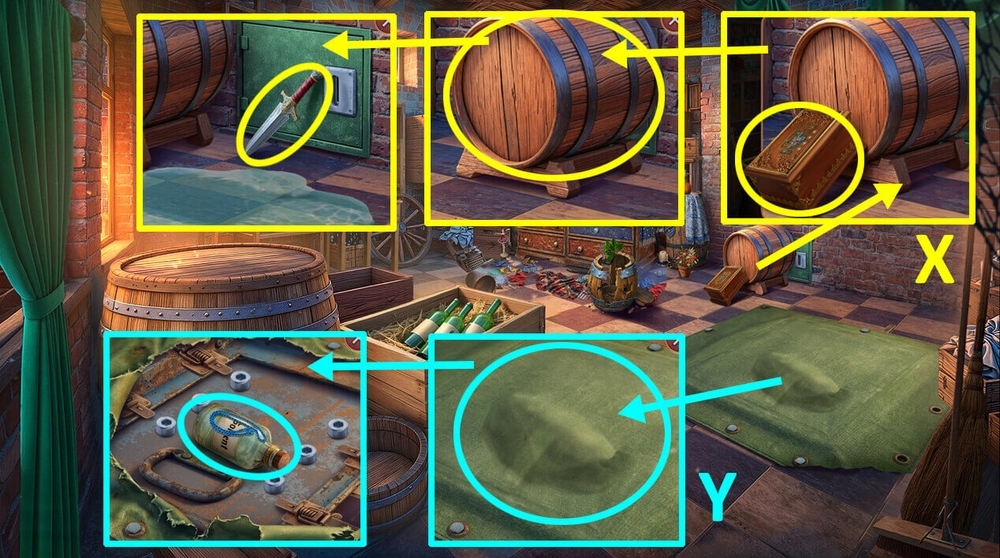
- Take JEWELRY BOX, use HAND DRILL on the barrel, take DAGGER (X).
- Use DAGGER on the tarp, take CHAIN and SOLVENT (Y).
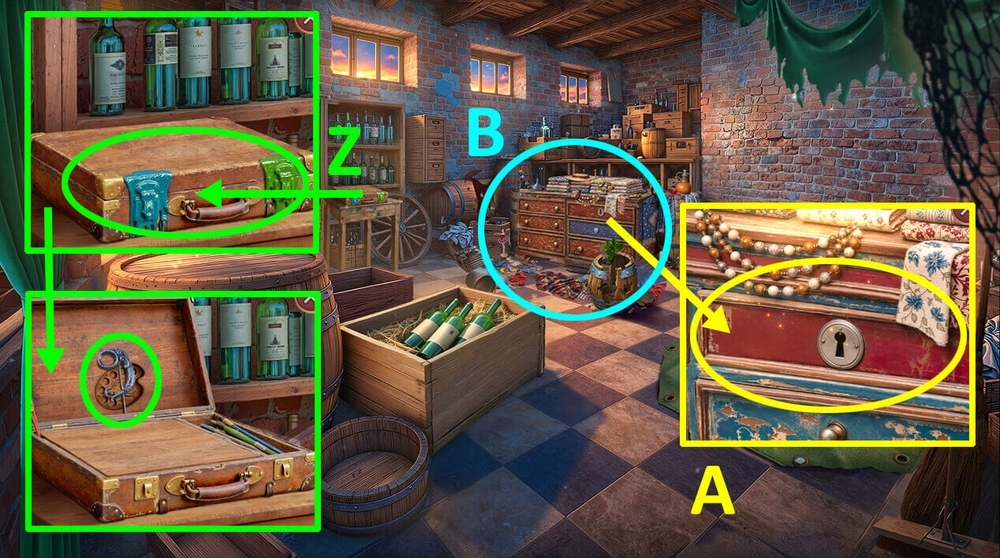
- Use SOLVENT on the old paint, take FIBULA (Z).
- Use FIBULA on the locked box (A).
- Play puzzle, earn TWINE (B).
- Go back.
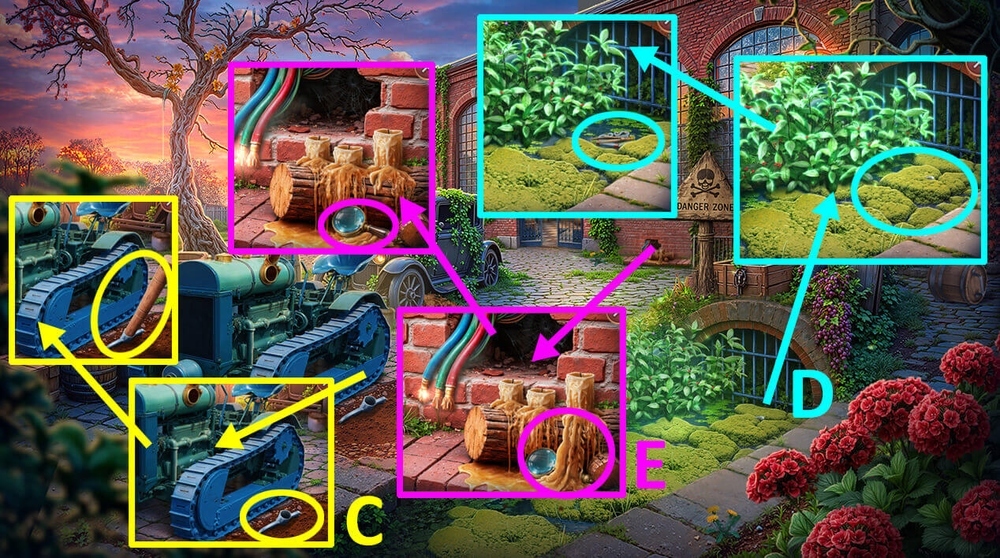
- Use STICK and TWINE on the broken pitchfork, take PITCHFORK (C).
- Use PITCHFORK on the ooze in the water, take TWEEZERS and FLINT (D).
- Use FLINT on the wax, take MAGNIFYING GLASS (E).
- Use TWEEZERS and MAGNIFYING GLASS on JEWELRY BOX.
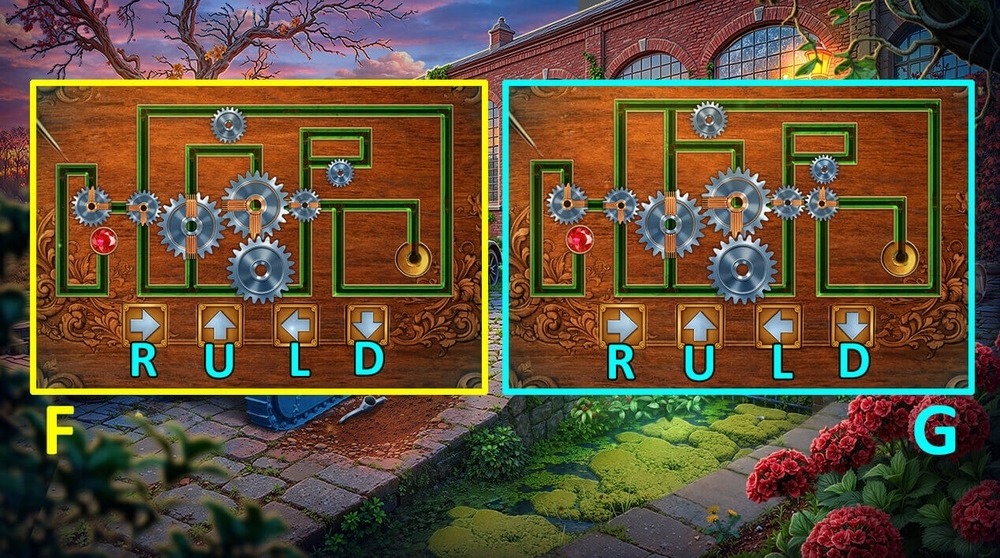
- Easy solution: D, L, U, R, D, R, D, R*2, U*2, R, U, L, D, R, U, L, D*3, L, U, R, D, R*3, D (F).
- Hard solution: D, L, U, R, D, R, D, R*2, U*2, R, U, L, D, R, U, L, D*3, L, U*2, R, D, L, U, R, D (G).
- Look at the photos inside the JEWELRY BOX, take FEATHER and CUFFLINK.
- Go forward.
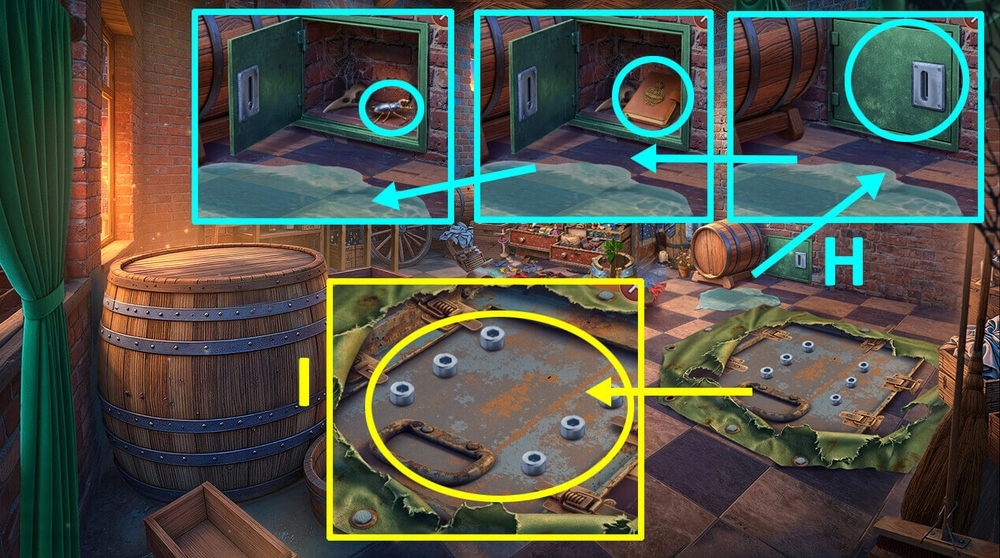
- Use CUFFLINK on the hidden compartment, read the journal, take STAG BEETLE AMULET (H).
- Use STAG BEETLE AMULET on the hatch (I).
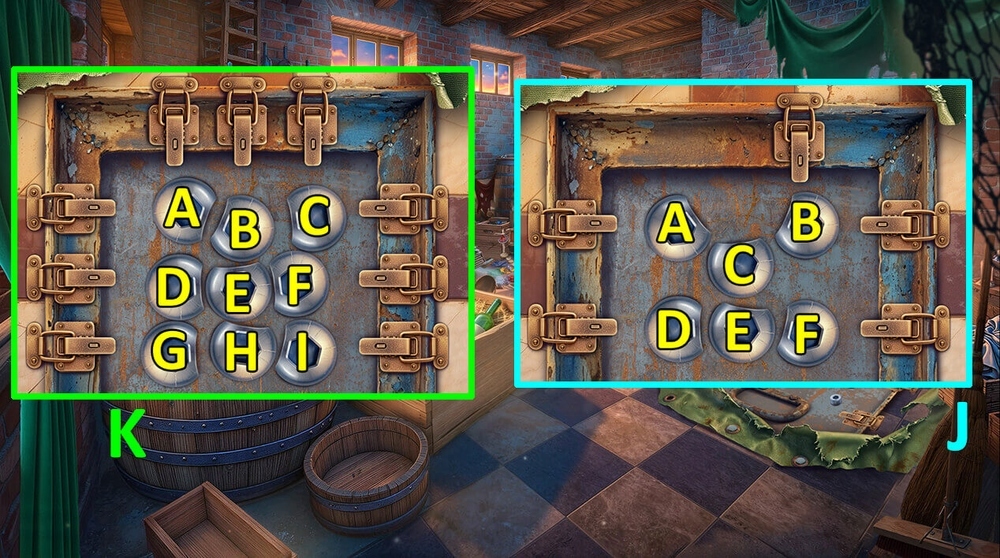
- Easy solution: A*2, B*2, C*2, E, F*4, E*2, D*2 (J).
- Hard solution: A*4, B*3, E, F, C*4, F*3, E, H, I*4, H*3, E, D, G*4, D (K).
- Go forward.
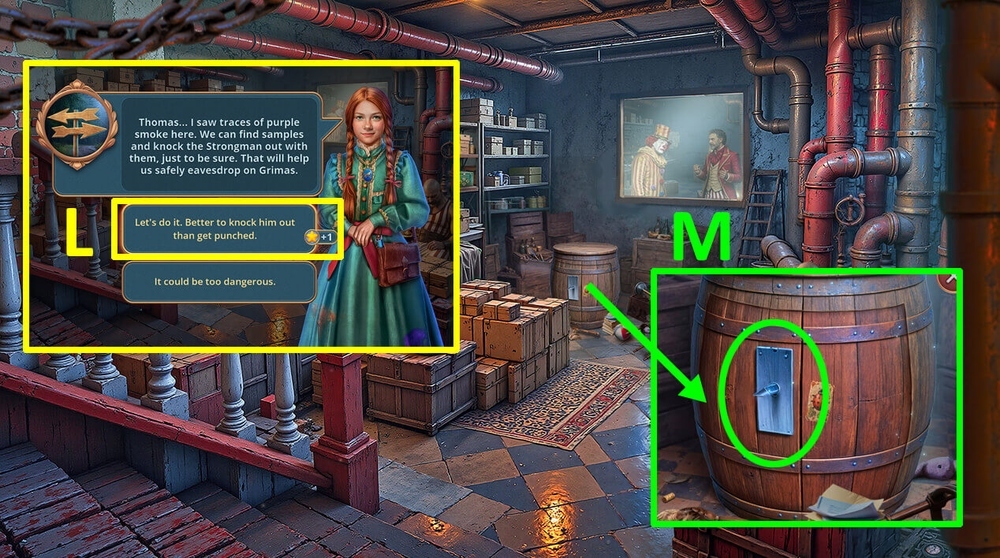
- Select this option (L).
- Use CORK on the pin (M).
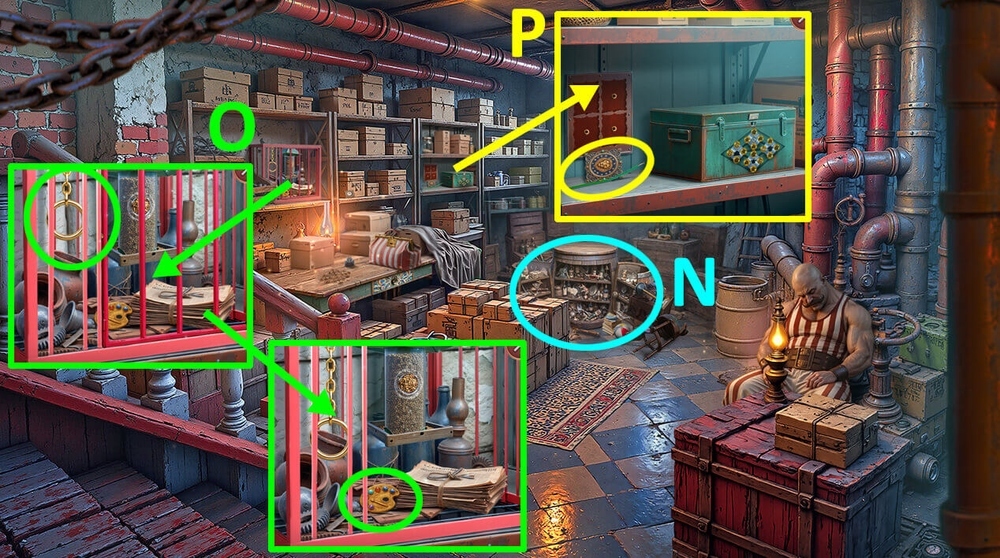
- Play puzzle, earn POKER (N).
- Use POKER on the ring, take PALETTE AMULET (O).
- Take WIRES 1/2 and CIRCUS EMBLEMS 2/4 (P).
- Go back.
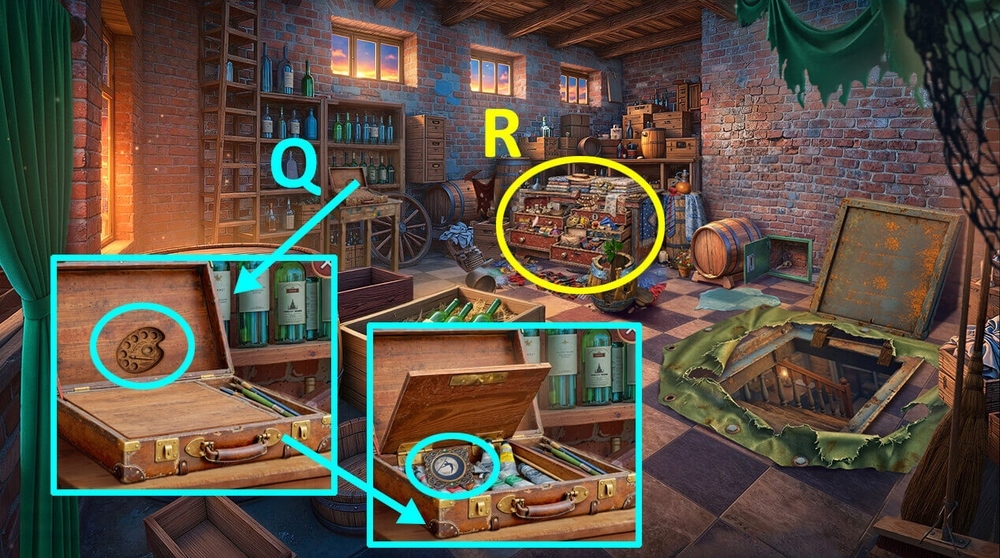
- Use PALETTE AMULET on the easel suitcase, take CIRCUS EMBLEMS 3/4 (Q).
- Play puzzle, earn NOTEBOOK (R).
- Go forward.
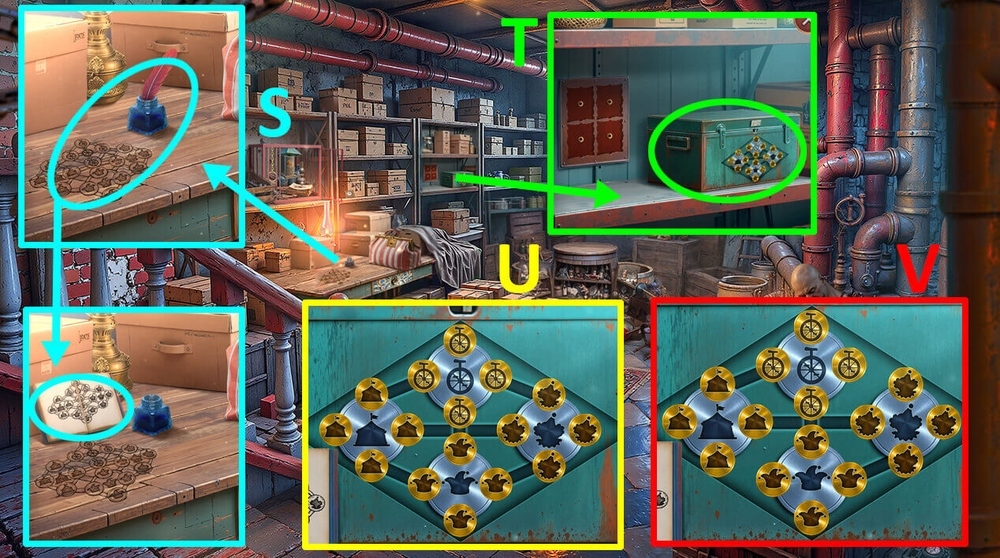
- Use FEATHER and NOTEBOOK on the inkwell on the table, take HINT (S).
- Use HINT on the symbols on the drawer (T).
- Easy solution: Use the picture as a hint (U).
- Hard solution: Use the picture as a hint (V).
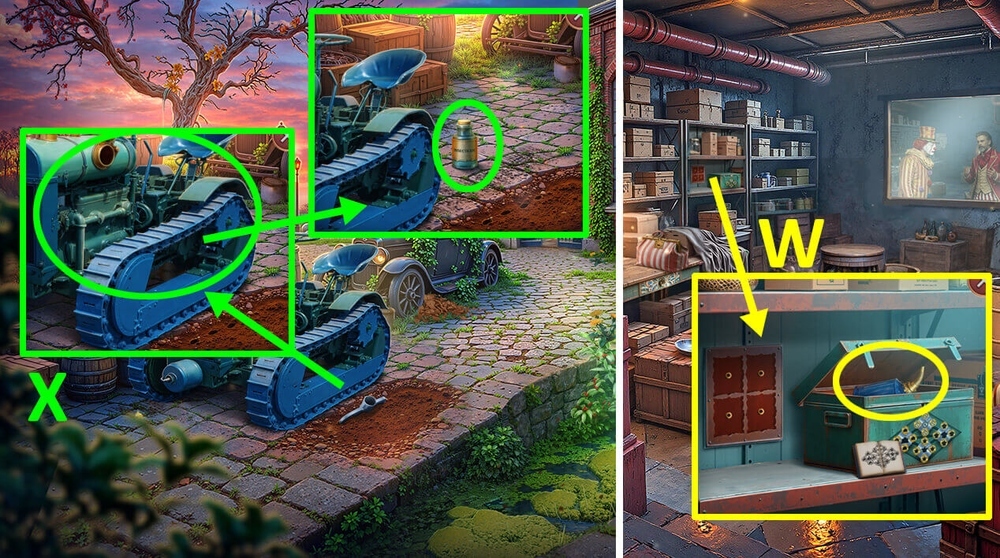
- Take FUEL (W).
- Go to Abandoned Warehouse.
- Use FUEL on the tractor, take INSECTICIDE (X).
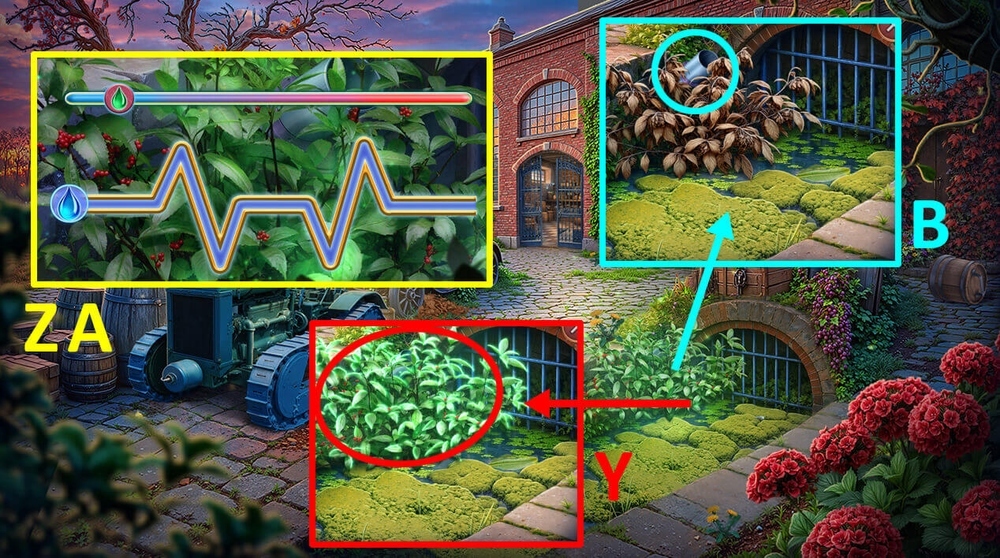
- Use INSECTICIDE on the poisonous bush (Y).
- Easy solution: Solution is random (Z).
- Hard solution: Solution is random (A).
- Take FEEDER TUBE (B).
- Go to Warehouse Basement.
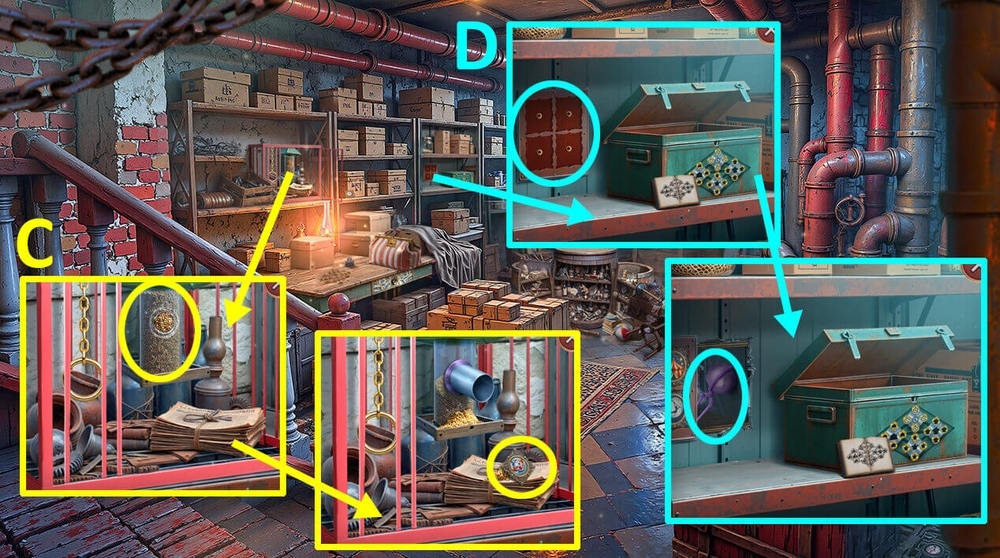
- Use FEEDER TUBE on the feeder, take CIRCUS EMBLEMS 4/4 (C).
- Use CIRCUS EMBLEMS 4/4 on the slots on the wall, take TEA STRAINER (D).
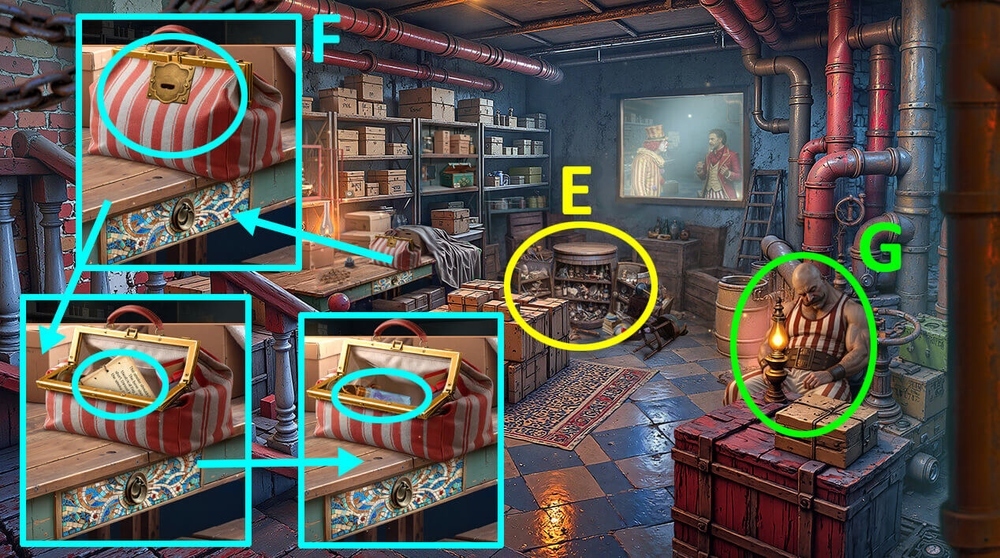
- Play puzzle, earn MASK AMULET (E).
- Use MASK AMULET on the bag, read the note, take PURPLE SMOKE SAMPLE (F).
- Use PURPLE SMOKE SAMPLE on the strongman (G).
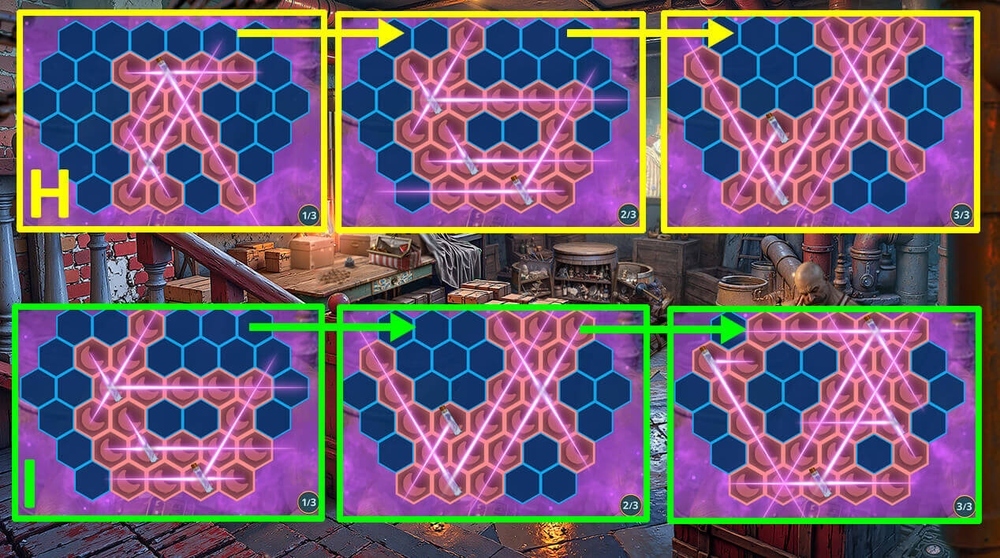
- Easy solution: Use the picture as a hint (H).
- Hard solution: Use the picture as a hint (I).
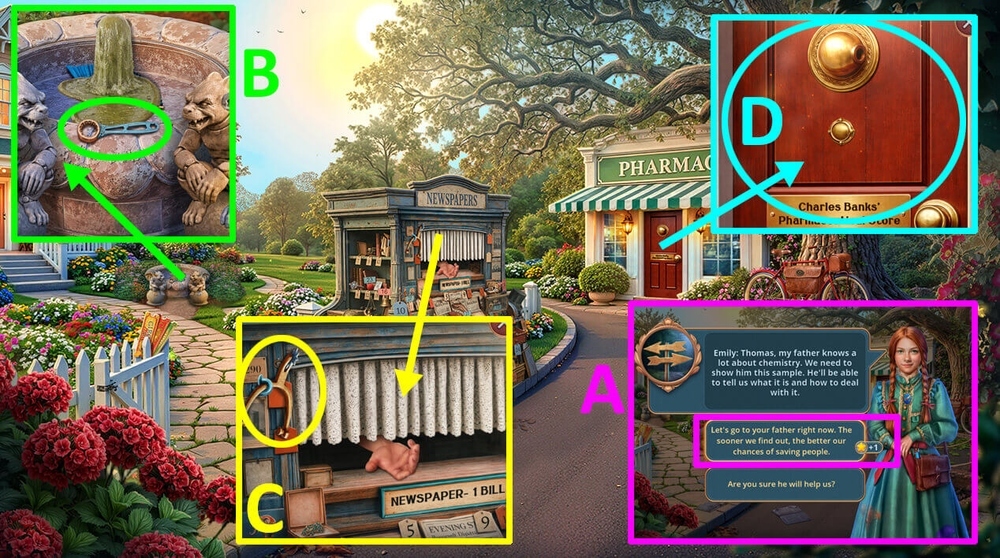
- Select this option (A).
- Take KEY (B).
- Use KEY on the nail, take HORSE SPUR (C).
- Use HORSE SPUR on the door (D).
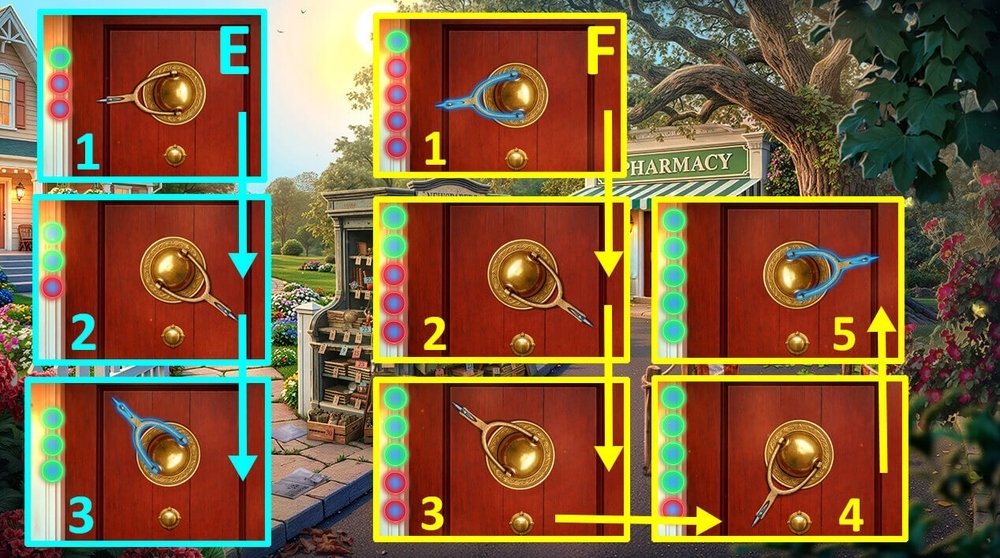
- Easy solution: Set the horse spur to the positions indicated in the steps 1, 2, 3 (E).
- Hard solution: Set the horse spur to the positions indicated in the steps 1, 2, 3, 4, 5 (F).
- Go forward.
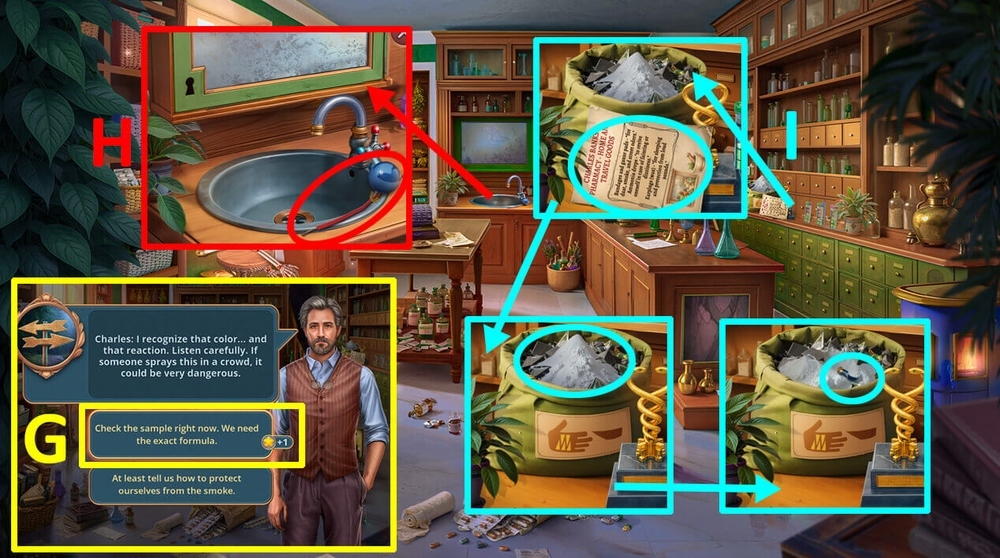
- Select this option (G).
- Take JOINT and WIRES 2/2 (H).
- Read the note, use TEA STRAINER on the powder, take HOOK (I).
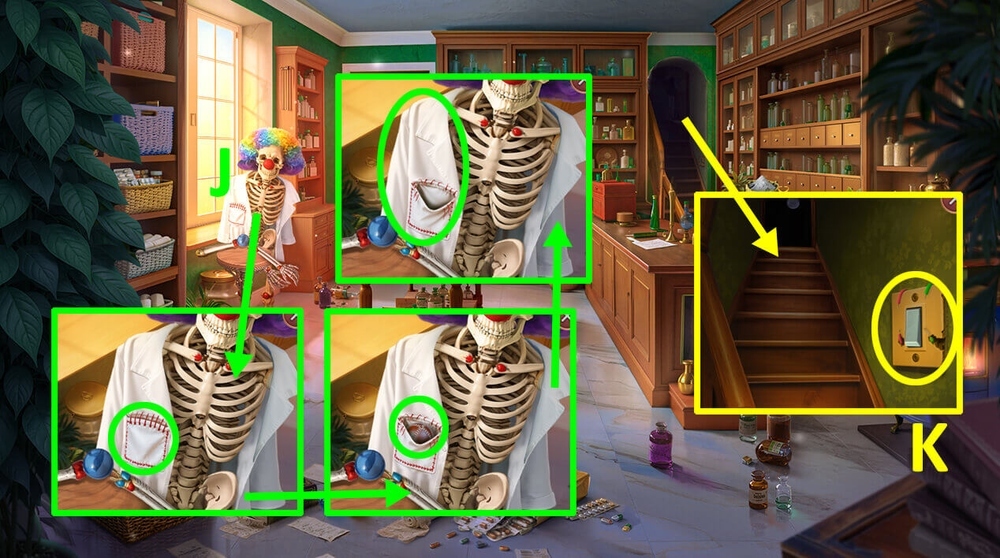
- Use HOOK on the pocket, take TENNIS BALL and POSTAGE STAMPS, click on the lab coat (J).
- Use WIRES 2/2 and POSTAGE STAMPS on the light switch (K).
- Go forward.
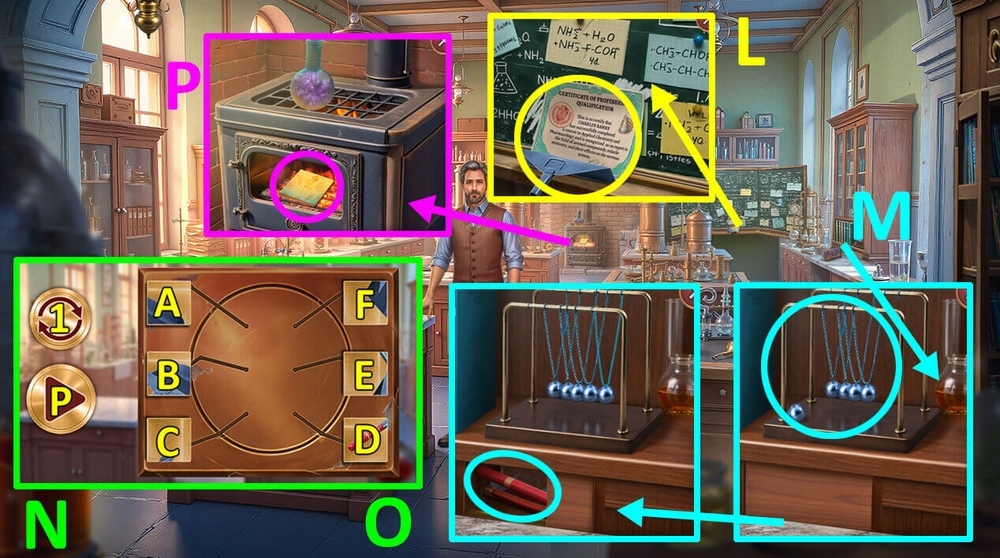
- Read the note, take TUBES 1/2 and FIREPROOF SHOVEL (L).
- Use CHAIN on the Newton’s cradle, take HOSE and SHOVEL PART (M).
- Use SHOVEL PART on FIREPROOF SHOVEL.
- Easy solution: Click: A, 1, 1, B, 1, 1, C, 1, 1, 1, D, 1, 1, E, 1, F, 1, 1, 1, P, earn FURNACE SHOVEL (N).
- Hard solution: Click: A, 1, F, 1, 1, 1, B, 1, C, 1, 1, D, 1, 1, E, 1, P, earn FURNACE SHOVEL (O).
- Use FURNACE SHOVEL on the hot tile, earn FIREPROOF ALCHEMICAL TILE (P).
- Go back.
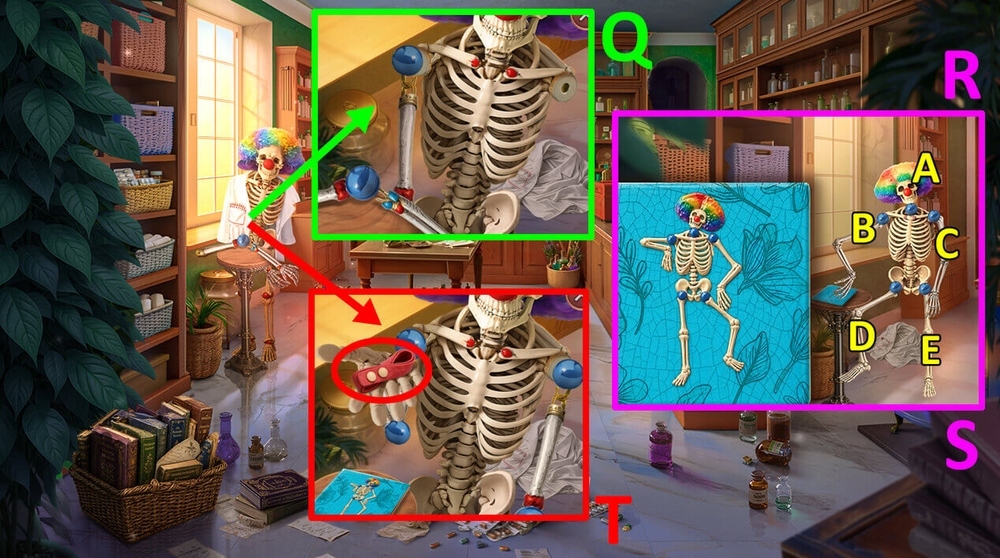
- Use JOINT and FIREPROOF ALCHEMICAL TILE on the mannequin (Q).
- Easy solution: Click: A*2, B, C, D*2, E*2 (R).
- Hard solution: Click: B, A, C*2, E*2 (S).
- Take MEDICAL TOURNIQUET (T).
- Go back.
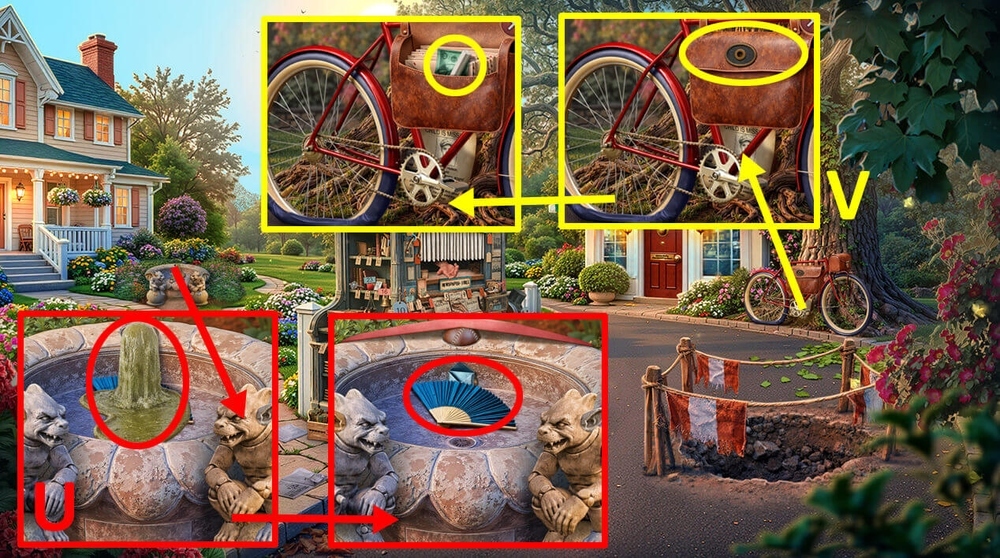
- Use TENNIS BALL and MEDICAL TOURNIQUET on the water splashing from the fountain, take FAN and LETTER-SHAPED AMULET (U).
- Use LETTER-SHAPED AMULET on the bag, take CHALK and BANKNOTE (V).
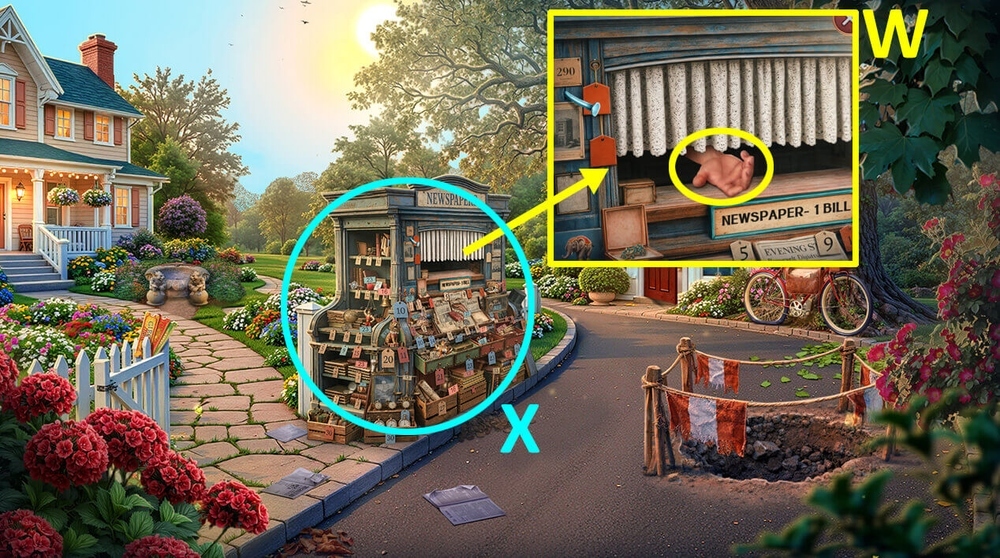
- Use BANKNOTE on the newspaper vendor (W).
- Play puzzle, earn WINGED FIGURINE IN AMBER (X).
- Go to Laboratory.
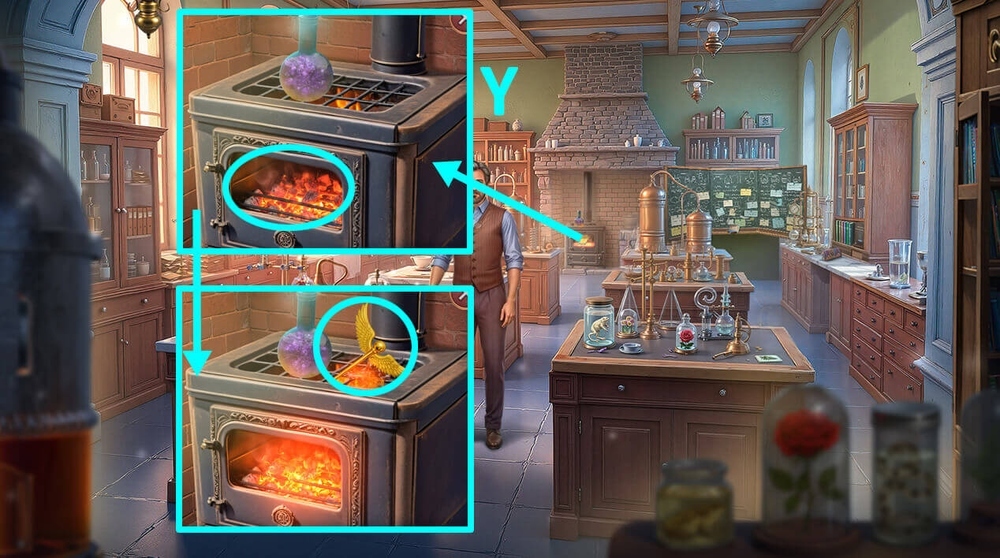
- Use FAN and WINGED FIGURINE IN AMBER on the smoldering coals, take WINGED FIGURINE (Y).
- Go back.
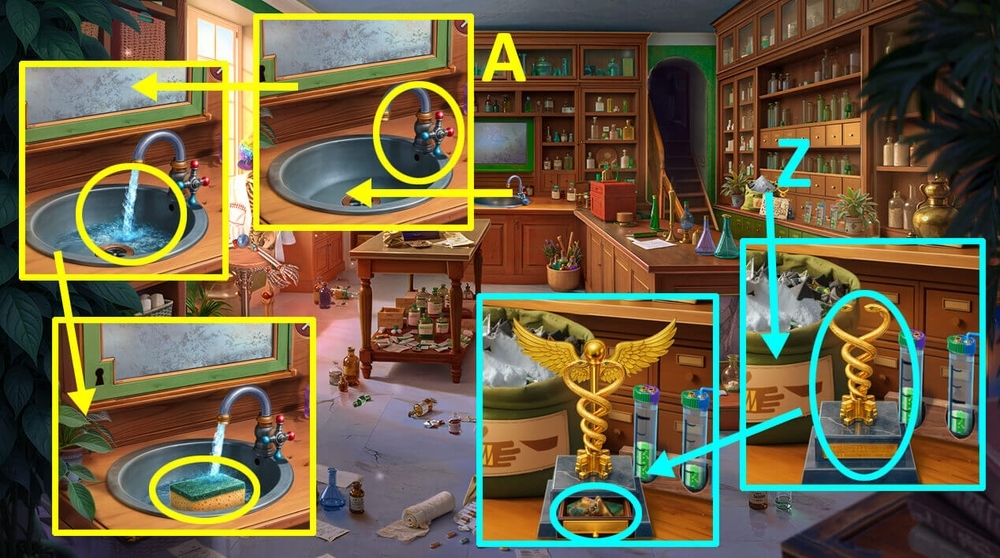
- Use WINGED FIGURINE on the incomplete statue featuring a caduceus, take BENT AMULET and DRY SPONGE (Z).
- Click on the sink faucet, use DRY SPONGE on the water, take WET SPONGE (A).
- Go forward.
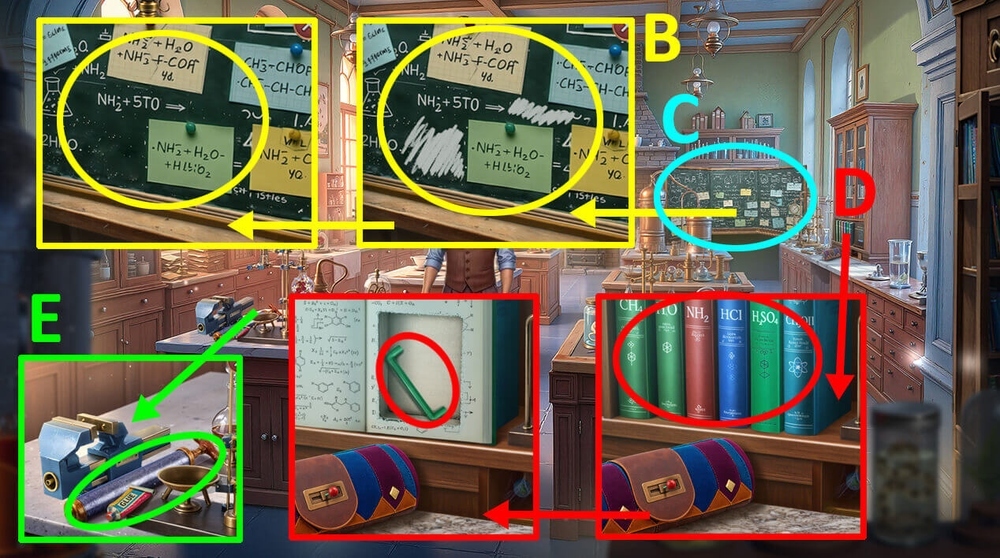
- Use WET SPONGE on the board covered with writing, use CHALK on the incomplete formulas on the board (B).
- Play puzzle, earn CHEMICAL FORMULA (C).
- Use CHEMICAL FORMULA on the chemistry books, take TUBES 2/2 (D).
- Take GLUE and PUMP (E).
- Go back.
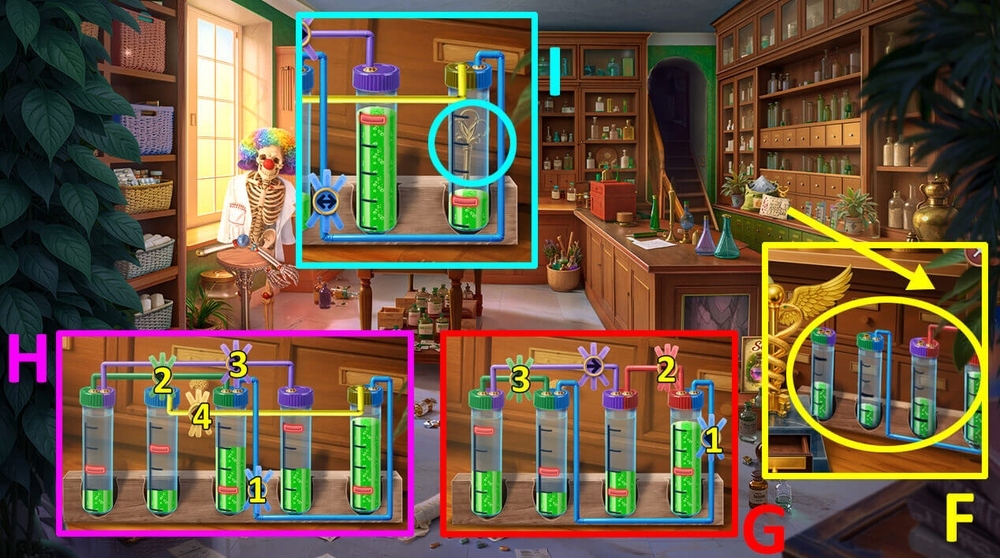
- Use TUBES 2/2 on the system of test tubes (F).
- Easy solution: Click: 1, 2, 3 (G).
- Hard solution: Click: 1, 2, 3, 4 (H).
- Take KEY (I).
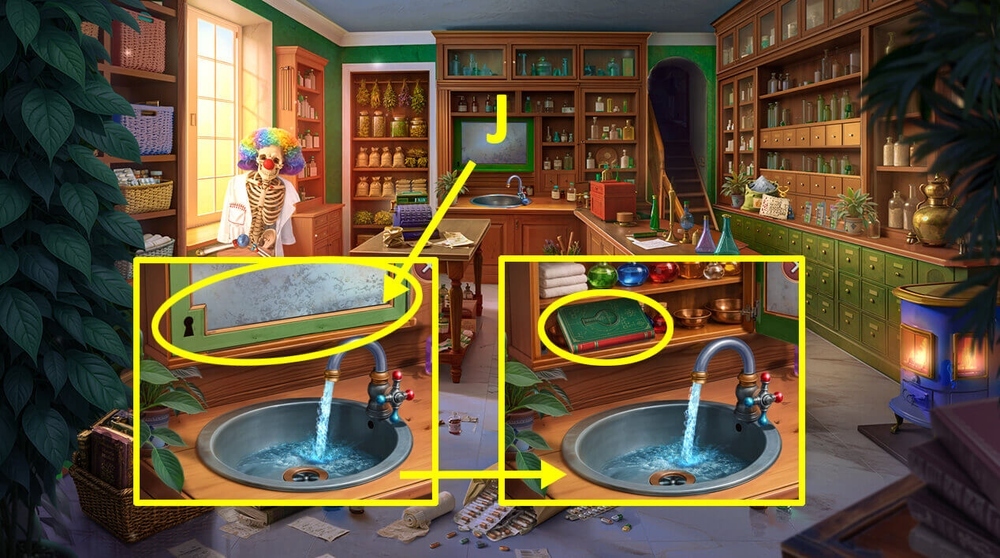
- Use KEY on the cabinet door, read and take EMILY’S ENCYCLOPEDIA and NOZZLE (J).
- Use HOSE and NOZZLE on PUMP, earn PUMP.
- Go back.
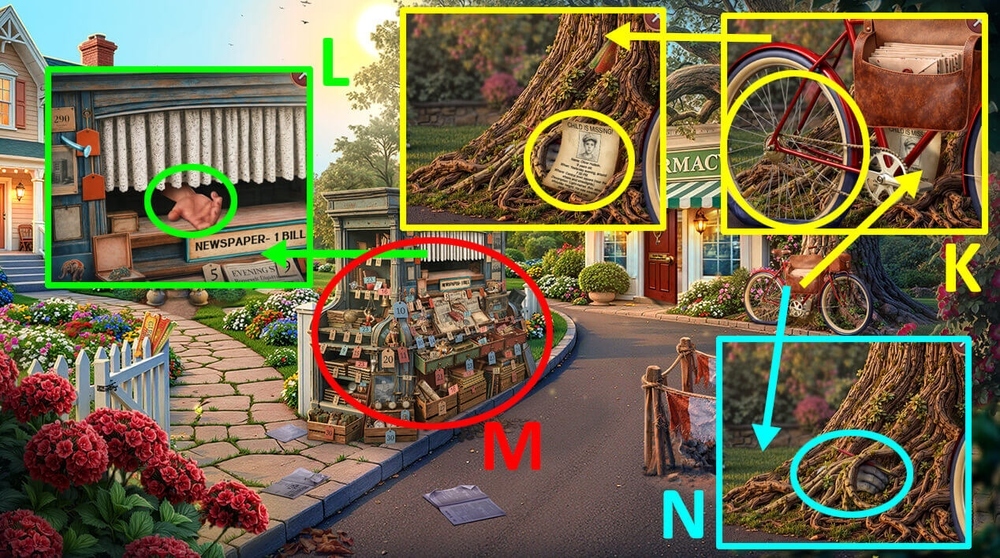
- Use PUMP on the flat bicycle tire, read MISSING CHILD POSTER, take MISSING CHILD POSTER (K).
- Use MISSING CHILD POSTER on the newspaper vendor (L).
- Play puzzle, earn SAW (M).
- Use SAW on the tree roots, take SMALL BRUSH and STATUE PART (N).
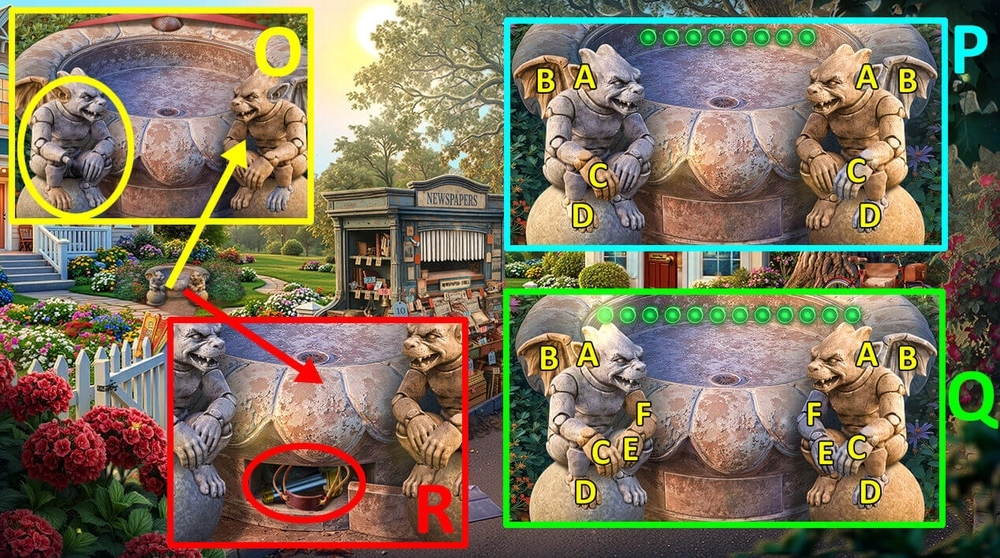
- Use STATUE PART on the gargoyle (O).
- Easy solution: Swap the parts A-A, B-B, C-C, D-D (P).
- Hard solution: Swap the parts A-A, B-B, C-C, D-D, E-E, F-F (Q).
- Take ELASTIC BAND and VICE HANDLE (R).
- Go to Laboratory.
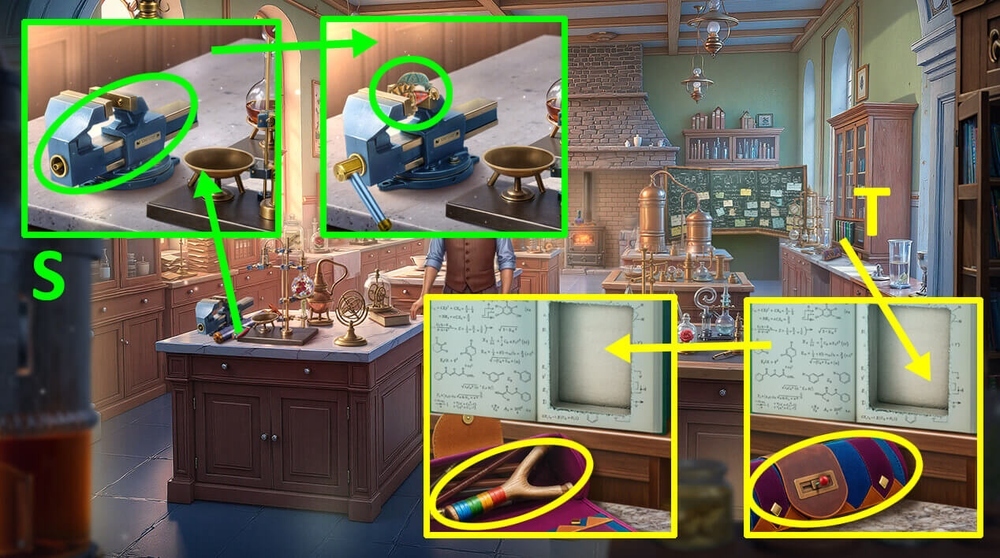
- Use BENT AMULET and VICE HANDLE on the vice, take REPAIRED AMULET (S).
- Use REPAIRED AMULET on the case, take SLINGSHOT (T).
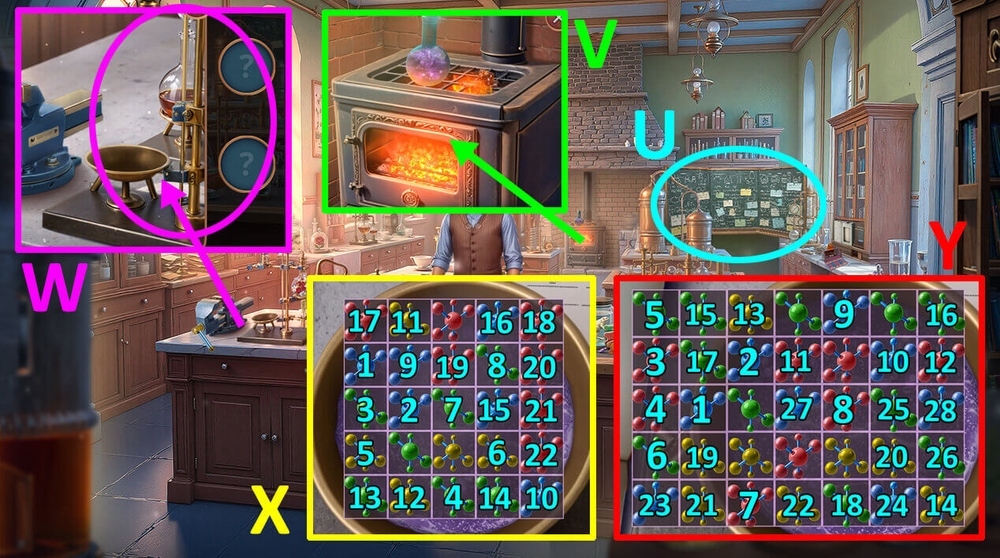
- Play puzzle, earn BLACKSMITH’S TONGS (U).
- Use BLACKSMITH’S TONGS on the hot flask, earn BUBBLING COMPOUND (V).
- Use EMILY’S ENCYCLOPEDIA and BUBBLING COMPOUND on the laboratory setup (W).
- Easy solution: Click: 1, 2, 3, 4, 5, 6, 7, 8, 9, 10, 11, 12, 13, 14, 15, 16, 17, 18, 19, 20, 21, 22 (X).
- Hard solution: Click: 1, 2, 3, 4, 5, 6, 7, 8, 9, 10, 11, 12, 13, 14, 15, 16, 17, 18, 19, 20, 21, 22, 23, 24, 25, 26, 27, 28 (Y).
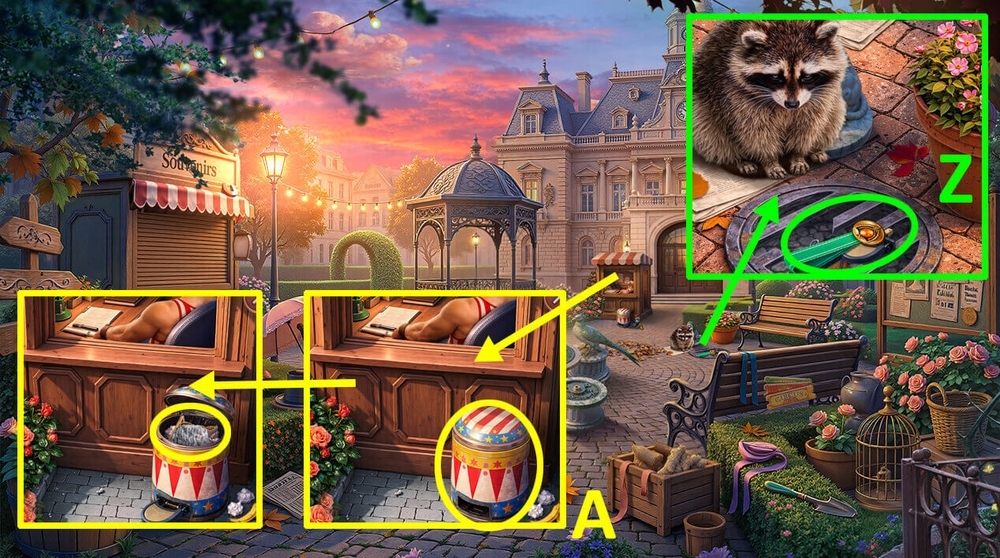
- Take MAYOR’S MEDALS 1/2 and TRASH BIN PEDAL (Z).
- Use TRASH BIN PEDAL on the trash bin, read the note, take CLOCK HAND (A).
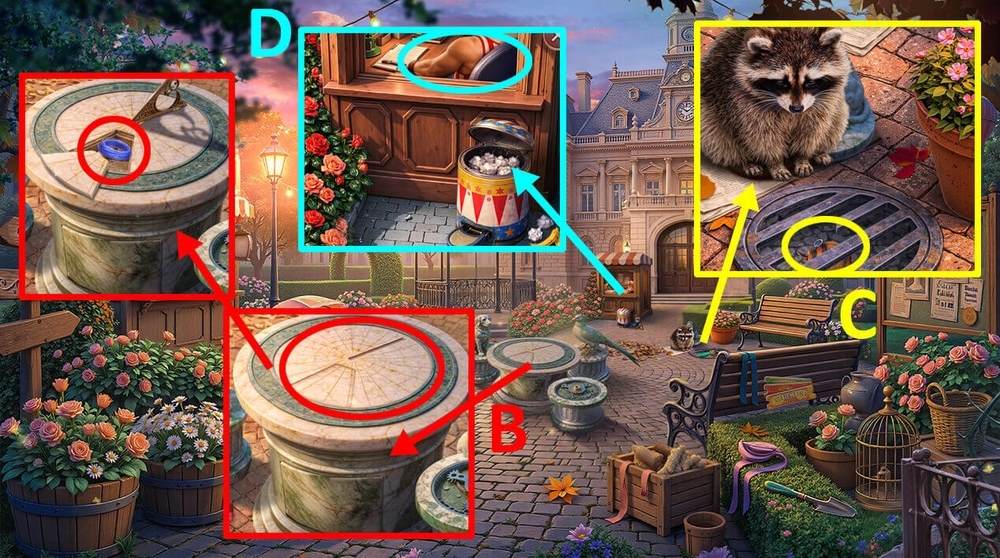
- Use GLUE and CLOCK HAND on the sundial, take LINE AND HOOK (B).
- Use LINE AND HOOK on the item stuck in the drain, earn SMOKE BOMB (C).
- Use FLINT on SMOKE BOMB, earn LIT SMOKE BOMB.
- Use LIT SMOKE BOMB on the guard (D).
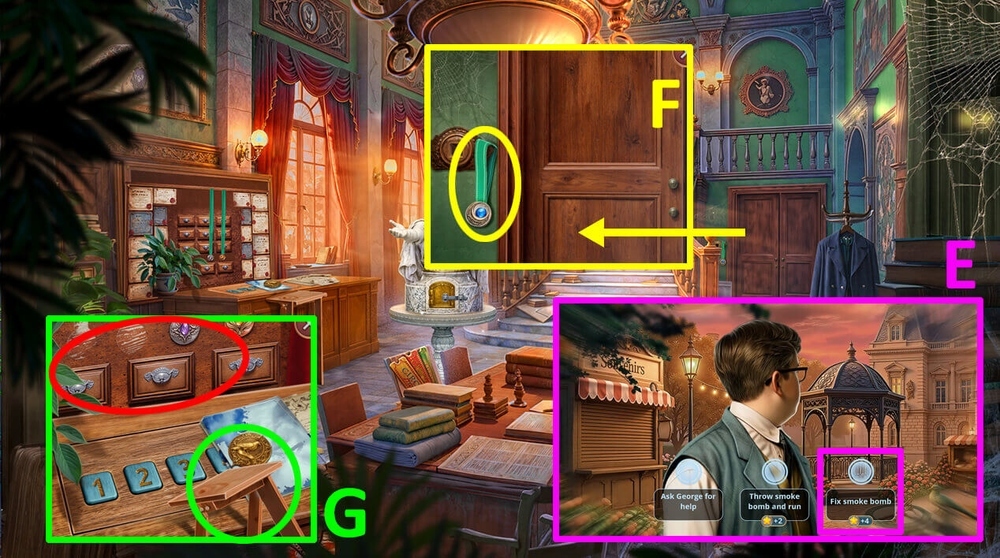
- Select this option (E).
- Take MAYOR’S MEDALS 2/2 (F).
- Take BROKEN STEPLADDER and FRAME PARTS 1/2, use MAYOR’S MEDALS 2/2 on the wall (G).
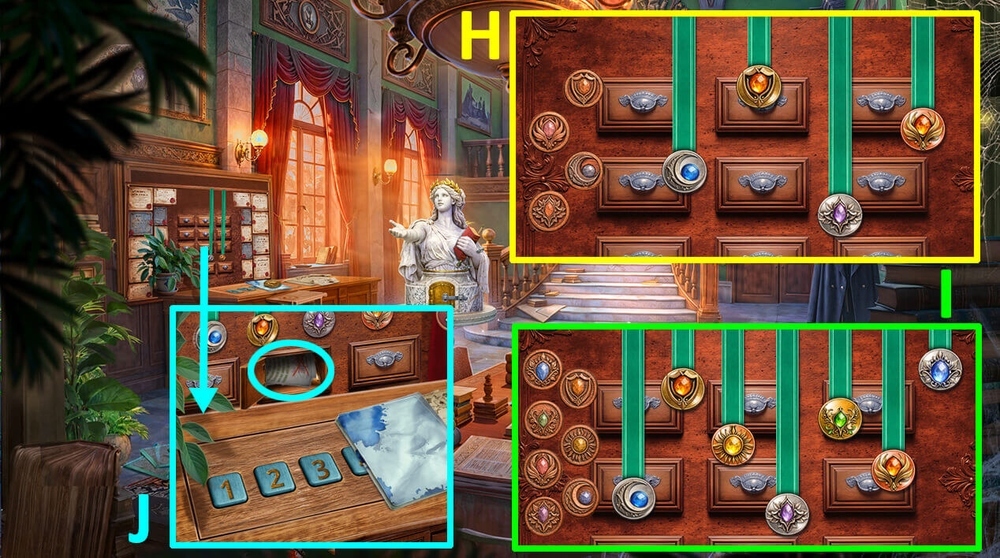
- Easy solution: Use the picture as a hint (H).
- Hard solution: Use the picture as a hint (I).
- Read the note, take PRIZE GOBLET (J).
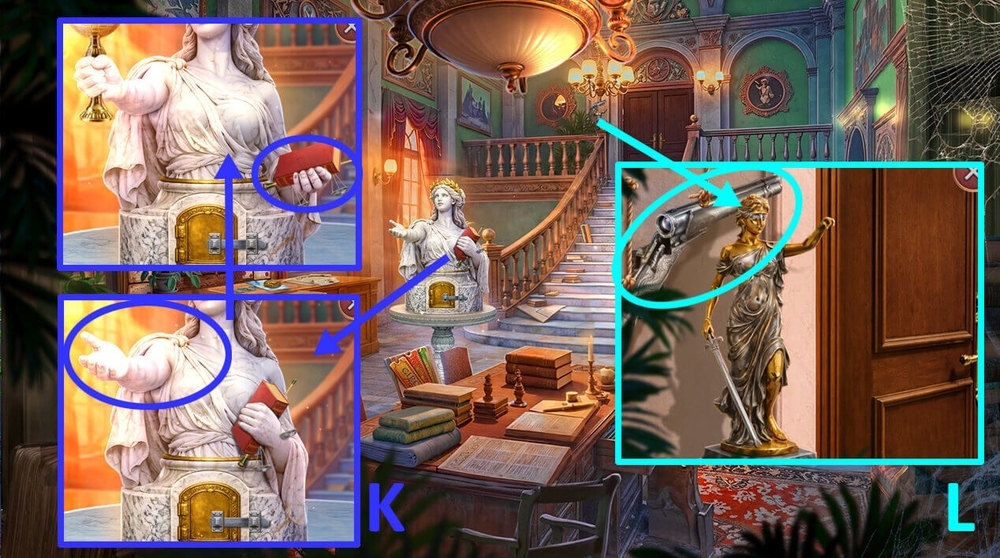
- Use PRIZE GOBLET on the statue, take OLD BOOKS 1/2, SCALES, and RAMROD (K).
- Use RAMROD on the rifle, earn GUNPOWDER BALL (L).
- Use ELASTIC BAND and GUNPOWDER BALL on SLINGSHOT, earn SLINGSHOT.
- Go back.
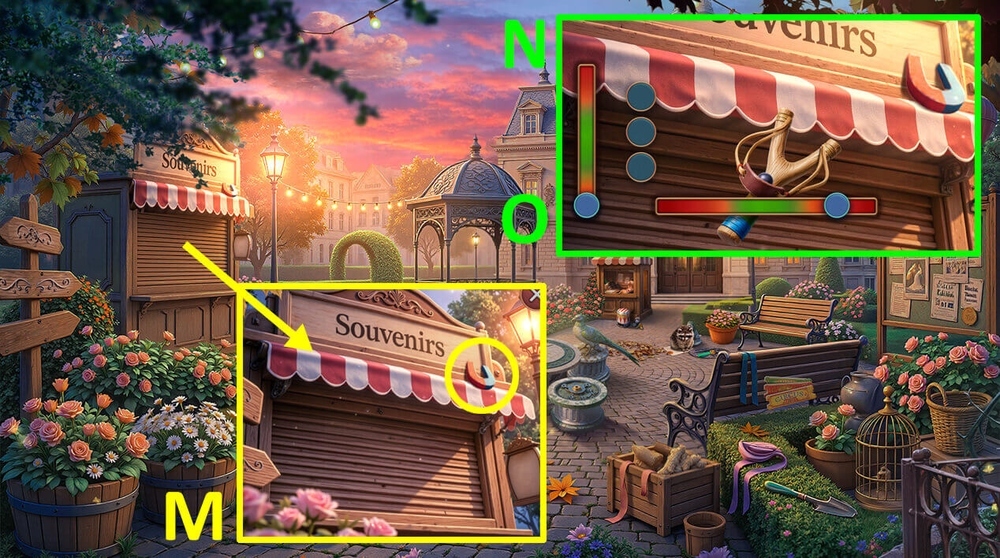
- Use SLINGSHOT on the magnet (M).
- Easy solution: Solution is random, earn MAGNET (N).
- Hard solution: Solution is random, earn MAGNET (O).
- Go forward.
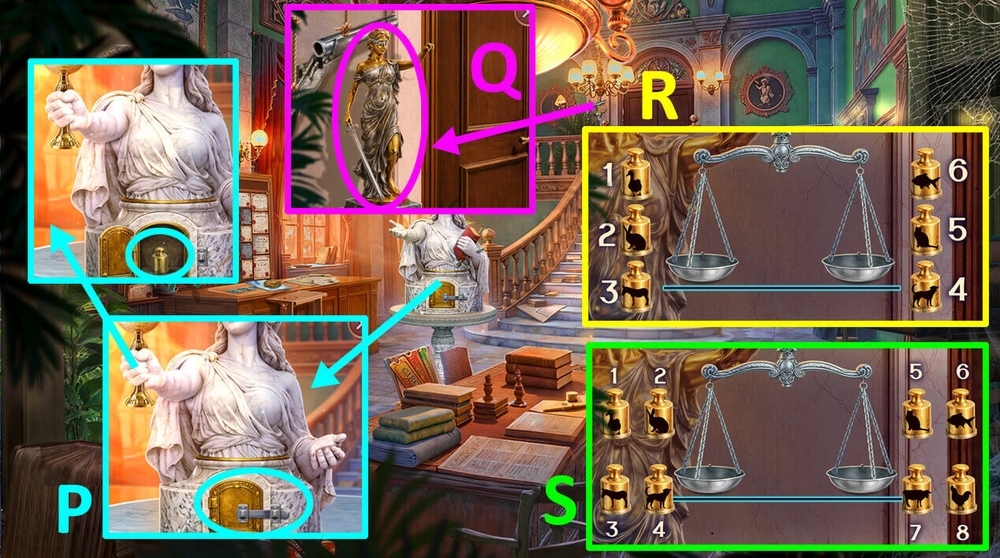
- Use MAGNET on the door latch, take SMALL WEIGHT (P).
- Use SCALES and SMALL WEIGHT on the statue of Themis (Q).
- Easy solution: Use the picture as a hint (R).
- Hard solution: Use the picture as a hint (S).
- Go forward.
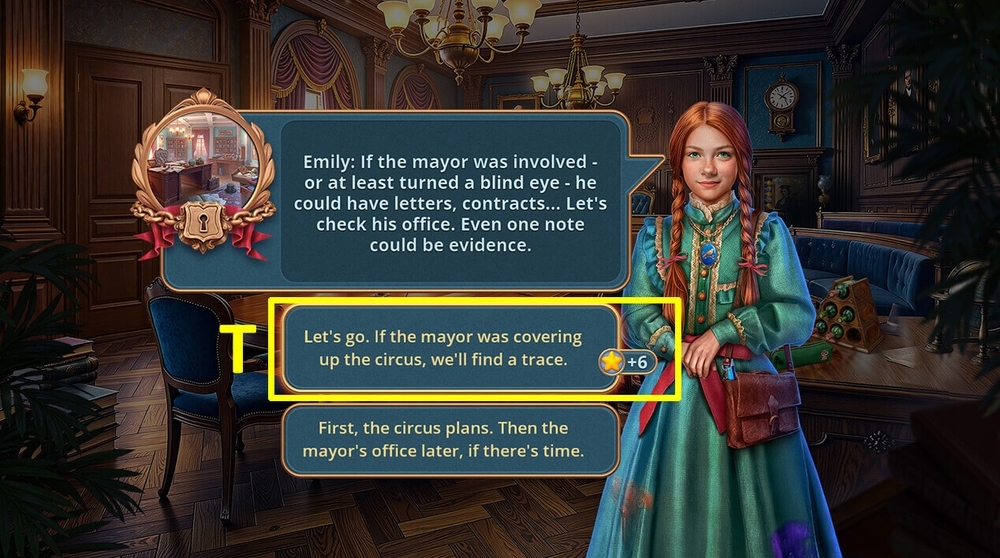
- Select this option (T).
- Go forward.

- Take OWL’S EYE and INSECTICIDE (U).
- Use OWL’S EYE on the owl statue, take SPRAYER NOZZLE (V).
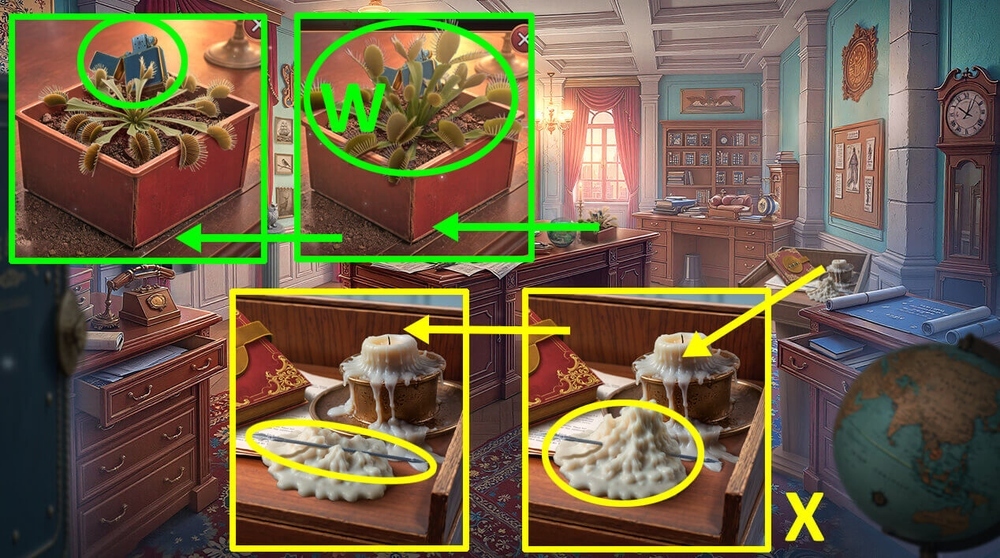
- Use SPRAYER NOZZLE on INSECTICIDE, earn INSECTICIDE SPRAY.
- Use INSECTICIDE SPRAY on the aggressive plant, take LIGHTER (W).
- Use LIGHTER on the wax, take TOY SPEAR (X).
- Go back.
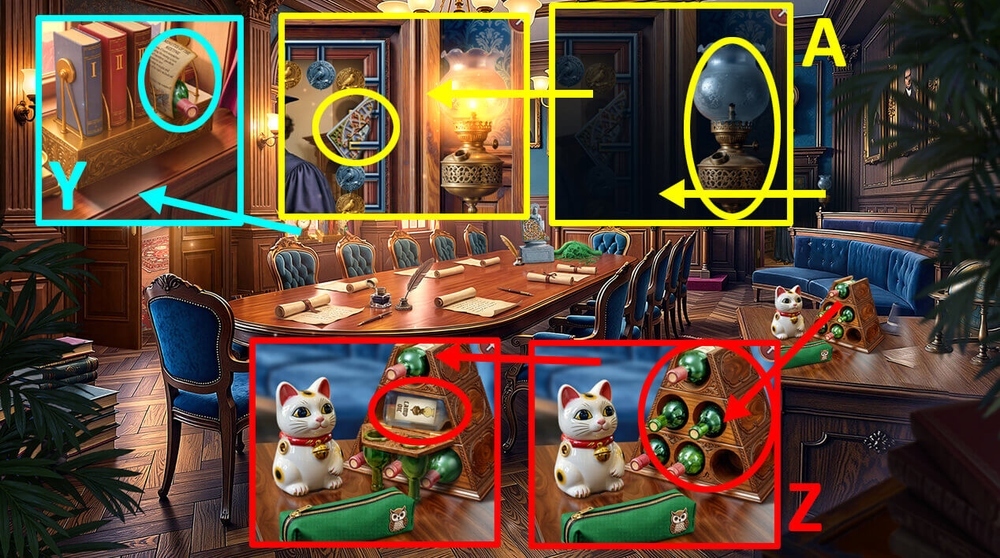
- Read the note, take WINE (Y).
- Use WINE on the wine stand, take LAMP OIL (Z).
- Use LAMP OIL on the lamp, take BUST PART (A).
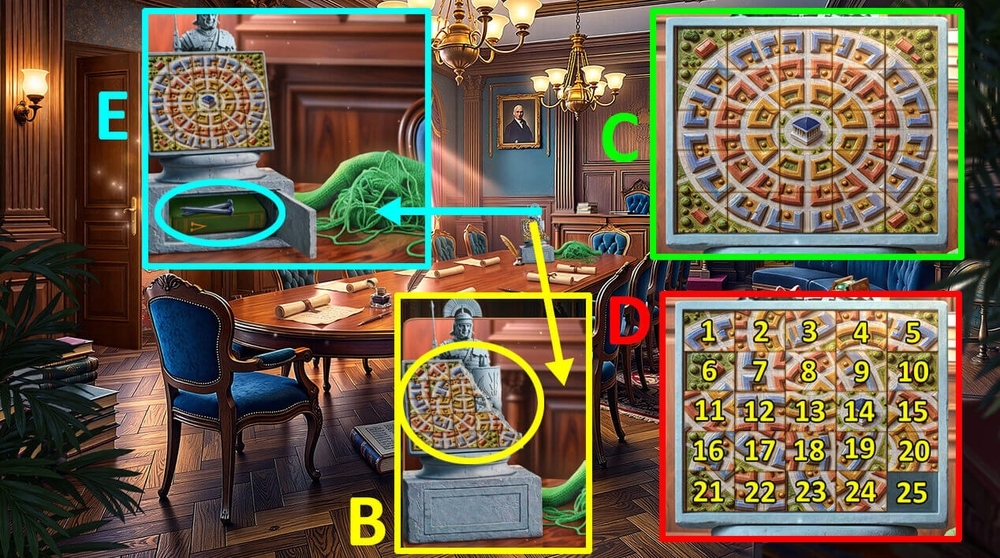
- Use BUST PART on the bust (B).
- Easy solution: Use the picture as a hint (C).
- Hard solution: Click: 24, 19, 18, 23, 22, 17, 18, 13, 12, 11, 16, 17, 12, 7, 2, 1, 6, 11, 12, 7, 8, 13, 14, 9, 4, 3, 8, 9, 4, 5, 10, 15, 14, 9, 10, 15, 20, 19, 14, 15, 20, 25, 24, 19, 20, 25 (D).
- Take NAILS and OLD BOOKS 2/2 (E).
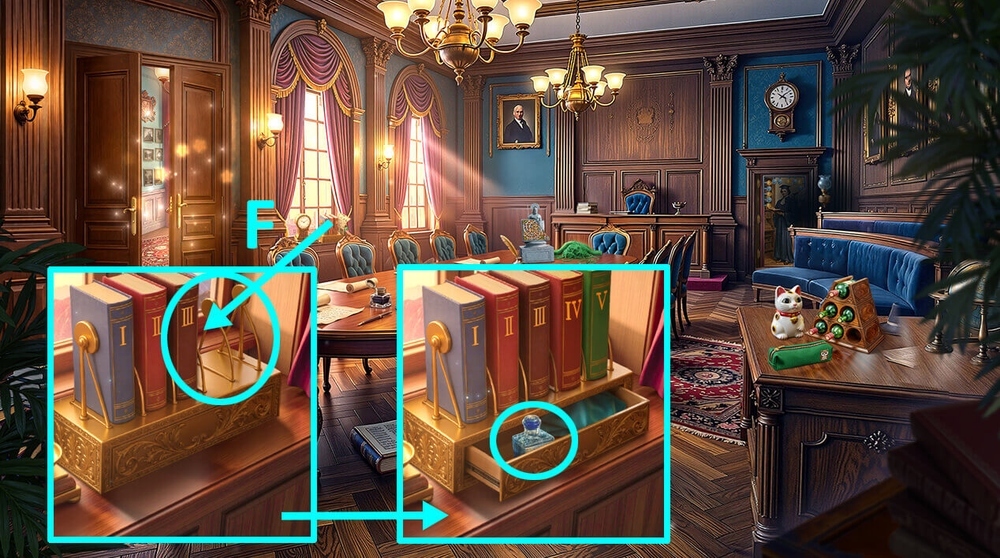
- Use OLD BOOKS 2/2 on the book stand, take INK DEVELOPER (F).
- Go back.
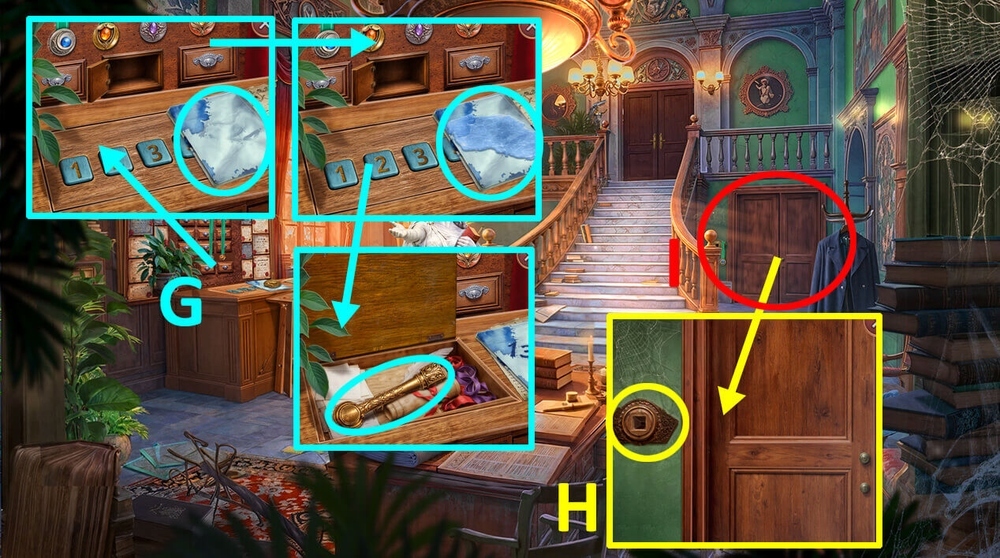
- Use INK DEVELOPER and SMALL BRUSH on the paper, take CLOSET LEVER (G).
- Use CLOSET LEVER in the latch slot on the closet door (H).
- Play puzzle, earn CROCHET HOOK (I).
- Go forward.
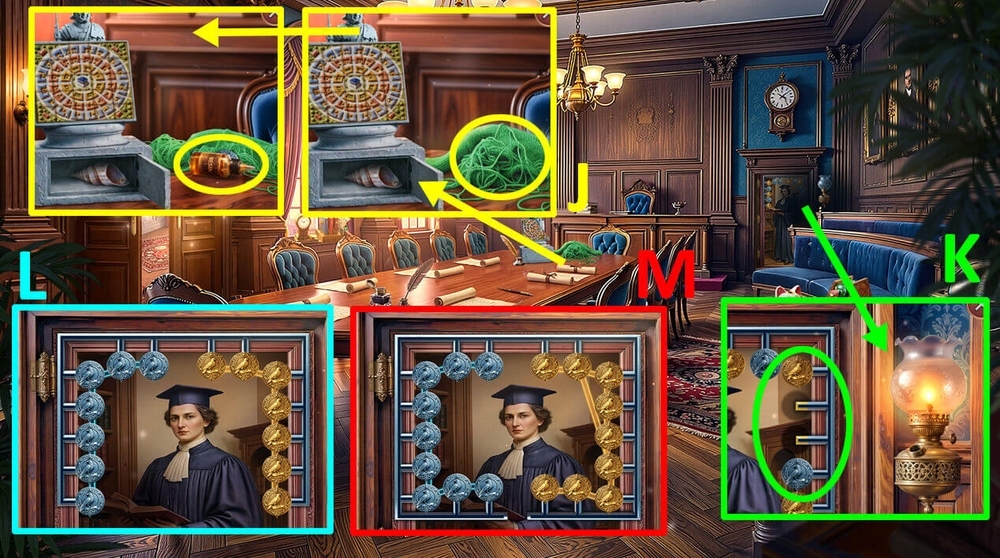
- Use CROCHET HOOK on the unraveling sweater, take RESIN and FRAME PARTS 2/2 (J).
- Use FRAME PARTS 2/2 on the frame (K).
- Easy solution: Use the picture as a hint (L).
- Hard solution: Use the picture as a hint (M).
- Go to Clerk Offices.
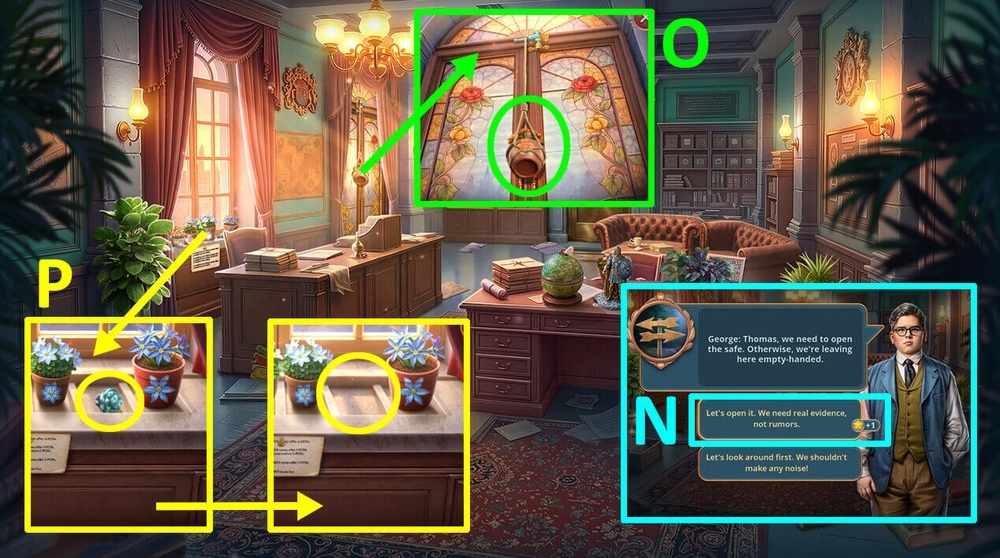
- Select this option (N).
- Take FLOWERPOT (O).
- Take SAFE SPINNERS 1/2, use FLOWERPOT on the empty spot for a flowerpot (P).
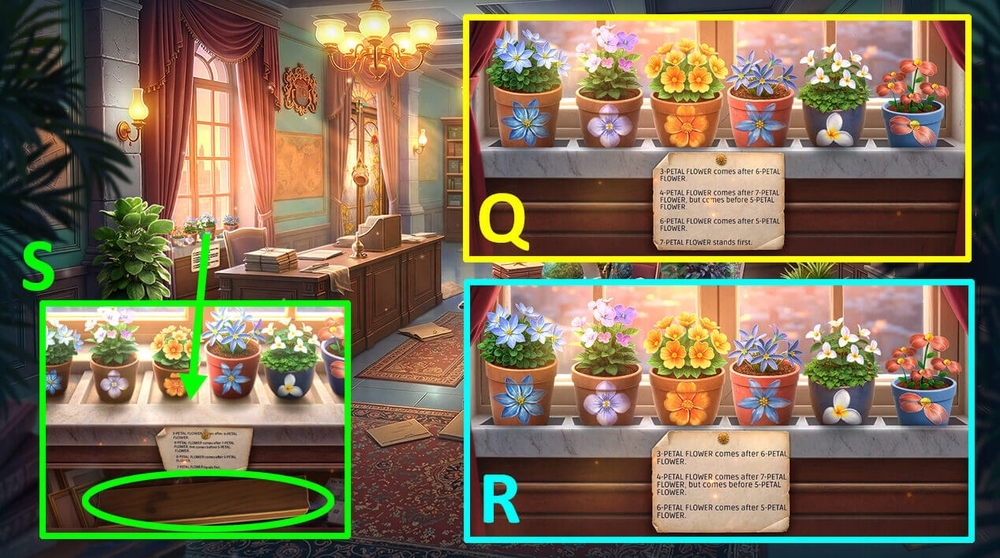
- Easy solution: Use the picture as a hint (Q).
- Hard solution: Use the picture as a hint (R).
- Take BOARD (S).
- Go to City Hall.
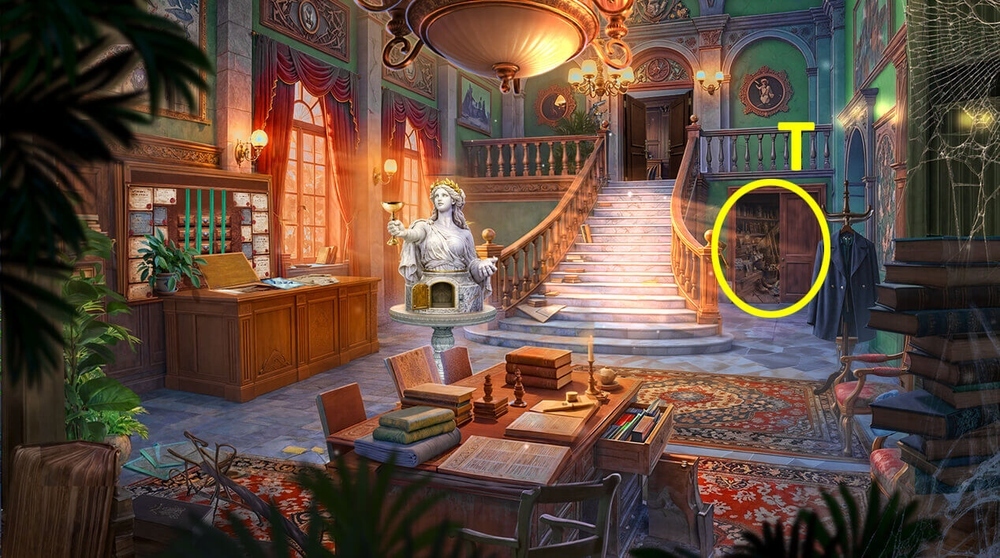
- Play puzzle, earn SANDWICH (T).
- Go back.
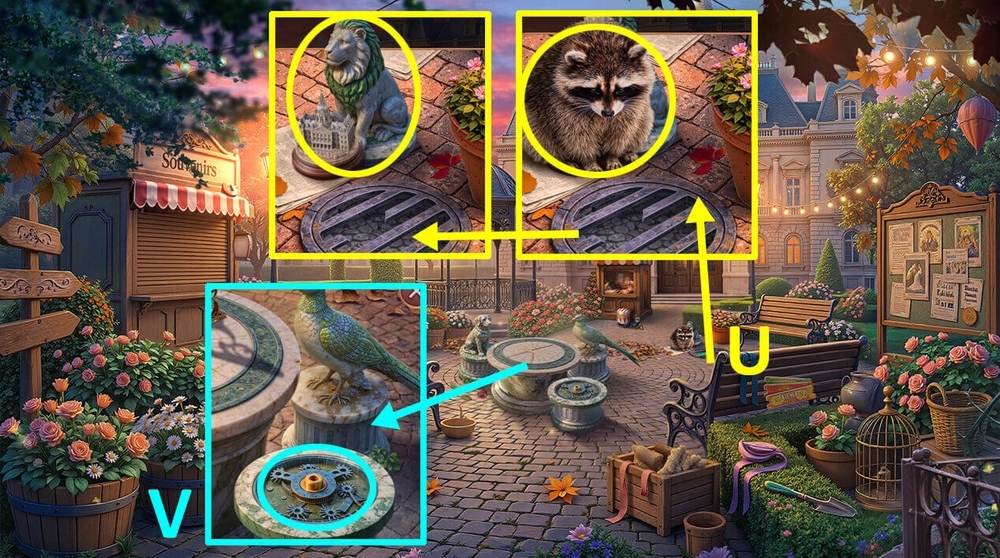
- Use SANDWICH on the raccoon, take FIGURINE and PLASTER LION (U).
- Use PLASTER LION on the mechanism (V).
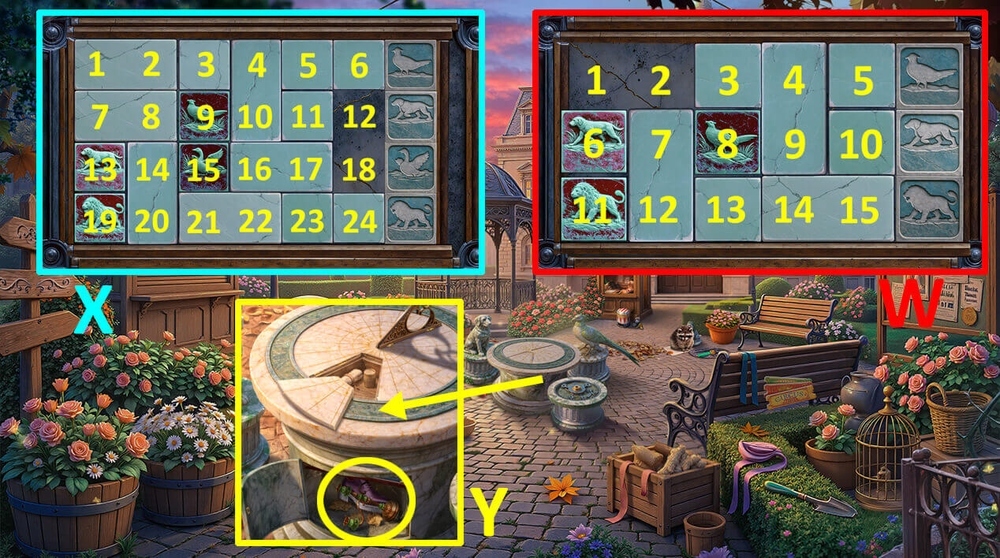
- Easy solution: Click: 6-2, 11-1, (7,12)-(6,11), 2-12, 1-7, 3-1, 8-2, (4,9)-(3,8), 10-4, (14,15)-(9,10), 13-15, 12-14, 7-13, 2-12, (3,8)-(2,7), 4-8, 5-3, (9,10)-(4,5), 14-10, 15-9, 13-15, 12-14, 8-12, 9-13, 10-8, 14-10, 8-14, 3-8, (4,5)-(3,4), 10-5, 14-10 (W).
- Hard solution: Click: 24-12, 23-18, (21,22)-(23,24), 15-22, 9-21, 3-15, (1,2)-(2,3), (7,8)-(8,9), 13-1, 19-7, (14,20)-(13,19), 15-20, (16,17)-(14,15), 18-16, (23,24)-(17,18), 22-24, 21-23, 16-21, (4,10)-(16,22), (2,3)-(3,4), (8,9)-(9,10), 1-2, 7-8, (13,19)-(1,7), (14,15)-(13,14), 20-19, 21-20, (16,22)-(15,21), (17,18)-(16,17), 24-18, 23-24, (16,17)-(22,23), 11-16, 12-17, (9,10)-(11,12), 8-9, 2-8, (3,4)-(2,3), 5-10, 6-4, (11,12)-(5,6), 10-12, 9-11, 8-10, (2,3)-(8,9), 4-2, (5,6)-(3,4), 12-5, 11-6, 10-12, 17-10, 18-11, 24-17, 12-24, 11-18, 5-12, 6-5, 12-6, 17-12, 5-17, 6-5, 12-6, 18-11, 24-12, 17-24, 11-18 (X).
- Take CANDELABRUM and HEAVY SHOE (Y).
- Use NAILS, BOARD, and HEAVY SHOE on BROKEN STEPLADDER, earn SMALL STEPLADDER.
- Go to Clerk Offices.
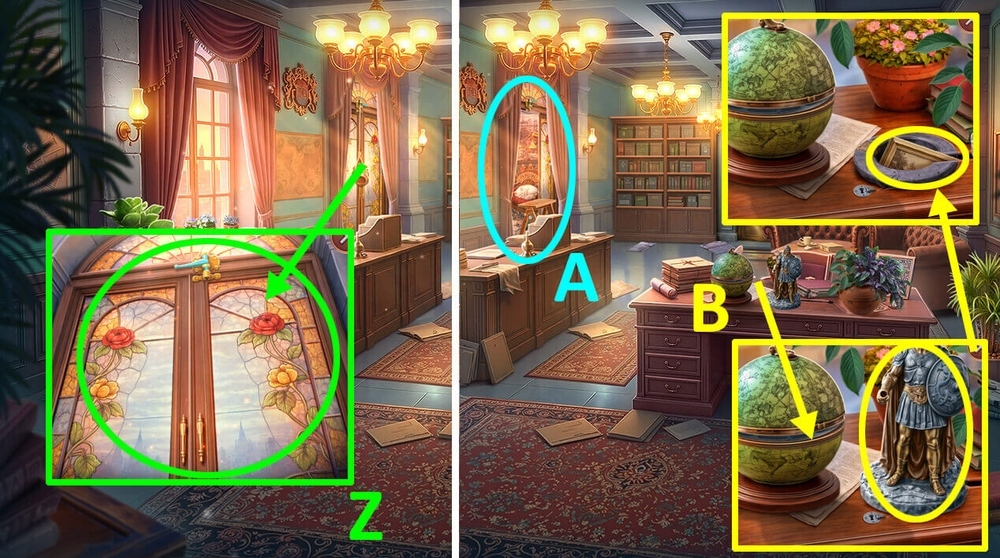
- Use SMALL STEPLADDER on the balcony door (Z).
- Play puzzle, earn PAW (A).
- Use TOY SPEAR on the warrior figurine, take PHOTO (B).
- Go back.
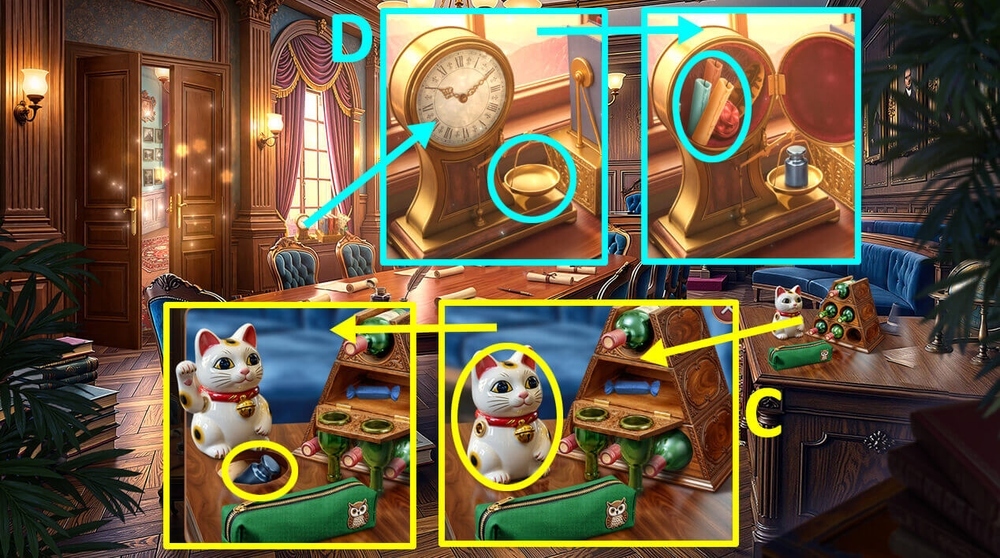
- Use PAW on the cat statuette, take SCALE WEIGHTS (C).
- Use SCALE WEIGHTS on the clock weights, take CANDLES and SAFE SPINNERS 2/2 (D).
- Go to Mayor’s Office.
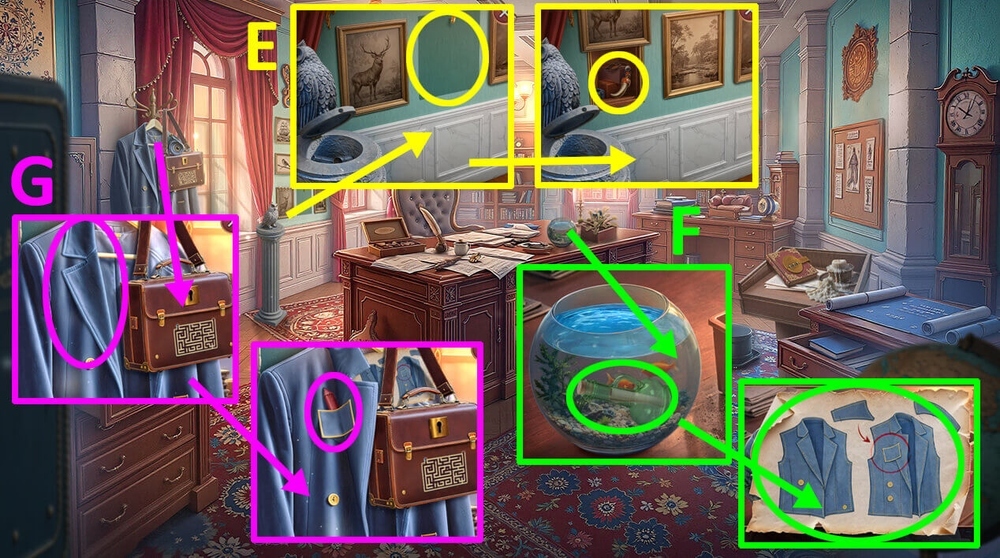
- Use PHOTO on the wall, take FANG PENDANT (E).
- Use FANG PENDANT on the bottle, take PATTERN (F).
- Use PATTERN on the coat, take WAX CHALK (G).
- Go back.
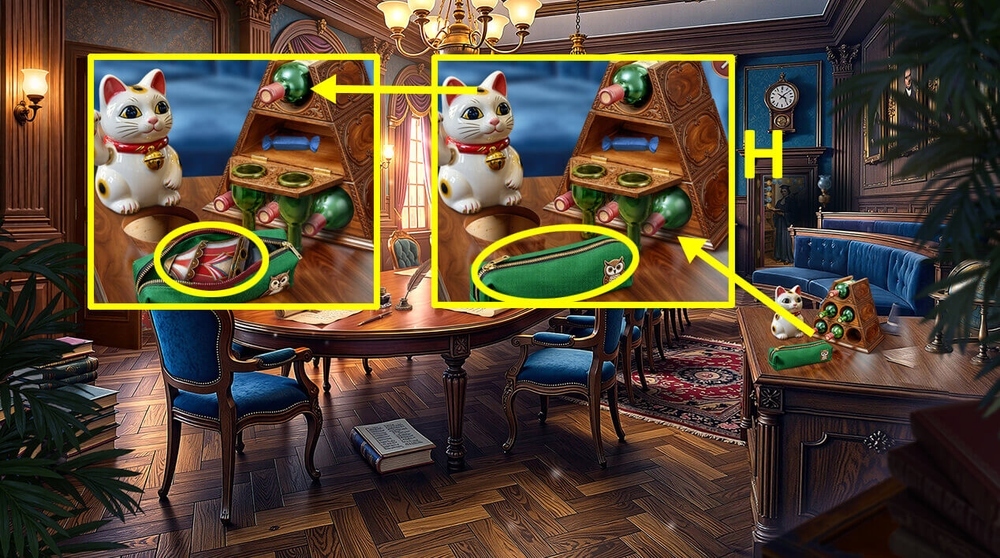
- Use WAX CHALK on the zipper, take BOOK AMULET (H).
- Go to Mayor’s Office.
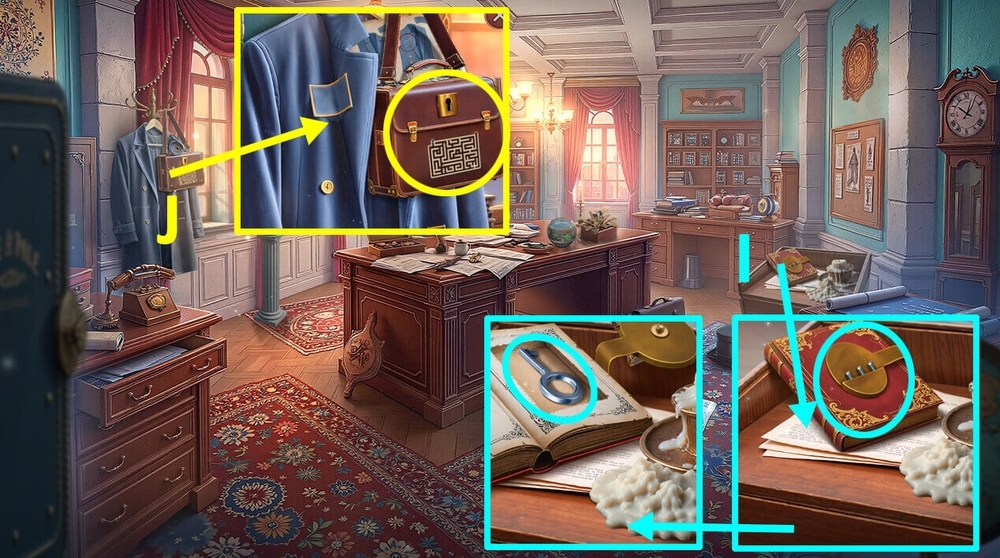
- Use BOOK AMULET on the book, take CASE KEY (I).
- Use CASE KEY on the suitcase (J).
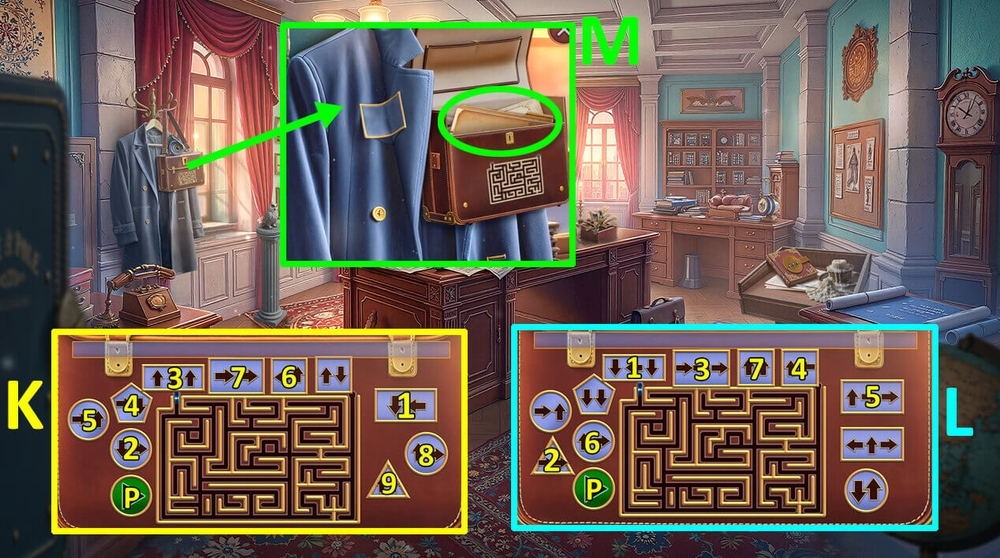
- Easy solution: Click: 1, 2, 3, 4, 5, 6, 7, 8, 9, P (K).
- Hard solution: Click: 1, 2, 3, 4, 5, 6, 7, P (L).
- Read the notes (M).
- Go to Clerk Offices.
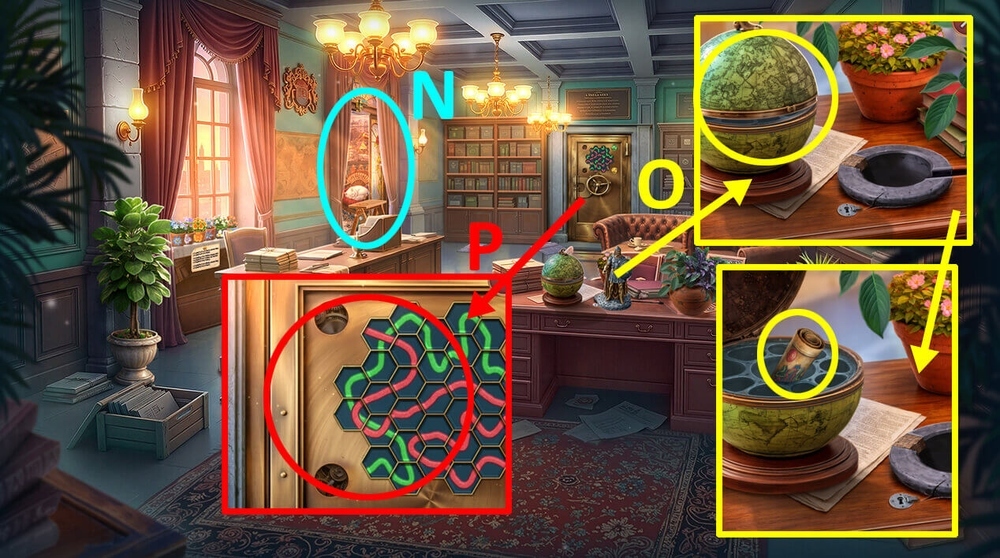
- Play puzzle, earn CALIPER (N).
- Use FIGURINE and CALIPER on the globe, take SAFE CODE (O).
- Use SAFE SPINNERS 2/2 and SAFE CODE on the safe (P).
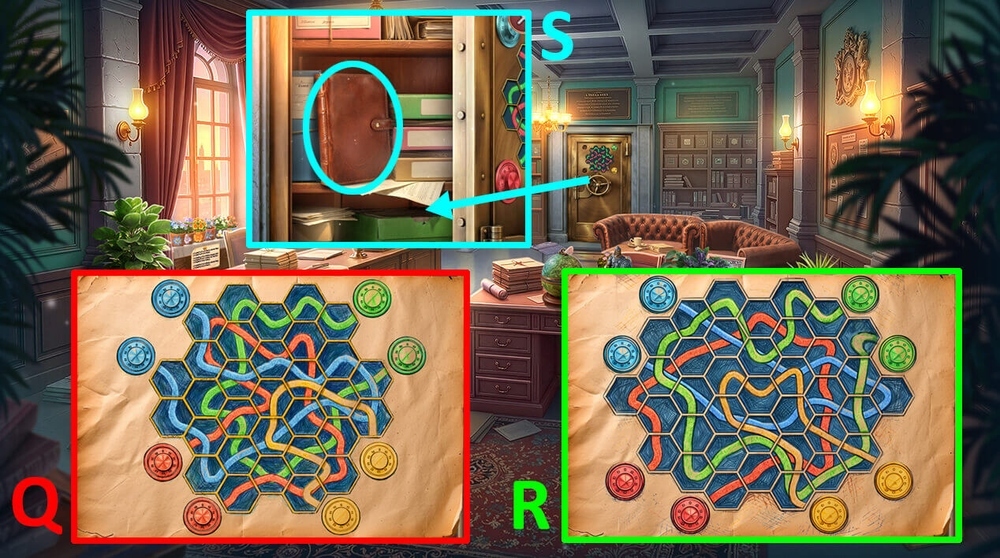
- Easy solution: Arrange the pieces as shown in the hint (Q).
- Hard solution: Arrange the pieces as shown in the hint (R).
- Take CIRCUS STAGE PLANS (S).
- Walkthrough Bonus Chapter, at the link below.